author.travelffeine.com

Category: Travel


“Twenty years from now you will be more disappointed by the things that you didn’t do than by the ones you did do. So throw off the bowlines. Sail away from the safe harbor. Catch the trade winds in your sails. Explore. Dream. Discover.”     — H. Jackson Brown, Jr.

  • How to Skip the 14-Day Quarantine in Hawaii

    The islands are officially back open to visitors from the mainland!  If you want to book a trip to Hawaii but don’t want to spend 14 days quarantining in a hotel room,  I am here to help!  My hubby and I rescheduled our 2020 trip to Maui three times due to delays in their re-opening and pre-testing option. We did not want to spend all that money to fly to Hawaii, only to sit in a room for 14 days. Finally, we had success when we rescheduled our trip for the third time to travel to Maui in November.  

    For those of you planning your trip or thinking about it, I’ve included all of the links and information I found useful when planning my own post-COVID trip to Maui.  Most of the information will apply to the rest of the Hawaiian islands as well.  

    The information I include here was up-to-date as of November 2020.  I am sharing my experience to help others plan their trip to Hawaii. However, please check Hawaii’s COVID-19 Portal for the most up to date and current information for travel to Hawaii.   

    Also, this information only applies to travelers coming from the mainland U.S. I traveled to Maui from the West Coast, so my experience might differ slightly from someone coming from other parts of the U.S.  However, the links I provide will give you the necessary information to plan your trip from anywhere in the lower 48 states.

    Overview of Steps to Avoid the 14-day Quarantine

    1. Take your COVID-19 test 72 hours or less before the last leg of your departure. This means if you fly from Dallas to L.A. to Hawaii, you’ll take the test based on the departure time of your L.A. flight.
    2. Create a Safe Travels account.
    3. After receiving your negative test results, upload a PDF version to your Safe Travels account. Also, notify your condo or hotel as needed. *Please note the State of Hawaii now requires your negative results to be uploaded before landing in Hawaii. Failure to do so will result in a 14-day quarantine, even if you receive your negative results after landing.
    4. Print a copy of your negative test results, flight reservations, and condo/hotel reservations and bring these with you.
    5. 24 hours prior to your departure, complete the Safe Travels Health Questionnaire and get your QR code. Save the QR code as a screenshot and also print and bring with you.  You are required to show this QR code at the airport upon arriving in Hawaii.

    *If you have a connecting flight to a second island, you will need a QR code for that flight as well.  We needed one for our flight to Honolulu and then our connecting flight to Kahului.  The QR codes have no identifying features to tell you which QR code is for which airport, so keep that straight to show the correct code for scanning at the corresponding airport.

    72 Hour Pre-test Requirements

    The COVID-19 State of Hawai’i Portal is where you’ll want to go for all the update to date information on their COVID-19 testing requirements.  At the time of my trip, the 72-hour pre-test requirements were as follows:

    Take your COVID-19 test 72 hours or less before your flight departure time. If you have a multi-city flight itinerary, the departure time is from the last city you leave before arriving at a Hawaii airport. So if you travel from Dallas to L.A. to Honolulu, you use your L.A. flight’s departure time to determine your 72-hour window. 

    You must take a Nucleic Acid Amplification Test (NAAT) from a certified Clinical Laboratory Improvement Amendment (CLIA) lab to bypass the State of Hawai‘i’s 14-day mandatory quarantine. These are also referred to as RT-PCR tests. Visit the State of Hawai’i’s travel partner page to see a list of approved testing facilities. The test must be administered by one of these approved testing facilities.

    Once you receive your negative test results, you will upload them as a PDF to Hawai’i’s Safe Travels websiteYou will need to create a Safe Travels account first. To do this, you’ll need your trip itinerary (flight information, duration of the trip, and where you’ll be staying). You’ll also need your State I.D. as they will ask you to fill this in. 

    *Each island may create their own additional test requirements, so check for any additional island-specific requirements.  You can check with the appropriate county office: County of Kaua‘iCounty of MauiCounty of Hawai‘i.

    Questions to Ask When Choosing Your 72-Hour Pre-Test:

    • How quickly will you get your results back?
    • Are they having any issues running out of tests? 
    • Do they process results on the weekends? (Some locations told me it was business days online, others said they process 7 days a week.)
    • How much does it cost? 
    • Can you use your health insurance to pay for it?
    • Is the test a diagnostic test (no antigen tests allowed), specifically a NAAT test? (They may use the words RT-PCR, this is a type of NAAT test.) 

    What Happens if Your Test Does Not Come Back in Time

    If your test results do not come back in before your flight departs, you will have two choices.  

    One: Cancel your trip plans and try to get your tickets and travel plans rescheduled for later. 

    Two: Fly to Hawaii and hope your test comes in by the time you arrive.  If it does, then you’ll upload your results to the Safe Travels site on your phone when you arrive in Hawaii, and you should be good to go.  If it does not, you are then required to quarantine at an approved location until your test results come in.  *UPDATE: You are now required to have your test results uploaded to Safe Travels before arriving in Hawaii. They will automatically quarantine you for 14 days if you do not, even if your negative test results come in when you land.

    You cannot get a rental car, and you cannot go to your condo (you’ll need to check the list to see if your hotel is on the approved quarantine list) if you have not uploaded your negative test results before arrival. If your test results are positive, then you’ll be forced to quarantine for 14 days at an approved quarantine location, and you will not be able to rent a car, get groceries, or go anywhere until the quarantine is completed.  They do follow up, and multiple tourists were arrested for breaking quarantine.

    *This situation is always changing. Please monitor the changes via Hawaii’s website and following news updates from Hawaii and your specific island destination.

    Setting Up Your Safe Travels Account

    As I mentioned in the steps above, you will need to create a Safe Travels account.  The Hawaiian State Government requires you to enter your travel itinerary details here.  This is also where you will upload the PDF results of your COVID-19 test.  

    To set up your account, you’ll need to provide your trip itinerary (flight information, duration of the trip, and where you’ll be staying) and your State I.D. as they will ask you to fill this in.  Make sure you use whatever I.D. you are bringing with you. For example, if you’re only bringing your Driver’s License and not your Passport, don’t enter your Passport info on the Safe Travels site as they will want to see the same I.D. when you arrive in person.

    24-Hour Health Questionnaire

    Then 24 hours before your departure, you will log-in to your Safe Travels account and complete the 24-hour Health Questionnaire. Upon completing this questionnaire, you are given a QR code.  

    QR Code

    You must show this QR code when arriving in Hawaii.  Take a screenshot of this QR code and save it on your phone. (Note: If you have a connecting flight that is also in Hawaii, you will need two QR codes. They don’t have any description to tell you which QR code is for which flight, so make sure to keep that clear when saving on your phone and when printing.) For example, we flew from Seattle to Honolulu, then Honolulu to Kahului.  We needed two QR codes.  To get this, you must enter each flight into your Safe Travels account separately.

    My Experience Getting Our Covid-19 Test:

    This was probably the most stressful part of planning our trip to Hawaii.  Our was condo booked, our flights booked, and rental car, but it all hinges on whether we get our test results back within the 72-hour pretest window.  If we do not get our test results back before landing in Maui, we will be directed to a quarantine facility until our test results come in.  That means we won’t be able to pick up our rental car or check in to our condo until the negative test results are processed. If our test results came back positive, then we’d be forced to quarantine for 14 days.* 

    *UPDATE: The State of Hawaii now requires the negative test results before arrival. Otherwise, you are forced to quarantine for 14 days–no exceptions. Visit the State of Hawaii website for the most up to date information.

    I researched all the options listed and determined which options were available to me in Washington State.  Due to the high number of visitors that travel from Seattle to Hawaii, I honestly thought there’d be more airport options available, but those seem to be popping up in California first.  We’re the ones with the rain here, people!  We need the sun more than those Californians!  Okay, all kidding aside, I am sure more choices will become available in the future as airlines do their best to provide travelers with additional options. 

    Check with your airline to see if they partner with any testing sites for travel to Hawaii, as these give your test results priority and give you the best chance of receiving your results back in time for your flight.

    Some of the options I found for travelers flying out of SeaTac Airport:

    • Bartell Drugs (Alaska Airlines partner)
    • Carbon Health (Alaska Airlines partner)
    • Walgreens (free to qualified participants)
    • Quest Diagnostics (you need to find out where they have locations)
    • Vault Health (Hawaiian Airlines customers receive priority processing for this at-home testing option.)

    We flew with Hawaiian Airlines who plans to expand drive-up testing options, but only San Francisco had a drive-up option available at the time of this article.  Hawaiian Airlines also partnered with Vault Health, an at-home approved test, for Hawaii’s 72-hour pretest requirements. 

    I initially researched using Quest Diagnostics and Walgreens.  I contacted Quest but never heard back from them, and their site did not show where their drive-up locations were located in Washington State.  So without knowing how close that option would be, and since they never replied to me, I moved on to the other two options available to me.

    Walgreens was next on the list, and I discovered I had two options: a 72-hour RT-PCR test or a rapid test option that allowed you to receive results the next day (only some locations offer this). Walgreens was also the only facility that allowed you to submit to insurance and didn’t require you to pay out of pocket (this may vary based on your location). 

    I loved the idea of not needing to pay anything for my test, as, let’s face it, it all adds up.  However, my main concern was that they only allowed appointments to be scheduled out 3 days in advance.  So I would need to wait to schedule until Monday before our flight.  This also meant that if there were no appointments available (I read reports from other travelers who couldn’t get appointments due to demand) that we would be out of luck and left scrambling to find a backup plan.  I was also told by a Walgreens employee that they were running out of the tests at some locations.  

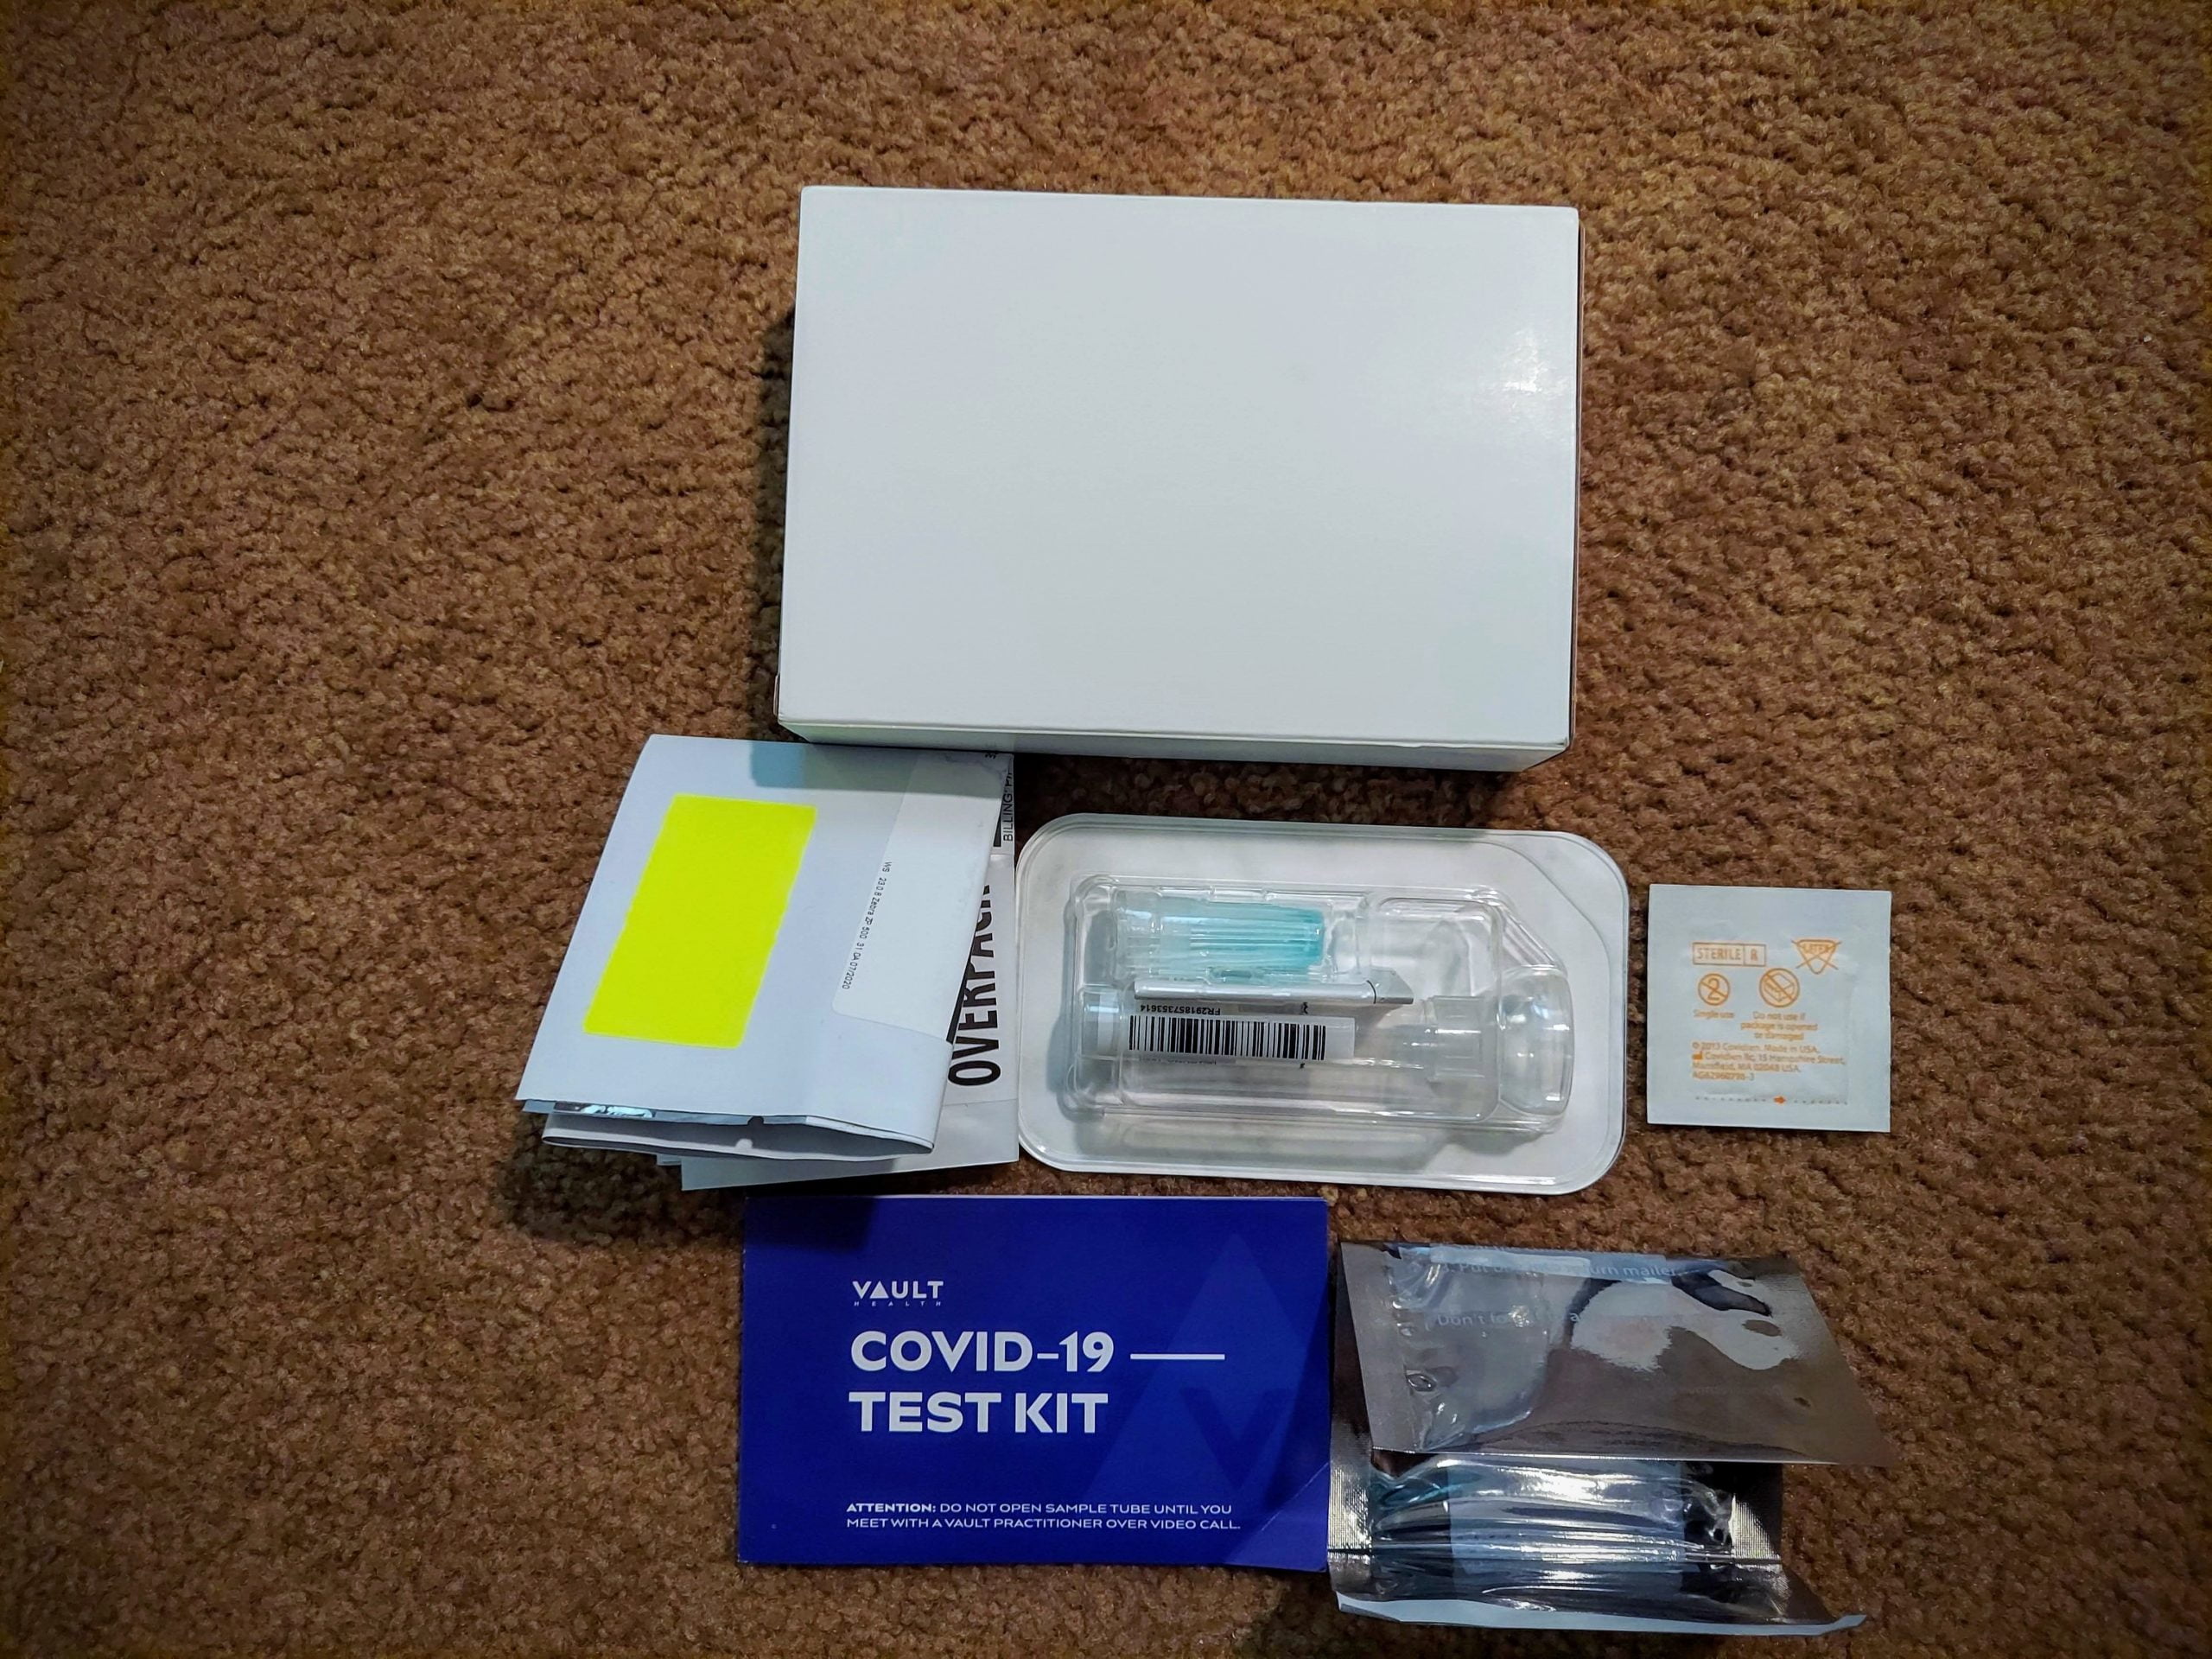
    Testing Thru Vault Health

    After lengthy discussions with my hubby, I decided to turn to Hawaiian Airlines’ partner Vault Health. Hawaiian Airlines partnered with Vault Health to provide at-home testing kits.  This was the most expensive option at $150 per test.  However, Hawaiian Airlines passengers are given priority processing to ensure the 72-hour window is met.

    How it Works:

    You take your test online via a zoom video call where a technician will step by step tell you what to do and observe you administering the test.  Don’t eat, drink, smoke, or chew gum for 30 minutes before your video call.  When you’re ready, you’ll log in to your Vault Health account and download the Zoom app for your video call.  This can be done on your computer, tablet, or phone. 

    The technician in the zoom video call will instruct you how to open the test’s packaging (don’t do this before your call, it’s crucial you do not open the specimen tube packaging before your zoom call). It should take less than 10 minutes to do the test with the practitioner over the zoom video call.

    Afterward, you’ll place your sample tube in the plastic bio bag, and then you’ll place that inside the white box that your kit came in, seal that up and then place that inside the shipping pouch with the pre-paid Next Day Air shipping label.  

    Drop it off at the nearest UPS store.  The lab receives your sample the following day, and you should get your results a day after this. They have a chart to show you examples for when to order your kit, when to take the test, and when you should get results back based on when your flight leaves.

    Our Experience Using the Vault Health At Home Testing Kit:

    We filled out the online order form for our tests. Each adult must create their own individual order (make sure to use the link on Hawaiian Air’s website for each order). Vault Health also requires an uploaded copy of our photo ID, so the technician who proctors our test can verify we are who we say we are.  Within an hour of completing our orders, we received an email notification that provided us with a UPS tracking number for our test kits. Our testing kits were shipped via UPS Next Day Air.  

    By using Vault Health for our tests, I was able to order our tests almost two weeks before our flight. I ordered ours on a Sunday night, and we received them Tuesday at 10:30 a.m.  Look at Vault Health’s recommended schedule for when to order your tests and when to take them.

    The testing kit arrived in a nondescript white box that is also the box you ship your test sample back in.  It is an ingenious design with low waste. I was impressed with that. Inside the box are instructions, the DNA specimen collection tube, alcohol wipe, a bio envelope to put that in, and a shipping bag pre-labeled with a UPS Next Day Air label for their New Jersey based lab.

    My husband and I took turns with our Zoom calls.  I showed the technician my I.D., and he had me unpack my kit and then walked me through how to provide a testing sample. Honestly, the hardest part was spitting in the collection tube, once you get that done, it’s just an easy stop at a UPS shipping store, and you’re set! 

    Make sure you get your sample dropped off before the last UPS Air pickup at your local UPS store.  Call and ask when that is or look on their website.

    The Waiting Period

    The test was the easy part; now, the hard part began. Waiting for our test results. I was so anxious, I felt like the fate of my travel plans were in someone else’s hands.  I prayed and I talked to my hubby about it. He got stressed by me being stressed. So I prayed some more and talked to a friend about it. 

    I dropped our tests off on a Thursday; our flight was scheduled to leave Sunday morning. A hurricane was hitting the East Coast, where our samples were headed.  Friday morning, I got up and entered the tracking numbers; I was so happy to see our test samples had already made it to New Jersey.  Around 10:00 a.m. PST, we received a notification from Vault Health that the lab received our test samples.  More waiting.

    Then it happened, on Friday night, at 5:44 p.m., we got the email with our test results.  We were COVID-19 negative, and we were going to Maui! 

    Summary Timeline of our Vault Health Testing Experience:

    • I ordered the test kit on a Sunday, received it via UPS Overnight Air on Tuesday morning.
    • We took our test with a lab tech via Zoom Thursday morning before our scheduled Sunday departure, and I dropped our test results off at UPS that morning.
    • The tests were sent via Overnight Air to New Jersey (I’m on the West Coast) and arrived their Friday morning.  We received our negative test results Friday night. I had all day Saturday to pack in peace.

    Next Steps After Getting Negative Test Results

    After receiving our negative results, I logged into our Vault Health accounts to download the PDF version of our test results.  This is required to submit to the Hawaii Safe Travels website.  I uploaded the PDF results, and then I also text the team at Chase’N Rainbows to let them know our results were negative.  They asked me to send them a copy of the negative results, and the following day I received instructions for checking into our condo.

    I also printed copies of the PDF results along with copies of our flights and condo reservations.  The state of Hawaii recommends you do this for faster processing and just in case your mobile device doesn’t work.

    Lastly, 24 hours before our scheduled flight departure, I logged into my Safe Travels account and completed the Health Questionnaire. Upon completion, you’re sent a QR code, which you’ll want to save as a screenshot on your phone and print out and bring with you.  This is required for each airport in Hawaii.  We had a connecting flight in Honolulu, so that meant I needed to generate a QR code for our flight from Seattle to Honolulu and then also a QR code for our flight from Honolulu to Kahului. I created two separate trips on their Safe Travels site to do this.

    Our Experience at the Airport in Hawaii

    Before boarding the plane, our forehead temperature is scanned. Other than this, and of course, everyone wearing face masks, the flight experience was pretty much the same. They gave us one meal, and everyone takes their masks off to eat and then put them back on.  There were no additional snack or meal services during the flight.  Also, expect that you may be seated next to a stranger, as flights are filling back up again, and they are no longer leaving the middle seats empty.

    QR Code Checkpoint at Airport:

    We had a connecting flight in Honolulu before continuing to Kahului, Maui. Upon arriving at the Honolulu airport, we were placed in two lines, one for those staying in Honolulu and another for those connecting to other flights.

    We stood in line for probably 30 minutes before we stopped at the checkpoint, where they asked for our QR code and proof of negative test results. They also checked our I.D. After that, we were free to head to our gate and get something to eat.  

    The options available for eating and shopping is one of the things that has changed.  Many of the options are closed, and the open ones don’t always offer seating areas or have limited hours.  We got food at Burger King in the Honolulu airport as it was one of two options, not counting Starbucks.  We then took our food to our seats, where we removed our masks to eat before replacing them again.

    Upon arriving in Maui, we once again waited in line to show our QR code, I.D., and negative COVID-19 test results.  Thankfully, the Maui line was much shorter than the line at the airport in O’ahu. 

    We asked if we needed a paper to show we had been screened with negative test results; the airport agent we spoke with said no, we could show our test results if asked.  However, the car rental counter agent said the airport checkpoint had been providing a piece of paper and that we should take a screenshot of our Safe Travels page that showed the negative results received. She said we could show this if needed.

    Mask Requirements in Maui

    No one in Maui asked us to show proof that we are exempt from the 14-day quarantine. However, I overheard someone saying if you take a boat tour, you must show this. Our Maui experience is the same as previous trips, except for the mask mandate and that many businesses are still closed. You don’t need to wear one at the beach when socially distancing or in the water.  However, when in public areas or places of business, a mask is required. We are still enjoying the water, still enjoying the sunshine, and still loving our time in the beautiful Hawaiian islands!

    Tips for Researching and Planning Your Trip

    Regularly review Hawaii’s COVID-19  Portal* as this is the official State of Hawaii page for traveling under the COVID-19 restrictions.  I made sure to check it multiple times during the weeks leading up to my departure.  I didn’t want to miss any important announcements.  

    Another method I used for staying up on any current changes was by searching “Hawaii travel” on Google, and then I click the “News” tab and sort by the past week.  This way, I read about any recent press releases that might be pertinent to my trip. 

    I verified the cancellation policy with my condo rental. When my hubby and I visit Maui, we stay in a condo.  We have had wonderful experiences booking our condos through Chase’N Rainbows: West Maui Condos.  We appreciate the fantastic customer service and communication that we get with the Chase’N Rainbows team.  They were quick to respond to our questions and keep us updated on any COVID-19 updates that would affect our stay with them. I also emailed them any questions and concerns I had and was so appreciative of their fast replies and willingness to work with us and the ever-changing travel situation. If you’re headed to Maui and want a condo on the west side, consider booking with Chase’N Rainbows. 

    No matter who you book through, make sure to ask them any questions you have, such as, “if our COVID-19 tests come back negative, can I still cancel and receive a full refund?” You will also want to keep them updated about any trip delays and as soon as you receive your negative test results, let them know as they need confirmation to finalize your trip plans.

    *Always verify you have the most up to date information when planning.  The COVID-19 situation, restrictions, and regulations are constantly changing. Always check for the most current information.

    Important Websites for Planning:

    Visiting Restaurants, Businesses & Tours

    Call before visiting a restaurant unless you know for sure that it is open.  Google is not entirely up to date with what businesses are currently opened, closed permanently, or temporarily closed.  It is pretty good, but not 100%. To avoid any disappointment, it is best to verify first before heading out.  This is the same when booking tours. Call and find out if they’re operating and what restrictions are in effect at that time.  

    Sadly, many businesses closed permanently due to the loss of business in 2020, and even more, are still temporarily closed.  When possible, spend your money where it will help the local economy. They really need it right now.  Many more places were opening in December in anticipation of increased tourism, so it may have changed greatly by the time you arrived. 

    Final Planning Thoughts On Post-COVID Travel to Maui

    Try not to stress too much.  We contacted our condos ahead of time to find out their cancellation policy if our test results didn’t come back in time or were positive and we had to cancel our trip.  Most places have a very lenient cancellation policy due to the demands and restrictions of living in a post-COVID world.  Once we knew we had options for canceling that didn’t cause us to lose our money, we felt a lot better about moving forward with our trip plans.

    Some people are not ready to start traveling yet, and that is okay.  However, many places, like Hawaii, rely almost solely on tourism for their economy. If you’re healthy and want to travel someplace, you couldn’t do much better for a travel destination than Hawaii.  

    Hawaii is a diverse state with a diverse set of islands.  Be respectful of the local customs, try to support local businesses when you visit, and soak in the sun and relaxing atmosphere of this incredible destination. I know so many people need time to relax and time to recover from this year. Perhaps more so than any other year.  So if you need a place to get away, Hawaii can offer you a respite from your cares and perhaps some mental healing too.

    I hope this article helps you plan your trip to Hawaii. I know I’ve repeatedly said this, but I cannot stress enough how fluid the COVID-19 situation is and how important it is to make sure you get the official travel information from Hawaii’s state COVID-19 webpage.

    Additional Articles You Might Enjoy

    *Please note these articles were written before 2020. Please keep in mind some of the places listed may not currently be open for business.  I am writing this from Maui and have already encountered favorite restaurants that are now permanently closed for business due to the COVID-19 shutdown.  I will update my posts shortly to reflect this.
     
    Aloha and Mahalo!
  • Suntop Lookout: Easy Access to Incredible Views

    Do you want stunning views of Mount Rainier and the surrounding mountain ranges but without a long hike? Then look no further than Suntop Lookout.  Suntop Lookout was built in 1933 as a fire lookout and also served as a U.S. Army Aircraft lookout site during WWII. It is one of the only fire lookouts in the area that I know of that you can drive all the way up to see.  That is, if the gate is open, I’ll explain more about that below.  However, suffice it to say, even if the gate is closed, it’s a short hike to incredible panoramic views!  

    Getting to Suntop Lookout

    From the town of Enumclaw, head east on SR 410 for about 24 miles. About 6 miles after you pass through the town of Greenwater, you’ll make a right onto Forest Service road 73 (FS 73). It is the first right after passing the winter chain-up area.

    Follow FS 73 for a little over a mile before you make a left on to FS 7315.  Continue up forest road 7315 for about 6 miles before reaching Suntop Lookout. 

    *Please note that the gate to Suntop Lookout may be closed about a mile below the lookout. If this is the case, you’ll need to park below the gate and hike up the road or the trail just below the gate.

    Recreational Pass Required

    A Northwest Forest Pass is required to visit the Suntop Lookout and picnic area.  I did not see a pay station along the road either, so you’ll want to purchase your recreational pass before driving up. You have the option to buy a $5 day pass or a $30 annual pass.

    What Kind of Vehicle Do You Need?

    Road Conditions:

    The road to the Suntop Lookout is a mostly flat gravel road.  However, there are some very deep potholes and in one section of the road, some pretty deep grooves created by water rushing down the mountain.   

    Cars

    I recommend you have an AWD vehicle or one with some ground clearance.  That said, I did see people up there with minivans and small sedans.

    Motorcycles

    This is the option my hubby and I chose.  It is easy to swerve around potholes and makes for a fun ride unless, of course, you’re stuck behind a car choking on dust.  Okay, even then, we have fun! If you have a road-licensed dual-sport or motorcycle set up for off-road riding, this is a great option.  I even saw a couple of Harley riders up here.  However, I wouldn’t recommend a street bike.

    One thing to consider when riding up on your motorcycle is that if the gate is closed, you will need to hike up the rest of the way in your gear.  Plan ahead and make sure you have boots and clothing you’ll feel comfortable hiking in.  We did it with our gear, but it was hot and less than ideal, but do-able.

    Mountain Bikes

    This area is very popular with mountain bikers. We saw some people who had their bikes transported to the gate, and then cycled to the top from there and then back down.  However, others made the entire ride up, which I thought was pretty impressive!  From what I have learned, there are a bunch of excellent mountain biking trails in the area near Suntop Lookout.

    Best Time to Visit Suntop Lookout

    Summer & Fall:

    Summer and early fall are when most people will want to visit Suntop Lookout. The road is typically free from snow during this portion of the year and, therefore, the most accessible. It is also a drier and more pleasant time of the year to visit Suntop. 

    Spring:

    Depending on the snowpack from winter, the road will most likely still have snow.  My hubby and I tried riding our motorcycles up one year over Memorial Day Weekend and hit snow about 2 miles below the summit. It depends on the year, but if you want to be able to drive all the way up, or at least to the gate, then summer would be my recommendation for when to come.

    Winter:

    I have not attempted visiting Suntop Lookout during the winter, but I read that it is a popular snowshoe and cross-country ski destination. Many people snowshoe or ski up the road in the winter.  You will need chains and an AWD vehicle to access the sno-park during winter.

    Hiking to Suntop Lookout When the Gate is Closed

    If you find the gate across the road on your way up to Suntop, don’t worry, it’s only a short hike to the top from here. From the gate, you have two options for hiking to Suntop: walking up the road or taking the trail. Either option will take around 30-40 minutes at a slow, steady pace before reaching the top.

    Walking Up the Road

    If you hike up the road, you’ll have an easy but steady incline to the top. Hiking the road is my recommendation if you have any mobility issues that might make it hard when walking on a narrow trail with lots of loose rocks.  The road has less shade on hot days, so make sure to bring a bottle of water before making the walk up. It is about 0.8 miles to walk from the gate to the Suntop Lookout via the gravel road.

    A hiker walking up a trail.
    Jake is hiking up the trail just past one of the Mt Rainier viewpoints you’ll see along the way.

    Hiking the Trail to Suntop Lookout

    There is a trailhead just below the gate on the left side of the road (when facing the gate).  It is only a 0.5-mile hike to the lookout via the trail. The trail to Suntop is narrow, and there are a lot of loose rocks along the path.  I would still classify the hike up the trail as easy. However, due to the narrow trail, loose rocks, and sometimes steep incline, I think it is best for individuals without mobility issues and are in reasonable shape. I also recommend bringing hiking poles. That said, I passed small children and families along this trail that appeared to be traversing it without issue.  

    When hiking up the trail, you’ll pass a small, rocky trail shortly before reaching the top. This trail is a shortcut to one of the best views of Mount Rainier along this hike. The little trail leads you up to the road where you can get unobstructed views of Mount Rainier before continuing to the lookout.  You can also choose to stay on the main trail, which will curve around and lead you to the lookout first. Then, before heading back to your vehicle, you can walk down the road from the lookout to see gorgeous, unobstructed views of Mt Rainier.

    A hiker walking down a road toward Mt Rainier
    Jake was walking the short walk down the road from the restrooms at Suntop to the unobstructed views of Mt Rainier.

    Advantages of Each Option

    The advantage of the trail is that it is a slightly shorter hike up, and you have a little more shade on sunny days. The advantage of the road is that it is wide, mostly flat, and provides plenty of room for groups to pass and take breaks as needed.

    The road to the Suntop Lookout is also a popular mountain biking route, so you may encounter mountain bikers coming down either the road or the single track trail.  There isn’t much room to get out of the way when they come down the path, but do your best to pull over where it is safe to let them pass.

    What’s At the Top?

    Restrooms:

    You’ll be happy to know that there is a vault toilet just below the lookout and adjacent to the picnic area.

    Picnic Tables:

    There are picnic tables just past the vault toilets.  There is also another picnic table near the lookout. It is a beautiful place to sit and enjoy a picnic lunch with a view. 

    Views at Suntop Lookout

    Hike up to the lookout for 360-degree views of Mount Rainier and the surrounding mountain ranges. Mount Rainier is only 10 miles to the south, and on a clear day, you’ll enjoy views of the central Cascades, Olympic Mountains, and just maybe (and with the aid of binoculars) get to see Mount Baker! If you’re lucky enough to visit when there’s a forest ranger present, you may get a chance to see inside the lookout.  However, even if it is closed up when you visit, the views from the lookout are worth the trip!

    Suntop Lookout Photography

    Suntop lookout is an excellent spot for sunrise and sunset photos.  Look at the forecast the week you want to visit and then see if you can plan for a day with clear skies.  Both sunrise and sunset will provide stunning photo opportunities with the gorgeous colors of the sun reflecting off snow-capped Mount Rainier.  After dark, you can practice your astrophotography and enjoy stargazing at the summit. 

    What to Bring for the Hike

    Picnic Lunch & Snacks: Although it’s a short hike, you might as well make the most of it by enjoying a picnic at the top.

    Water: Water is always a good idea.  It gets hot at the summit during the summer, so having some extra water with you will help!

    Bug Spray: The mosquitoes weren’t bad when we visited. However, they can be depending on the time of year, so I’d bring bug spray just in case.

    Hiking Poles: These are especially useful if you hike up the narrow trail.

    Layers: Depending on what time of year you visit, you may want to bring extra layers. If you chose to come up for the sunset, you’d need layers for when the sun goes down as it can get quite cold.

    Downloaded Offline Map: I always like to have an offline map when I’m going off-road just in case I lose my way.

    Recreational Parking Pass: A Northwest Forest Pass is required at Suntop Lookout.

    Things to Do Nearby

    Places to Eat

    Greenwater Outfitters:  58410 WA-410 east, Enumclaw, WA 98022

    Enjoy lunch at Greenwater Outfitters or pop in for some delicious ice cream.

    Wapiti Outdoors: 58414 WA-410 E, Enumclaw, WA 98022

    Stop in at Wapiti Outdoors for some fantastic coffee and ice cream. If you’re lucky to visit during huckleberry season, make sure to try a huckleberry milkshake. They also have a great selection of t-shirts and outdoor gear.

    Naches Tavern: 58411 WA-410, Enumclaw, WA 98022

    If you’re looking for a bite to eat and something cold to drink after a day of hiking, stop in at the Naches Tavern. 

    Camping

    Dispersed Camping:

    Dispersed (free) camping is allowed in the Mt Baker-Snoqualmie National Forest around the Suntop Lookout area. There are no toilets provided. Follow “leave no trace” principles and clean up your site before leaving. In addition to dispersed camping off of FS-73, if you travel 5 miles past FS-73 on SR-410, you’ll come to NF-7160. Make a right here, and you’ll find more dispersed camping by the Ranger Creek Airstrip.

    Established Campgrounds near Suntop:

    There are also so many other great trails in the area, such as Snoquera Falls, Skookum Flats Trail, and many more.  Plus, you are a short drive to the White River entrance at Mount Rainier National Park.  Why not make it a weekend adventure! I love visiting the Sunset visitor center at Mount Rainier and camping at the White River campground.  

    Here are a couple of articles to get you started planning.

    Happy Trails!
  • Hiking to Spray Park & Falls: My Beautiful Misadventure

    The Spray Park trail and Spray Falls have been on my list of hiking to-dos for years.  The Spray Park trail checks off all my hiking favorites.  It has an alpine lake (Mowich Lake), waterfalls, stunning views, and wildflowers. Plus, I get to see snow in August! It is easy to see why this trail and area of Mount Rainier is so popular. So when I read that the road to the trailhead parking lot was open, I knew I had to go!

    I’ll tell you about my experience hiking to Spray Park and also give some tips and advice on what to bring. Make sure to read over the Know Before You Go, What to Pack, and Additional Tips sections before your trip as they will help you be a little better prepared than I was my first visit here. 

    It may take some extra effort to get to this corner of Mount Rainier, but Mowich Lake and the surrounding area is known for its stunning beauty and outstanding hikes, and it is well worth the effort! 

    Here’s a video montage that gives an overview of my hike to Spray Falls.  You can continue reading about my day below as well as my tips for what to know and how to get there.  You can also click on the links above to jump to each section.

    My Experience Hiking to Spray Park & Spray Falls

    The Drive Up

    I leave my house around 6:45 a.m. I have 2 hours to go before I reach the Mowich Lake parking lot. It is a Tuesday morning, so I hope that it won’t be too busy when I arrive.

    As I drive through the small town of Wilkeson, I think how it looks like a set from an old western. I make a mental note to come back another day to explore the town. 

    After passing through Wilkeson (which has the last gas station along this route), I pass through the town of Carbonado and eventually cross the anxiety-inducing Fairfax bridge.  It is a one-lane bridge suspended high above the canyon, and honestly, it looks a bit rickety, but I go ahead and trust its stability and cross it safely.

    Where the Pavement Ends

    Not long after Fairfax bridge, the pavement ends.  It’s less than 17 miles to the parking lot on this stretch of dirt road, but it will take me almost an hour to get there.  I am in an SUV, but even so, I keep my speed around 20-25 for most of the road. There is a section that is labeled “30 mph,” and it is still very rough. 

    Additionally, I am driving in the direction of the sunlight, so it hits my dirty windshield as I go in and out of the shadows, making it difficult to see.  This part of the drive up is the hardest, but on a clear day, the views of Mt Rainier help to pass the time.

    Mt Rainier from Hwy 165
    This is one of the views on the drive to Mowich Lake.

    I pass by the Paul Peak Trailhead and pay station, I already have an annual national park pass, so I do not need to stop.  I’ve only got another 5 miles to go before arriving at the Mowich Lake Parking area.

    It’s about 8:30 a.m. when I reach the Mowich Lake parking lot. I count at least 20 cars already parked here, but there is still plenty of parking spaces available. I gather my gear and make a quick stop at the pit toilets. They are clean and include hand sanitizer. I grab my camera bag, which doubles as my day pack and head to the trailhead.

    Hiking to Spray Falls and then on to Spray Park

    I walk to the Spray Park trailhead just past the pit toilets, and I notice the trail sign says it’s only 6.0 miles roundtrip to Spray Park. My guidebook and other online sources state that it is 8.0 miles roundtrip. The distance you hike depends on how far into Spray Park you want to go. There is no “you’ve arrived” sign, you hike as far into the meadow as you feel like before returning. The further up you go, the better the views.

    The trail gradually descends into the forest, and soon I cross a small creek.  I love the sound of the water as it makes its way over the rocks. The sights, sounds, and smells of the forest are comforting, and it makes me smile. It feels so good to get away and unplug! 

    Eagle Cliff Viewpoint
    My view while at the Eagle Cliff viewpoint.

    Eagle Cliff Viewpoint

    At about 1.5 miles into the hike, I come to the Eagle Cliff viewpoint. Make sure to stop here, it’s only an extra 100 feet of trail, and on a clear day, it has some beautiful views of Mt Rainier.  I enjoy a mostly clear view of the mountain during my stop.

    After taking some photos, I continue along the main trail, and about .25 mile past Eagle Cliff, I come to the junction for Eagle’s Roost camp.  The campground goes to the right, but the trail for Spray Falls and Spray Park continues on the left. I follow the sign for “water .10 mile,” and soon, I cross another wooden bridge and look up to see a series of small cascading waterfalls flowing over mossy rocks. It’s so beautiful. 

    Shortly after this creek crossing, I arrive at the trail junction for Spray Park and Spray Falls. I head right to take the path toward Spray Falls as I want to stop and see the falls before heading up to Spray Park.

    mossy rocks and cascading waterfalls at spray creek
    A series of small cascading waterfalls shortly before the Spray Falls trail junction.

    Spray Falls

    I’ve seen photos of Spray Falls, and many of them showed people right next to the waterfall.  However, I’m not sure what time of the year they visited as this was not possible during my hike here. There was so much water coming down the mountain that I was unable to cross the rushing water to get unobstructed views of the falls. 

    I was disappointed but unwilling to risk getting my camera gear wet or worse for a better shot.  I will try again at a different time when there isn’t so much water rushing down the mountain.

    Spray Falls at Mt Rainier
    Spray Falls in the distance.

    Spray Park

    I make my way back to the main trail and start my climb up to Spray Park.  The trail sign at the Spray Falls junction says it’s .8 miles to Spray Park. This is where the trail rating turns from “easy” to “moderate.” 

    I read somewhere that there is only a 600-foot elevation gain for the hike to Spray Falls. However, the hike to Spray Park has a 1700 foot elevation gain. It feels like the majority of that is in this .8 mile hike to the entrance of Spray Park. 

    As I climb upward, I’m serenaded by the sounds of Spray Falls in the distance. Soon though, I no longer hear the falls as I continue my climb up to Spray Park.  “Slow and steady wins the race,” I tell myself, and soon I arrive at a log footbridge, which marks the entrance into Spray Park. 

    The entrance to Spray Park at Mt Rainier.
    The entrance to Spray Park at Mt Rainier.

    I chat with a dad and daughter who stop by the log bridge for a break. They offer to take a photo for me with my phone, which is nice as typically, I don’t get pictures of myself on these solo excursions.  We realize, though, as we stop that the mosquitoes are worse here, and no one wants to linger here too long. Soon the dad and daughter leave to continue their hike into Spray Park.  

    I take a few photographs, and eat a snack and then continue following the trail up.  It winds its way through some scattered trees and maintains a steady, but not too steep climb upward.  Soon I get views of Mount Rainier on the right and views of Mt Pleasant and Hessong Rock on the left. 

    A hiker with Mt Rainier in the background.
    A photo a fellow hiker volunteered to take with my phone.

    Alfred Hitchcock’s “The Birds”

    I see a hiker headed my way, and I move to the side to let her pass. As she passes, she tells me there are more beautiful views to come–but, she says, the mosquitoes are “ferocious!”  Yes, that was the exact word she used.

    She said they get “much worse.”  She planned to eat lunch further up in Spray Park, but the mosquitoes were so bad she decided to hike back to Mowich Lake.  Great! I thought glumly, as I tend to be a bug magnet.  If there’s one bug in the room, it’s going to find me!  Now, I wish I’d have brought the can of bug spray with me so I could re-apply. 

    Despite the warning, I continue hiking further into Spray Park, hoping to find “the view.” I love the wildflowers dotting the meadow with beautiful colors!

    Spray Park trail with wildflowers on each side.
    The Spray Park trail continues upward, surrounded by wildflower.

    A little further up, I chat with another dad and daughter on their way back to Mowich Lake.  The dad said he’s hiked this trail before and saw seven bears, but this time not a single one.  They did get to see some goats, though, so that sounded pretty neat!  I love meeting people on the trail and seeing others out enjoying nature and life. I say my goodbyes to the dad and daughter and continue hiking a bit further into Spray Park.

    It’s Lunch Time, and I’m on the Menu

    It’s about a quarter to noon, and I’m hungry, so I decided to stop for a quick lunch break.  I put my bag on the ground to get my water and sandwich, and as I do, a swarm of mosquitoes lands on my backpack.  There’s not even any blood for them to get out of my pack!  

    Of course, they land on me as well, and I do my best to swat them off while trying to take a quick drink and a bite to eat. (Again, if only I’d have brought the bug spray with me!) This lesson will stick with me for about a week as the swelling and itching finally dissipate.

    It’s like Alfred Hitchcock’s movie The Birds, except replace birds with mosquitoes and you’d have a pretty accurate description of my experience.  

    I quickly zip my bag up and decide I too will not be lunching here. I put my pack on, take a few more photos while the mosquitoes make a lunch break out of me, and then decide I’ve got my views for the day. I’m heading back. I couldn’t stop for 5 seconds without being attacked. It just isn’t enjoyable any longer.  I did, however, enjoy the views and beautiful flowers. I even saw a patch of snow, but the bugs…

    The Bee & The Magic Hat

    I descend back into the trees, and soon I pass the junction to Spray Falls and continue toward Mowich Lake.  It’s around the Eagle Cliff viewpoint that a bee decides it wants to chase me.  I try to ignore it, I wave my hand at it, it flies towards my face, and I try to swat it away without making it angry. It does not want to leave me alone!  

    So, I start running. I figure if I run a little way down the trail, it will lose interest.  Nope.  It did not. It kept coming at me.  The last thing I want right now is to get stung by a wasp.  

    I hear voices up ahead, and I jog toward them,  a man and woman come into view, and I say, do you have a hat? I have a bee chasing me.  The woman says, “a hat?”  “Oh, you mean to swat at the bee?”  I say, yes!  So the man graciously takes his hat off, and you know what?  As soon as he takes his hat off, the bee flies away!  I am not kidding!  

    It was quite funny, and we all laughed about his “magic hat.”  Then they tell me a story of when they were hiking years ago, and a bee flew up his wife’s nose!  It sounded like a horror story to me, but she lived, although she did get stung.  I am very thankful the bee left me, but I still heard phantom buzzing noises for a while after I continued down the trail.

    spray park trail hessong rock
    Spray Park trail with views of Hessong Rock.

    The Flat Tire

    It takes about an hour for me to hike back to the Mowich Lake Campground from Spray Park.  I am tired and a little hungry, but happy to be away from the mosquitoes.  As I walk over to my car, I discover that I have a flat tire.  I must have run over something on the way up.

    I make a stop at the restrooms before changing my tire. As I’m walking back to the car, the dad and daughter duo that I spoke with earlier about seeing the goats spot me and say hi and ask me about my hike.  

    We chat for a bit, and then I walk over to change my flat tire.  I’ve never actually changed a tire on my SUV before. It takes me a little bit to figure out how to lower the tire from underneath the vehicle.  I do that, but I am not sure how to now detach it from the cable it is on. 

    I decided to ask the man I chatted with moments before for help. They were driving past my vehicle to leave for home when I stopped them to tell them about my situation. The man quickly parks his truck and very graciously helps me get the spare tire out from underneath the vehicle and then proceeds to change my flat tire.  I am so thankful he stayed to help too as he mentioned the lug nuts were on really tight, and he had a hard time getting them loosened.  I am so grateful for the kindness of strangers!

    Mowich Lake in the morning.
    Mowich Lake is a beautiful, clear alpine lake.

    Conclusion to My Hiking Experience

    I made it home safely but stopped in Wilkeson to air up my spare tire as it also appears to be losing air. All in all, between being eaten alive by mosquitoes, chased by a bee, and getting a flat tire, I’m not sure I’d do it again if I had to pick those exact circumstances, but I don’t regret going either.  

    So would I recommend you make the trip to Mowich Lake?  Absolutely! The hike to both Spray Falls and Spray Park is beautiful, the wildflowers are stunning, and Mowich Lake is a serene alpine lake accessible by car. I would not want to discourage anyone from going, only to suggest you plan ahead and don’t forget to pack bug spray for the hike! 

    In addition to applying bug spray in the parking lot, next time I will also bring it with me on the hike.  Read my tips on what to pack and how to be better prepared than I was before leaving home.

    Getting to the Spray Park Trailhead

    The trailhead for Spray Park is in the northwest corner of Mount Rainier National Park in the Mowich Lake campground. As I previously mentioned, you’ll have an almost 17 mile stretch of gravel road leading up to the parking area. The road ends at the parking lot for the Mowich Lake campground.  Whether you’re coming from Seattle, Tacoma, or Bellevue, the drive will take approximately 2 hours.  

    Driving Directions

    From the town of Wilkeson, you’ll drive south on Highway 165 for about 9 miles before coming to a fork in the road.  Stay to the right of the fork and continue south toward Mowich Lake.  Soon after the road turns into a dirt road, continue along this main road, and in about 9 miles, you’ll come across the Paul Peak Trailhead and pay station.  Stop here if you do not already have a National Parks pass.* You only have about another 5 miles to go from the pay station before you reach Mowich Lake. The road ends in the parking lot.

    *Please note the Washington Discovery Pass and the Northwest Forest Pass are not the same things as the National Park pass, you need to pay an entrance fee to be within the Mount Rainier National Park boundary.  Purchase online ahead of time or stop at the pay station mentioned above.

    Know Before You Go

    Best Time of the Year to Go: July to October

    The road to the Mowich Lake parking lot and Spray Park trailhead is typically only open from mid-July to October. 

    Fees: $30 for a 7-day park pass/$55 for an annual park pass

    You can purchase your national park pass ahead of time online, or you can stop at the pay station on the way up.  The pay station is at the Paul Peak trailhead.  You will see signs telling you to stop and pay.  If you already have a pass, just keep going up the road.

    Road Conditions: The last 17 miles of the drive to the trailhead parking area is on a dirt road.  

    The road is rough and has potholes and washboard conditions along the way—plan for this section of the road to take about one hour to complete. Recommended speeds range from 15-30 mph, depending on the conditions and the vehicle you are driving in. Cars and SUVs alike will have no issue making it. Just take it slow.  On a clear day, you’ll have views of Mt Rainier for the drive up.

    Fuel Up: Make sure to fuel up your vehicle ahead of time. 

    The town of Wilkeson is your last stop for fuel on the drive up.

    No Cell Service: There is no cellphone service in this area of the park. 

    Most people will lose cellphone signal in one of the small towns like Wilkeson before you ever hit the dirt section of the road.  Let someone know of your hiking plans, so in case of an emergency, they will know where to look.  This is always a good idea when hiking in the mountains.

    No Pets: Pets are not permitted on any of the trails within Mount Rainier National Park.

    No Potable Water Provided: There is no potable water for the Mowich Lake trailheads or campground.  

    You need to bring enough drinking water with you or a filtration system to filter lake or creek water.

    Check the Park’s Website for Alerts: Always check with the park to find out if there are any alerts for road closures or weather alerts you need to be aware of before your trip.

    What to Pack for Your Hike

    • Bug spray: Do not leave home without it! Bugs are notoriously bad at Spray Park, read my experience below, and make sure to apply and re-apply as necessary. You may also want to bring a mosquito net for your head.
    • Layers: I hiked this on a warm August day and didn’t need more than my t-shirt, but I still packed a sweatshirt just in case. Depending on what time of year you are here, you may need more layers, and in case you’re ever stranded on a hike, the extra layer may be a lifesaver.
    • Water: There is no potable water, so make sure to pack enough water for your hike, lunch break, and for the ride back down the mountain. 
    • Food: Make sure to pack snacks and food to keep your energy up. I like to bring snacks I can eat on the go and then a sandwich for my lunch break. 
    • First aid kit: It’s always good to have a first aid kit with you, in addition to that I also like to make sure I have moleskin when I’m hiking or backpacking, just in case I or someone in my group gets a blister. 
    • Buff/Bandana: I like the buff I purchased at REI as you can use it as a bandana, hat, face mask, or neck gator. A bandana will also work for most of those situations too.
    • Bear spray: You are hiking in bear country, and your odds of seeing a bear while hiking to Spray Park is pretty good.  So I recommend bringing bear spray, and if you’re by yourself, consider also getting a bear bell or calling out now and again to announce yourself.  
    • Hiking/Trekking Poles: These are optional, but useful for crossing small creeks and for keeping your balance over the rocky terrain and roots on the trail.
    • Sturdy Hiking Shoes: You may want hiking boots, or you may feel comfortable with good trail shoes.  Either way, make sure they’re comfortable and give you enough support.  Then pack a pair of flip flops for, after the hike, I always find my feet like to breathe after a hike.

    Prepare for the drive: Roadside Tools 

    Make sure your car is equipped with the necessary emergency roadside tools and make sure you know how to use them. Bring a tire pressure gauge, jumper cables, and a portable air compressor if you have one.

    Additionally, I recommend you check your tire pressure before leaving town and also make sure your spare tire is properly aired up. 

    Spray Falls Hike Overview

    Distance: 4.0 miles, round trip

    Difficulty Level: Easy

    Approximate Hiking Time: 1.5 hours to 2.5 hours

    The hike to Spray Falls is a mostly level hike with some smaller rolling hills. There is no significant elevation gain for this hike. The trail is narrow for most of the hike, and there are a lot of roots and rocks embedded in the path. If you have significant issues with your balance, the trail might not be a suitable choice.  However, for most people, including families with children, this hike should be a relatively easy hike accomplished in a few hours.

    Hiking to Spray Falls

    Start at the trailhead for Spray Park. You’ll find the Spray Park trailhead on the right, just past the pit toilets at the Mowich Lake Campground. The trail gradually descends into the forest, and soon you’ll cross a small footbridge over Lee Creek.  At about .2 miles into the hike, you’ll come to a trail junction for the Wonderland Trail. Continue to follow the trail signs for Spray Park. 

    About 1 mile past this trail junction, you’ll come to the Eagle Cliff viewpoint. You’ll see a small trail sign pointing to the right.  It is only 100 feet off the main trail.  I recommend stopping here for a quick look.  On a clear day, you’ll have incredible views of Mt Rainier and the Mowich glaciers. 

    After stopping at the Eagle Cliff viewpoint, continue on the main trail for about .25 miles where you’ll arrive at another trail junction. The trail sign will point right for Eagle’s Roost Camp, and to the left, it shows water .10 miles.  Stay to the left of the fork to continue to Spray Falls. 

    Soon you’ll reach the trail junction for Spray Falls. You’ll see a sign that points to the right for Spray Falls viewpoint .10 miles.  Take the trail on the right and follow this until it ends at the viewing area for Spray Falls.  

    Retrace your steps to return to Mowich Lake, or continue to Spray Park if you prefer a longer and more challenging day hike.

    Spray Park Hike Overview

    Distance: 6.0-8.0 miles, round trip

    Difficulty Level: Moderate

    Approximate Hiking Time: 3.5 hours to 5 hours

    The hike to Spray Park is moderately challenging.  However, I feel if you’re in reasonable shape, it should be one you can manage with relative ease.  For some comparison, if you’ve ever hiked to Poo Poo Point, I find the uphill gain to be similar to Spray Park.  The real uphill climb starts at the junction for the Spray Falls viewpoint. This is where the trail switches from easy to moderate difficulty. 

    The trail is narrow for most of the hike, and there are lots of rocks and roots and a variety of creek crossing, so I recommend sturdy hiking shoes and hiking poles will also be helpful, especially if you have troublesome knees.

    The park trail sign shows 6 miles roundtrip; however, my guidebook shows 8 miles roundtrip.  That is because Spray Park is a large area, and how far you choose to hike into Spray Park will determine how long your hike is.

    Hiking to Spray Park

    Follow the directions above for Spray Falls until you reach the junction for Spray Park and Spray Falls. From the junction for the Spray Falls viewpoint, the trail sign shows .8 miles to Spray Park.  This distance brings you to the beginning of Spray Park. You’ll know when you’ve reached it as you come into an open area and begin moving outside of the treeline into an alpine meadow. 

    You’ll soon have views of Hessong Rock and Mount Pleasant to your left and views of Mount Rainier to your right. You can hike an additional mile or so further to see more viewing areas, depending on how you feel or how far you wish to go. 

    Depending on the time of year that you go, if you hike far enough into Spray Park, you will come to the area known as Seattle Park.  Snowfields often surround this area, and I’ve read in the earlier months that hikers often get lost in the snowfields.  I was here in August during a heatwave, so that wasn’t an issue, but be cautious and play it safe if you come when it is snowy, it’s better to turn around than to get lost.

    After enjoying your time in Spray Park, head back the way you came to Mowich Lake campground.

    Camping near Spray Park

    You have a couple of campground options if you want to turn your day hike into an overnight trip.

    Mowich Lake Campground

    Mowich Lake campground is a walk-in, tent sites only, first come first served primitive campground. The walk from the parking lot to the campsites is a short one, though, and they provide a wheelbarrow to help you carry your supplies from the car.   The tent sites are set around a dirt circle, and there is no privacy between campsites. Bear boxes are provided for your food and gear.

    What this campground lacks in amenities and privacy, it makes up for in beauty and location. Mowich Lake is a gorgeous alpine lake!  You can bring your SUP or kayak and enjoy time in this serene mountain setting. It is also a fantastic base camp for hiking trails in the area.

    • Fee: There is no fee to camp here. Campers self-register at the campground, and no wilderness permit is required.
    • No Fires Allowed
    • Pit Toilets
    • No Potable Water (You must pack your water in, or bring a filter to filter lake or creek water.)

    Eagle’s Roost Camp

    This backcountry camp is an excellent place for a beginner backpacking trip or an overnight family backpacking trip.  The camp is located about 2 miles from the Mowich Lake campground, and it takes approximately one hour to hike there. There are seven campsites with bear poles provided for hanging your gear. Remember, you are in bear country, so make sure to take the necessary steps to keep yourself safe.

    • Fee: $20 per trip (good for up to 14 days). You also need a wilderness permit to stay here.
    • No Fires Allowed
    • Pit Toilets
    • No Potable Water (You must pack your water in, or bring a filter to filter lake or creek water.)

    Additional Tips for your Trip & Other Articles You Might Enjoy

    Come during the week to avoid the crowds.  If you do come on a weekend during July and August, plan to arrive early in the morning. This gives you the best chance to get a parking spot and completing the hike before the crowds come.

    Sometimes it is easy to think “I’m not going that far” and, therefore, not perform vehicle checks you might otherwise do for a more extended road trip. However, anytime you’re going to drive up a mountain or be out of cell service range, it’s good to make sure you are adequately prepared! Also, make sure to let someone at home know where you’re going and what your hiking plans are, just in case of an emergency.

    Other articles for things to do in Mount Rainier National Park:

    Have fun and create beautiful memories!

  • Twin Falls Hike: A Short Hike With Gorgeous Views

    Are you feeling a little stir-crazy? Do you need a good day hike to shake off some winter blues?  Well, that’s how I felt after what seemed to be a never-ending winter and a cold and rainy start to our summer in Seattle. I was ready to get outside and soak in the beautiful sunny day we finally had.  So I headed for one of my favorite waterfall hikes close to home, the Twin Falls hike near North Bend, Washington. 

    The Twin Falls trail is a beautiful path that winds its way along the river and through the trees (sorry no Grandma’s house) before leading you to spectacular waterfall views! I’ll tell you all you need to know to get there and as well as some tips, so you don’t extend your hike further than you want to.

    Useful Things To Know Before Getting Started

    • You need a Discover Pass to park at the trailhead for the Twin Falls hike.
    • You can purchase a day-use pass at the trailhead or buy ahead of time.
    • Bring bug spray, depending on what time of year you visit the mosquitoes can be quite bad.
    • Twin Falls is a popular trail, so if you plan to go on a weekend, be prepared for crowds and limited parking. I recommend you come on a weekday if possible, and try to get an early morning start.  Even on a weekday during the summer, the parking lot is often full by noon.
    • There are pit toilets with hand sanitizer provided.
    • I found it easy to follow social distance guidelines along this hike. However, on crowded days, you may want to wear a mask when passing other hikers if you are unable to follow social distancing guidelines.

    Hiking the Twin Falls Trail

    The Twin Falls trail is about 3 miles round trip from the trailhead to the Upper Falls Viewpoint. 

    If you have ever hiked the Franklin Falls trail near Snoqualmie Pass, I will share my thoughts on a comparison of the two. I have hiked the Twin Falls trail and Franklin Falls trail multiple times. I love the ability to get up close to the waterfall at Franklin Falls, but I think Twin Falls is the prettier hike.  You get more access and views of the river along the way, plus the forest opens up a lot more than with the Franklin Falls trail.  

    That said, Franklin Falls is the easiest of the two trails. So depending on your physical shape or the age of those hiking with you, be aware that hiking to Twin Falls is the more challenging hike. 

    It is still a fairly easy to moderate hike, but you will have some steep inclines along the way, and over 100 stairs to descend and ascend to see both waterfall viewing areas.  Take it slow, there are lots of places for breaks along the way and enjoy the journey!

    Starting at the Main Trailhead

    Starting from the main trailhead, you will begin your hike with almost immediate views of the river below.  If you’re itching to dip your toes in the water, don’t worry, you’ll have plenty of opportunities to do that later along the hike. Follow the trail as it winds its way down a hill and into the forest.  You’ll soon cross a little bridge (above photo).  After you cross the bridge, you’ll reach an area with easy access to the river.  

    There are several stops along the way with good river access. Huge boulders are separate the river into small pools. These are good for dipping one’s feet in to cool off on a hot summer day or letting the dogs have a little fun splashing around.

    Benches With a View

    As you continue along the trail, you’ll hike through narrow parts where the foilage crowds the path on either side.  Then you’ll come into large open areas with giant trees looming all around.  Make your way up a series of switchbacks before arriving at a resting point.  You’ll climb a steep switchback to arrive at a set of benches that offer your first glimpse of the upper falls. 

    The benches are a beautiful place to stop and rest.  There is usually a breeze blowing here, so in the summer, it is a refreshing place to sit and cool off.  However, in the colder months, you may wish to bundle up or only stop for a short break if it’s really windy.

    The Big Tree by the River

    When you’ve finished resting at the benches, follow the trail as it descends back down into the forest.  Near the bottom of the hill, you’ll come across a huge tree looming tall, not too far from the river’s edge.  Stop to take photos with the big tree and if you want you can also take another break by the river. I just love all the beautiful trees along this trail!

    Lower Falls Viewpoint

    After you leave the big tree, continue hiking upward to where it levels off, and before long, you’ll see some stairs that fork off to the right.  These stairs will take you down to the Lower Falls viewpoint. 

    This viewpoint, in my opinion, is the best one along the trail.  So make sure to either stop on your way to the Upper Falls Bridge or hike down to it on your way back.  Whichever you choose, you don’t want to miss it! I know hiking down and back up over 100 stairs may not seem worth the effort, but I assure you, it is!

    Upper Falls Viewpoint & Turnaround Area

    As you pass the stairs to the Lower Falls viewpoint, you’ll soon see a large bridge zigzagging through the trees.  There’s a clearing on the bridge providing views of the valley on one side, and the upper falls on the other.  If you want to continue past this point, you can hike a little further up to a small viewing area with a slightly closer view of the upper falls.  

    upper falls bridge
    The wooden bridge viewing area for the upper falls.

    From here, you will turn around and head back in the direction you came.  If you were to continue past this viewpoint and up the trail, it would take you to the John Wayne Trail/Iron Horse Trail that leads to the alternate trailhead I mention in the “Getting Here” section.

    Warning: Don’t make the mistake of passing the upper falls viewing area and thinking the trail will loop you back to the main trailhead.  I had a few families who started to pass me going further up the trail, and I asked them if they had parked at the Homestead Valley Road trail or not.  They had not, but mistakenly thought the trail continued on and somehow lead them back to the main trailhead off Exit 34.  There is no need to hike further (unless you want to) once you’ve seen the Upper Falls.

    Enjoy your hike back to your car, and if you didn’t take time to stop near the river, the walk back is a great time to do it.  I enjoyed having a snack break there, listening to the rushing water, and smiling as I saw a family further up the river enjoying their time together.

    Getting to the Twin Falls Trailhead

    The Main Twin Falls Trailhead:  SE 159th St, North Bend, WA 98045

    1. Take I-90 east to exit 34
    2. Turn right off the exit ramp onto 468th Avenue SE
    3. Drive about half a mile and make a left onto SE 159th Street.
    4. Follow the road until it dead-ends in the Twin Falls parking lot. (You will need a Discover Pass to park here.)

    Alternate Hiking/Parking Option:

    If the main Twin Falls trailhead parking is full, you can also hike to the falls coming from the opposite direction. The hike will be different than what I describe below, but if you drive out there and discover the main trailhead is full, this gives you an alternate option.

    1. Take I-90 east to exit 38
    2. Turn right off the exit onto SE Homestead Valley Road. Drive about 0.10 miles and make your first right, you’ll see a sign for Olallie State Park that lists various trails
    3. Follow this dirt road for a little over a quarter-mile, stay left as you pass two forks in the road along this route.
    4. You will park near the trailhead junction for Iron Horse Trail.
    5. Follow the Iron Horse Trail (may also see signs for John Wayne Pioneer Trail) for about a third of a mile before it connects with the Upper Twin Falls trail. 
    6. Once you reach the Upper Twin Falls and the big bridge, you’ll just need to hike a little further down where you’ll find stairs on your left, leading you to the Lower Falls viewing area.

    Read the following articles for more waterfall fun:

  • 15 Travel Shows to Keep You Inspired at Home

    If you’re like me, you’re probably getting a little stir crazy at home while we wait out these unprecedented times and hope for a tomorrow that once again involves world travel. To quench my thirst for travel, I’m exploring areas close to home, and I’m also streaming travel shows to keep my travel dreams alive until they can once again become a reality. 

    This list of travel shows is some of the travel television I’ve been streaming lately.  Some of the shows on this list remind me of past trips I’ve taken, and others inspire ideas for future travels.  Watching travel shows is not as good as actually being able to travel, but it definitely helps!

    Food & Travel Shows

    Warning: Do not watch these shows on an empty stomach.  I love watching food and travel shows, but they tend to make me really hungry! Lately, due to closures and other restrictions, these shows also remind me of how quickly things have changed. I hope for a day when I can once again immerse myself in the food culture both locally and abroad.  All right, let the salivating begin!

    Diners, Drive-Ins, and Dives

    Diners Drive-Ins and Dives food travel show

    This food and travel show with host Guy Fieri is probably not new to most of you, but maybe it’s been a while since you’ve watched it. In case you didn’t know, Guy started filming for season 32 at the end of last year.  Season 32! That’s a lot of episodes to inspire your future travels and food stops along the way.  

    I’ve met people during my travels that plan their trips around the nearest Diners, Drive-Ins, and Dives restaurants for their intended destination.  Once you watch the show, you’ll understand why.  So if you’re planning a road trip this summer, watch the show and see if any of the restaurants featured are along your route and get ready to feast on some incredible food! 

    I recommend you see if there are any Diners, Drive-Ins, and Dives restaurants located near you and plan a trip to visit one soon!  You might call ahead first to make sure they’re open, then make a day of it and create some great memories, while eating some fantastic food.

    Streaming on: Hulu, Amazon Prime Video, Pluto, iTunes, YouTube, and most major streaming services

    Taste the Nation with Padma Lakshmi

    Taste the Nation travel show

    This Hulu Original travel show starring Padma Lakshmi (Top Chef) explores the connection of the food we eat in America to its origins and influences within our communities. 

    This is perhaps one of the things I love most about trying new foods when I’m traveling. It is such an excellent way to connect to the local culture and experience the region you are in. There is a story behind each dish, and food transforms life in ways we often overlook. 

    Food is a common tie that brings us all together. I love learning about the history behind the foods we eat in America, and it reminds me of what a beautiful melting pot our country is.

    Streaming on: Hulu

    Eat the World with Emeril Lagasse

    Eat the World travel food show with Emeril Lagasse

    This Amazon Original travel show takes us on a food adventure with host Emeril Lagasse. Top chefs join Emeril as he goes on a culinary trip around the world to discover what goes into making some of our favorite global dishes. 

    Eat the World will have you making plans for where to eat on your next trip and possibly inspire you to try making some of these dishes at home. Bam! Okay, sorry, just felt like I needed to throw Emeril’s famous catchphrase in there, perhaps you’ll do it too when cooking up one of these incredible dishes.

    Streaming on: Amazon Prime Video

    Street Food

    Street Food Netflix show

    Street Food is a Netflix Original travel show that explores the street food commonly seen on different continents.  There are two different Street Food series to choose from on Netflix. One is Street Food Asia, and the other is Street Food Latin America.  I recommend watching both.  It teaches you more about the various street food options and also about the sub-culture behind street food vendors. 

    I love sampling food at a street food market. It’s an easy (and cheap) way to sample a variety of local foods.  These markets often open up at night, and I love the energy and atmosphere that surrounds them.  It’s a travel and food experience all in one place.

    Streaming on: Netflix

    Bizarre Foods

    bizarre foods tv show

    Okay, speaking of street foods makes me think of this food and travel show hosted by Andrew Zimmern. There are 22 seasons of the show and a whole lot of different foods to consider trying and a few definite no’s. 

    I’m pretty adventurous, I’ve eaten scorpion, silkworms, grasshoppers, and other types of non-traditional foods, however, Anthony Zimmern takes this curiosity for food to a whole new level.  Cringe, binge, and be thankful you don’t have to eat everything he does!

    Other shows with Andrew Zimmern you might enjoy are Driven by Food and The Zimmern List.

    Streaming on: Hulu, Amazon Prime Video, Pluto TV, iTunes, YouTube, and most major streaming services

    Non-Traditional Comedic Travel Shows

    Here are a couple of less traditional travel shows.  I’m not sure they’ll always inspire you to travel to the specific places their hosts do, but they’ll make you laugh and help you see tourist destinations from a different perspective. 

    If you enjoy these then you may also want to consider The Layover with Anthony Bourdain, I mention this and other favorite travel shows in this other article about travel movies and TV shows.

    Travel Man: 48 Hours In…

    Travel Man

    This travel show hosted by Richard Ayoade (The IT Crowd) is almost an anti-travel show. That’s not the right word, really, but Richard certainly seems to be a bit of a reluctant traveler at times and often finds the most peculiar places to visit or odd means of visiting popular areas.  

    Richard’s quest is to see each popular tourist destination in only 48 hours.  His dry British humor will have you laughing along in his adventures, and perhaps his unique travel choices will inspire a few of your own.

    Streaming on: Amazon Prime Video, Hulu and iTunes

    James May: Our Man in Japan

    james may our man in japan

    Another off-beat travel show this time with James May, who you might recognize from shows like Top Gear and The Grand Tour.  He, too, tries unique and off-the-wall adventures during his tour through Japan. He learns more about the Japanese culture and meets locals who introduce him to experiences unique to their country. 

    I’ve only been to Japan once, but May’s adventures remind me of my trip and inspire me to try some unique experiences of my own on my next visit there. 

    Streaming on: Amazon Prime Video

    Travel Shows to Inspire a U.S. Road Trip

    These travel shows will inspire your next road trip or even a camping trip to stay at one of America’s gorgeous National Parks.  I love our National Parks system. We may not have ancient buildings or old castles, but what we lack in historical buildings we more than makeup for with the beauty of our parks.  If it’s been a while since you’ve explored the U.S., start planning a trip with these travel shows.

    Secrets of the National Parks

    secrets of the national parks

    Explore the secrets of our National Parks with this beautiful television series. Learn about the unique natural wonders in these parks, as well as some of the wildlife that lives there.  You will get ideas of things to do and what to see when you visit some of America’s National Parks.  The videos are beautiful to watch, and it inspires me to go and explore more of the parks that I haven’t yet visited.

    Streaming on: Amazon Prime Video and Tubi

    America’s National Parks

    america's national parks national geographic series

    This series by National Geographic about America’s National Parks focuses more on the wildlife that lives in each of the parks.  This is a nature and travel show in one.  I watch it and am grateful that we have these National Parks as a refuge for our wildlife and unique plants to preserve them for future generations to see.  It is such an amazing world we live in!

    Streaming on: Amazon Prime Video and Disney+

    Seeing the USA

    Seeing the USA is a reality-style travel show.  Follow Brandy Yanchek as she explores the U.S., meeting locals, and learning about the culture of each state she visits.  You will get ideas for places in each country that perhaps you might not have considered before and also learn about some of the local businesses that are unique to each city she visits.  If you’re considering a trip somewhere in the U.S., check out this series found on Amazon Prime Video.

    Streaming on: Amazon Prime Video

    Adventure Travel Shows

    Expedition Overland

    expedition overland off-road toyota

    Expedition Overland is a reality-style travel show that follows a team of people in their vehicles as they travel across remote areas in an overlanding expedition.  Overlanding is sort of like backpacking, but with an off-road vehicle.  You carry what you’ll need to sleep and eat and any emergency supplies you might need should you get stuck somewhere.  You are typically driving off-road through remote areas and over rugged terrain.  The adventure is in the journey. 

    Expedition Overland shows the planning, equipment needed, and the fun that goes into one of these adventures.  You may just find yourself heading to the nearest car dealer to begin an overlanding adventure of your own.

    Streaming on: Amazon Prime Video and YouTube

    Around the Next Bend

    around the next bend photo of India

    This reality travel show is about an epic adventure two young (and extremely underprepared) guys take on their journey rafting down the Ganges River in India. Their trip appears to have been a spontaneous idea. 

    Although some have commented on their lack of things like a waterproof bag for electronics, I love hearing stories of people pursuing their dreams and seeking out new experiences.  Perhaps it will inspire your spontaneous adventure. At a minimum, it should make you smile.

    Streaming on: Amazon Prime Video and iTunes

    By Any Means with Charley Boorman

    Charley Boorman tv show by any means

    If any of you have watched the Long Way Round or Long Way Down shows, then Charley Boorman will be a name you recognize.  Follow Charley in this travel show as he avoids commercial travel and instead tries to travel by any (transportation) means necessary. 

    He’ll use animals, small aircraft, rides with strangers, motorcycles, and more as he journeys from Ireland to Sidney (season one) and Sidney to Tokyo (season 2). Charley has a playful and expressive side, and you can’t help but smile along with him as he relishes in the joy of the journey and the discovery of new places and people.

    On a side note, season 2 is called Right to the Edge: Sydney to Tokyo By Any Means. It’s helpful to know that when searching for streaming options.

    Streaming on: YouTube and Dailymotion (originally aired on BBC)

    Rogue Trip

    Rogue Trip DIsney Plus Travel show

    Rogue Trip is the latest travel show released by Disney Plus.  In this father-son travel show, you’ll travel to countries most people will never get a chance to visit. 

    Former war journalist Bob Woodruff takes his son Mack on a journey to explore some of the countries he visited during his work with ABC.  They visit places like Columbia, Papua New Guinea, Ethiopia, Pakistan, and more. See beautiful places, unique wildlife, and learn about the people and culture that make up these countries.

    Streaming on: Disney+

    Lost Cities

    Lost Cities Disney Plus show

    Lost Cities is another Disney Plus travel show that reminds me of a real-world Indian Jones adventure.  You’ll follow Albert Lin as he seeks out Lost Cities scattered around the world.  Albert uses the latest technology combined with the knowledge of locals to seek out lost civilizations.  

    You’ll learn more about the history and the mysteries behind places like Petra, Stonehenge, El Dorado City of Gold, and more.  So grab your bullwhip (I don’t know, Indiana Jones seemed to think they were useful) and join the adventure!

    Streaming on: Disney+

    More Travel Shows To Inspire You

    There are so many great travel shows to inspire you when you can’t travel and help you plan for when you can.  Read more of my favorite travel shows and travel movies in the post 32 Travel Shows & Movies to Inspire You at Home. I understand that it can be a challenge right now to stay positive and to plan for future trips. I recommend you explore areas where you live and stay inspired by the many fantastic travel shows, movies, and books that are available to you.

    To Future Travels!

  • Spokane’s Georgeous Riverfront Park & the Numerica Skyride

    It’s incredible to me how many times I visited Spokane or drove past the city without ever stopping at Riverfront Park. It is one of the main attractions in this Eastern Washington city, and yet I hadn’t visited it!  Well, recently, during a visit to see some family, I discovered what I’d been missing. 

    The Spokane Riverfront Park is a 100-acre urban park with trails for walking and biking, plus plenty of green spaces for just relaxing too.  There are sculptures, bridges, a historic clock tower, and the Numerica Skyride and Skate Ribbon.  

    The Numerica Skyride at Riverfront Park is a short 15-minute ride over part of Riverfront Park and then across the river where you get to see the lower falls from a bird’s eye view.  You feel the spray coming off the falls as your gondola glides past.  It is a fun and unique way to view the river, and I highly recommend you try it!

    COVID-19 Update and Changes

    Currently, in Washington state, we are in “Phase 2” of the COVID re-start timeline. Phase 2 means more businesses are allowed to re-open.  One of the businesses to recently re-open is the Numerica Skyride at Spokane’s Riverfront Park.  

    An attendant sanitizes each gondola before permitting you to board. It takes a little more time as you have to wait for them to wipe each gondola down before boarding, but they do their best to keep things moving.  They also have multiple hand sanitizer stations in the waiting area for you to use before boarding and when you disembark.

    They only board by individual family groups.  This is sort of a perk from the new restrictions as my hubby, and I had the entire gondola to ourselves, which allowed me to easily enjoy views from both sides without fighting for a good view.  Okay, no fighting would have occurred, but it was nice to have it all to ourselves.

    The Numerica Skyride also has the Skate Ribbon, which was still closed at the time of our visit. Typically though, you can rent skates or bring your own and then skate around their track. The skate ribbon looks like a miniature race track for cars, but instead, it’s for skating.  In the winter, they turn it into an ice skating rink.  Hopefully, soon it will also re-open, and people can enjoy this fun activity in Riverfront Park.

    The Numerica Skyride Experience

    Tickets and Hours:

    You’ll purchase your tickets inside the Numerica Skate Ribbon building. Visit their website for current ticket prices and hours of operation. You can also book your ticket online if you prefer.  The Numerica Skyride is wheelchair accessible. They offer a variety of discounts for those in the Military, Seniors (55+), AAA, and college students.

    The Ride:

    After they sanitize your gondola, you’ll enter with your group and take a seat.  There are two benches on each side of the gondola. There are also open window slats behind each bench as well as in the door.  So you not only have good air circulation, but you can also take photos through the slats and avoid the glare/reflections off the glass.

    If You’re Unable to Ride the Skyride

    I realize there may be many reasons why you might be unable to ride the Skyride at Riverfront Park.  Perhaps you’re afraid of heights, or you don’t like enclosed spaces, or maybe you don’t have the funds for it right now.  Whatever the reason, you still have the option to view the lower falls up close without taking the gondola ride. 

    Walk west past the Skyride and follow the overhead line of the gondola.  This path will lead you down a series of staircases that will take you to a viewing platform at the base of the lower falls.  You can look up and see the gondolas above you.  You’ll enjoy beautiful views of the falls from the ground level. 

    More Fun Things to do at Spokane’s Riverfront Park

    In addition to the Skyride, I highly recommend you take time to explore other areas of this 100-acre urban park. Strolling around scenic Riverfront Park is a great way to spend an hour or two.  There are signs throughout the park, pointing you in the direction of the main attractions, so it is easy to find your way. 

    Spokane Visitor Center, Rotary Fountain, & Looff Carrousel

    You can also stop at the Spokane Visitor Center and pick up some maps and get ideas for other sites to see during your visit to Spokane. Next to the Visitor Center, you’ll find the Rotary Fountain. Follow the path a little further east, and you’ll see the historic Looff Carrousel.  The Looff Carrousel is currently closed due to the COVID-19 restrictions. However, you can check here periodically to learn about its future re-opening date.

    Sculptures in the Park

    Admire the sculptures scattered around the park like the ones shown above commemorating the runners in Spokane’s Bloomsday Run. You can get a map at the Visitor Center that shows the locations to the various sculptures.

    Bloomsday Run Sculptures

    Garbage-Eating Goat

    Don’t miss seeing the Garbage-Eating Goat. It is an interactive sculpture designed by Sister Paula Mary Turnbull, also known as the “welding nun” Make sure to bring a piece of garbage to feed it. Press the white button on the right side and then place your garbage in the goat’s mouth and watch it disappear! Try only to feed it paper trash as it’s an old goat, and larger trash items will choke (I mean clog) it. The garbage eating goat is on the east side of the Looff Carrousel.

    metal goat sculpture

    The famous garbage eating goat.

    Pavilion at Riverfront

    The Pavilion is another unique attraction at Riverfront Park.  Built for the 1974 World Expo, it used to be covered by a large canvas material.  Later, it was redesigned and now looks like a work of modern architectural art. The cables are illuminated with colorful lights to create the free light shows displayed every Friday, Saturday, and Sunday.  

    Pavilion at Riverfront Park
    Looking at the Pavilion near the Howard Street Bridge.

    The Great Northern Clock Tower

    Make sure to visit Havermale Island and see the historic clock tower. Completed in 1902, the Clock Tower was a part of the Great Railroad Depot.   You can easily spot it as it towers above the park. This giant clock is still wound by hand every week. A person must climb five stories and then crank the clock 98 times to keep the giant clock operating. That’s a lot of work! 

    It’s strange as I didn’t even realize I was on an island when I crossed the bridge to admire the clock tower more closely. The clock tower is on Havermale Island. The island was a refuge to the people in Spokane while fleeing from the Great Fire of 1889.  Make sure to read the plaques scattered around Riverfront Park to learn more about its interesting history. 

    The Great Northern Clocktower

    The Childhood Express (also known as “the Big Red Wagon”)

    Kids and adults alike will enjoy this giant red wagon.  It’s not only fun to look at, but it’s also a slide that kids (and kids-at-heart) can enjoy climbing up and sliding down via the front handle. Underneath the wagon are monkey bars for swinging on as the kids make their way back to the ladder.  The Childhood Express, created by artist Ken Spiering, is 12 feet tall by 12 feet wide and 27 feet long.  I love its playful design.  

    The Big Red Wagon in Spokane's Riverfront Park

    Upper & Lower Falls

    Another area I enjoyed walking to was the Howard Street Bridge and trail to see the upper waterfalls.  Make sure to look for the mountain goat sculpture just below the bridge. You can cross the bridge to access Snxw Meneɂ Island (sin-HOO-men-huh), formerly known as Canada Island (the plaques in the park were not yet updated to reflect this).  

    Another option that I chose to do is to follow the trail that goes below the Howard Street Bridge to get more views of the lower falls. If you continue down the stairs and along the path, you’ll come to a pedestrian suspension bridge, which you can also cross to access Snxw Meneɂ Island (formerly Canada Island).

    Howard St Bridge and a mountain goat sculpture
    The Howard Street bridge, as seen from the stairs that lead to the path below it and the pedestrian suspension bridge.

    Central Promenade

    Stroll along the newly completed central promenade, which you can access from the Rotary Fountain. Watch the ducks swim by, bring a blanket or picnic fixings, and enjoy making memories in the park.  There is so much to see and do at Spokane’s Riverfront Park.  You can spend an hour or half a day here–it’s really up to you!

    Where to Park

    Riverfront Park is in the process of being renovated.  They are continually working to improve the park, and the newly completed central promenade is just one of these beautiful improvements.  Because of this, there are many areas closed due to construction, including many of the park’s parking lots.

    You can park in Parking Lot 7, located at 527N N Lincoln St, which is on the north side of the Spokane River close to the Post Street Bridge. You can also look for street parking in the areas surrounding Riverfront Park. Visit the city’s website to learn more about parking lot closures due to construction.  

    Another option, which I used, was to park in the River Park Square parking garage located at 777 W Spokane Falls Blvd.  It is across from the Numerica Skyride and main entrance to Riverfront Park.  It costs more than Parking Lot 7, but it felt a little safer to me, and I also liked the added convenience of being across from the main entrance as well as places to eat in the mall and surrounding area.

    Places to Eat Near Riverfront Park

    There are so many food choices located close to the main entrance of the park and around the River Park Square shopping center.  You will find food to curb any craving from sushi, ramen, Mexican, or burgers. There are options for everyone!  More restaurants are opening for dine-in service as we continue to progress in the state’s phased plan for the post-COVID response. 

    Cafes

    There are also some great cafes around the area of Riverfront Park across from the Skyride and main entrance.  I recommend you try Atticus Coffee and Gifts, named after the character in To Kill a Mockingbird.

    Atticus Coffee: 222 N Howard St.

    Another excellent cafe option around the corner from Atticus Coffee is Indaba Coffee. You will be welcomed into the cafe like an old friend to enjoy some delicious coffee and food too if you’d like.

    Indaba Coffee: 210 N Howard St.  

    Last but certainly not least, if you’ve never tried Dutch Bros. Coffee, then you should experience it at least once while you’re on the east side of the state. They are scattered all around the city, so Google one to see which is closest to you.

    Getting to Spokane’s Riverfront Park

    Riverfront Park: 507 N Howard St, Spokane, WA 99201

    From Seattle:

    If you’re coming from Seattle it takes about 4 hours to get to Spokane, you could do it as a day trip if you got up early, but it will be a more relaxing visit if you stay overnight.  The drive from Seattle is a straight shot on I-90 East.  Enjoy the varied terrain as you make the road trip there.  

    You’ll cross Snoqualmie Pass and see the beautiful mountains and lush green forests and not too long after that you’ll be in a desert area with volcanic rock-lined canyons on either side. Soon you’ll pass by farms with signs along the way telling you what crop is grown there.  Bring your tunes, bring a friend, and have fun!

    Final Thoughts

    Whether you’ve never visited Spokane’s Riverfront Park before or whether it’s been a long time, I recommend you take the time to explore all the unique features of this beautiful park.  I also recommend you ride the Numerica Skyride and take in the beauty of the Spokane River falls.  

    The setting of this urban park is an incredible one with the Spokane River, the falls, small islands, multiple bridges and trails, and all smack in the middle of the city! 

    As more local businesses open up, I encourage those who are healthy to get outside and start making memories!  We may not be able to travel far, but everyone can explore their hometowns and their local states.

    Here are some ideas for those of you who live in Washington state to get out and start exploring.


    Have Fun Making Memories!

  • Hiking the Whimsical Gnomes Trail

    **Update** The Gnomes Trail has relocated to 25719 Maple Valley Black Diamond Rd SE, Maple Valley, WA 98038. This is also the parking area for the Maple Valley Farmers Market. Read my updated post on the NEW Gnome Trail here.

    Facebook
    Pinterest
    Reddit
    Twitter
    Email

    If you’re looking for a fun, family-friendly hike, then look no further than the Gnomes Trail in Maple Valley, WA. 

    Explore this whimsical trail located within Henry’s Ridge Open Space. Henry’s Ridge Open Space is a network of trails that extend within the Maple Valley and Ravensdale areas.  

    The Gnomes Trail is an easy 2-mile roundtrip hike suitable for all ages. The trail is mostly flat and has a very mild elevation gain of only about 150 feet.  I saw people of all ages and fitness levels hiking this trail. So if you are new to hiking or have younger kids, the Gnomes Trail is a great place to start.

    Getting to the Gnomes Trail

    There are two starting points for the Gnomes Trail in Maple Valley. 

    • 279th Street Park: Maple Ridge Way SE, Maple Valley, WA 98038
    • Henry’s Ridge Open Space: 253rd PI SE, Maple Valley, WA 98038

    I chose to start my hike at the 279th Street Park.  However, you can also start the hike from the Henry’s Ridge Open Space trailhead off of SE 281st Way and 253rd Place SE. 

    Click on the map and see the two trailhead parking areas as well as the mapped trail routes.  I recommend downloading the Google Map for offline use before leaving for your hike.  

    Google Maps will give you walking directions from whichever parking area you choose to start the hike. Google Maps displays the trail and shows you which path to take. You can refer to the map all along the way to make sure you’re on the right track.

    Parking for the Gnomes Trail

    Whether you choose to start from the 279th Street Park or Henry’s Ridge Open Space, just know that there is only street parking at both trailheads.

    I found the 279th Street Park to have less traffic and more parking areas than at the trailhead for Henry’s Ridge Open Space. You can always go to one, and if you can’t find parking, then try the next trailhead.  Refer to the above map for directions.

    Sharing the Trail

    The Henry Ridge Open Space is a multi-use trail system. This means that you are sharing the trails within this natural space with bicyclists, horses, and other hikers.  So yield to horses and move over for the bicyclists.  I know the sign says bicyclists should yield to both hikers and horses, yet, I find as a hiker it is easiest for me to move out of the way.

    Hiking the Gnomes Trail in Maple Valley, WA

    I started my hike from the 279th Street Park, but if you choose to start from the Henry Ridge Open Space trailhead, the directions are the same once you reach the Once Upon a Time trail. 

    It’s important to note that not all of the trails are clearly labeled, so use this guide to help you navigate. Additionally, download an offline map from Google Maps for directions before leaving home.

    fork in the trail
    Route 66 and the Once Upon a Time trail (left). You make a left onto the OUAT trail if coming from Stinger or a sharp right if coming from the 279th Park.

    Starting from the Henry Ridge Open Space Trailhead

    You’ll access the trailhead next to the road and continue straight (pass the Old Mike trail) until you reach the Stinger trail where you’ll make a right. Follow Stinger until you reach a wide gravel trail, this is Route 66, turn right on to the path. In about 20 feet, you’ll cross the road and make a left onto the Once Upon a Time trail (OUAT).  From here the directions are the same as if you were starting from the 279th Street Park.

    Starting from the 279th Street Park

    Park alongside the 279th Street Park and then cross the road to the trailhead. This gravel path is called Route 66 on the map. 

    Follow Route 66 for less than a quarter-mile before making a sharp right onto the Once Upon a Time trail (OUAT).  You’ll spot your first gnome shortly after starting this trail. I think he’s there to let you know you’re heading the right way.

    first gnome you see on OUAT
    This is the first gnome to greet you on your hike.

    This portion of the hike is a dirt trail with rocks and roots here and there, but ample space to stop on the side to let people pass when needed.  Enjoy the forest with its moss-covered trees and stumps left from larger trees that once grew there.   

    a tree growing over a stump
    I liked this tree growing over the old stump.

    The Derailer Trail and Two Choices

    Eventually, you’ll come to a fork in the path, and if you look right, you’ll see a diamond-shaped sign and a sign above it that reads “Derailer.”  You can go right or left here.  

    • If you go right on the Derailer trail, you will follow the path as it loops around and links up with the Lorax trail. Make a right onto the Lorax trail.  (Skip to the asterisk (*) past the directions for making a left to continue.) (The instructions from that point on are the same whether you make a right or left at the Derailer fork.)
    • If you go left at the fork where you see the Derailer trail sign, you will continue a short way down the trail before reaching another fork in the path.  Make a right here to continue on the OUAT trail (Bad Wolf is to the left). In about 250 feet you’ll make another slight right onto the Lorax trail (I don’t recall seeing a sign).  You’ll continue down the Lorax trail and soon pass the fork for the Derailer loop, just stay to the left. 

    *Continue along the trail, and soon you reach a footbridge made out of a fallen tree.  There are two bridges, I stuck with the larger one on the left, but both link you back to the same trail.  

    Cross the bridge and follow the path as it curves left; shortly up ahead, you’ll see the welcome sign for the Gnomes trail.

    footbridge on gnomes trail

    The Gnomes Trail

    Take the Gnomes trail on the right and stay right to follow the trail’s loop.  The Gnomes trail loop is around 0.5 miles. 

    At the entrance to the Gnomes trail, you’ll find a welcome area and a trailhead sign.  Continue up the path enjoying the gnomes scattered everywhere.  Make sure to look up in the trees and under shrubs.  You could make it a game for the kids to see how many gnomes they can find.

    Speaking of games, there is also a geocache hidden not too far from the entrance to the Gnomes trail.  If you’ve never been geocaching, it is a lot of fun for kids and adults alike!  You can download the app and look up geocaches near you to find more.

    Click on the photos below to view a larger image.  These are some of the signs that greet you near the entrance of the trail.

    The Gnomes trail loop is a series of switchbacks curving right and left and then right and left again as it winds its way up, and then down, and then back up before looping you down and around to the main entrance of the Gnomes trail.

    You see a huge variety of gnomes in the first part of the trail, there are even a few fairies, dwarfs, and I also spotted a troll. The gnomes appear to enjoy many of the same activities we do, such as camping, sports, gardening, and so on.  You’ll have fun spotting all the unique gnomes along the way.

    Here are some of the ones I found during my hike.  Make sure to visit and discover your favorites too!

    After the first series of switchbacks, you find yourself back near the main entrance, however, the trail curves right here and begins climbing up again.  The gnomes will appear less and less as you continue along this portion of the trail. 

    You’ll pass another trail junction, make sure to stay left, and soon you’ll come to a “T” in the path where you’ll make a left onto what is called the Ogre trail.  Soon you’ll see a fork on the right for the Ogre trail but continue straight and don’t turn right where you see the sign that reads “Ogre.” 

    You’re looping back, so you’ll want to stay left, and soon you will be back at the main entrance to the Gnomes trail. From this point on, you backtrack the way you came to return to your parking spot.

    Useful Information to Know

    • There are no restrooms at either the parking areas/trailheads or anywhere along the trail. So make sure to take a pitstop before you come.
    • The hike is a little over 2 miles roundtrip, and it took me a little over an hour to hike it. If you have small kids or a large group, plan for it to take 1.5 to 2 hours for the roundtrip hike.
    • The Gnomes trail is an easy hike with minimal elevation gain, but it is narrow in spots with rocks and roots and overgrown bushes along the way. So wear the appropriate shoes, and if you have any mobility issues, you may want to bring a hiking stick.
    • The trail is too narrow in most spots to accommodate a stroller, so plan accordingly.
    • Dogs are allowed, but make sure to pack your poo out as there are no garbages along the trail. This goes for all trash.  This trail system is within a neighborhood, and we must be respectful of the community and the trails.
    • Bring bug spray!  The mosquitos were quite bad on the trails, and I sadly forgot to apply bug spray before leaving.
    • Download an offline map through Google maps of the area, and Google can give you walking directions for the trail.  You can also use any favorite maps apps you might have, such as AllTrails or BackCountry Navigator, if you want to track your hike.
    • The Henry’s Ridge Open Space trails are designed in loops. So don’t panic if you do take a wrong path as it will link up with another one.  There are multiple ways to get to the Gnomes Trail. I am only sharing a couple of options. 

    Recommendations for a Post Hike Treat

    If you’d like something refreshing after your hike, why not head to Dairy Queen for a delicious ice cream treat or perhaps go through Gravity Coffee’s drive-through for a little pick-me-up for the ride home. I’ve marked both of these on the map at the beginning of this post.  There are a ton of other options for food in the Maple Valley/Four Corners area if you want to grab a bite to eat.

    Dairy Queen
    23924 SE Kent Kangley Rd, Maple Valley, WA 98038

    Gravity Coffee
    23912 SE Kent Kangley Rd, Maple Valley, WA 98038

    I’d love to hear from you if you have hiked the Gnomes trail and what you thought about it. If you have any questions, please feel free to send me an email or post them in the comments section below.

  • A Beginner’s Guide to Photographing Waterfalls

    I love waterfalls! I’m not sure what it is about water cascading down rocks and over cliffs, but I can’t seem to get enough of it! Thankfully, here in the Pacific Northwest, we have no shortage of waterfalls.  Snoqualmie Falls and Franklin Falls are a couple of my favorites, just a short drive from Seattle.  

    I especially love hiking to see waterfalls. The waterfalls are my reward at the end of the trail.  You know, sort of like the pot of gold at the end of the rainbow, but without the actual gold.  And speaking of rainbows, waterfalls are great places to see those too!

    As a photographer, I enjoy capturing a waterfall’s beauty to share with others who might not get a chance to see it in person, or better yet, to inspire others to see it themselves! Waterfall photography is a skill I am still learning, but I wanted to pass along some tips I found especially useful when just beginning. Use the tips in this post as a foundation for developing your skills, and most of all, have fun!

    What Kind of Camera Do You Need

    You can use any camera to photograph waterfalls. However, if your camera doesn’t allow you to adjust your settings manually, you will be limited in the type of photograph you can get. 

    So in this post, I’m going to assume you have a DSLR camera, mirrorless camera, or some type of digital camera that allows you to manually change your ISO setting, aperture, and shutter speed.  

    I know some smartphones allow you to adjust some of these settings, so even if all you have is a smartphone or point-and-shoot camera, you can still apply many of these tips using the camera you currently own. I think getting out and using what you have now is better than not getting out at all.

    What Kind of Lens Should You Use

    I recommend you start with a wide-angle lens.  I like to use my 24mm to 70mm zoom lens as it allows me a little flexibility on zooming in and cropping areas of my scene to achieve a different look.  

    If you have fixed lenses, then bring a wide-angle lens and also a telephoto lens and use both to see what you can capture with each.  While it may seem like you should always try to photograph the entire waterfall, often you will find by zooming in or using a telephoto lens you can highlight one unique area of the waterfall that might be overlooked with a wide-angle shot.

    Remember, you should have fun when you’re out photographing the world. Develop your eye, learn new techniques, but always have fun while doing it.

    Additional Gear to Bring

    Other gear you might want to bring would be a backpack for your camera and additional lenses, plus any snacks or water you might want.  Another item that can be useful depending on the temperature you’re shooting in is a pair of gloves. Preferably ones that allow you to touch your smart phone or camera screen without removing them. I’ll also go over other gear you’ll want, such as filters, lens cloth, and waterproof clothing in the tips below.

    12 Tips for Photographing Waterfalls

    #1 Bring a Sturdy Tripod

    A good tripod is necessary for photographing waterfalls, especially if you want to try to blur the water’s movement, rather than stop it. When using a tripod, you can slow your shutter speed down and capture the silky motion of the cascading water.

    One other tip regarding the use of a tripod is to be mindful of where you place it.  If you put it in a stream or at the edge of the waterfall’s flow, the vibrations from the water flowing around your tripod’s legs can cause blurry images.  So keep that in mind when choosing where to set up your shot.

    #2 Wear Water-Resistant Clothing

    You will get wet while photographing waterfalls, so make sure to wear clothing that is water-resistant or waterproof. A good rain jacket and waterproof shoes will go along way in keeping you comfortable while photographing waterfalls.

    #3 Pack a Lens Cloth

    This one is also essential to remember to bring. Often, you will be close to the waterfalls you are photographing, and a lens cloth will be a lifesaver! Trust me, when your lens is covered in spray from the waterfall, it makes it hard to take that photo!

    You don’t want to scratch your lens either by using your shirt, so it’s nice to have a lens cloth tucked in your pocket so you can easily pull it out whenever you need to wipe your lens off.

    #4 Set Your ISO to the Lowest Setting

    To capture the flow of water and not have the highlights in the water completely blown out, you need to set your ISO at the lowest setting on your camera.  This will probably be around ISO 100, depending on your camera’s settings. You may even want to underdevelop your photos a little and then correct the exposure in post-processing to get the best results.

    Where you might want a higher ISO is if you’re working in low lighting conditions, and you’re trying to freeze the water’s motion.  Then you might want to use ISO 200 or ISO 400.

    #5 Set Your Aperture to Capture the Details

    In addition to setting your ISO to the lowest setting, you’ll also want a smaller aperture (also known as an f-stop). The aperture controls the amount of light reaching your camera’s sensor.  A small aperture allows less light in but will enable you to capture more of the detail of your waterfall and surrounding scenery.  Whereas, the opposite is true when using a wide aperture. A wide aperture allows more light in but has less of the scene in focus.

    The higher the f-stop number (f/22), the smaller the opening and the least amount of light reaching the sensor.  The lower the aperture or f-stop (f/2.8), the larger the opening and the more light entering your camera’s sensor.  I suggest playing around with f-stops starting at f/11 through f/22 (or up to the highest f-stop your camera allows). 

    Sometimes you may want to have a wider aperture like an f/5.6 depending on what part of the scene you want in focus(or out of focus) or if you need to allow more light in to freeze the water’s motion. Other times, to achieve a longer exposure time (slow shutter speed), you’ll need a smaller aperture to let in less light. The more you experiment with your camera’s settings, the more you’ll learn and improve your photography skills.

    #6 Setting Your Shutter Speed

    You can adjust the shutter speed to create different effects when photographing waterfalls. You can freeze the motion of the water with higher shutter speeds, or you can slow it down and create a blurred, silky movement with longer exposure times.  I recommend trying different shutter speeds to see which effect you prefer. There is no perfect shutter speed or aperture; it all depends on the look you want.

    Experiment with your settings to see which effect you like the best.  If, for example, you want to try freezing the motion of the water than start at a shutter speed of 1/200, this will partially freeze the movement, then try 1/500 to freeze the water’s action completely.  You may need to use a larger aperture and increase your ISO to achieve this depending on the light in which you’re shooting.

    #7 Bring the Right Filters

    Two types of filters are handy to have when photographing waterfalls, polarizing filters, and a neutral density (ND) filter. The polarizing filter is useful when you’ve got a pool of water below your waterfall, and you want to capture what’s beneath the surface.  The polarizing filter will reduce the glare and reflections on the water’s surface.

    ND filters reduce the amount of light coming into the camera’s sensor.  They make your camera think it’s darker than it is. You can purchase them in varying strengths depending on how much light you want to block. Although not a requirement for photographing waterfalls, they help you achieve the lower shutter speeds you need to capture the motion of the waterfall without blowing out the highlights. 

    If you think you’ll photograph waterfalls regularly, then consider purchasing one. All of the images I’ve shown in this article were shot without an ND filter.  However, I also shot early in the morning, in a wooded landscape shaded from the sun. This is a good set to get started with, however if you’re looking for something a little less expensive you can always buy one to start with and then add on from there.  Make sure you purchase the correct filter size to match your lens size.

    You would not be able to achieve the low shutter speeds and retain the details in the waterfall if this were a bright sunny scene.  The highlights will be completely blown out.  ND filters are necessary when shooting waterfalls on a bright sunny day if you wish to slow the water’s motion.

    #8 Get a Shutter Release Cord

    Another helpful tool is a remote shutter release cord. They are useful when working with very low shutter speeds, as any amount of movement can blur your image. So by using a shutter release cord, you reduce the risk of camera shake when pressing down the shutter release button.  This is the one I use with my Nikon and ask you can see they’re relatively inexpensive.

    All of the images in this post were taken without a shutter release cord. So, you can certainly photograph waterfalls without them, but they are convenient to have and not all that expensive either.  Plus, if you have any interest in astrophotography or night photography, you’ll definitely want one!

    #9 Try Different Angles & Viewpoints

    Play around with the various angles at which you can photograph your waterfall. All of the photographs in this article were taken at the same waterfall setting. At the beginning of the post, I included a photo of the overall scene I was working with. I did this so you could see examples of shooting a single scene from many different angles and viewpoints.

    Try shooting down low, or finding a higher vantage point.  Perhaps, swap out your wide-angle lens for a telephoto lens and try focusing on just one area rather than trying to capture the entire waterfall. No matter what you’re photographing, it is always good to try to see it from different angles and viewpoints. 

    Many times people will just walk up, center their subject, snap, walk away.  However, if they took the time to compose their photo, choosing to highlight unique features in their scene, they would most likely create a more visually appealing photograph. 

    Take time to get low to the ground, or to climb that small hill close by, and discover a new way of viewing your subject. If you have a zoom lens, make sure to move it in and out to see what look you prefer. You might be surprised at what a difference cropping the scene in can make.

    #10 Be Careful of the Slippery Conditions

    This one should go without saying, but be careful when walking around a waterfall.  Slippery when wet, is a condition that always applies to waterfalls. So while I recommend that you try to photograph all the available angles, only do so when it is safe. You don’t want to injure yourself or break your camera–now that would be bad!

    #11 Shoot in RAW Mode

    If possible, shoot in RAW mode as this enables you to capture the most detail in the highlights and shadows.  This is important for post-processing as you can bring out those details later when you begin to “develop” your photo and correct any low-lighting and underdevelopment.

    If your camera does not allow you to shoot in RAW, then just choose the highest JPEG setting it allows. Often cameras will have JPEG-Fine or JPEG-Normal, if that is the case with yours, choose JPEG-Fine or the highest quality available when RAW isn’t an option.

    #12 Experiment & Take Notes

    Use bracketing on your camera to take multiple photos at different exposures. Try different combinations of aperture and shutter speed to achieve the effect you desire. 

    Consider bringing a small pocket notebook with you and a pen to take notes about what settings you’re trying, what you’re learning, and maybe any ideas that come to you for future photoshoots. 

    Yes, modern cameras now record all your settings for you, but sometimes it’s nice to write it down for easy viewing in the field.

    Final Notes on Photographing Waterfalls

    Best Weather for Photographing Waterfalls

    Often when photographing outdoors, we prefer sunny conditions, but when it comes to waterfalls, a cloudy day can often be a bonus!  You see, if it is a little darker out, it helps achieve the lower lighting conditions needed to fully capture the details of the waterfall. 

    A calm day is also essential when photographing waterfalls. This helps keep your camera from shaking and limits the risk of blurred, out of focus images. If you have a long exposure and it’s windy, then the trees and shrubs and water in the scene will be blowing and end up blurred due to the slow shutter speeds.

    No Perfect Setting

    Remember, there’s no “right” shutter speed or aperture.  However, some settings you can start with to freeze the water are a shutter speed of 1/200 and higher and then a wider aperture to let in more light.  If you want to capture the silky motion of the waterfall, in addition to choosing the lowest ISO, try a smaller aperture, maybe f/16 and a 1-second shutter speed for a starting point.  Then play around with the settings from there until you get the look you want.

    Have Fun

    Enjoy developing your photography skills (yes, I meant that as a pun). It is so much fun to try new things. When you look at your photographs later, it’s exciting to see what you’ve captured and to come up with ideas to try next time. 

    Remember, all the gear in the world won’t replace a good eye and regular practice. So learn to use what you have, and most of all, have fun doing it!  

    Go Chase Some Waterfalls!

    Note: Travelffeine is reader-supported. This post contains affiliate links. When you make a purchase using one of these affiliate links, we get paid a small commission at no extra cost to you. And as always, all opinions are our own. Thank you!

  • Choosing a Travel Credit Card in 2020

    Perhaps you’re like me, and you’ve put off choosing a travel credit card.  Maybe you aren’t sure if they are worth the annual fees, or whether they give you any additional benefits over your current credit cards. 

    Well, I have been in the same boat as you.  I’ve received the offers in the mail, and I’ve heard friends talking about their travel credit cards, but I never made the leap to get one myself.  Now that I look back on all my travel, I realize I have missed out on a lot of miles and bonus travel rewards.  So, this year, I decided I would do some research and decide on a travel credit card.

    This article is the outcome of that research. I hope it helps you decide whether or not a travel credit card is right for you and helps you choose the best card based on your travel spending patterns.

    Are Travel Credit Cards Still Beneficial in 2020

    2020 is an entirely different year than any I have experienced, and I’m guessing you would probably say the same. You may have wondered whether or not it even makes sense to get a travel credit card this year.  I mean, we haven’t really been able to travel yet this year.  So what’s the use of a travel credit card if you can’t use it for travel?  

    Money.com answers this question and explains some of the travel benefits you can earn during this time when travel is limited.  In their article on the Best Travel Cards in 2020, they explain that credit card companies are adapting to the current COVID-19 restrictions. Some are extending the eligible purchases window to give you more time to earn your sign-on bonuses. Many of them currently allow you to accrue bonus points for non-travel purchases such as groceries and streaming services. 

    As you can see, there are a variety of benefits you can still receive as well as accrue points for future travel based on your current non-travel purchases.  Travel credit card companies are adapting to the present situation and providing incentives and options for future travel.  

    I’ve also listed some travel credit card options that allow you to accrue travel miles based on everyday purchases.  These are an excellent choice during times like this when you are unable to make travel-related purchases.

    Why You Might Want a Travel Credit Card

    In case you’re not sure why you would want a travel credit card, here is a quick summary of some of the benefits they provide.

    • Earn travel rewards for purchasing you’re already making. Choose a travel credit card that rewards your everyday purchases, and you’ll get points to use on future travel for things you were going to buy anyway!
    • Get a complimentary companion fare.  Some airline travel cards reward you with complimentary companion fares–all you do is pay the taxes and fees!
    • Ever wished you could use those nice airport lounges? Some travel cards give you access to over 1,000 airport lounges.  That means a quiet place to rest, plug in your laptop, get complimentary hot coffee and snacks, and relax before your flight.
    • Get free upgrades on hotel rooms and flights.  Travel cards allow you to get exclusive upgrades with partnered hotels, and some even allow you to receive complimentary upgrades on flights.
    • Most travel credit cards offer no foreign transaction fees, and let me tell you from experience–those really add up!  Early on in my travels, I learned this lesson the hard way.  I quickly switched to only using a card with no foreign transaction fees.
    • You get added protection when you travel.  Travel credit cards offer a wide range of trip insurance coverage, lost luggage reimbursement, and even reimbursements for flight delays.
    • The main reason you might want a credit card is to accrue mileage points to use toward future trips.  You’re already spending the money on travel and everyday expenses, why not be rewarded with even more while doing it!

    Researching the Best Travel Credit Cards

    Now that we’ve established why you might want one and that travel credit cards are beneficial even during this no-travel period, I want to quickly go over my research to find the best travel credit cards.  I read numerous articles on this subject, specifically searching for the most up-to-date information for 2020 card options. I also looked over the travel credit card offers I received in the mail for comparison.

    After reviewing all of the available options I narrowed them down based on the categories I thought would interest most people. 

    I’ve summarized my research into the following categories.  Feel free to jump ahead and see my top picks for each group.

    Best First-Time Travel Credit Cards

    These are my top two choices for someone looking to get their first travel credit card but aren’t ready to pay the high annual fees charged for the more luxury credit cards.  Perhaps you only travel a few times a year, and you’re not sure you could maximize all the benefits of the luxury cards. These travel cards are an excellent place to start. Both provide great travel benefits, even when compared with some of the “luxury” cards.

    Chase Sapphire Preferred

    Currently, Chase offers new cardmembers 60,000 bonus points when you make $4,000 on purchases in the first three months after opening an account.  Cardmembers also earn 2X points on travel and dining and 1 point per dollar spent on other purchases.

    You can redeem your points through the Chase Ultimate Rewards site to receive 25% more return on travel-related purchases. Rewards earned with the Chase Sapphire Preferred card also give you a 1 to 1 point transfer with a variety of frequent flyer programs such as Southwest Airlines Rapid Rewards, United MileagePlus, and many others.

    Other benefits include trip cancellation insurance, auto rental collision damage waiver, and trip reimbursement. They also offer exclusive bonuses for Door Dash and Lyft customers. Additionally, you can redeem reward points for other non-travel related purchases. 

    When used with Chase’s Ultimate Rewards program, you can get more bang for reward-buck with the Sapphire Preferred card than say the below Venture Rewards card.  However, it is not as straight forward as some might prefer. See the Chase Sapphire Preferred website for more information on benefits and restrictions.

    Quick Overview:
    • Low annual fee of $95
    • 60,000 bonus points after spending $4,000 during the three months after initial sign-up.
    • 2X points on travel and dining and 1X for all other purchases.
    • Extra redemption benefits through Chase Rewards as well as 1:1 point transfer with airline/travel partners.
    • No Foreign Transaction Fees
    • A variety of trip insurance and travel protection benefits
    • Primary car rental insurance.
    • Additional offers for cardmembers with DoorDash subscriptions or Lyft accounts. 

    Capital One Venture Rewards Card

    The Capital One Venture Rewards travel credit card offers an easy way to earn points. There aren’t separate categories for earning miles. Instead, you earn 2X miles rewards for every dollar you spend on all purchases. New cardmembers get 50,000 bonus miles after spending $3,000 on purchases within the first three months after initial sign-up. 

    There are no foreign transaction fees with the Capital One Venture Rewards card.  Cardmembers receive travel accident insurance, car rental coverage, and extended warranty protection on qualified purchases. Redeem reward points for flights, hotels, and even use them to pay for purchases on Amazon.com.  

    You can also transfer rewards points to a variety of travel partners such as EVA Air, Jet Blue, and Air France. Another benefit not offered by Chase Sapphire Preferred is the reimbursement of up to $100 for the Global Entry or TSA PreCheck application fee. 

    The Venture Rewards card is a good choice if you plan to use it for everyday spending vs. travel purchases. Its simple accrual and redemption of points will appeal to many who prefer to find their own travel deals rather than book through a specific travel site such as Chase Travel. Visit the Capital One Venture Rewards card website to learn more about additional benefits and restrictions.

    Quick Overview:
    • Earn 2X miles rewards on all purchases.
    • Earn 50,000 bonus miles after spending $3,000 during the three months after initial sign-up.
    • No foreign transaction fees.
    • Low annual fee of $95
    • A variety of trip insurance and travel protection benefits
    • Transfer miles to other travel partners, redeem points for travel-related purchases and even use for non-travel purchases on Amazon.com
    • Receive up to $100 reimbursement for Global Entry/TSA PreCheck application fees.

    Best Luxury Credit Cards

    This category is best suited for frequent travelers—those that travel for business or work, rather than the vacation traveler. Review your travel needs to determine whether the high annual fees are worth the travel benefits you receive and what you will use.

    Chase Sapphire Reserve Card

    The Chase Sapphire Reserve Card is similar in many ways to the Chase Sapphire Preferred Card.  I highlight the extra benefits the Sapphire Reserve offers and where it might make sense to choose it over the Sapphire Preferred. If you want to look at an in-depth comparison of the two cards, I recommend reading this comparison done by The Points Guy.

    The Chase Sapphire Reserve is a travel credit card designed with the frequent traveler in mind. As such, it has travel perks not seen on the lower-tier Sapphire Preferred card. Benefits such as complimentary access to over 1,000 airport lounges or complimentary room upgrades at luxury resorts worldwide.  

    Cardmembers also receive up to $100 every four years as reimbursement for the Global Entry or TSA PreCheck application fee. Additionally, Chase Sapphire Reserve cardmembers earn an annual $300 credit for travel purchases charged to your account each year. If you factor in the yearly $300 credit, then the $550 annual fee is only $250.  Cardmembers who use Lyft will also receive 10X the points on Lyft rides vs. 5X with Chase Sapphire Preferred.

    New cardmembers receive 50,000 in bonus points after spending $4,000 in purchases within the first three months of opening an account. Earn 3X points on travel and dining (2X on the Sapphire Preferred) and 1 point per dollar spent on other purchases. Redeem your points through the Chase Ultimate Rewards site to receive 50% more return on travel-related purchases (Sapphire Preferred was 25%). See the Chase Sapphire Reserve website for additional benefits and restrictions.

    Quick Overview:
    • Annual fee of $550. 
    • $300 annual travel credit.
    • Access to over 1,000 airport lounges worldwide.
    • Earn 50,000 bonus points after spending $4,000 during the three months after initial sign-up.
    • 3X points on travel and dining and 1X for all other purchases.
    • Extra 50% redemption value when redeeming points through Chase Rewards
    • No Foreign Transaction Fees
    • A variety of trip insurance and travel protection benefits
    • Receive up to $100 reimbursement for Global Entry/TSA PreCheck application fees.
    • Earn 10X points on Lyft rides as well as extra benefits for DoorDash subscribers.

    American Express Platinum Card

    If you travel mostly in the U.S., another luxury card option to consider is the Amex Platinum card. It has a lot of the same benefits as the Sapphire Reserve, with a few rewards options not offered with the Sapphire Reserve.  However, Amex cards are not as widely accepted internationally as Visa or Mastercard, so you may have to carry a second card with you as a backup.  

    Some of the benefits the Amex Platinum has over the Sapphire Reserve are an annual Uber credit up to $200, up to a $100 credit to Saks Fifth Avenue, gold status with Marriot Bonvoy and Hilton Honors, and a more extensive airport lounge network with access to over 1,200 airport lounges.

    Currently, Amex offers 75,000 bonus points (usually 60,000) when cardmembers make $5000 in purchases within the first three months after sign-up.  You’ll earn 5X points when booking flights and hotels directly through the Amex Travel site and 1X points for all other purchases. You’ll also receive an annual $200 airline fee credit to cover fees charged by participating airlines. See the American Express Platinum website for additional benefits and restrictions.

    Quick Overview:
    • Annual fee of $550. 
    • $200 annual airline fee credit to use towards baggage fees and in-flight beverage fees, etc.
    • $200 in annual Uber credits
    • $100 in Saks Fifth Avenue credits annually.
    • Access to over 1,200 airport lounges worldwide.
    • Earn 75,000 bonus points after spending $5,000 during the three months after initial sign-up.
    • 5X points on travel and hotels booked directly through Amex Travel and 1X for all other purchases.
    • No Foreign Transaction Fees
    • A variety of trip insurance and travel protection benefits
    • Receive up to $100 reimbursement for Global Entry/TSA PreCheck application fees.
    • Excellent travel customer service and personalized travel planning with Amex Platinum Travel Counselors

    Best Airline Credit Cards

    Choosing an airline credit card will be a very subjective choice.  It depends on which airline you tend to travel with the most.  I list two options I would consider for an airline credit card based on my travel preferences.  You will need to review both and see if either of these match up with your travel habits.

    Southwest Rapid Rewards Priority Card

    If you are a frequent flyer with Southwest Airlines, then consider getting the Southwest Rapid Rewards Priority card.  This travel credit card has an annual fee of $149, but if you frequently fly with Southwest, the cost quickly pays for itself. 

    New cardmembers will receive 40,000 bonus points when they spend $1,000 during the first three months after opening an account. Cardmembers also receive 7,500 bonus points annually on their cardmember anniversary.  Earn 2X points on all Southwest Airlines purchases and 1X points on all other purchases.  Cardmembers also receive a $75 annual credit from Southwest, four upgraded boardings per year, 20% back on in-flight beverages and WiFi, and no foreign transaction fees.

    Cardmembers can also earn up to 15,000 tier-qualifying points each year to use towards A-list status rewards like priority boarding and same-day standby flights. Another fantastic benefit of using a Southwest travel card is it allows you to earn points toward receiving your Southwest Airlines Companion Pass

    With a Companion Pass, you can bring a friend or family member for free (just pay taxes and fees) on any flight you take! That is an excellent benefit!  Did you know Southwest now flies to the Hawaiian islands?  Yup, you could become the most popular person at this year’s Christmas party. See the Southwest Rapid Rewards Priority card website for additional benefits and restrictions.

    Quick Overview:
    • Annual fee of $149.
    • Earn 40,000 bonus points for new members after spending $1,000 in the first three months after sign-up.
    • Receive 7500 bonus points annually.
    • Earn 2X points on all Southwest purchases and 1X points on all other purchases.
    • $75 annual Southwest travel credit
    • Four upgraded boardings per year, plus 20% back on in-flight beverage and WiFi purchases
    • Earn up to 15,000 tier-qualifying points to help you achieve A-list status rewards.
    • No foreign transaction fees.

    Alaska Airlines Visa Signature Card

    If you live on the West Coast and frequently fly with Alaska Airlines, then consider the Alaska Airlines Visa Signature card. Currently, new cardmembers receive 40,000 bonus miles and one companion fare after making $2,000 in purchases during the first 90 days of sign-up. The current offer also includes a $100 statement credit.

    Cardmembers also receive an annual companion fare every year on their account anniversary.  The Alaska Famous Companion Fare means you only pay around $121 for a second companion ticket valid on Alaska flights book on alaskaair.com. You’ll also receive free checked bags for you and up to 6 guests on the same flight. 

    Earn 3X miles for every $1 spent on Alaska Airlines purchases and 1X miles for all other purchases. Cardmembers also get 50% off day passes at Alaska airport lounges and 20% back on all in-flight purchases when you pay with your Alaska Airlines Visa Signature card. 

    Although Alaska Airlines is primarily a West Coast-based airline, you can redeem mileage points to over 800 destinations worldwide on Alaska Airlines flights as well as with their global airline partners such as British Airways, Korean Air, and many others.  Upgraded Points wrote a detailed article on the various ways you can redeem your Alaska miles. 

    See the Alaska Airlines Visa Signature card website for additional benefits and restrictions.

    Quick Overview:
    • Annual fee of $75.
    • Earn 40,000 bonus miles, an extra companion fare, and receive a $100 statement credit after making $2000 or more in purchases within the first 90 days of opening an account.
    • Earn 3X miles on all Alaska Airlines purchases and 1X miles on all other purchases.
    • Receive an annual companion fare on your cardmember anniversary each year.
    • Get 50% Alaska airport lounge day passes and 20% back on in-flight purchases.
    • No foreign transaction fees.

    Best No Annual Fee Travel Credit Cards

    I know for some people the biggest drawback to choosing a travel credit card has been the annual fees.  Before my research, I would think, “why would I pay a credit card company just to use their credit card?” After doing a little homework on the subject, I can see that with the right card, the fee is quickly paid for in rewards benefits.  

    That said, I realize you might not be ready to pay an annual fee.  So here are a couple of good choices for travel credit cards with no annual fee.

    CapitalOne VentureOne Rewards Card

    The VentureOne Rewards card is CapitalOne’s no annual fee counterpart to the CapitalOne Venture Rewards card I mentioned above. With the VentureOne Rewards card, you’ll earn 1.25X miles per dollar you spend on all purchases. New cardmembers will receive 20,000 bonus miles when they spend $1,000 during the first three months of opening an account.

    One thing that makes this no fee card unique is that in addition to redeeming miles for statement credits, you can also transfer the miles to any of CapitalOne’s travel loyalty partners.  This is typically only an option with travel credit cards charging annual fees.  It can be a little complicated to learn when to use the statement credit and when to transfer the miles to a travel partner, but here is an article that explains some of the miles transfer options.

    Cardmembers also receive rewards like travel accident insurance, extended warranty coverage, rental car coverage, and no foreign transaction fees. In addition to redeeming rewards for statement credits and transferring to travel partners, you can also use your rewards point on Amazon.com purchases. See the VentureOne Rewards website for more benefits and restrictions. 

    Quick Overview:
    • No Annual Fee
    • Earn 20,000 bonus miles after spending $1,000 on purchases within the first three months of opening an account.
    • Earn 1.25X miles on all purchases.
    • No foreign transaction fees.
    • Travel Accident Insurance
    •  Car Rental Coverage
    • Transfer miles to other travel partners, redeem points for travel-related purchases and even use for non-travel purchases on Amazon.com

    Discover it Miles Card

    The Discover it Miles credit card is another option to consider when looking for a travel credit card with no annual fee. It offers a unique bonus to new cardmembers that I haven’t seen from other credit card companies. Instead of giving you a fixed bonus after you spend “x” amount of dollars, Discover offers a one-year unlimited bonus.

    At the end of your first year, Discover matches all the miles you’ve earned for the entire year! So the more you spend, the more you get. The regular earnings rate is 1.5X miles for every dollar spent on all purchases and no foreign transaction fees. So this means in the first year you’ll effectively earn 3X miles for every dollar you spend.

    Cardmembers can redeem their miles as a statement credit or have them deposited as cash in their bank account (one mile equals one cent).  There are no blackout dates, no foreign transaction fees,  your miles never expire, and you won’t lose your miles even if you close your account.  

    However, similar to American Express cards, Discover is also not as widely accepted internationally as Visa or Mastercard.  Thus, you might need to bring a secondary credit card when traveling abroad. For more information on benefits and restrictions, visit the Discover it Miles card website.

    Quick Overview:
    • No Annual Fee
    • Earn an unlimited first-year bonus. Get an unlimited miles match at the end of the first year for all miles earned.
    • Earn 1.5X miles on all purchases.
    • No foreign transaction fees.
    • Travel Accident Insurance
    •  Car Rental Coverage
    • No minimum for redeeming miles.
    • Redeem for travel or cash.

    Deciding Which Card is Right for You

    Deciding which travel credit card is the right one for you is a personal choice.  Review the sign-up bonuses and the regular earning of miles/points.  For example, if you typically spend on everyday purchases (rather than travel) such as groceries, bills, and online shopping, then you might consider the CapitalOne Venture card over the Chase Sapphire Preferred.  

    If you’re a frequent flyer with Southwest, then considering that card is a no brainer. Perhaps you aren’t ready for an annual fee, then either the Discover it card or VentureOne Rewards card make great choices. You must analyze your spending and traveling habits to determine which travel card is best for you. 

    Some argue that to truly maximize all the available travel benefits, more than one travel credit card is needed.  Many people have an “everyday” credit card that gives them the best rewards for everyday spending and then one that rewards them for travel purchases. Using two cards allows them to maximize rewards for both categories and provides even more significant travel benefits each year.

    Credit Score & APR

    Another important thing to consider is your credit score.  The cards on this list require average to excellent credit scores to qualify. You might try an airline card or a cash rewards card for starters as you build up your credit score.  Most of the travel credit cards will want a credit score of 650 or higher.  

    And one final point I want to make, these cards are not low APR credit cards.  So if you aren’t prepared to pay off the balance each month I suggest you wait and consider getting a low interest rate card instead.

    There are a variety of things to consider when getting a travel credit card. I hope this article narrows down which options to research when determining the one that is right for you. Whenever there is an opportunity to get free travel benefits, I think it’s worth looking into.  I can’t believe it’s taken me so long to do it! Please let me know if you have any questions, and I will do my best to help!  

    Happy Travels!

  • A Diary of My Visit to Auschwitz-Birkenau

    I tried to think of what I would write regarding my visit to Auschwitz.  I have so many thoughts regarding WWII and on the subject of The Holocaust.  There are so many studies on The Holocaust and so much history to cover that I knew I could not discuss it all or better express the facts already documented. 

    Before my trip to Europe, I listened to the full version of The Diary of Anne Frank. I also spent a few days in Amsterdam, where I visited the secret annex where Anne and her family and the others hid from the Nazis. It was very moving to read her diary and then to visit the place where she penned it. 

    After the Nazis discovered them, Anne and the other seven people in hiding were all sent to Auschwitz. Some transferred to other camps, and only Otto, Anne’s father, survived. So as I contemplated how to write about my visit to Auschwitz, it seemed fitting to write a diary of my day and the thoughts I had along the way.  

    I will also provide information on how to visit Auschwitz-Birkenau at the bottom of the page.  I recommend if you get a chance to visit here, that you’ll take it. It is a place that will leave an imprint on your heart. A place all of us should remember and never forget.

    Tuesday, September 18th, 2018

    My day begins far too early for my liking. However, I get up when my alarm goes off at 4:45 a.m.  I have somewhere to be. Today is the day I will check off another bucket list destination.  I know some may consider it a strange one, but it is a place I’ve read about since I was a child. A place that seems too awful to be true.  Today I will visit Auschwitz-Birkenau. 

    My friend Angela and I finish getting ready. We leave our Airbnb apartment in Krakow around 5:25 a.m. to meet our Uber driver. His name is Dmytro. He is nice, but nervous and keeps apologizing for every bump in the road. I assure him that we have rough roads where we come from too.

    We arrive ahead of schedule, so we wait for the bus. Angela told me earlier she’s a little apprehensive about today as she thinks it will be horrible.

    Which of course, what happened was horrible.  It was something so awful that people need to remember it happened. The horrors of Auschwitz and The Holocaust showed us the evil side of human nature. 

    Yet, it also demonstrated the resilience of the human spirit. The hope and faith that is still here. And the willingness of humans to not only sacrifice their earthly possessions to help others but to also lay down their very lives for the cause of freedom.

    Bus Ride to Auschwitz-Birkenau

    As I ride the bus to Auschwitz, sitting in my padded blue seat, I think what the journey must have been like for the victims transported there. I watch the landscape as we zip past the fields, the small towns, and forests along the way.  What was the scenery like almost 80 years ago when they brought the first prisoners to Auschwitz?  

    Later, I would see the train cars that brought the captives packed so tight they could hardly breathe. They didn’t have the luxury of a padded seat or windows to view the scenery.  They were transported like cattle, worse than cattle. The Nazis packed 80-100 people to a train car with no windows, little to no food or water, and only a bucket to use as a toilet; many died during the journey. I cannot imagine it is too awful to consider.

    Eating Breakfast in Auschwitz

    The bus drops us off just outside the museum complex.  We cross the parking lot, and I think about how I haven’t had breakfast and should eat as it will be a long day. I feel almost guilty about this. Even though most would consider my breakfast here mediocre at best, it would have been a royal feast for the prisoners at Auschwitz. I try not to think about this and instead eat my egg with toast and drink a cup of coffee.

    I later learned that the prisoners at Auschwitz would work 11 hours of hard labor and receive around 1150-1400 calories per day.  The food was so awful that in the beginning, it was hard for them to eat it, and later due to their starvation, they would eat food out of the garbage.  I saw photographs of people who had lost over 50% of their body weight.  They were living skeletons.  

    Waiting for Our Museum Tour

    After eating breakfast, we walk through a security checkpoint on our way to a waiting area for our 9:00 a.m. tour group.

    I find a seat by a window where I look out over the courtyard. It is a bright sunny day, hardly a cloud in the sky.  It doesn’t feel dark and scary. There are hundreds of people milling around in tour groups, walking to and from the various barracks and buildings. 

    I look out over the grassy lawn to see the iconic gates that read “Arbeit Macht Frei” (“work sets you free”), and  I think about the prisoners’ first glimpse of these gates and what they must have felt. 

    I try to imagine what it must have been like to arrive here on one of those trains. Indeed, I cannot grasp the agonizing journey that would have brought them here nor the atrocity of their fate.

    Why It’s Important to Remember

    No, try as I might, sitting there, looking out the window, as I wait safely for my tour, I could not grasp the horrors they went through.  

    However, I felt it was important to try.  It is important to remember and never to forget.  To accept what happened.  Denying it does no one any good.  It does not preserve the memory of those murdered, and it does nothing to respect the memory of those who gave their lives to stop these horrible crimes. We must remember and work to see that it is never again repeated.  

    And so I begin my tour, knowing I will hear the stories of things that are too terrible to imagine, but this isn’t fiction, this is the raw, unedited history of human depravity–and also the courage of the human spirit.

    “Remember only that I was innocent and, just like you, mortal on that day, I, too, had had a face marked by rage, by pity and joy, quite simply, a human face!”

    ~Benjamin Fondane, murdered at Auschwtiz-Birkenau, 1944

    Heroes of The Holocaust

    It was these stories of courage that our guide tells us about during our tour at Auschwitz.  She told us about Helena Plotnicka. A wife and mother of six kids.  Helena sacrificed what little food her family had to leave food in the fields where she knew Jewish prisoners worked. She left it there for them to find.  

    Helena also worked to acquire medicines for the prisoners and would also leave these in the fields. Additionally, the prisoners would give her letters and correspondence explaining the conditions in the camp so she could help spread the word. Helena was later arrested and died in Auschwitz in 1944. She was one of many heroes that tried to fight the tide of evil. 

    Other heroes like Miep Gies, Victor Kugler, Bep Voskuijl & Johannes Kleiman from the Diary of Anne Frank. Corrie Ten Boom and her family, Oskar Schindler, and countless others, including the millions who sacrificed their lives during World War II to give hope and freedom to the victims of the Holocaust and the cause of freedom for all humanity. We must remember their sacrifice.

    The Lies of the Nazis

    Our guide explains that survivors would later recount the relief they felt upon arriving at Auschwitz. They came to Auschwitz believing if they worked hard, they would continue to live. The Nazis were fine with people knowing that they had work camps, but they hid the true identity of Auschwitz-Birkenau. They hid the fact of what it really was—a death sentence.   

    So they lied. Guards forced other prisoners to write postcards from Auschwitz telling their family that the conditions were better there and that they didn’t have to work as hard.  Then these prisoners were murdered.  Later the Nazis tried to destroy the evidence of the crematoriums and other documents that would connect them with their crimes.

    We saw piles of canisters once filled with Zyklon B. This gas, a type of cyanide, was used by the Nazis to exterminate millions in the gas chambers. Later our tour group walked inside one of these gas chambers.  Fake showerheads placed on the ceiling perpetuated the lie that those entering were only taking a shower before moving to the barracks. Instead, they were sent to their deaths.

    The Death Wall

    Just before our break, we stop at the death wall. It’s an area where prisoners went through a series of steps that required them to undress and then walk naked to a wall where they were shot.  Later the Nazis decided this was too slow of a process and thus came up with the idea of using gas chambers and crematoriums.  They could only kill as many as they could burn; this turned out to be around 5,000 per day.  

    I saw the rooms with over two tons of human hair, the thousands of shoes, combs, pots, pans, and personal possessions left behind from the millions murdered. The Jews and other prisoners brought here thought they would leave someday, so they packed as many belongings as they could for the trip.  

    Upon arrival, they were told to leave their belongings in a pile and to remember where they left them as they would return to that spot.  This was another lie.  Instead, they went straight to a gas chamber, never to return.

    Our Lunch Break

    After almost 3 hours of touring Auschwitz, our guide announces that we’ll take a 40-minute break before continuing to Birkenau.  40 minutes.  Just enough time to quickly eat the pb&j sandwiches we packed.  We look for a place to sit in the shade to stay out of the burning sun.  

    It all seems surreal. One thing is for sure, I certainly won’t complain about the sun burning down on me, or how my back and feet are tired from so much standing and walking on the hard ground.  These inconveniences are so inconsequential in the grand scheme of what occurred here.  If complaining is wrong in normal circumstances, it seems almost sacrilegious now. Disrespectful, perhaps, is the sentiment I feel.

    I look around at the other visitors lounging on benches and the grassy lawn outside the museum complex.  Forty minutes doesn’t seem like a lot of time to digest what I’ve just seen and heard.  Is there any amount of time that will make processing these horrors any easier?

    Time is up, we board another bus and leave for Birkenau.

    Auschwitz II-Birkenau

    Birkenau, or Auschwitz II-Birkenau as it is also known, is a little over two miles from Auschwitz I and is shockingly massive.  It is twenty times larger than Auschwitz I and designed for one purpose.  Death.  It was the largest of the death camps.  They executed men, women, and children without regard for life.

    I cannot stop looking around in shock at how big this concentration camp is.  We ascend to the top of the central guard tower or “death gate” at the entrance to the Auschwitz II-Birkenau concentration camp.  We have an aerial view of Birkenau from here.  It stretches out further than I can see.  

    On the left, I see barracks made of brick.  I learn that the prisoners had to tear down homes and buildings in the nearby towns and then use them to build these brick barracks. They ran out of bricks, and so to the right, I see row after row of barracks made of wood.  

    There were over 300 buildings here during WWII.  The barracks used to house prisoners had been designed as horse stables.  They were not insulated and would have been awful both in the hot summer and in the freezing winters.  Prisoners often had to sleep five or more to a bed.  You can imagine the smells, the dirt and filth, and the hopelessness of the place. 

    electric barbed wire fences
    Electric barbed wire fences surrounding Auschwitz-Birkenau.

    The Family Camp

    We walked to a “family camp” where a select number of children were allowed to live.  We see drawings from these children that show their perspective.  The few that were allowed to stay in this camp were there for propaganda purposes to send out letters and postcards before meeting their fate.  

    The Gas Chambers

    Our guide takes us down the long stretch of train track that leads from the death gate to the unloading ramp where they forced prisoners into groups: women and children in one and men in another.  They immediately killed some while others walked the long way to the gas chambers.  

    There were four massive gas chambers at Birkenau, and they crammed over 2,000 people into these at a time.  Toward the end of the war, the Nazis expedited their killing and murdered anywhere from 5,000 to 6,000 people per day.

    Dr. Mengele, also known as the “angel of death,” selected some of the prisoners for his twisted human experiments. He performed medical experiments on them without anesthesia.  Twins and people with physical anomalies such as two different colored eyes were of particular interest to him.  

    We view the remains of two of the gas chambers and crematoriums.  The Nazis tried to destroy these at the end of the war to hide the evidence of their crimes. It is hard to imagine, even as I stare out over the demolished gas chamber and crematorium, that such evil exists.  

    The horrors of The Holocaust and the actions of the Nazis are so unfathomable to me.  This is not ancient history. This happened in the last 100 years.  I know, too, that holocausts have occurred in other parts of the world. It is heartbreaking to consider. 

    Individuals Not Just a Number

    Over 1 million people died at Auschwitz-Birkenau. Most of these were Jews, but there were also other prisoners of war murdered here. The death toll for Polish Jews was particularly high. Around 3 million Polish Jews were killed, that’s half of all Jews killed during The Holocaust. Only about 10 percent of Poland’s Jewish population survived.

    Our group walks to a building on the far side of the Birkenau concentration camp that has an important story to tell.  The story of the victims before they came to the concentration camps before they were hunted down, back when their lives were healthy and happy.

    In one area of the exhibit, there are enormous books on display that visitors can flip through and read name after name of those murdered during The Holocaust.  There are over 4 million Holocaust victims listed with blank pages at the end for the names not yet recorded. These books are a tribute to those murdered. They have no graves and no tombstones. However, every life mattered, and everyone one of them was an individual with a name.

    The Holocaust Book of Names

    Photographs, Memories & Moments in Time

    In another room, I see photos of some of these individuals. There are photographs with them at the beach, at the park, and hanging out with friends at dinner parties. They are photographs of kids at school, family portraits, young couples in love–people enjoying their lives.  People like you and me. 

    In another room, home movies discovered after the war play on every wall of the room.  I stood there watching people at concerts, on sailboats, with friends and family smiling and laughing.  It was as if I had a time machine to go back and see them alive again. These movies brought their memories to life, and I saw my humanity reflected in their faces.  

    I, too have home movies and photographs, I also have people I love and a life I love. However, their lives were taken from them, and I still have mine. Children never to become adults, parents never to know parenthood, and grandparents robbed of the joys of grandchildren. This exhibit had the most significant impact on me.

    wall of photographs from those murdered at Auschwitz
    A wall displaying photographs recovered from suitcases found after the war.

    It is easy, due to the mass total of victims murdered, to view them as a number.  However, it is essential to see them as individuals who loved and laughed–people like you and me. 

    As a teenager, I read the personal stories of the survivors and those that died.  Knowing these people as individuals makes it easier to empathize, to relate.  No, I can’t comprehend the horror they endured at the hands of the Nazis and others, but I know what it is to love, to laugh, to be scared, and to have dreams.  Their stores teach me about courage, about love, and to never take life for granted.

    Here is a short clip from the room displaying the home movies.

    Life and Freedom are Gifts

    That is the theme by which I try to live my life.  To live life to the fullest and be grateful for everything.  I am so blessed. I’m rich with love and family, friendship, opportunities to travel, and the ability to see the beauty in the simple.  I am thankful that I still get excited over a beautiful flower, a fall leaf, and a snowflake.

    We are not all survivors of a horrible event such as The Holocaust, but we all deal with hurt, the pain of loss, and death.  I suppose it is this terrible and painful side of humanity that can also enhance the joy we can find in life.  I think it should cause us to be more thankful for life and to embrace the joy amidst the pain.  

    Don’t stop living while you’re still alive.  There are so many others whose lives ended too soon, those that never got to graduate high school, those that never learned to ride a bike, those that never got to marry, to have kids, or to wake up to another beautiful morning.

    So be kind. Be humble. Help others and reach out to those that are hurting. Encourage. Share hope. Enjoy the simple things of life.  Be grateful. Never, ever forget that all human life is precious!

    And maybe, just maybe, in the tiniest way, by living our lives, we remember those who no longer are able to live theirs.

    Visiting Auschwitz

    Tour Options:

    You have several options when planning a visit to Auschwitz. You can go with a tour group, or you can take a self-guided tour through the concentration camps. 

    The 6-hour study tour is what I took, and I highly recommend it.  It allows for a slower pace to see both camps and provides more time for reflection.  There are tours from 2.5 hours to 6 hours in length. If you choose to go with the self-guided option, just know that you can only enter at certain hours, usually early morning or late afternoon.  You still need to reserve a self-guided tour, just as you would a guided tour. 

    The guided tours offer insightful commentary and information I feel one might miss by going on their own, but each person will have their reasons for choosing which type of tour they take.

    Booking Online: 

    Make sure to book your tour in advance of your trip to Auschwitz as the tours do book up. Learn more about the different tours offered, book your tour, and get useful information regarding your visit on the museum’s website

    Food: 

    They have a cafeteria at Auschwitz I and a hotel across the street that also has a restaurant.

    Getting There:

    I booked a shuttle through Discover Cracow from Krakow to Auschwitz.  If you are staying in Krakow, I highly recommend you consider using their service.  It is incredibly affordable and easy to book.

    The journey takes 1-1.5 hours—plan for your visit to the camps to take an entire day. Depending on which tour option you choose, it may take more or less time, however, given the solemnity of these memorial sites, it is good to give yourself time for some restful reflections rather than pack a bunch of sightseeing in afterward. 

    Additional articles for your visit to Krakow, Poland:

     
    Always remember life is a gift!