author.travelffeine.com

Blog

  • Sunrise at Haleakala National Park: Don’t Miss It!

    There is nothing quite like watching the sunrise at Haleakala National Park.  Sitting in the dark with others, waiting expectantly for nature’s light show.  The sun creeps over the horizon, bathing a sea of clouds in light. You soon forget how cold you are and stare in awe at the beautiful display before you. It is something I feel should not be missed on your visit to Maui.

    First Steps To Watching a Sunrise at Haleakala National Park

    Book your reservation!  Due to a large number of visitors to Haleakala to watch the sunrise each morning, the National Park has created an online reservation system to limit the number of visitors between the hours of 3 a.m. and 7 a.m. It costs $1.00, and you can reserve two months in advance which I highly recommend you do!

    If you are unable to get a reservation prior to your trip to Maui, they do offer a small number of last-minute tickets 48 hours before the desired sunrise date. Visit Haleakala Sunrise Reservations for more information on reserving online as well as steps to get a last-minute ticket.

    What to do if you can’t get a reservation?

    If you are unable to get a sunrise reservation for your vacation to Maui, here is the next best option.  See a sunset at Haleakala National Park instead! Sunsets here are beautiful as well, and there are some advantages to coming here for sunset.

    First, you don’t have to get up in the wee hours of the morning!  Second, you don’t need a reservation.  Third, you can plan your day around exploring Maui’s Upcountry, then do some day hikes from the Haleakala National Park before watching a fantastic sunset.  And finally, after your sunset, you can enjoy stargazing at 10,000 feet!  You will be up above the air pollution, away from the city lights where you can enjoy the millions of stars twinkling above.

    Entrance Fee to Haleakala National Park

    You must also pay an entrance fee to visit Haleakala National Park.  The sunrise reservation fee is only to reserve your spot to see the sunrise on the specific day you have reserved.  It does not include the Haleakala National Park entrance fee.

    You do not need to pay the entrance fee if:

    • If you have already visited the Kīpahulu District (perhaps on a visit to Hana) to see the Pools of Ohe’o (Seven Sacred Pools) and you still have a valid 3-day pass from that, you do not need to pay an additional entrance fee.
    • You have a US National Parks annual pass.

    Person wrapped in a blanket watching sunrise at Haleakala

    What to Pack & What to Wear

    Before your flight to Maui, if you intend on viewing the sunrise at Haleakala National Park (or even sunset) make sure to plan ahead and pack warm clothes.  I know when you think of packing for Maui, you are thinking swimsuits and flip-flops, and you definitely need those, but you’d be surprised how cold it can get at Haleakala.  Freezing temperatures.  No joke.

    When I made my first visit to see the sunrise at Haleakala National Park, I read other traveler’s telling me to pack warm, and thank goodness I listened! I packed my ski base layers, thin, moisture-wicking layers I wear when I go skiing.  Then I wore hiking pants on top of these as well as a t-shirt and sweatshirt on top. I also wore my ski hat.  Additionally, we borrowed the blankets from our condo.  And yes, I still got cold!

    Also, it’s important to note that there are no concessions in the park.  So you will want to pack extra water, snacks, and even a picnic lunch for later, especially if you plan to go hiking afterward.

    Recommended Items:

    Base Layers: Tights, moisture-wicking undershirt and/or pants
    Pants (hiking pants or something you can pull on over a pair of tights or base layer)
    Sweatshirt
    Scarf
    Jacket
    Hat
    Thick socks
    Tennis Shoes/Hiking Shoes
    Blanket from condo/hotel
    Snacks & Drinks (picnic lunch for later or bananas and a muffin for breakfast, plus water and something hot to drink)
    Sunglasses (it’s going to get bright!)

    Things to Do After the Sunrise at Haleakala

    After you enjoy the brilliant colors of the sunrise, drive over to the Haleakala Visitor’s Center. There are some great hikes you can do from the visitor’s center, ask a friendly park ranger, and they will be glad to offer you some suggestions. The hikes range from short paved trails to hiking for miles down the sandy trail into the crater of Haleakala. It is truly a breathtaking place, unlike any I had visited before.  Here in Washington state, we have composite cone volcanoes and I’ve never been able to walk inside one of them! It was both a fun and educational experience to learn more about shield volcanoes like Haleakala.

    It is important to remember that you might experience mild altitude sickness at this elevation, so don’t overdo it!  If you are feeling dizzy or lightheaded rest and hydrate. Talk to a park ranger if you need assistance.

    Take time to enjoy Maui’s Upcountry before heading back to your resort or condo. I have marked a few places you might want to stop on the map. Hali’imaile General Store, Maui Pineapple Tours, Piiholo Ranch Zipline, and Ali’i Kula Lavender Farm are just a few of the possibilities. Upcountry Maui is full of wonderful options and is worth staying a night or two if your visit to Maui allows it.  You might even consider spending the night in Maui’s Upcountry the night before your scheduled sunrise visit and save yourself a little driving time that morning.

    Tip: Hang on to your entrance receipt to Haleakala National Park. You can use this to gain entry to the Kipahulu District and the Pools of Ohe’o. (must be within the 3-day validation period)

    Sandy crater trail of Haleakala

    Getting to Haleakala National Park

    The best spot to watch the sunrise at Haleakala National Park is at the summit.  There is a summit house you can stand inside to get warm if needed and it is the highest point you can drive to for viewing the sunrise.  The Haleakala Visitor Center is also a great choice if the summit parking lot is full.

    If you are coming from West Maui the drive will take you around 3 hours, so make sure to get up early enough to arrive at least 30 minutes before sunrise. For example, if sunrise at Haleakala National Park is at 5:30 a.m., then you will want to leave around 1:30 a.m. to 2:00 a.m.  It’s early I know! It’s also totally worth it and makes for unforgettable memories!

    The road up to the summit is full of switchbacks and steep drop-offs, so take your time as you drive up in the dark.  Also later in the day, there are often hikers and bicyclists on the road, so always be on the lookout and drive slowly and carefully.

    How to use this map: Click on the star to the right of “Haleakala N.P./Upcountry Maui” and you can add this to your own Google maps, you can also click on the icon to the left of this and use the drop-down menu to see the list of sites. Tap on the icons directly on the map to pull up options for driving directions.

    Final Thoughts on the Sunrise at Haleakala National Park

    “Haleakalā has a message of beauty and wonder for the soul that cannot be delivered by proxy.” ~ Jack London

    I think Jack London is absolutely right. You really must see Haleakalā for yourself.  I can describe the beauty of the red colored sand cascading down into the crater or the surprising beauty of the desert you find on this tropical island.  I can do my best to paint a picture of watching the blackness of the night turn into a brilliant, blinding array of morning colors, but I really can’t do it justice.  You must discover for yourself why the Hawaiians called Haleakala “house of the sun.” So what are you waiting for?

    If you need further help planning your trip, ask in the comments below and make sure to read The Ultimate Maui Itinerary for First Time Visitors and 7 Fun Things to Do in Kahului and our Road to Hana guide.

  • 7 Fun Things to Do in Kahului Before Your Flight

    The day has arrived, you must leave the tropical paradise that is Maui.  Chances are after checking out of your condo or resort you may have some downtime before your flight leaves from Kahului airport. I created this list of things to do in Kahului before your flight to help you make the most of your final hours in Maui.

    How to use this map: Click on the tiny star next to “Things to Do in Kahului” to add this to your own Google maps. You can also click on the little icon to the left of “Things to Do in Kahului,” and you’ll see a drop-down list of each location in this post. You can click on the icons to pull up more information and to get driving directions.

    7 Fun Things to Do near Kahului Airport


    1) Iao Valley State Monument

    This first one is technically not in Kahului, but it’s so close I had to include it. The paved loop trail to the Iao Needle Monument is only a little over a 1/2 mile in length. This makes it an easy hike to do before you need to catch your flight.  The paved trail has interpretive signs along the path describing the history of the Hawaiians who settled in the Iao Valley. You will walk thru lush vegetation as you make your way to a scenic viewpoint of the Iao Needle.  It’s a great way to see another side of what the unique island of Maui has to offer. There is a $5 parking fee that you will need to pay with a credit or debit card. I’d plan to spend about an hour here.

    2) Golf at Waiehu Public Golf Course

    The Waiehu golf course, in Wailuku, is about 20 minutes from Kahului Airport. It has incredible views, and the employees have always been so helpful and friendly! I’ll tell you something; I don’t typically golf when I’m at home. Occasionally I’ll go to a 3 par course with friends for fun, but if my feet touch the green more than once a year that’s a hot streak for me!  However, I have gone to this golf course on my last two visits to Maui.  We rent a golf cart, and that is just a ton of fun, plus it cools you off as you drive from hole to hole.

    The real treat though is the beautiful views over the ocean and the gorgeous tree-lined fairway. Plus, my friends and I don’t get too serious about golf, it’s more about having fun together. This course is pretty laid back, and we’ve never had problems with anyone being rude or impatient with us.  Although it’s never been too busy when I’ve been there, it is always a good idea to call ahead and reserve a tee time in advance.

    3) Grab Something to Eat

    So by now perhaps you’ve worked up an appetite for golfing or hiking. Why not grab some lunch or dinner and enjoy having someone else cook for you one last time before you return home to the “real world.” Da Kitchen is a great place to eat some Hawaiian cuisine.  It can be busy, so come prepared to wait.  Or if you prefer a little more variety, check out the food trucks by Costco.  There is a big gravel parking lot, and they have picnic tables set up in the shade for seating.  And in case you have already spent all your money, never fear, grab a foot-long hotdog with soda for only $1.50 at Costco.

    Kahului public golf course4) Ululani’s Hawaiian Shave Ice

    You’ve eaten your lunch, why not treat yourself to dessert!  Ululani’s Hawaiian Shave Ice on Dairy Road is one of the best spots in Kahului for Hawaiian shave ice. It’s a favorite thing of mine to do in Kahului before heading to the airport. There are only a couple of picnic tables outside the shave ice “hut” so you might need to stand around in the shade or eat these in the car.  However, after the first bite, you’ll tell yourself it is worth it.

    5) Souvenir Shopping

    In case you didn’t make time for souvenir shopping, these are some great options for buying souvenirs to take back home.  I would recommend you save most of your souvenir shopping for Kahului as it has some fantastic choices.  If you happen to be here on a Saturday, make sure to check out the Maui Exposition & Swap Meet.  It meets every Saturday from 7:00 am. to 1:00 p.m. There is an entry fee of $0.50.

    Another great option is Costco. If you have a Costco membership, this is a great place to stock up on boxes of chocolate-covered macadamia nuts, assorted seasoned macadamia nuts, Hawaiian coffee, Hawaiian shirts, Maui Gold pineapples, and more. You can also stock up with a variety of souvenirs from the local Target or Wal-Mart.

    6) Beach Time

    Squeeze in a little more beach time and hang out at Kanaha Beach Park. It is less than 10 minutes from Kahului airport. You can watch airplanes coming and going as well as the kite surfers enjoying the waves.  It is a great spot to hang out before catching your flight back home.

    Golfing in Kahului Maui

    7) Escape the Heat

    Perhaps you have had enough sun for the day, or you have a much later flight and more hours than you know what to do with.  Why not watch one of the latest movies released at the Regal Cinemas. Regal Cinemas Maui Mall Megaplex 12 (yeah that’s a mouthful) is just a 10-minute drive from Kahului Airport. And it is conveniently located in the Maui Mall so that you can do some last-minute shopping too.

    Plus, you can try the cold treat of guri guri. The Tasaka Guri Guri Shop is the only place I know that makes it. It is also located in the Maui Mall.  Guri guri is a mix between sherbert and ice cream, well sort of, you need to try it for yourself to see. I know, perhaps you’ve already had some Hawaiian shave ice earlier in the day, hey, you’re still on vacation, and you can’t get this anywhere else, so give it a try!

    Final Thoughts on Things to do in Kahului:

    As you can see, there are a lot of great options for things to do near Kahului airport before your flight.  So don’t worry if you have extra time to spare.  Make the most of your vacation to Maui by creating some final memories before going home.  And if you’re still at home planning your trip to Maui, why not check out the Ultimate Maui Itinerary to help you plan your trip to this incredible island.

    Mahalo! And Aloha!

  • The Ultimate Maui Itinerary for First Time Visitors

    About this Maui Itinerary

    Maui is an extraordinary place.  It has a unique combination of adventure and relaxation. In this Maui itinerary, you will have opportunities for outdoor adventures as well as pure, do nothing relaxation! Snorkel, surf, watch the sunrise at 10,000 feet elevation, devour macadamia nut pancakes by the plate full and test your nerves on the road to Hana.  I have included all this and more.

    This Maui itinerary is tailored to those staying in West Maui, but if you decide to stay in South Maui, plan extra travel time for the activities listed on the west side. Also, I like to stay in a condo when I visit, as it allows me to save some money on food and gives me the feeling that I’m at my home away from homes. However, if you prefer a resort where you can get room service, this itinerary will work for you as well.

    This Maui itinerary is designed to be a self-driving guide. So I make the assumption you will have a rental car.  Yes, Maui has a bus system, and yes you can take tours, but I feel this island is best seen with your own vehicle.  It gives you more flexibility and allows for spontaneity.

    When to Visit: Anytime. You can often get discounted airfare from late March to early June and also from September to November. December thru May is whale season and if you want to visit during the winter book around 6 months in advance as this is a popular time for travelers.

    Getting Around: Car rental makes the most sense in Maui.

    Weather: Nice year round.  November-March tends to be the rainiest.

    Maui Itinerary Highlights: Road to Hana, Haleakala National Park, Ka’anapali Beach, Kapalua Bay, and Coastal Trail, Molokini Snorkel Tour, Try Hawaiian Shave Ice, Warren & Annabelle’s, Hawaiian Luau

    Length of Stay Recommended: 7-14 days

    How to use this map: Click on the icons to see the address and get directions using Google Maps, you can also click the star next to Maui Itinerary to add this to your own Google Maps. And the icon to the left of Maui Itinerary will show you a list of all the regions and locations I have saved for each.

    Day of Arrival:

    You will fly into Kahului Airport, which is only a 5-minute drive to Costco & Wal-Mart. Depending on when your flight lands, I recommend taking time right after you get your rental car, to head to Costco and Wal-Mart to shop for your stay. If you’re staying at a condo, this is a great way to save money on your trip.  Buy stuff to BBQ, cases of water, fresh fruit, salads, pb&j sandwiches, etc.

    It is much cheaper to purchase your stuff here, rather than closer to the resorts.  If you are a member of Costco, make sure to stop off at their bakery and pick up a pineapple coconut loaf with macadamia nuts. This paired with a cup of Hawaiian coffee while sitting on the lanai is the perfect way to start a day!

    Tip: Make sure you purchase reef safe sunscreen. In 2021, Hawaii will implement a ban on the sale of sunscreen containing the coral-harming chemicals oxybenzone and octinoxate.

    Day 2: Haleakala National Park

    On your first full day, you will most likely wake up early. So why not be adventurous today and head to Haleakala to watch the sunrise. You must have a reservation to enter the park between the hours of 3am-7am. It costs $1.00, and you can reserve 2 months in advance which I highly recommend you do! Make sure to pack warm clothes & bring a blanket; it gets surprisingly cold up there!

    Sunrise at Haleakala has all the details on how to get there, what to pack and what you need to know for an unforgettable day trip to Haleakala. Or if you’re really not an early bird read this post on spending an amazing day at Haleakala and enjoying the sunset at Haleakala instead!

    Take time to enjoy Maui’s Upcountry before heading back to your resort or condo. I have marked a few places you might want to stop on the map. Hali’imaile General Store, Maui Pineapple Tours, Piiholo Ranch Zipline are just a few of the possibilities. Upcountry Maui is full of wonderful options and is worth staying a night or two on a future trip to Maui.

    Tip: If you can’t make it to the sunrise, sunsets here are spectacular too, so enjoy your day exploring Upcountry Maui, do a day hike in Haleakala’s crater and then enjoy a gorgeous sunset and star gazing afterward.

    Sunrise at Haleakala National Park Maui
    A breathtaking sunrise captured over a sea of clouds.

    Tip: Try to snorkel first thing in the morning, prior to 11 am for the best snorkeling conditions.  The trade winds tend to kick up in the afternoon and visibility is reduced.

    Day 3: Kapalua Beach & Kapalua Coastal Trail

    After breakfast head over to Kapalua Beach for some spectacular snorkeling. Get here early as the parking lot fills up quickly!  I have seen turtles, eels, and all sorts of colorful fish here.  It is one of my favorite snorkel beaches that I return to multiple times a visit.  Plus it’s a beautiful beach! They also rent paddleboards, kayaks, snorkel gear, and beach umbrellas from a hut on the right side of the beach.

    After you’ve had your fun at the beach, consider walking the Kapalua Coastal Trail.  One of the highlights is the Dragon’s Tooth area connected to the trail.  The Kapalua Coastal Trail trail is about 2 miles in length and stretches from Kapalua Beach to  D.T. Fleming Park. It does get a little rocky in parts, so you may want to wear strap-on sandals or tennis shoes versus flip-flops.

    Tonight treat yourself to a Hawaiian Luau. I recommend Old Lahaina Luau for an authentic luau experience. If you want to see fire dancers,  Legends of Kāʻanapali Lūʻau is another good option. If you’re staying in South Maui consider Te Au Moana.

    Day 4: Road to Hana

    Give yourself a break from the sun by getting up early and driving to Hana.  No Maui itinerary would be complete without including the road to Hana. The drive is an adventure in itself. It has 620 curves in the short 52 miles!  You will see gorgeous waterfalls, hike thru dark lava caves, walk across black sand beaches and so much more! Plan the whole day for your drive to Hana.  Get up early to beat the crowds and tour buses. Read our Road to Hana Guide to learn more about how to plan for this incredible day trip while in Maui.

    Tip: To see the Seven Sacred Pools at Ohe’o before the crowds arrive, drive all the way here first, then see all the sights in reverse order back down.  Better yet, camp at Wainapanapa State Park (reservations required) or snag a first come first serve site at Kipahulu Campground.

    Maui Sea Turtle eating on rocks
    Honu is what the Hawaiians call these beautiful sea turtles.

    Day 5: Ka’anapali Beach

    After yesterday’s drive to Hana, you will want a relaxing day at the beach.  Pack up your sunscreen, water, and beach gear, and get ready for a day at Ka’anapali Beach.  This beautiful sandy beach stretches for almost a mile.  It is also where the famous Black Rock is at.  Get an early start and snag a free parking spot if you can. There are a few public parking areas scattered along the parkway. Look for beach access signs near parking areas. Otherwise, you can park in the parking garage for Whalers Village, where you can get a 3-hour validation if you purchase something at one of the stores.

    There is excellent snorkeling at Black Rock when the conditions are calm. Just be careful as this area can also get some massive waves and currents near the rock. Watch the adventurous people who make the climb up Black Rock to jump off. Be careful if you are snorkeling and keep an eye on those jumping to make sure you don’t get in their way. I have seen eels, sharks, turtles, octopuses, and lots of fish all around Black Rock.  Even if the snorkeling isn’t great during your visit, it is still a spectacular beach for swimming and sunbathing.

    When you get hungry or would like to do some shopping, head down the beach away from Black Rock and go to Whalers Village, there are lots of places to eat and shop. Additionally, there is the Whalers Village Museum worth taking a peek at.

    Maui Sunset
    One thing not to be missed is enjoying the beautiful sunsets in Maui.

    Day 6: Molokini & Kihei

    You have a lot of tour options when planning a trip to Molokini.  I recommend Kai Kanani Sailing; they are a smaller boat with a fantastic crew!  I loved my trip to Molokini with them. Other options would be Pride of Maui Molokini and Turtle Town tour, or if you want a more all-inclusive option, Ali Nui Maui includes transportation with their packages.

    Most tours leave from South Maui, so if you are staying in West Maui, make sure to consider how long it will take you to get there when choosing your tour time.  Grab some breakfast at Kihei Caffe and then head to Kama’ole Beach II or III to enjoy more snorkeling and beach time. When you’ve had your fill of the beach, get some gelato or shave ice and enjoy all that South Maui has to offer.

    Day 7: Napili Bay

    Eat breakfast at The Gazebo. You must try the macadamia pineapple pancakes and fried rice!  Oh and have the coconut syrup on your pancakes.  Yum! Get there early, before it opens if possible, and be prepared for a line.  The line moves fast, and if you’re lucky, you’ll get a seat with a view overlooking the ocean.  After breakfast, take a little time to walk along the water and explore the tidal pools while your food settles.

    Then head off to Napili Bay to find a good spot on the beach.  This is the perfect beach to do some body surfing, but please exercise caution as these waves get huge! Oh and make sure you put your beach bag as high up as possible, or it will get wet!

    Tonight, head to Warren & Annabelle’s to be entertained with comedy & magic.  You’ve got to trust me on this one, I have gone to this show two different times, and each time it was different, and both times I thoroughly enjoyed myself.  It is a great way to spend an evening! Make sure to book ahead of time.

    Day 8: Day of Relaxation

    Today is a good day for you to experience some of that “do nothing” relaxation I mentioned before.  Grab your favorite book, sunglasses & sunscreen, and find the nearest beach umbrella and chair.  And if napping in the sun isn’t relaxing enough, why not get a relaxing massage at a local spa.

    Tip: Always carry extra water with you. You can freeze water bottles the night before at your condo and then you will have cold water in the car as it melts throughout the day.

    Day 9: Historic Lahaina

    Surf’s up!  Today why not try one of the favorite pastimes for locals and learn to surf! It is easier than you think.  I recommend Royal Hawaiian Surf Academy located right in Lahaina. You will walk to the harbor where they will teach you to surf.  Or if you prefer a smaller group size away from the crowds, you can try Maui Surfer Girls. They offer small group size lessons at Ukumehame Beach Park.

    After your surf lesson, grab some lunch before starting this self-guided walking tour of historic Lahaina. When you finish the walking tour, head up Front Street and cool off with gelato at Ono Gelato and Espresso Bar. They have a couple of tables in the back of the store with views over the water. If gelato isn’t your thing, then head to Ululani’s Hawaiian Shave Ice and enjoy more of this delicious treat!

    Banyan Trees in Lahaina, Maui
    These Banyan trees in downtown Lahaina are incredible to see!

    Day 10: Honolua Bay, Nakalele Blowhole & Olivine Pools

    Drive to Honolua Bay for an amazing snorkel spot in a marine life conservation area.  Make sure you’ve got all your essentials packed in a beach bag, including good walking shoes. You will have a short hike through a “jungle” before reaching the rocky beach. Snorkeling is best on the right side of this protected bay.  You have to swim about 600 feet offshore to get to the reefs, so I recommend you wear a life vest if you have any concerns at all about swimming that far. Plus sometimes it is very shallow over the vast reefs, so I prefer a life vest as it helps me float over the reefs and avoid touching them. There are portable toilets at the beginning of the trailhead, but no other facilities at the beach.

    After you finish snorkeling, grab some shave ice or a fresh coconut at the Coconut Caboose you passed right before the parking lot to Honolua Bay. Then continue up the road towards the Nakalele Blowhole & the Olivine Pools.  You want good shoes for getting to the Olivine Pools and the Nakalele Blowhole. It is a very steep and rocky climb. Please use caution when visiting here! If it is windy, or rainy or there are huge swells, don’t risk your life! People have died after being swept away by large waves.  So don’t put yourself close to the edge or anywhere this could happen.  It isn’t worth it. These are beautiful places to visit,  but caution and safety have to take priority over everything else.

    If you’re still feeling adventurous, you can continue up the road past the Olivine Pools and explore the historic town of Kahakuloa. Just know that this stretch of road will give the road to Hana a run for its money with some of its narrow curves and sheer drop-offs. But if you do make the drive, make sure to try the local banana bread and shave ice!

    Day 11: Olowalu

    Book a kayak tour and explore the reef at Olowalu, mile marker 14.  Another excellent option for this fantastic reef system is to rent a stand-up paddleboard; you can paddle out to the reef and then snorkel off your board whenever you wish! Afterward, get some of the best pie in Maui at Leoda’s Kitchen & Pie Shop. I highly recommend the banana cream pie and coconut cream pie.  Honestly, I got the banana cream pie by mistake and was blown away by how good it was! Drive towards Kahului and visit the Maui Ocean Center to learn more about all the marine life you have been snorkeling with for the past week.

    Olowalu Paddleboarders
    The view from my stand-up paddleboard.

    Day 12: Relax

    I think by now it’s time for another do-nothing day!  So grab that book you’re reading and find a cozy spot to curl up.  Perhaps today is a good day to spend shopping for souvenirs or eating your fill of Maui Gold pineapples and fresh coconut. A great spot to get fresh coconut is at a store called the Farmer’s Market; they will cut the top off for you so you can drink its refreshing coconut water. Then scrape out the coconut back at your condo and let it dry out a little before enjoying your fresh coconut. And if you’re hungry for lunch, just down the street from the Farmer’s Market, you’ll find delicious fish tacos at The Fish Market. If you’re looking for something else to do, you might consider a glass blowing class and create a unique souvenir.

    Day 13: Customize Your Day

    Today is your day to decide what you want to do. This Maui Itinerary is packed with lots of snorkeling and beach activities. Perhaps you’d like to do some more relaxing or better yet, more shopping? Or if you’re like me and you can’t get enough of the ocean, why not rent a SUP for the day. Take the ferry to the island of Lanai or book a dolphin snorkel cruise to Lanai or a sunset dinner cruise with the Pacific Whale Foundation. Perhaps you need a little more adventure, get some spectacular views over Maui as you’re flying down a zip line! You decide!  This is your last full day in Maui, make the memories you want to make.

    rainbow on Kapalua Coastal Trail
    Catching a glimpse of a rainbow along the Kapalua Coastal Trail.

    Day 14: Day of Departure

    Sleep in and then have macadamia pancakes one last time before you have to check out. If you have a late flight check out these 7 things to do in Kahului near the airport.  Make the most of your last day in Maui!

    Customize this Maui Itinerary

    You can customize this itinerary to fit a vacation of 7, 10, or even 14 days.  Feel free to change days around as suits your needs and tailor the activities to your interests.  This Maui Itinerary covers the “must-see” highlights of Maui.  However, there is so much more to see and do, you can’t do it all in one trip, and you wouldn’t want to try.  Leave that for your return trip. Because if there’s one thing I’ve learned about Maui, it’s that you’ll miss it before your plane leaves the ground.

    Final Thoughts

    Hawaii is made up of beautiful islands with a unique culture and history. Make sure to take time to learn about the Hawaiians and their rich heritage.  Be respectful of this beautiful area and do your best to preserve it for future generations.  And if you want to learn ways you can do even more while on your vacation to Maui here are some great volunteer opportunities.

    Make sure to check out these other great Maui guides to help you plan your trip to Maui.

    Mahalo & Aloha!

  • Mercer Slough SUP & Kayak Adventure

    My husband and I recently purchased a couple of these Body Glove inflatable SUPs on sale at Costco. The flexibility and compact storage features of owning an inflatable appealed to us.  We could throw these in the trunk of the car and be on our way! I started researching some good beginner spots to try them out at.  We weren’t sure how inflatables would handle, so we wanted to go someplace with calm waters.  I narrowed it down to Lake Sammamish & the Mercer Slough.

    We tested them first on Lake Sammamish.  In the beginning, I felt unstable, however, I quickly learned where to stand and got my “sea legs” back. Soon I had a big grin on my face as I enjoyed being out on the water.  After two hours, we packed up our SUPs and headed home with plans to try them out on the Mercer Slough the next day.

    Stand up paddleboards on Lake Sammamish
    Lake Sammamish

    Mercer Slough Nature Park

    We tried to find parking at Enatai Beach Park; however, it was around 11 a.m. on Memorial Day, so we knew our chances were slim.  We headed to find parking next to the Mercer Slough instead.  As luck would have it, there was plenty of parking at the Sweyolocken Boat Launch.  We aired up the SUPs one at a time from the back of our SUV.

    During that time (about 10 minutes), I had already been bitten at least once by a mosquito.  I quickly regretted forgetting to bring bug spray.  Thankfully, a family was getting ready to put their kayaks in the water who remembered their spray.  They very generously lent me their bug spray and the dad told me that later in the year there would be swarms of mosquitoes.  So note to self, only come early in the season!

    On The Water

    We slid the paddleboards into the water and waded in a little past our ankles. With a slight shove off we went out from the boat launch into the slough.  We then had a decision to make, left would take us towards Bellevue and right would take us into Lake Washington.  We decided to go left and explore the canal.

    The Mercer Slough is an excellent area for beginners as the water is calmer here and you are more protected from the wind due to the trees and vegetation on either side.  Additionally, only non-motorized boats are allowed in the Mercer Slough. So this made it easier to practice on our new paddleboards as no jet skiers or boats were driving by creating waves like we had at Lake Sammamish.

    Mercer Slough canal and bridge
    A bridge that links Mercer Slough trails

    Mercer Slough Wildlife

    The Mercer Slough is one of Lake Washington’s largest remaining wetlands. One of the great things about the Mercer Slough Nature Park is all of the wildlife you will see along your journey.  We saw great blue herons swooping down and catching fish in their beaks, green herons walking along the water’s edge, frogs hopping on lily pads, ducklings and goslings learning to swim with their families and turtles sunbathing.  It felt like an adventure down a jungle river rather than paddling in the middle of an urban center!  We passed multiple families and groups both in kayaks and on stand up paddleboards.  It was a great way to spend the afternoon.

    Turtles sunbathing in the mercer slough
    Turtles sunbathing

    Getting to the Mercer Slough

    Here are a couple of the places you can park to enjoy the Mercer Slough.

    Enatai Beach Park, 3519 108th Ave SE, Bellevue, WA 98004.
    This park has a swimming area off of Lake Washington as well as a boathouse that rents kayaks and canoes.  It is a great place to spend the day with the family. Plus you can access the Mercer Slough by paddling down Lake Washington a short way before entering the slough.

    Sweyolocken Boat Launch, 3000 Bellevue Way SE, Bellevue, WA 98004.
    This dirt parking lot has direct access to the Mercer Slough. There is also one honey bucket portable restroom should you need it.

    Additionally, if there are those in your party who don’t want to go out on the water, there are miles of trails in the Mercer Slough Nature Park that they can go walking on while you SUP or kayak.  They can even wave at you along the way from various spots.

    *Please note that there is construction going by parking lots at the Sweyolocken Boat Launch and the Mercer Slough Nature Park parking lot right off of I-90. 
    Paddleboarding in the mercer slough
    Paddling thru the Mercer Slough

    Final Thoughts

    Make sure to pack the following: life jacket and whistle (both required by WA law), sunscreen, bug spray, drinks, lunch or snacks (there are a couple of places along the canal you can pull your SUP or kayak out of the water to have a picnic), a hat for further sun protection, hand sanitizer and a waterproof bag to carry it all in.  Plus if you have a waterproof camera or case, there are some great picture opportunities along the way. We paddled through the Mercer Slough for around 3 hours and wished we had brought more to drink with us and perhaps some PB&J sandwiches.

    There were areas in the water where the vegetation was very thick, so it was harder to paddle thru it. Kayaks seemed to have an easier time crossing the dense vegetation. I worried I might get stuck, but I just sat down on my paddleboard and passed without a problem.

    The Mercer Slough is a great place to spend a few hours paddling around and enjoying the wetland’s wildlife.  Kids and adults alike will enjoy the adventure.  Check it out and let me know how you enjoyed it.

    And if you’re looking for more local activities, why not check out the Snoqualmie Falls for a quick, but beautiful hike.

    Happy paddling!

  • Reasons Why You Should Travel the World

    Travel has taught me many life lessons thru the years.  Some people may think of travel as a frivolous activity or only as a means to get away and relax.  And don’t get me wrong, it can be a fantastic way to get some relaxation! However, travel also provides so many other benefits.

    I will share with you some of my reasons for why you should travel and what I have learned along the way. And although a lot of these lessons apply to those just starting their adult life, I want you to know that the benefits of travel extend to everyone, no matter your age!

    Where It All Began

    Travel has always been a passion of mine.  As a child, I would read books on travel and dream of faraway places I might visit one day.  Before graduating from high school, I had very little traveling experience. My family had taken a couple of road trips around the U.S., but that was the extent of my travel experience up to that point.

    Then right after high school, I took a 2-month road trip around the U.S. with my best friend, and we had a great time and made some amazing memories.  However, it wasn’t until my first international trip, by myself, that I would begin to see how travel helped prepare me for college and life.

    Solo Travel

    My first solo trip was also my first time traveling abroad.  Oh, I had gone to Canada and Mexico before, both during road trips with friends. But, I didn’t have any experience flying internationally, using taxis or being someplace where I didn’t know anyone else. I didn’t know what to expect on this first solo trip outside the United States. The feelings I had were an odd mixture of nervousness, excitement, and fear.

    On this particular trip, I was traveling to Taipei, Taiwan. I didn’t know the language or anything about the culture. Everything would be new to me. And this is precisely what I needed. I needed that experience of being on my own, away from the comforts of home, from the safety of the familiar.  This trip would be just the beginning of my solo travel, and the lessons I learned would prepare me for college and life. I learned more about myself, in ways I never imagined I could, from traveling.

    New York City View of Central Park from above

    10 Lessons I Learned From Travel

    1) It’s okay not to have it all figured out.

    You don’t need to know it all in advance. When you travel, you don’t know what you are going to encounter on a day to day basis.  You may not even know where you are going to sleep the next night. It’s okay.  And this is like life. When you graduate from high school, there is so much pressure for you to know what you want to do.  However, it’s okay not to have it all figured out. The truth is, you will be “figuring it out” your whole life, so enjoy the journey.

    2) You discover who you are as an individual.

    Independence is a vital skill solo-travel helps to develop. It is a skill you will need as you begin your journey as an adult. When you go away to college by yourself.  When you start your first job and need to work independently.  Being confident in who you are and the strengths you have will be an invaluable gift in life. In a way traveling abroad, by yourself, forces you to be independent. It is incredible how much a person learns about themselves when they leave everything and everyone they know.

    3) Facing your fears is hard, but it develops confidence.

    Travel teaches you to face your fears. Face the unknown, the what-ifs and self-doubt. As you leave behind the known, you develop your self-confidence. Just thru the act of going on a trip, you become more confident. You are following thru on a plan, perhaps a long-awaited dream.  You are accomplishing a goal and maybe proving a few naysayers wrong in the process.

    It shows you that you can do what you put your mind to.  You realize it’s okay to be afraid as long as you don’t let it stop you.  Sometimes it’s easy to look at confident people and think they were born that way, but that’s not true.  Confidence can be taught and learned. Travel teaches you to stand on your own.

    Monkey in Japan near Kyoto

    4) You can’t plan for every scenario.

    So do your best and then learn from your experiences. Life is full of what-ifs, never let fear keep you from discovering your possibilities or let failure keep you from trying. It’s okay to be afraid as long as you don’t let it stop you. Things are going to come up that will catch you off guard.  Perhaps a tourist site you want to see is closed on the one day you are in town.  Or your trip gets rained out, or a natural disaster occurs, maybe you reserve a place to stay online and get there only to discover it’s a total dump.

    It’s okay.  What you do when these situations arise determines your character.  Grow from it and do your best to have a good attitude, that will get you far in life no matter the situation.

    5) Decision Making

    Each day you travel, you are confronted with decisions.  Where to sleep, where to eat, and what to see? You are making the decisions that determine your course.  The same is true in life.  Going to college, you will make decisions on what classes to take and what to major in.  Other life decisions are where to live, who to marry, and what job to take.  The less afraid you are to make decisions, the happier you will be.

    As you let go of the fear of failure and of making the wrong decision, you develop an internal compass that guides you, and with confidence, you follow your heart.

    6) Some of your best friends are people you have yet to meet.

    Travel connects you with people. It levels the playing field and brings people together in a unique way that I haven’t found at home.  Travel seems to remove any barriers of superiority or dividing differences. Each person is out of their element, each struggling to communicate in another language, and each is finding the commonalities between each other. It is a beautiful thing.

    Fellow travelers are eager to learn about each other; assumptions and stereotypes are torn down as you have real-life conversations face to face.  Friendship is one of the greatest gifts of travel. I have made so many beautiful friendships while traveling, and I am a better person because of them. Read more about one of these moments created over good food at Cantinho Lusitano in Lisbon.

    7) The world is bigger than the one you left behind.

    Travel gives you perspective. I think this is one of the best reasons why you should travel.  There is so much more to the world than your tiny corner back home.  Cultures very different than yours, but just as rich and beautiful.  People are people, no matter where they live; we are unique and yet so much alike.  Don’t just listen to the media tell you about other countries, go and see for yourself! Explore and discover — it’s not as scary as some may have you believe.

    Water Droplet on the Beach

    8) Travel inspires creativity.

    Travel reveals passions you may not have know you had. It gives direction to your dreams. It is invigorating! You may discover your home away from home.  Or you may find a language that you connect with and continue learning once you’re back home.  Perhaps you find a love for certain foods. Maybe you see a particular style of art that calls out to you.  You may even be inspired to write a book.  You never know.  That’s why you should travel.

    9) Travel educates you.

    You begin to think as a scientist and as an observer.  You are living in a large classroom, learning about social psychology, economics, culture, anthropology, linguistics, political science, geography, and more. Travel is real-world, hands-on learning.  You can study it in the classroom or watch it on television, but there is nothing quite like the great teacher Experience.  Are people really that different?  What is it like to live in a developing country? How do others view your culture? Go see for yourself. You might be surprised at what you learn.

    10) Travel teaches you to appreciate the simple things in life.

    Stuff won’t make you happy. You will observe cultures which have very little and yet are some of the most joyful and satisfied people. Additionally, I have found that those with less are also some of the most generous. Travel, new experiences, and relationships bring long-term happiness, not stuff. If there’s one lesson we all can learn, it is to know what is truly valuable.  Life. Moments. People. Things come and go, and as I travel, I learn just how little I need to live and be happy.

    Why You Should Travel:

    Focus on developing a life that is rich with meaning and experiences.  Chase your dreams and encourage others to do the same.  Give back. Be thankful for what you have. You will make mistakes.  Things won’t always work out as planned.  Keep going and be flexible.  You control your attitude.  Choose to be positive.

    These are all lessons travel has taught me and why I think you should travel.  Because travel is more than just getting away, it’s learning about yourself and about this fantastic world in which you live.

    So what are you waiting for?  Book your flight today!

    Bon Voyage!

    Read Bucket Lists & Good Friends for more on friendship and traveling together.

  • What I Learned on my First Trip to Thailand

    I had a lot of questions before my first trip to Thailand. Would it be challenging to get around? How much of the Thai language would I need to know? Would I get tired of the food? Is it cheap to travel to Thailand?  So here is a quick rundown of all the things I learned after my first trip to Thailand. I hope it will help you prepare and perhaps help relieve some of your concerns.

    Airline Luggage Requirements

    Our international flight to Thailand was on EVA Air. We also used both Air Asia & Bangkok Airways for domestic flights within Thailand.  We had a 15lb weight limit for our combined personal item & carry-on luggage for two of the flights. Our plane to Sukhothai was the most limiting with a weight limit of 11lbs. However, everyone checked their bags as the aircraft wasn’t large enough to store luggage on board.

    So, as you can see, you are very limited to how large your luggage can be as well as the weight limits.  We found that even with our backpacks, we had to check our luggage due to their severe weight restrictions.

    And since you need to check your luggage, why not plan by packing full-size sunscreen, and bug spray.  You will be so glad you did! Sunscreen is quite expensive in Thailand and this way you will make sure you have the brand you prefer. Just make sure to put your liquids inside a sealed bag, to avoid any possible leaks from ruining your clothes. I also carry extra ziplock bags just in case!

    Recommended Luggage

    Packing lighter is freeing, you aren’t burdened down with a bunch of stuff that you won’t need or extra weight that you will inevitably regret carrying.  When I first started traveling, I made the mistake of overpacking. Thankfully I have learned along the way that I don’t need a pair of jeans for every day or 4 pairs of shoes.  Try packing light, and I think you will discover just how freeing it can be!

    I use the Osprey Porter 46 backpack. During a 2 1/2 month trip to Europe, I traveled on Ryanair, Easyjet, AirFrance Hop! & Norwegian Air and never had any issues bringing it on board as a carry-on. And in Thailand, I highly recommend you have a backpack.  Having a backpack will come in very handy when disembarking long tail boats and boarding the ferries that will take you from island to island.

    red osprey backpack

    The Language

    You can get by just knowing your basic greetings and thank you words in Thai.  They speak English everywhere we traveled, and they even spoke other languages, thanks in part to the large tourist population from around the world.  Spanish, French, Russian, and Chinese were all languages in addition to English that I heard Thai people speak. I was so concerned about not knowing the language, but after my visit to Thailand, I discovered I was worried for no reason.

    Thai Words to memorize:

    If you are a man, you will end each phrase by saying, “khrap.” And if you are a woman, you will complete each sentence by adding “kha” to the end.

    • Hello: Sawasdee (sounds like sah wah dee) So for example, if you are a man, you will say: Sawasdee khrap, and if you are a woman, you will say Sawasdee kha. Sometimes the “r” in khrap isn’t pronounced.
    • How are you?: sabai dee mai? (sounds like suhbye dee my) You can respond with Sabai dee (good) if asked this.
    • Thank you: khap khun (sounds like cop coon), then add khrap or kha (male/female ending)
    • I don’t understand: mai khao jai (sounds like my cow jai)

    One final custom you will observe is the wai.  Thai’s use the wai to show respect and as a way of saying thank you.  You press your palms together in front of you with your fingers pointing up to the chin and then dip your head in a bow, lowering your eyes.  Then return looking forward and smile.

    There are different levels of wai’s depending on whether someone is considered of “lower status” than you or “higher” or for monks, but I wouldn’t worry too much about it. Always try to return a wai. Your smile and attempt to respect their local customs will be appreciated, even if you don’t get it exactly right.

    Getting Around

    Grab Taxi is Thailand’s form of Uber, and it is a convenient way to get around.  Download the app before your trip to Thailand, and you can use it to get from the airport to your hotel. We used it in Bangkok, Chiang Mai, and Phuket.  A lot of the smaller areas do not use it though.  In Chiang Mai, the red taxi trucks (songthaew) are also very cheap and an easy way to get around.

    The drivers ask you where you want to go and as long as your stop is along their current route, they will take you.  If not just ask another one until you find a driver going your way. We used Grab most of the time as it allows you to pay with your credit card via the app, thus eliminating the need to use cash.

    Red Truck Taxi Songthaew

    Thai Culture

    • Thais appreciate cleanliness.  One custom is to take your shoes off before entering a home (or hotel room for that matter).  Why track the dirt and grime from the streets into your house?
    • Thai royalty is revered, and you must always be respectful around any monuments to their royalty or any discussion of their royalty.  I think most people would do this intuitively, but I read about travelers getting fined for rude remarks regarding the King. So obviously for some, it needs to be spelled out.
    • Smile. Thailand is called the land of smiles. They smile because they are friendly, and they also smile to help put others at ease and “save face.”  You should do the same.  Smile when bartering a deal with the local tuk-tuk driver or roadside vendor.  Smile when you can’t understand the language, or you forget how to say thank you in Thai.  It is incredible how trans-formative a smile can be.

    Food

    The food is great! Let’s face it, that’s a big reason why people travel to Thailand, it’s one of the reason’s we did for sure!  So the fact that Thai food is fantastic is not what I learned when visiting Thailand.  What I learned, is that if you need a break from Thai food (I know hard to believe) that they have lots of other options!  Options will, of course, depend on where you are staying.

    The cities will have the most variety.  We had Mexican in Bangkok, Korean, and delicious burgers in Chiang Mai, and we had American style bacon at almost every hotel breakfast!  Plus for those of you who prefer fast food, there are lots of options for that too.

    Pictures of food in Thailand

    Cash or Credit Card

    One quick note regarding payments.  You will want to withdraw enough money from an ATM to cover expenses for a week or so and reduce the ATM fees you might need to pay.  ATM’s in Thailand, typically charge around $7 per transaction.  So unless your credit card refunds you the withdrawal fees, this can add up.  And cash is the most widely used form of payment throughout Thailand.  Most places do not accept credit cards, so be prepared to pay in cash.

    Costs

    • Food: There were just two of us, and we would each have one dish, plus dessert and drinks, and it still would only cost around $10 – and we were stuffed full! One person could quickly get a meal for around $3.
    • Transportation: Grab rides usually cost $2-$10 each way. Taxis are similar in price.
    • Accommodations: You have many choices ranging from hostels to luxury hotels.  Prices range $8 and up depending on where you stay.  At our hostel in Bangkok, we had a private room with a private bathroom and a balcony, and it was about $20.
    • Attractions: The price of each attraction will vary.  In Bangkok, for example, you might spend $17 for a ticket to the Golden Palace or around $5 for visiting Wat Arun.  Then you have more expensive attractions, like watching a Muay Thai match that will cost about $150.  In Chiang Mai, you might take a tour to an elephant nature park which can cost $200-$300.
    There are many options, no matter what your budget.  And you can’t beat free–like lounging in a hammock by the beach or taking a hike like this Chiang Mai hike.  Even on a tight budget, you will have a fantastic time in Thailand.
    Swing by the water in Koh Lanta Thailand

    Conclusion

    If you’re considering a trip to Thailand, but worried about not speaking the language, or about how you’ll get around or even about what to eat, don’t worry!  Thailand has you covered!

    The only thing stopping you now is booking your flight!  If you need help with that too, please feel free to contact me or check out this article on how to book your flight. And to help you plan out your itinerary, check out this three week Thailand itinerary.

    See for yourself why everyone who visits Thailand falls in love with it!
  • How to Avoid Jet Lag & Enjoy Your Trip

    Jet lag. That annoying feeling of drowsiness that you can’t seem to shake even though you’re so excited to start your adventure. It feels like you need to sleep for hours even though it’s the middle of the day.  No one wants to deal with jet lag when they travel.  So here are some tips to avoid jet lag and start enjoying your trip right away!

    Preparing For Your Trip

    I am rarely able to sleep on a plane, no matter how tired I am.  So making sure to get a good nights’ rest before my departure ensures that I will have a more enjoyable flight and feel better when I arrive at my destination.

    Some people try to slowly adjust their sleep schedule a week in advance, by either going to bed an hour later or getting up an hour earlier.  However, I feel like this is not a reasonable solution for most people.  Instead, I find that I feel better if I maintain a consistent sleep schedule and get plenty of rest before my trip.

    Also, when booking your flight, I would recommend you book a flight that coincides with your regular sleeping hours.  So for example, a flight that leaves between 6-10 p.m.  This way you can eat dinner and then try to sleep during the long flight over.  Then when you arrive, you will be ready to go out and explore as it will coincide with your regular schedule back home.

    Another option I like to choose when booking my flight is a window seat.  It gives me something to lean against for sleeping, and it also means I won’t be disturbed by my seat partner whenever they need to get up to use the restroom.

    sleep on plane play when you land

    During the flight

    Eat as little as possible.  I like to pack some nuts and apple slices for my flights.  Once I’m past security, I purchase a bottle of water or bring a refillable water bottle and fill it up before boarding my flight.  Research has shown that if you can avoid eating on the plane and instead start eating when you reach your destination, that this will help you avoid the effects of jet lag. So for example, you eat at your regular time before your flight, but then during the flight, skip the meals and instead eat some light, healthy snacks and drink plenty of water.

    Upon Arrival

    Then upon arriving at your destination, you will eat according to the local time zone (if you land in the morning: eat breakfast, afternoon: eat lunch). If you land in the evening, even if it is later than your usual dinner time, go ahead and eat dinner and then you can head to bed. Eating tells your body to set its clock to the current destination. Adjusting your internal clock is key to avoiding jet lag.

    In addition to eating after you land, I recommend you drop your luggage off and immediately head out even if it is only for 1-2 hours (more if it’s an earlier arrival).  The best thing you can do to avoid jet lag is to adjust to the local time zone as quickly as possible.  I know that this seems hard, especially if you haven’t slept on the long flight over, but it pays off during your trip. Plus it is exciting being in a new place, and going out, even just for a short time, really sets the mood for the rest of your trip.

    Cheesy Burger at Burgermaster

    Sleep Aids

    I pack ZzzQuil; it is a non-habit forming sleep aid that helps you fall asleep.  I have also used melatonin, and it works the same way.  So if you have a hard time switching off your brain and falling asleep, you may want to consider a mild sleep aid.

    If you have any concerns about sleeping or flying and any medications you might need, please talk to your doctor ahead of time, they can also give you some tips for adjusting to the new location and avoiding jet lag. I tend to experience the phenomenon where I am utterly exhausted and yet wide awake.  It can be frustrating, but usually taking some melatonin or listening to some relaxing music helps me drift off to sleep.

    And speaking of music, make sure you pack headphones.  These are useful on the plane too.  You can use them to help block out noise as well as listen to music or watch movies during the flight.

    And then finally I would recommend you pack an eye mask.  I like the Alaska Bear eye mask. It is comfortable and adjustable and great for blocking out light and eliminating distractions.

    items to bring to help avoid jet lag

    Final Tips to Avoid Jet Lag

    Make sure your first day isn’t packed too full since you will still be adjusting to the new time zone.  I like to pack it full enough to keep me busy from morning until dinner, with small breaks in between.  Then I won’t be so exhausted that I can’t enjoy the sights. I also won’t be tempted to come back and sleep at the hotel during the day.

    When you are traveling, you have a limited amount of time to see the sights, and you certainly don’t want to spend your whole vacation trying to adjust your sleep schedule. So whatever you can do to avoid jet lag and sync to the local time zone the better!

    Please feel free to contact me if you have any questions or need any further advice.

    Read Trip Planning 101 to get you on your way to that next adventure! Or if you’ve already decided where you want to go, make sure to check out How to Book Your Flight & Get the Best Deals.

    Here’s to traveling while you’re awake!

  • Hiking in Chiang Mai: Facing My Spider Fears

    I love mixing in outdoor activities when I travel.  National Parks and mountains surround Chiang Mai so hiking in Chiang Mai was top on my list of things to do during my visit. I knew that we didn’t have enough time to do any longer hikes. So I looked to see if there were any hikes we could reach by either walking from our hotel or via a quick taxi ride. That’s when I read about this Chiang Mai hike to Wat Pha Lat.

    Wat Pha Lat is a Buddhist temple and monastery.  The hike is called the Monk’s trail, and you will see trees wrapped by monk’s ribbon all along your walk to Wat Pha Lat.  It only takes about 40 minutes to reach the temple. The path has ample shade, and you will pass some small waterfalls and resting spots on your way.

    Monks ribbon wrapped around a tree

    Getting Here: 

    You will want to make sure your driver understands that you want to go to the trailhead.  We booked a Grab from our hotel. We gave the driver the address to the trailhead, but we still needed to explain that we didn’t want to drive to the Temple.

    There is a road you can take to drive up there, but that defeats the purpose of hiking. It was only a 10-minute ride to the trailhead from our hotel at BED Nimman in Chiang Mai.

    Trailhead Address: Unnamed Rd Tambon Su Thep, Amphoe Mueang Chiang Mai, Chang Wat Chiang Mai 50200, Thailand

    The Hike

    You will find a sign at the trailhead showing the route to Wat Pha Lat.  I didn’t find the map to be that useful for me.  Just follow the main trail.  I found it to be reasonably intuitive.  Plus there are usually other hikers on the path to help guide you, should you have any questions. There are also a few viewpoints along the way, and if you happen to be there when the smog isn’t too bad, you will be rewarded with views of Chiang Mai below.

    Chiang Mai Monk's Trail hiking sign

    Since the hike to Wat Pha Lat is such an easy one, it makes a good one for families too.  So don’t be too concerned if you have kids, as you can quickly stop to take breaks on the way up if needed.  I saw quite a few families making their way up and down the trail.  It will make for beautiful memories and stories to tell about their hike thru the Chiang Mai jungle.

    When you arrive at Wat  Pha Lat you will come to a small bridge, and there will be signs about a coffee stand, you will see a small waterfall as well as a bunch of rocks that make for great resting spots for enjoying the views.

    Waterfall in Chiang Mai

    Remember that you have now entered a Buddhist monastery so you will notice signs everywhere asking you to be quiet and respect the temple areas. You are, however, free to wander around and explore the temple grounds.

    We finished walking around the temple and decided to go back to the trail and follow it up to a small creek we saw.  We watched some little fish swimming in the stream and looked at tadpoles (at least that’s what we think they were). Then we went back to the trail.

    Chiang Mai Monk's Trail Temple

    My Spider Fears Confronted:

    That is when we noticed this enormous spider suspended in its web above us!  This picture does not do it justice as it was HUGE!  I had done my best up to this point, to not think about there being spiders here in Thailand.  In fact, before the trip, I purposely chose not to research spiders in Thailand because I didn’t want to know!

    So needless to say, my arachnophobia kicked in, and I let my husband know he was free to stay there and take pictures, but I was going to move down the trail a bit.

    Giant Thailand Spider

    After he finished, he came over to show me the photos (which I had no interest in seeing), and that’s when he looked above my head and said “oh my goodness!”  I of course panicked, and sure enough, suspended over my head was another one of these giant spiders!

    So I took off and decided to wait on this little bridge we had passed, it seemed safe enough. I checked over my head, and couldn’t see any more spiders, so I stood there waiting and doing my best not to bolt down the mountain at full speed!

    bridge at Chiang Mai

    I told myself, it was probably like our garden spiders back home. They are big and scary looking, but for the most part harmless.  Now, of course, our garden spiders aren’t the size of my palm!

    Before seeing the spiders, I had enjoyed my visit very much, but ignorance is bliss, and since I was now fully aware of what lurked in the trees, I was not too eager to stay any longer than I had to.  We quickly made our way down the mountain.

    Getting Back to Chiang Mai:

    You may not have cell service at the trailhead. But don’t panic! You can walk down the road until you do and then call a Grab taxi to pick you up.  Or if you wait at the trailhead, a red songthaew (red truck taxi) will usually arrive dropping off hikers.

    We waited about 2 minutes before one pulled up at the trailhead. We told the driver where we were staying and then she told us the price.  I believe it was 100 THB total for my husband and me.

    Red Truck Taxi Songthaew

    You sit in the back of the truck on benches. It is a very inexpensive and easy way to get around Chiang Mai.  You may want to use them for traveling around the city or to other sites, such as to see Wat Phra That Doi Suthep.

    The songthaew taxis try to collect passengers that want to go to the same general area. So if you stop and ask a songthaew driver for a ride and they won’t take you, it is most likely because you don’t fall along their route.  So don’t be discouraged, ask the next red truck taxi you see and you will find one that is willing to take you.

    Where to Grab Lunch:

    After your hike, I am sure you will be hungry.  I highly recommend trying out one of these dining options:

    KOBQ: A fabulous Korean BBQ restaurant. Make sure to try their Korean fried chicken, it was amazing!

    Address: 202 เอ็น พาร์ค Tambon Su Thep, Amphoe Mueang Chiang Mai, Chang Wat Chiang Mai 50200, Thailand

    Beast Burger: If you are looking for a fabulous burger, look no further!  Their balsamic cheesesteak burger was one of the best I have ever eaten! Make sure to check the time as they close between lunch and dinner for a short 2 1/2 hour break.

    Address: Nimmanhemin Soi 17 Suthep, Tambon Su Thep, Amphoe Mueang Chiang Mai, Chang Wat Chiang Mai 50200, Thailand

    Cheesy Burger at Burgermaster

    Final Thoughts on hiking to Chiang Mai’s Wat Pha Lat (Monk’s Trail):

    There are many options for hiking in Chiang Mai, but if you are short on time, this is an easy hike you can do first thing in the morning before it gets too hot and still have ample time for sightseeing afterward.  Wat Pho Lat was a refreshing change of pace. It is a peaceful and beautiful area. A perfect setting to relax after your hike up the hill.

    You can continue up the trail and hike to Doi Suthep (this is a much longer and more challenging hike). However, I recommend enjoying the tranquil setting of this jungle temple. It is a respite from the busy city below. If someone told me that I would see giant spiders while hiking in Chiang Mai, I am not sure I would have gone. But I am so glad that I did! I enjoyed my visit to this temple more than all the other temples in Chiang Mai. And that’s even with the spider!

    Check out my full 3-week itinerary to Thailand for more inspiration. And in case you prefer something longer or to hire a guide, Trip Advisor offers some additional options for hiking in Chiang Mai.

    Elephant Wall Decoration

    Here’s to seeing new places & facing your fears!

  • Best Thai Massage in Bangkok & Coffee Bar

    If you’re looking for a great coffee or an amazing Thai massage in Bangkok, look no further! Stand Alone Coffee Bar & Spa combines an amazing Thai massage spa with an incredible coffee house! If they were to add an Air BnB rental into the mix, I am not sure I’d ever leave!  They have a fabulous coffee bar and two doors down is the Stand Alone Spa & Massage. It is located in a residential neighborhood and is a relaxing and quiet space.

    Stand Alone Coffee Bar:

    The coffee bar has a full menu, so if you’re hungry try a burger and fries or some pasta or whatever suits your fancy.  However, I would probably wait to eat until after your massage.

    In addition to the gorgeous industrial-style interior, the coffee bar also has an outdoor space for lounging.  I tried the cold brew and it was bold and flavorful.  In addition to their menu and coffee choices, they also roast their own coffee beans which are available for purchase.  Check out their business page at Stand Alone Coffee Bar.

    Location: Bangkok, Khwaeng Chom Phon, Khet Chatuchak, Krung Thep Maha Nakhon 10900, Thailand

    Hours: 7:30 a.m. – 9:30 p.m.

    Stand Alone Coffee Bar Massage Bangkok

    Stand Alone Spa & Massage:

    As I mentioned above, the spa and massage are separate from the coffee bar, you exit the coffee bar and walk to the other end of the building and you will find the spa.  We did not have reservations, as we had just wandered over to try a coffee before walking to the spa next door.  However, they were able to get my husband and me in for a one hour traditional Thai and foot massage.

    Previous Thai Massage Experiences:

    Now let me backtrack a little to tell you, this was our last day in Thailand before heading back home. We already had a Thai massage at the Wat Pho Thai Massage School (would not recommend it, you can read a little about my experience at 2 Days in Bangkok).

    Then we tried a traditional Thai massage again in Chiang Mai (this was much better than at the massage school, however, it still felt mechanical and just didn’t “wow” me). My husband got another massage on the beach in Phuket, which he said was good.  But up to that point, I was just feeling a little “meh” with regards to Thai massages.

    You see, I get deep tissue massages regularly at home and love them.  I have scoliosis and a lot of back pain, so they really help me manage my spinal health.  So when coming to Thailand I had been so excited at the prospect of getting 1-hour massages for less than $20!  Then I had a couple of massages and they just weren’t as good as I had expected.  That was until I got my massage at Stand Alone Spa & Massage.

    Massage Experience at Stand Alone Spa & Massage:

    The woman who gave me my massage was strong and firm and did a wonderful job of balancing stretching and pressure to create a massage that felt both relaxing as well as therapeutic. Honestly, I was so sad that this was my last day in Bangkok, as I would have gone back for another one the next day!

    And what is more incredible, it was the cheapest out of the four massages we had while in Thailand!  They have a special going where it is only 200 THB for a one hour Thai & foot massage. Please visit Stand Alone Spa & Massage for more information.

    Location: วิภาวดี​รังสิต​20​ Soi Chom Phon, ​, Khet Chatuchak, Krung Thep Maha Nakhon 10900, Thailand

    Hours: 10:00 a.m. – 9:30 p.m.

    I highly recommend Stand Alone Coffee Bar & Stand Alone Spa & Massage.  If you are in Bangkok and need a respite from the hustle and bustle of the city don’t miss this hidden gem. For a full trip itinerary to Thailand, check out What to See in Thailand For Your First Trip.

  • 2 Days in Bangkok: Here’s What to See

    With only 2 days in Bangkok, you can’t see it all and you shouldn’t even try. Bangkok is a very large city, okay, it’s a huge city!  It is also hot and humid and crowded. So you will undoubtedly feel a little overwhelmed at first.  And due to jet lag combined with the heat, you may not have the stamina you normally would.  I know that was the case for me.  Usually, I like to conquer a new city, see all the sights and just go-go-go, however, Bangkok taught me a good lesson in slowing down.

    I will share with you tips on where to stay, a great place to catch a Muay Thai boxing match, some coffee shops for those much-needed breaks, and some of the top sights to see in Bangkok. This 2 Day Bangkok itinerary covers the highlights and gives you a little flexibility. So without further adieu! (queue the drum roll)

    Table of Contents

      • Day 1: Grand Palace, Wat Pho, Wat Arun
      • Day 2: Jim Thompson House, Parks, Muay Thai at Rajadamnern Stadium, Optional Weekend Excursions
      • Useful Info: Getting around Bangkok, Where to Stay,  Additional Tips for Visiting Bangkok


    Day 1 of 2 days in Bangkok

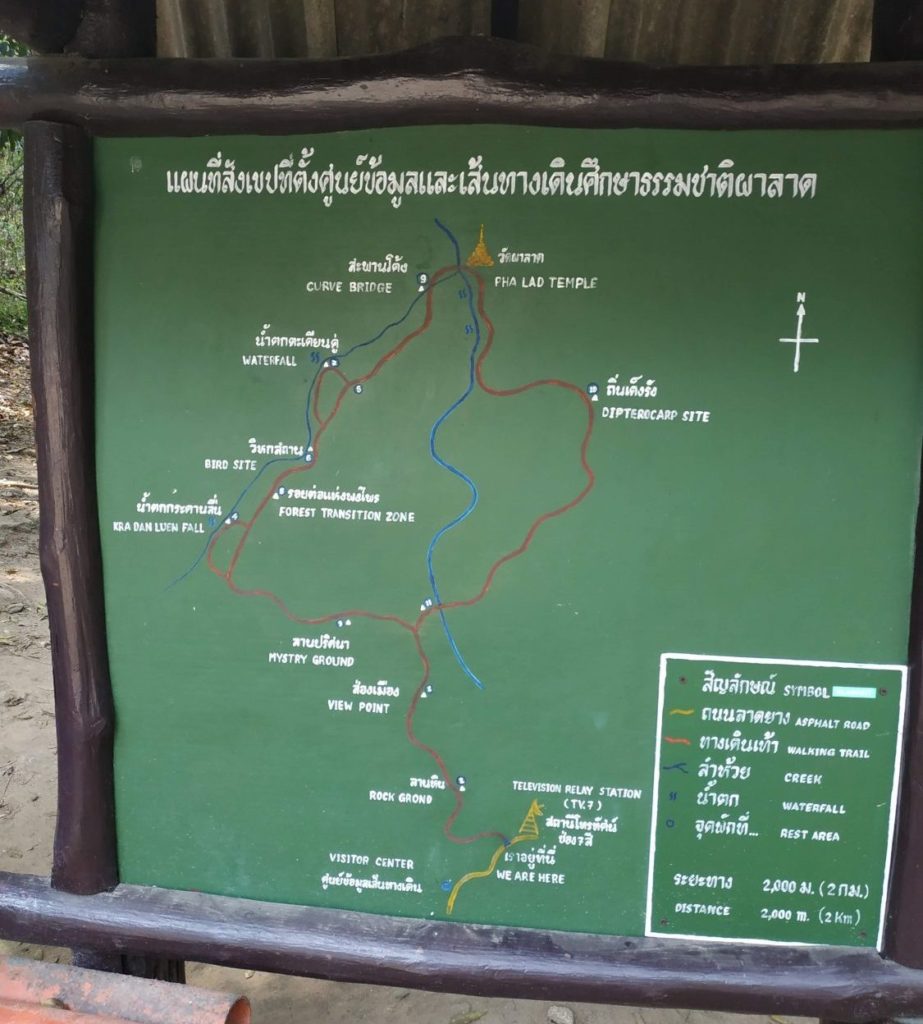
    As you can see on the map these top attractions are clustered together.  So for Day 1 of your 2 days in Bangkok, I organized the itinerary around these attractions to avoid backtracking on Day Two. These attractions included the Grand Palace Complex (includes Emerald Buddha), Wat Pho (Reclining Buddha) & Wat Arun.

    The Grand Palace Complex

    The Grand Palace is stunning.  The architecture and details will blow you away!  That being said, it is crowded and chaotic.  Get here at 8:30 a.m. when it opens. By afternoon the heat and the crowds will be unbearable.  The Temple of the Emerald Buddha (Wat Phra Kaew) is located within the Grand Palace complex and is the most popular attraction here.

    You must take your shoes off before walking up the stairs to enter the temple.  And don’t be surprised if it is wall to wall people.  I found this experience to be the least enjoyable. I think admiring the ornate buildings from the outside is what I enjoyed most.

    What to wear: Make sure to wear long pants or a skirt that goes past the knees and also a shirt with sleeves or bring a scarf to cover up with.  If you forget these, they do have a place to rent them from.

    Opening Hours: The Grand Palace is open daily 8:30 a.m.-3:30 p.m. rarely it closes for special events.  Tickets are 500 THB (Thai Baht currency). Visit The Grand Palace for more information.

    Location: Na Phra Lan Road, Phranakorn (Rattanakosin) Follow the signs for the foreign visitor entrance and follow the crowds. I read about scams that tell you it’s closed when it’s not or try to steer you somewhere else, I did not personally have this happen, but just ignore anyone who tries to tell you this and make your way to the main entrance.

    Golden architecture at the Grand Palace Bangkok

    Lunch

    Take a break for lunch or a light snack before moving on to Wat Pho.  AMA is a great Thai restaurant only a 5-minute walk from the Grand Palace and in the direction of your next stop at Wat Pho.

    Address: 270 272 Maha Rat Rd, พระบรมมหาราชวัง Khet Phra Nakhon, Krung Thep Maha Nakhon 10200, Thailand.

    One of the best things you can do in a crowded and hot place like Bangkok is to take time for your breaks.  They are a requirement if you don’t want to burn out too quickly.

    Wat Pho (The Reclining Buddha)

    The Wat Pho complex is much less crowded than the Grand Palace.  That’s not to say there aren’t crowds, but that it is less crowded.  I found it to be more enjoyable to walk around.  The main attraction, the reclining Buddha is almost 50 feet high and over 150 feet long!  The bottoms of the feet are almost 10 feet high and over 14 feet long!  The mother of pearl used on the feet is really stunning to see in person.

    What to wear: Make sure to wear long pants or skirt that goes past the knees and also a shirt with sleeves or bring a scarf to cover up with when you go into the temple of the Reclining Buddha or any other temple within Thailand.  I don’t recall if they had a place to purchase scarves inside the Wat Pho complex, but I’m guessing they probably did, or close by since it is a requirement to cover your shoulders and legs.

    Opening Hours: Wat Pho is open daily 8:00 a.m.- 6:30 p.m. Tickets are 200 THB.

    Location: 2 Sanam Chai Rd, Khwaeng Phra Borom Maha Ratchawang, Khet Phra Nakhon, Krung Thep Maha Nakhon 10200, Thailand. Visit Wat Pho for more information.

    Enormous gold reclining buddha in Bangkok

    Side Note Regarding Massage School: At Wat Pho, there is also the Wat Pho Thai Traditional Massage School. I read about the school, which was established in the ’50s and it sounded like a good place to get a traditional massage.  However, I have to be honest, I did not have a good experience here and would not recommend it.  I found it to be a crowded fast-food style of massage.

    (*warning gross details, you may wish to avoid reading) Besides being placed side by side with other strangers getting their massages, it did not appear to be a sterile environment either.  I saw a man with a large sore on his arm, that was bleeding, he just wiped it with his hands, while he sat and waited for his massage.  And as far as I could see they didn’t sterilize or wipe down the massage mats between clients.

    Also, it was the most expensive massage I got while in Thailand.  So although others may have had good experiences here, I did not, and could never recommend it based on my own experience.  You are better off to find a smaller massage studio near your hotel that is highly rated and can provide a cleaner and more personalized Thai massage.  Read about my massage experience at Stand Alone Spa & Massage, I highly recommend it!

    Wat Arun Ratchawararam (Temple of Dawn)

    Getting to Wat Arun: After leaving Wat Pho if you make your way back to the street the AMA restaurant was located on, you will walk about a block down to the Tha Tien water taxi/ferry.  You walk thru a small hallway with little shops and vendors on each side and make your way to the ticket line where it is 4 THB per person to cross the river to Wat Arun.

    Break Time: Now it is a good time for you to take another break before visiting Wat Arun. There is a cafe inside the Wat Arun complex, but I recommend that you instead pass the entrance gate to Wat Arun and walk about 5 minutes to the end of the street where you will find a couple of small cafes that make a great place to get a cold drink and have a break from the crowds.

    Wat Arun Temple of Dawn Bangkok

    Wat Arun is an incredibly detailed temple! It is definitely worth seeing on any trip to Bangkok.  Visit it at sunrise or sunset to see it lit up by the sun.  The stairs to the top, are very steep!  It was closed for a ceremony when I visited, but I can say by walking up the portion that was open, if you have a fear of heights, it is best to stay at the bottom.  However if not, you will be provided with views of the river and of Bangkok below.

    Location: 158 Thanon Wang Doem, Khwaeng Wat Arun, Khet Bangkok Yai, Krung Thep Maha Nakhon 10600, Thailand, for more information visit Wat Arun

    What to wear: Make sure to wear long pants or a skirt that goes past the knees and also a shirt with sleeves or bring a scarf to cover up with.  If you forget these, they did have a place to purchase scarves to cover up with.

    Opening Hours: Wat Arun is open daily 8:30 a.m.-5:30 p.m.  Tickets are 30 THB.

    Porcelain details on Wat Arun

    Dinner

    It has been a full day of sightseeing, so depending on how you’re feeling, you can either head back to your hotel to relax and get dinner or another option is to take the river taxi that loads directly in front of Wat Arun and ride it to the stop for Khao San Road. *Tip: Skip an expensive sunset river cruise and instead ride the water taxi to the end of the line during sunset hours.

    I went because it was my first time here, and it was on the list of “must see’s.” However, having visited it, I can say, it’s nothing special. It is very touristy, but if you really must eat a scorpion or see what it is all about, then, by all means, go check it out.  It makes for a nice ride down the river and once getting off the water taxi you will be rewarded by walking through streets filled with restaurants and plentiful dining options.

    Location: Khaosan Rd, Khwaeng Talat Yot, Khet Phra Nakhon, Krung Thep Maha Nakhon 10200, Thailand

    Day 2 of 2 days in Bangkok

    Today you will want to take it a little slower. As I said earlier, with only 2 days in Bangkok, it isn’t enough time to see every attraction.  Plus that will really burn you out and not allow you to appreciate Thailand’s capital city. Instead, I recommend you take some time today for wandering and relaxing. Perhaps even get a massage! These sights allow time for all of that.

    The Jim Thompson House

    The Jim Thompson House is a museum to its former owner, Jim Thompson, an American businessman who moved to Thailand in the ’40s and helped promote the Thai silk trade by creating the Thai Silk Company Ltd.

    He was also a collector of Asian art and the Jim Thompson House displays his collection.  If you enjoy history with a dash of mystery (he mysteriously disappeared in the ’60s) and a stroll thru some quiet gardens, then this might be the place for you.

    Opening Hours: The Jim Thompson House is open daily 9:00 a.m.- 6:00 p.m. Tickets are 200 THB and include a 30-minute guided tour of the house (unaccompanied visits are not allowed). During the guided tour, you are expected to remove your shoes and no pictures allowed on the tour. You can, however, wander around grounds outside the house on your own.

    Location: 6 Rama I Rd, Khwaeng Wang Mai, Khet Pathum Wan, Krung Thep Maha Nakhon 10330, Thailand. Visit Jim Thompson House for more info.

    Lunch

    You have the option of finding someplace close to the Jim Thompson House or if you’d like to check out one of Bangkok’s many malls (and have an air-conditioned break), I recommend Terminal 21.

    Terminal 21 is about a 30-minute ride on the BTS Sukhumvit Line. It is an airport-themed mall and the top floor is full of restaurant choices as well as a food court.  They also have a movie theater and unique shopping choices, with each level representing a different destination (Tokyo, London, San Francisco, and so on).

    Location: 88 Soi Sukhumvit 19, Khwaeng Khlong Toei Nuea, Khet Watthana, Krung Thep Maha Nakhon 10110, Thailand

    Bangkok City Skyline from Terminal 21

    Visit a Park: Lumphini Park or Benchakiti Park

    Lumphini Park is a huge park, with lots of shaded areas if you’re needing a break from the sun.  There is also a lake and boat rental options.  There are large monitor lizards in certain areas of the park. Although they tend to mind their own business, I think it is good to note, in case you’re not a fan of giant lizards.

    Benchakiti Park is a small park with a great running/biking path, but it has fewer shade options than the larger Lumphini Park. You might also see the occasional lizard here. You can rent bicycles and ride around the path by the lake.  Both parks offer nice skyline views of the city.

    Opening Hours:

    • Lumphini Park is open daily 4:30 a.m.- 9:00 p.m.
    • Benchakiti Park is open 5:00 a.m. – 9:00 p.m.

    Location:

    • Lumphini Park: Thanon Rama IV, Khwaeng Lumphini, Khet Pathum Wan, Krung Thep Maha Nakhon 10330, Thailand
    • Benchakiti Park: Ratchadaphisek Rd, Khwaeng Khlong Toei, Khet Khlong Toei, Krung Thep Maha Nakhon 10110, Thailand

    Dinner

    After you have had sufficient time to stroll thru a city park or explore some city streets.  You can make your way back to your hotel to freshen up before heading out for dinner.

    I recommend dining at The Family, it’s a wonderful Thai restaurant located not far from our next stop, Rajadamnern Stadium.  This quaint little restaurant situated on the canal is brightly decorated and the staff is exceptionally helpful and courteous. The food is delicious and you can get it as spicy as you want, just let them know your preferences.

    They also have vegetarian and vegan options, just let them know your needs and they will do their best to accommodate. The Kitty Cat Cafe shares a space next door so don’t be surprised to see cats strolling thru the restaurant.  The food is exceptional, the portions huge and everything is reasonably priced. It was one of the best meals I ate while in Thailand!

    Location: 1, 6 Prachathipatai Rd, Khwaeng Ban Phan Thom, Khet Phra Nakhon, Krung Thep Maha Nakhon 10200, Thailand

    Watch a Muay Thai Boxing Match at Rajadamnern Stadium

    Muay Thai fight at Rajadamnern Stadium in Bangkok

    Muay Thai has a long history within Thailand’s culture dating as far back as the 18th century. It is the national sport in Thailand and is a version of kickboxing that utilizes the fists, elbows, knees, and legs.  It is one of the top things to see and do in Thailand.  Rajadamnern Stadium is centrally located in Bangkok, which is why I recommend it here, vs the newer Lumpini Stadium.

    I wasn’t sure what to expect when attending a Muay Thai match. Will it be crowded? How violent would the matches be?

    I discovered there are plenty of seats, so no need to purchase in advance, we just bought our tickets at the ticket office. They have ticket options ranging from 1,000 to 2,000 THB. Although they will most likely try to give you a deal for upgrading. And second, the fights are very structured, they have a specific format and rules that must be followed.  It isn’t graphic and is more technical than violent.

    They have different levels of fighters throughout the night.  Ranging from junior Muay Thai fighters to the ones in the professional class. It is fascinating to watch years of Muay Thai history being followed to this day.

    Opening Hours: They are only open on Sundays, Mondays, Wednesdays, and Thursdays. Visit Rajadamnern Stadium to learn more and see specific fight times. Also, no outside food or drinks are allowed, but there are snack and drink options inside.

    Location: Rajadamnern Stadium is about a 10-minute walk from The Family restaurant. You can also take a taxi or Grab if you prefer. Address: 1 Ratchadamnoen Nok Rd, Pom Prap, Khet Pom Prap Sattru Phai, Krung Thep Maha Nakhon 10200, Thailand

    Gold statues at the Grand Palace in Bangkok

    Additional Options for what to see in Bangkok

    If you’re in Bangkok over the weekend check out these additional things to do:

    • Visit Chatuchak Weekend Market for shopping and street food.
    • Visit Damnoen Saduak Floating Market or one of the other more traditional floating markets near Bangkok.

    Useful Info

     Getting around Bangkok:

    • Taxis: At Suvarnabhumi airport, you take a number and then go to the appropriate taxi stand associated with that number.  It is a very easy system. When getting a taxi around town, you can just wave down any unoccupied taxi and they will pull over to pick you up.
      *Please note that for taxis and Grab, depending on the route you choose, you may need to pay an extra fee for the toll roads. When leaving from Suvarnabhumi airport this fee is an additional 50 THB.  The fee varies depending on your route. 
    • Grab: I would highly recommend downloading the Grab app prior to arriving in Thailand so you will be ready to go as soon as you touch down in Thailand.  It is extremely affordable and very easy to use. Plus you use your credit card to pay thru the app, so it can really help if you haven’t had a chance to get to an ATM.
    • BTS (Skytrain) & MRT (subway): These are two of the main public transportation modes with routes in central Bangkok.  I’d look at Google map to see if your hotel is located along one of their routes.  If it is then you might prefer this option to the taxi or Grab.
    • Tuk Tuks: These three-wheeled rides do not use a meter like a taxi or Grab.  Be prepared to haggle and if it doesn’t feel right, walk away.

    Final Thoughts on Transporation in Bangkok:
    With only 2 days in Bangkok, I suggest maximizing your time by using the most efficient mode of transportation. Taxis and Grab are very affordable and easy to use. And if you are located along the BTS or MRT these are easy to use, however they can get very crowded. So choose the method that will best help you enjoy your time in Bangkok.

    Canal in Bangkok with flowers

    Where to Stay:

    You have many great neighborhood options when staying in Bangkok.  Start by looking at the attractions that interest you and then choose a hotel within walking distance to those sights.  Or perhaps if you are a runner, you will want to choose a hotel near one of their parks. Depending on your travel plans after Bangkok, you may want to stay closer to the airport.  Think about your needs and then look for a hotel based on that.

    We stayed in two different areas.  Our first 3 nights were in the Sukhumvit neighborhood at Hide Bangkok Hostel.  The hostel was affordable and clean.  However, it was about a 15-minute walk along some very busy roads to actually reach the BTS (sky train) and taxis were also harder to come by here.  If you do end up staying in the Sukhumvit neighborhood, make sure to check out this Eco-friendly coffeehouse for some delicious food and coffee!

    Our last night in Bangkok we wanted to be closer to the airport, so we stayed at V20 Boutique Hotel in the Chatuchak neighborhood near the Chatuchak Weekend Market. We loved the neighborhood here!  It had produce stands, convenient stores, post office, fabulous coffee and massage all within 10 minutes or less.  Getting into town via taxi also was quicker and so was getting to the airport.

    Technology:
    You can purchase a SIM card for your stay in Thailand at the Bangkok airport upon arriving in Thailand.  There are two different kiosks (you will need cash), I used the AIS tourist SIM and it worked everywhere we went but did cost a little more than the True Move SIM that my husband used and it had a smaller data plan. The True Move SIM had more data and for the most part and worked everywhere we went, but there were a few spotty areas where my husband didn’t have coverage when I did.

    Final Tips for Bangkok:

    • Use sunscreen & wear a hat.
    • Carry water with you.  I recommend purchasing a refillable water bottle and bring it with you wherever you go.
    • Take lots of breaks from the heat and the crowds.  Even a small 30-minute break will do wonders!
    • The air quality in Bangkok is poor.  If you have respiratory issues, just make sure to plan ahead and bring any inhalers or asthma medicine you might need.
    • And remember, 2 days in Bangkok, is not enough, but give this city a chance, and I think it might just surprise you.  Wander it’s streets, mingle with the locals, go off the beaten path to really begin to feel the heartbeat of this capital city.
    • Use bug spray, especially if you plan to be out after dark. While in Bangkok I was bitten by something that left huge welts on my leg and arm.  This was the only place I had this problem. I wasn’t as vigilant with bug spray in Bangkok as I should have been.  I visited a pharmacy and purchased some cream to help with the itching.  The pharmacy staff was very helpful.
    • Cash is king in Thailand.  Most places do not accept credit cards, so you will need to withdraw cash at the ATMs.  Please note that ATMs charge approx $7 per withdrawal, so make it count!
    • And speaking of royalty, Thailand loves its monarchy. You will see statues and posters of their royalty everywhere. Be respectful.  I feel this goes without saying.  Whenever you travel to another country, do your best to respect their culture.


    If you need some ideas for what to see in Thailand after you leave Bangkok, read What to See in Thailand For your First Trip. And if you want to read about where I traveled to after Bangkok check out Visiting Sukhothai.

    Happy Travels!