author.travelffeine.com

Category: Le Cafe

Over the centuries cafes have been the place to brainstorm ideas, discuss life and socialize. Everyone from writers and artists to scientists could be found huddled together, dreams spilling out, and plans forming.
I hope to create a space here to provide some of that creativity and inspiration. A place to chat with you about life and all things coffee.
So grab a cup & enjoy!

  • Cinnamon Coffee Cake: Embracing Kaffee & Kuchen

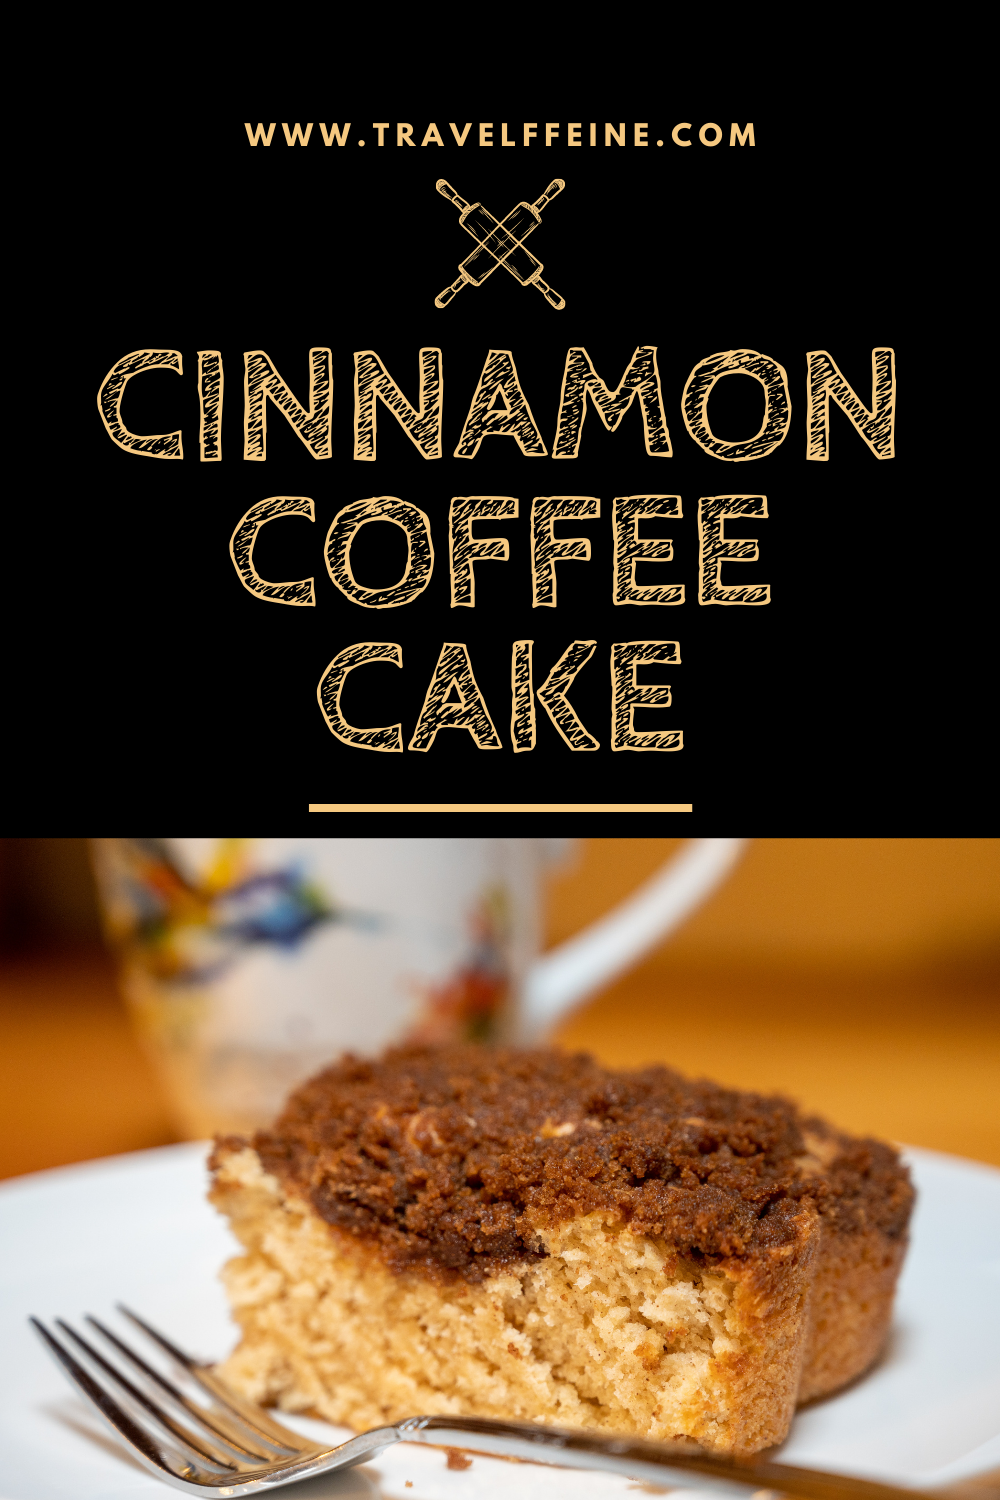
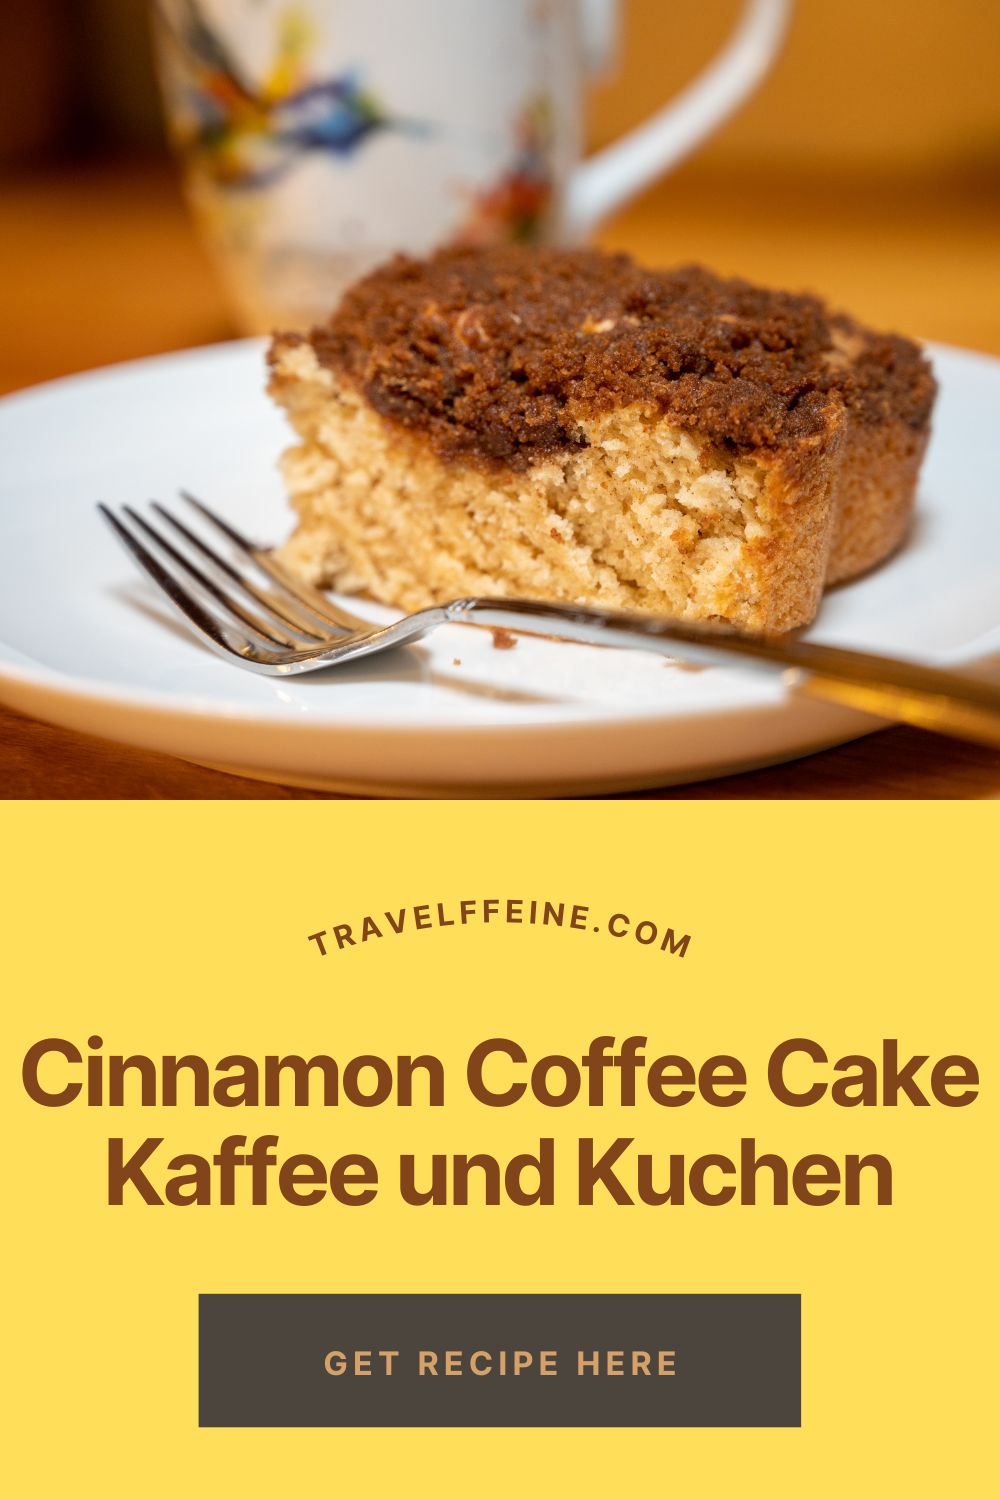
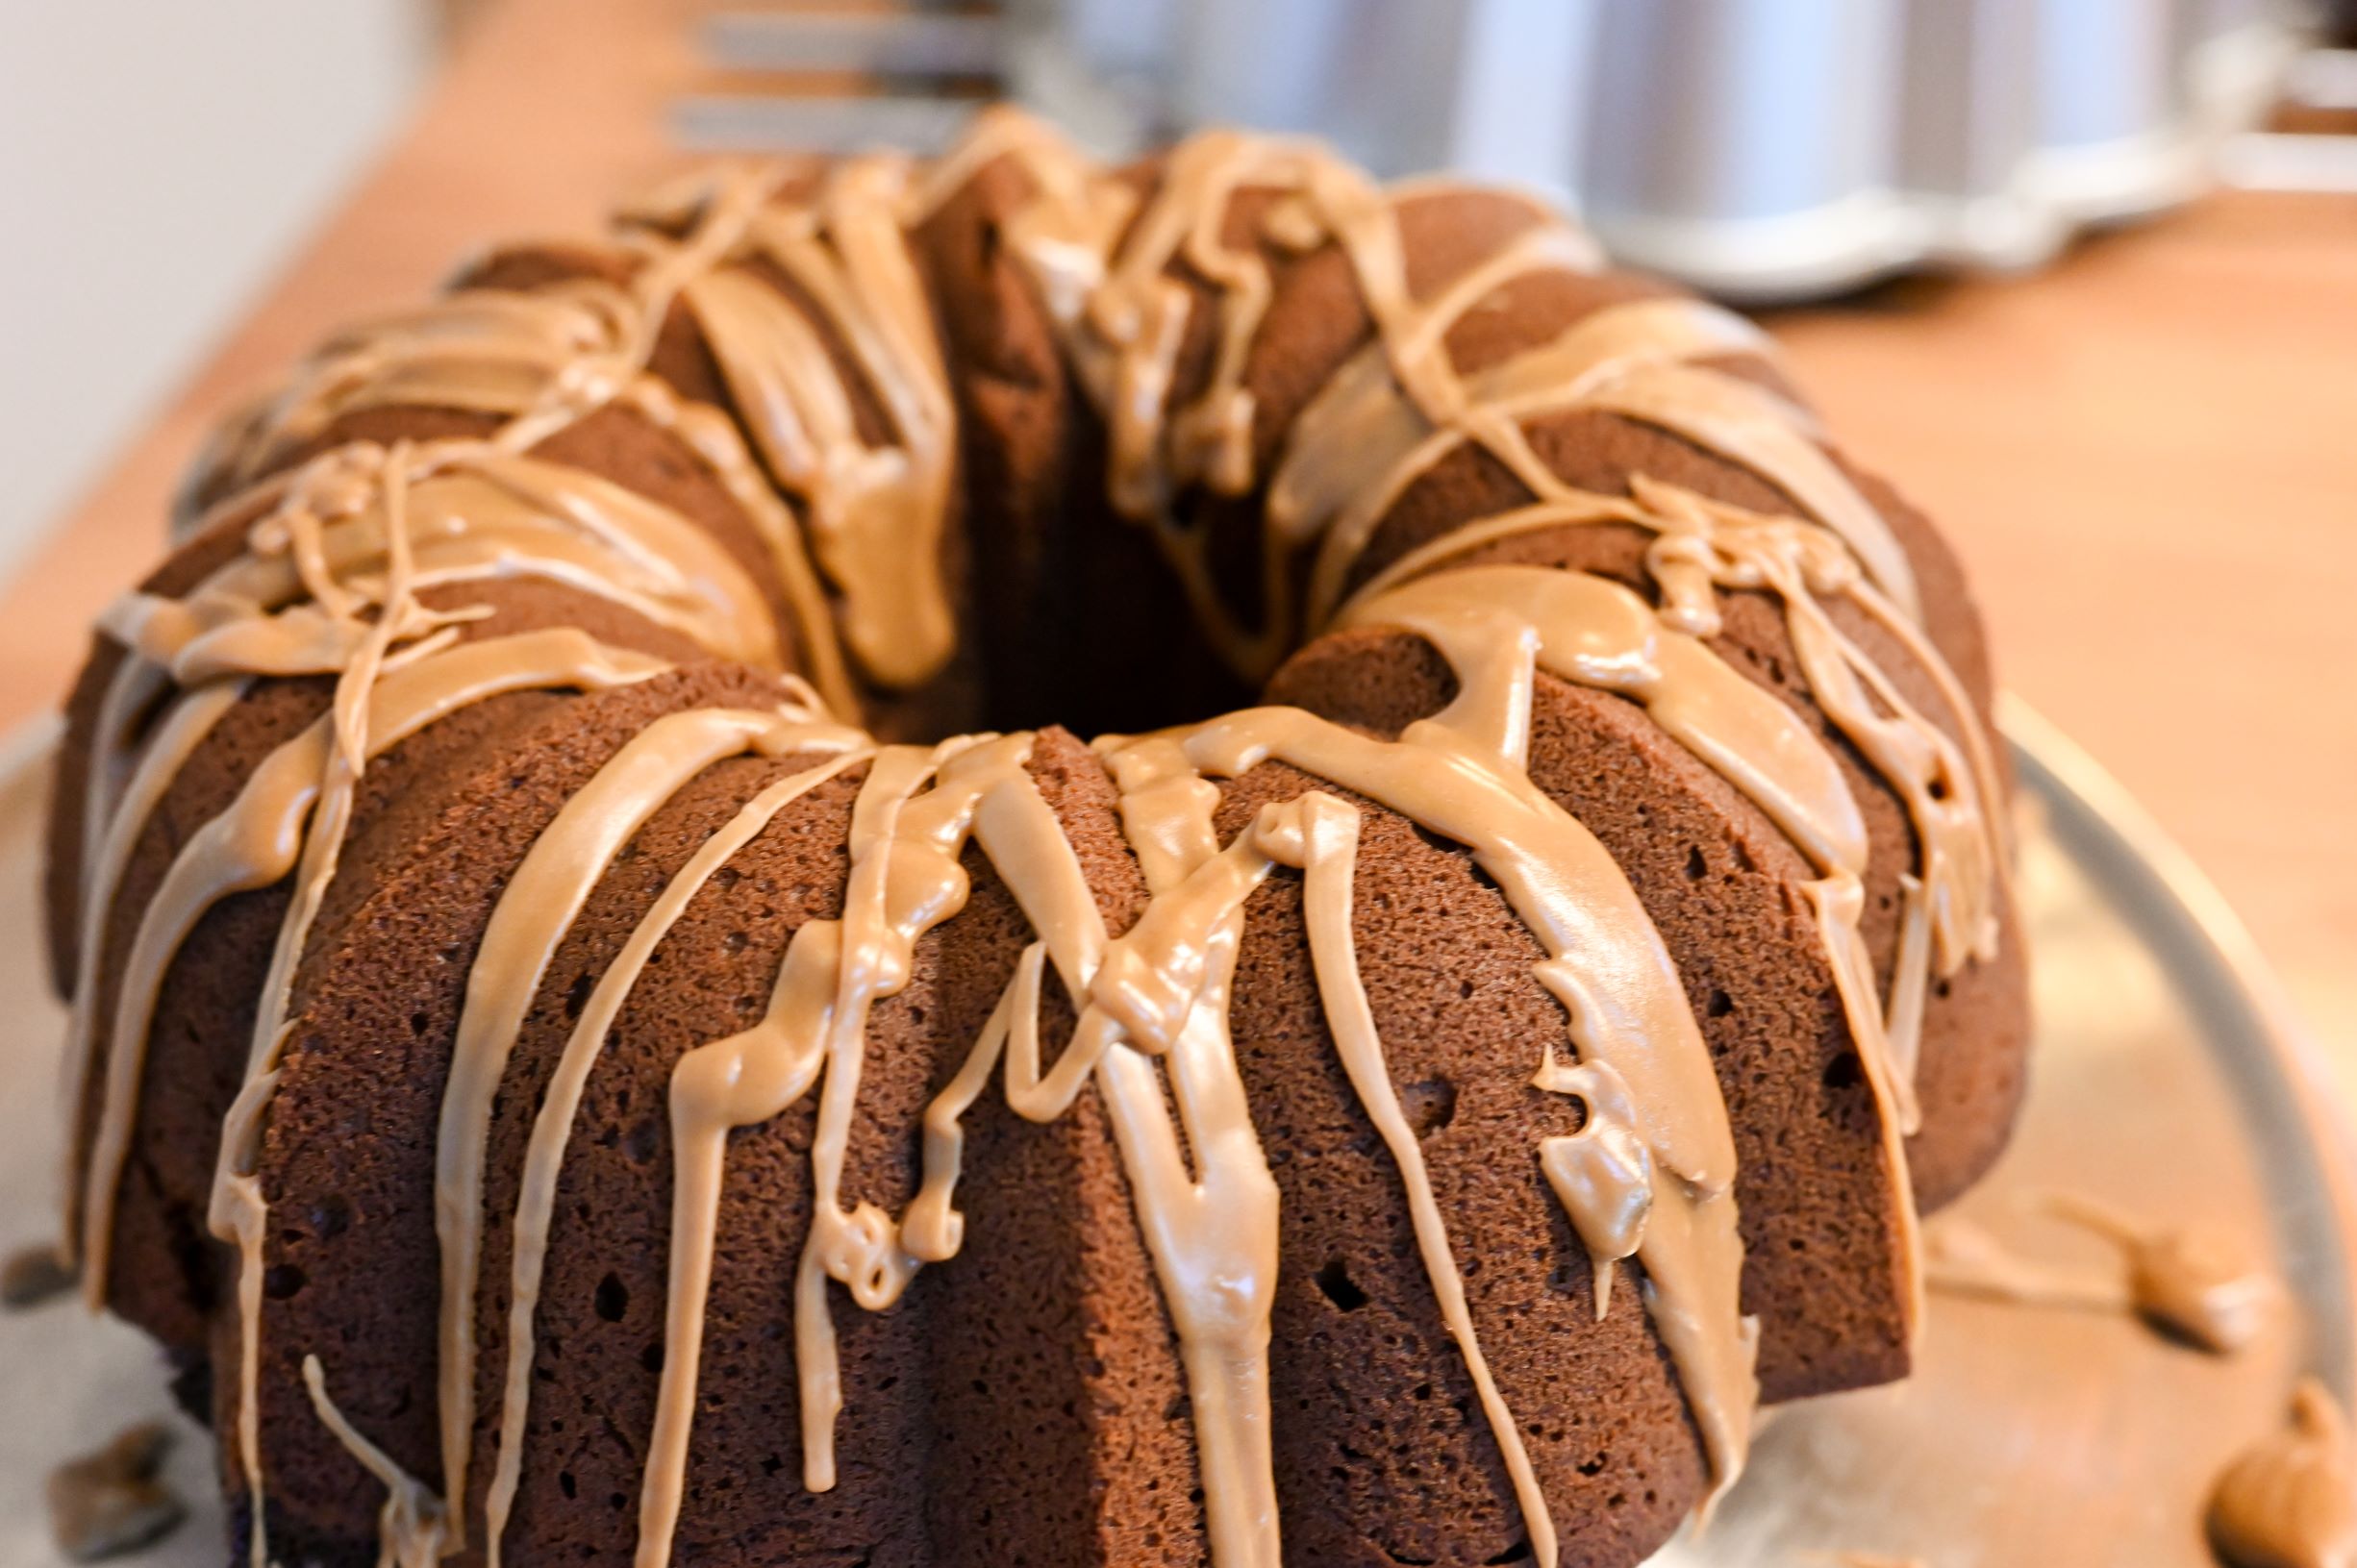
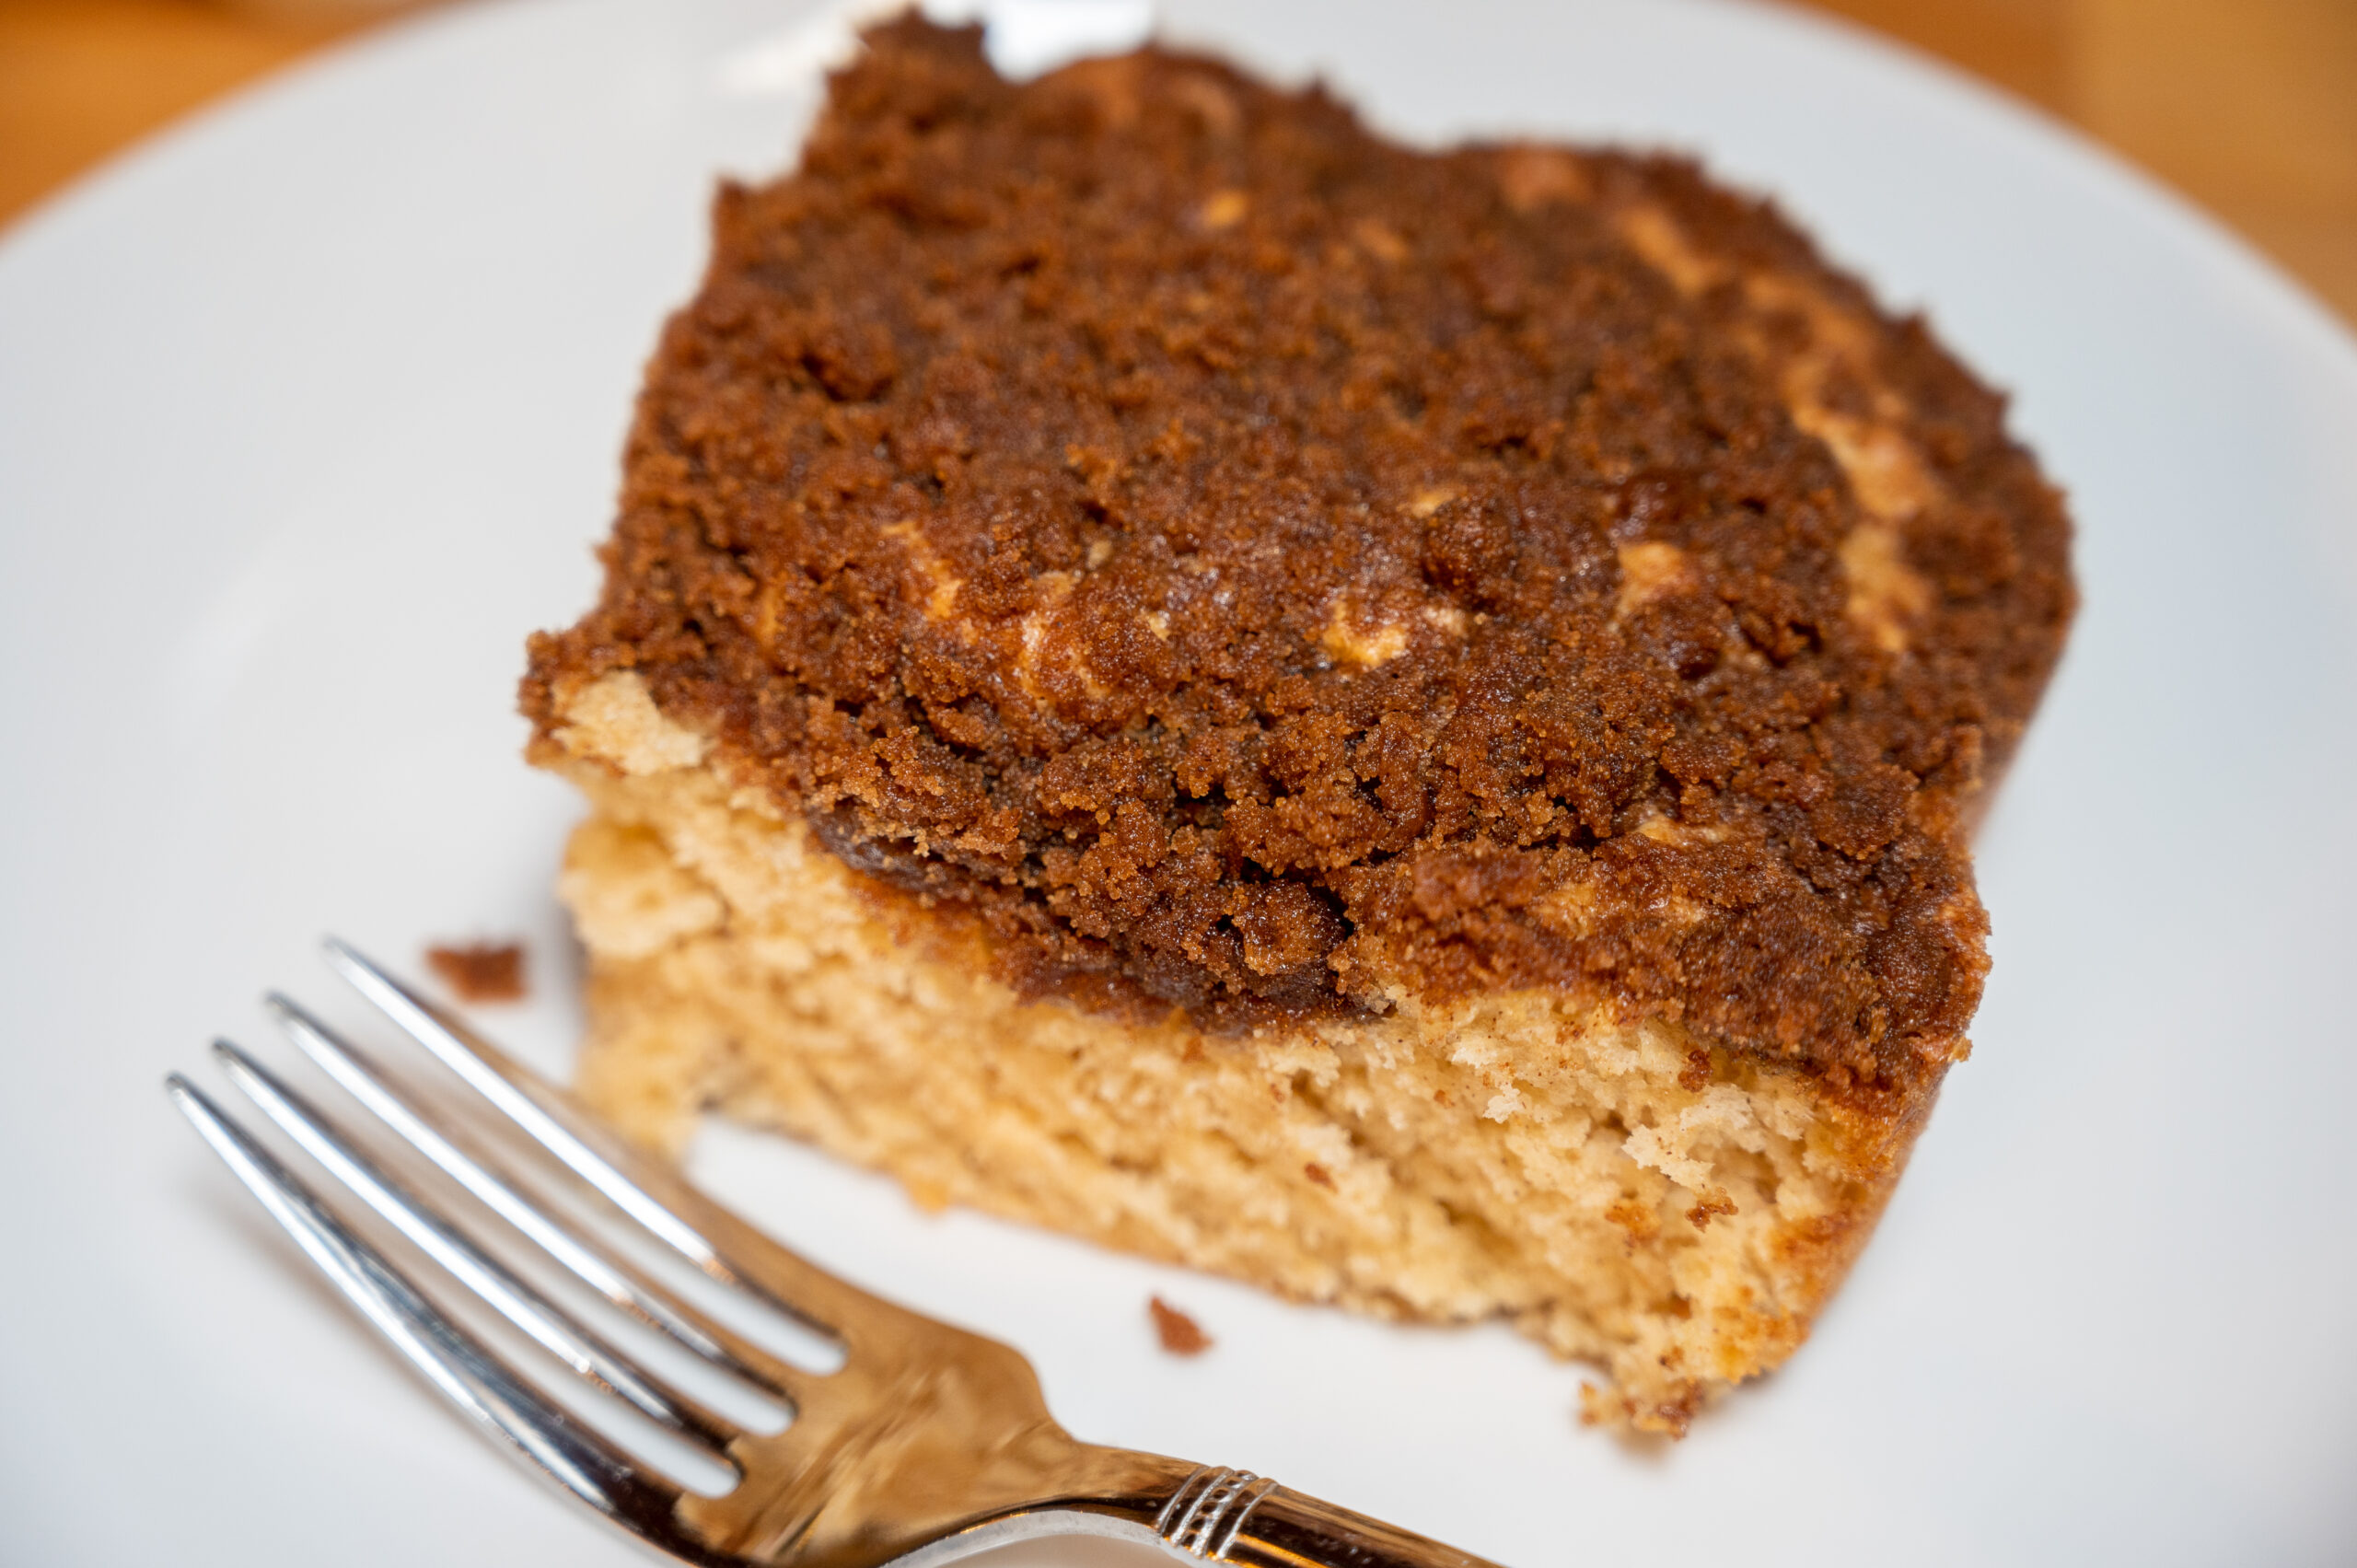
    There’s nothing quite like the fragrance of cinnamon as it wafts through the air and fills your home.  This cinnamon coffee cake recipe with streusel topping will make your house smell great, and it tastes great too! The coffee cake tradition is tied to Kaffee und Kuchen. A tradition practiced in Germany, Vienna, and parts of Switzerland. 

    My first experience hearing of Kaffee und Kuchen (coffee and cake) was during my first trip to Germany back in 2018. I was blown away by the beautiful cakes and baked goods I discovered during my travels around Europe.  The German bakeries had me drooling and wanting to sample every last cake.  I gave it my best shot, but alas, I will need to return to finish this lofty goal.

    What is Kaffee und Kuchen?

    Essentially, it’s a pause button for your afternoon. It’s a coffee and cake break usually taken during the afternoon hours 2-4 p.m. A time when friends, family, and co-workers gather together for coffee and cake and community. I love this! Not only do I enjoy something sweet with my coffee, but I love the idea of taking time to connect.

    Our world has become so busy and full of hurried distractions. Perhaps, if we were to slow down and make a habit of connecting over a cup of coffee and a slice of coffee cake, we’d be just a bit happier. Maybe, a little less stressed. Perhaps, we’d focus on what we have, our blessings, our friendships, and our family.  I don’t know, but let’s give it a shot!

    Bake Ahead Cinnamon Coffee Cake

    I think I established that I love all things coffee, and I love something sweet with my coffee. Be it pancakes, coffee cake (actual cake with coffee in it), or leftover Thanksgiving pie. Coffee and desserts give that perfect balance of bitter and sweet. I have some go-to coffee cake recipes, this cinnamon coffee cake recipe is one of them, and I also love my cranberry coffee cake and a rhubarb crisp in the summer.  I did not know it, but I was born for this Kaffee & Kuchen concept! I just didn’t realize there was a term for it.

    This cinnamon coffee cake recipe is so easy to make, and it makes your house smell incredible! Between prep and baking, you’ll have this cinnamon coffee cake made in less than 1-hour. As a bonus, I think this tastes best after it’s completely cooled, meaning you can bake it the night before, and it will taste even better the next morning.  No muss, no fuss, bake ahead cinnamon coffee cake.

    Tips for Making this Cinnamon Coffee Cake Recipe

    1. When you mix the wet and dry ingredients, try not to overmix. I like to turn and fold the mixture to grab the flour off the bottom of the bowl. Stir the flour and wet ingredients together until combined, and you no longer see powdered flour.
    2. Mix the brown sugar, flour, and cinnamon for the topping first, eliminating any brown sugar lumps before adding in the melted butter.
    3. And as I mentioned above, I think baking the cinnamon coffee cake ahead of time and serving it cold tastes the best, and the texture is best this way too. Plus, it makes for easy prep the night before. You can even microwave a slice for 10 seconds if you want it slightly warm (this is my hubby’s preference).
    4. Serve with coffee, and enjoy!

    Cinnamon Coffee Cake Recipe

    cinnamon coffee cake

    Additional Articles You Might Enjoy

    coffee cake with cinnamon streusel
    coffee cake kaffee und kuchen recipe
  • 10 Best K-Cup Coffees To Start Your Day

    I love a relaxing morning where I have time to grind my coffee beans and brew a cup of French Press coffee or Chemex Coffee. However, some mornings I’m exhausted and don’t have time to spend 5-10 minutes making a cup of coffee. Enter my Keurig K-Cup coffee machine! It is so convenient to pick out a K-Cup coffee pod, place it in the machine and click brew. Easy-peasy.  These are some of the best K-cup coffees I’ve found in over a decade of drinking K-Cup coffee.  I chose them based on their flavor, strength, aroma, and willingness to drink them repeatedly.

    I typically drink my coffee either black with a teaspoon of sugar or with two teaspoons of half-and-half and one teaspoon of sugar.  All of the K-Cup coffees listed here were tested both with half-and-half and without.

    1) Tim Hortons Original Blend

    Tim Horton's K-Cup coffee

    I first tried Tim Hortons Original Blend while traveling in the U.S. years ago. The hotel I stayed at had a K-Cup machine in the room, and one of the provided K-cup coffees was Tim Horton’s Original Blend. It was love at first sip! Often, the in-room coffee given in hotels is, well, less than adequate, but I loved Tim Horton’s K-Cup coffee and started buying them online for a quick go-to coffee for those busy mornings when I need something quick! It is still one of the best K-Cup coffees I’ve tried to date.

    2) Don Francisco’s Hawaiian Hazelnut Coffee

    Don Francisco Hawaiian Hazelenut coffee

    I am not someone who typically enjoys flavored coffees. I think most of them taste artificial. That said, the one flavor I do enjoy is hazelnut-flavored coffee. Don Francisco’s Hawaiian Hazelnut combines two of my favorite flavors, hazelnut, and coconut. What can I say? I’m nuts about it! It takes me back to Maui, sitting on the lanai, sipping coffee, and watching the sunrise. Now, that’s the life!

    If you’re someone who likes flavored coffees, then you need to try Don Francisco’s Hawaiian Hazelnut. It is one of the best flavored K-Cup coffees! I’ve been drinking it for years, and it is a favorite of mine and my houseguests.

    3) Peet’s Coffee Café Domingo

    medium roast coffee

    I mentioned Peet’s Cafe Domingo in my article on the 7 Best Coffees to Try for Any Brewing Method, and it continues to be one of my favorites. It is an excellent medium roast coffee with nutty and toffee flavor that is the perfect morning pick-me-up! Although I typically buy it in whole bean 1lb bags, it is also one of the best K-Cup coffees I have tried.

    4) Krispy Kreme Classic Coffee

    Krispy Kreme Classic coffee K-cups

    I remember my first time visiting a Krispy Kreme donut store, and I ordered a coffee with my donuts, one cream, two sugars. I was pleasantly surprised when I took my first sip at how good it was! So when I saw that Krispy Kreme was producing a line of K-Cup coffee, I had to try it! It’s great! The Krispy Kreme Classic Coffee is a lot like what they serve in their stores. It is a favorite of mine and my hubby’s. It tastes even better with a Krispy Kreme donut, but then we can’t have everything!

    5) San Francisco Bay Coffee Fog Chaser

    San Francisco Bay Fog Chaser Coffee

    Another long-time staple of mine is San Francisco Bay Coffee’s Fog Chaser. This is one of the best K-Cup coffees for those who enjoy a full-bodied dark roast coffee. In addition to the great flavor, I also like that these K-cups are made with plant-based materials and are certified fully commercially compostable. 

    I used the Fog Chaser K-Cups to make quick DIY lattes as it is a bold dark roast blend. You use one of their K-Cup coffee pods and set your water amount to 4 oz, then add in your favorite flavoring and some frothed milk, and you’ve got a quick DIY latte! 

    Now, I use my Nespresso Essenza Mini to make lattes and cappuccinos. Still, if you don’t have an espresso maker, then the San Francisco Bay Coffee Fog Chaser K-cups are perfect for a K-cup espresso substitute.

    6) Atlas Coffee Club K Cups

    Atlas Coffee El Salvador

    Atlas Coffee Club is a forerunner in the subscription coffee world delivering freshly roasted coffee to your door and now they have added K Cups to their coffee offerings.  Atlas Coffee Club K Cups have taken coffee pods to a whole new level.  They don’t sacrifice quality for convenience, in fact, they figured out a way to fit 20% more coffee into their pods for a richer brew. They roast the coffee on-demand before shipping so you get freshly roasted coffee, something previously lacking in the world of coffee pods.  Additionally, they pay above Fair Trade prices and their K Cups are recyclable–now that’s a win-win!

    If that wasn’t enough, they also packed their K-Cups into a beautiful box that functions as a drawer. No need to hide an ugly box of coffee pods, you will want to display these beautifully designed containers on your countertop. It is the best-designed and functional K-cup box I’ve ever seen.  

    If you subscribe to their monthly coffee club you will also receive a postcard from the country of origin (how cool is that), along with the history on the origin of the coffee, and each month you’ll receive a new box from a different country to try. 

    I tried the Brazil and El Salvador blends so far and both were great.  I preferred the Brazil with a little sugar and half and half, while the El Salvador was perfect black.  When you drink it black you taste the notes of cinnamon and spice. It was a pleasant surprise to find a K-Cup with so much flavor! I am excited to try more of Atlas Coffee Club’s K Cups, I’m thinking maybe a “trip” to Costa Rica?

    7) Folger’s Hazelnut Cream K-Cup Coffee

    Folgers Hazelnut Cream K-cups

    If I remember right, there was a time when I couldn’t get the Don Francisco Hawaiian Hazelnut K-Cup coffee, and I had to try something else. I saw that Folger’s Hazelnut Cream K-Cup coffee got good reviews, so I decided to give it a try. I was glad I did! It ties for the best Hazelnut K-Cup coffee I’ve tried to date! It doesn’t have the added coconut flavor that I love in Don Francisco’s Hawaiian Hazelnut, but it has a delicious creamy hazelnut flavor and fragrant aroma. If you love hazelnut coffee, you will love Folger’s Hazelnut Cream!

    8) Diedrich Morning Edition Regular & Decaf

    Diedrich Morning edition

    Diedrich Morning Edition is another one of those hotel-provided K-Cups that turned out to be great! In addition to the regular Morning Edition Coffee, Diedrich Coffee’s Morning Edition Decaf K-Cup coffee is the best decaf K-Cup coffee I’ve tried. Now, I haven’t tried a lot, as I don’t typically drink decaf coffee. However, I have some houseguests who prefer decaf, and occasionally in the evening, I enjoy decaf coffee. So, if you like drinking decaf, I highly recommend you give Diedrich Coffee’s Morning Edition Decaf a try!

    9) The Original Donut Shop K-Cup Coffee

    Donut Shop coffee k-cups

    The Original Donut Shop Regular Coffee is one of the best K-Cup coffees for that good all-around diner-style cup of coffee. This is one of my husband’s favorite k-cup coffees. It’s that dependable cup of coffee that goes great with a sweet bread or donut hole.

    10) Starbucks Veranda Blend

    Starbucks Veranda blend

    I don’t think the K-Cup style coffee makers typically lend themselves well to light roast coffees. However, I do enjoy Starbucks Veranda Blend Blonde Roast K-Cup coffee. It is probably the best light roast K-Cup coffee I’ve found so far. I enjoy getting it on drip at my local Starbucks, but it is much cheaper to brew a cup at home!

    Final Thoughts on the Best K-Cup Coffees

    I brew the K-Cup Coffee listed in this post using 10 ounces of water. My K-Cup Coffee maker does go up to 12 ounces, but I found it is a little weak for my taste with that much water. I only change this water amount when using the San Francisco Bay Coffee Fog Chaser K-Cups to create a quick latte. Then I only use 4 ounces to create a strong shot of coffee in place of using a shot of espresso.

    I think the best sign of a good coffee is one you want to drink repeatedly. I’ve tried around 25 different K-cup coffees, and the ones that made this list of the best K-Cup coffee are the ones I continue to purchase year after year. That said, the “best K-Cup coffee” is a subjective term. I’d love to hear about some of your favorite K-Cup coffees that didn’t make my list. I am always up to try a new coffee!

    Related Articles You May Enjoy

    Note: Travelffeine is reader-supported. This post contains affiliate links. When you purchase using one of these affiliate links, we get paid a small commission at no extra cost to you. And as always, all opinions are our own. Thank you!

    10 Best K-Cup Coffees (2)
    10 Best K-Cup Coffees Travelffeine
  • Valentine’s Day Gift Ideas and Memorable Things to Do

    When I was in the first grade, all the kids would bring Valentine’s Day cards to give each other. It was a simple gesture of friendship and something we looked forward to. As an adult, I feel that Valentine’s Day has become a bit commercialized. However, there is no reason we can’t use this day to show love to our family and friends in a meaningful way. 

    With that in mind, I created this list of Valentine’s Day gift ideas and things to do to help you create memories with those you love. You can purchase a gift, make a gift, or plan a memory-making adventure. Make it what you want and have fun with it!

    1) DIY Candle-Making Kit

    This DIY candle-making kit is a Valentine’s Day gift idea and thing to do all rolled up in one. Why not plan to make candles with your significant other or your kiddos. This fun Valentine’s Day activity is sure to create meaningful moments with your loved ones.

    2) Take an Online Cooking Class

    Thanks to technology, you can now take a cooking class from the comfort of your home! Cozymeal offers online cooking courses with chefs that teach a variety of cuisines. You pick the class you want, and they provide you with your shopping list. Then during the class, you set up your tablet or other device, and the chef walks you through the recipes step by step. You can ask as many questions as you like and have a personal chef guide you. A cooking class is a fun solo activity or would also make a great Valentine’s Day gift idea for couples.

    3) Plan a Picnic

    A  picnic is such a fun way to create memories with those you love. This backpack picnic basket includes dishes and silverware for four and makes a great Valentine’s Day gift idea for a couple or a family.

    Don’t worry if you live somewhere like the Pacific Northwest, where it rains; plan for an indoor picnic instead! Layout a blanket, set up some music or a photo backdrop, and pretend you’re somewhere in Europe enjoying a picnic in the park on a sunny day. Whether you enjoy this outside or indoors, you’re sure to make beautiful memories.

    4) Adventure Coupons

    A fun DIY Valentine’s Day gift idea is to create adventure coupons to hand out to friends and family. If you know someone who enjoys hiking, give them a coupon to go on a hike with you. This is a wonderful way to set up multiple memory-making opportunities throughout the year. 

    Perhaps you know someone who wants to go kayaking, then give them a coupon for a kayaking date with you. These can also be used for one-on-one time with kids who will love feeling like they have their own special date planned.

    5) The Gift of Coffee

    You can’t go wrong with giving the gift of coffee, no matter what the occasion! At least, that’s my opinion, but then I love coffee! Read Awesome Gift Ideas for Coffee Lovers to find Valentine’s Day gift ideas for all things coffee. Here are 7 best coffees to buy no matter how your loved one brews their coffee.

    Another great Valentine’s Day gift idea for the coffee lover in your life is the coffeegram. A new offering from Bean Box that ships in time for Valentine’s Day. Each coffeegram comes with six different coffees and treats to enjoy along with your coffee. The treats include:  shortbread ganache, chocolate handcrafted in Switzerland and Hawaii, cinnamon-dusted churro bars, and espresso-infused truffles.

    6) A New Favorite Coffee Mug

    What would the gift of coffee be without a new favorite coffee mug to go with it! I found this fun color-changing Super Mario mug that is too cute! Be aware that it is not dishwasher safe or microwave safe. Maybe you have a Gilmore Girls fan in your life who needs this Luke’s Diner coffee mug. If you want something more functional and durable, then look no further than my favorite coffee mug, the Yeti Rambler. It comes in various colors, and it is the best mug I’ve found for keeping my coffee hot while the mug itself remains cool to the ouch. I love it!

    7) Shared Acts of Love

    This idea encaptures the heart of what I think Valentine’s Day should be about. Although not a traditional Valentine’s Day gift idea, it is perhaps more of a gift for others as well as an opportunity for you to connect and share special memories with a loved one. By doing acts of kindness for others, we often create the most memorable moments for ourselves, and I think it boosts our mood too. 

    Some ideas for shared acts of kindness you can do with another loved one are:

    • Volunteer at your local food bank.
    • Buy a stranger’s coffee when you’re in line at your local coffee shop.
    • Deliver groceries to someone who needs them.
    • Drop off surprise flowers for someone who can’t leave their house and needs cheering up.
    • Send a card to a grandparent or loved one far away.

    8) A Chocolate Making Party

    It seems you can’t make a list of Valentine’s Day gift ideas without including at least one chocolate gift idea. So this Valentine’s Day gift idea is a gift and a thing to do combined in one. In addition to the included chocolate bar mold and cocoa bomb molds, you’ll, of course, need to purchase the actual ingredients for making the chocolate. This is a fun idea for couples and families. Why not make some chocolate gifts to give away too!

    9) A Photo Montage

    This DIY Valentine’s Day gift idea is a memorable one that can be enjoyed many times over the years. I make photo montages for my nieces and nephews’ birthdays and milestone birthdays for my siblings, and everyone loves the little trip in the past. The kids always exclaim, “I remember that!” They get so excited seeing themselves in the photos and videos and remembering the fun we’ve shared as a family over the years. I find it a great way to remember our love for each other and the shared memories we have together.

    Some free photo slideshow options are: Movavi Slideshow MakerFilmora Wondershare, and Canva’s slideshow toolFor more professional-style software, you can download Davinci Resolve for free. Still, since this is for more professional video editing, it comes with a much greater learning curve.

    If you prefer something a little more low-tech, then consider purchasing this Adventure Album and scrapbook your adventures together as a fun way to connect and relive memories while planning for new ones.

    10) Game Night

    A game night is a perfect way to spend Valentine’s Day. Gather friends and family, or make it a game night for two. Either way, you’ll laugh and play and grow closer by creating fun memories together. Scrabble is always a fun one, and you can even try to come up with Valentine’s Day-themed words. Candyland is also a fun take on a Valentine’s Day-inspired game. UNO is another fun game that is good for two or more people. I found this Super Mario version of UNO, and it is so cute!

    Planning Valentine’s Day Gift Ideas & Things to Do

    Valentine’s Day doesn’t have to be a “holiday” only about romantic candlelit dinners and pressure to buy the “perfect” gift. Instead, let’s make it about intentionally showing love to others, creating last memories and special moments with those we love. Make it fun, and make it unique to you and your loved one(s).

    To Making Memories!

    Note: Travelffeine is reader-supported. This post contains affiliate links. When you make a purchase using one of these affiliate links, we get paid a small commission at no extra cost to you. And as always, all opinions are our own. Thank you!

  • 7 Best Coffees to Try For Any Brewing Method

    I live in the Pacific Northwest, surrounded by so many great coffee roasters. This gives me ample opportunities to try the best coffees and find my favorites. These 7 coffees are my go-to coffees no matter what brewing method I use. Whether it’s my Aeropress, drip coffee maker, Chemex, or French Press, these are some of the best coffees I’ve found. I highly recommend you purchase these coffee beans whole and grind them yourself at home for the best results.

    1) Fonte Coffee’s Portofino Blend

    For those who read my article on How to Easily Make French Press Coffee, you know how much I love the Portofino Blend sold by Bean Box. The Portofino Blend is one of the best coffees I have ever tried, and it is so versatile! Although I love it in my French Press, it is also good in my Chemex and Aeropress. Honestly, I think this coffee blend works with every coffee brewing method. I highly recommend you try it!

    • Roast: Dark
    • Flavors: Chocolate and Hazelnut
    • Best for: All Brewing Methods (Drip, Espresso, French Press, Pour Over)

    2) Vashon Island Coffee’s Costa Rica Reserve

    The Costa Rica Reserve #401 blend is another favorite coffee of mine. Honestly, I think Costa Rican coffees are some of the best coffees in the world. I hope to visit Costa Rica soon and perhaps get to try some locally roasted coffee when I’m there. This medium roast coffee is also great in everything I’ve tried it in, including my drip coffee maker. If you enjoy medium roasted coffee with a nutty caramel flavor, then make sure to try the Costa Rica Reserve.

    • Roast: Medium
    • Flavors: Caramel and Nutty
    • Best for: All Brewing Methods (Drip, French Press, Pour Over)

    3) Keala’s Honolulu Blend

    I don’t believe I’ve met a Hawaiian coffee that I didn’t like.  Hawaii truly makes some of the best coffee in the world. It comes at a price, but I think it’s worth it!  Keala’s Honolulu Blend #40 is a smooth medium roast blend that has a nutty flavor.  I enjoy this in my drip coffee maker and my Chemex. I need to try it in my French Press next, but I have no doubt I will like it using that method too.

    • Roast: Medium
    • Flavors: Bold and Nutty
    • Best for: Chemex (Pour Over), French Press & Drip Coffee Makers

    4) Broadcast Coffee Roaster’s Johnson House Blend

    The Johnson House Blend is one of the best coffees I’ve found for brewing in a traditional drip coffee maker. It is a wonderful coffee to drink first thing in the morning. It has a fantastic aroma that hits your senses, and it also has some toffee notes in it, which I love! If you want to try something new for your morning coffee, but you tend to be more of a traditionalist, then the Johnson House Blend is a perfect coffee for you to try!

    • Roast: Medium
    • Flavors: Toffee with hints of chocolate
    • Best for: Chemex (Pour Over), French Press & Drip Machines, Iced Coffee

    5) Peet’s Cafe Domingo

    Peet’s Coffee has been around for over 50 years, and you can typically find their coffee in your local grocery store. However, I have difficulty finding their Cafe Domingo blend in stores, so I usually order it online. The Cafe Domingo blend tastes wonderful in a traditional drip coffee maker, and it is also great for the French Press. Additionally, if you’re someone who only uses a K-cup coffee maker, they also sell Cafe Domingo K-cups, which are also quite good!

    • Roast: Medium
    • Flavors: Toasted Toffee
    • Best for: French Press, Drip Machines, and K-cup Brewers

    6) Altruistic Joe’s Big Iron Blend

    Altruistic Joe is a coffee roasting company I learned of last year. They are a veteran-owned small business that happens to make one of the best coffees for your morning pick-me-up! Plus, they give back 20% to deserving charities with every purchase. It’s a win-win scenario! You can read all about them in Altruistic Joe: Coffee With a Cause.  

    As soon as I tried their Big Iron Blend, I was hooked! It is now one of my favorite coffees to use in my drip coffee maker and French Press. They have a variety of other coffees to choose from, so make sure to check them out.

    • Roast: Medium-Dark
    • Flavors: Bold with notes of Caramel and Chocolate and a hint of smokiness
    • Best for: French Press & Drip Machines

    7) Boona Boona’s Blueberry Brandy Ethiopian

    If you’re more of an adventurous coffee drinker, then consider trying this light and fruity blend made with Ethiopian coffee beans. It’s well-known that Ethiopia produces some of the best coffee beans globally, and the Blueberry Brandy Ethiopian blend is sure to surprise and delight your senses. I recommend trying it in an Aeropress, pour-over, or your espresso machine.

    • Roast: Light
    • Flavors: Blueberry, Fruity with a bit of Spice
    • Best for: Espresso, Aeropress, Chemex

    Finding the Best Coffees for Every Brewing Method

    Whether traveling or finding your favorite cup of coffee, the key is to be adventurous and always curious. One of the reasons I love using Bean Box and have been using them for years is the huge variety of coffee roasters they partner with. They always have a new blend to try, but they also keep the favorites around so you can continue to purchase the ones you know you love while exploring new options.

    I recommend looking up any roasters that operate locally near your home and purchase some freshly roasted beans there. Ask them about the flavor profiles and get recommendations based on the types of coffee you like to drink and the brewing methods you use. It’s always fun to talk coffee with others who share your passion. Plus, you may find a new favorite coffee!

    Note: Travelffeine is reader-supported. This  post contains affiliate links. When  you make a purchase using one of these affiliate links, we get paid a small commission at no extra cost to you. And as always, all opinions are our own. Thank you!

    Here are more coffee articles you might enjoy:

    Best Coffees to Try No Matter How you Brew (7)
    Best Coffees to Try No Matter How you Brew Travelffeine
  • Altruistic Joe: Coffee With a Cause

    Altruistic Joe isn’t “just” another coffee company. They are a veteran-owned business that sells coffee with a cause.  You’ll not only get a fantastic cup of coffee, but you can also feel good knowing your money went toward a worthy cause, other than the cause of delicious coffee, I mean.

    Keep reading to learn more about the company and the coffee I tried, but let me skip to the point. Try Altruistic Joe coffee. It is fantastic coffee from a great company!

    The Faces Behind Altruistic Joe Coffee

    So just who is behind this coffee with a cause, you ask? Owners (and veterans) Libby & Jamie Jenks are the faces behind this veteran-owned coffee roasting company. They are passionate about their coffee and about giving back, and it shows in the quality of their coffee.

    On the company’s website, they define their goals as follows:

    1. “Provide our customers the very best coffee available in the world, roasted fresh before it ships, sold at a competitive price.”
    2. “Maximize the positive global impact of each order by donating 20% of all net proceeds to a group of highly-rated charities, addressing a diverse set of needs.”

    Now, if that isn’t coffee with a cause, I don’t know what is! They explain that they choose the charities to support using strict guidelines to ensure the causes they support receive the maximum benefits. So they only partner with charities that receive a high rating of excellence.

    They further define the causes they are most passionate about giving back to as:

    • Global Health & Human Services
    • Military Veteran & Family Services
    • Animal Welfare
    • Environmental Conservation

    Where Do the Coffee Beans Come From

    As you read in the company’s goals above, you know that their priority is providing their customers with the best coffee available in the world.  That’s a pretty tall order, but they do it by partnering with independent farmers from Ethiopia, Guatemala, Columbia, Sumatra, & El Salvador. That’s some pretty great sources for excellent coffee beans!

    Coffee With a Cause Delivered To Your Door

    So how does it all work for you? Well, they take their premium sourced coffee beans and custom roast each order right before shipping it to you. That’s right. You are getting the freshest possible coffee beans delivered to your door! Your mailbox never smelled so good! Now, you can sit back and drink your amazing cup of coffee and feel good knowing your purchase gives back to a veteran-owned small business and other charitable organizations.  That’s a lot of bang for your cup! 

    The Big Question: How Does it Taste

    The company reached out to me to see if I’d try their coffee and potentially write a review if I liked it.  Well, as my readers know, I only give my honest opinion, and I won’t write a review for a product that I don’t like or wouldn’t use myself.  So, I was excited to try a new coffee roaster, but at the same time, I wasn’t sure what to expect.

    The Sniff Test

    First things first, I like to smell my coffee beans, and freshly roasted coffee is the best! So when I got my Altruistic Joe coffee in the mail and could smell it through the packing, I felt optimistic that this was going to be some great coffee. And it was.

    two bags of Altruistic Joe coffee

    Two Great Coffees To Try

    Altruistic Joe sent me two of their year-round favorites to try. The Big Iron Blend and the Cream and Crimson Blend.

    Big Iron Blend

    A medium-dark roast blend sourced from Guatemala and Sumatra. Its flavor profile includes “caramel and milk chocolate notes, citrus-like acidity, and a touch of smoke from our Smokehouse Dark Roast.”

    Cream & Crimson Blend

    A light-medium roast sourced from Guatemala and Ethiopia. Part of what makes the Cream & Crimson Blend unique is it is a little different each time you try it. They describe it as their “floating blend.” Saying although it comes from “the same geographical regions, each iteration is slightly different from the last.” Its flavor profile has notes of caramel, dried fruit, and citrus.

    The Taste Test

    When I opened the 12 oz bag of Big Iron Blend, I knew if it tasted as good as it smelled, I would like this one. I brewed a pot for my husband and me in our drip coffee maker.  I like to try different brewing methods when tasting coffee, and the one tried-and-true method that almost everyone I know uses is the drip coffee maker. So it needs to taste good in that first to pass the test.

    The Big Iron Blend did not disappoint! It is bold without being too bitter and has the caramel notes that I like in my coffee. I may not be able to describe each of the complexities with a particular coffee blend, but I do know good coffee when I taste it, and this is good coffee! If you like a bold coffee that hovers above a medium but not quite a dark roast, you will love the Big Iron Blend. It’s full of flavor and is a great way to start your day!

    Next, I tried the Cream & Crimson Blend, a light-medium roast, and I noticed more of its fruity and citrus notes. I liked the Cream and Crimson Blend because although it is a light-medium roast, it leans more toward the medium end, so it had a deeper richness that is often missing with a standard light roast. It also tastes great in my Aeropress!

    If you’ve never tried a light roast and always stick with the medium or dark roasts, I highly recommend giving the Cream and Crimson Blend a try. I think it’s a great starting point for the diehard dark roast fan looking to try a lighter roast.

    Altruistic Joe Coffee

    Freshly Roasted Right Before Shipping

    I looked at the “roasted on” dates on both of the bags of coffee I received, and it was indeed roasted right before shipping! This is a key reason why this will be some of the best coffee you’ve ever tried.  For the coffee connoisseur, you know that freshly roasted coffee beans, as well as a fresh grind right before brewing, are two crucial components to brewing the most flavorful cup of coffee.

    Other Coffee Options from Altruistic Joe

    In addition to the two coffees I tried, they offer a selection of single-origin coffees. I love sampling single-origin coffee as they always have something unique to offer, the only downside is you only get to try them once, but that’s part of the fun!

    The other thing I appreciate about Altruistic Joe is the size options when ordering coffee.  You can choose either their 12-ounce bags, which I tried, or if you drink a lot of coffee in your household, they also offer 5lb bags! I love that they have that additional option, as you can go through a 12 oz bag pretty quick! They also offer bags of ground coffee for those that prefer it pre-ground.

    Why Buy Altruistic Joe Coffee?

    One, it tastes amazing! Two, you’re supporting a veteran-owned small business, and if that weren’t enough, your purchase is also giving back to other charities in need.  It’s coffee with a cause and coffee with great flavor.  Win. Win.

    Try it today, and you get 10% off your first order by subscribing to their newsletter or receive 10% all future orders when you sign up for their coffee subscription service.  

    Other Articles You Might Enjoy

    Coffee with a Cause
  • How to Easily Make French Press Coffee

    French Press coffee is one of the simplest ways to brew coffee, but it can be a little intimidating when you’re first getting started. I know my first attempts ended in bitter and acidic coffee that was not enjoyable to drink. However, with a few simple steps, I learned to make delicious French Press coffee in only about 5-minutes! It really is so simple, and it tastes great!

    So when a friend recently asked me how to make coffee in her new French Press, I decided to create this easy guide for how to brew French Press coffee to help her and others who are beginning their journey using this classic coffee maker.

    What You Need to Make French Press Coffee

    First things first, let’s go over what gear you need to brew French Press coffee.

    In the step-by-step instructions, I explain how to make French Press coffee if you are missing some of the gear.  For example, let’s say you have a French Press, but don’t have a hot water maker with a temperature gauge or a kitchen scale, don’t worry, you can still make French Press coffee.  I highly recommend you get the additional gear, as it makes a big difference in the quality. That said, it’s not a requirement.

    • A French Press(You can purchase in various sizes, a popular option is this 34oz Bodum.)
    • Freshly Roasted Coffee Beans (Quality coffee beans really do make a huge difference!)
    • Burr Grinder (Grinding your coffee right before brewing ensures the best flavor.)
    • Water
    • Wooden Spoon or Chopstick (most French Presses are made of glass, so a metal stirring utensil is not recommended.)
    • Kitchen scale (This is to weigh your coffee to get the best coffee to water ratio.)
    • Hot Water Kettle

    How to Make French Press Coffee

    Essentially brewing coffee with a French Press is as easy as adding coffee grounds and hot water to your French Press, waiting 4-7 minutes, pushing down the plunger, and voila! You’re ready to drink your coffee! However, small but important details like how much coffee to water you should use and getting the right temperature can make all the difference in getting it right.  The components that really set apart a good cup of French Press coffee are quality coffee beans, proper grind, water to coffee ratio, and brew time. So let’s get started!

    Here are the step-by-step instructions for how to make French Press coffee.

    Step 1: Heat Your Water

    If you have a hot water kettle that allows you to set the desired temperature, then set it to 200 degrees Fahrenheit. This is a good starting point. I use anywhere from 200ºF-205ºF when brewing French Press coffee. 

    If you don’t have a temperature gauge, then heat your water to boiling and remove from the heat for 1-2 minutes.

    Step 2: Pre-Heat Your French Press

    Fill your French Press with hot water to pre-heat it. Use hot water from the tap or take some water you boiled and swirl it around the carafe with the lid on to warm the glass. This way, when you add the water for brewing, your carafe isn’t cold and won’t affect the brewing temperature of your coffee.

    Step 3: Measure & Grind Your Coffee Beans

    When brewing coffee with a French Press, I found the 1:15 water to coffee ratio to be the best.  I’ve tried a 1:13, and it is too weak. 1:15 seems to be the sweet spot.  Use 1 gram of coffee per every 15 grams of water. Here are some of the amounts I use depending on how many cups/ounces I brew.

    • 12 ounces of water: 23 grams of coffee (size of my travel French Press)
    • 34 ounces of water: 64 grams of coffee (size of my regular household French Press)

    If you don’t have a coffee scale, the approximate amounts in cups are as follows:

    For a 12 oz French Press (Single-Serve French Press), I use 23 grams of course ground coffee, which equals about ⅓ cup.

    For my larger 32 ounce French Press, I use 63 grams of coffee which equals a heaping ¾ cup of coffee.

    Coffee Grind Size

    Grind your coffee to a coarse size about the size of sea salt crystals. I use the second notch of the course setting on my burr grinder.

    Step 4: Add Coffee & Water to Your French Press

    After you’ve ground and measured your coffee, empty any water in your French Press that you used to pre-heat it.  Then add your coffee to the French Press and give it a little shake to even out the coffee grounds.

    Pour in your hot water up to the silver line on your French Press. This usually sits about 1-2 inches below the top. I recommend you measure out how much water your French Press holds ahead of time so you’ll know exactly the water to coffee ratio needed.

    Gently stir it with a wooden chopstick or spoon before placing the French Press lid and plunger, so it is just resting on top with the plunger pulled all the way up. It should not be pushing down on the coffee at this point.

    Travel Size French Press

    Step 5: Wait for Your Coffee to Brew

    Set a timer for 4:00 minutes.  Typically, anywhere between 4-7 minutes will produce a medium to strong flavored coffee.  I prefer 4-minutes for a dark roast like this Portofino Blend and 5-6 minutes for a medium roast coffee like this Costa Rica Reserve.

    Optional: Bloom Time

    If you’ve read any of my other coffee-making tutorials, you’ll know I normally recommend allowing your coffee grinds to bloom before brewing. I tried making French Press coffee both with a bloom time and without and did not find a noticeable difference, so for simplicity’s sake, I skipped this step.  However, you are welcome to try it and see if you prefer adding it in or not.

    If you want to try blooming your coffee first, then follow these steps after completing Steps 1-3 as directed above:

    Add your coffee, shake it to level, then add enough water to cover the grounds. Wait 30 seconds, then add the remainder of the water, stir and wait for another 4-minutes before plunging/pressing.

    Step 6: Pressing & Pouring Your French Press Coffee

    After your 4-minute timer goes off, gently press the French Press plunger down slowly until you feel it touch the bottom, then stop. You don’t need to push hard or flatten the grounds at the bottom; resting on top is enough. Otherwise, you might stir up the coffee grinds resting at the bottom.

    After pressing, wait about 30 seconds for it to settle, and then slowly pour and enjoy!

    Pouring French Press

    Tips & Advice for Using a French Press

    Experiment with your brew times. As I mentioned, I do a 4-minute brew time for my dark roast and a 5-6 minute for medium roasts. The times and coffee amounts I provide are great starting points, but this is your coffee, so find your own personal sweet spot and make it the way you like it. 

    Grinding your coffee.  If you don’t have a burr coffee grinder, it is an invaluable tool for making coffee. It is essential to adjust your grind size to the brewing method you use (drip, pour-over, etc.). This can make a huge difference when making French Press coffee. If your grind is too fine, it can increase the bitterness of the coffee, and if your grind is too coarse, it can result in a highly acidic coffee.

    Coffee Sediment. A little coffee silt in the bottom of your cup is normal. That is part of the experience when using a French Press. It creates a strong, rich, flavorful cup of coffee. It is a more bitter flavored brew than an AeroPress or Chemex, which brew smoother less-acidic coffee.  I like both types, but for those that prefer a smoother, lighter flavor than using an AeroPress is probably going to suit you better.  Try the French Press and see what you think.  Brewing coffee with a French Press is so simple. It is one of the reasons I traveled with mine for many years.

    Don’t leave the coffee sitting in the press if you’re not drinking it right away. It will get more acidic and bitter.  It’s best poured right away or poured into an insulated carafe if you can’t drink it right away.

    French Press Coffee and plant

    What to Do With Your Used Coffee Grounds

    I recently read this article on ways to use your old coffee grounds. It has some great ideas like using it as compost for your garden. It’s also a good pest deterrent for slugs and mosquitos. You can, of course, empty your coffee grounds into the wastebasket, but whatever you do, don’t dump them down the drain. Coffee grounds swell up and stick to the plumbing causing your pipes to clog.

    My French Press Coffee Gear

    If you want to see the gear I use or purchase your own, here are links to what I use when making French Press coffee.

    Additional Uses for a French Press

    In addition to making a bold cup of coffee, you can use your French Press as a milk frother and make cold brew in it. It is a multi-purpose coffee-making tool!

    To froth milk using a French Press: Add heated milk to the French press, push the French press plunger into the milk, and with short quick and up and down movement, froth your milk until it has doubled in size. It’s so easy, but it froths milk really well to make DIY lattes at home.

    Here is a simple French Press cold brew recipe to start with. As with all coffee-making recipes, adjust the water and coffee ratio to fit your preference and always purchase quality coffee beans!

    Final Thoughts

    The French Press was my first coffee gear purchase as an adult. Before that, I grew up only trying coffee from a drip coffee maker or purchasing a latte from the local cafe.  Since purchasing that first French Press, I have added many other coffee makers and coffee gear to my arsenal of supplies. However, the French Press is still a go-to staple whether I use it for travel or a weekday pick-me-up.

    Let me know what you think of French Press coffee. If it is your first time trying it, I’d love to hear your thoughts.  Remember, this is about brewing coffee you love from the comfort of your home.  You are worth it!

    Au revoir! 

    Additional Articles That Might Interest You

     
    Note: This post contains affiliate links. When you make a purchase using one of these affiliate links, we get paid a small commission at no extra cost to you. And as always, all opinions are our own. Thank you!
  • Coffee Memories: Road Trips and Coffee

    My husband was reading my post “Bucket Lists & Good Friends,” and he paused on the picture of my friend and me in front of our tent and said, “I like this photo!” Then he says, “Hey, your shirt says coffee on it!” I said: “What? That’s funny! That was my nightshirt.” And then we both started laughing and talking about my obsession with coffee and how it’s been going on a lot longer than we both realized.

    After he pointed out my coffee shirt, it triggered a memory from that road trip that I hadn’t thought about in a long time. This memory only further confirmed my love of coffee. As if there was any doubt.

    U.S.A. Road Trip Plans: A Short Overview

    Recently graduated from high school, my friend and I began planning a road trip around the U.S. We made a huge list of all the places we’d like to see, and we used books to do it!  I know, how archaic! This was long before Google and still a few years away from Mapquest (does anyone still use Mapquest?) 

    We bought a road atlas and mapped out all the stops we’d make along our journey.  Our trip took a life of its own, and soon we had a route mapped out that took us around the entire country!  We decided we could save up to take a little over 2 months off to make this happen. Thus the adventure began.

    Road Trip Car Coffee Maker – Important Decisions

    Before leaving on our road trip, I purchased a coffee maker that allowed you to brew your coffee in the car using the car’s adapter/cigarette lighter.  Hey, I was going on a 2-month road trip, on a budget, with a friend that doesn’t drink coffee! (I know it’s a sore point in our relationship, but I try to overlook it.) Going without coffee was not an option, and with my limited budget, I didn’t think I could afford to purchase one every day.  Thus my purchase of a portable coffee maker.  It looked a lot like this one. Now of course I would have brought my Aeropress but then I would have missed out on creating this “fun” memory.

    Starting Out

    Our route had us working our way through Washington and along the Oregon coast before continuing down along the California coastline. In a matter of a couple of days, we were in California. This meant a lot of driving and very little sleep.  We ended up getting a hotel in Crescent City after sleeping in the car the night before and driving on very little sleep. This hotel was also our first encounter with a cockroach.  Needless to say, I don’t think I slept very well here either.

    So after leaving Crescent City, we drove for probably less than an hour before discovering beachside camping near the small town of Orick, California. Warm sunshine and waves beckoned us to stop and enjoy it!

    We spontaneously pulled over and decided to camp here.  The stretch of beach used to be open to camping. There weren’t any assigned spots. You just found a parking spot, paid a few dollars, and pitched your tent on the beach.  It was great! We spent the rest of the day relaxing in the sun, spending time walking along the water, and listening to the waves.

    Funnily enough, this was also the only time we used our tent during our 2-month road trip.  The rest of the time, we slept in our car, at friends or families scattered along our route, or at the occasional motel.  

    Beach camping in California
    The photo that triggered this memory. And the tent that was used only once.

    Beach Camping & Coffee

    The next morning, I awoke to the sound of the ocean. We discovered the night before that we lacked fire-making supplies (and skills), so I knew boiling water over a fire to make coffee was out of the question. Good thing I have a portable coffee maker sitting in the car, all ready to brew coffee! What better way to spend the morning than sipping coffee and staring out watching the waves roll in.  

    I trudged through the sand and found my coffee supplies, I filled the maker with water, and soon I had a delicious pot of coffee brewing–no fire required!  It was wonderful. I walked back to the beach and enjoyed my coffee while waving to our camping neighbors, who were making their cowboy coffee over the fire.  Boy, did I feel superior with my high-tech car coffee!  

    Soon, it was time to pack up and hit the road.  So we put our tent away, packed up the car, and prepared to leave.  The funny thing is, when I brewed my coffee earlier, well, I didn’t turn the car on to do it. Whoops! Needless to say, our car battery was dead.  

    I can tell you this, if I had coffee before I went to make coffee that morning, my brain would not have been so fuzzy, and I would have thought to turn the car on.  So I blame this on not having enough coffee, not on the actual making of said coffee.

    Some campers who were parked nearby gave our car a jumpstart, it was probably our camping neighbors who made their coffee over the fire. Now, who’s the superior one! Okay, I don’t remember who it was exactly, but I imagine they sat there quietly smiling and enjoying their coffee. Sometimes the simple way is the best way.

    What Ever Happened to my Car Coffee Maker?

    Remembering this gave me a good laugh. Then, I was also a little sad, as I remembered that my coffee maker mysteriously disappeared after that trip. I never saw it again.  And my friend Moe says she doesn’t know what happened to it, but I have my suspicions… I’ve come a long way since this trip and now have a variety of ways that I make coffee while camping, and I have never run my car battery dead making coffee again.

    latte art in a cup

    Coffee-Infused Memories

    This is just one of my many memories that involve coffee. Others include sipping coffee on the lanai in Maui or at a cafe in Prague.  Even better are the memories with loved ones no longer here, like coffee with my Grandpa.  He liked it, black, very black. I would sneak milk into mine when he wasn’t looking.  I tried to be tough and drink his sludge, er coffee, but it was a little too strong for my taste. It didn’t really matter, though. I was with my Grandpa sharing our love of coffee as he told me stories of his youth. Coffee, much like food, brings people together.   

    I like to think that I’m creating a sensory memory by combining moments with friends, family, and life while drinking coffee.  That down the road, I’ll smell a certain blend and will be transported to a beautiful moment in time. Yes, I admit, I enjoy drinking coffee because it’s delicious, but the added benefit of creating memories and special moments is pretty great too!

     
    What are some of your favorite memories that involve coffee? I’d love to hear about them!
     
    Off to grab another cup!
     
    Note: This post contains affiliate links. When you make a purchase using one of these affiliate links, we get paid a small commission at no extra cost to you.
  • Nespresso Essenza Mini: The Complete Guide

    Let’s face it, a lot more people are working from home than there used to be, so swinging through your local coffee drive-thru isn’t always an option. Not to mention the high cost of buying a daily espresso at, say, your local Starbucks.  Enter Nespresso’s Essenza Mini original line coffee maker.  The Nespresso Essenza Mini makes a delicious espresso in only about 30 seconds! Making espresso at home has never been easier! So if you want a way to make a luscious, crema-topped espresso in less than a minute, then keep reading to find out how.  

    If you recently purchased an Essenza Mini and want tips on using it, feel free to jump ahead using the below links.  

    First Things First: What is Nespresso?

    Nestle, a Swiss company you probably think of in connection with chocolate, owns and operates Nestle-Nespresso or just Nespresso as it is known here in the States. Actually, the word “Nespresso” comes from combining “Nestle” and “espresso.” Nespresso has been around for over 30 years, but it’s only been in the last 10 years that it has made a name for itself in the U.S. market. In a nutshell, Nespresso is to espresso what Keurig K-cup is to coffee. They are the original single-use coffee maker, and as the forerunner in single-cup coffee makers, theirs are one of the best!

    Two Types of Nespresso Coffee Makers

    Nespresso has two different lines of coffee makers.  The original line of Nespresso espresso machines and the Vertuoline. The Vertuoline was created for the North American market, which prefers a larger American-style cup of coffee. In comparison, the original Nespresso makers were designed for espresso drinkers.

    3 Key Differences Between the Original & Vertuoline

    1) Coffee Sizes

    The Original Nespresso machines have two options: Espresso & Lungo.  The Espresso option brews a 1.35oz espresso shot. The Lungo option brews a 3.7oz “long” espresso shot.

    The Vertuoline coffee machines have 5 different size options: Alto (14oz), Mug (7.77oz), Gran Lungo (5oz), Double Espresso (2.7oz), and Espresso (1.35oz).

    2) Brewing Technology

    The Nespresso Original machines use the standard pump espresso machine technology that utilizes pressure to create an espresso shot.  The Nespresso Original machines use 19-bars of pressure to extract the espresso (a bar is a metric unit of pressure). 

    The Nespresso Vertuoline machines use proprietary centrifugal technology to brew coffee.   Essentially, it spins your coffee capsule really fast while ejecting water into it. It also spins it after brewing to “dry” the capsule out.  

    3) Coffee Capsules 

    The Original Nespresso machines and Vertuoline coffee makers also use different coffee capsules based on the technology used to extract the coffee.  This is important to note for ordering your Nespresso capsules and because it affects both price and variety when it comes to purchasing your Nespresso coffee pods.

    Vertuoline Capsules

    The Vertuoline capsules are still under patent, so you are restricted to the Nespresso brand of coffee pods/capsules.  The Vertuoline capsules range in price from $0.85 to $1.25 per capsule.  

    The Vertuoline capsules also use a barcode technology which the machine reads and then based on which type of pod it scanned, it then heats the appropriate amount of water designed for that specific pod.  This takes all the guesswork out of it for the customer. No more deciding on whether to choose a 6 oz or 8oz cup size. Instead, you pick your capsule, and the machine scans it and determines the optimal amount of water (and temperature) to brew that specific capsule.

    Original Capsules

    The Original line uses a small capsule that sort of looks like the little creamer capsules you get at breakfast diners. The main difference with the Original line is that in addition to Nespresso’s line of coffee pods, you can also purchase original capsules from coffee roasters such as Starbucks, LavAzza, Pete’s, Cafe Bustelo, and more.  Original coffee capsule prices typically range from $0.44 to $0.80.  

    Spoiler alert: The price per pod coupled with a choice in coffee roasters was a big factor in my choice to go with the Essenza Mini Original Nespresso maker. 

    Which One Should You Buy?

     If you mainly drink large cups of coffee but also want the option for the occasional espresso, then go for one of the Vertuo line coffee machines. This is also a good choice for someone looking to replace the Keurig with a single-cup coffee machine that brews a stronger cup of coffee. If that sounds like you, I recommend buying the VertuoPlus

    If you primarily want to make espressos and espresso-based drinks such as lattes, cappuccinos, etc., I highly recommend the Essenza Mini. It’s the perfect espresso machine for beginners and those looking for a quick espresso option that doesn’t require learning to pull their own shots or get the perfect espresso grind. Easy peasy, no muss, no fuss, delicious espresso!

    Nespresso Machines Brands

    One final note on branding before I tell you all about the Nespresso Essenza Mini. You will notice the machines comes in a variety of brand names. The two most commonly seen are De’Longhi and Breville. 

    The most important thing to note is the machine functions and features are essentially the same, even if the brands are not. 

    There is no advantage (that I found) to one brand over the other. It comes down to aesthetics.  So choose whichever Nespresso coffee maker you like the looks of best, or whichever has the best price.

    Please continue reading to learn about using the Nespresso Essenza Mini and some tricks I’ve learned to customize the espresso sizes.

    My Top Pick: The Nespresso Essenza Mini

    Why I Chose the Essenza Mini

    The short answer is, I wanted this for espresso, not for coffee.  I already have a Keurig, Aeropress, and Chemex that I use to brew coffee, but what I didn’t have was an easy way to make espresso.  I also wasn’t ready to spend the money to buy a semi-automatic espresso machine which often cost $500 to $1,000 for a good one. I’m not ready for the learning curve that comes with grinding my espresso beans just right and pulling my shots and the maintenance involved with owning an espresso machine.  

    The Nespresso Essenza Mini was exactly what I was looking for!  Plus, this makes it easy for my hubby and family and friends to make themselves an espresso quickly or at least make it easy for me to create them a latte or mocha on demand.  

    What is a Nespresso Essenza Mini?

    The Essenza Mini is an automatic espresso machine–a tiny one too! Its small size makes it easy to find space on just about any countertop.  In fact, it’s so compact that my hubby once had an executive visiting from Europe who packed his Nespresso machine with him!  Now that’s true dedication!

    Nespresso Essenza Mini

    Essenza Mini Brewing Sizes

    The Nespresso Essenza Mini brews two sizes of coffee.  Espresso (1.35oz) & Lungo (3.7oz).

    Espresso

    An espresso is a type of coffee and also the method of brewing coffee. This is, of course, a very summarized answer. There is a ton of information on all the intricacies of what makes an espresso an espresso, but this is my short answer.  Specific types of coffee beans are used for brewing espresso, and the method for brewing espresso uses intense pressure to extract the flavor from the beans. This gives you the lushes crema and dark rich flavor of espresso.

    Nespresso created a line of coffee capsules specifically tailored to create a delicious espresso.  They come in a range of intensity levels that correspond to your espresso’s bitterness and flavor profile.  The intensity ranges from 4-13. An intensity of 4 will result in a milder, more sweet flavor of espresso. The 13 will result in the highest level of intensity and create a stronger and more bitter flavor.

    Lungo

    What is a lungo? Lungo in Italian means “long.”  A lungo is a long shot of espresso that uses extra water to pull the espresso shot through.  It also takes longer to “pull” the shot and creates an espresso with a somewhat milder flavor profile.  Lungos typically use a slightly different coffee grind too.  

    Nespresso sells lungo-specific coffee capsules in addition to their espresso capsules. They also range in intensity from 4-10. You can also try their regular espresso capsules with the lungo brewing option. The flavor profile will be different, but you only live once, so feel free to give it a shot! (Do you see what I did there?) 

    Ristretto (not given a brewing button, but it is a capsule option offered by Nespresso)

    Now, to complicate it a little more, Nespresso also offers a ristretto Nespresso pod. A ristretto (“restricted” in Italian) pulls less water through a shot of espresso resulting in less bitterness. It also contains a little less caffeine than a standard shot of espresso.  You might wonder how you can make a ristretto with the Nespresso Essenza Mini, which only has two cup sizes? Keep reading below to find out how.

    TIP: You can customize the amount of water released when you press either the espresso or lungo buttons!

    How to Use the Nespresso Essenza Mini

    It’s SO EASY! Perhaps, too easy to brew an espresso shot with the Essenza Mini.  In about 30-seconds, you have a delicious shot of espresso (or maybe two shots–thus the “too easy” part). 

    Brewing Your First Espresso

    • When you first receive your Essenza Mini, the instructions have you fill the water reservoir with filtered water. Then you’ll run 3 cups of water through the machine using the Lungo button to rinse it for initial use.  After you complete this step, you’re ready to brew your first cup of espresso.
    • Fill the water reservoir and click it in place. 
    • Press the espresso or lungo button to turn the machine on (it takes about 30 seconds to heat up initially).  The Essenza Mini has an auto-off feature and shuts itself off after 9-minutes of inactivity.
    • Lift the lever on top of the Essenza Mini and insert an espresso capsule. (The Essenza Mini comes with a Nespresso sampler box of capsules.)  
    • Close the lever and place a cup below.  You can remove the drip tray if you want to use a larger coffee mug for brewing.
    • Press either the espresso button or the lungo button, depending on your preferred drink. You can stop the flow of coffee by pressing the button again during brewing.  After it finishes brewing, you can press the button again to create a weaker coffee by running water through the pod twice.
    • Lift the lever on top to eject the capsule into the used capsule bin.  This bin holds up to 6 pods before you need to empty it.  You can empty the used capsule container by pulling on the drip tray. *Be careful, though, as there is also a drip attachment under the capsule container, which catches any liquid that comes off the used pods.  Sometimes this has liquid that spills out when you pull out the capsule tray.
    You are ready to sit back and enjoy your delicious cup of espresso!  

    Additional Equipment for Creating Espresso Drinks

    If you want to use your Nespresso Essenza Mini to create lattes or cappuccinos, then consider purchasing a milk frother in addition to your espresso machine.  Some versions of the Essenza Mini come with an aeroccino milk frother like this one.  However, I purchased just the Essenza Mini machine as I already owned this milk frother, and I love it! It also froths thick cold foam for those who enjoy iced coffee drinks like an iced caramel macchiato or iced lattes.

    The other accessory I purchased was this original capsule storage drawer.  My Essenza Mini sits on top of it along with my syrups and sugar, thus taking up no extra countertop space to store my Nespresso coffee pods.

    How to Customize Your Brew Size

    This video from Nespresso explains how to customize your pre-programmed brew sizes to fit your coffee preferences. So, for example, if you prefer espresso and ristretto shots, you could program the “espresso” button to pull a smaller amount of water for ristretto shots and subsequently program the “lungo” button to pull an espresso shot.  It’s really up to you how you customize it based on your espresso drinking preferences.

    How to Reset Water Amounts to Factory Settings

    If you changed the factory-set water levels and now wish to change them back to the original factory settings (Espresso: 1.35oz, Lungo: 3.7oz), here is how to do it (you can also find these instructions in the Nespresso instruction booklet).

    1. With the Essenza Mini turned off, press and hold down the Lungo button for 5 seconds.

    2. LEDs will blink fast 3 times to confirm the machine has been reset to factory settings.

    3. LEDs will then continue to blink normally as it heats up until it is ready. – Steady Lights mean your Essenza Mini Nespresso machine is ready.

    Final Thoughts

    If you’re in the market for a Nespresso coffee maker, in addition to the links I’ve given you above, you may also want to check on Bed Bath & Beyond to see if you can use their 20% off coupon for a better deal.  Also, if you’re a Costco member, check to see what specials they have on a Nespresso machine.  Last I checked, they had both an Original machine and a Vertuoline machine for sale online, but their inventory is always changing. 

    Someday I may decide to spend the money on a semi-automatic espresso machine, but for now, I love how easy it is to create a fantastic espresso at the press of a button!  I especially love how easy it is to make an affogato on a hot summer day–so good!

    At the end of the day, it came down to what I wanted this new coffee maker purchase for.  For me, that was espresso.  I wanted a quick way to make an espresso with as little fuss as possible.  I couldn’t be happier with my decision!

    Let me know if you already have a Nespresso coffee maker, and if so, did you go with the Original line or the Vertuoline?  

    Note: This post contains affiliate links. When you make a purchase using one of these affiliate links, we get paid a small commission at no extra cost to you.


    Here are some other great coffee articles to check out:


    Ciao Everyone!
    (Yes, now that I’m drinking more espresso, I feel the need to add Italian into my daily conversations.)

  • RISE Brewing: 8 Delicious Recipes With Oat Milk & Coffee

    Until recently, I’d never heard of oat milk, much less tried it. So when RISE Brewing reached out to ask if I’d like to sample some of their product, my curiosity was piqued.  I occasionally use almond milk, and I really like oatmeal, so the idea of oat milk sounded promising. Once I received the oat milk, I began experimenting with various culinary creations to develop some recipes with oat milk that I would enjoy using in the future. 

    Since I love coffee, it seemed a natural place to start. These 8 recipes with coffee and oat milk are a combination of favorites my hubby and I liked using RISE Brewing oat milk. 

    Who is RISE Brewing Co

    RISE Brewing was created in 2014 with humble beginnings brewing nitro cold brew in a garage. They have since grown and now offer quality nitro cold brew coffee in a can that can be shipped anywhere in the USA.  They are USDA-certified organic and strive to use only the best ingredients in all of their products.  Visit their website to learn more about the company and their products. 

    Benefits of Oat Milk

    Since starting, RISE Brewing branched out into producing oat milk as well as cold brew coffee.  Their oat milk is organic (non-GMO), gluten-free, and vegan (dairy-free).  RISE Brewing oat milk is a great option for someone with celiac disease or gluten intolerance. It’s also great for people with nut allergies as it is a nut-free milk substitute.* 

    Oat milk is an excellent option for anyone suffering from lactose intolerance. In the past I’ve used almond milk, but unlike milk it has a watery consistency. That is not the case with oat milk! I was impressed with the creaminess of oat milk and its milk-like texture. 

    *Please note they do mention that although RISE Brewing uses only gluten-free oats to make their oat milk, there is a chance the factory they use also processes nuts or gluten products.

    8 Delicious Recipes With Oat Milk & Coffee

    Here are 8 easy and delicious recipes using oat milk and coffee to jazz up your mornings (or evenings) and provide a stepping stone to all things oat milk. Make sure to check out the additional recipes with oat milk at the bottom of the post to learn even more ways for using oat milk in your day-to-day recipes and savory dishes. 

    Feel free to jump ahead to any of the recipes in this article.

    1. Vanilla Oat Milk Cold Brew
    2. Cinnamon-Vanilla Latte
    3. Coffee Chia Pudding with Oat Milk
    4. Mocha Pudding
    5. Brown Sugar & Oat Milk Iced Coffee
    6. Coffee Banana Oat Milk Smoothie
    7. Oat Milk Chai Tea Latte
    8. Coffee & Cream Bundt Cake

    Plus: Additional Recipes & Ways to Use Oat Milk

    1) Vanilla Oat Milk Cold Brew

    RISE Brewing started as a cold brew company.  In addition to trying their oat milk, I also had the opportunity to sample their Original Black Nitro Cold Brew. I was surprised at the frothiness they could achieve from a canned nitro cold brew. Normally, I add half-n-half to my cold brew at home, but since I had oat milk, I used that instead.  It was great! My hubby really likes using the RISE Brewing oat milk in his morning coffee too.  It gives the cold brew an oaty flavor that seems sweet to me even without using any additional sweetener in my cold brew.

    Vanilla Oat Milk Cold Brew

    • 8 oz cold brew
    • ¼ cup oat milk
    • 2 pumps vanilla syrup (or 1 tsp vanilla extract)

    Instructions:

    Fill a glass with 2 cups of ice. Pour cold brew over the ice, then add oat milk and vanilla syrup. Stir and enjoy!

    Vanilla Oat Milk Cold Brew

    Creamy oat milk cold brew.
    Prep Time 2 minutes
    Total Time 2 minutes
    Servings: 1 serving
    Course: Drinks

    Ingredients
      

    • 8 oz cold brew
    • ¼ cup oat milk
    • 2 pumps vanilla syrup
    • 2 cups ice

    Method
     

    1. Fill a glass with 2 cups of ice. Pour cold brew over the ice, then add oat milk and vanilla syrup. Stir and enjoy!

    2) Cinnamon-Vanilla Latte

    My hubby was the first to try frothing oat milk.  I stood silent by (okay, not too silently) and waited skeptically for his oat milk to froth.  Since almond milk was my only experience with milk substitutes and it does not froth well, I had very low expectations for this oat milk recipe. However, hubby was triumphant, and I was left pleasantly surprised to discover how frothy the oat milk got!

    If you want a great starting place for a recipe for oat milk, then look no further than your favorite latte recipe.  I personally prefer something simple, and create my own version of a faux latte like this:

    Faux Cinnamon-Vanilla Oat Milk Latte

    • 4 oz dark strongly brewed hot coffee
    • ½ cup frothed oat milk
    • 2 pumps vanilla syrup
    • dash of cinnamon
    Instructions:
    Brew 4 ounces of strong coffee and add to a mug. Add in the vanilla syrup now or mix in with the frothed milk. Then top with foamy oat milk and sprinkle with a dash of cinnamon.
     

    I use a milk frother similar to this one and either brew a strong shot of coffee using my Aeropress to make a faux espresso, or if I’m in a hurry, I’ll brew 4 ounces using a dark roast k-cup in my Keurig k-cup machine.

    Cinnamon-Vanilla Oat Milk Latte

    Faux Cinnamon-Vanilla Oat Milk Latte
    Prep Time 5 minutes
    Total Time 5 minutes
    Servings: 1 serving

    Ingredients
      

    • 4 oz dark strong brewed coffee
    • ½ cup frothed oat milk
    • 2 pumps vanilla syrup
    • dash cinnamon

    Method
     

    1. Brew 4 ounces of strong coffee and add to a mug. Add in the vanilla syrup now or mix in with the frothed milk. Then top with foamy oat milk and sprinkle with a dash of cinnamon.

    3) Coffee Chia Pudding with Oat Milk

    This recipe with oat milk also uses cold brew, making it a great way to get a little extra coffee kick later in the day.  It’s a healthy coffee treat you can eat guilt-free! Okay, mostly guilt-free.  Chia seeds are packed with nutrients. According to this article, some of their benefits are improved digestive health, blood levels of heart-healthy omega-3s, and possibly lowering risk factors for heart disease and diabetes. I like to toss a little in with my smoothies or make chia pudding like the recipe below.

    Coffee Chia Pudding with Oat Milk

    • ½ cup cold brew
    • ½ cup oat milk
    • ¼ cup chia seeds
    • 1 tsp honey or sweetener (optional)
    • 1/2 tsp cinnamon (optional)
    • banana slices for topping (optional)

    Instructions:

    Add all the ingredients except bananas to a jar or small bowl, stir and put a lid on your container. Place in the fridge overnight. You will want to stir one more time before eating for the “pudding” to thicken. The chia seeds settle and need this final stirring to fully thicken the oat milk. Since I make mine before going to bed, I take it out the next morning, stir and then place it back in the fridge for another hour. I then slice up a banana, place some on top and enjoy!

    Coffee Chia Pudding with Oat Milk

    Easy coffee-flavored chia pudding.
    Prep Time 5 minutes
    Resting Time 8 hours
    Total Time 8 hours 5 minutes
    Servings: 2 servings
    Course: Breakfast, Dessert

    Ingredients
      

    • 1/2 cup black cold brew
    • 1/2 cup oat milk
    • 1/4 cup chia seeds
    • 1 tsp honey or sweetener
    • 1/2 tsp cinnamon (optional)
    • 1 banana (slices for topping)

    Method
     

    1. Add all the ingredients except bananas to a jar or small bowl, stir and put a lid on your container. Place in the fridge overnight.
    2. Stir one more time before eating for the "pudding" to thicken. The chia seeds settle and need this final stirring to fully thicken the oat milk.
    3. Slice up a banana, place some on top and enjoy!

    Notes

    Since I make my chia pudding before going to bed, I take it out the next morning, stir and then place it back in the fridge for another hour. I then slice up a banana, place some on top and eat!

    4) Mocha Pudding

    This creamy pudding combines coffee and chocolate for a decadent treat! Try it with a little whipped topping or dip a banana in it for a yummy chocolate banana combo. If you want a more kid-friendly version, you can leave out the instant espresso and make a regular chocolate pudding.

    Mocha Pudding

    • ⅓ cup sugar
    • ⅓ cup cocoa powder
    • 2 tbsp cornstarch
    • 2 cups oat milk
    • 2-3 oz bittersweet chocolate chopped
    • dash of sea salt
    • 1 tbsp instant espresso
    • 1 tsp vanilla extract
    • cinnamon (for topping) (optional)
    • whipped topping (optional)

    Instructions:

    In a 2-quart saucepan, whisk together the sugar, cocoa, cornstarch, and salt. Slowly whisk in the 2 cups oat milk until smooth and combined. Stir the mixture constantly over medium-low heat.  Continue stirring until it begins to bubble and thicken. The pudding should coat the back of the spoon (about 10-15 minutes). Add the chopped bittersweet chocolate and stir it into the pudding until fully combined, and the pudding is thick and smooth (about 1 minute). 

    Remove from heat and stir in the vanilla and instant espresso until the espresso is fully dissolved. Spoon into a bowl, cover, and chill for about 3 hours before eating.  (You can eat warm too if preferred, but it will thicken as it cools.)  Top with cool whip and a dash of cinnamon, and enjoy!

    For an additional chocolate punch, you may want to consider trying their new chocolate oat milk!

    Mocha Pudding

    Rich pudding with chocolate and coffee.
    Prep Time 5 minutes
    Cook Time 15 minutes
    Cooling Time 3 hours
    Total Time 3 hours 20 minutes
    Servings: 6 servings
    Course: Dessert
    Cuisine: American

    Ingredients
      

    • cup sugar
    • cup cocoa powder
    • 2 tbsp corn starch
    • 2 cups oat milk
    • 2-3 oz bittersweet chocolate (finely chopped)
    • dash sea salt
    • 1 tbsp instant espresso
    • 1 tsp vanilla extract
    • cinnamon (for dusting on top) (optional)
    • whipped topping (optional)

    Method
     

    1. In a 2-quart saucepan, whisk together the sugar, cocoa, cornstarch, and salt.
    2. Slowly whisk in the 2 cups oat milk until smooth and combined. Stir the mixture constantly over medium-low heat.  Continue stirring until it begins to bubble and thicken. The pudding should coat the back of the spoon (about 10-15 minutes).
    3. Add the chopped bittersweet chocolate and stir it into the pudding until fully combined, and the pudding is thick and smooth (about 1 minute). 
    4. Remove from heat and stir in the vanilla and instant espresso until the espresso is fully dissolved. Spoon into a bowl, cover, and chill for about 3 hours before eating.  (You can eat warm too if preferred, but it will thicken as it cools.)  Top with cool whip and a dash of cinnamon, and enjoy!

    5) Brown Sugar & Oat Milk Iced Coffee

    During this initial period that I was sampling RISE Brewing oat milk and trying recipes with oat milk, my hubby tells me Starbucks released a new drink using brown sugar and oat milk. He thinks “we” should try making one at home.  So, of course, since his “we” really meant “me,” I am tasked with trying to create a similar drink even though I’ve never even tried the original.  Ha! Well, that’s what I get for playing the role of oat milk recipe scientist. So here is what I came up with, we like it but have no idea whether it even remotely resembles the latest Starbucks creation.

    Brown Sugar & Oat Milk Iced Coffee

    • 1/4 cup brown sugar
    • 1 tsp vanilla extract
    • 3 tbsp water
    • 1/2 tsp cinnamon
    • 1/4 cup oat milk
    • 4 oz dark strong brewed coffee or double espresso shot
    • 2 cups ice

    Instructions:
    Heat the brown sugar, vanilla extract, and 3 tablespoons of water in a microwaveable bowl for 1 minute, stirring at 30 seconds and then again after 1 minute.

    Brew 4 ounces of dark strong coffee, pour over 2 cups ice, then top with brown sugar syrup and 1/4 cup oat milk. Shake until well mixed. Enjoy!

    Brown Sugar & Oat Milk Iced Coffee

    A sweet refreshing iced coffee.
    Prep Time 5 minutes
    Total Time 5 minutes
    Servings: 1
    Course: Drinks
    Cuisine: American

    Ingredients
      

    • ¼ cup brown sugar
    • 1 tsp vanilla extract
    • 3 tbsp water
    • ½ tsp cinnamon
    • ¼ cup oat milk
    • 4 oz strong brewed coffee (or 2 shots espresso)
    • 2 cups ice

    Method
     

    1. Heat the brown sugar, vanilla extract, and 3 tablespoons of water in a microwaveable bowl for 1 minute, stirring at 30 seconds and then again after 1 minute.
    2. Brew 4 ounces of dark strong coffee, pour over 2 cups ice, then top with brown sugar syrup and 1/4 cup oat milk. Stir until mixed. Enjoy!

    6) Coffee Banana Oat Milk Smoothie

    This breakfast smoothie has it all in one glass! You’ve got your grain, fruit, coffee, milk, and protein all in a handy-to-go smoothie.  It is so easy to make too!

    Coffee Banana Oat Milk Smoothie

    • 1/2 cup cold brew or chilled strong coffee
    • 1/2 cup oat milk (refrigerated)
    • 1 frozen banana
    • 1/4 cup quick oats
    • 1/4 tsp almond extract
    • 2 TB protein powder (optional)

    Instructions:

    Blend all the ingredients, pour into a cup, and enjoy!

    TIP: Make sure to put your oat milk in the fridge.  I found this helped enhance the flavor of the oat milk and gave me more of the “milk” feeling I like.

    Coffee Banana Oat Milk Smoothie

    A unique breakfast smoothie made with coffee.
    Prep Time 5 minutes
    Total Time 5 minutes
    Servings: 1 serving
    Course: Breakfast

    Ingredients
      

    • ½ cup cold brew (or strong brewed coffee chilled)
    • ½ cup oat milk (chilled)
    • 1 frozen banana
    • ¼ cup quick oats
    • ¼ tsp almond extract
    • 2 tbsp protein powder (optional)

    Method
     

    1. Blend all the ingredients, pour into a cup, and enjoy!

    7) Oat Milk Chai Tea Latte

    I have a nephew who won’t drink coffee, but he recently discovered he loves chai tea lattes. Now he has something to order when his friends want to go to the café.  Perhaps you’re like him, or you’re like me and enjoy both tea and coffee. Either way, here’s an easy chai tea latte recipe with oat milk.

    Oat Milk Chai Tea Latte

    • 1-2 bags of strong black tea (I like to use Assam tea.)
    • 1 tsp chai spices (see below)
    • 1 cup oat milk
    • brown sugar, maple syrup, or 2 pumps of vanilla syrup (optional sweeteners)
    Instructions:
    In a small saucepan, whisk together the oat milk and spices, add the tea bag, and heat over medium heat until boiling, remove from heat, and steep for 2 minutes. Remove the tea bag and pour into a mug and enjoy! Add in any optional sweeteners such as brown sugar, vanilla syrup, or maple syrup. (Pour your chai tea mixture through a fine mesh strainer or coffee filter after heating to filter out the spices, otherwise they settle in the bottom of your cup.)

    Microwave instructions: Add oat milk and spices to a microwaveable container, whisk, then add the tea bag (only the kind with no metal staple), and microwave for 1.5-2 minutes until boiling. Watch carefully, so it doesn’t boil over. Steep for 2 minutes. Remove the tea bag and stir (be careful as the microwave container might be hot to the touch).  Add in any optional sweeteners such as brown sugar, vanilla syrup, or maple syrup. (Feel free to strain the mixture before drinking to remove the sediment from the spices.)

    Chai Spices Mixture

    Mix: 3 TB cinnamon, 2 TB ground ginger, 1/2 TB cardamom, 1/2 tsp ground nutmeg, 1/2 tsp ground cloves, 1/4 tsp ground black pepper—Reserve extra for future use.

    Oat Milk Chai Tea Latte

    Creamy chai tea latte.
    Prep Time 5 minutes
    Cook Time 5 minutes
    Total Time 10 minutes
    Servings: 1 serving
    Course: Drinks

    Ingredients
      

    • 1-2 black tea bags
    • 1 tsp chai spices (see recipe below)
    • 1 cup oat milk
    • 1 tbsp brown sugar/maple syrup/sweetener of choice
    Chai Spices
    • 3 tbsp cinnamon
    • 2 tbsp ground ginger
    • ½ tbsp cardamom
    • ½ tsp ground nutmeg
    • ½ tsp ground cloves
    • ¼ tsp ground black pepper

    Method
     

    Stovetop Instructions
    1. In a small saucepan, whisk together the oat milk and spices, add the tea bag, and heat over medium heat until boiling, remove from heat, and steep for 2 minutes. Remove the tea bag and pour into a mug and enjoy! Add in any optional sweeteners such as brown sugar, vanilla syrup, or maple syrup. (Pour your chai tea mixture through a fine mesh strainer or coffee filter after heating to filter out the spices, otherwise they settle in the bottom of your cup.)
    Microwave Instructions
    1. Add oat milk and spices to a microwaveable container, whisk, then add the tea bag (only the kind with no metal staple), and microwave for 1.5-2 minutes until boiling. Watch carefully, so it doesn't boil over. Steep for 2 minutes. Remove the tea bag and stir (be careful as the microwave container might be hot to the touch).  Add in any optional sweeteners such as brown sugar, vanilla syrup, or maple syrup. (Feel free to strain the mixture before drinking to remove the sediment from the spices.)
    Chai Spices
    1. Whisk together the chai spices with a fork or small whisk, reserve the extra for future use.

    8) Coffee & Cream Bundt Cake

    This Bundt cake looks pretty and tastes good too! It uses strong coffee mixed with oat milk (for the “cream”) to create a fluffy coffee-flavored dessert.  I made it using coffee icing, but if you prefer a glaze, I also included that option in the recipe notes.

    Oatmilk Coffee & Cream Bundt Cake

    A coffee flavored bundt cake with oat milk.
    Prep Time 10 minutes
    Cook Time 45 minutes
    Total Time 55 minutes
    Servings: 14 servings
    Course: Dessert
    Cuisine: American

    Ingredients
      

    • 3 cups all-purpose flour
    • 1 ½ tsp baking soda
    • ½ tsp baking powder
    • ½ tsp sea salt
    • 1 cup unsalted butter (room temperature) (2 sticks)
    • 1 tsp cinnamon
    • ¾ cup brown sugar
    • ¾ cup granulated sugar
    • 3 eggs (large) (room temp)
    • 1 tbsp vanilla extract
    • 1 cup strong brewed coffee
    • 3 tbsp instant espresso
    • ¼ cup oat milk
    Coffee Icing
    • 6 tbsp butter
    • 1 tbsp instant espresso
    • 2 cups powdered sugar
    • 1 tsp vanilla extract
    • 2 tbsp oat milk
    *See alternative Coffee Glaze option in the notes.

    Method
     

    1. Preheat oven to 350°. Grease and flour a 10-inch bundt cake pan.
    2. Whisk together the flour, baking soda, baking powder, cinnamon, and sea salt. Set aside.
    3. With an electric mixer, cream the butter. Add the brown sugar and granulated sugar ¼ cup at a time and mix into the butter until light and fluffy. Scraping the sides of the bowl as needed to mix all the sugar in.
    4. Add the vanilla and then the eggs one at a time, scraping the sides of the bowl after each egg.
    5. Mix the coffee and oat milk together in a cup.
    6. Add the flour and coffee mixture to the mixture at the lowest/stir setting. Mix a little at a time alternating between the coffee mixture and flour until it is all incorporated in the mixing bowl.
    7. Pour the batter into the bundt cake pan. Bake about 45 minutes or until a toothpick inserted in the middle comes out clean.
    8. Cool the cake for 10 minutes. Then invert it onto a cooling rack lined with parchment paper. Cool completely.
    Coffee Icing
    1. Add 6 TB butter for the icing to a small saucepan and melt over low heat.
    2. Add 1 TB instant espresso and whisk to combine with the butter. Take the pan off the heat.
    3. Add 2 cups powdered sugar, 2 TB oat milk and 1 tsp vanilla extract. Whisk it all until well combined.
    4. Let the icing cool 1-2 minutes before drizzling over the cooled coffee bundt cake.

    Notes

    *If you prefer a glaze for your bundt cake instead of icing then make a coffee glaze as follows:

    Coffee Glaze

    • 2 TB hot coffee
    • 1/2 TB instant espresso
    • 1 cup powdered sugar
    • 1 TB oat milk
    • 1/2 tsp vanilla extract
    Directions: Mix hot coffee and instant espresso in a saucepan over low heat until fully combined, then turn off the heat and whisk in the powdered sugar, oat milk, and vanilla extract.  Pour the warm glaze over the cooled bundt cake.

    Additional Uses & Recipes with Oat Milk

    I realize up to this point, most of these recipes are for coffee and oat milk. However, I wanted to make sure to include some recipes that demonstrate the versatility of oat milk outside of your morning coffee fix. 

    I found these recipes for ranch dip and artichoke dip on RISE Brewing’s website. I have yet to try these two recipes, but I look forward to trying them and adding a couple of recipes to my repertoire when my vegan or lactose-free friends come to visit.

    You can also use oat milk in soups and savory dishes. It adds a creaminess to these types of dishes that other milk substitutes lack.  Try this vegan potato soup or this creamy vegetable soup.

    My Opinion & Final Thoughts

    I was surprised at how much I liked RISE Brewing’s oat milk, and I love that they use quality ingredients with no added chemicals.  I enjoyed the thick creaminess as well as the oaty flavor of their oat milk.  It had the thickness that was lacking from my almond milk.  That being said, it is much higher in calories than almond milk.  So, I will most likely continue to use almond milk for things like cereal and some of my smoothies to reduce calories.  

    Calories in 1 cup:

    • Almond Milk – 30 cal. 
    • Oat Milk – 130 cal.
    • 2% dairy milk – 124 cal.

    I will continue to use oat milk as a substitute for milk whenever I want that thick creaminess.  If you’re blessed with the ability to not think about calories, then the choice is probably much easier for you.  I love oat milk in my coffee and will continue to explore more recipes with oat milk to expand my list of uses for this delicious new choice!

    *I was not paid for this article, and this is my personal opinion based on my experience trying RISE Brewing oat milk. 

    Other Recipes You Might Enjoy

     
    Note: This post contains Amazon affiliate links. When you make a purchase using one of these affiliate links, we get paid a small commission at no extra cost to you.
  • Coffee Toffee Espresso Cookies Recipe

    I’ve made these coffee toffee espresso cookies for about six years now, and they are always a hit!  I send them with my hubby for his work’s holiday cookie exchange, and they are typically the first to disappear.  It’s no surprise considering how many coffee lovers there are in the world. 

    I am not a big chocolate fan, or really a huge sweets fan, but if you tell me a recipe has “coffee” in it.  Well, all I can say is, “you had me at coffee!”  Really, it doesn’t matter what it is. My ears perk up if I hear of a recipe with coffee in it; the same goes for anything with goat cheese in it, but I digress.  This coffee toffee espresso cookie recipe is sure to please the coffee lover in your life, even if that turns out to be you!

    Speaking of coffee lovers, if you need any gift ideas for yourself or a fellow coffee lover, check out these awesome gift ideas for coffee lovers.

    So Easy to Make!

    Another reason to love this recipe is that it is so easy to make!  I love that I can make it a day ahead of time. In my opinion, these cookies taste better the next day.  Any recipe that helps me get a jump start on all the cooking I do during the holidays is a winner in my book. 

    Not that you need to wait until a holiday rolls around to bake these coffee toffee espresso cookies.  I usually make them for Christmas get-togethers, but they work great for Valentine’s Day, dessert and coffee with a friend, or when you need a pick-me-up to get you through the week.  Hey, have one with your morning coffee. I won’t judge!

    Ingredients Needed for Coffee Toffee Espresso Cookies

    • Butter
    • Granulated White Sugar
    • Vanilla Extract
    • All-purpose Flour
    • Egg
    • Baking Powder
    • Heath Toffee Bits
    • Espresso Instant Coffee Powder (I use Medaglia D’oro espresso instant powder, but I have also used Folgers instant coffee to make this recipe too. Either one works.)
    • Baking Spray or Parchment Paper (you could also use butter to grease your cookie sheet)

    Tips for Making Coffee Toffee Espresso Cookies

    If you’re like me and forget to take your butter out of the fridge to soften, you can microwave a stick of butter (or two) for 5-second increments.  Turn the butter sticks every 5 seconds checking them until they are softened.  Now you’re ready to start baking!

    Slicing these toffee coffee espresso cookies a ½” thick is key to creating a cookie that is both soft and chewy.  I tried these about ¼” thick, and it was too thin, in my opinion, as the cookie hardens and then it’s more like a cookie crisp.  If you prefer that, go ahead and slice them thinner, that’s the fun thing about recipes. You can customize it to your liking.

    Make sure to cool the cookie dough in the fridge for at least 4 hours, as this hardens the dough for slicing into cookie rounds.  Then, bake according to the recipe, and let cool completely before serving. I prefer these the day after baking. Of course, you can eat them the same day, but I think the flavor is stronger the next day.  Try and see for yourself.

    This recipe makes around 40 cookies (give or take depending on how thick you slice them).

    Coffee Toffee Espresso Cookies Recipe

    Coffee Toffee Espresso Cookies

    Delicious coffee-flavored cookies sprinkled with toffee.
    Prep Time 5 minutes
    Cook Time 10 minutes
    Chilling Dough 4 hours
    Total Time 4 hours 15 minutes
    Servings: 40 cookies
    Course: Dessert
    Cuisine: American

    Ingredients
      

    • 1 tsp vanilla extract
    • 1 TBSP Instant Espresso Powder Can also use instant coffee crystals.
    • 2 sticks butter (1 cup)
    • cup granulated sugar
    • ½ tsp baking powder
    • 1 egg
    • cups all-purpose flour (plus a little extra to flour surface)
    • ¾ cup Heath toffee bits

    Method
     

    1. Stir the espresso instant coffee and vanilla together in a small container until the instant coffee dissolves into the vanilla.
    2. Beat butter, sugar, and baking powder together in a large mixing bowl with an electric mixer until fluffy.
    3. Stir in the egg and coffee mixture into the mix.
    4. Slowly beat in the flour until incorporated.
    5. Divide the dough in half and roll each half on a lightly floured surface into a 9-inch log.
    6. Wrap each log in plastic wrap and refrigerate for 4 hours until firm.
    7. Cut in 1/2-inch slices and place on a greased baking sheet (or line with parchment paper) about 2 inches apart.
    8. Top each cookie with a 1/2 teaspoon toffee bits and press lightly.
    9. Bake at 350° degrees for 10-12 minutes. Edges will be slightly browned.
    10. Cool for 3 minutes before moving to a rack to cool completely.