author.travelffeine.com

Blog

  • 7 Best Coffees to Try For Any Brewing Method

    I live in the Pacific Northwest, surrounded by so many great coffee roasters. This gives me ample opportunities to try the best coffees and find my favorites. These 7 coffees are my go-to coffees no matter what brewing method I use. Whether it’s my Aeropress, drip coffee maker, Chemex, or French Press, these are some of the best coffees I’ve found. I highly recommend you purchase these coffee beans whole and grind them yourself at home for the best results.

    1) Fonte Coffee’s Portofino Blend

    For those who read my article on How to Easily Make French Press Coffee, you know how much I love the Portofino Blend sold by Bean Box. The Portofino Blend is one of the best coffees I have ever tried, and it is so versatile! Although I love it in my French Press, it is also good in my Chemex and Aeropress. Honestly, I think this coffee blend works with every coffee brewing method. I highly recommend you try it!

    • Roast: Dark
    • Flavors: Chocolate and Hazelnut
    • Best for: All Brewing Methods (Drip, Espresso, French Press, Pour Over)

    2) Vashon Island Coffee’s Costa Rica Reserve

    The Costa Rica Reserve #401 blend is another favorite coffee of mine. Honestly, I think Costa Rican coffees are some of the best coffees in the world. I hope to visit Costa Rica soon and perhaps get to try some locally roasted coffee when I’m there. This medium roast coffee is also great in everything I’ve tried it in, including my drip coffee maker. If you enjoy medium roasted coffee with a nutty caramel flavor, then make sure to try the Costa Rica Reserve.

    • Roast: Medium
    • Flavors: Caramel and Nutty
    • Best for: All Brewing Methods (Drip, French Press, Pour Over)

    3) Keala’s Honolulu Blend

    I don’t believe I’ve met a Hawaiian coffee that I didn’t like.  Hawaii truly makes some of the best coffee in the world. It comes at a price, but I think it’s worth it!  Keala’s Honolulu Blend #40 is a smooth medium roast blend that has a nutty flavor.  I enjoy this in my drip coffee maker and my Chemex. I need to try it in my French Press next, but I have no doubt I will like it using that method too.

    • Roast: Medium
    • Flavors: Bold and Nutty
    • Best for: Chemex (Pour Over), French Press & Drip Coffee Makers

    4) Broadcast Coffee Roaster’s Johnson House Blend

    The Johnson House Blend is one of the best coffees I’ve found for brewing in a traditional drip coffee maker. It is a wonderful coffee to drink first thing in the morning. It has a fantastic aroma that hits your senses, and it also has some toffee notes in it, which I love! If you want to try something new for your morning coffee, but you tend to be more of a traditionalist, then the Johnson House Blend is a perfect coffee for you to try!

    • Roast: Medium
    • Flavors: Toffee with hints of chocolate
    • Best for: Chemex (Pour Over), French Press & Drip Machines, Iced Coffee

    5) Peet’s Cafe Domingo

    Peet’s Coffee has been around for over 50 years, and you can typically find their coffee in your local grocery store. However, I have difficulty finding their Cafe Domingo blend in stores, so I usually order it online. The Cafe Domingo blend tastes wonderful in a traditional drip coffee maker, and it is also great for the French Press. Additionally, if you’re someone who only uses a K-cup coffee maker, they also sell Cafe Domingo K-cups, which are also quite good!

    • Roast: Medium
    • Flavors: Toasted Toffee
    • Best for: French Press, Drip Machines, and K-cup Brewers

    6) Altruistic Joe’s Big Iron Blend

    Altruistic Joe is a coffee roasting company I learned of last year. They are a veteran-owned small business that happens to make one of the best coffees for your morning pick-me-up! Plus, they give back 20% to deserving charities with every purchase. It’s a win-win scenario! You can read all about them in Altruistic Joe: Coffee With a Cause.  

    As soon as I tried their Big Iron Blend, I was hooked! It is now one of my favorite coffees to use in my drip coffee maker and French Press. They have a variety of other coffees to choose from, so make sure to check them out.

    • Roast: Medium-Dark
    • Flavors: Bold with notes of Caramel and Chocolate and a hint of smokiness
    • Best for: French Press & Drip Machines

    7) Boona Boona’s Blueberry Brandy Ethiopian

    If you’re more of an adventurous coffee drinker, then consider trying this light and fruity blend made with Ethiopian coffee beans. It’s well-known that Ethiopia produces some of the best coffee beans globally, and the Blueberry Brandy Ethiopian blend is sure to surprise and delight your senses. I recommend trying it in an Aeropress, pour-over, or your espresso machine.

    • Roast: Light
    • Flavors: Blueberry, Fruity with a bit of Spice
    • Best for: Espresso, Aeropress, Chemex

    Finding the Best Coffees for Every Brewing Method

    Whether traveling or finding your favorite cup of coffee, the key is to be adventurous and always curious. One of the reasons I love using Bean Box and have been using them for years is the huge variety of coffee roasters they partner with. They always have a new blend to try, but they also keep the favorites around so you can continue to purchase the ones you know you love while exploring new options.

    I recommend looking up any roasters that operate locally near your home and purchase some freshly roasted beans there. Ask them about the flavor profiles and get recommendations based on the types of coffee you like to drink and the brewing methods you use. It’s always fun to talk coffee with others who share your passion. Plus, you may find a new favorite coffee!

    Note: Travelffeine is reader-supported. This  post contains affiliate links. When  you make a purchase using one of these affiliate links, we get paid a small commission at no extra cost to you. And as always, all opinions are our own. Thank you!

    Here are more coffee articles you might enjoy:

    Best Coffees to Try No Matter How you Brew (7)
    Best Coffees to Try No Matter How you Brew Travelffeine
  • 25 Winter Activities to Banish the Winter Blues

    Maybe you’re one of those people who live on a tropical island, and winter blues aren’t a thing where you live, and if that’s the case, I am happy for you. For the rest of us, the winter brings rain, snow, and cold temperatures. In the Pacific Northwest, winter is called “The Big Dark.” Many of us turn into bear-like creatures that want to hibernate until spring. So in that spirit, I thought I’d come up with a list of winter activities to help make winter a more memorable season and maybe a more productive one too!

    Don’t let winter stop life’s adventure; instead, let’s turn winter into a season we look forward to. If we change our mindset about winter and make it something to look forward to rather than just get through, we’ll create a year full of memories that won’t let the weather dictate our days.

    25 Winter Activities To Banish the Winter Blues

    1) Game Night

    Every winter, we dust off the board games and once again remind ourselves how fun it is to play something that doesn’t need a charger or a cable. Now that isn’t to say that game night in your household couldn’t be an intense round of Mario Kart or a Minecraft building extravaganza. Still, there’s something about gathering around a table and playing a board game.

    There are so many to choose from, no matter the age group. We gather as a family on New Year’s, and even my 90+-year-old Grandma plays Pictionary and Apples to Apples. Those are memories I will always cherish, and it is something I look forward to each winter. There is a lot of laughter and certainly some competitiveness, but in the end, it’s all in good fun. Other family favorites are CraniumTicket to Ride, and Catan.

    2) Scrapbook Your Adventures

    Scrapbooking can be a solo project or a group project. Gather together ticket stubs, photos, postcards, airplane tickets, and other mementos from a trip you’ve recently taken and create a scrapbook to preserve the memories in. This is a fun way to travel down memory lane and relive some happy moments while thinking forward to new adventures to come. It’s also a fun way to share those memories with others.

    You can purchase a journal, notebook binder, or scrapbook at your local craft store to get started. You can also create your scrapbook pages at Canva.com or print a photo book from Google Photos. Check out Pinterest for scrapbooking inspiration. There are so many great ideas there.

    Treat Yourself to World Class Coffee

    3) Make a Shadow Box

    Another fun way to display trip mementos and memories is to create a shadow box. You can fill it with international currency, photos, shells, rocks, ticket stubs, and so on. You could create a series of them based on various trips you take. I purchased a small one to hold some shells and beach memories. I love the ocean, so I bought a shadow box to keep a favorite beach photo and some shells and rocks I collected during my beach walks.

    It’s art and a memory all in one, and those are often the most meaningful things to hang in your home. Create a home filled with the memories you love, your interests, and your passions, and you design a home that inspires all year long. This article from shelterness.com gives wonderful examples of ways to use shadowboxes to display your adventures.

    4) Create a Patch Jacket

    I buy patches when I’m traveling, and I have had this project in the works for a while. I told myself that this winter is the winter I will finally finish my patch jacket! So, I started laying out my patches to decide where I want to attach them to my jacket.

    In addition to a patch jacket, you can also add patches to your favorite travel bags or make yourself a patch quilt! I discovered this idea while writing this post, and I love it! By utilizing old clothing, like worn-out jeans that you’d typically toss, you can create a quilt that displays your favorite travel patches.  

    I love the idea of creating a blanket because blankets don’t go in and out of style like a jacket might. You can use a blanket pretty much indefinitely. The other nice thing about patches is if you sew them on, rather than iron them on, you can remove and fix them to something else if you decide you want to.

    Travel patches are a fun way to memorialize your travels and create unique clothing and bags. Make sure to look in the visitor centers at all the U.S. National Parks as they typically sell these and offer the current designs for a limited time. Tourist gift shops often sell them too, and you can also hunt for vintage patches online at eBay and Etsy.

    DIY travel patch jacket

    5) Curl Up with a Good Book

    Many of us spend a lot more time indoors during the winter, so why not catch up on a bit of reading. Get your favorite tea or coffee and curl up with a good book. Here are a few inspiring travel books that will also spark your creative side. You’ll be transported to another place and perhaps find yourself picking up a paintbrush too!

    6) Watch Travel Movies & Shows

    Unless you can travel during winter, you may feel a little stuck and have a case of wanderlust. I suggest watching one of these great travel movies or travel tv shows to inspire your future travels and remind you of places you visited. Our imagination can open up a whole new world of winter activities, whether it’s traveling from the comfort of your recliner or creating indoor adventures with your family.

    7) Indoor Camping

    Who says you can’t camp in winter? Of all the winter activities, I think this one will appeal to kids and the child at heart. My guess is they will want to do this every winter. Set up a tent indoors, gather your blankets and pillows, and create a fun night of make-believe stories, games, and maybe even some microwave smores. See this article for more ideas. You can also make these delicious smores brownies!

    8) Organize Your Photos

    If you’re anything like me, your photos are probably filling up space on your computer or cloud storage and perhaps becoming somewhat disorganized. I have amassed quite a collection of photographs over the years and am continually trying to find better ways to organize them. It is helpful to find photos of loved ones for a birthday montage, travel photos from a specific country, landscape photos for printing, and so on. 

    It is also useful when creating photo albums of your travels and adventures. This makes for a perfect winter activity! You can stay snuggly and warm inside your home while traveling down memory lane. Make some photo gifts while you’re at it. I find photo calendars are always appreciated and are lovely Christmas or New Year’s gifts.

    You might also do what I did and ask your parents or grandparents if you could borrow some of the family albums and then scan them and travel back in time and enjoy a few laughs as you do.

    9) Plan Your Next Adventure

    Another great winter activity is planning your next adventure later in the new year. Typically, you have a little more downtime in winter (once the holidays have passed), and you can begin planning for the future. Gather some travel books filled with photos or go online and start researching your next destination. 

    You could have every member of your family place their top choice for a family vacation in a hat and then randomly draw a destination and begin planning your adventure there. This helps you focus on the fun to come and banish any winter blues with thoughts of faraway places.

    10) Start a Gratitude Journal

    A gratitude journal is a good idea all year long, but it makes a great winter activity as it helps with the seasonal blues. In the Seattle area, many people suffer from SAD (Seasonal Affective Disorder) due to the long dark days we experience in winter. Studies show that gratitude positively impacts our moods and outlook. Some studies even found it created actual changes in the brain. In short, gratitude is powerful and can help you feel better about your life. We often focus on what we don’t have or things we can’t do, but a gratitude journal allows us to see all that we already have and give us a thankful mindset all year.

    11) Take a Snow Day

    You know what they say “if you can’t beat them, join them.” Well, winter is sort of like that. Sometimes you have to embrace the cold and make it fun! A great way to do this is to have a snow day. Remember what it was like as a kid when you first got snow and how excited you were to play in it? Well, bring that back, go outside and build a snowman (or woman), create snow angels, or have a fun snowball fight. Snow is beautiful, and you can always warm up inside with a cup of hot cocoa after playing in the snow. Just think of the memories you’ll make! Here are a few snow and ice sculpture ideas to help.

    12) Try a Winter Hike

    Your outdoor adventures don’t need to stop just because there’s snow outside. Why not try a new hobby like snowshoeing this winter. For many, skiing is outside their budget, but snowshoes are a much more affordable winter hobby. You can even rent them from your local REI if you prefer not to buy them. REI also hosts guided snowshoe excursions. These are a great way to try something new with no commitment if you decide it’s not your thing. 

    The mountains are so beautiful when decorated with snow, so why not explore them and see them in a different light from your usual summer experience.

    winter activities skiing snowshoeing

    13) Take Up a New Hobby

    Have you ever wanted to play a musical instrument, make candles, or try knitting? These are great winter activities to take up, and you’ll get to cross something off your bucket list or last year’s resolutions. With so many apps and online tutorials, there isn’t much you can’t learn at home. The hardest part is starting, so set a day and go for it!

    14) Cook Something New

    Cooking is a great winter activity as it warms the house and transports us to another place and time. Food really can be something that brings us all together in a way nothing else can. So, try out your culinary skills. Pick a cuisine from another country or try baking homemade bread or a recipe from your Grandma. Worst case scenario, there’s always Doordash.

    15) Have an Indoor Picnic

    While we’re on the subject of food, why not have an indoor picnic this winter. Get out a blanket and a picnic basket. Create a charcuterie board or make little sandwiches. You could even pop up a background scene on the television, like a park in Paris, or turn on a little background music and pretend you’re at a concert in the park. Whatever your picnic lunch has, you will make it fun and create winter memories you’ll never forget! 

    16) Visit a Museum

    A good museum can make you forget everything about the weather outside. Pass away a couple of hours at a great art museum or natural history museum and immerse yourself in a different world. If you live in the Seattle area, make sure to read my post on how to get free tickets to Seattle’s top museums.

    airplane at museum of flight

    17) Complete a Puzzle

    A puzzle is a perfect winter activity. Gather around the table with friends and family, or play some music and allow yourself to pass an hour or two enjoying a simple pleasure. Puzzles can be an excellent stress-relievers. Pick out a puzzle that interests you, perhaps a travel puzzle or some artwork you might like to hang once you’ve completed it. You can always glue the puzzle together and hang it on the wall. Consider this puzzle made up of vintage travel posters or this Washington State Big Foot Puzzle made to look like Van Gogh’s Starry Night. You can even have a puzzle made from one of your photographs!

    18) Color

    No, not your hair, although you can certainly do that too but buy some coloring books and color! There is something about coloring that brings us back to childhood. It’s a simple, relaxing, and joyful activity. Plus, if you have kids, they will get the biggest kick out of an adult coloring with them! Here’s an around the world in 50 pages coloring book that adds a little travel fun or an affirmations coloring book for kids. Frame your colored pictures and hang them up for art or mail them to a friend and spread the love.

    19) Take a Cozy Cabin Getaway

    Look at cabins or lodge rentals on Airbnb or through your local state park, or if you live near a National Park, these also offer some cozy winter getaways. Here in Washington State, we are fortunate enough to have three National Parks, two of which offer year-round lodging. It is one of my favorite winter activities to book a cabin or stay at one of the lodges in the Olympic National Park.

    My husband and I have been doing this almost every winter for over a decade. Typically we’ll stay at Kalaloch Lodge cabins, and in the past couple of years, we’ve also stayed at the Lake Quinault Lodge. It’s a historic lodge that feels like you stepped into the past. Plus, the Olympic coast is beautiful no matter what time of year you go, so whether it’s rain or shine, we always enjoy our visit. I’ll tell you a secret though, we’ve always had mostly shine on every winter visit we’ve taken there.

    Pick a place with a fireplace and a good view or activities you’ll enjoy nearby. Let it be your winter retreat and perhaps, become an annual tradition.

    View of Lake Quinault Lodge

    20) Winter Organizing

    Everyone talks about spring cleaning, but why not get a jump start and begin sorting through paperwork and closets during the winter. There are so many areas in the house that often need a bit of organizing, such as the pantry, closets, office paperwork, desk drawers, junk drawers (don’t we all have at least one), and the foreboding garage.

    Why not get some organizing done during the winter and then in the spring, when everyone else is inside spring cleaning, you can be outside enjoying the finally arriving sunshine! 

    21) Build a Blanket Fort

    Often, the simple joys from childhood are the best way to chase away any doldrums or blues, no matter what time of the year it is! I have lovely memories of building blanket forts when I was a kid. You can tip over your sofa and hang blankets over it to make a fun “cave,” or use the kitchen table and create a secret fort underneath of it. Kids will love this idea, and if you’re a couple, it might spark a little fun romance too.

    22) Be British For a Day

    I relate to England’s winters, they are much like winter here in the Pacific Northwest–gray and rainy! I think that’s why sitting down with a pot of tea, some tea cookies, and a good book sounds so inviting in the wintertime. 

    However, I suggest taking it one step further for a fun winter activity.  Why not host an afternoon tea and serve little sandwiches, along with scones with clotted cream. You can often find beautiful teacups and teapots at your local thrift store for a bargain price!

    I absolutely love scones and clotted cream! After my first visit to England, I came home and had a tea party and attempted to bake everyone English scones with clotted cream and jam. Plus, I brought tea from Fortnum & Mason because if it’s good enough for the Queen, it’s good enough for me! If you really want to splurge you can purchase their tea online and have it shipped, I think it cost around 25£ for shipping, but it’s still cheaper than a flight to London.

    British Tea and Scones

    23) Travel Somplace Warm

    A warm getaway is an ideal thing to do in winter if you can. I keep telling my hubby that I’ll skip winter altogether one of these days. That hasn’t happened yet, but we take a couple of weeks somewhere warm when it works out. Last winter, I visited Death Valley National Park and Joshua Tree National Park. Let me say I don’t think there is a time when Death Valley is ever cold. I was hiding from the sun in March! Valley of Fire State Park near Las Vegas is also a great place to visit in the winter.

    Since I live on the West Coast, some of the best warm winter getaways are not too far away. Arizona, California, Nevada, Hawaii, and even Mexico are all within a 6-hour flight or less. Maui is a favorite getaway for my husband and me, and winter is the best time to see whales!

    For those on the East Coast, Florida always has sunshine, and they are also close to Mexico and the Bahamas. If you keep your eyes open for sales ahead of time, you can find some pretty great deals during the winter too!

    24) Host a Hawaiian-Themed Party

    Perhaps you can’t afford a warm getaway this winter. Why not host a Hawaiian-themed party instead? You can set up some indoor lights, turn up the heat a bit, maybe set up some heat lamps for extra effect. Mix up some fruity drinks, turn on some luau music, make some crockpot pulled pork, or purchase a shave ice machine. You could fill a little kiddy pool up with some sand and set up a beach chair for people to stick their toes in the sand while playing ocean sounds in the background. Make it fun! 

    25) Learn a New Language

    Winter is an excellent time to learn that foreign language you always planned on. Maybe you’re planning an international trip in the coming year. Why not get a jumpstart on learning the local language? There are so many great tools available to help you. Download the Memrise app or Duolingo and get started today! Begin watching movies in the language you want to learn or sign up for a class at your local Community College.

    Maui Sunset

    Final Thoughts for Fun Winter Activities

    This post lists out only some of the many winter activities you can find to do. Come up with some of your own. I hope it sparks inspiration and creates moments of laughter and memories to carry you through the winter season. Winter can often feel like a time of isolation. I hear from so many who dislike the season, but I say let’s take this season back and instead make it a time of renewal and a time for reconnecting with those we love.  

    Here’s to winter!

    Note: Travelffeine is reader-supported. This post contains affiliate links. When you make a purchase using one of these affiliate links, we get paid a small commission at no extra cost to you. And as always, all opinions are our own. Thank you!

    25 Winter Activities to Banish the Winter Blues
    25 Winter Activities to Banish the Blues
    25 Winter Activities to Banish the Winter Blues
  • Tips for Planning a Two Week Road Trip in Portugal

    This 2-week road trip in Portugal outlines a route using three base locations from which to take day trips, thus minimizing the need to frequently change accommodations.  You need a rental car, and you will also want to make sure each of your accommodations has parking. Read 5 Tips for Renting a Car and Driving in Portugal to learn more tips for your road trip in Portugal. 

    If you’ve never visited Portugal, it really should be at the top of your list. It is one of the sunniest destinations in Europe, and it has fantastic food, gorgeous scenery, and historic cities. There is something for everyone!

    2-Week Road Trip in Portugal – Map of Destinations

    Planning a Road Trip in Portugal

    I planned this two-week road trip in Portugal with a minimal amount of accommodation changes. This trip was a vacation with my hubby, who prefers longer stays vs. 1-2 night stays before switching accommodations. It creates a more enjoyable experience when we’re not checking in and out of AirBnbs or hotels every day or two.  

    So with that in mind, I broke up our road trip in Portugal into three sections.  Using this method, I created three main bases from which we could then take day trips.

    Three Base Locations in Portugal

    1. Lisbon
    2. Luz (the Algarve)
    3. Porto

    Using these cities as our base of operations, I created a list of activities, points of interest, and day trips we could take from each of these three locations. I listed all possible day trips I was interested in, knowing that we might not get to all of them. 

    Additionally, I did not list out every possible attraction in each of the day trip locations. You need to research which options you’re most interested in and plan your day trip around those.  You can see the main highlights in a full day or pick out a few favorites if you only want to spend a half day.

    Below I list out the approximate one-way travel times from each city to the listed day trip options. Depending on what sites you want to see in each city will determine whether you’ll want to spend a half-day or a full day at each. Some of the options are close enough to each other you can combine two or more for a full day trip experience.

    Lisbon Day Trips

    • Batalha Monastery (2 hours from Lisbon)
    • Evora (1.5 hours from Lisbon)
    • Nazaré (2 hours from either Lisbon or Porto)
    • Óbidos (Castelo de Óbidos) (1.5 hours from Lisbon)
    • Sintra (1 hour from Lisbon)

    Luz Day Trips

    • Lagos (15 minutes from Praia da Luz)
    • Benagil (35 minutes from Praia da Luz)
    • Carvoeiro (35 minutes from Praia da Luz)
    • Sagres (30 minutes from Praia da Luz)
    • Ria Formosa Nature Park (1 hour from Praia da Luz)

    Porto Day Trips

    • Douro Valley (Pinhão) (2 hours from Porto)
    • Peneda-Geres National Park (2 hours from Porto)
    • Braga (1 hour from Porto)
    • Guemeres (1 hour from Porto) (30 min from Braga)
    • Coimbra (1.5 hours from Porto)
    • Aveiro/Costa Nova (1 hour from Porto)

    Tip: Look for the large brown road signs with drawings on them, these are Portugal’s tourist attraction signs.

    Viewpoint at Sao Jorge Castle Lisbon

    Our Road Trip in Portugal: Final Route & Experience

    We had a connecting flight in London Heathrow before arriving at Lisbon’s Humberto Delgado Airport. I planned ahead and made sure to have all the necessary entry documents and negative-test results.  

    This is all uploaded before departure, but if you can, printing the documents out is helpful at check-in. 

    Travel requirements are constantly changing, so make sure to look at the updated requirements before you travel. This includes requirements for traveling to a new destination and also for returning home.

    Lisbon (3 nights)

    Portugal is 8 hours ahead of Washington’s Pacific Standard Time (PST). So I planned our initial arrival in Portugal to be a relaxing transition to the new time zone. We stayed in Lisbon three nights and enjoyed a leisurely pace of sleeping in, seeing the sights in Belém where our Airbnb was located, and then also spending a day exploring Lisbon on foot.

    Belém

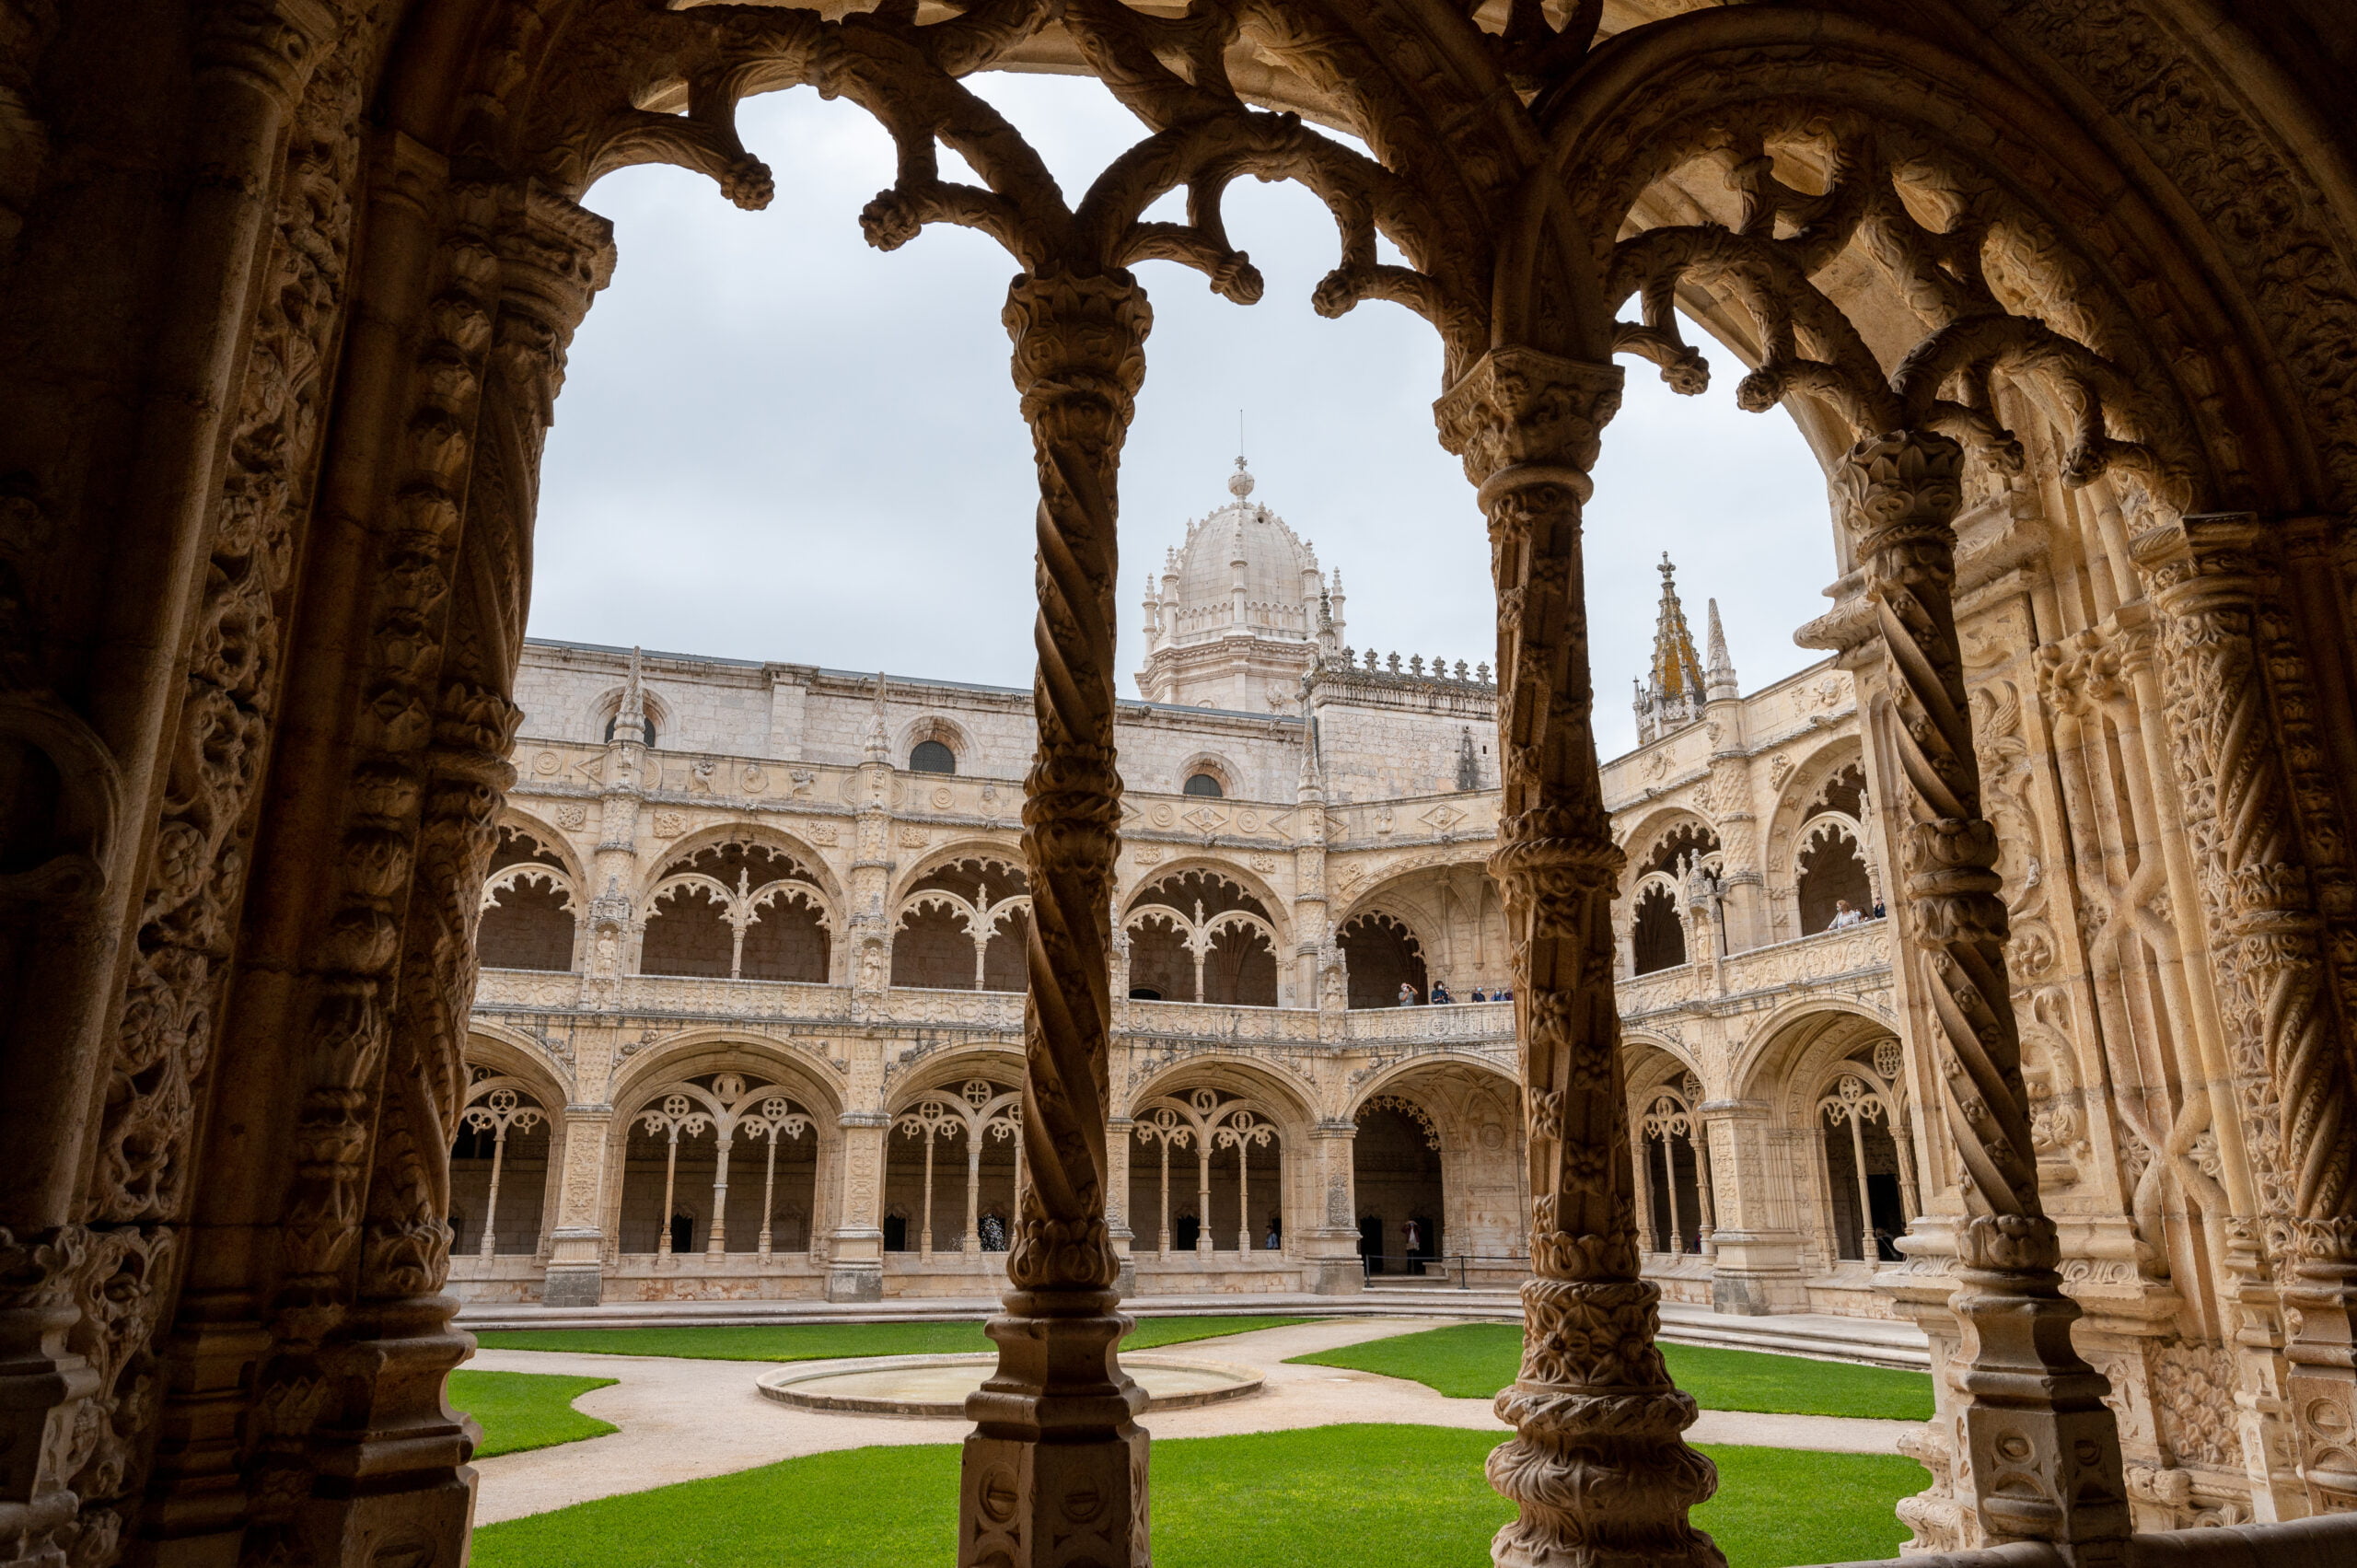
    Jerónimos Monastery in Belém was one of the few places I visited on a previous trip to Lisbon that I knew I wanted to return to with my hubby.  He wanted the trip to include new experiences for both of us, but there were a couple of things I knew he had to see and do.  

    One was visiting the Jerónimos Monastery, and the other was eating pastéis at Pasteis de Belém, then we walked to the Tower of Belém. The Tower of Belém was closed for renovations at the time of our visit, however sitting on the stairs in front and listening to the street musicians play while the waves rolled in made for wonderful travel memories.  Afterward, we visited the Museu Coleção Berardo, a modern art museum close to the Jerónimos Monastery.

    Jeronimos Monastery Belem Lisbon
    Inside the Jerónimos Monastery.

    Alfama

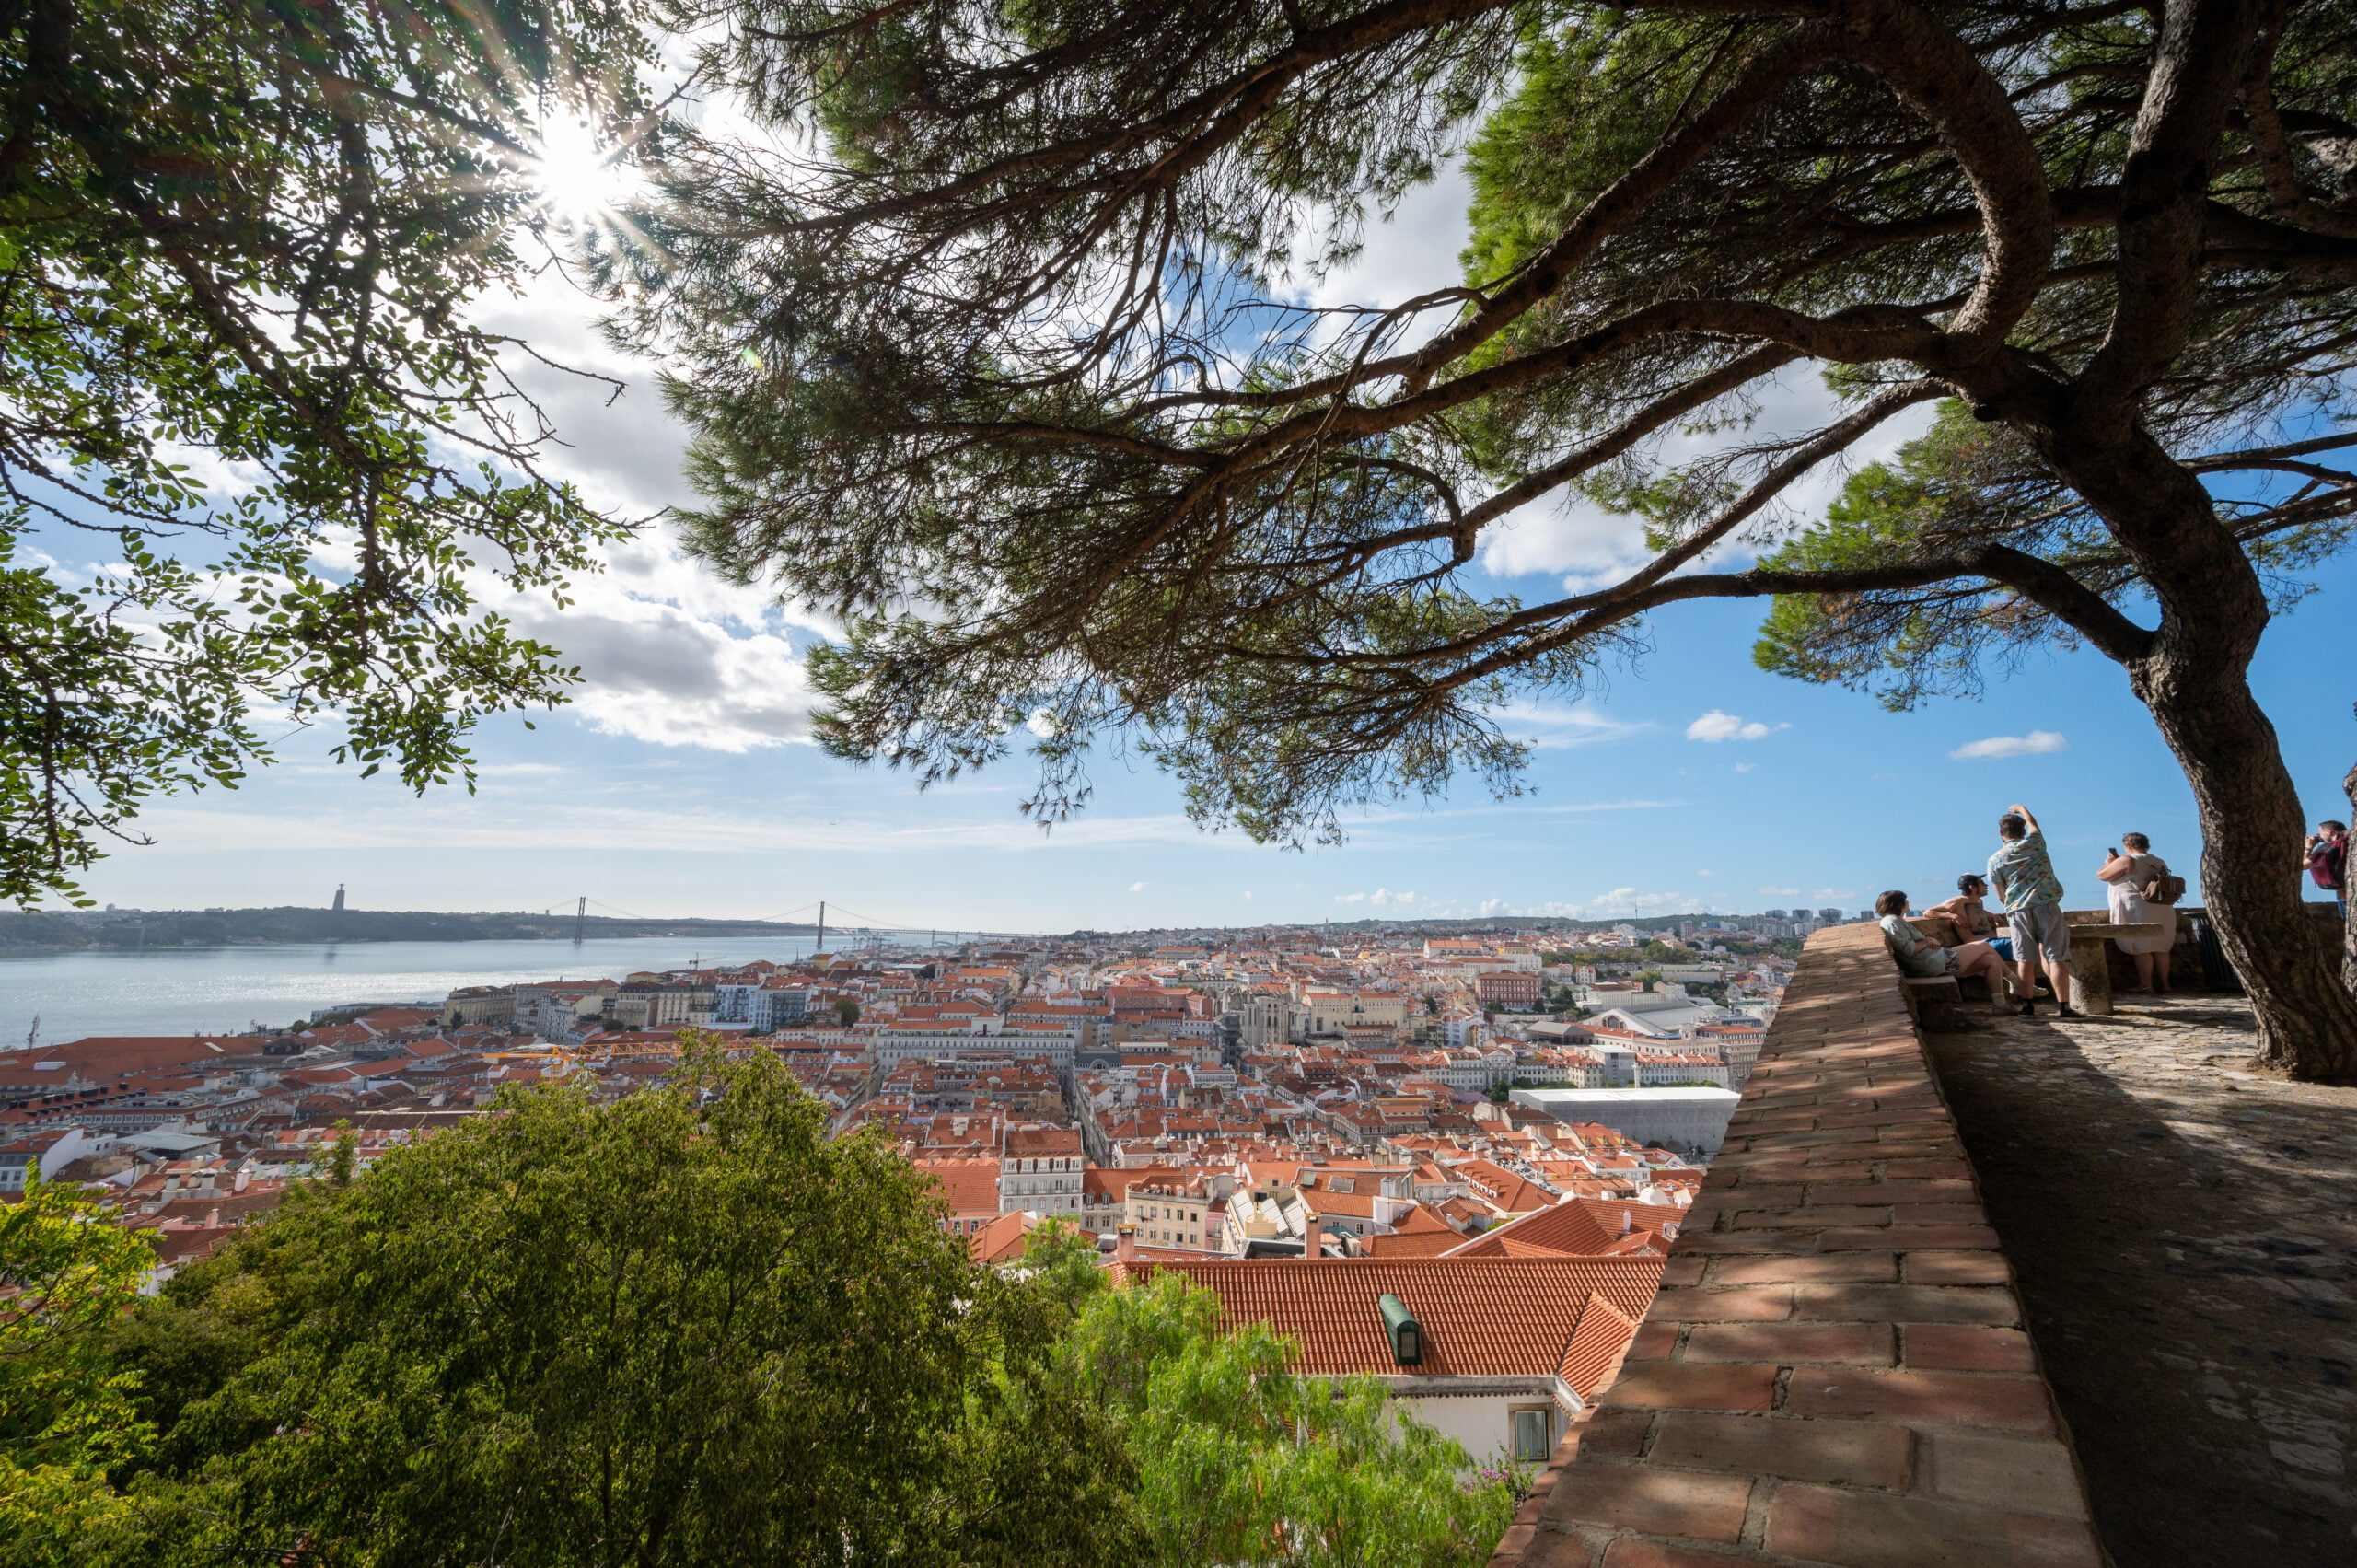
    We took in the views at Castelo de São Jorge, walked around the Alfama neighborhood, and ate gelato pops at Popbar. When you visit this area, make sure to try their passionfruit (maracujá) bar, it is incredible! The woman explained that they make all their gelato and sorbet in-house, and the fruit bars are made of 80% real fruit!  No wonder it tasted like eating a fresh passionfruit–so good! 

    Also, next door is Portugalidades, a store comprised of ceramics, artwork, and other handmade products, all sourced from artisans in Portugal.  If you want real made in Portugal gifts to bring home, this store is a great place to shop!

    I visited Lisbon back in 2018 and took a day trip to Sintra on that trip.  If this is your first to Lisbon, Sintra makes a wonderful day trip option, although I’d only go if the weather is nice as it’s mostly outdoor activities. 

    Speaking of weather, we had beautiful weather our entire visit, and it wasn’t until our last full day in Lisbon that we got some rain.  Thanks to my previous visit to Lisbon, I came prepared with ideas from an earlier article I wrote on How to Spend a Rainy Day in Lisbon.

    Side trip to Sines on road trip in Portugal

    Driving from Lisbon to Luz (The Algarve Region)

    We left Lisbon around 10:00 a.m. and headed for Luz in Portugal’s Algarve region.  Along the way, we decided to jump off the freeway (E1) and take the slightly slower but more scenic route along highway A-26.  

    Side Trip: Sines, Portugal

    Around lunchtime, we stopped in the town of Sines and admired our first views of the Atlantic coastline.  Beautiful teal blue water sparkled in the sun.  

    Sines is a beautiful old town! I would love to return here and spend a night or two strolling its streets and soaking in the ambiance of this laid-back fishing town. It is also the birthplace of Vasco da Gama. You’ll find his statue near the Sines Castle overlooking the sea and the aptly named Vasco da Gama Beach.  The locals we met were so warm and welcoming.  

    The architecture and colors of this town are appealing and picturesque. It felt like a real town as opposed to a tourist destination. It’s worth a short stop on your way from Lisbon to the Algarve. 

    If you’re hungry, I recommend getting a bite at Restaurante Bar Ponto de Encontro. We stopped in here for lunch during our visit, and the owner could not have been friendlier. We sampled Portuguese goat cheese and ate fried choco (cuttlefish) while enjoying views of an ancient castle and a beautiful historic church.

    With stomachs full, we left Sines and continued down the coast. We didn’t make it far before pulling off at a roadside parking area to kick off our shoes and run down the beach.  We walked in the surf and watched surfers and sunbathers enjoying the warm glow of the afternoon sun.  

    Now, with a proper amount of sand attached to our feet, we were once again ready to continue our journey to the town of Praia da Luz.  This is our base while visiting the Algarve region of Portugal.

    Vasco Da Gama Sines Portugal

    Praia da Luz (4 nights)

    We arrived at our Airbnb around 5:30 p.m. We had a self-check-in which allowed us to take as much time as we wanted to arrive. I prefer this type of Airbnb as it is one less thing to worry about when traveling.  

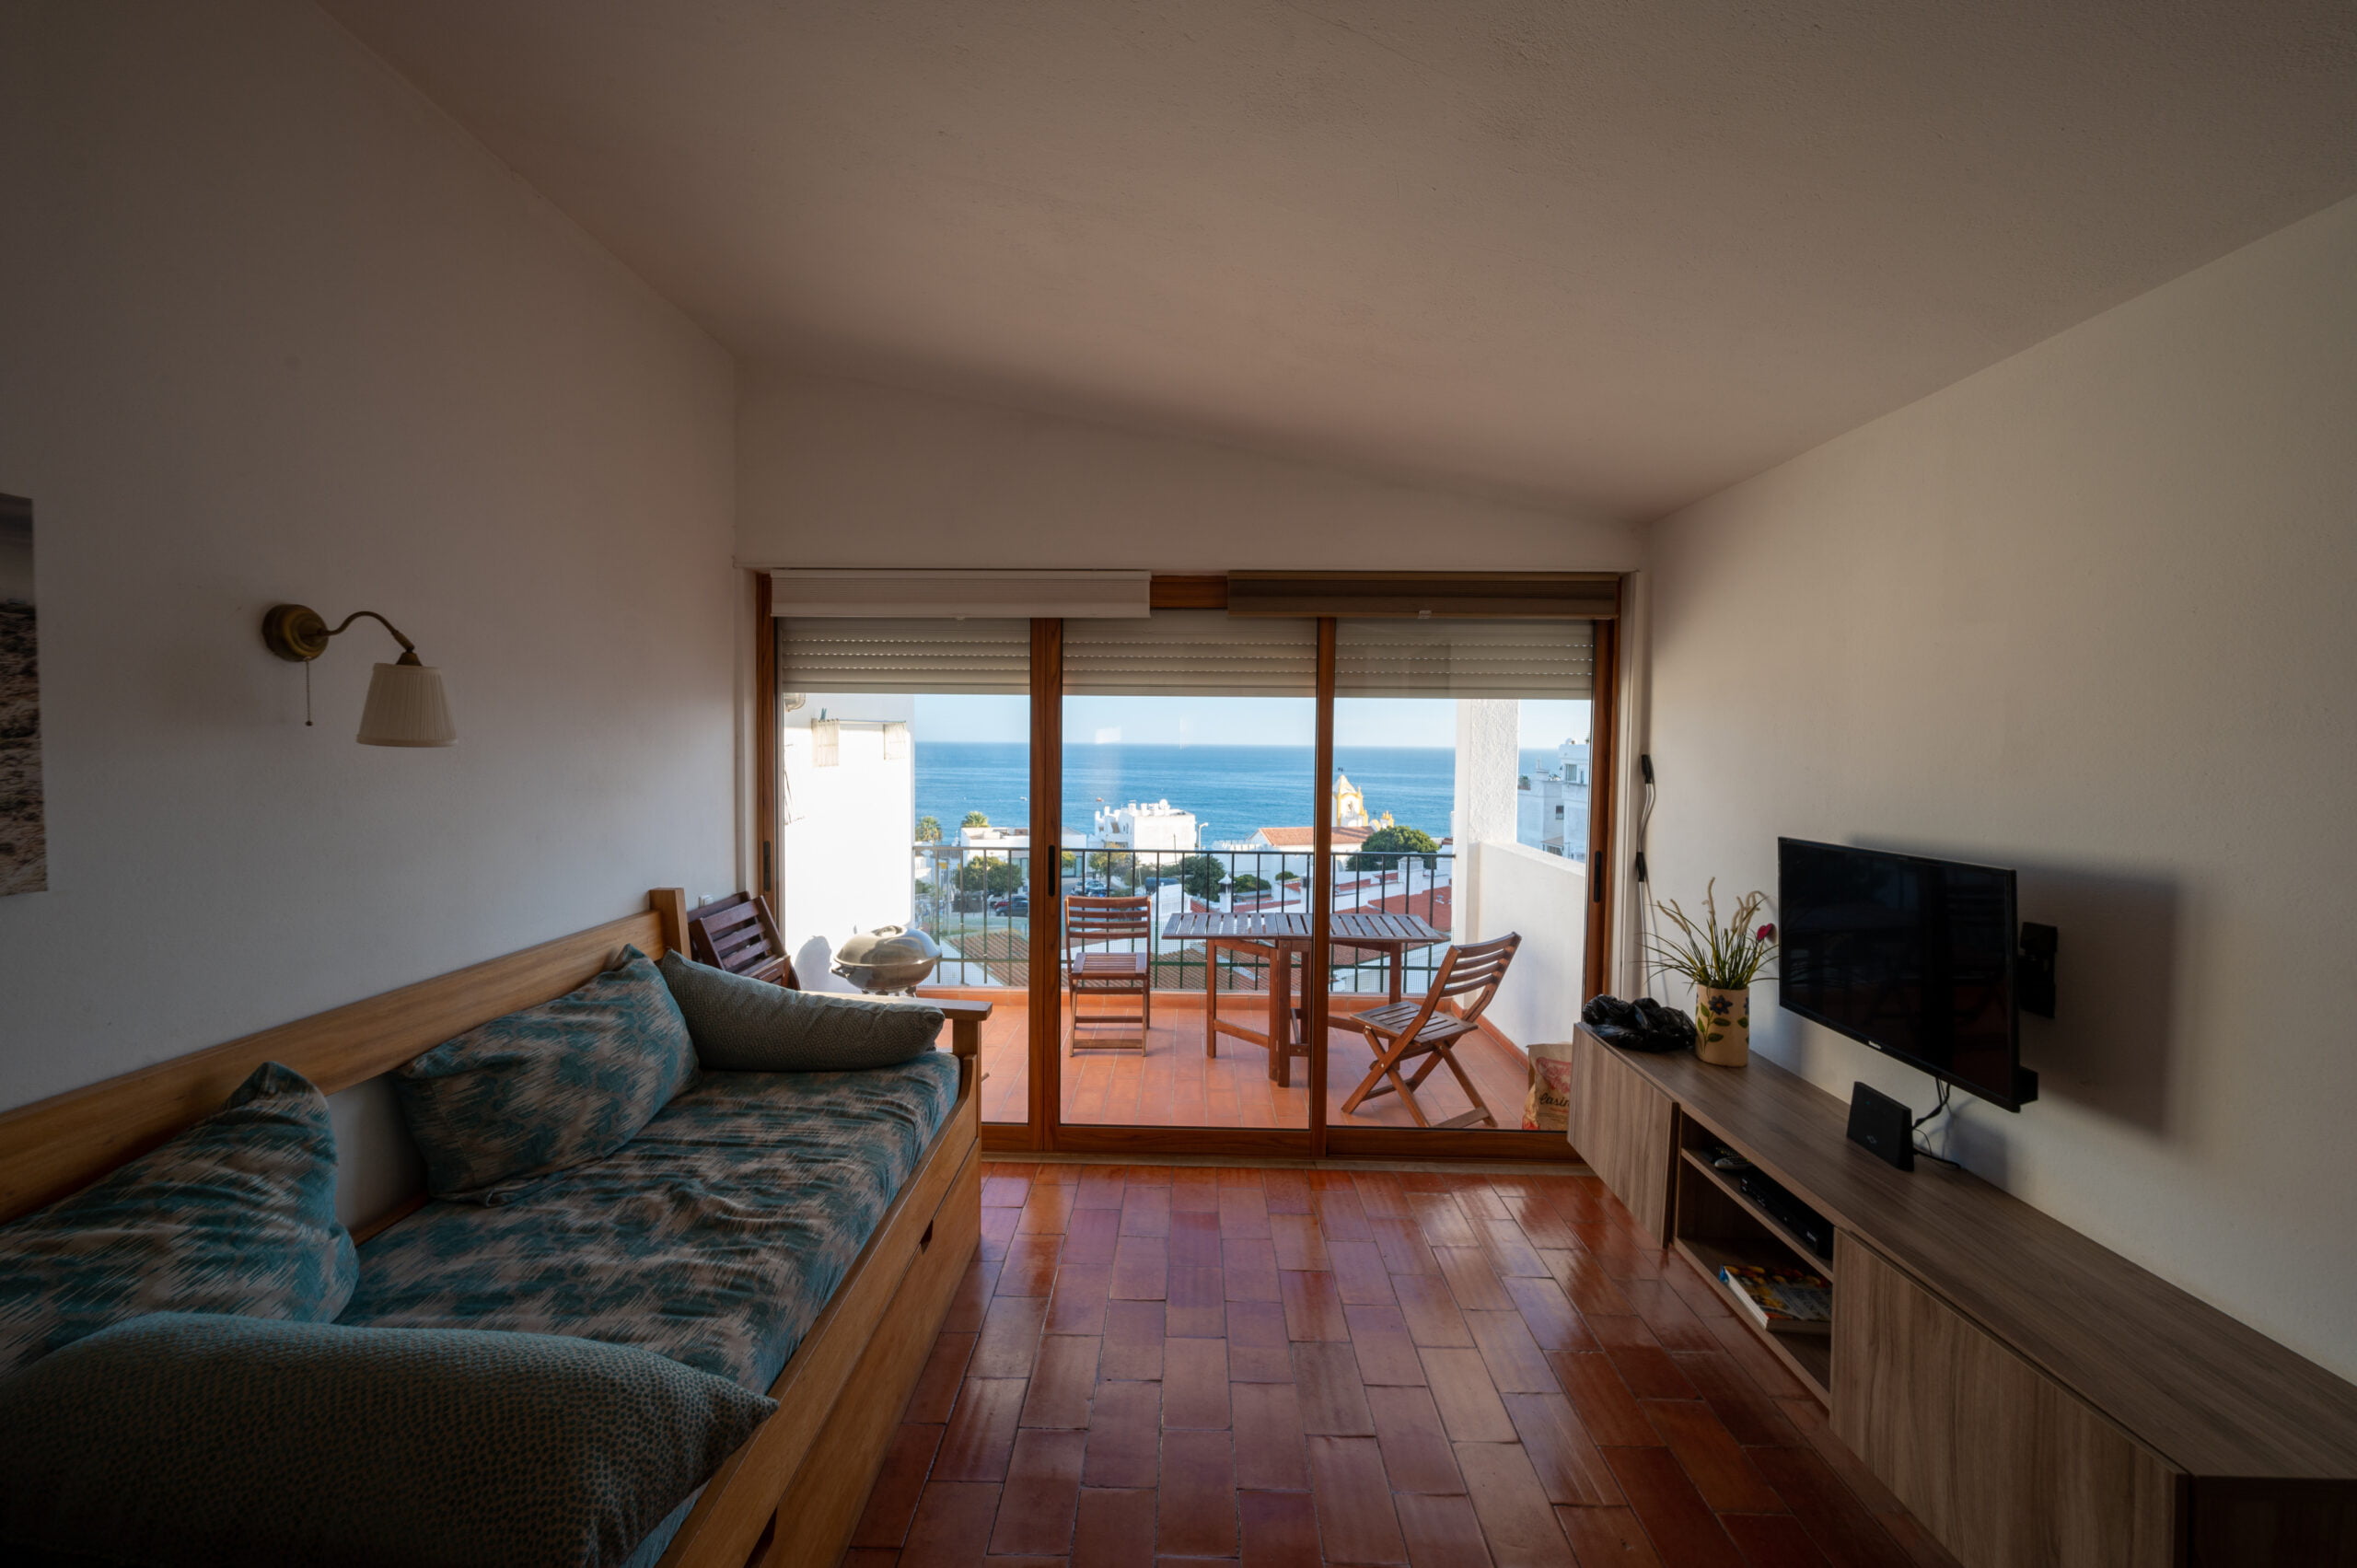
    Our Luz Airbnb was a charming two-story flat with a bedroom and bathroom on the first floor and the kitchen, living area, and balcony on the second floor.  

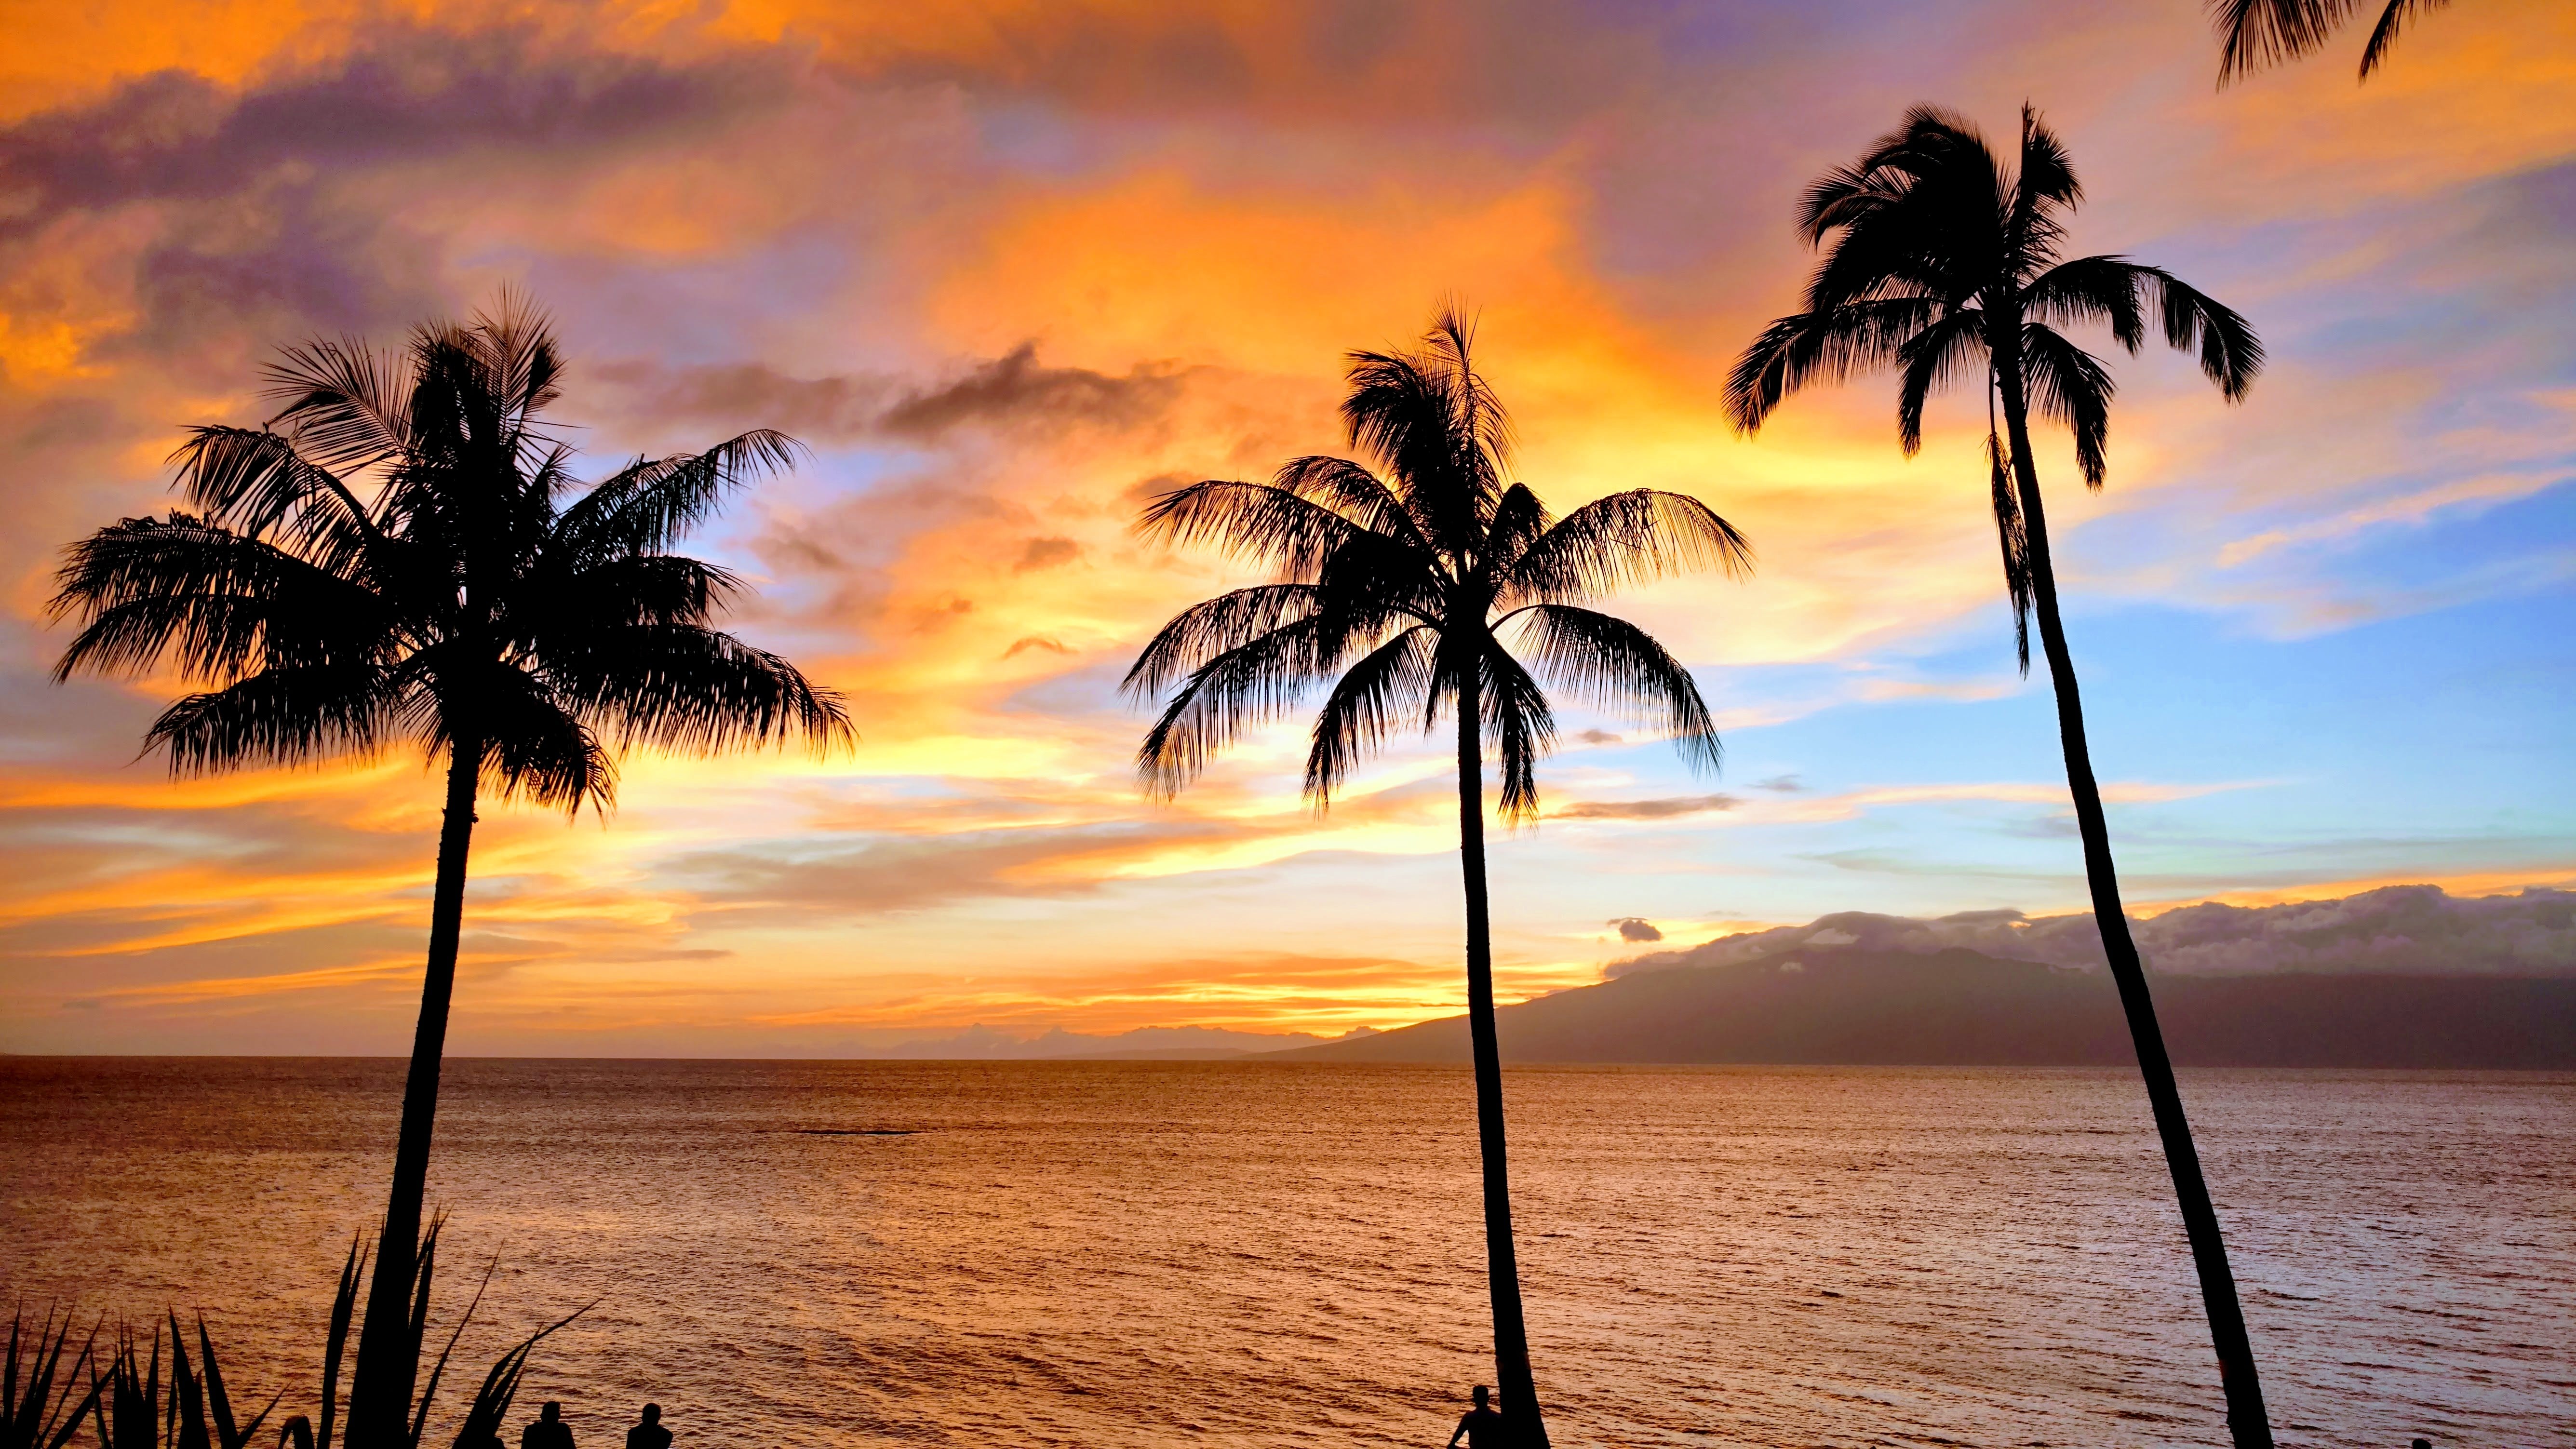
    As soon as we saw the view from our “lanai” (that’s what we like to call all of our vacation balconies in memory of our times in Maui), we fell in love with the place.  White buildings with red roofs and the Atlantic shimmering in the distance.  It is only a 5-minute walk from our apartment to the beach. What a beautiful base while exploring the Algarve!

    TIP: Know your check-in times and plan your route based on this. If staying at an Airbnb consider choosing self-check-in locations for greater flexibility.

    Luz Airbnb apartment
    The balcony at our Luz Airbnb was perfect for watching the sunrise and sunset.

    Algarve Day Trip: Sagres (The End of the World)

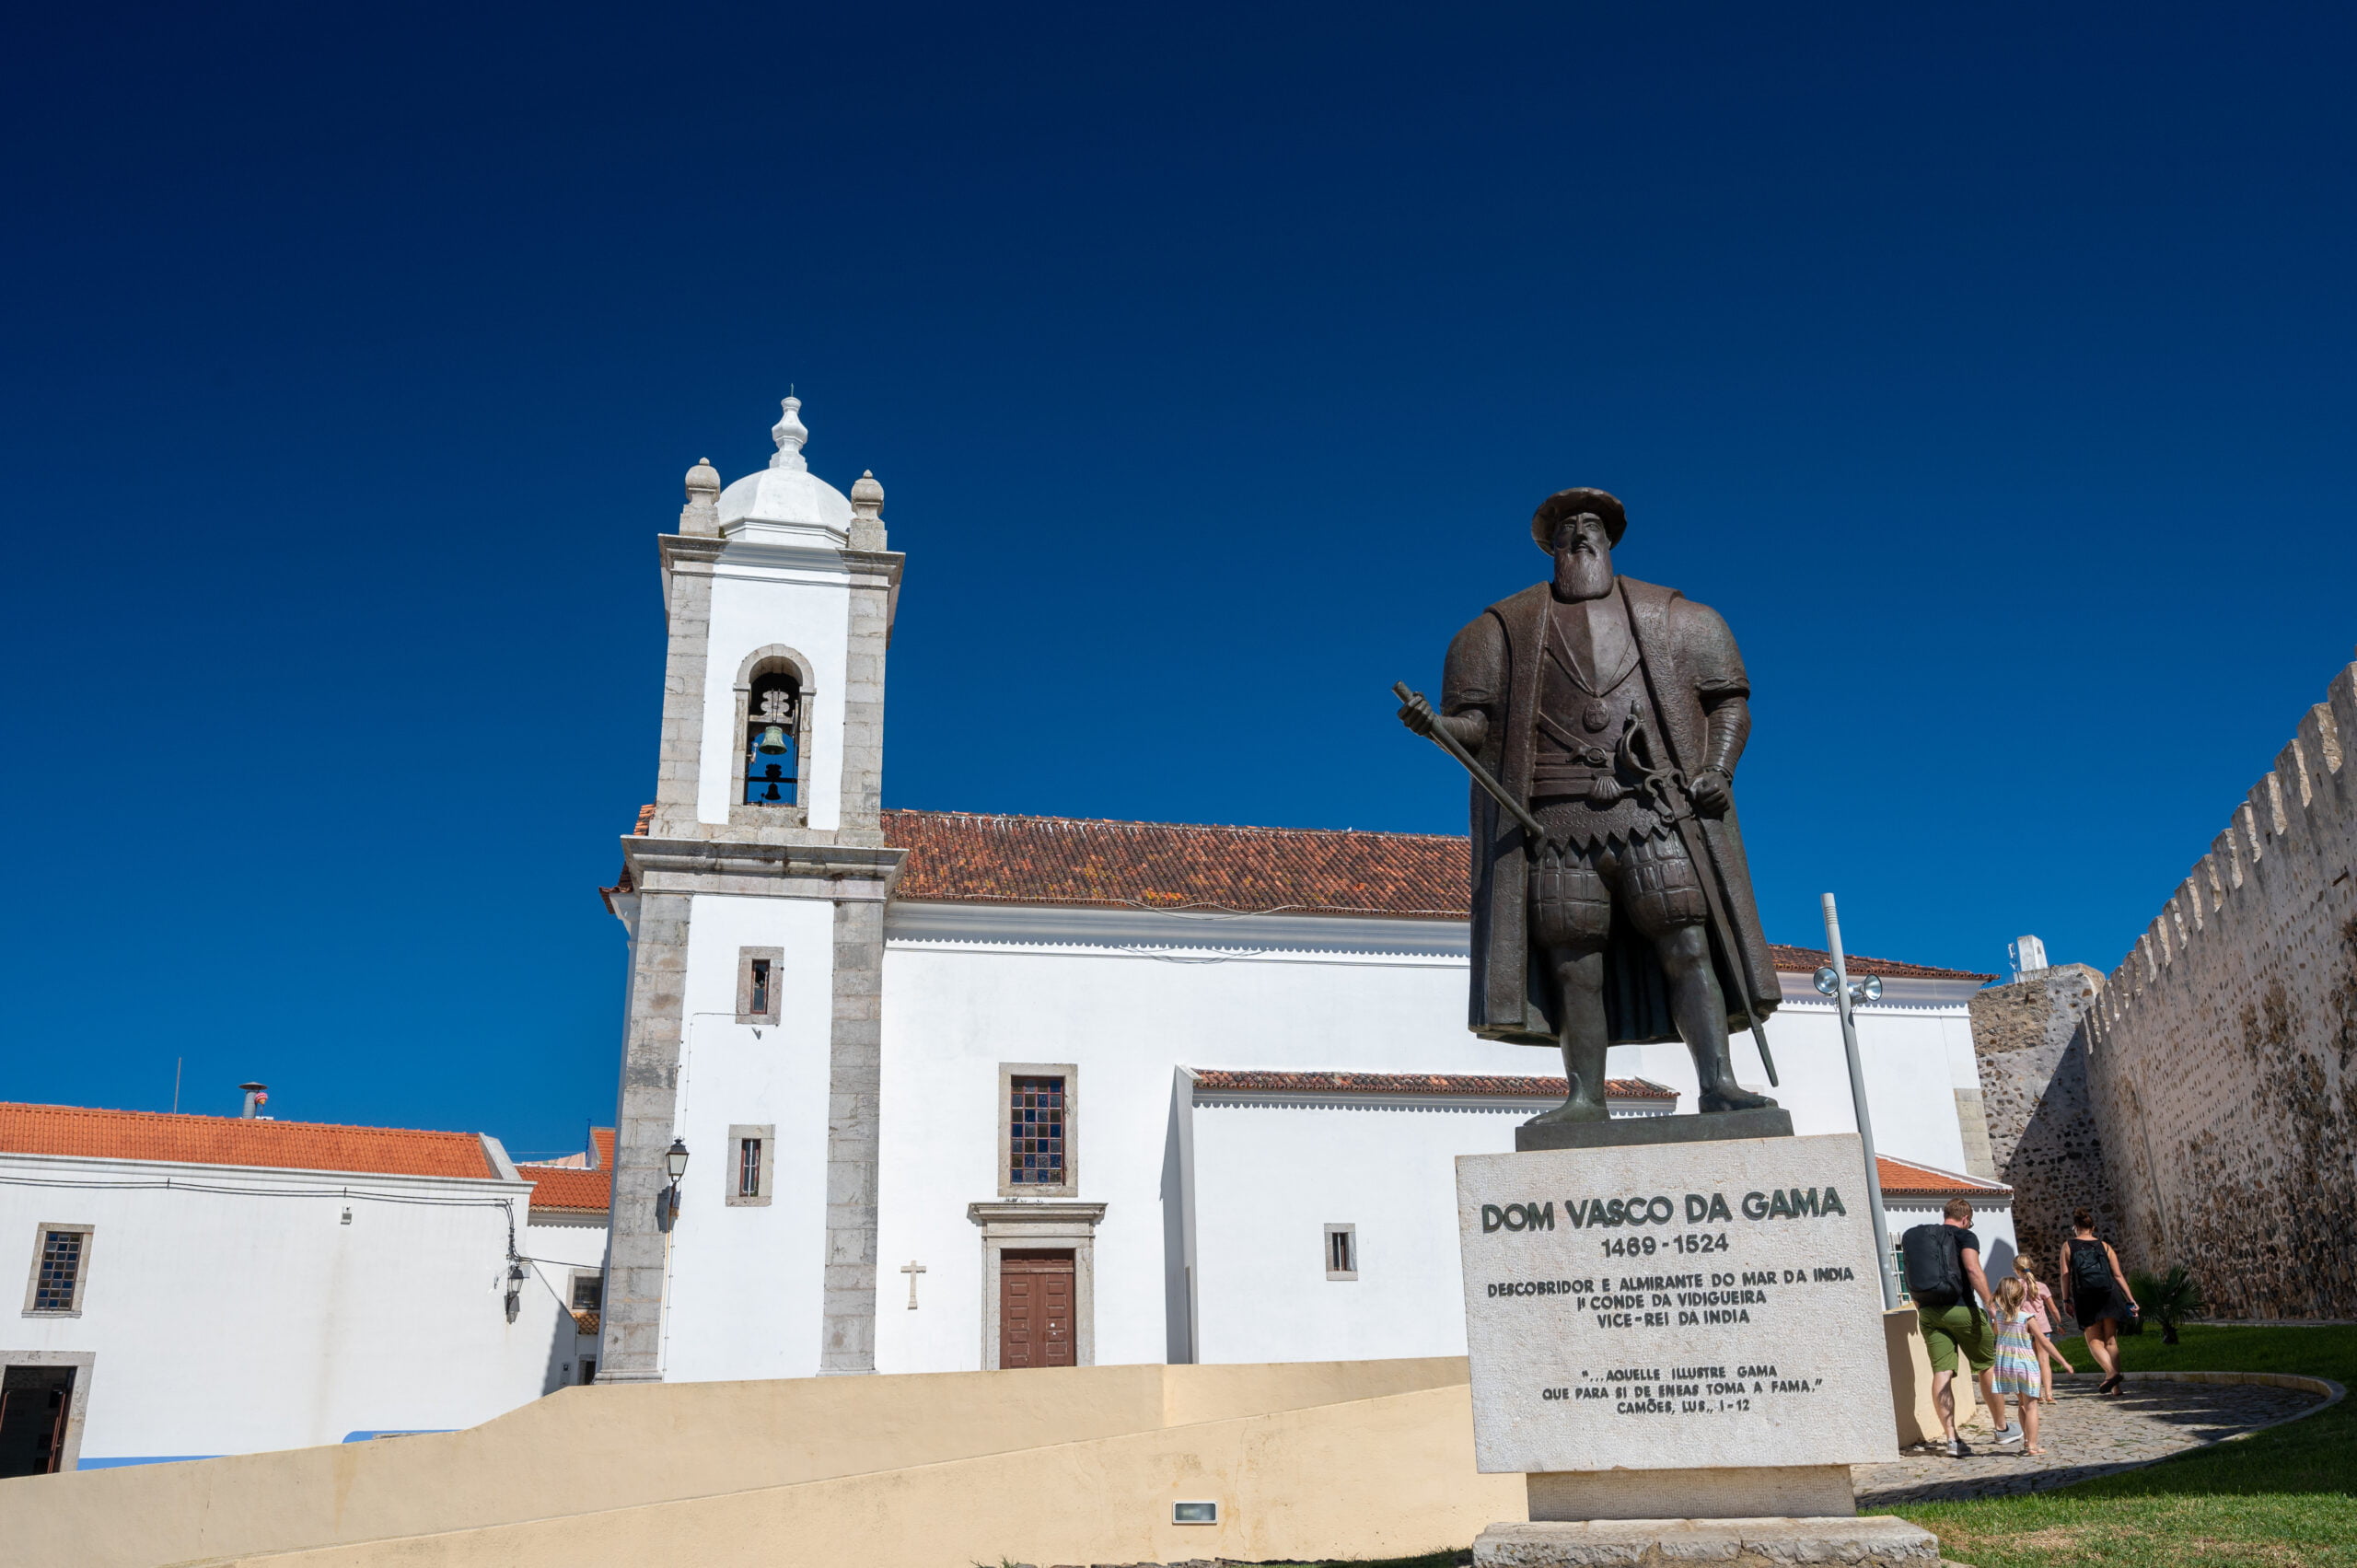
    We visited Sagres the following morning and walked around the Sagres Fortress, admiring the views of the Atlantic below us. Sagres was considered “the end of the world” or the furthest point of exploration in ancient times.  Although we know better now, it is fun looking out across the ocean and seeing only water.

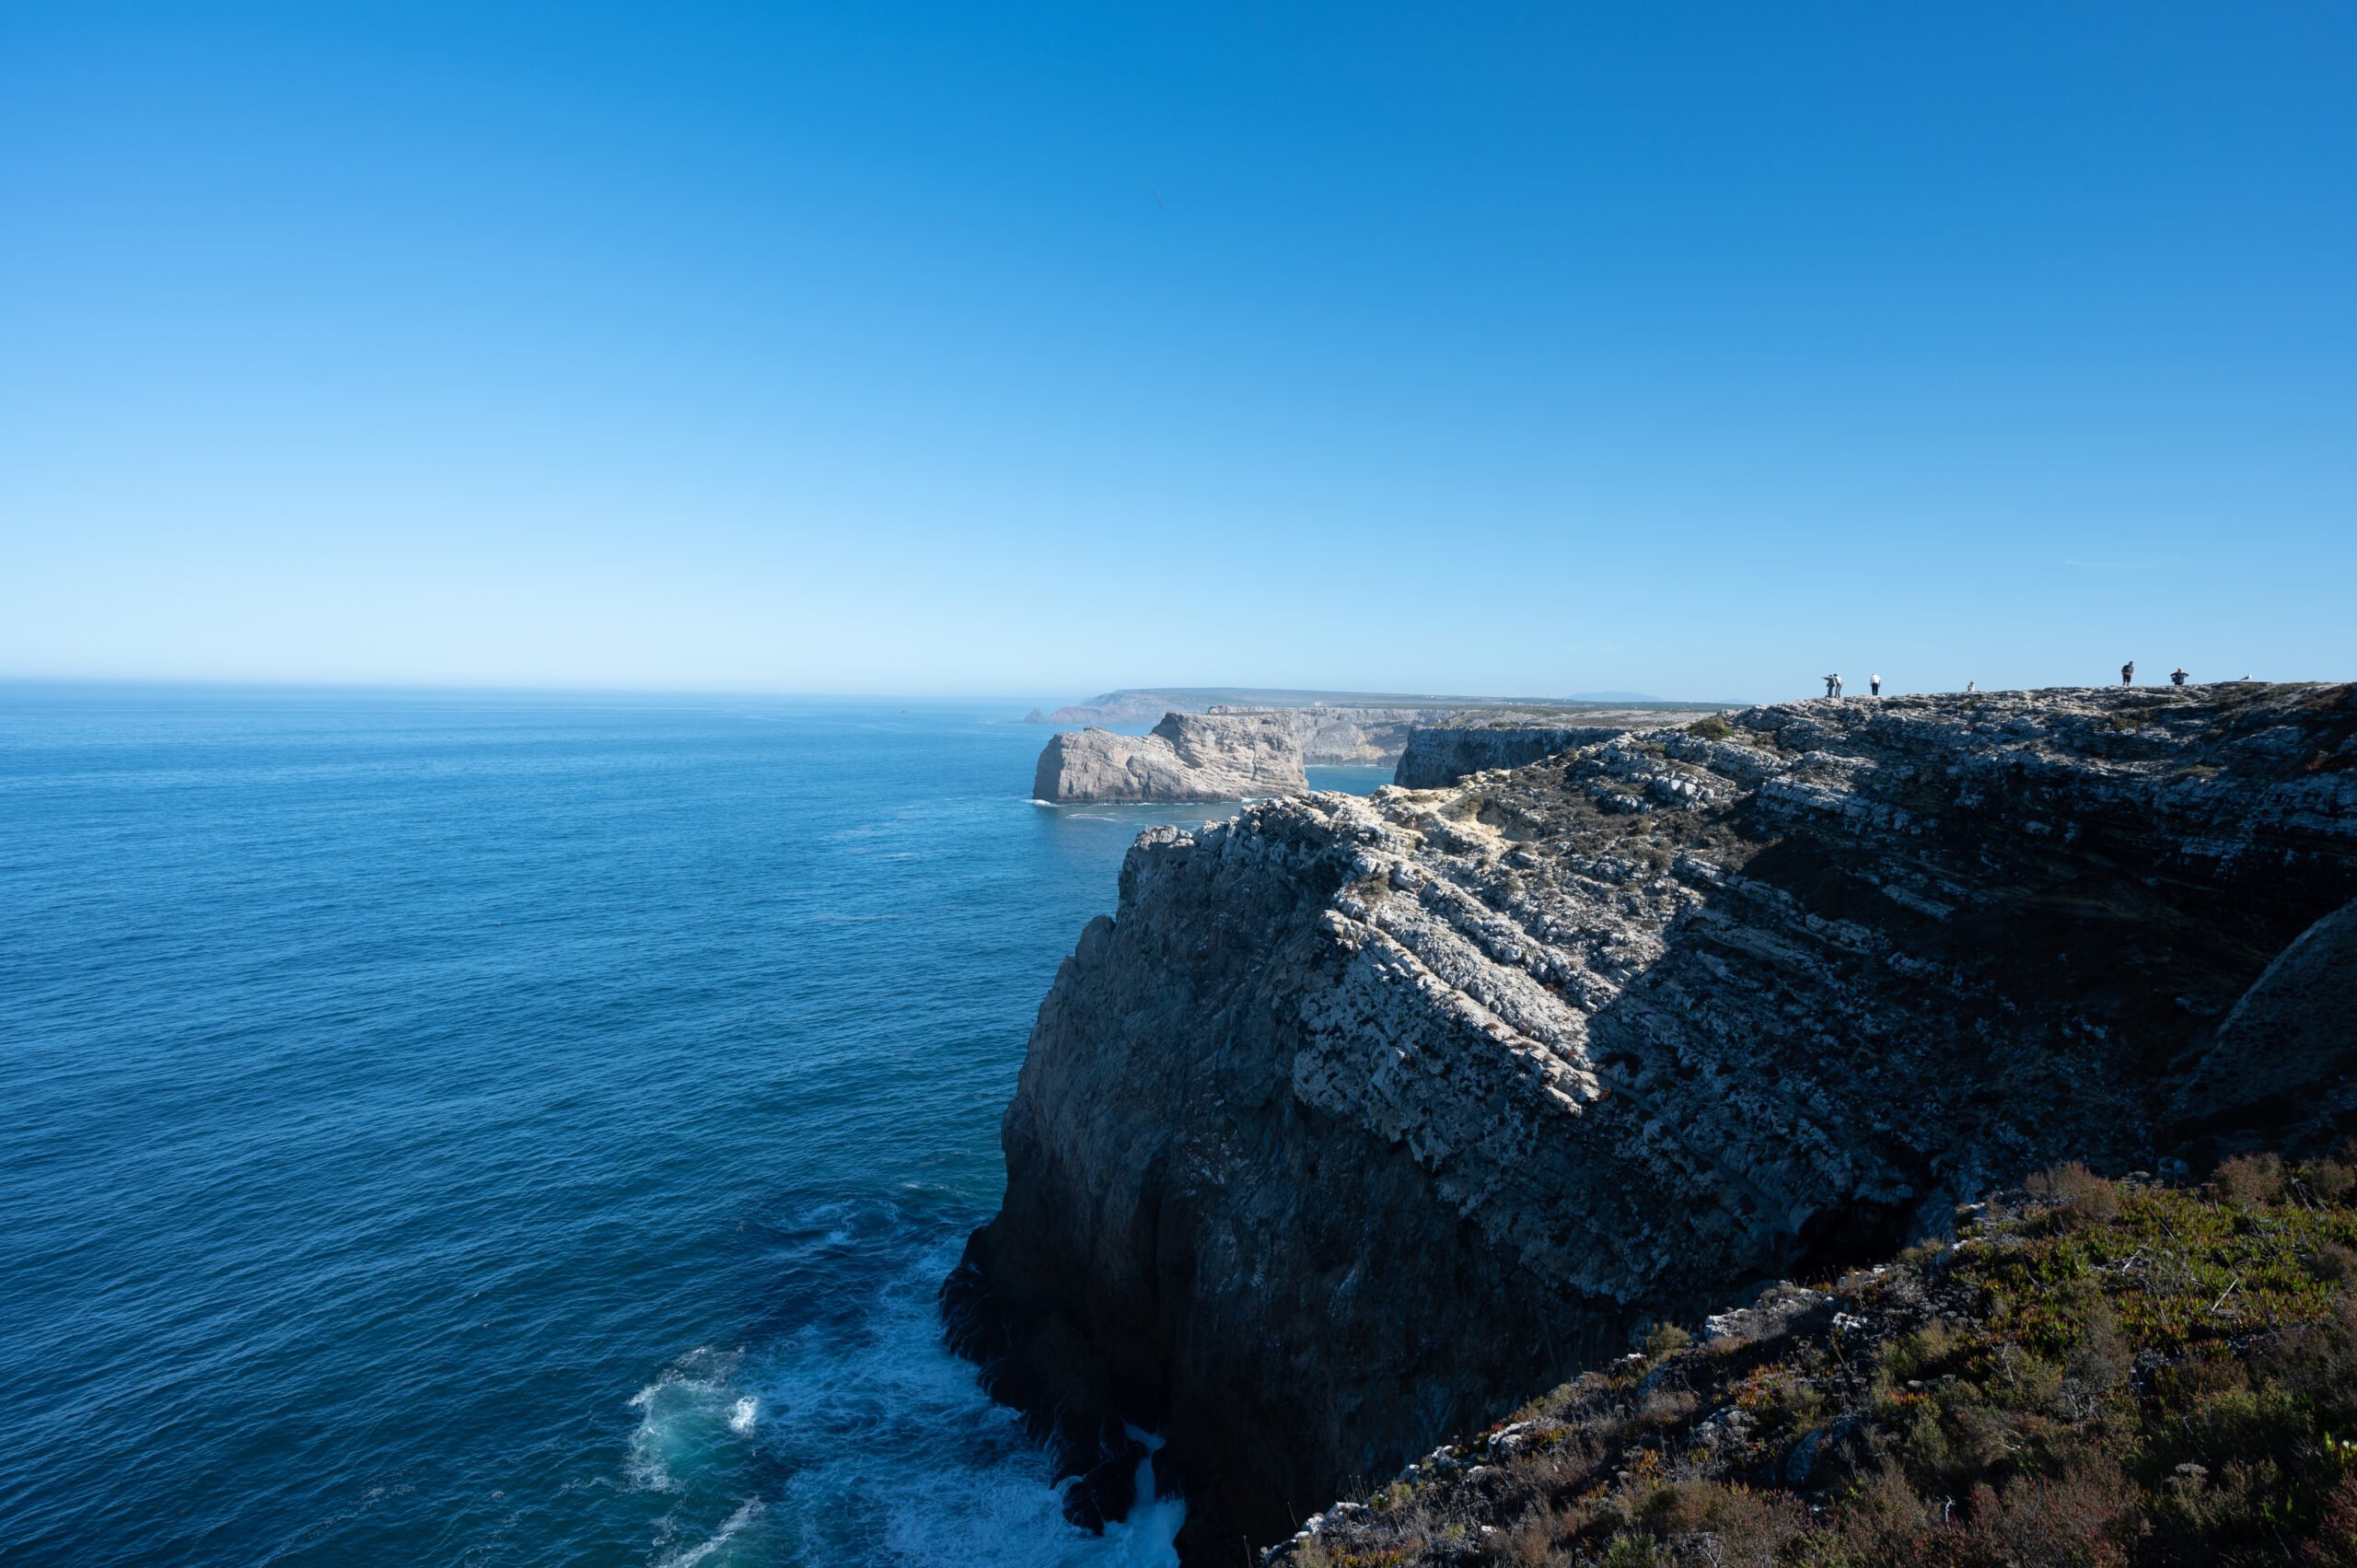
    After leaving the Sagres Fortress, we drove 3 miles to Cape St Vincent, considered the southwesternmost point of Europe. The area around the Cabo de São Vicente Lighthouse includes a couple of small gift shops, restrooms, and a small cafe. 

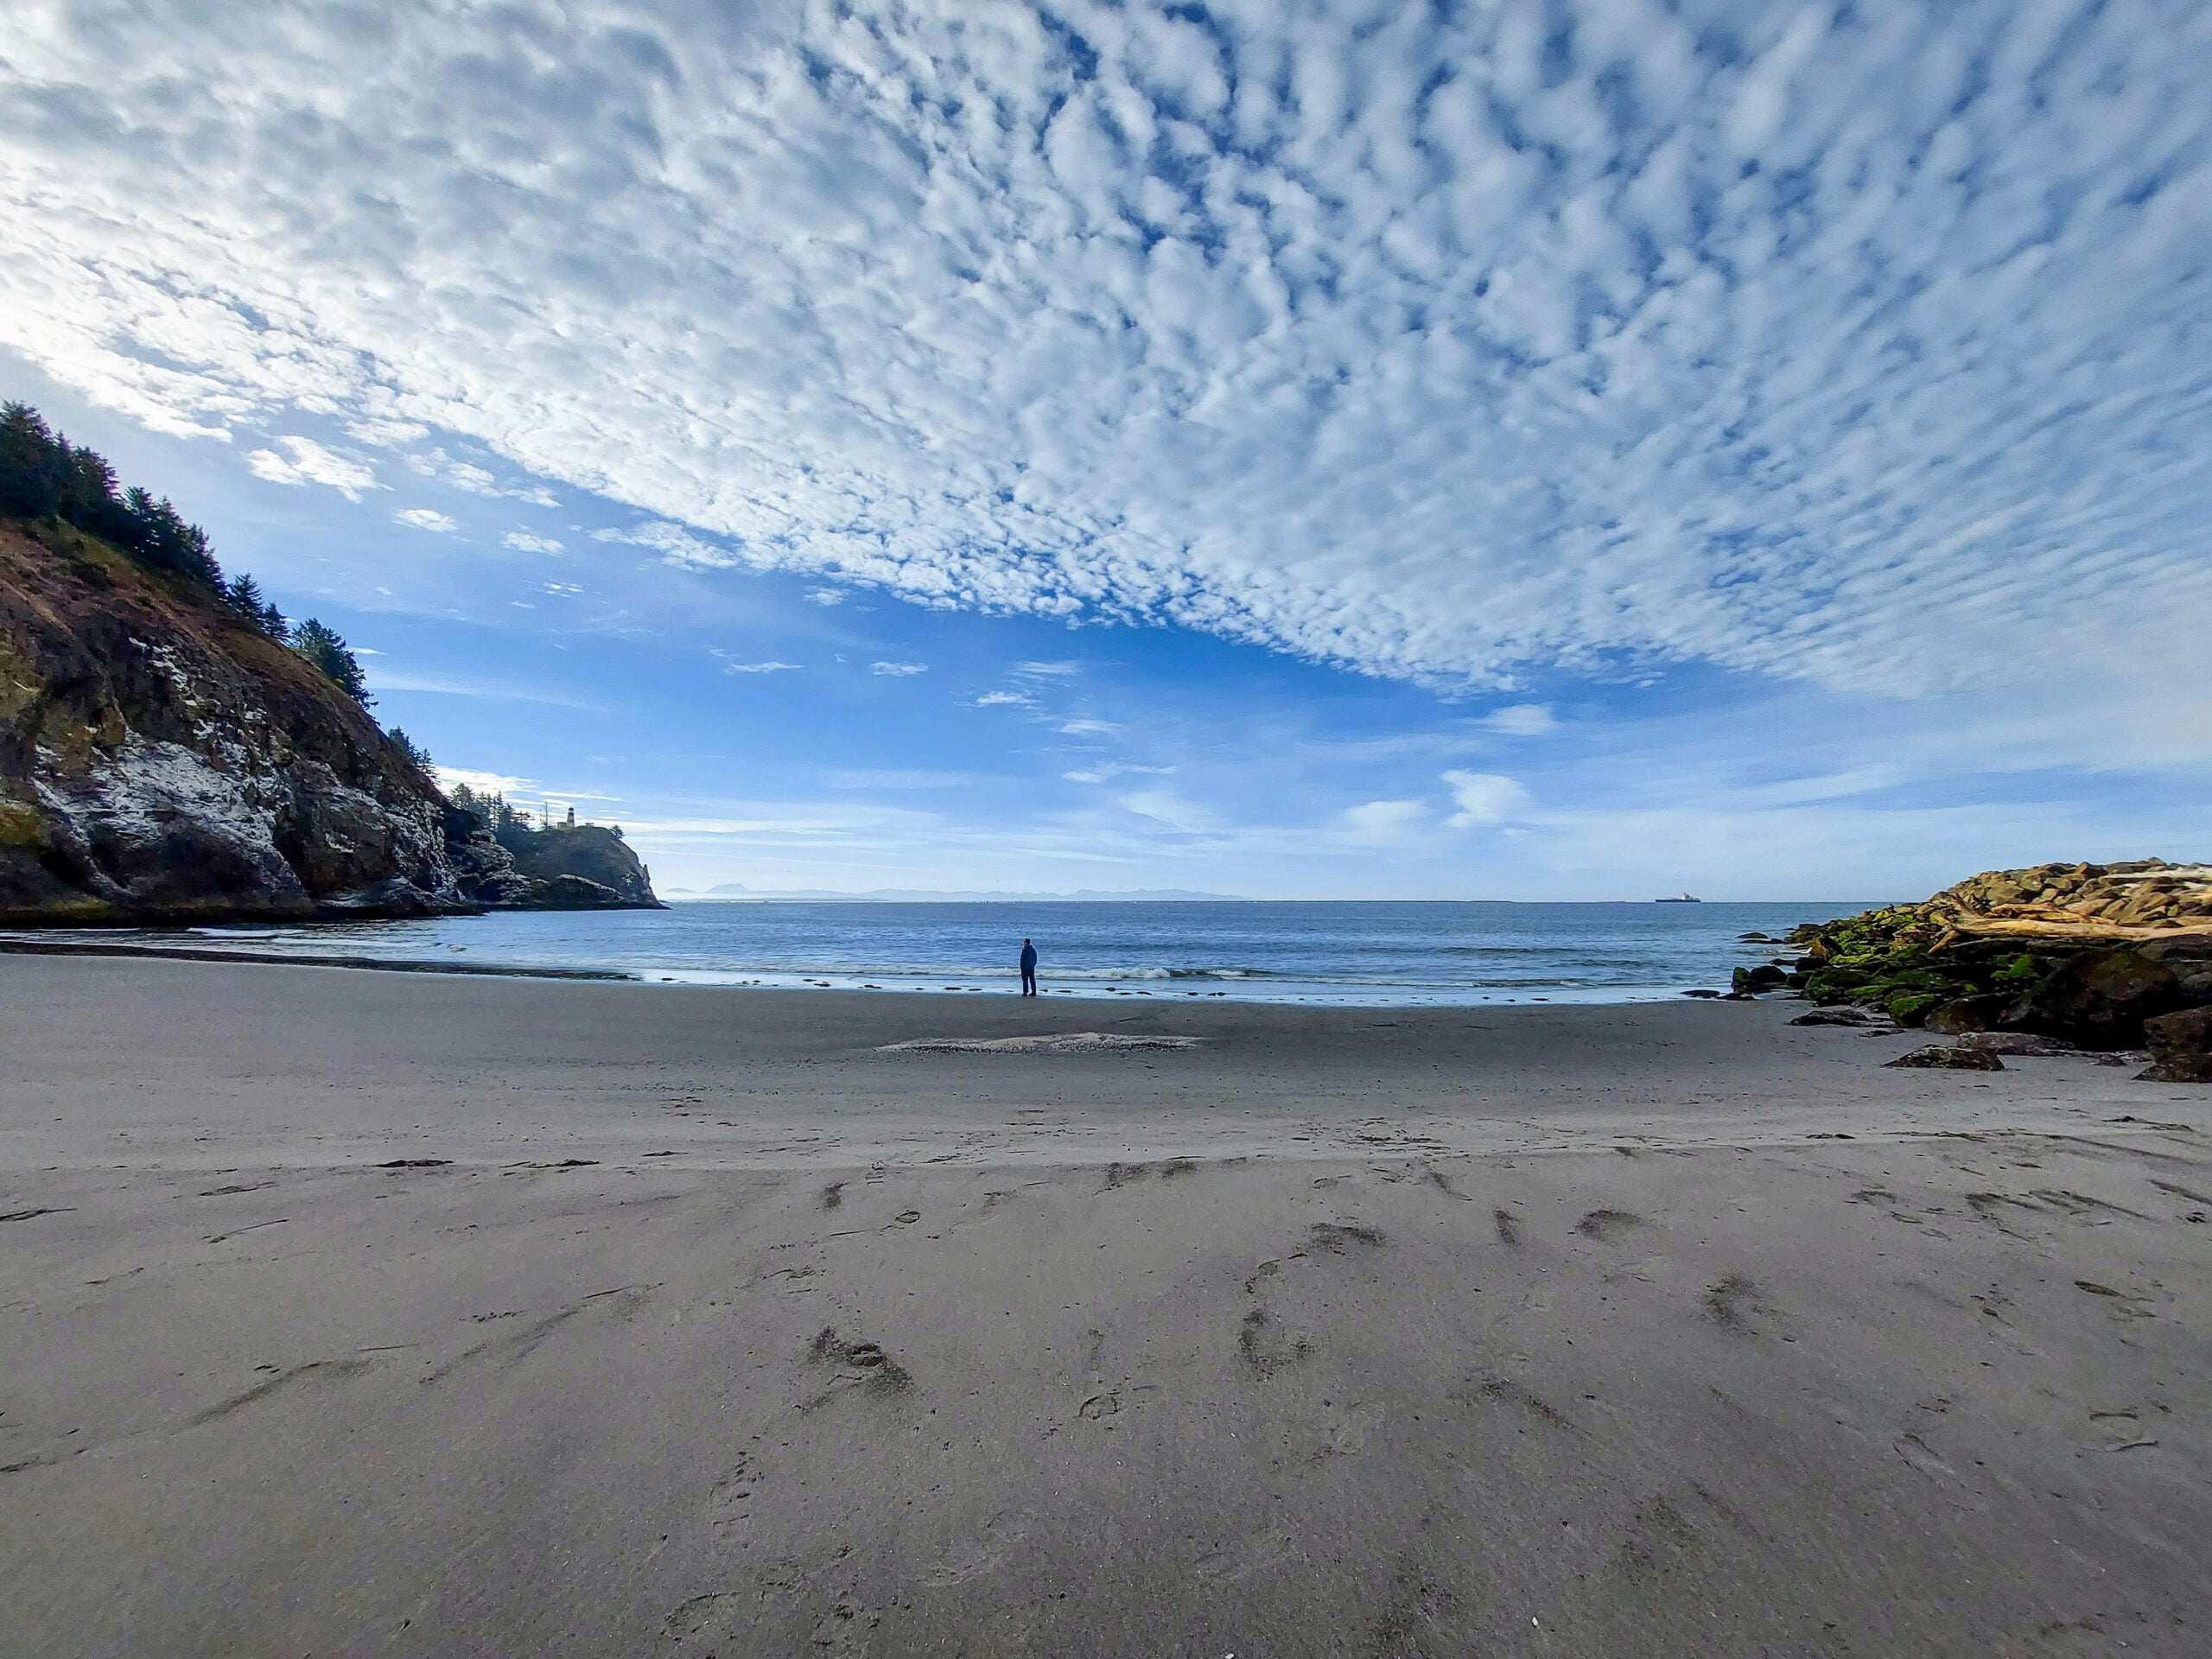
    Take in the views surrounding the lighthouse and imagine what it must be like on a stormy day with the waves crashing at the base of the lighthouse. It reminded me of our visit to Cape Disappointment and the pictures there of the massive waves that roll in during storm season.

    Soon, we began to feel the full force of the sun and were ready to head someplace cool, so we drove back to Luz, where we had lunch, and then headed for the beach! It was a “refreshing” swim in the Atlantic. After you are completely submerged, it feels pretty good, plus you can lay out in the hot sun, and soon enough, you’re toasty warm again. Now, this is a vacation!

    The pattern of our days in Luz was to spend the mornings exploring other parts of the Algarve and then spend the evenings in Luz.  This filled my need to explore and my hubby’s need for relaxation. When planning a trip with others, it’s always good to create a mixture of activities to suit different travel styles.

    coastline in Sagres Portugal
    The coastline views by the Cabo de São Vicente lighthouse.

    Algarve Day Trip: Lagos & Praia do Camilo

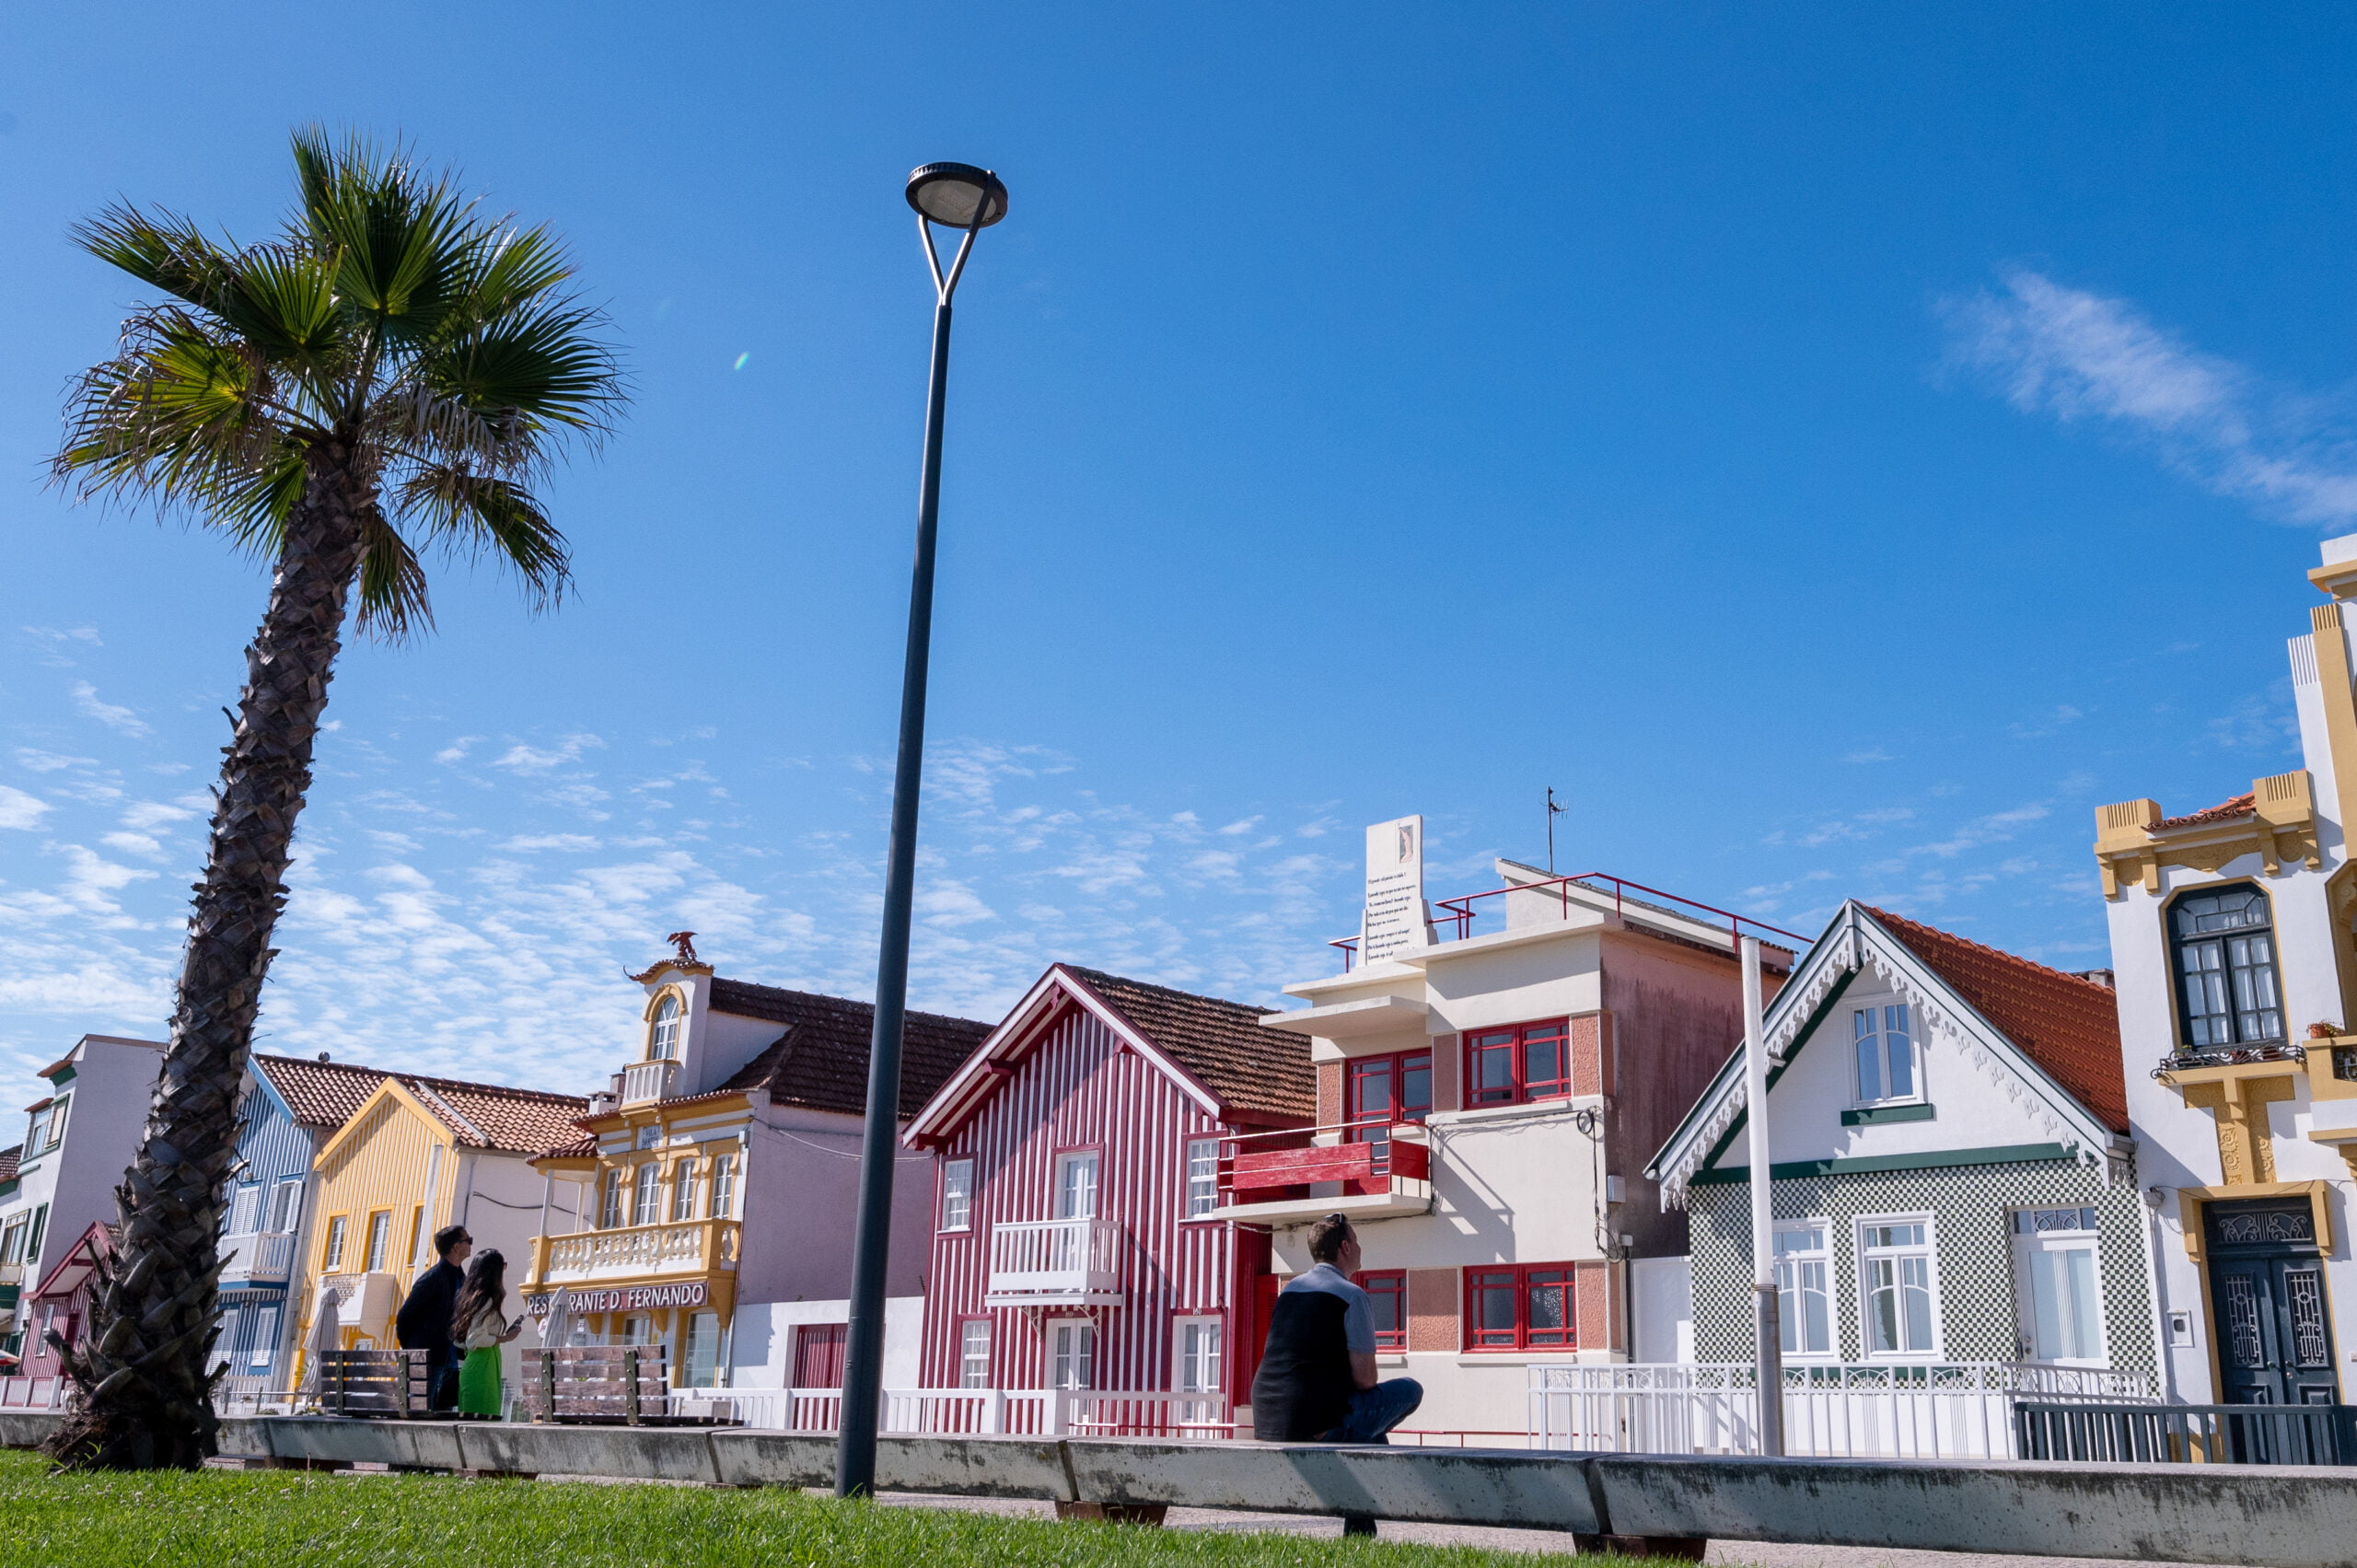
    We stopped in the town of Lagos, as I wanted to see what it was like. Many travelers to the Algarve choose to stay here, and I considered it before opting for our Airbnb in Luz. It is a much larger city with multiple beaches in the area.  Since we hadn’t eaten breakfast, we headed to Coffee and Waves, a small cafe serving locally roasted coffee. It has a surfer vibe, and we enjoyed our delicious avocado toast and peanut butter toast with bananas.

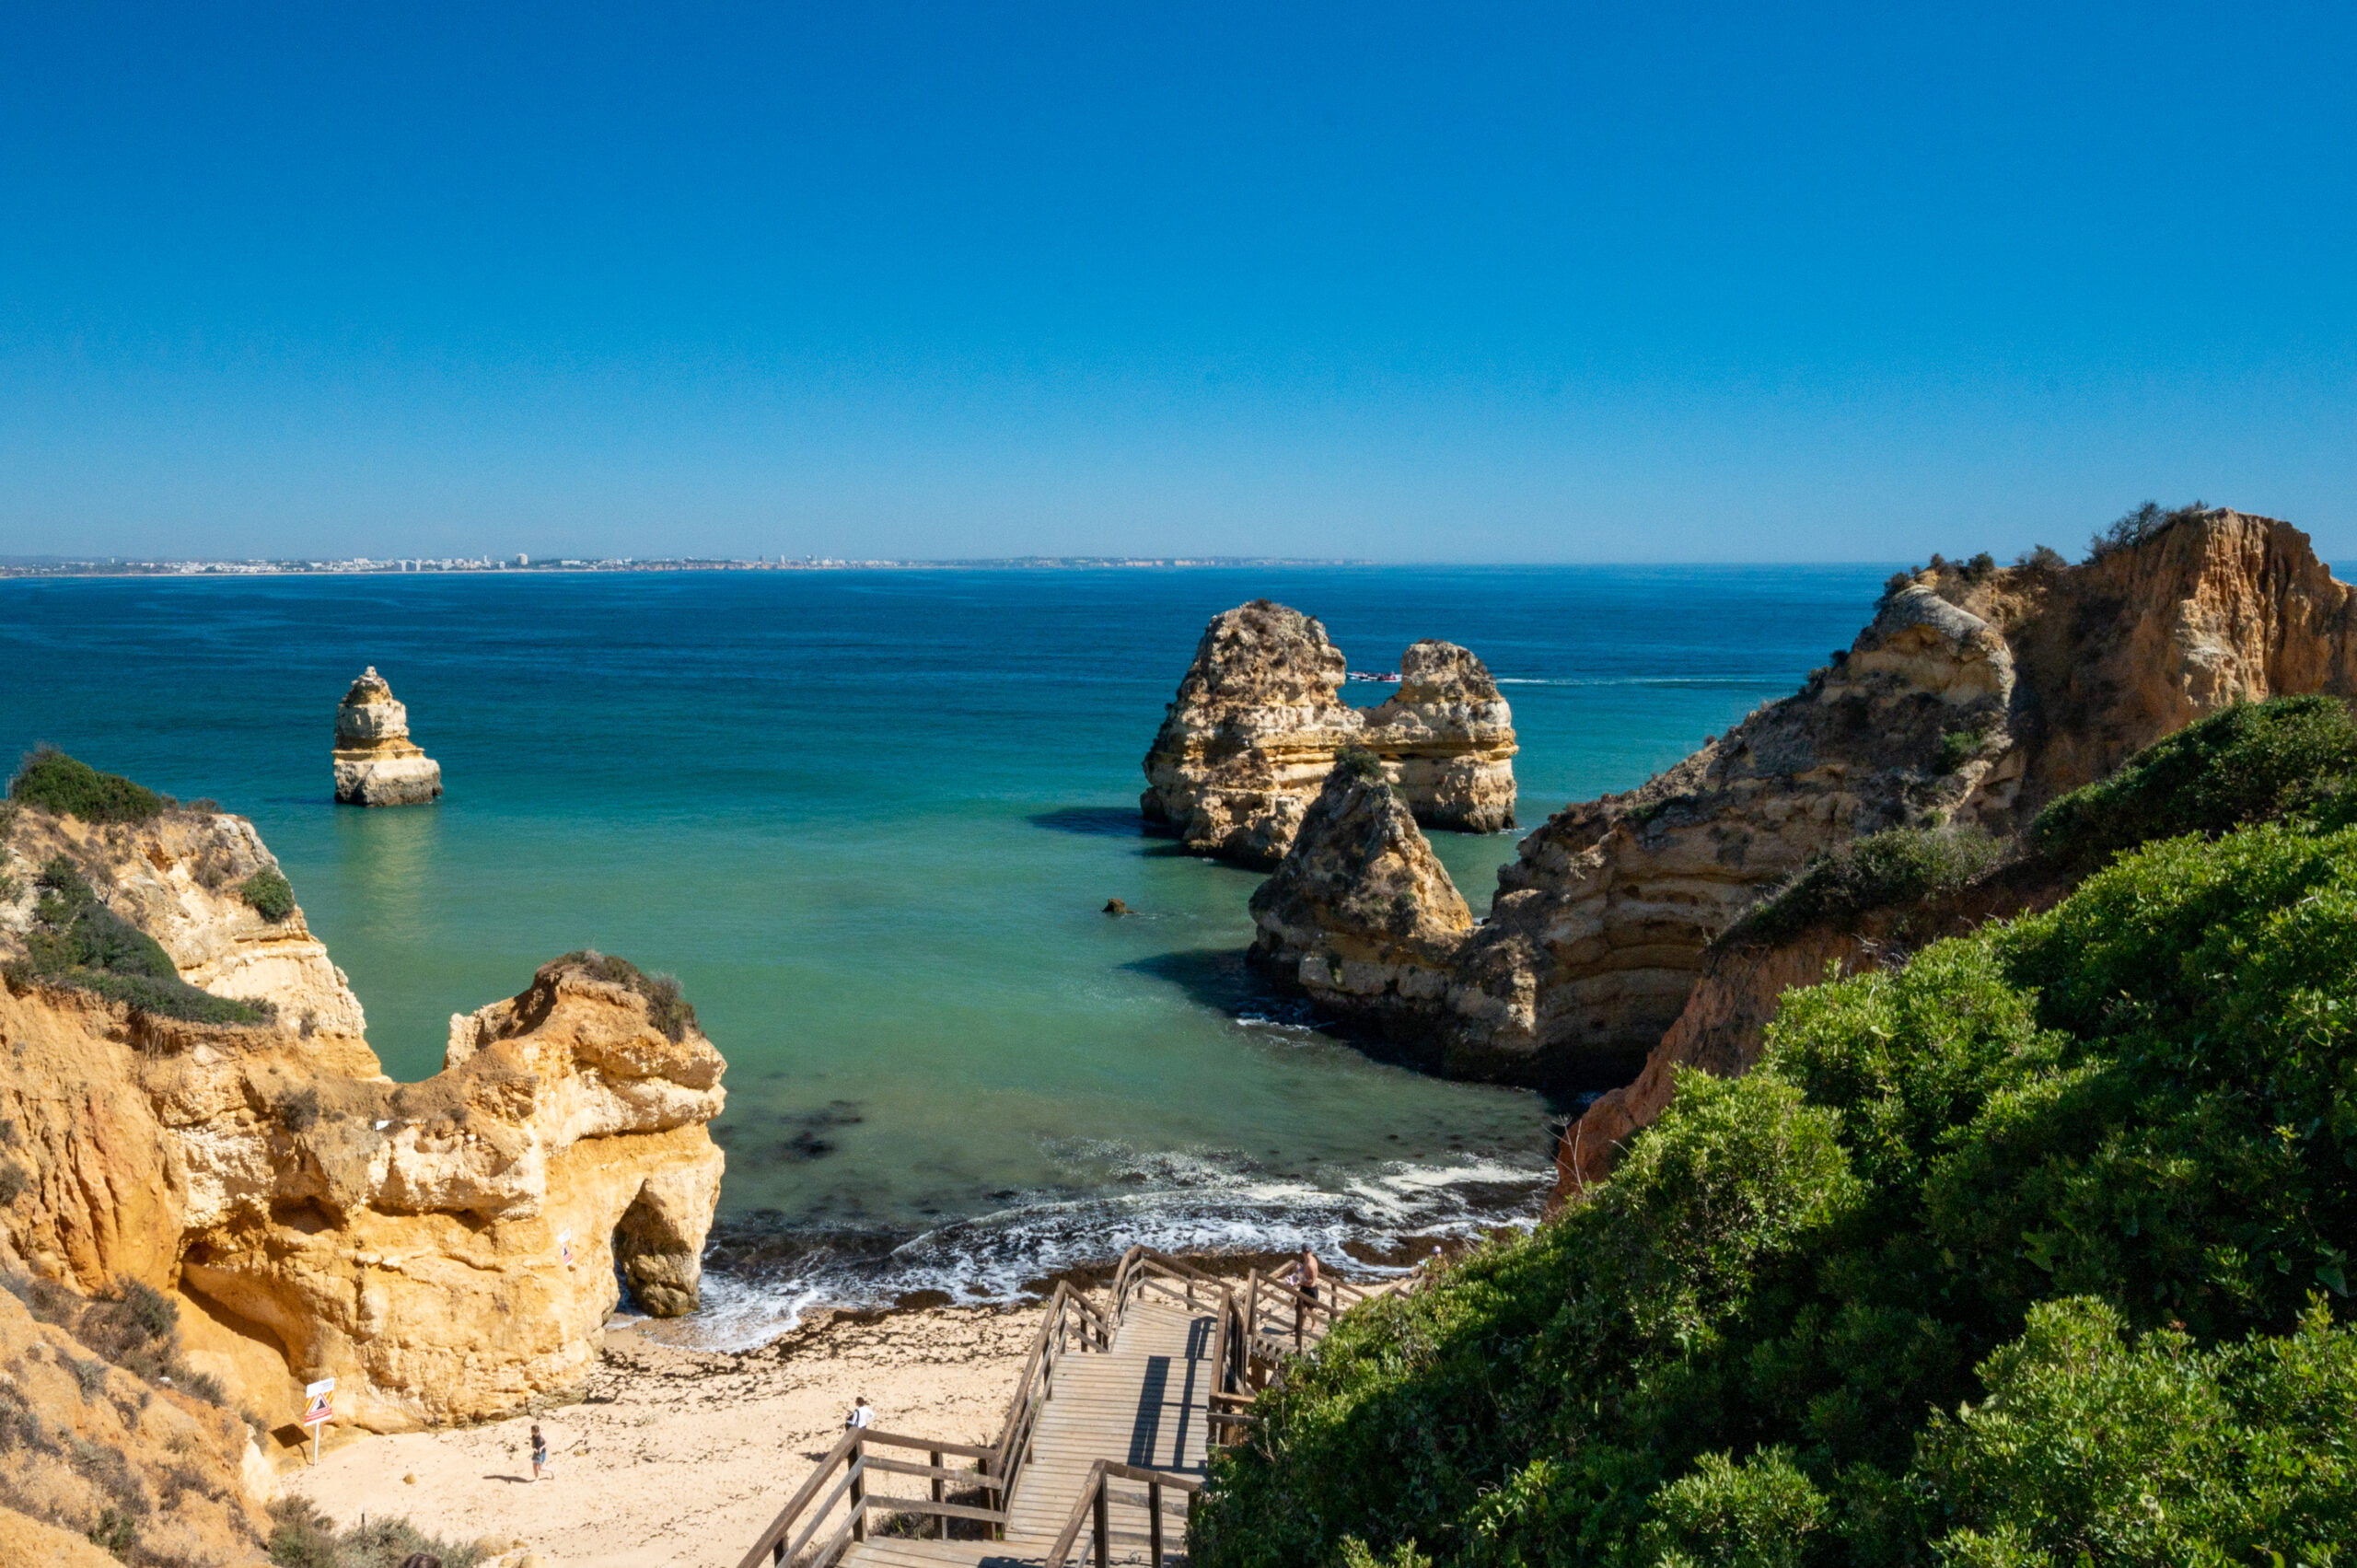
    After breakfast, we strolled through town until we ended up along the water.  It didn’t take long to realize we were out again when the sun was its hottest.  Since our beach gear was back in the car, we made a beeline for the parking garage before heading to Praia do Camilo to get a little beach time and cool off a bit.

    Praia do Camilo is a small beach that connects with another small beach through a tunnel.  You walk down a series of stairs (very common in the Algarve) to reach the first beach and then head left through the tunnel to access the adjoining beach.  We watched kayak tour groups as they explored the arches along the coastline and smiled as we watched the kids having fun digging in the sand.  Is it me, or does everyone seems happier at the beach?

    If you want more to do in the area, drive a little further down the road to Ponta da Piedade to see more beautiful rock formations, caves, arches, and a small lighthouse. Ponta da Piedade is also a popular place to photograph the sunset. 

    stairs leading to Praia do Camilo
    The stairs leading to Praia do Camilo near Lagos, Portugal.

    Algarve Day Trip: Benagil Caves & Carvoeiro

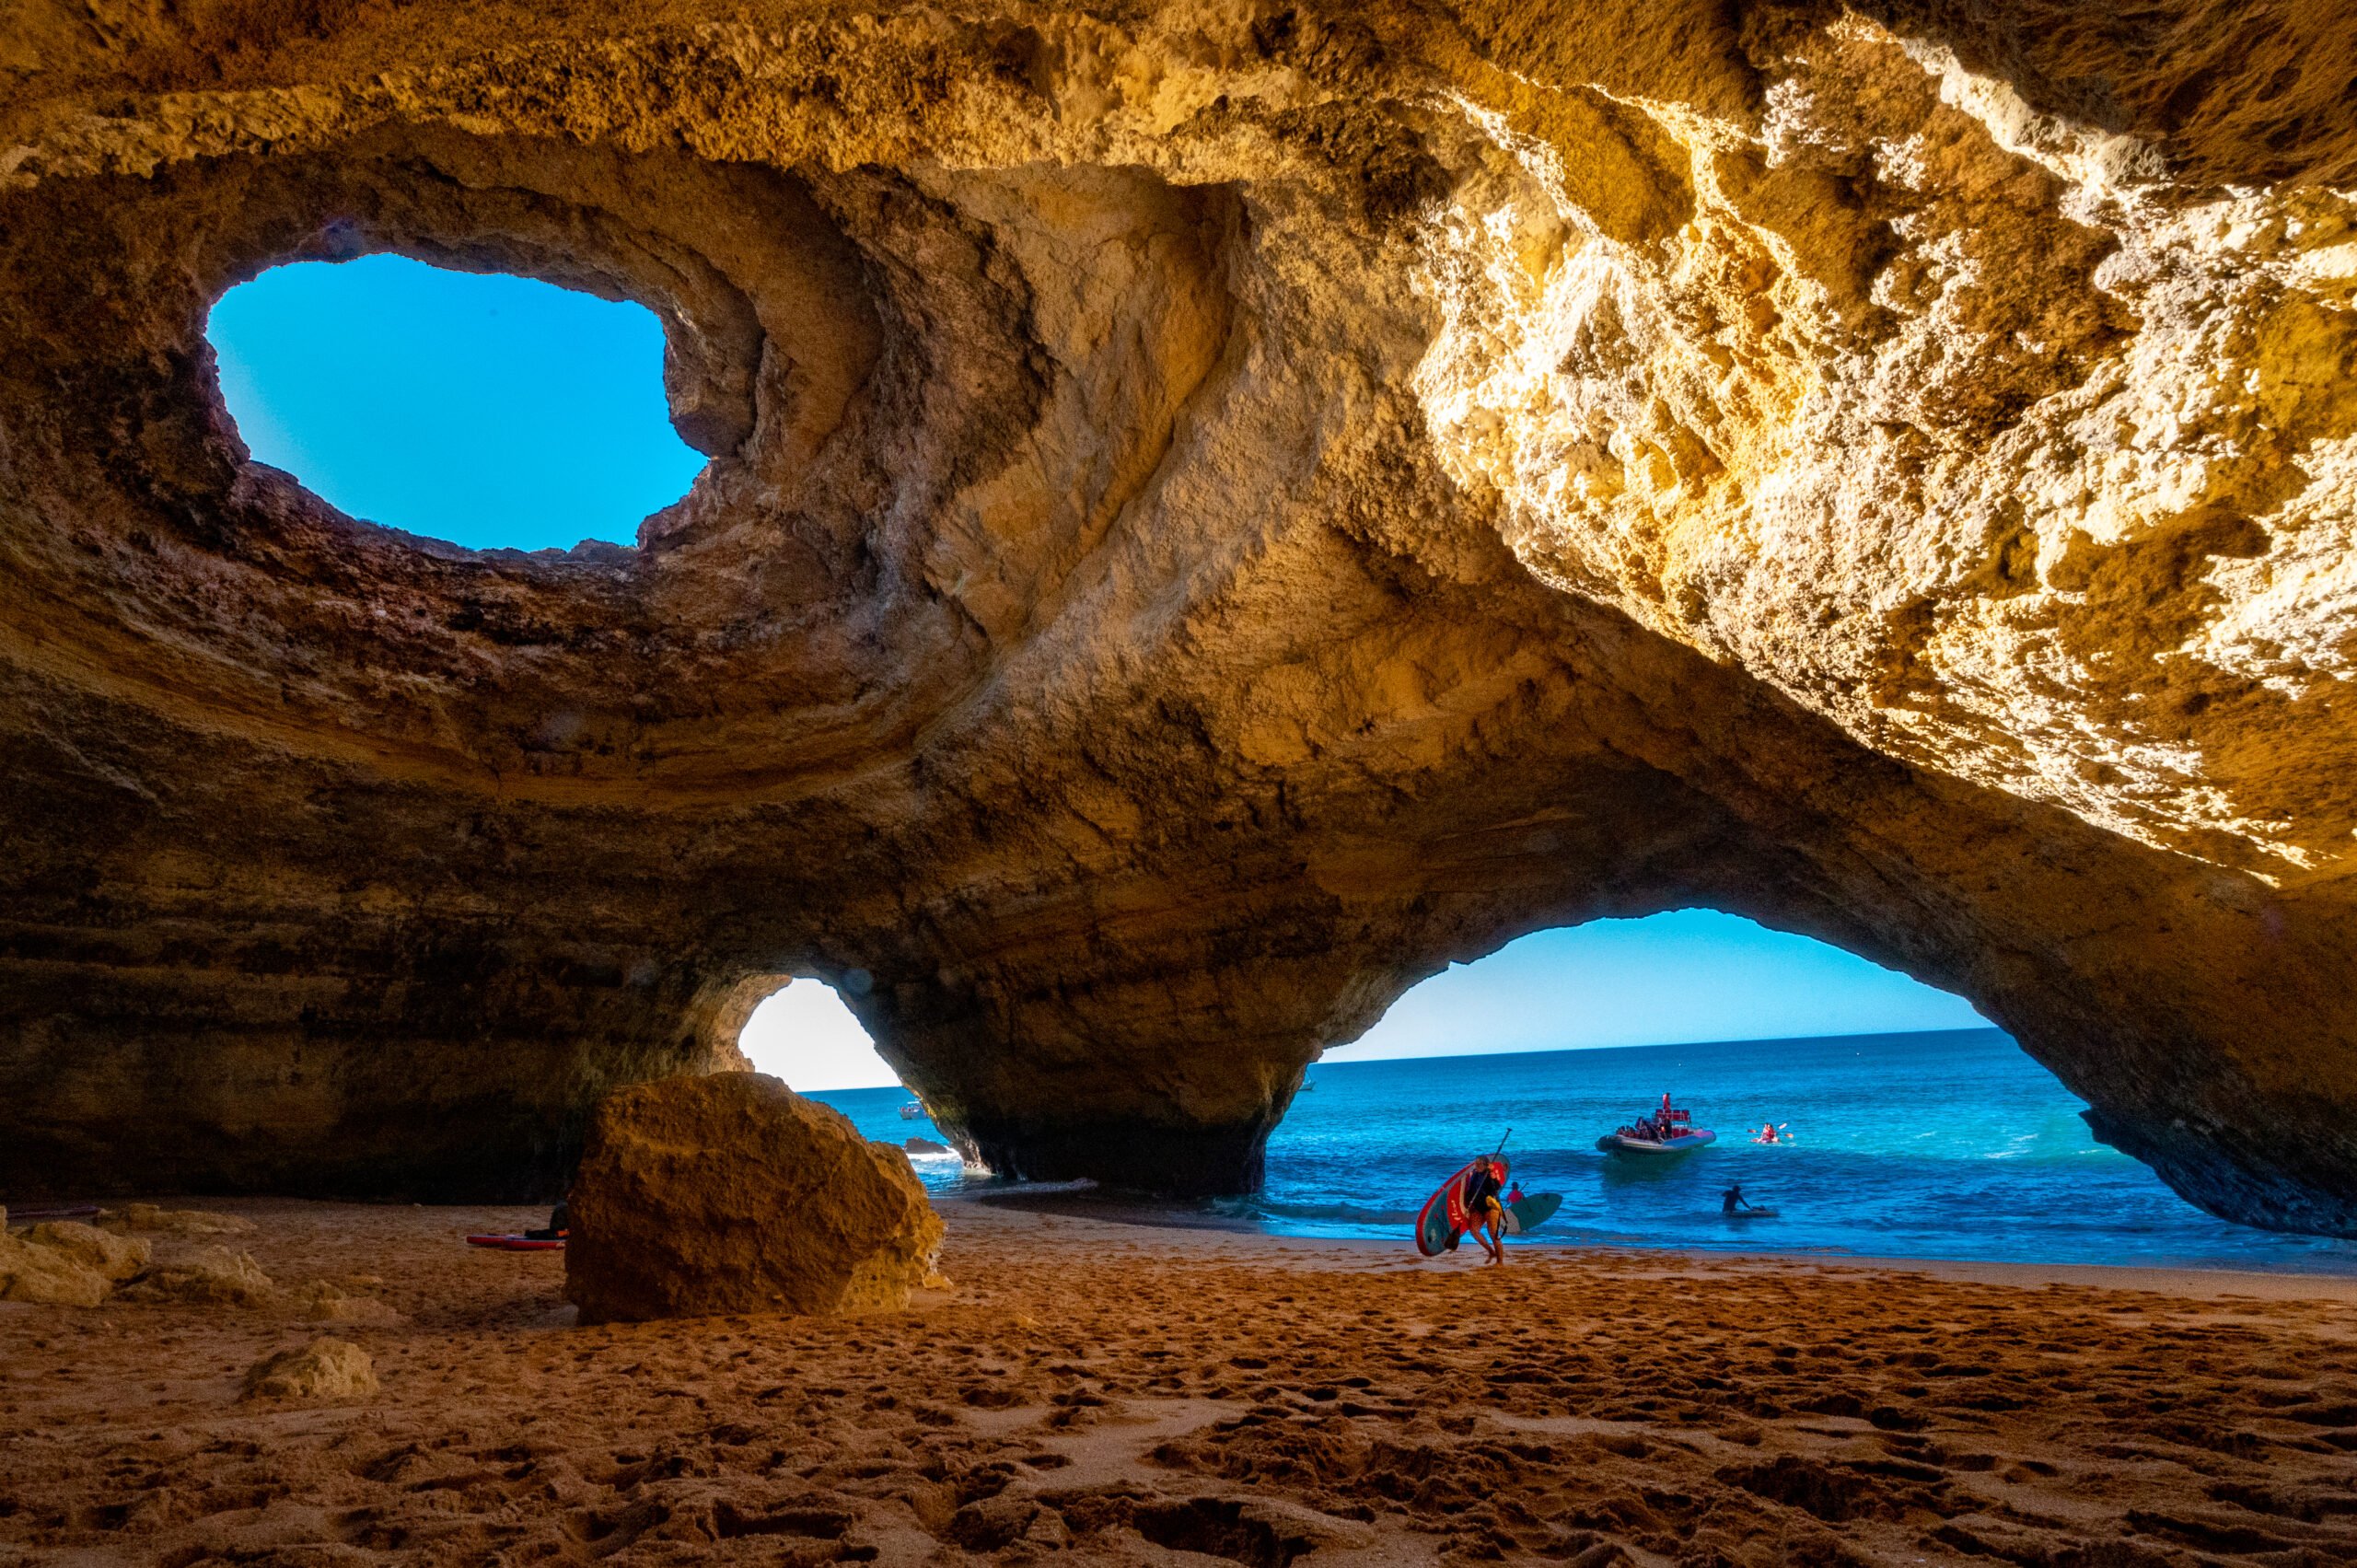
    On our last full day in the Algarve, we rented stand-up paddleboards, and SUP’d to the Benagil Caves.  We had so much fun SUP’ing to the cave. We met a woman who once lived in West Seattle, and I think she was the first American we met on our road trip in Portugal. It’s always fun to meet someone from your home area, and it reminds you how small the world really is. She gave us a few tips for things to see in Porto before she paddled back to Benagil beach.

    After taking some photos and enjoying the beauty of the cave, we paddled back to Benagil beach to return our paddleboards.  The paddleboard rental is good for 90 minutes, which is plenty of time to see the cave and even explore a little of the area around it before returning. 

    Before leaving Benagil, we walked to the far corner of the public parking area to find the trail that leads to a viewing area above the Benagil caves. The hike there was easy, and it provided beautiful views of the coastline and a unique bird’s-eye view looking down into Benagil cave. 

    “Praia” means “beach” in Portuguese, so whenever you see this on a map, you know there is a beach there.

    inside the Benagil Caves
    Inside the Benagil Caves.

    Carvoeiro

    Next, we drove to Carvoeiro to eat lunch and have more beach time. Carvoeiro is another town I considered staying at for our base while in the Algarve.  After visiting here, I want to spend a few days here on a future trip to the Algarve region.  

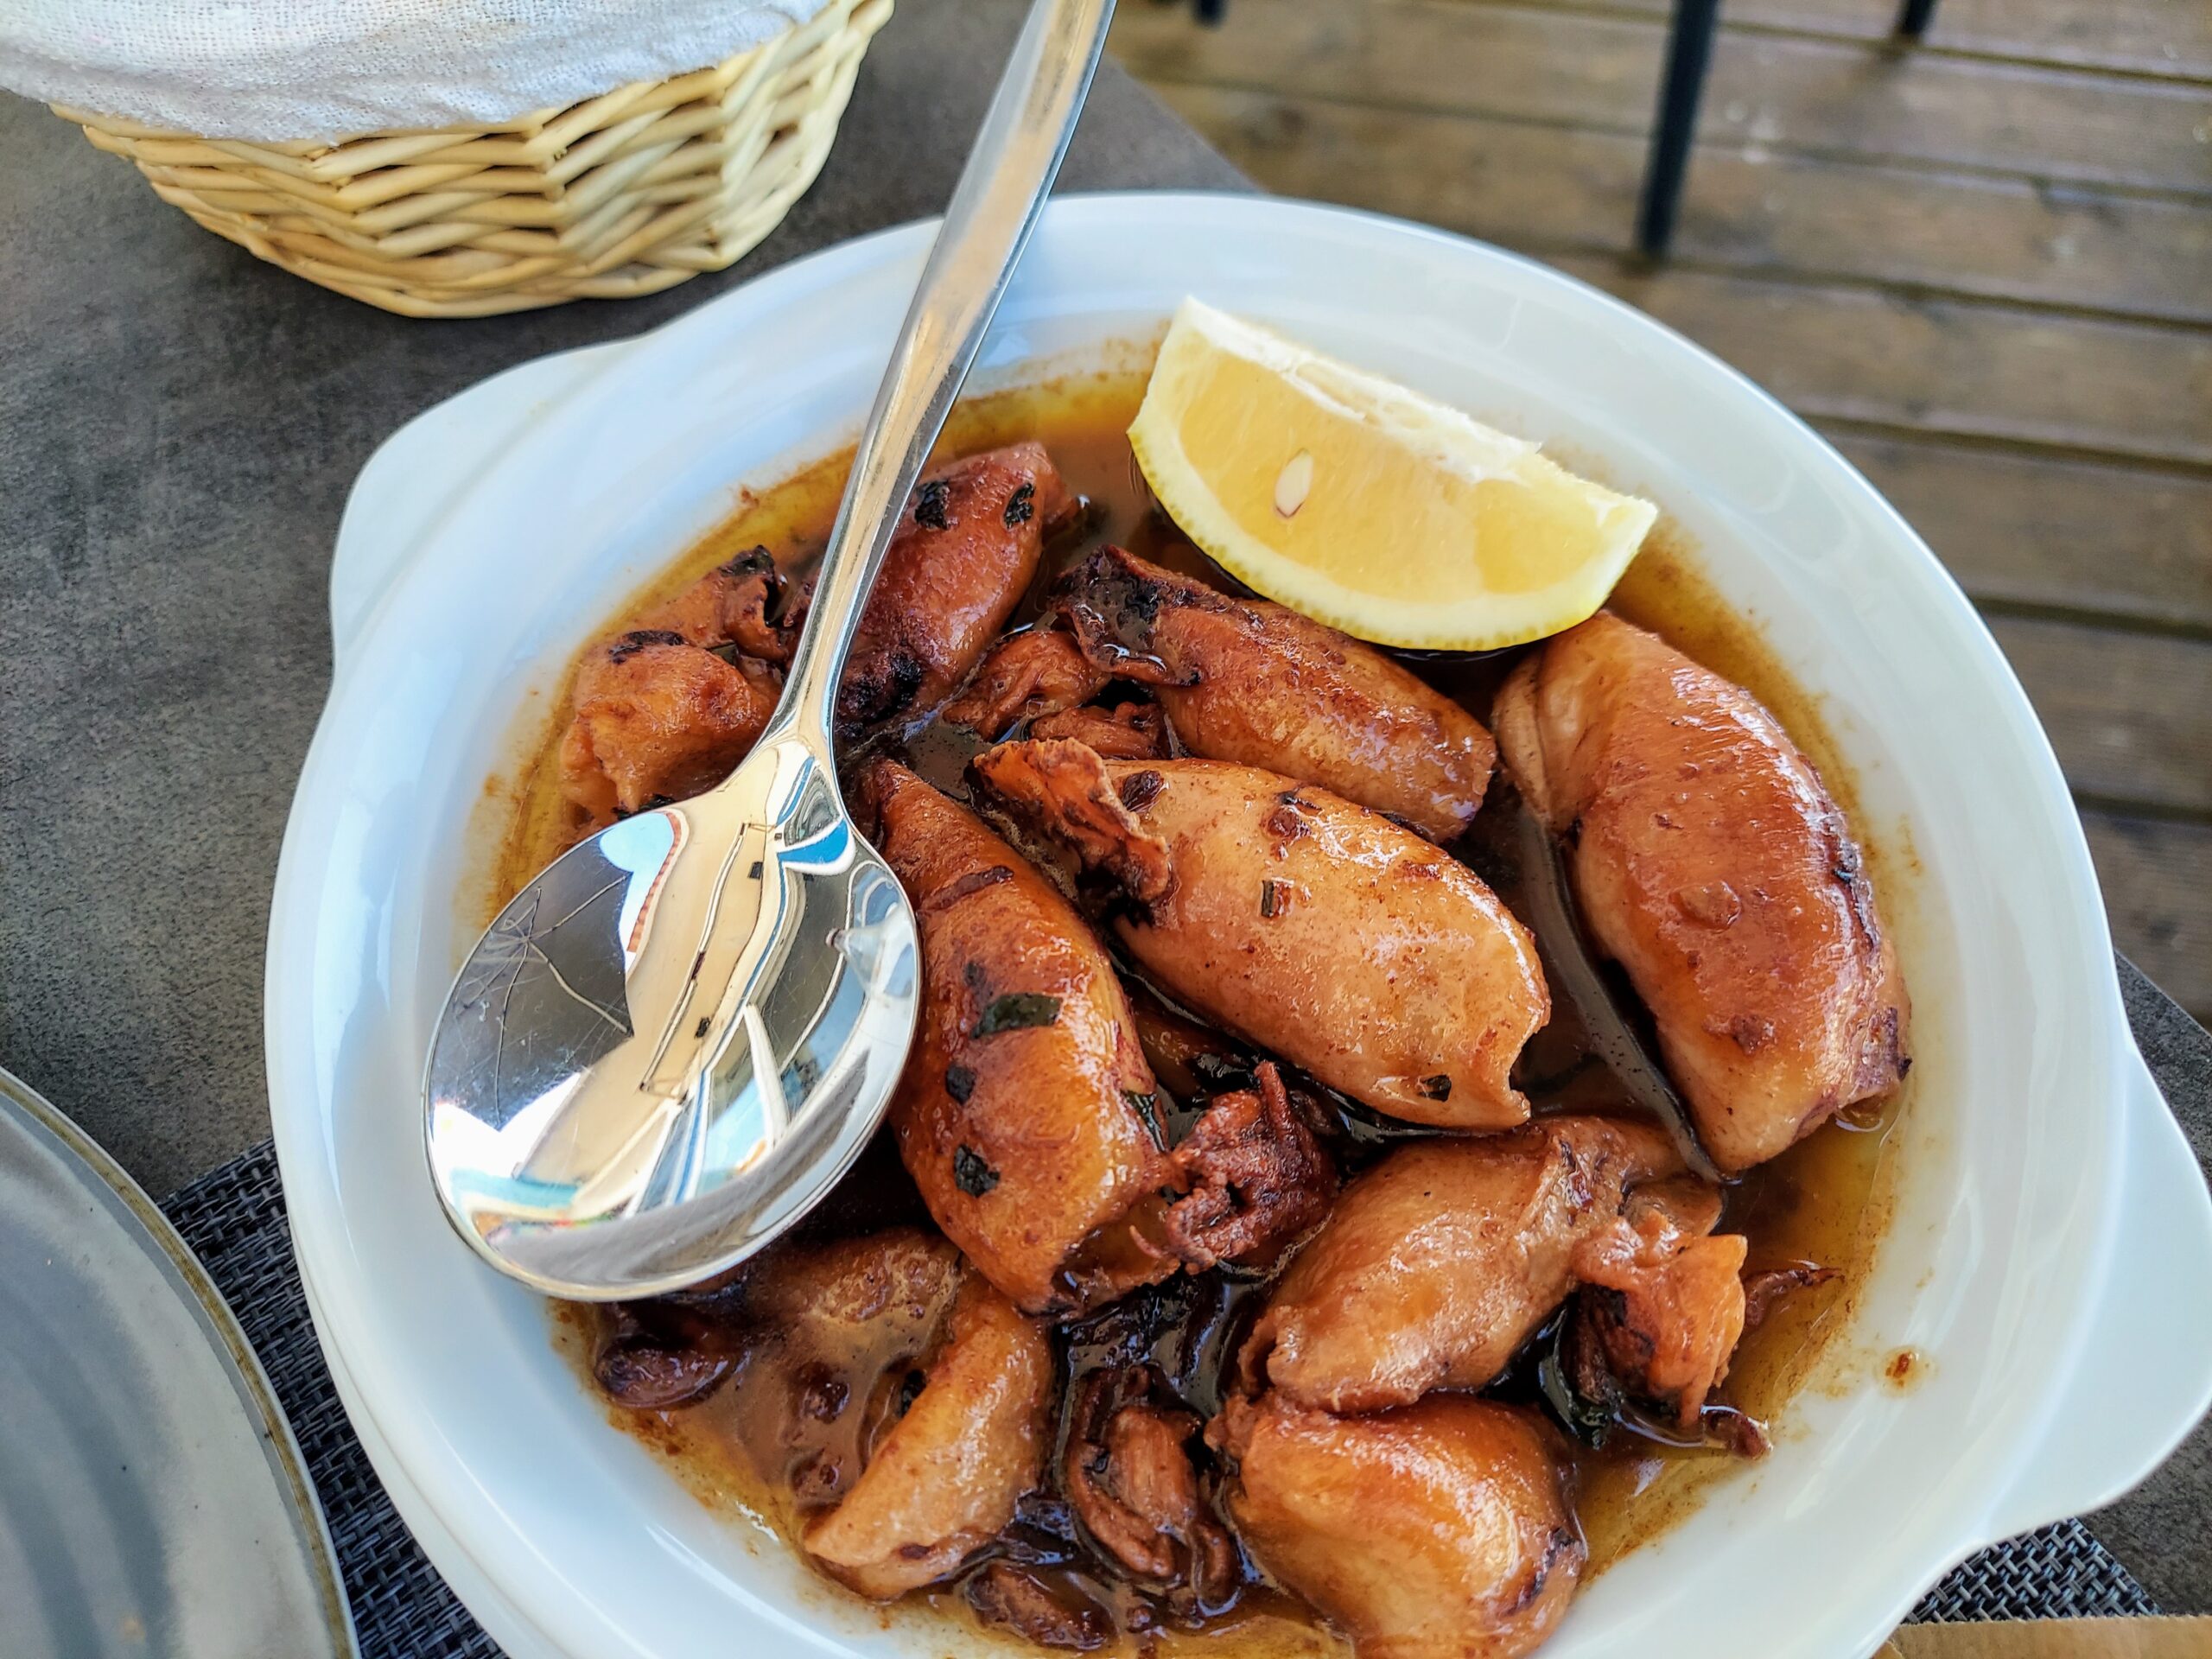
    We ate tapas at Tapas da Vila, and everything we ate was delicious! You can’t go wrong getting the oven-baked goat cheese with honey and the fried baby squid with garlic. So good! When I originally ordered them, I thought I’d get deep-fried, battered calamari rings like we find in the States. However, I got something far more delicious! I love finding new things I like while traveling. The owner and staff here were friendly and helpful; I highly recommend it!

    After lunch, we walked across the street to Praia de Carvoeiro, where we joined other sunbathers and swimmers for more time in the sun.  After a couple of quick dips in the “refreshing” water and plenty of Vitamin D, we packed up our gear and headed to the nearest gelato stand.  I got the maracuja (passionfruit) because I’m hooked on passionfruit ever since trying it for the first time in Maui last year. I was so excited to discover that the Portuguese also love passionfruit, and soon I was buying maracuja sparkling water, gelato, sorbet pops, and well, anything I could find with “maracuja.”

    Our last day in the Algarve was our favorite, but alas, it was time to move on.

    Portuguese Algarve Style Fried Squid

    Driving from the Algarve Region to Porto

    It takes about 5 hours to drive directly from Luz to Porto.  We had to meet our Airbnb host by 5 p.m., so we didn’t have as much flexibility for our drive, but we left early enough to enjoy at least one stop.  Originally I planned for us to stop in Evora, but instead, we opted to stop in Nazaré on the way to Porto.  

    A road trip in Portugal is not so different from a road trip in the States.  You have the flexibility to hop off the freeway and take the slow and scenic way if you prefer, but when you are on a time constraint, taking the highway in Portugal is a fantastic option! There is almost no traffic, and the speed limit is 120 kph/75mph. It can be a very efficient way to go while on a road trip in Portugal.

    Side Trip: Nazaré, Portugal

    There were no big waves in Nazaré during our visit, but we didn’t expect any. It’s too early in the season for the record-breaking waves, although it would have been so cool to see one!  One thing I didn’t expect was for Nazaré to be so big and crowded. It was possibly the most stressed I’d seen my hubby during our whole road trip in Portugal. The streets were narrow, and there were pedestrians to watch out for everywhere in addition to bumper-to-bumper traffic!

    We ended up driving toward the end of the Praia da Nazaré, where there was ample parking and, thankfully, a great sushi restaurant facing the beach where we could take a break from driving and eat before we both became hangry. If you stop in Nazaré, consider eating at Kabuki Sushi it was delicious!

    Afterward, you can dip your toes in the sand and walk along the pier to Farol Nazaré Pontão Norte for a view of Nazaré, the venicular, and Forte de São Miguel Arcanjo. You get a neat perspective from this side view as you imagine the legendary waves that break against it during the winter months.

    You can easily spend half a day to a full day exploring all the sites of Nazaré, but after our experience, I recommend you don’t visit on a weekend if you can help it.

    sunset in Porto seen from Luis I Bridge

    Porto (5 nights)

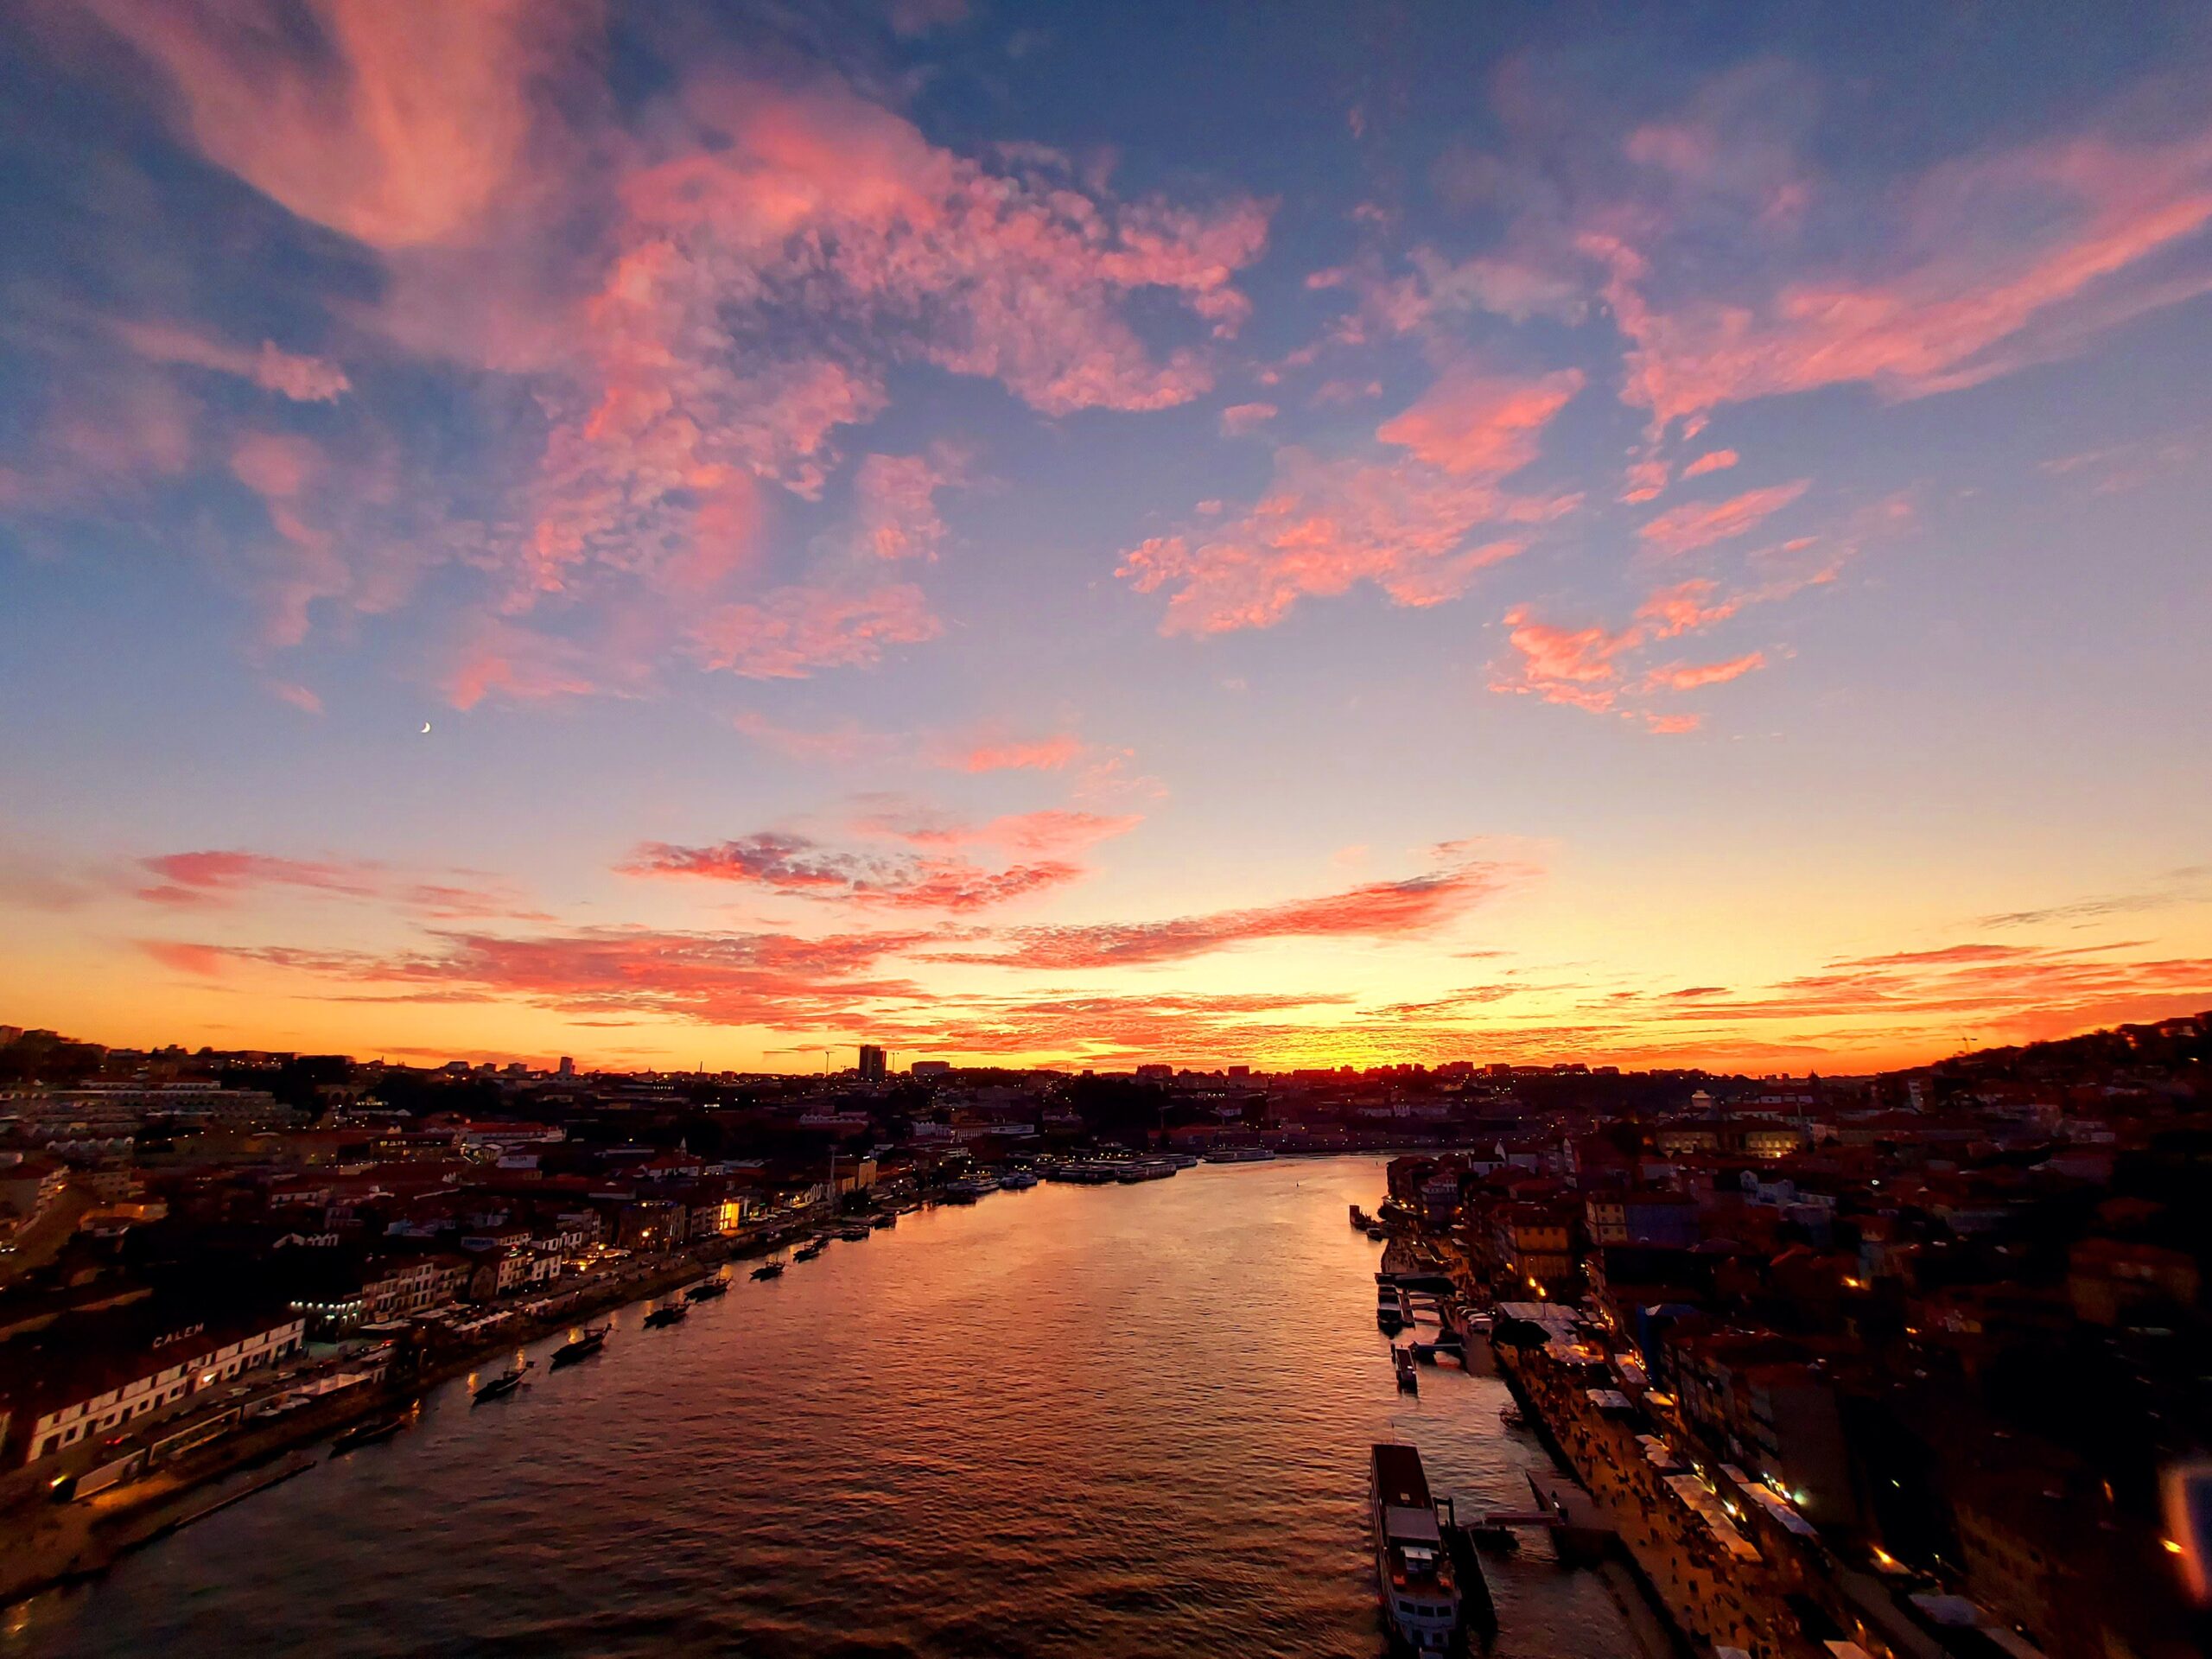
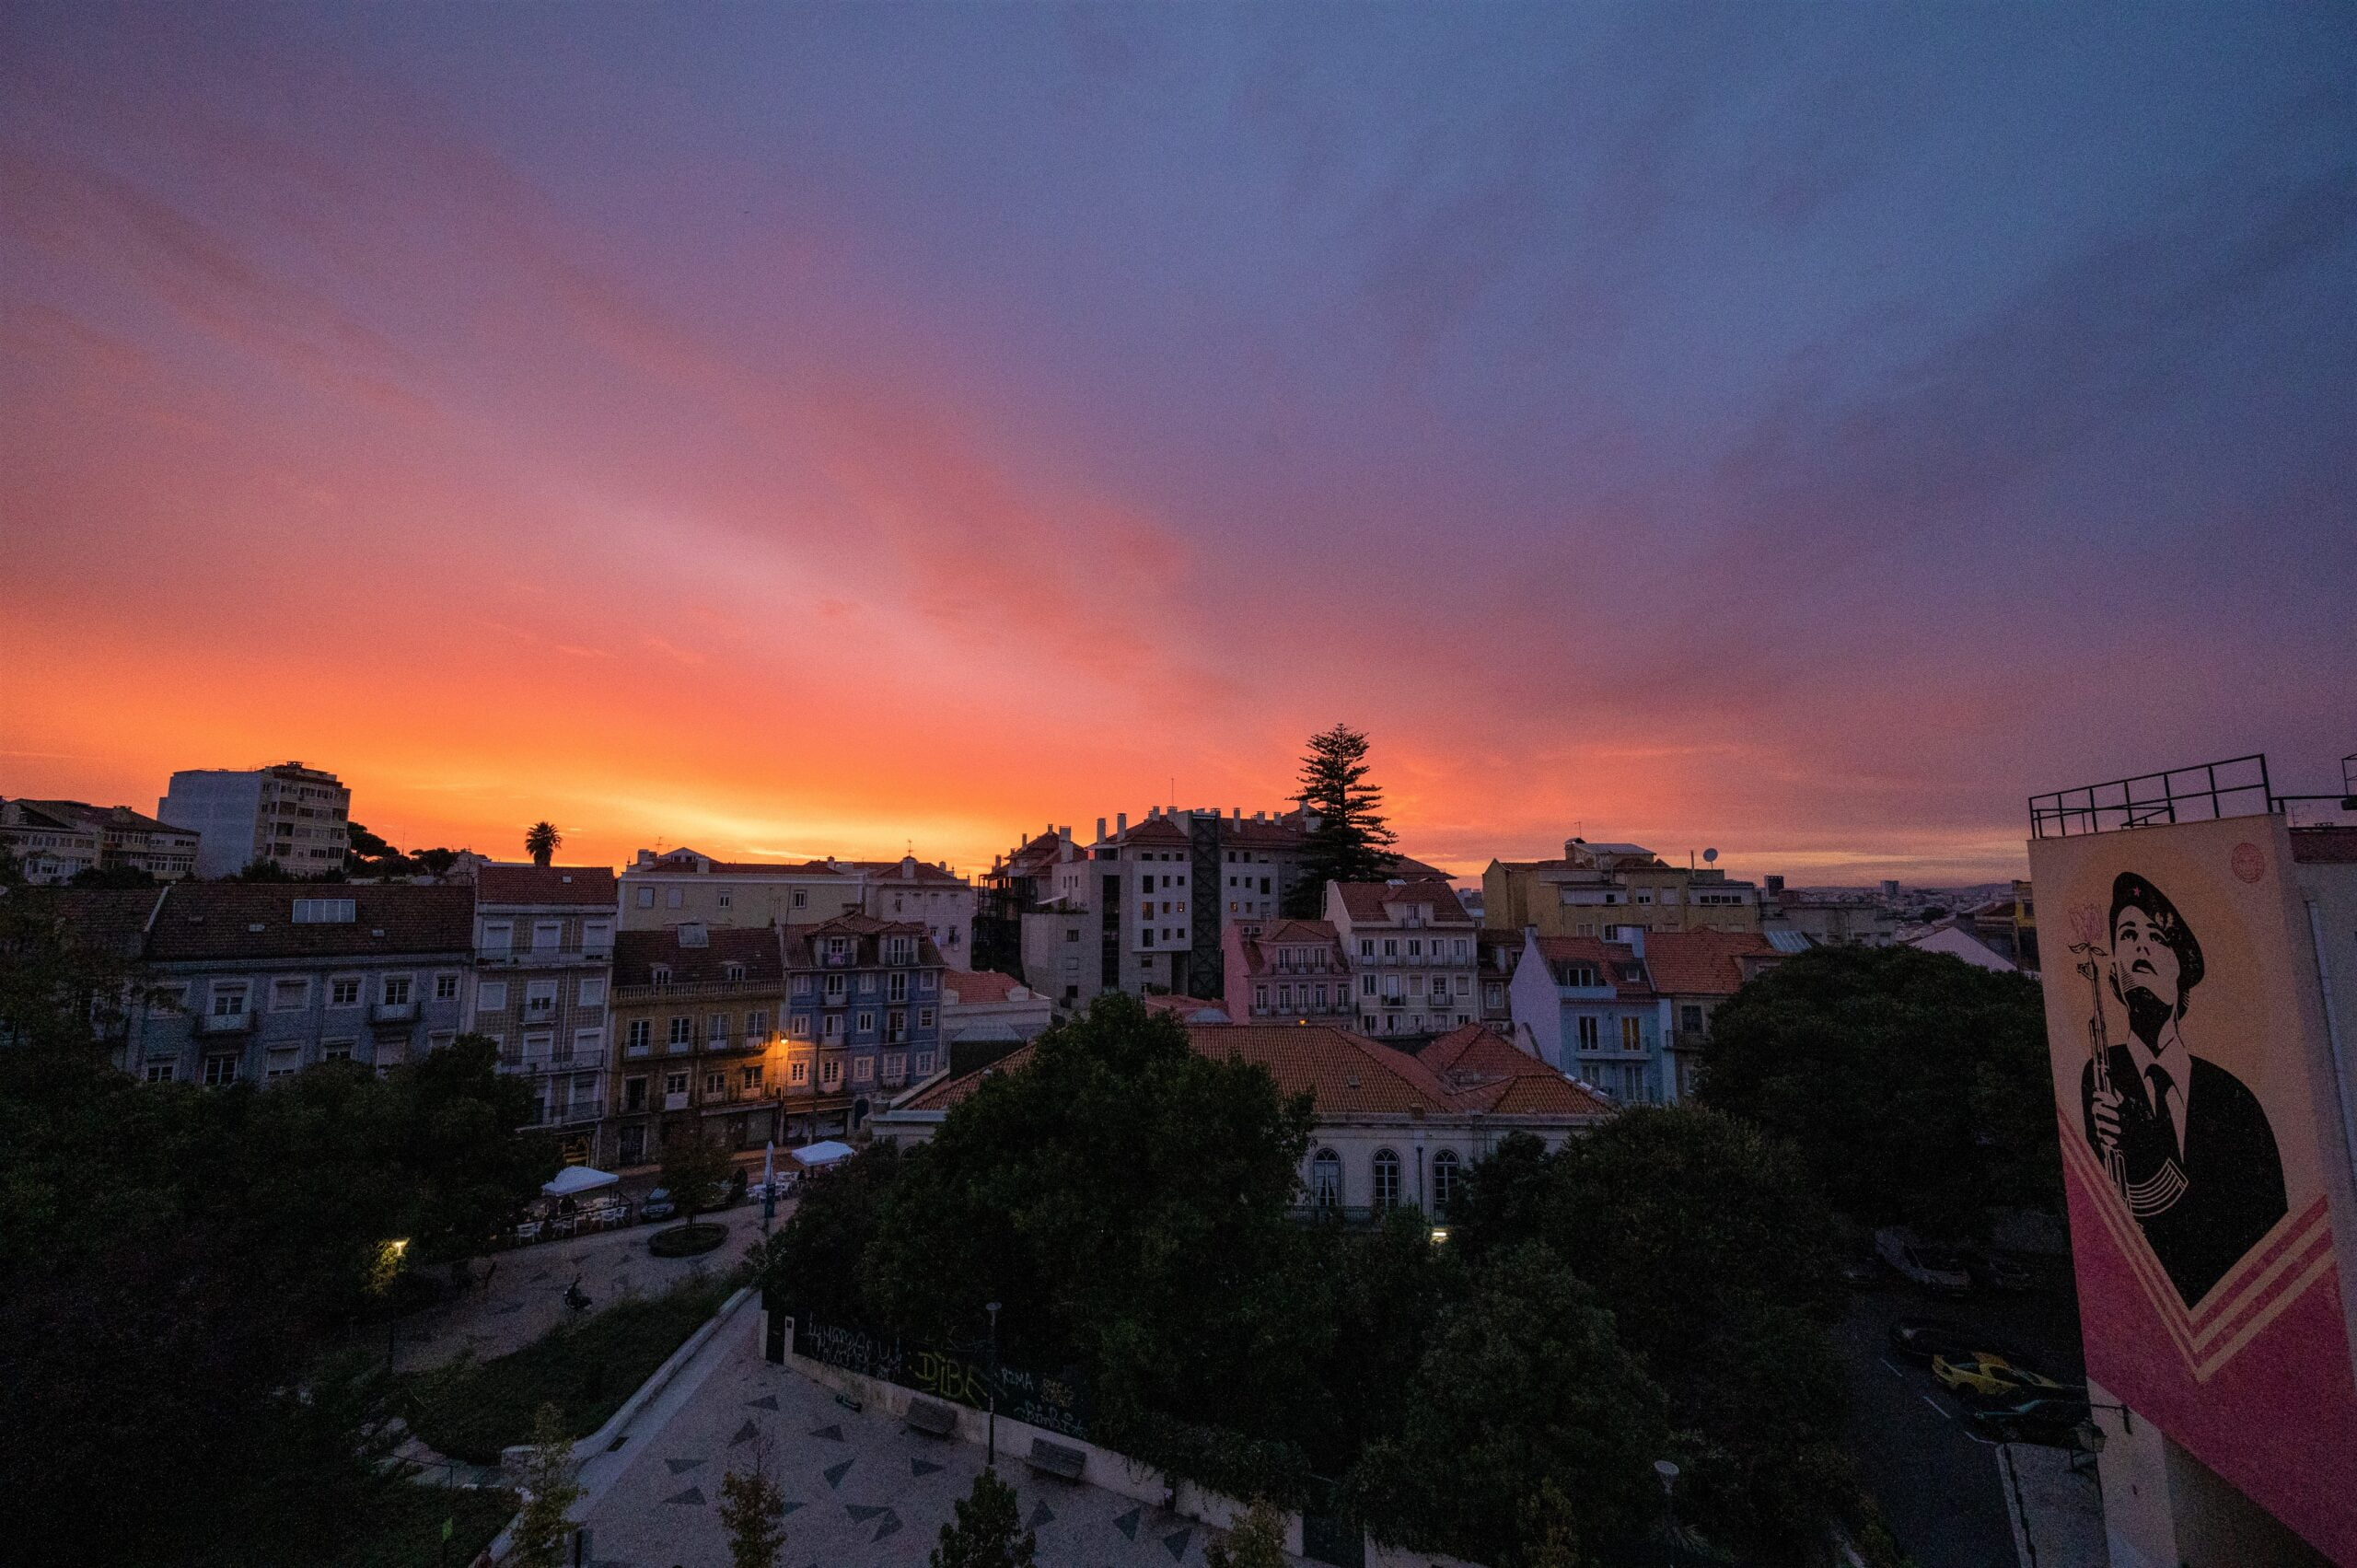
    It was almost 6 p.m. by the time we checked in to our Porto AirBnb and after a long day spent in the car we were ready to explore on foot. So we walked to the Luis Bridge and joined hundreds of other pedestrians waiting expectantly for the sun to set. We heard Fado singers and sounds of music and laughter amid the hustle and bustle of the city.  I smiled as I listened to the heartbeat of this city.

    Soon the sun began to dip below the horizon.  The gorgeous oranges turned to deep reds and purples reflecting off the Douro River below.  What a perfect way to spend our first night in Porto.

    For two whole days, we walked around Porto and took in the sights and sounds of the city. We also took a short river cruise and tried our first bites of francesinha. Don’t let its appearance fool you, this is one delicious sandwich! We spent the remaining time taking day trips and enjoying evenings in Porto.

    Porto Day Trip: Peneda-Gerês National Park

    We escaped the busy city and headed toward Portugal’s only National Park, Peneda-Gerês National Park  (often referred to as Gerês). Peneda-Gerês National Park covers almost 270 sq miles and shares a border with a natural reserve in Spain.

    Side Trip: Braga’s Bom Jesus do Monte

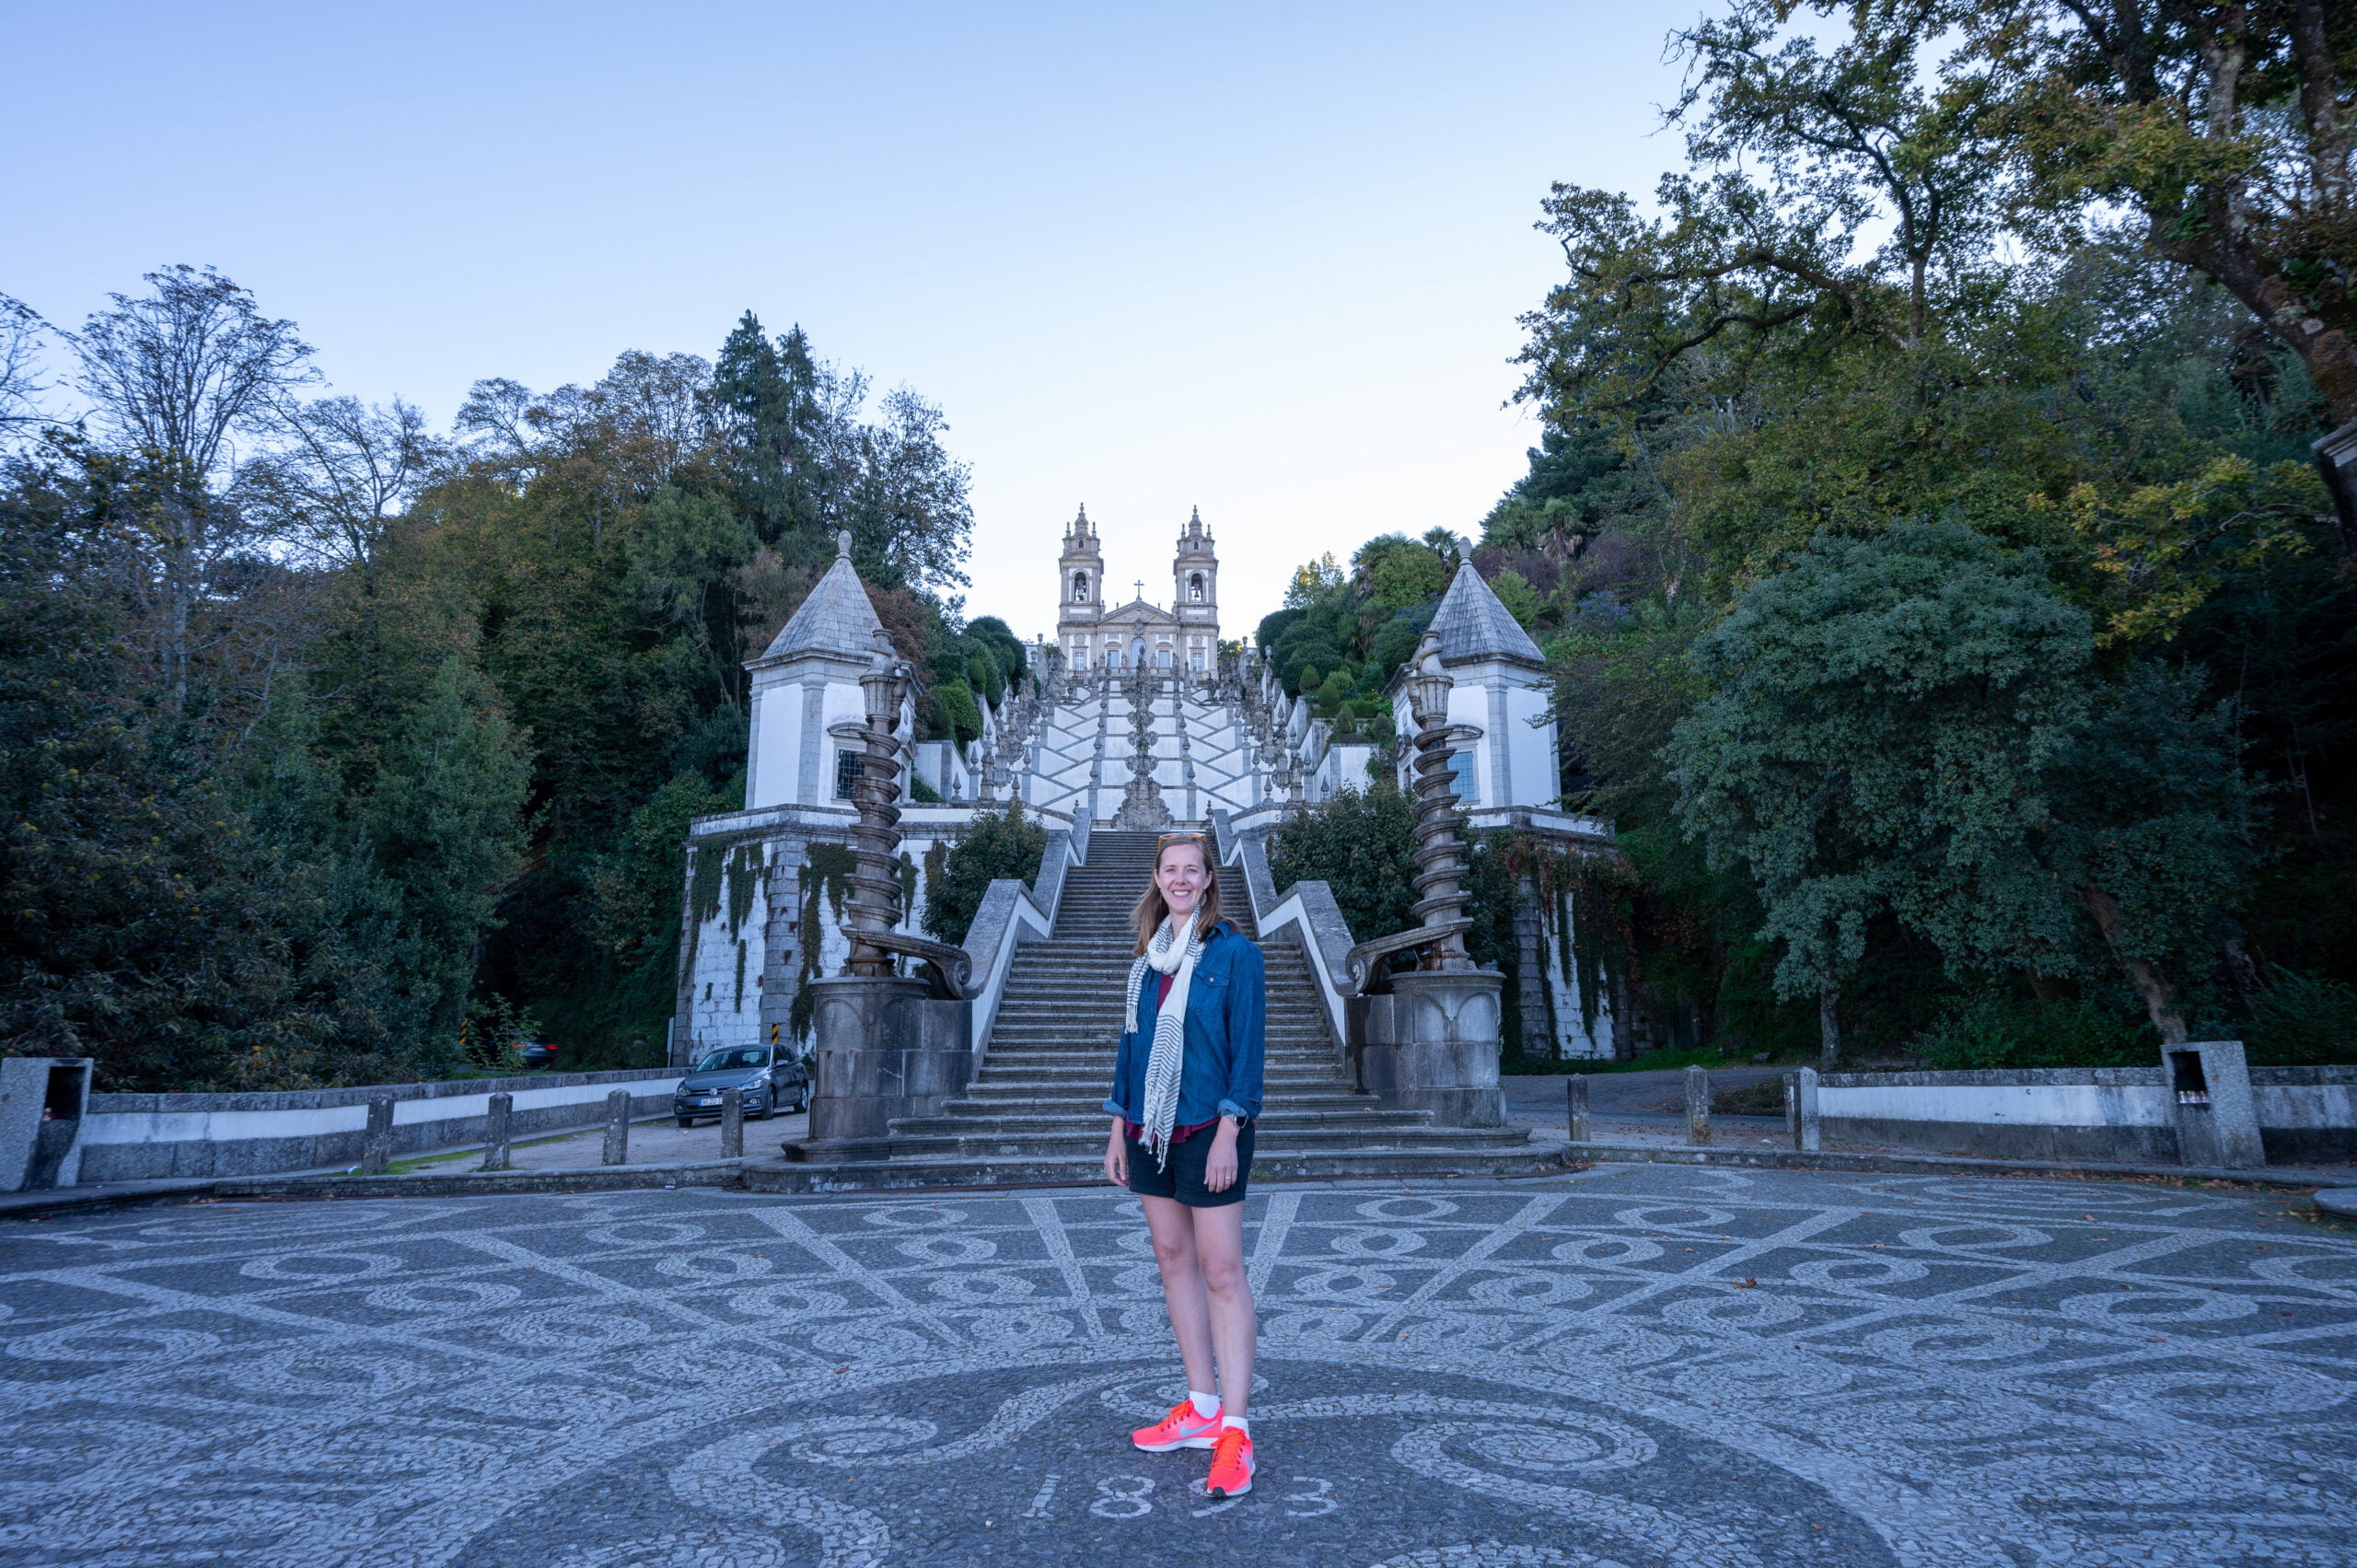
    We made one side trip on the way and stopped to see Braga’s Bom Jesus do Monte. It was a beautiful sight to see early in the morning.  Morning runners were using the church staircase as their ultimate stair climbing machine.  Now that’s a workout!  I think this church is worth a quick stop, even if you don’t have time to explore the city of Braga.

    Braga Bom Jesus do Monte
    Standing at the base of Braga’s Bom Jesus do Monte.

    Gerês

    Shortly after entering Peneda-Gerês National Park, we had to stop our car to let a herd of goats pass on their way to graze.  They are so fun to watch!  About 15-minutes up the road from where we saw the goats, we also saw Portugal’s long-horn cachena cows. They are free-range cows allowed to graze within the national park and produce excellent beef and milk.

    The roads are narrow and winding in Peneda-Gerês National Park, and as mentioned, there are animals grazing alongside the road, so take it slow and enjoy the views. It felt like we had the park all to ourselves for most of the day!  Gerês really is a hidden gem in Portugal.

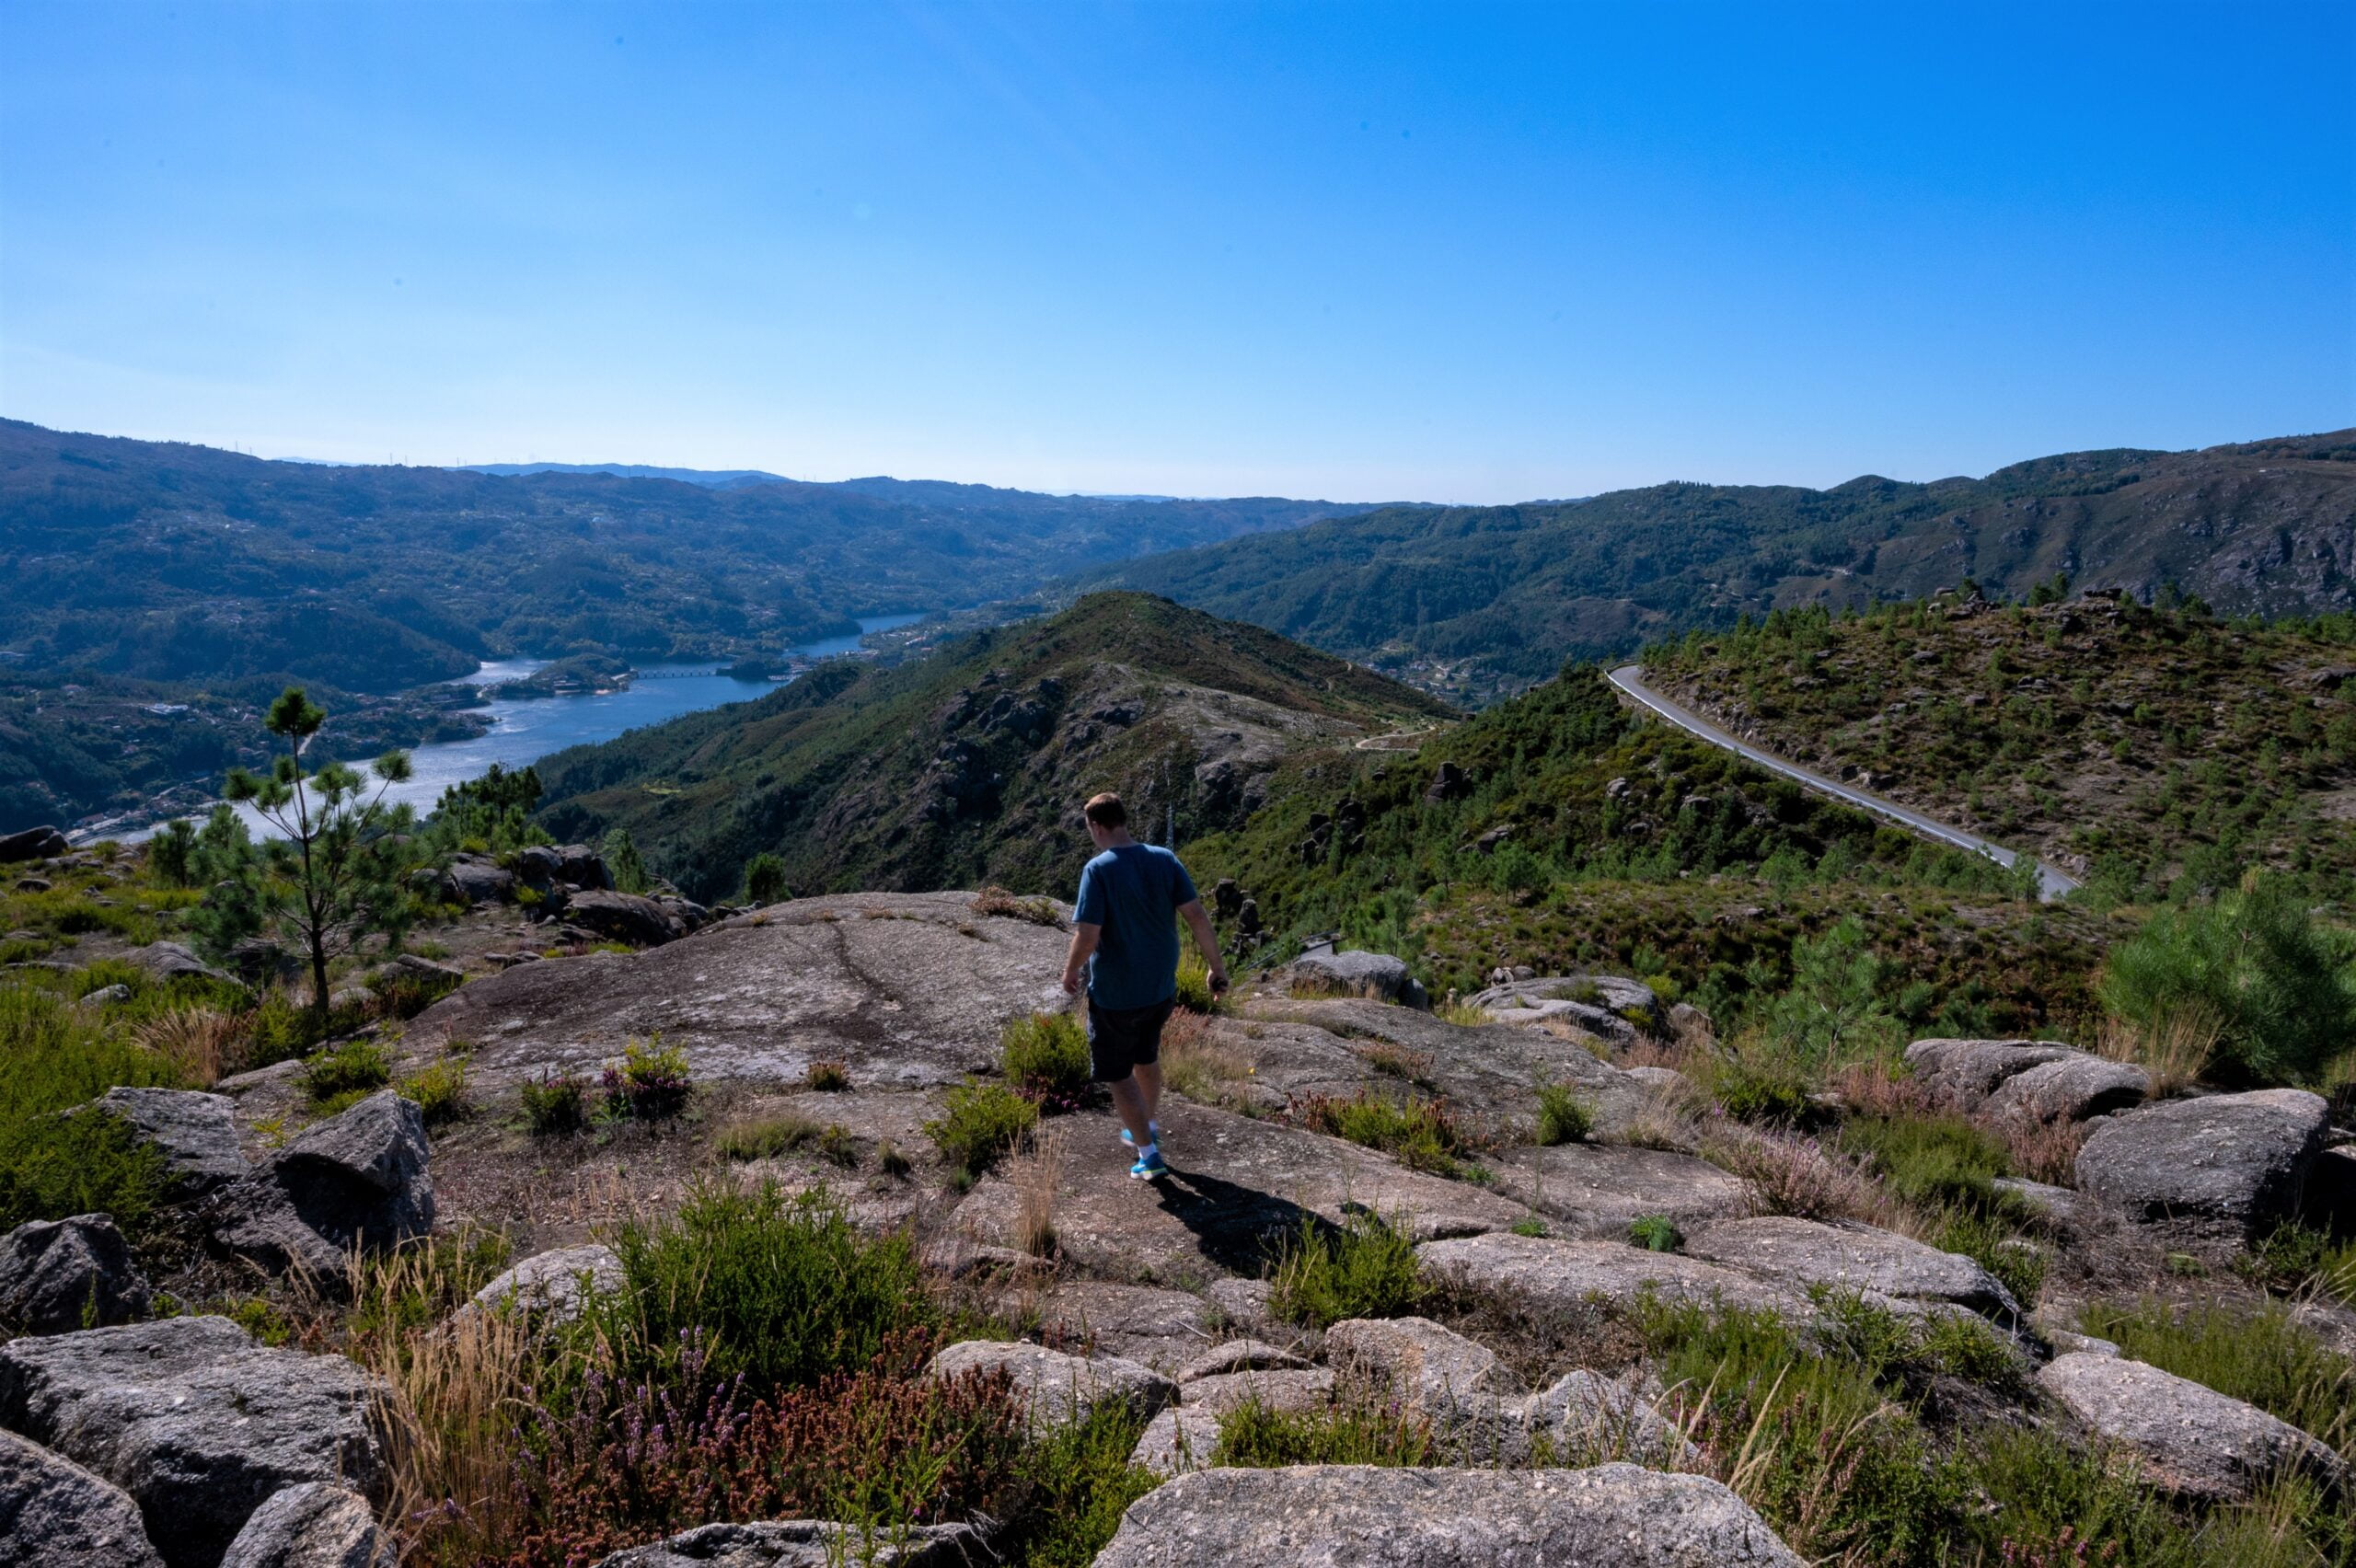
    We hiked to the Arado waterfalls and also to the Miradouro das Rocas. Miradouro means viewpoint, so whenever you see that on a map, it means it’s a viewing area, usually set high above with expansive views of the terrain below.  In this case, it is a rocky viewpoint you climb up to that provides sweeping 360º views of Peneda-Gerês National Park.

    It was nice to spend a day in nature seeing more of Portugal’s beauty.  I try to do at least one day hike whenever I’m traveling. It’s great to see the natural beauty each area of the world offers, plus I find nature to be a great way to recharge.

    Visiting Peneda-Gerês National Park on a road trip in Portugal
    I am so glad we included Peneda-Gerês National Park on our road trip in Portugal.

    Porto Day Trip: The Douro Valley

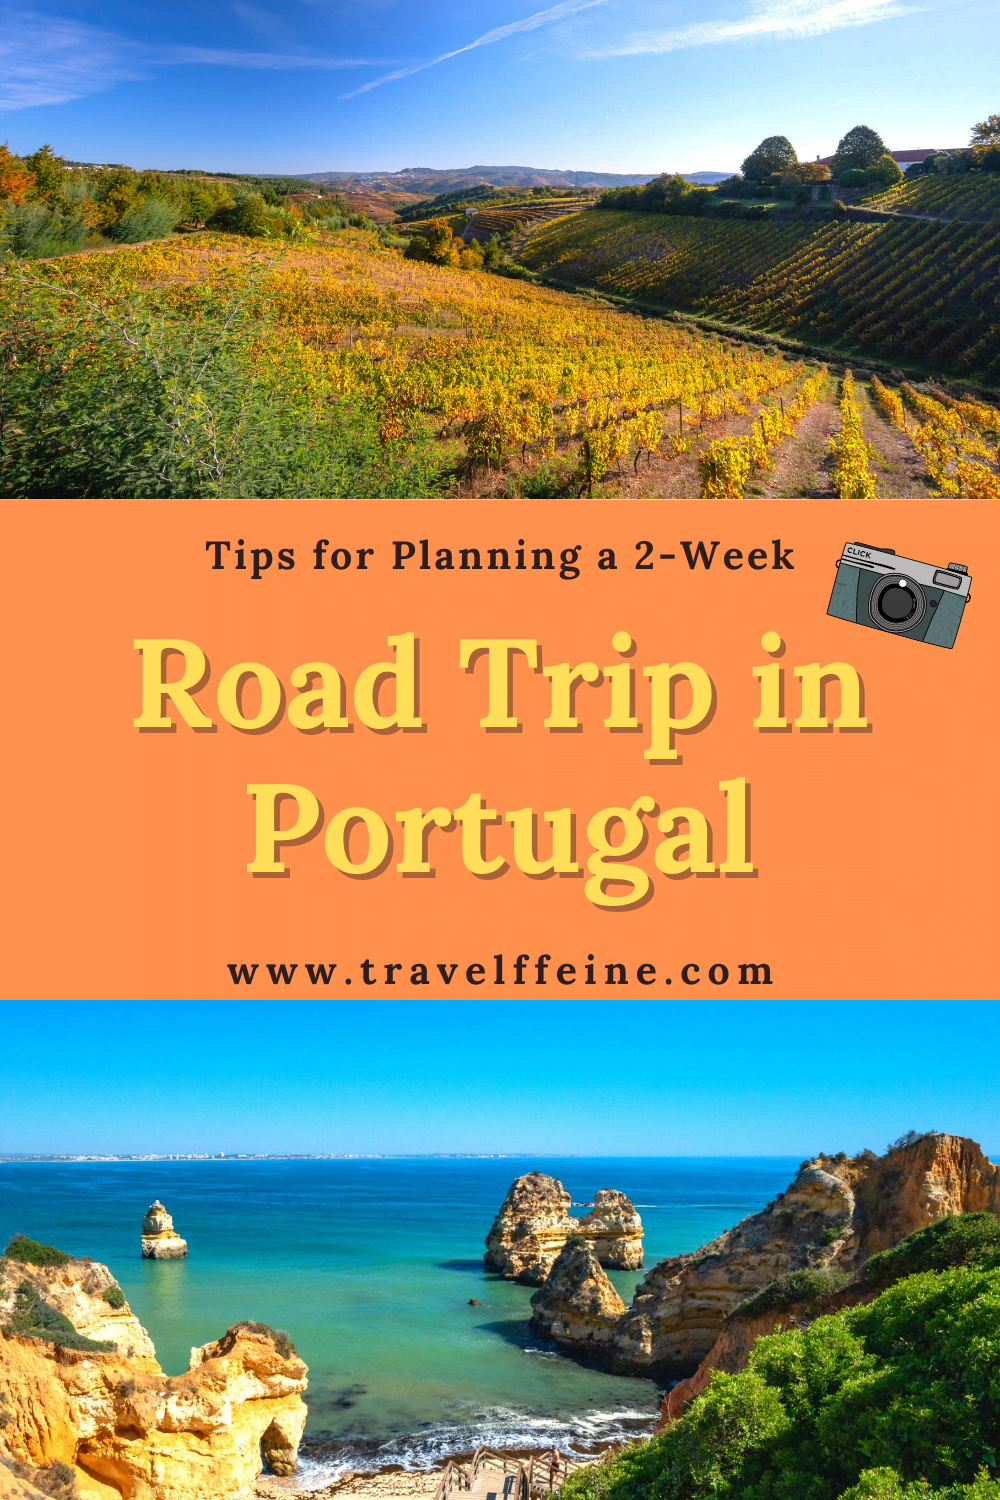
    Another day trip we took from Porto was a road trip to the Douro Valley.  This day was one of my favorites during our road trip in Portugal.  It was so beautiful to see the terraced vineyards just beginning to show their fall colors.  The terraced landscape rose from the Douro River that wound its way through the valley.

    The drive through the Douro Valley has many miradouros (viewpoints) along the way. Many of these include information boards describing the area’s history and its beginnings.

    We visited Quinta do Bomfim, a family-owned vineyard, and winery in Pinhão. We learned so much about what it took for the early farmers to carve out the terraced landscape and work the rocky land. There is so much more that goes into running a vineyard and making great port and wine than I ever realized!

    We also ate an incredible meal at Casa dos Ecos by Pedro Lemos. The restaurant sits above the Quinta do Bomfim vineyard, and it was one of the best meals we had on our entire road trip in Portugal!

    Driving from Porto to Lisbon

    Two days of day trips and two full days spent in Porto, and now it is time to return to Lisbon for our final visit before flying home. Our road trip in Portugal has come full circle.  Since we can’t check into our Airbnb before 5:00 p.m. and it only takes 3 hours to go from Porto to Lisbon, we decided to take another side trip.

    Side Trip: Aveiro and Costa Nova

    The beachside town of Costa Nova is too cute to pass up! I loved this little town with its colorfully painted houses that face the beach.  Palm trees line the promenade with a walking and cycling path that goes for miles along the waterfront. These houses, which are now primarily used as holiday getaways, were once fishing huts and storage shacks for the fisherman who lived here.  

    Just a short drive away is the town of Aveiro, where you can walk through their salt mine and learn how seawater is collected and salt harvested here each year.  I found it to be an interesting side trip.  The town is also home to the University of Aveiro, and we saw college students out walking about getting lunch and going to class. I want to come back to this town and explore it more on a future trip.

    costa nova side stop on road trip in Portugal

    Lisbon (Final 3 nights)

    We’re back in Lisbon, where we’ll spend our remaining days at an Airbnb in the Graça district of Lisbon. We returned our rental car early since we plan on staying in Lisbon for the remainder of our time. We felt even better about this decision after the taxi ride to our Airbnb. The streets in the Graca area are narrow and crowded, and it would have been a stressful drive had we chosen to keep our rental car.

    We love the rooftop balcony at our Graça Airbnb, and we spend the evening watching the sunset, enjoying good food and good company as we listen to the city and take it all in.

    Graça is one of Lisbon’s oldest suburbs, and it sits high on a hill with many incredible viewpoints for admiring Lisbon below. The following day, we visit the Miradouro da Senhora do Monte, an excellent viewpoint with sweeping views of Lisbon and Castelo de Sao Jorge to the far left (south). 

    We explored Lisbon on foot, walking to Praça Dom Pedro IV, a popular plaza with fountains and restaurants and shops surrounding it, and wandered the streets, popping in and out of shops like this art supply store and just enjoying being out in the world again.

    That’s really what this trip is about for us. It is our first international trip in two years, and we are so grateful we could come. We stop at the Fábrica Coffee Roasters for a light lunch and coffee.  I recommend you stop here if you’re ever in Lisbon.  They have a good selection of coffee, and the staff is incredible!

    Sunset in Lisbon's Graça neighborhood

    Closing Thoughts on a Road Trip in Portugal

    With only two weeks, we didn’t hit all the stops on my “day trips” list. I would love to have walked the ancient walls around Obidos and seen the church made out of bones in Evora, but I’ll save that for another visit and instead focus on all I did get to see. 

    You rarely get to “see it all.” Chances are you’ll want to return to Portugal after your first trip. Plus, did I mention they have a whole group of islands to explore? Yep, the Azores islands look like a tropical paradise; they are next on my list to see when I return to Portugal. As another trip ends, I savor the memories made and look forward to those yet to be created.

    Boa Viagem!

    Note: Travelffeine is reader-supported. This post contains affiliate links. When you make a purchase using one of these affiliate links, we get paid a small commission at no extra cost to you. And as always, all opinions are our own. Thank you!

    More Articles That Might Interest You

    Tips for Planning a Road Trip in Portugal
    2-week road trip in Portugal
  • 5 Tips for Renting a Car and Driving in Portugal

    Below are five tips for driving in Portugal that I learned during my two-week road trip there. Renting a car in Portugal is not so different from renting a car in the U.S. However, there are a few things that are helpful to know before starting on your road trip in Portugal.

    Things to Know Before Renting a Car in Portugal

    First, let me go over a few useful things to know before you make your car rental reservation.

    • You need a valid driver’s license to rent a car in Portugal.
    • Almost all rental cars in Portugal have manual transmissions. So make sure you know how to drive a stick shift before renting one.  Larger rental car companies will have a small selection of cars with automatic transmissions, but it will cost a lot more, and you need to reserve one well in advance if you hope to get one. In general, almost all cars in Europe use manual transmissions, and it’s an excellent skill to learn!
    • Portugal has some of the highest rates of car accidents and allegedly some of the worst drivers in Europe. So, as a precaution, you want to get rental insurance. Typically this means getting CDW (collision damage waiver) insurance. You can pay for this directly with the car rental company, or you can check ahead of time with your credit card company to see if they already provide this and what you need to do to use their coverage. Whichever choice you make, it’s good to understand what it covers and what it does not cover.
    • Most car rental companies in Portugal also charge a deposit to your credit card. You need to make sure that you have sufficient credit to cover this additional deposit. If you think this could be a problem for you, call and ask the company in advance for the rental deposit amount so you can make sure to have enough credit to cover it.

    Tip: Reserve the smallest car that will accommodate your needs. Parking spaces are tight and roads are narrower so a smaller car is easier to maneuver when driving in Portugal.

    5 Tips for Renting a Car and Driving In Portugal

    night driving in Portugal

    1) Renting a Car In Portugal

    First off, you want to research a rental car company and determine where you want to pick it up. You can rent at the airport, which we did, and then drive it into the city, or you can take a taxi into the city, and rent a car there.

    Our trip to Portugal had us flying into and out of Lisbon, so we rented our car from Lisbon’s Humberto Delgado Airport.  In hindsight, I may have opted to get a rental in the city instead when we were ready to move on to our next destination.  It was stressful for my husband driving in a new country, in the dark, with a large five-lane roundabout and city traffic, to get to our first Airbnb in Lisbon.  

    Before driving off, you need to walk around your rental car and mark any damage you see. At Avis, we were given the keys to our car on the ground level but then had to walk up one level to find our car.  We walked around the car and took photos of any damage we saw (the rental agent said the images would be our evidence should any dispute arise upon return), and we also wrote it down on the rental envelope they gave us. You do this on your own with no rental agent present.  

    Before the trip, I read many reviews that said to be very thorough in your walk around and note everything. So we were a little paranoid when doing our inspection and probably worried more about small bumps and scratches than necessary. However, better safe than sorry, I guess. In the end, we didn’t have any issues at check-in. The man who checked us in walked around the car once and then gave us our receipt.

    Toll Roads: Deciding How to Pay

    Make sure you understand your options regarding Portugal’s toll roads and how you’ll pay when driving there.

    Option 1

    Most rental companies give you the option of paying to “rent” a Via Verde device which allows you to use all Verde Lanes on any toll road without stopping.  You’ll pay a fee to use this device in addition to any tolls you accumulate during your road trip in Portugal. We rented with Avis and paid $45 for the device, which we later discovered was for the rental of the device AND roadside assistance.  The rental for the device itself was around €16.

    Option 2 

    You can choose not to rent a Via Verde device and instead go into a CTT (Portugal’s post office) every 3-5 days to pay your accrued toll bill. You cannot use the Via Verde lanes with this option. The convenience of using any toll road and all Verde Express Lanes (no stopping) and not needing to find a CTT location every few days makes renting the electronic device worth it, in my opinion.

    Option 3 

    I discovered this option after returning home to the U.S. However, if you plan to make repeated trips to Portugal, or you don’t want to pay the extra fees to the rental car company, this option seems the simplest and cheapest option.  You can rent your own electronic toll device directly with Via Verde.  You pay only for the months you use it, and you can activate it for use on any subsequent trips to Portugal.  This is the option I will choose in the future.

    My recommendation

    I recommend Option 1 or Option 3 (however, as I mentioned, I have not yet tested option 3). You’re on vacation. Do you really want to mess with finding a CTT/post office every few days? I don’t think it’s worth the time or money you’ll spend finding one. 

    With a Via Verde electronic device, you slow down to 60km as you pass through the designated toll lane.  All of the Via Verde passenger lanes we encountered were on the far left side of the toll checkpoint.  

    I am still waiting to receive the toll charges from Avis. It’s been almost a month since we returned, and we still have not been charged for this. I will update this post if I learn anything more or have a bad experience with this.

    2) Research Portuguese Driving Laws

    Read up on road signs, speed limits, and driving laws before your trip.  This will ease some of the stress of driving in a new country if you are somewhat familiar with the basics of their road rules.  

    Driving in Portugal isn’t that different from driving in the States, except for a few things I’ll note below.  Another nice thing we discovered when driving in Portugal was how traffic-free the freeways are.  There is always some congestion surrounding large cities, but otherwise, we often felt like we had the highway to ourselves!

    Speed Limits 

    During my most recent visit, the freeway speeds were 75mph/120kph, although it appeared most traffic went around 140kph. Another critical thing to note is that Portugal highways have speed cameras scattered in different spots, typically near cities. If you use Google, it will make a “ding” noise and alert you about an upcoming traffic camera.

    Driving Laws

    Many of their driving laws are the same as here in the U.S. Such as driving on the right side of the road, wearing your seat belt, only using hands-free mobile devices, and so on.  I’m not going to list all of them as you can research that on your own, but here are a few that stood out to me.

    • Dash cameras are illegal in Portugal, so leave them at home as they violate their privacy laws.
    • It’s illegal to pass on the right.
    • It’s illegal to cross a solid white line and don’t even think about crossing a double one. If you need to make a turn there, don’t do it; instead, go past it until you’re able to turn around.
    • Also, this isn’t a driving law, but something we noticed driving in Portugal. Almost all of their lines are white. In the U.S., we use yellow lines to distinguish a two-lane road with traffic going in both directions, and we use white lines for roads where the traffic is all going in the same direction.  In Portugal, almost all their lines are white, which means when you’re in a city with one-way roads, it’s hard to know if you’re turning down a street with traffic coming at you or going in your direction, so pay attention to what other drivers are doing. 

    Road Signs 

    Overall, we were able to get around without knowing what all their traffic signs meant. The speed limit signs and roundabout signs, parking signs, etc., were all easy enough to figure out. However, quite a few signs had me reaching for my phone more out of curiosity than anything else, but it is a good idea to review all the traffic signs before driving in Portugal. This article on their road signs includes an extensive list with photos of each street sign.

    3) Driving in Portugal: Roundabouts

    For any of you considering renting a car from the Lisbon airport, let me go over the one area that gave my husband a little trouble.  The roundabout.

    Now, he’s no stranger to roundabouts. In fact, he’s driven in the Swindon’s magic roundabout (watch the video to see how impressive this is), and of course, here in the States, we have a few small roundabouts scattered here and there.  Since we live on the West coast, they are still few and far between, but we still have them.  

    Shortly after leaving the Lisbon airport, we came to a large roundabout with five lanes encompassing it.  Since we were new to the area and relying on Google Maps to navigate us, there was a slight delay in knowing which exit we would take. 

    This, coupled with the fact that it was dark and the seemingly odd way cars were cutting across multiple lanes to exit, made for a very stressful first encounter to the Portuguese roundabout.  After we were on the highway, my husband said, “remind me to research the driving rules for roundabouts in Portugal.”

    After we checked into our Airbnb, he did his research and discovered that in Portugal, unless you are taking the first exit out of the roundabout, you are required to take one of the inner lanes, then cross through the other lanes of traffic to exit at a later exit.

    It took a lot of practice on his part to learn how to use their roundabouts properly, but by the end of the trip, he maneuvered them like a pro, including the 5-lane roundabout at the airport.

    4) Fueling up Your Car

    To Fuel Up or Not to Fuel Up? That is the Question.

    When you’re at the car rental company, they will explain that you can pay them for a full tank of gas upon return of your rental, or you can fuel it up before returning.  

    Our rental agent explained that they charge the same amount for fuel as you pay at the gas station. He also said that we didn’t have to decide in advance but that if we wanted to return and pay them to fuel it up, it was best to return on empty. If the car still has half a tank when returning, it is better to fuel it up rather than pay for a full tank when it only needs a half tank.

    Regular Fuel or Diesel

    Make sure you know whether your car takes regular unleaded fuel (petrol) or diesel. You do not want to make the mistake of putting the wrong fuel in your engine. Your CDW will not cover that, and it will put a significant damper on your vacation. Typically, it will say what type of fuel the vehicle uses on the gas tank door or gas cap. 

    Regular unleaded gas/petrol is referred to as “gasolina sem chumbo” or “gasolina sin plomo” and has an octane rating of 95 or 98.  We looked for the “95” on the fuel pump to ensure we used the recommended fuel type.  Diesel is called “gasoleo,” and liquid propane gas (LPG) is called GPL or “gas liquido.”

    5) Parking Your Car

    Make sure each of your accommodations has on-site parking before reserving a place to stay. Most reservations sites, such as Expedia.com or AirBnb.com, offer a sort feature that allows you to select only accommodations with parking.  Use this when researching where you’ll stay.  

    Tip: Uber is easy to use when you’re staying in large metropolitan areas such as Porto and Lisbon. Dealing with traffic and trying to find a parking spot can make a vacation really stressful, so when staying in a city, consider leaving your car parked at your accommodations and instead walk, or take an Uber or a taxi.

    I research well-located Airbnbs that allow me to walk to many of the main attractions, thus eliminating the need for a car. Sometimes, they may cost a little more, but in the end, they’re worth it for the time and money I save on transiting to the sights and attractions.

    Final Thoughts on Renting a Car in Portugal

    Portugal has an excellent public transport system.  You can take trains from Lisbon to Porto and even Lisbon to the Algarve, but it is nice to have a car if you want to explore.  When you’re visiting the Algarve region of Portugal, a vehicle is a must if you’re going to drive to the different beaches along the coast.  

    When you’re in Porto or Lisbon, you can book day trips through tour groups, but then you’re on their schedule, and you no longer have the flexibility of stopping when you want.  So, although you could spend two weeks without renting a car in Portugal, I think a rental car provides flexibility and allows for spontaneous side trips.

    It is easy to navigate using Google Maps. I did bring a paper map with me but never needed to use it. Make sure to download Google offline maps for Portugal before leaving home. That way, even if you lose cell coverage, you can still navigate to your next destination.

    And last, if you have a GSM phone that uses a SIM card, you can purchase a SIM card from the Vodafone store at the Humberto Delgado Airport.  They will help you install it and activate it so you can make sure it works before heading out.  This is so easy, and the card is good throughout Portugal.

    Other Related Articles You Might Enjoy

    Happy Travels!

    5 Tips for Renting a Car & Driving in Portugal (6)
  • Altruistic Joe: Coffee With a Cause

    Altruistic Joe isn’t “just” another coffee company. They are a veteran-owned business that sells coffee with a cause.  You’ll not only get a fantastic cup of coffee, but you can also feel good knowing your money went toward a worthy cause, other than the cause of delicious coffee, I mean.

    Keep reading to learn more about the company and the coffee I tried, but let me skip to the point. Try Altruistic Joe coffee. It is fantastic coffee from a great company!

    The Faces Behind Altruistic Joe Coffee

    So just who is behind this coffee with a cause, you ask? Owners (and veterans) Libby & Jamie Jenks are the faces behind this veteran-owned coffee roasting company. They are passionate about their coffee and about giving back, and it shows in the quality of their coffee.

    On the company’s website, they define their goals as follows:

    1. “Provide our customers the very best coffee available in the world, roasted fresh before it ships, sold at a competitive price.”
    2. “Maximize the positive global impact of each order by donating 20% of all net proceeds to a group of highly-rated charities, addressing a diverse set of needs.”

    Now, if that isn’t coffee with a cause, I don’t know what is! They explain that they choose the charities to support using strict guidelines to ensure the causes they support receive the maximum benefits. So they only partner with charities that receive a high rating of excellence.

    They further define the causes they are most passionate about giving back to as:

    • Global Health & Human Services
    • Military Veteran & Family Services
    • Animal Welfare
    • Environmental Conservation

    Where Do the Coffee Beans Come From

    As you read in the company’s goals above, you know that their priority is providing their customers with the best coffee available in the world.  That’s a pretty tall order, but they do it by partnering with independent farmers from Ethiopia, Guatemala, Columbia, Sumatra, & El Salvador. That’s some pretty great sources for excellent coffee beans!

    Coffee With a Cause Delivered To Your Door

    So how does it all work for you? Well, they take their premium sourced coffee beans and custom roast each order right before shipping it to you. That’s right. You are getting the freshest possible coffee beans delivered to your door! Your mailbox never smelled so good! Now, you can sit back and drink your amazing cup of coffee and feel good knowing your purchase gives back to a veteran-owned small business and other charitable organizations.  That’s a lot of bang for your cup! 

    The Big Question: How Does it Taste

    The company reached out to me to see if I’d try their coffee and potentially write a review if I liked it.  Well, as my readers know, I only give my honest opinion, and I won’t write a review for a product that I don’t like or wouldn’t use myself.  So, I was excited to try a new coffee roaster, but at the same time, I wasn’t sure what to expect.

    The Sniff Test

    First things first, I like to smell my coffee beans, and freshly roasted coffee is the best! So when I got my Altruistic Joe coffee in the mail and could smell it through the packing, I felt optimistic that this was going to be some great coffee. And it was.

    two bags of Altruistic Joe coffee

    Two Great Coffees To Try

    Altruistic Joe sent me two of their year-round favorites to try. The Big Iron Blend and the Cream and Crimson Blend.

    Big Iron Blend

    A medium-dark roast blend sourced from Guatemala and Sumatra. Its flavor profile includes “caramel and milk chocolate notes, citrus-like acidity, and a touch of smoke from our Smokehouse Dark Roast.”

    Cream & Crimson Blend

    A light-medium roast sourced from Guatemala and Ethiopia. Part of what makes the Cream & Crimson Blend unique is it is a little different each time you try it. They describe it as their “floating blend.” Saying although it comes from “the same geographical regions, each iteration is slightly different from the last.” Its flavor profile has notes of caramel, dried fruit, and citrus.

    The Taste Test

    When I opened the 12 oz bag of Big Iron Blend, I knew if it tasted as good as it smelled, I would like this one. I brewed a pot for my husband and me in our drip coffee maker.  I like to try different brewing methods when tasting coffee, and the one tried-and-true method that almost everyone I know uses is the drip coffee maker. So it needs to taste good in that first to pass the test.

    The Big Iron Blend did not disappoint! It is bold without being too bitter and has the caramel notes that I like in my coffee. I may not be able to describe each of the complexities with a particular coffee blend, but I do know good coffee when I taste it, and this is good coffee! If you like a bold coffee that hovers above a medium but not quite a dark roast, you will love the Big Iron Blend. It’s full of flavor and is a great way to start your day!

    Next, I tried the Cream & Crimson Blend, a light-medium roast, and I noticed more of its fruity and citrus notes. I liked the Cream and Crimson Blend because although it is a light-medium roast, it leans more toward the medium end, so it had a deeper richness that is often missing with a standard light roast. It also tastes great in my Aeropress!

    If you’ve never tried a light roast and always stick with the medium or dark roasts, I highly recommend giving the Cream and Crimson Blend a try. I think it’s a great starting point for the diehard dark roast fan looking to try a lighter roast.

    Altruistic Joe Coffee

    Freshly Roasted Right Before Shipping

    I looked at the “roasted on” dates on both of the bags of coffee I received, and it was indeed roasted right before shipping! This is a key reason why this will be some of the best coffee you’ve ever tried.  For the coffee connoisseur, you know that freshly roasted coffee beans, as well as a fresh grind right before brewing, are two crucial components to brewing the most flavorful cup of coffee.

    Other Coffee Options from Altruistic Joe

    In addition to the two coffees I tried, they offer a selection of single-origin coffees. I love sampling single-origin coffee as they always have something unique to offer, the only downside is you only get to try them once, but that’s part of the fun!

    The other thing I appreciate about Altruistic Joe is the size options when ordering coffee.  You can choose either their 12-ounce bags, which I tried, or if you drink a lot of coffee in your household, they also offer 5lb bags! I love that they have that additional option, as you can go through a 12 oz bag pretty quick! They also offer bags of ground coffee for those that prefer it pre-ground.

    Why Buy Altruistic Joe Coffee?

    One, it tastes amazing! Two, you’re supporting a veteran-owned small business, and if that weren’t enough, your purchase is also giving back to other charities in need.  It’s coffee with a cause and coffee with great flavor.  Win. Win.

    Try it today, and you get 10% off your first order by subscribing to their newsletter or receive 10% all future orders when you sign up for their coffee subscription service.  

    Other Articles You Might Enjoy

    Coffee with a Cause
  • The Historic Snoqualmie Tunnel: A Spooky Adventure!

    If you’re looking for an easy trail that offers a unique and spooky experience, then you need to hike the Snoqualmie Tunnel Trail.  The Snoqualmie Tunnel is 2.3 miles long (one way), and it is a part of the Iron Horse Trail, sometimes referred to as the John Wayne Pioneer Trail. 

    Your journey is in almost total darkness the entire way, and this makes for a spooky adventure! As everyone walks into the dark tunnel, there are often whoops and hollers as people listen for an echo and begin experiencing walking in almost total darkness. 

    There might be a few scary movie reenactments or tales of ghost stories, or better yet, others pretend they are walking into the Mines of Moria on an epic quest. The Snoqualmie Tunnel trail is suitable for all ages and can be done either on foot or a bicycle.

    Interesting Facts About the Snoqualmie Tunnel

    • It’s the longest tunnel open to non-motorized traffic in the U.S.
    • This same path was once used as a footpath by the Native Americans before it became a railway that ran from Seattle to Chicago.  Ironically, it is now, once again, a footpath.
    • The Snoqualmie Tunnel is a part of the John Wayne Trail that follows the old Milwaukee Railway line.  You could go from Seattle to Chicago in 45 hours!

    Exploring the Snoqualmie Tunnel

    One of the great things about the Snoqualmie Tunnel is that it is good on even the rainiest of days.  That’s what first prompted me to hike this trail.  My brother was visiting, and we usually went hiking during his visits, but it happened to be one of the rainiest summers we’d had in a long time in the Seattle area.  

    After researching some ideas for things to do in the rain, I found an article online that mentioned the Snoqualmie Tunnel.  Eureka! We packed our raincoats, headlamps, flashlights, water, and snacks and drove toward Snoqualmie Pass.

    Hyak Parking Lot Restroom Bldg

    At the Trailhead Parking Area

    There is a building with a “Hyak” sign in the parking lot with restrooms inside. There are also a couple of information boards regarding trails in the area and a parking fee dropbox in case you don’t have a Discover Pass.

    After grabbing our gear, we headed for the trail. The sign in the parking lot said it is 0.4 miles to the Snoqualmie Tunnel entrance. The wide gravel path is lined with blackberry bushes and trees, some of which were starting to show the fall colors.

    The Tunnel Entrance

    Soon you arrive at the entrance to the Snoqualmie Tunnel.  The great tunnel doors tower above you as you look up and into the darkness. At this point, you want to make sure everyone has fully charged batteries in their flashlights and phones. Put on your headlamps and get out your flashlights as you step into the dark. Almost immediately, you will notice the coolness and dampness of the tunnel compared to the outside temperature. Enter if you dare.

    Snoqualmie Tunnel Cyclist

    Walking Through the Snoqualmie Tunnel

    After walking into the tunnel and getting further from the light at the entrance, we turned off our flashlights to fully experience what it’s like to walk in total darkness.  It is an experience you won’t forget! It is odd and feels a little disorienting.  Quickly we began having fun running in the dark and waving our lights around. We’d put them under our chins and make scary faces. We had so much fun hiding from each other and turning our lights off for this new experience of walking in the dark. 

    I recommend you try this during your hike as it is a fun and strange experience.  However, I don’t recommend it for long periods as other hikers and cyclists pass through the tunnel and need to see you.  You may even want to wear some reflective clothing or a backpack with reflectors to help cyclists coming through the tunnel see you in advance.

    There are small alcoves and pipes, and the sound of dripping water is constantly heard.  Although the Snoqualmie Tunnel is only 2.3 miles one-way, it feels much further when you’re walking in the dark with no views of the outside. There is a small bend halfway thru, and after that, you see a small light at the end of the tunnel.  It’s okay, go toward the light!

    Dark tunnel with a light at the end
    tunnel silhouette

    On the Other Side

    As you reach the end of the tunnel and come outside you’ll see a picnic area with a tables a little further up the trail. This makes a good place to stop for a snack and talk about your experience with your group.  There is also a pit toilet here, but to be honest, I’d only use it if you absolutely have to. 

    After enjoying a snack and a break, it’s time to return to the darkness. The way back will seem even darker I think, but now you know what to expect.  Have fun and enjoy the experience!

    Snoqualmie Tunnel Exit Other side

    About the Snoqualmie Tunnel Trail

    Trail Length: 5.4 miles (roundtrip from the parking area)

    Trail Difficulty Rating: Easy (flat, gravel path)

    Features: Walk or bike in darkness through a historic train tunnel that goes through the mountain. Listen to water dripping down, examine the tunnel walls and create your own adventure!

    Entrance Fee:Washington Discover Pass is required to park here or purchase a one-day parking pass for $10 in the main parking area for the trailhead.

    Restrooms: There are restrooms at the trailhead parking area. There is also a pit toilet on the other side of the tunnel.

    Open Hours: 8 a.m. to Dusk (May to November)

    Different Names: The area is sometimes referred to by other names. Iron Horse State Park trail area, John Wayne Pioneer Trail, and the most recent name change to the Palouse to Cascades State Park Trail.

    Who Is This Hike Good For?

    It’s a flat trail, so it is suitable for all ages and abilities. However, if you have anyone who is seriously afraid of the dark, it’s best to leave them out on this hike. Except for the light from your flashlights, you are walking in darkness for over 2 miles. 

    If you love spooky adventures and enjoy something a bit different, this will be one you enjoy!  This hike is not about the views, it’s about the experience of walking in darkness through a mountain for over 2 miles.  It really is what you make it.


    What to Bring

    • Headlamp
    • Flashlights (with spare batteries)
    • Jackets
    • Sweatshirt/layers
    • Gloves
    • Hat
    • Water
    • Snacks
    • Reflective gear
    • Discover Pass or cash for parking pass
    Looking out the entrance of Snoqualmie Tunnel

    When is the Best Time to Go

    Rain or Shine the Snoqualmie Tunnel makes a great adventure.  The trail is open May through October and closes for the winter. Due to the snow and ice the area receives, it is not safe during this season.

    Since you are walking inside a tunnel in the dark, the weather outside won’t matter all that much! I hiked this on a rainy day because it was raining, and I wanted to go for a hike without being in the rain.

    I have friends that hiked this on a really hot day in the summer so they could go somewhere cool, and it is certainly cool inside the Snoqualmie Tunnel! It is chilly inside, and there is water dripping down, so no matter when you hike it, you’ll want to bring a jacket, sweatshirt, or other layers and perhaps even gloves and hats depending on the time of year.  I’ve hiked this in early September, and I appreciated having gloves and a hooded jacket.

    friends at trail sign

    Getting to the Snoqualmie Tunnel Trailhead

    From Seattle, take I-90 East toward Snoqualmie Pass. Take Exit 54 for WA-906 and Hyak. Make a right off the exit ramp, then take a left at the next stop sign onto WA-906. Drive about 0.4 miles before making a right onto NF-906.  Then take the first right into the parking area; you’ll see signs for the State Park and Hyak.

    Google MapsIron Horse State Park – Hyak Trailhead, Iron Horse Trail, Snoqualmie Pass, WA 98068

    Final Thoughts & Tip for a Second Hike

    Although this hike is not about the views, you will not soon forget this experience of walking through a mountain in the dark. After you finish your adventure, if you find you’re still up for another hike, check out the scenic Gold Creek Pond Trail. It’s an easy 1.2-mile loop that packs in stunning views! You’ll find the trailhead on the other side of I-90 from the Snoqualmie Tunnel trail. Read my post, Gold Creek Pond: A Short Hike With Beautiful Views, for more information on getting there and what to expect.

    Happy Adventures!

    Travelffeine is reader-supported. If you purchase using links provided in this post, we may receive a small commission at no additional cost to you. 

    tunnel entrance
    Snoqualmie Tunnel
    Historic Tunnel
  • 6 Travel Books to Inspire Artists & Travelers Alike

    I love books, and as you already know, I also love travel!  So it won’t be surprising to hear that I  love to read travel books. I also love art. Whether it’s photography, painting, or beautiful sculptures, it is something that brings me joy.  I believe that everyone has a creative side, and when we allow ourselves time to do creative things, it inspires and energizes us.  

    These six travel books combine my love of travel and my love of art. Each book inspired me with new places to explore, restaurants to try, and museums to visit. They also gave me great ideas for using sketches and photographs to create artistic travel journals. The use of drawings, paintings, and pictures combined with written notes creates a travel journal that makes each experience easier to recall and relive.

    Each of these travel books are beautiful to look at and will delight both lovers of travel and art. If you are an artist, you might even find that you begin thinking about designing your next trip around your art. There are so many wonderful ideas in these books of places to see and ways to use travel as a conduit for your art. 

    Perhaps you don’t identify as an “artist” that’s okay too, if you enjoy looking at art and discovering new things, you will find something in each of these books to inspire you too.

    Who should read these books?

    Do you love to travel?
    Do you enjoy looking at art?
    Are you an artist?
    Do you want to create art or find inspiration?
    Do you enjoy reading about beautiful and exciting destinations?

    If you answered yes to any of these questions, then you should read these books. If you answered yes to more than one of these questions, I’d rush to your nearest library or buy one today. These books are easy reading, beautiful to look at, and inspiring to read.

    1) Paris in Winter: An Illustrated Memoir

    Travel Book Paris in Winter

    In Paris in Winter: An Illustrated Memoir, David Coggins takes you on his annual winter trip to Paris. Each chapter is a different year, and another winter spent exploring Paris with his family. Paris In Winter is an example of luxury travel, fine dining, art museums, and shopping. 

    Paris in Winter is a journal and sketchbook in one. It’s filled with simple paintings that accompany the written memory Coggins is attempting to capture. The mood, the smells, the sounds he heard, and funny snippets of conversations with his family.

    It reads like a stream of consciousness journal in which the author shares his notes and watercolor sketches of individual moments. You don’t get a continuous story, but instead, you peer into his journal and see how he captures the essence of that particular memory—a moment he did not wish to forget.

    I also use this style of notetaking when I travel. I create short, bullet-point style references to help me recall what I did that day and the moments I don’t want to forget. Often I’m too tired at the end of the day to write pages of detailed notes. So this shorthand style of journaling helps me to capture the moments.

    The addition of drawings, paintings, and even photographs to your travel journal can enhance future recall when rereading your journal and make it a more interesting read.

    Paris In Winter leaves me with a long list of museums to visit the next time I’m in Paris. It also leaves me feeling just a little bit hungry as I read his descriptions of their sumptuous meals. There is something about Paris that calls people back to it year after year. Wander the streets with the Coggins family and get lost in the finer things of this magical city.

    2) Travels Through the French Riviera: An Artist’s Guide to the Storied Coastline, from Menton to Saint-Tropez

    Travels through French Riviera

    Reading Travels Through the French Riviera: An Artist’s Guide to the Storied Coastline, From Menton to Saint-Tropez by Virginia Johnson is like reading a storybook for adults. The brightly colored pages with pictures and text bring the feeling of the Riviera to the reader as you journey along the coastline with the author. I could almost feel the warmth of the sun as I imagined myself enjoying gelato along the waterfront.

    Travels Through the French Riviera is not “just” an art book and a travel book in one. As you read it, you feel like you’re taking a stroll through a French town with a friend. Johnson guides you through these beautiful French towns that were once artistic retreats for artists such as Picasso and Chagall. You learn of the art history in each town and her go-to spots for inspiration. 

    In addition to giving you detailed itineraries for each village, Johnson also provides a list of the best places to buy art supplies and what she uses as a traveling artist. If you want a personal artist retreat mapped out for you, then you need to read Travels Through the French Riviera.

    I’ve yet to visit the French Riviera, but after finishing this book, I’m excited to plan a trip to explore this beautiful region and delve into its artistic history. A month here would be perfect for seeing all of the towns. However, one could easily create an enjoyable 2-week itinerary by using this book as a guideline.

    If you’re interested in art, art history, and travel, this is the book for you! Painter or photographer, poet, or writer, Travels Through the French Riviera will inspire you to take a journey that feeds your creative soul.

    3) Dear Paris: The Paris Letters Collection

    Dear Paris book

    A Little Background

    I first read Janice MacLeod’s book Paris Letters: A Travel Memoir about Art, Writing, and Finding Love in Paris on a flight to Europe when I’d visit Paris for the first timeI enjoyed the humor she infused in her story of how she came to live in Paris. It describes her desire to live abroad, how she came up with a budget and a plan to do it, and how the experience changed her life. She used her painting skills to help pay for her stay in Paris, making both a dream to travel and get paid for her art a reality. 

    One of the ways she did this was through a letter subscription she sold to her Etsy subscribers.  She’d paint a letter and handwrite a note about her experiences as a newcomer to Paris and then copy and mail these to her subscribers. I loved this idea and have contemplated doing something similar with my photographs. 

    7 Years Later

    As I read her book Paris Letters, I imagined how the painted letters looked. So when I saw she published a book filled with them, I jumped at the chance to purchase it!  Dear Paris: The Paris Letters Collection is a beautiful book filled with a compilation of some of her best-painted letters. The ones presented in the book are only a fraction of what she sent over an almost eight-year period.  

    As you flip through the pages, you will find yourself living vicariously through Janice as she shares what it’s like for her to move to Paris. She shares her experiences about the language barrier, her favorite cafe, and the beauty she uncovers in this remarkable city.  Dear Paris is also a book about dreams and the beautiful life we can have if only we take the first step (or perhaps flight).

    If you’ve ever visited Paris, Dear Paris will be a walk down memory lane, you will envision the same places she sees, and it will be a beautiful way to relive your memories there. If you’ve never been, this may be one of the best ways to “visit” until you can. Dear Paris is a travel book worthy of being left on your coffee table for repeated glances and visits to Paris.

    4) A Paris Year: My Day-to-Day Adventures in the Most Romantic City in the World

    A Paris Year book

    I know I already mentioned her other two travel books on Paris, but I felt this one also deserved a place on the list.  In A Paris Year, Janice fills the book with artwork, photographs, and various clippings and written notes describing her life in Paris throughout every season of the year.

    It’s less a daily journal and more a book filled with musings, historical references, and all things Paris. Each page represents a day of the year, and it reads like an insider’s guide to living in Paris. She discusses the various markets, bookstores, her favorite art stores, local restaurants, and life in Paris from the view of a foreigner. 

    A Paris Year looks at what it’s like to move from the States to Paris for one year. Where you’d shop, what the seasons would be like, holidays celebrated, and more. If you’ve ever wanted to live in Paris, this book is only going to increase that desire further. 

    You’ll feel like you’re living a year in Paris along with Janice as she purchases bread at the local bakery, sips coffee at the cafe around the corner, and bonjours her way around Paris. It’s another beautiful book to inspire both artists and travelers, but especially anyone who loves Paris.

    5) An Illustrated Journey: Inspiration From the Private Art Journals of Traveling Artists, Illustrators and Designers

    Illustrated Journey traveling artist book

    Danny Gregory worked with 40 artists, illustrators, and designers worldwide to create An Illustrated Journey. What makes An Illustrated Journey unique as a travel book is its art-focused approach to travel. Each artist, illustrator, or designer describes how drawing changed their view of travel.  Gregory mentioned how he now plans his travel based on his artwork. Rather than it being a secondary factor, it is now his primary reason to travel.

    An Illustrated Journey is not only a travel book it’s also an art community. This travel book is a little different than the other ones on this list as it focuses on art first and its influence on travel. Gregory writes how each artist began drawing while traveling, and it “has made them more deeply in love with both.” Now, he continues, “they travel because they draw, rather than vice versa.”

    Each artist interviewed in the book gives examples of their drawings and shares their favorite places and pens and paper. They share the ways they immerse themselves in their art, whether at home or abroad. They offer tips for getting started drawing, creating the habit, and encouragement to persist for its life-changing benefits.

    An Illustrated Journey is chock full of inspiring ideas for artists. It makes a great coffee table book for flipping thru and looking at the variety of sketches and paintings from around the world. 

    This travel book is for the current artist, aspiring artist, and traveler who has never even thought of drawing in their travel journal. It’s a call to begin seeing your world thru a new lens. Its artistic spirit is contagious, and you might find yourself ordering a travel journal and pens before your next big adventure. I know I did.

    6) The Rainbow Atlas: A Guide to the World’s 500 Most Colorful Places

    Rainbow Atlas travel photography

    The Rainbow Atlas: A Guide to the World’s 500 Most Colorful Places by Taylor Fuller (along with other Instagram collaborators) is full of beautiful photographs of some of the most colorful places in the World. If you want a book to inspire you as a traveler or an artist, this book will do both, and you can use it as a bucket list guide to inspire your next travel destination. 

    As a photographer, I love finding ways to create photographs that resemble paintings. This book provides plenty of inspiring material.

    As a traveler, I love seeing unique places so different from my home, and this book is full of colorful destinations I would love to see in person and explore the culture and customs of each colorful area. 

    For painters and sketch artists, this book offers inspiration for your creations as well as muse-worthy destinations. And for anyone stuck at home right now and unable to travel, it gives gorgeous, brightly-colored photos to uplift and entertains your visual senses. The Rainbow Atlas is another beautiful book worthy of your coffee table. 

    I want to make one small comment regarding the images in the book. As a photographer and traveler, I’ve visited a number of these destinations. In person, they may not be as vivid as represented in this book. This can occur due to post-editing, as well as the settings when photographed. 

    For example, colors tend to pop more on a bright sunny day with a blue sky for the backdrop vs. an overcast day when grey skies tend to mute colors. So if by chance you visit and you think, “Hey, this doesn’t look like the image in the book,” you’ll know why. However, they are still gorgeous destinations, so will you really be disappointed? I doubt it.

    Closing Thoughts on Travel Books and Artistic Inspiration

    One of the reasons I love reading books about travel is because I can’t always travel. Reading travel books and watching movies about travel adventures is my way of traveling when I can’t leave home. I wrote the article 15 Inspiring Things to Do When You Can’t Travel to help you find ways to infuse your life with travel even when you’re at home.

    Lastly, take time to explore your creative side. It is an essential part of being a human, and I think you’ll find it both relaxing and energizing. You may spark a passion you’d long forgotten or find a new one to pursue. Life is about discovery.

    I’d love to hear your thoughts if you read any of the above books and what you thought. If you have any particular ways you mix your art with travel, I’d love to hear about that as well!

    Bon Voyage!

    Note: Travelffeine is reader-supported. This post contains affiliate links. When you make a purchase using one of these affiliate links, we get paid a small commission at no extra cost to you. And as always, all opinions are our own. Thank you!

    6 Travel Books Inspiring Artists and Travelers
    6 Travel Books Artists and Travelers
  • Top 7 Things To Do at Cape Disappointment State Park

    Cape Disappointment State Park is at the southwestern tip of Washington State, where the Columbia River meets the Pacific Ocean. It is a stunning stretch of coastline that, contrary to its name, does not disappoint.

    I don’t know why it took me so long to explore this beautiful stretch of coast in my home state, but now that I’ve been there, I’m looking forward to a return trip.  In this article, I share some of the top things to do at Cape Disappointment State Park, plus tips for what to see along with info on camping and accommodations in the park in case you want to extend your visit.

    Why is it Called Cape Disappointment

    Cape Disappointment isn’t the only name given to this area. The Chinook Tribe called the region Kah’eese, and Spanish explorer Bruno de Heceta referred to the Columbia River as San Roque.  However, when British trader John Meares came to the area searching for the Columbia River, he mistakenly believed it was only a bay. So, he was “disappointed.” Therefore he named the area Cape Disappointment, and that name stuck. 

    Ironically, we now know he did find the mouth of the Columbia River.  So, had he realized this, it might have been named Cape Discovery instead.  Perhaps there’s a life lesson here.  Sometimes, we think a dream or goal attained will look a certain way; our success will be obvious. When it doesn’t look the way we believe it should, we often give up, when in fact, we are at the precipice of a great discovery. If only we’d give it a second look and not give up so quickly. 

    Maybe, or maybe I’m looking too deeply into John Meares’ disappointment. It’s interesting to see things through the lens of hindsight if only Meares could see what we see today.

    Columbia River bar

    Columbia River Meets the Pacific Ocean

    Although John Meares named Cape Disappointment due to his erroneous assessment that he did not find the Columbia River, this stretch of coast has undoubtedly led to many sailors’ disappointment.

    This is one of the most hazardous stretches of coastline in the world. Where the Columbia River meets the Pacific Ocean, it creates a “bar.” This is a huge sandbar that changes due to the waves, strong currents, and ocean tides.

    Hundreds of shipwrecks have occurred here, and even today, a Columbia River Bar Pilot is required to guide large ships through this treacherous bar crossing. It is interesting to see in person the distinct line created where these two massive bodies of water collide. 

    Read this in-depth article to learn more about how the jetties were created and the two lighthouses in the area.  This region is full of fascinating history!

    Cape Disappointment Lighthouse Waikiki Beach

    Top 7 Things to Do at Cape Disappointment

    Cape Disappointment State Park is over 2,000 acres in size. You will certainly have no shortage of things to do during your visit here. Below I list what I think are the top 7 things to do here. You can see a lot in one day, but with two nights, you’ll enjoy a more relaxed visit with time to soak it all in.

    1) Beaches

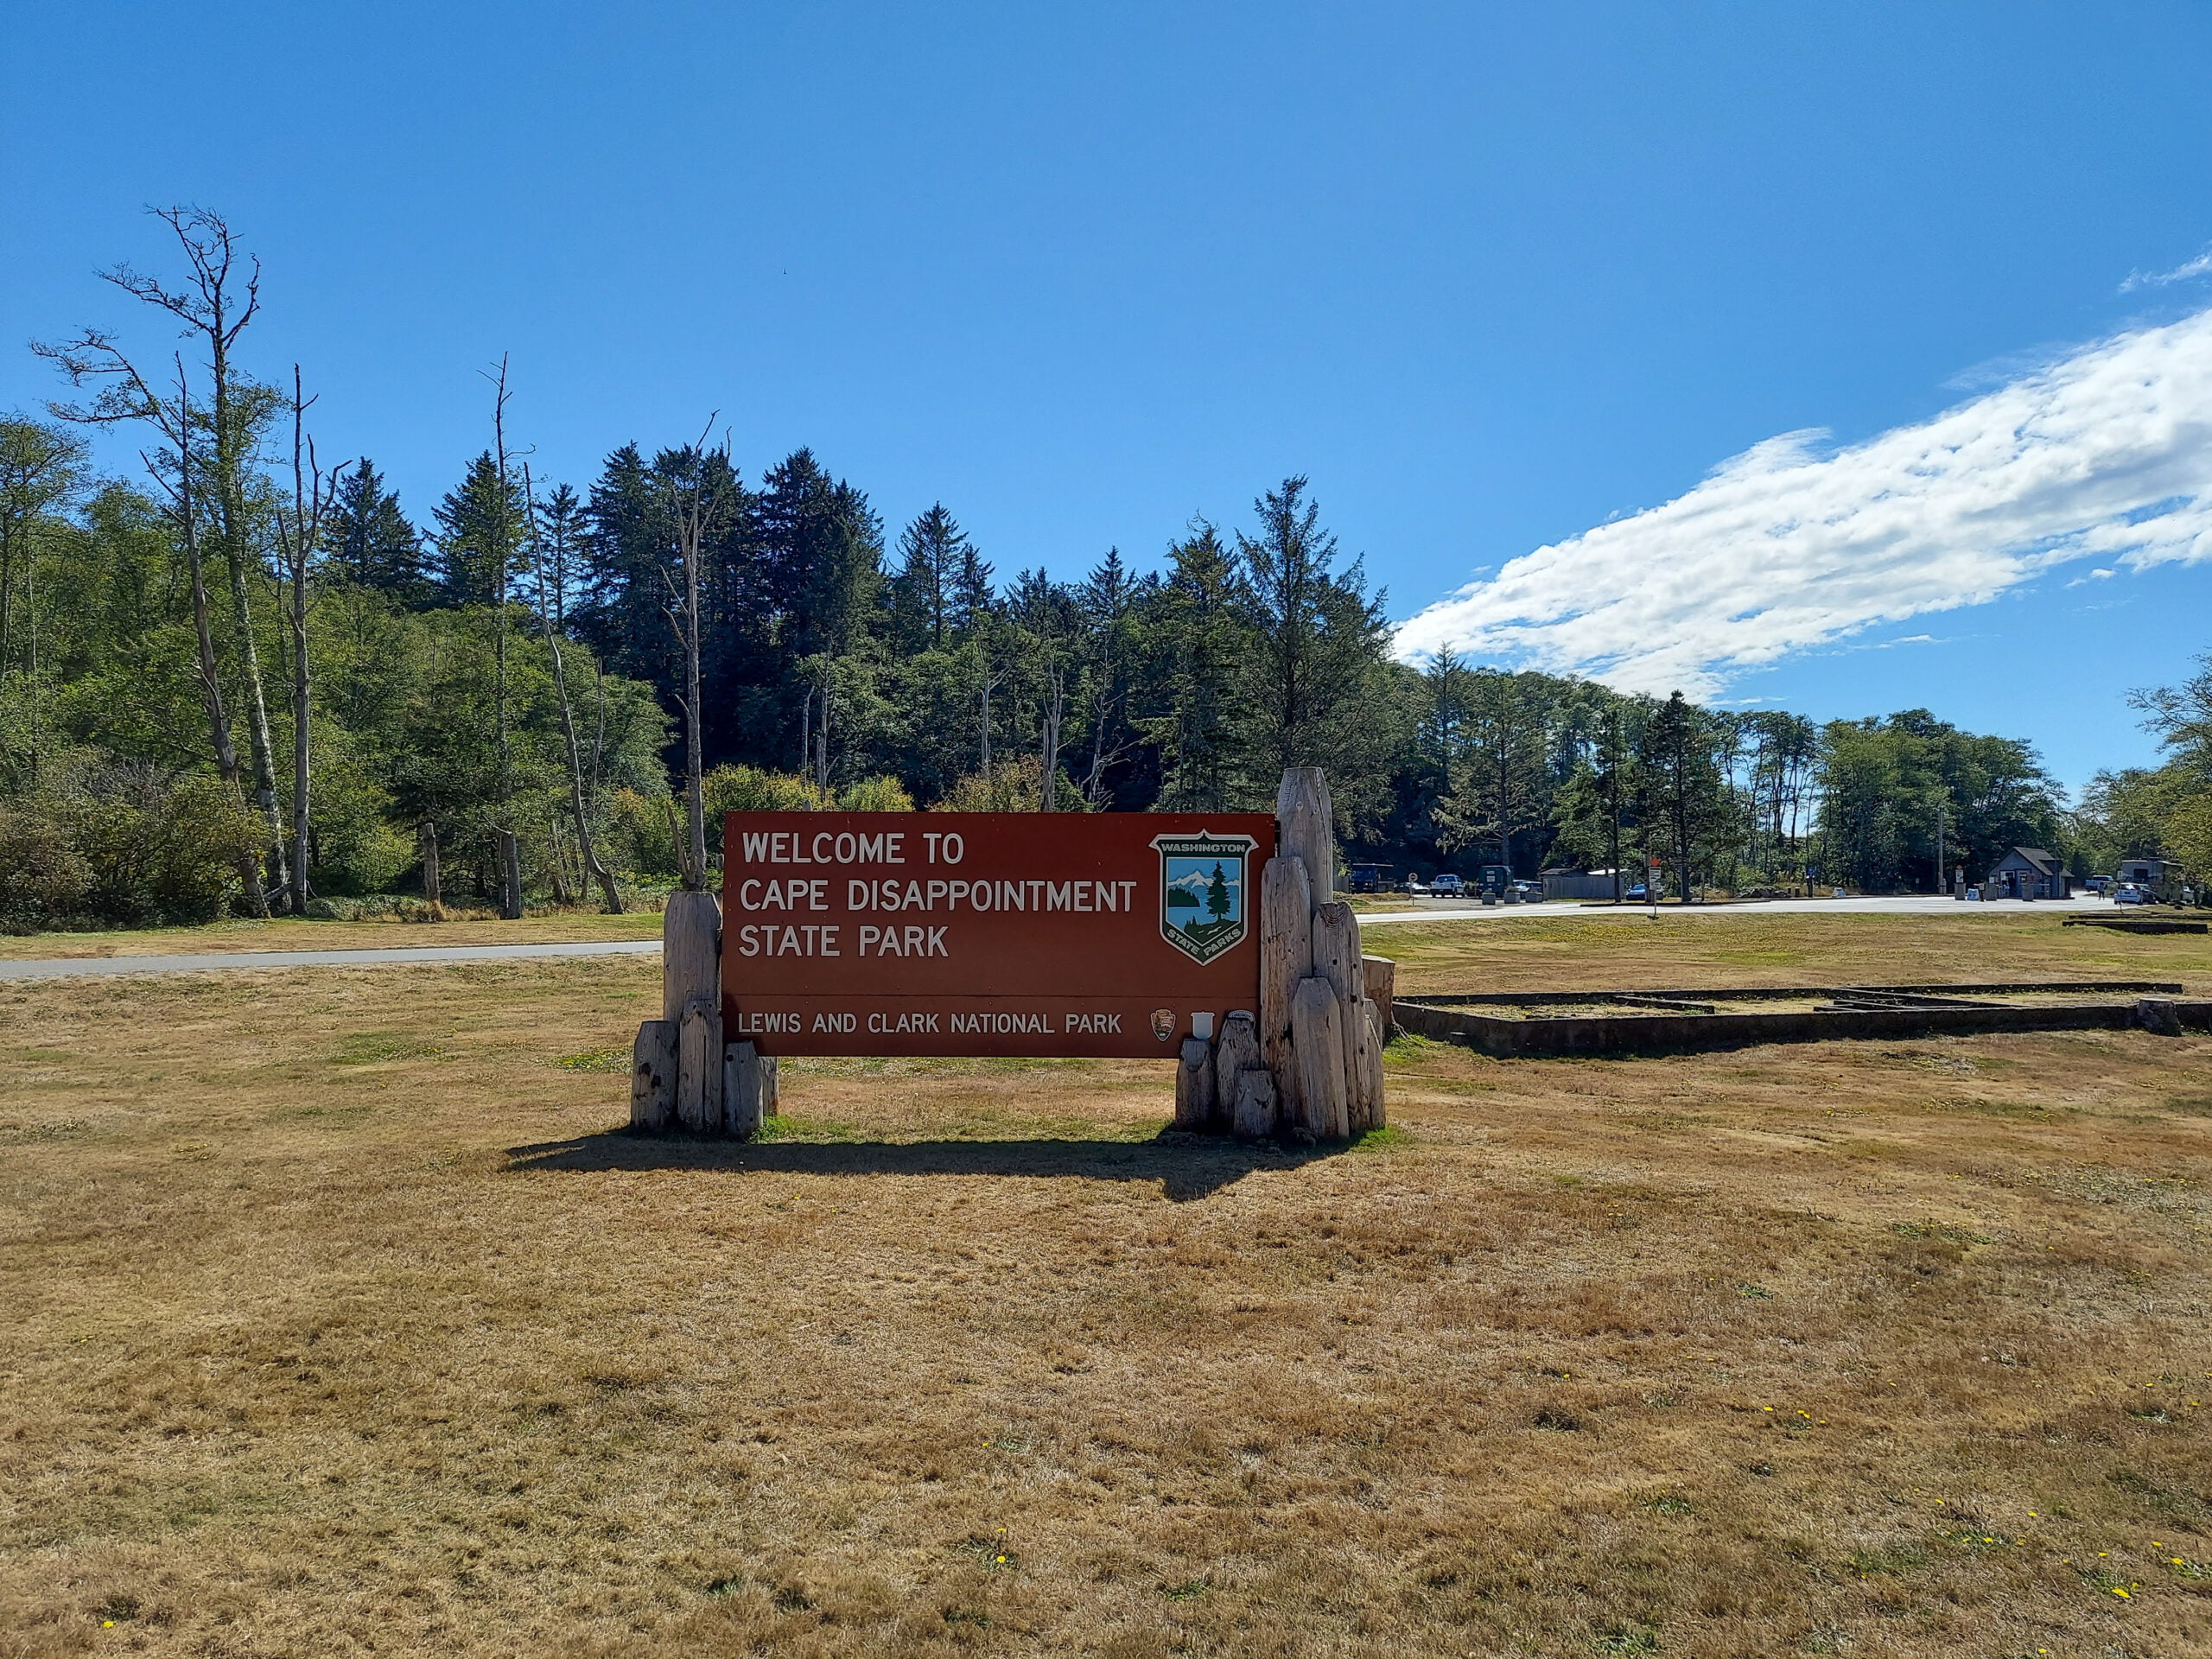
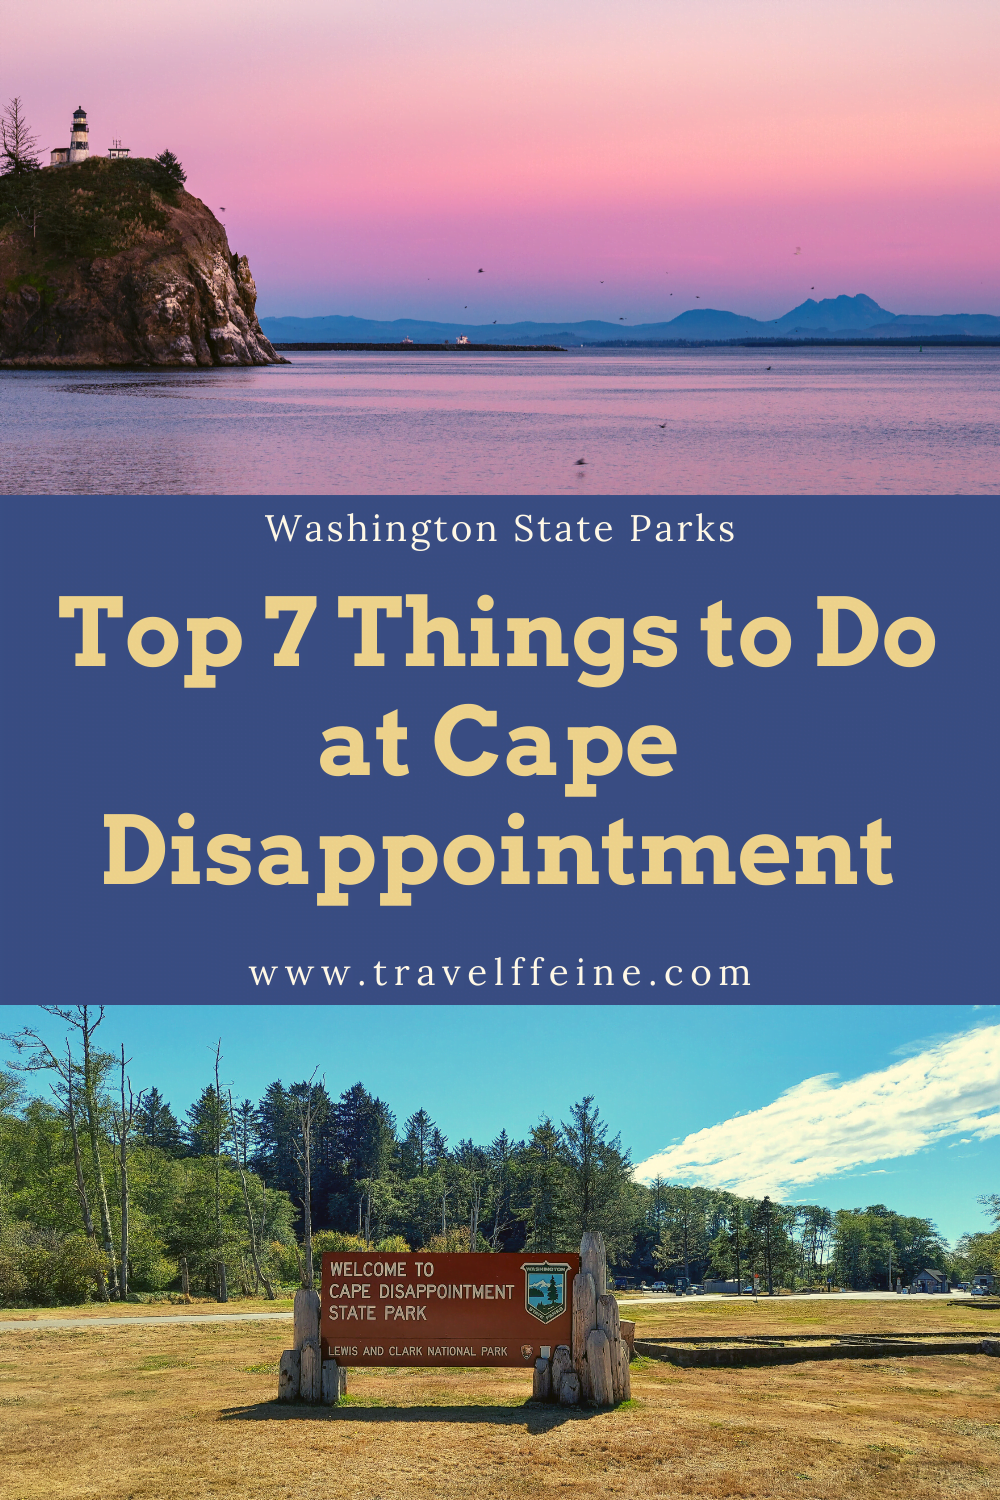
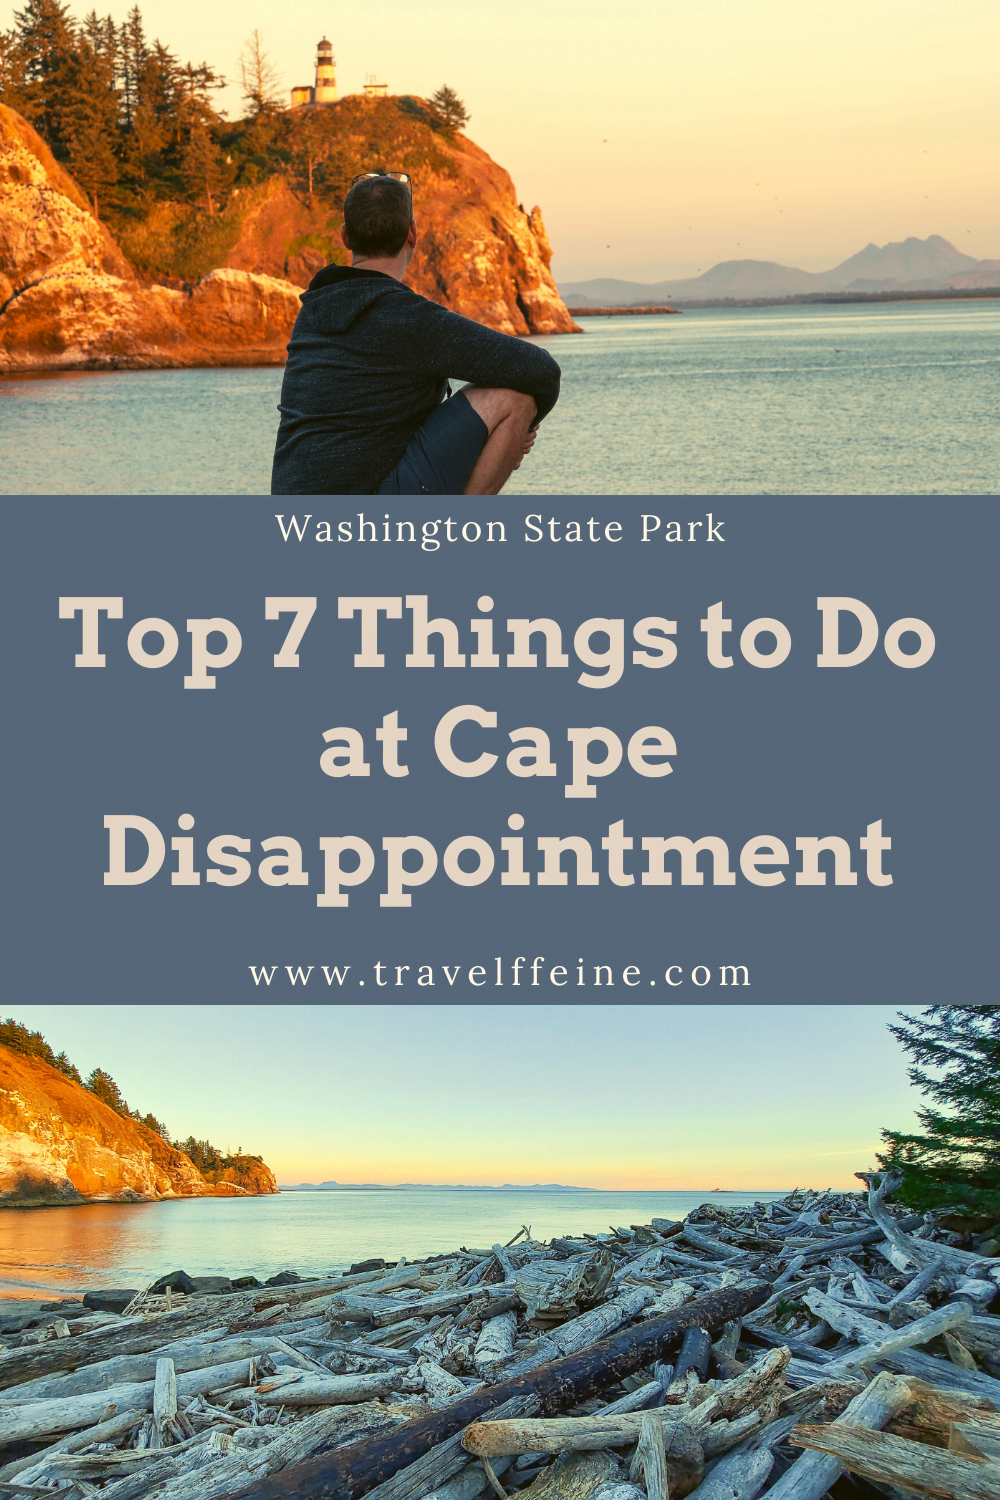
    Beaches are always at the top of my list of to-dos.  I love the water! These three beaches at Cape Disappointment State Park are my top choices for your first visit here. They are great for flying kites, building sandcastles, looking through driftwood, seeing the lighthouse, and watching the surf.

    Benson Beach

    From the main entrance to the campground area, at the three-way stop, take a left onto North Jetty Road and drive past Waikiki Beach to find the parking area for Benson Beach near the end of the road. There is also a trail to the beach near the campground amphitheater in Loop A. 

    This two-mile stretch of beach is vehicle-free.  I know that might sound strange for me to mention that, but actually, most of the Long Beach peninsula is open to vehicles.  So it’s nice to know you and your family can explore Benson Beach without worrying about a car driving up behind you.

    Benson Beach
    Benson Beach as seen from the North Head Lighthouse trail.

    Waikiki Beach

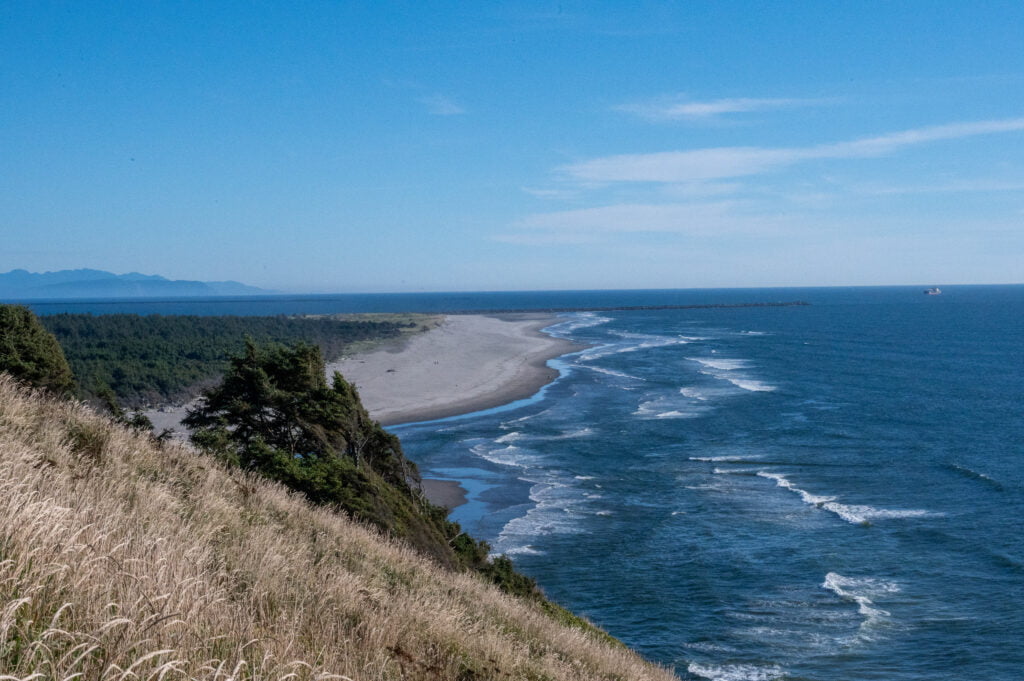
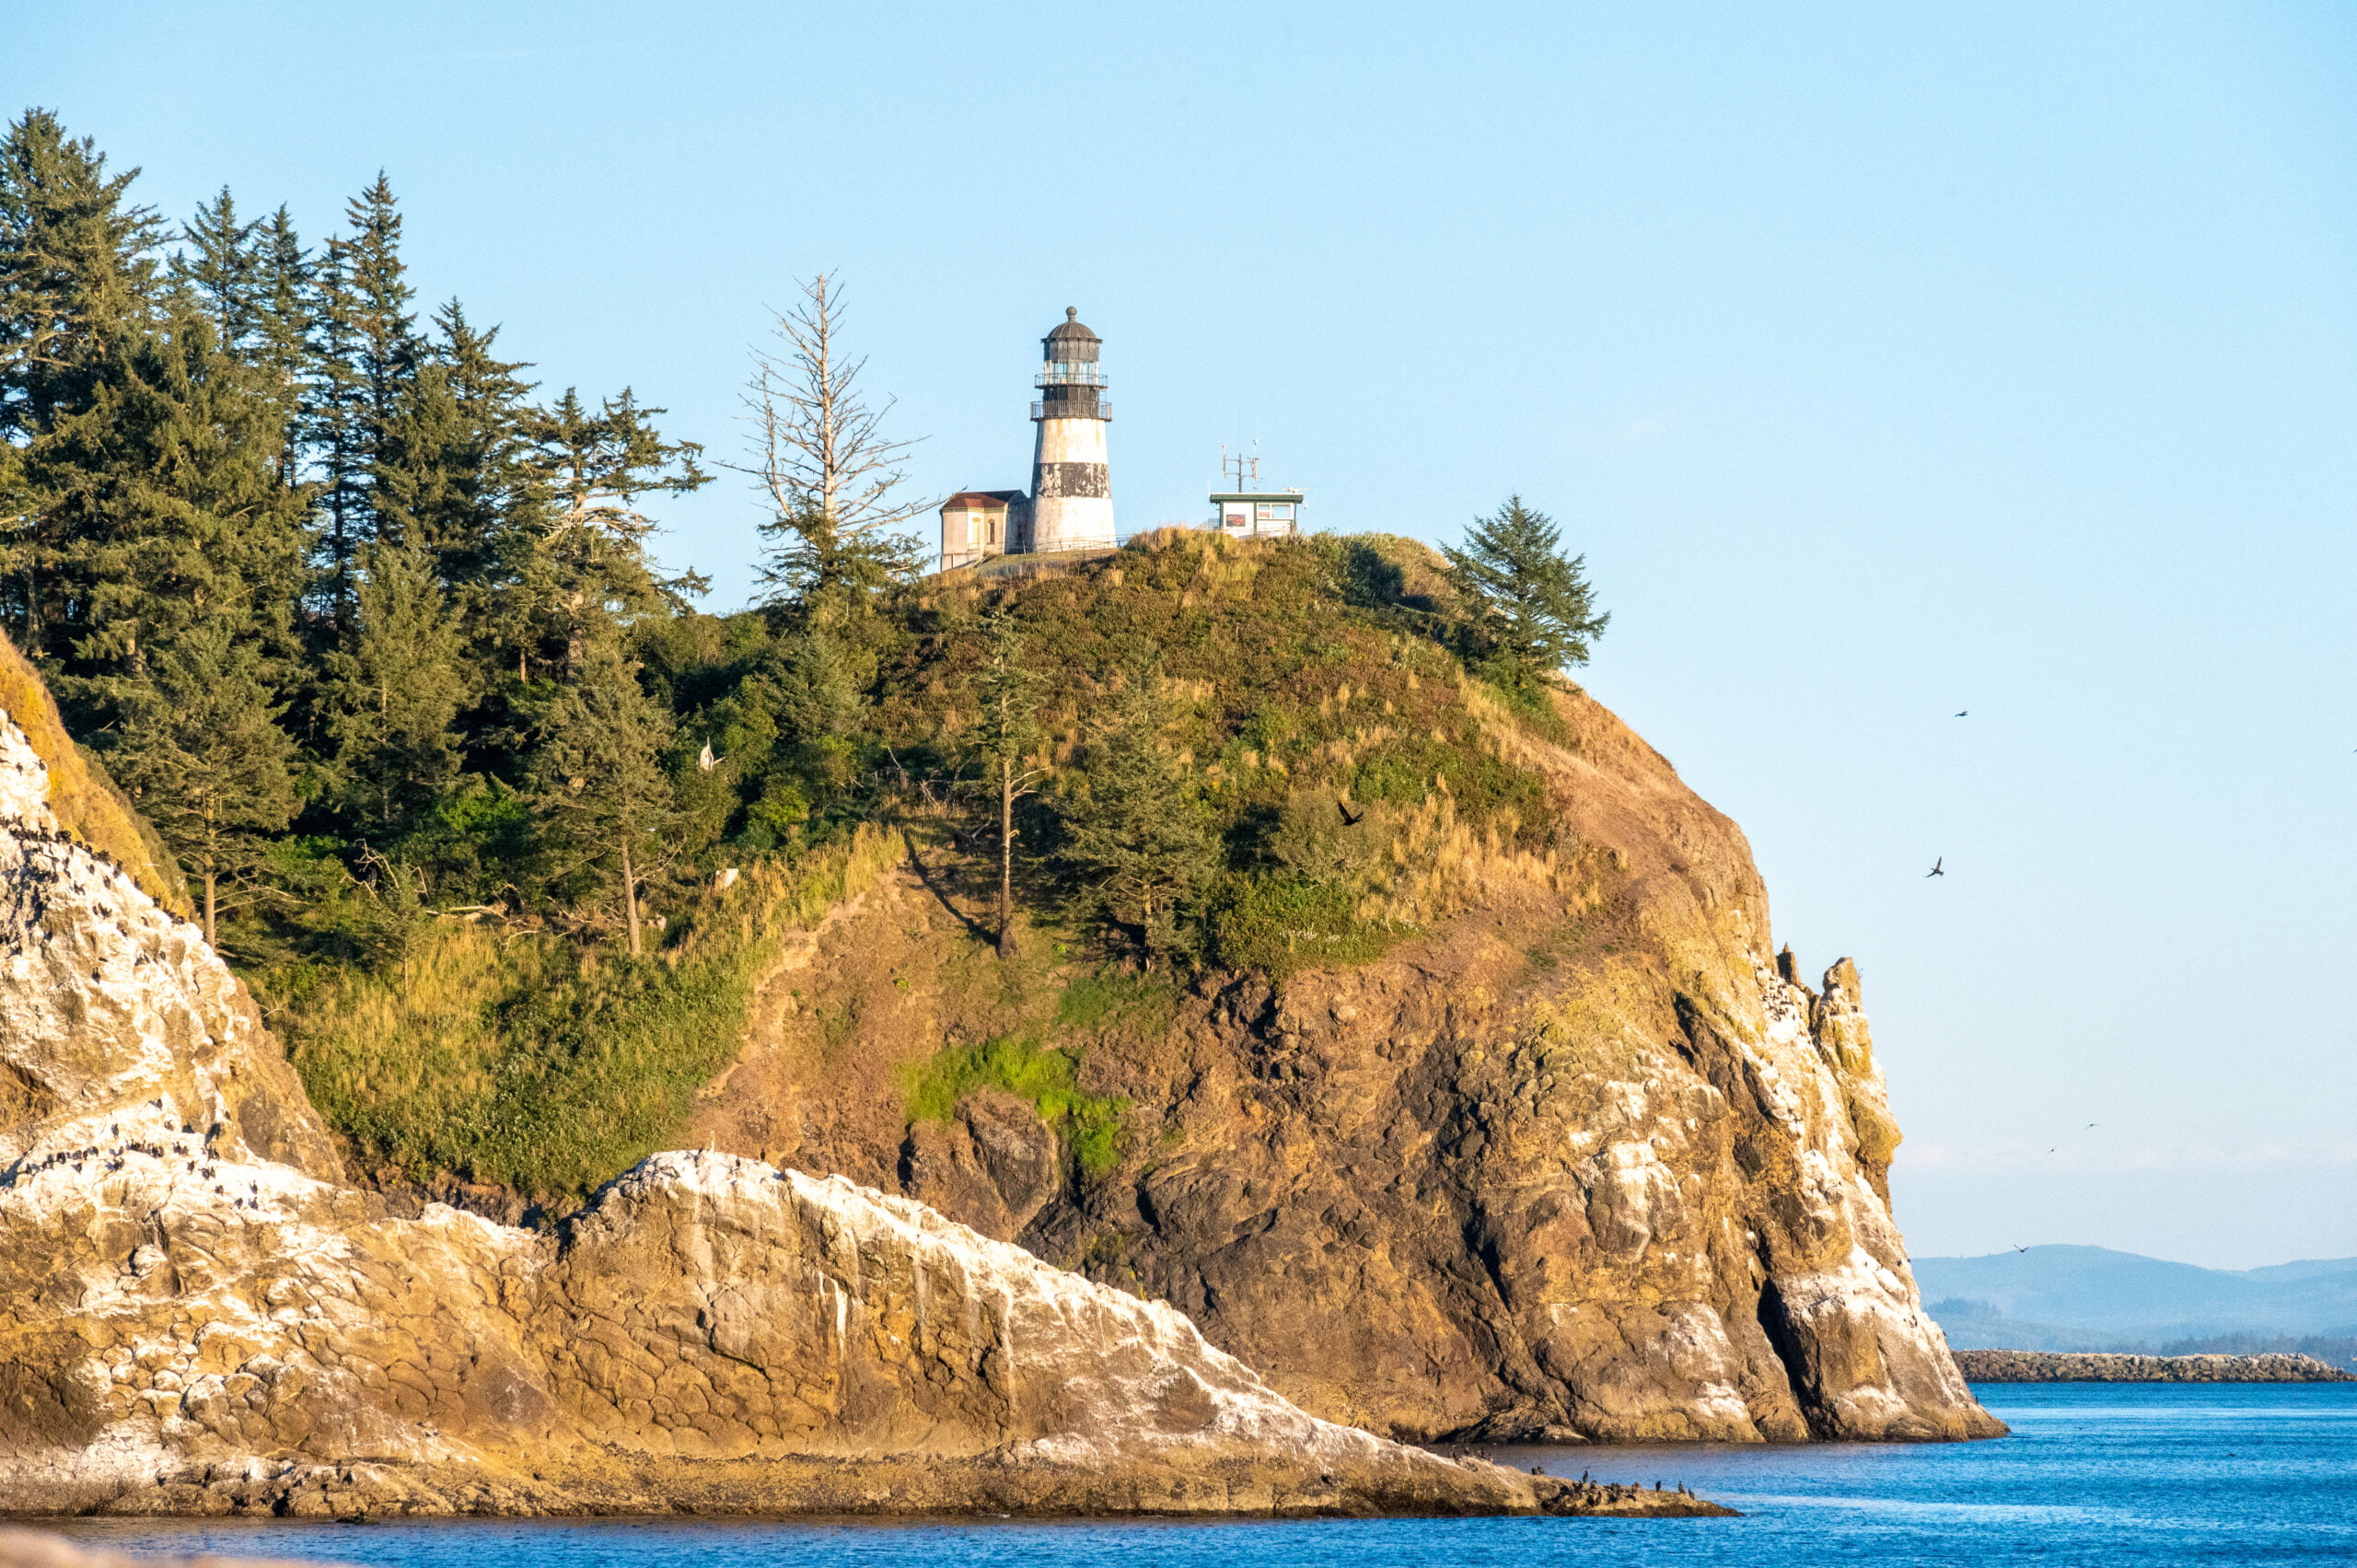
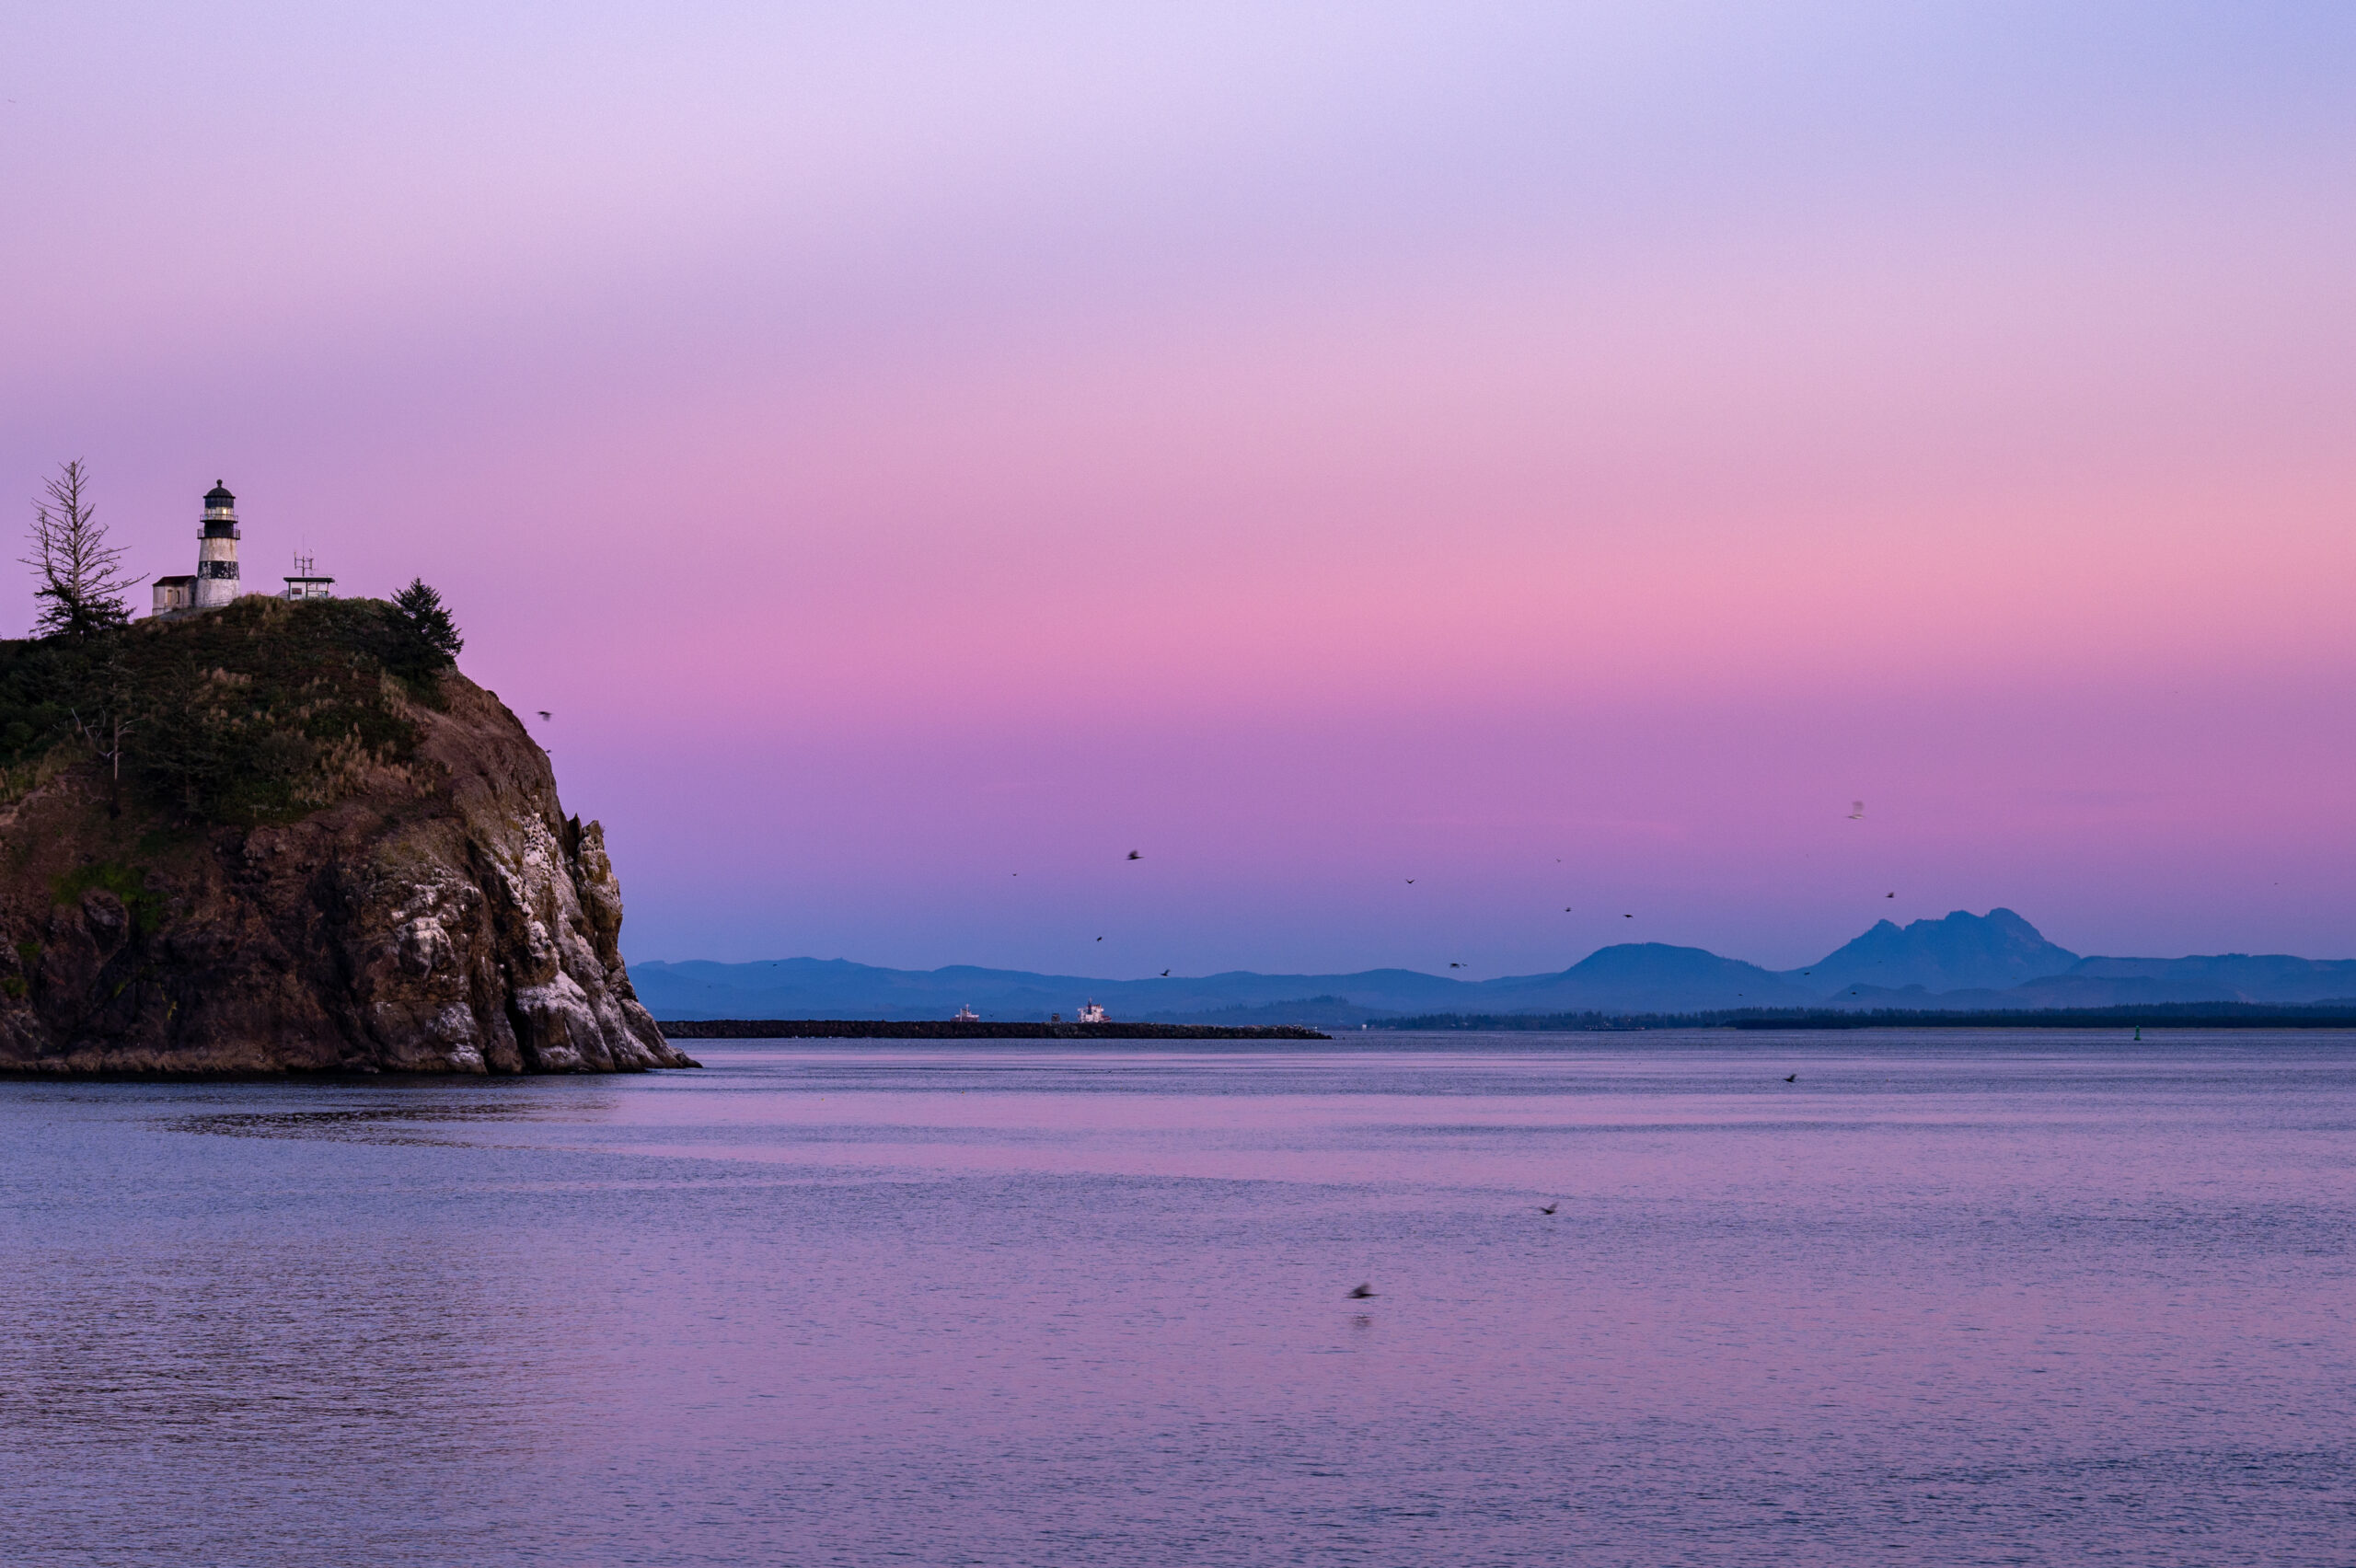
    I know you probably thought Waikiki Beach was only in Hawaii. Me too!  It turns out Washington State also has a Waikiki Beach. If you’ve ever seen the photographs of the enormous waves crashing below the Cape Disappointment lighthouse, this is the beach where those photographs were taken.  The winter storms that hit this part of the coastline are pretty epic.  You most likely won’t catch any wave action like that during the summer but visit October through March, and you’ll have a good chance of seeing this firsthand.

    If you camp in the D Loop area, it’s a short walk to Waikiki Beach. You can also drive to the parking area via North Jetty Rd. There is a lot of parking space, some with views facing the Cape Disappointment Lighthouse. Watch the sunset here while enjoying a warm cup of clam chowder.  That’s what I did! I also saw kids and families building forts out of driftwood on the beach. It looked like a great way to spend a couple of hours creating memories, and there certainly is no shortage of driftwood here!
    Waikiki Beach
    Waikiki Beach in the morning.

    Beard’s Hollow

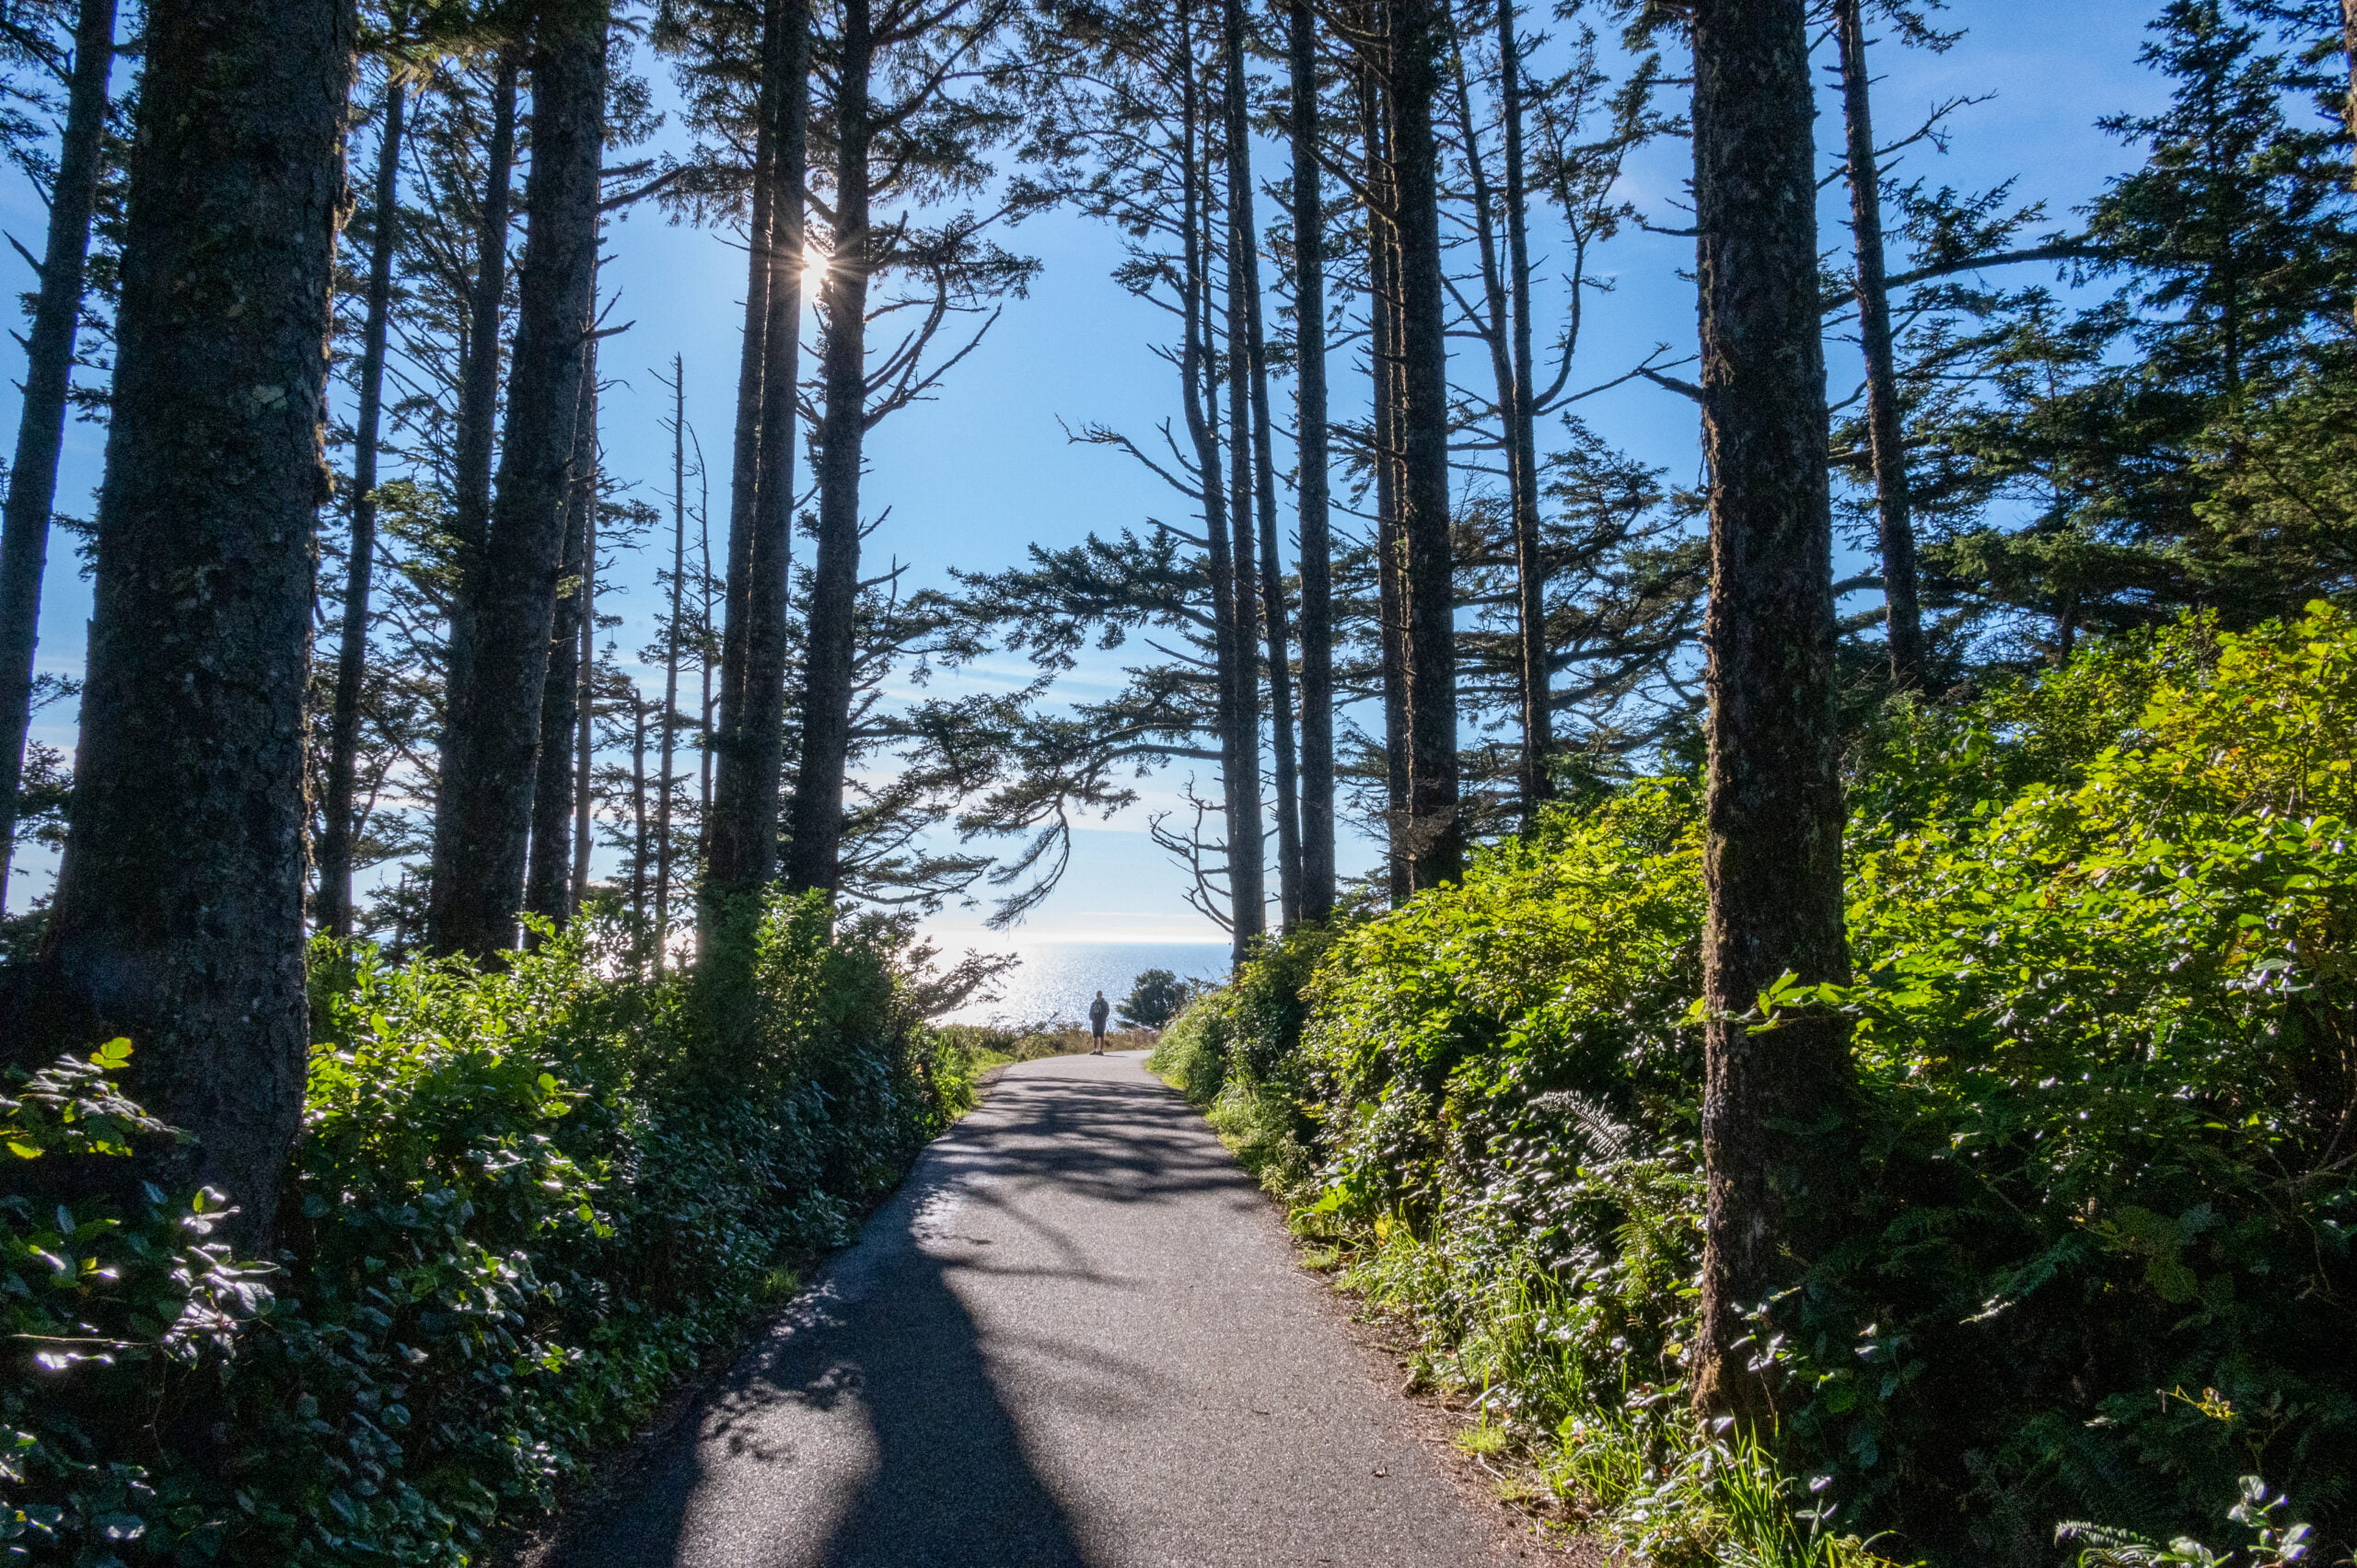
    You may have seen Beard’s Hollow viewpoint on your drive to the main entrance of Cape Disappointment State Park. Drive south about a half-mile past the viewpoint to a turnoff and parking lot for the Beard’s Hollow trailhead. Take the paved path straight ahead of the parking lot to access Beard’s Hollow and the beach.  The path to the right leading over the wooden bridge is for the Discovery Trail. Beard’s Hollow beach allows vehicles, so please be aware as you’re dipping your toes in the surf and sand.

    Isn’t this the perfect kite for the beach?

    2) Metal Detecting

    Cape Disappointment State Park is 1 of around 50 Washington State Parks that allow metal detecting.  You’ll need to complete this form and bring your metal detector. Cape Disappointment has about 240 acres of beach area designated for metal detection.

    3) Trails

    Whether on foot or by bicycle, Cape Disappointment has a lot of great trails. 

    The following trails are accessible from the Cape Disappointment campground.

    • Mackenzie Head
      0.5 mile (roundtrip) This short trail leads you to an old WWII battery and information boards describing its historical significance. It also has a nice view of the forest and ocean. Head toward the main A Loop campground area, and you’ll find a small parking area on the left about 0.5 miles along Fort Canby Rd. 
    • Coastal Forest Loop Trail
      The entrance to this loop trail is near Cafe D. You can take a shorter 0.5-mile loop or the longer 1.5-mile loop. If you take the longer loop trail, there is a 0.1-mile trail with a view of Baker Bay. This trail is typically wet and muddy, so come prepared.
    • North Head Trail
      This 3.0 mile (roundtrip) hike starts opposite the road from the Mackenzie Head trail and ends at the North Head Lighthouse trail area.

    These hikes require driving to the trailhead parking areas:

    • Bell’s View 
      This paved 0.5 mile (roundtrip) trail takes you to beautiful views of the coast as well as passing by more WWII outposts. Learn about the history and the incredible winds that hit this coastline in this short, informative hike. 
    • Beard’s Hollow
      The trail to Beard’s Hollow is a nicely paved trail within Cape Disappointment State Park, suitable for bikes and wheelchairs.  I am not sure of the actual mileage of this trail. It was a 10-minute leisurely pace to the beach along this mostly flat trail, and I’d guess maybe 0.3 miles each way.
    • Discovery  Trail
      Starting from the North Head Lighthouse Parking area, this 7.3 mile (one-way) trail takes you to the town of Long Beach, with lots of beautiful views along the way. (You can also start this trail from the Beard’s Hollow Parking area, shortening the hike to 6.3 miles. However, I think this trail is best on a bike — see #6.)

    4) History

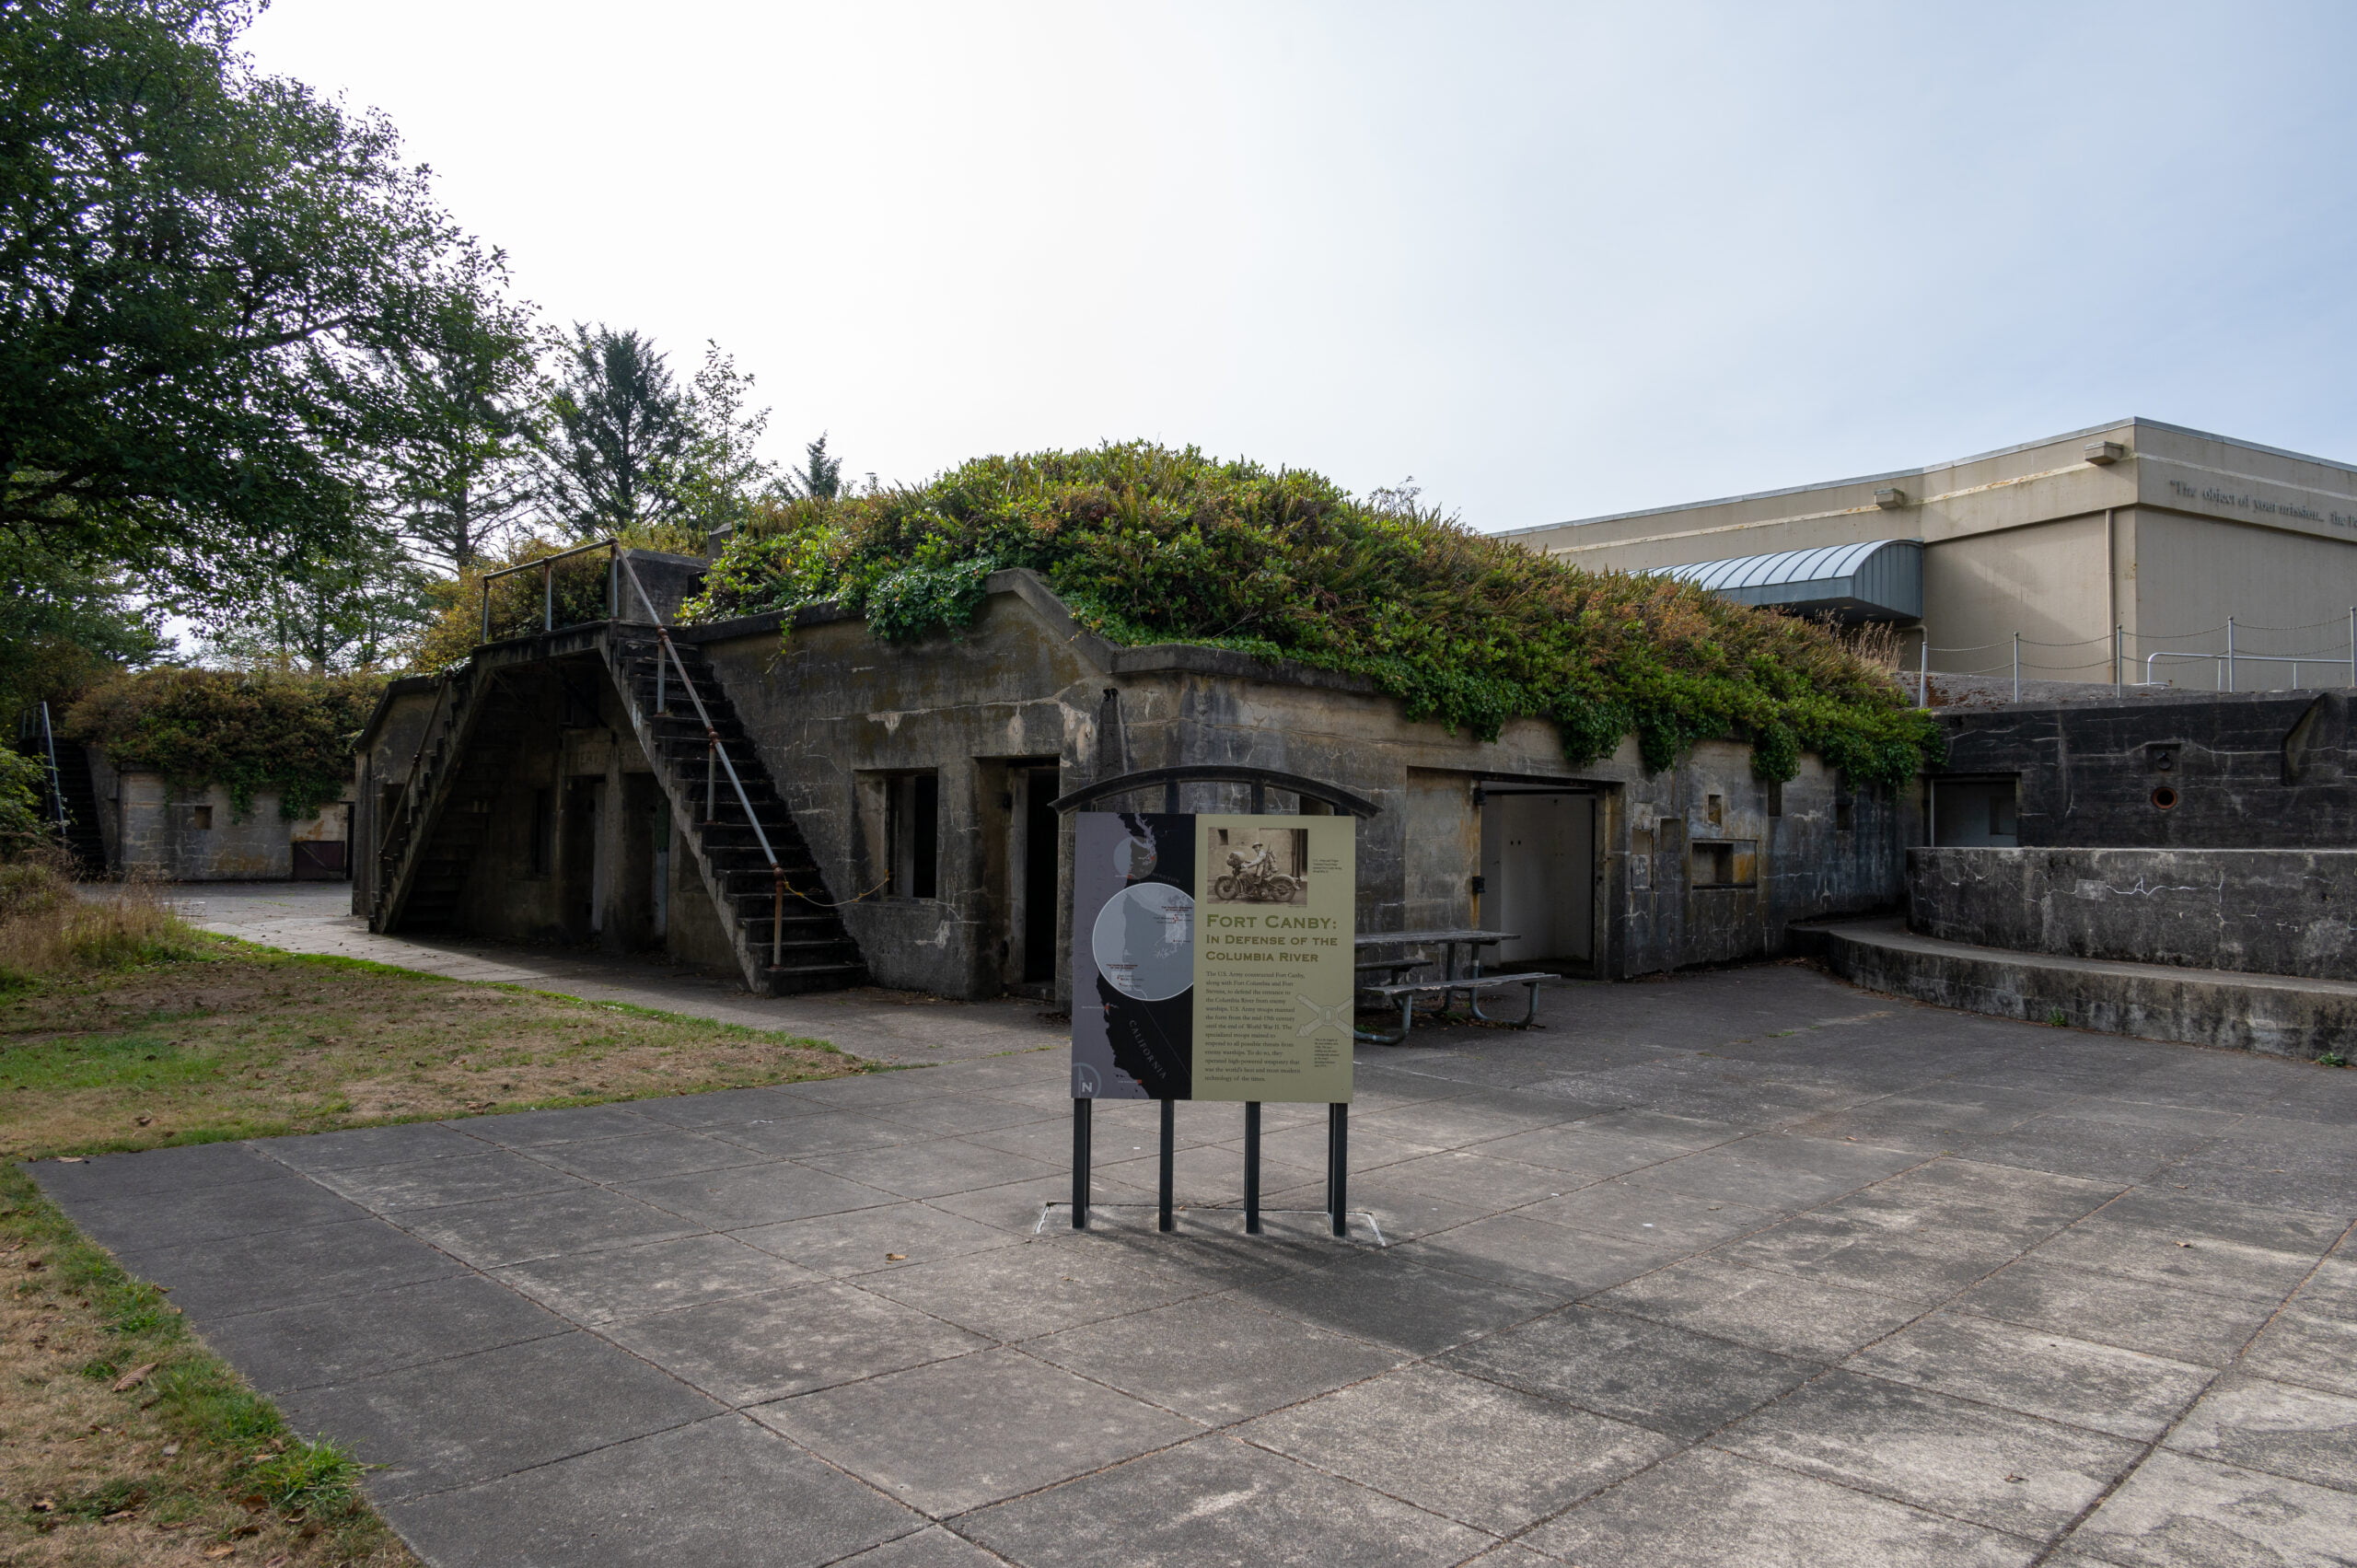
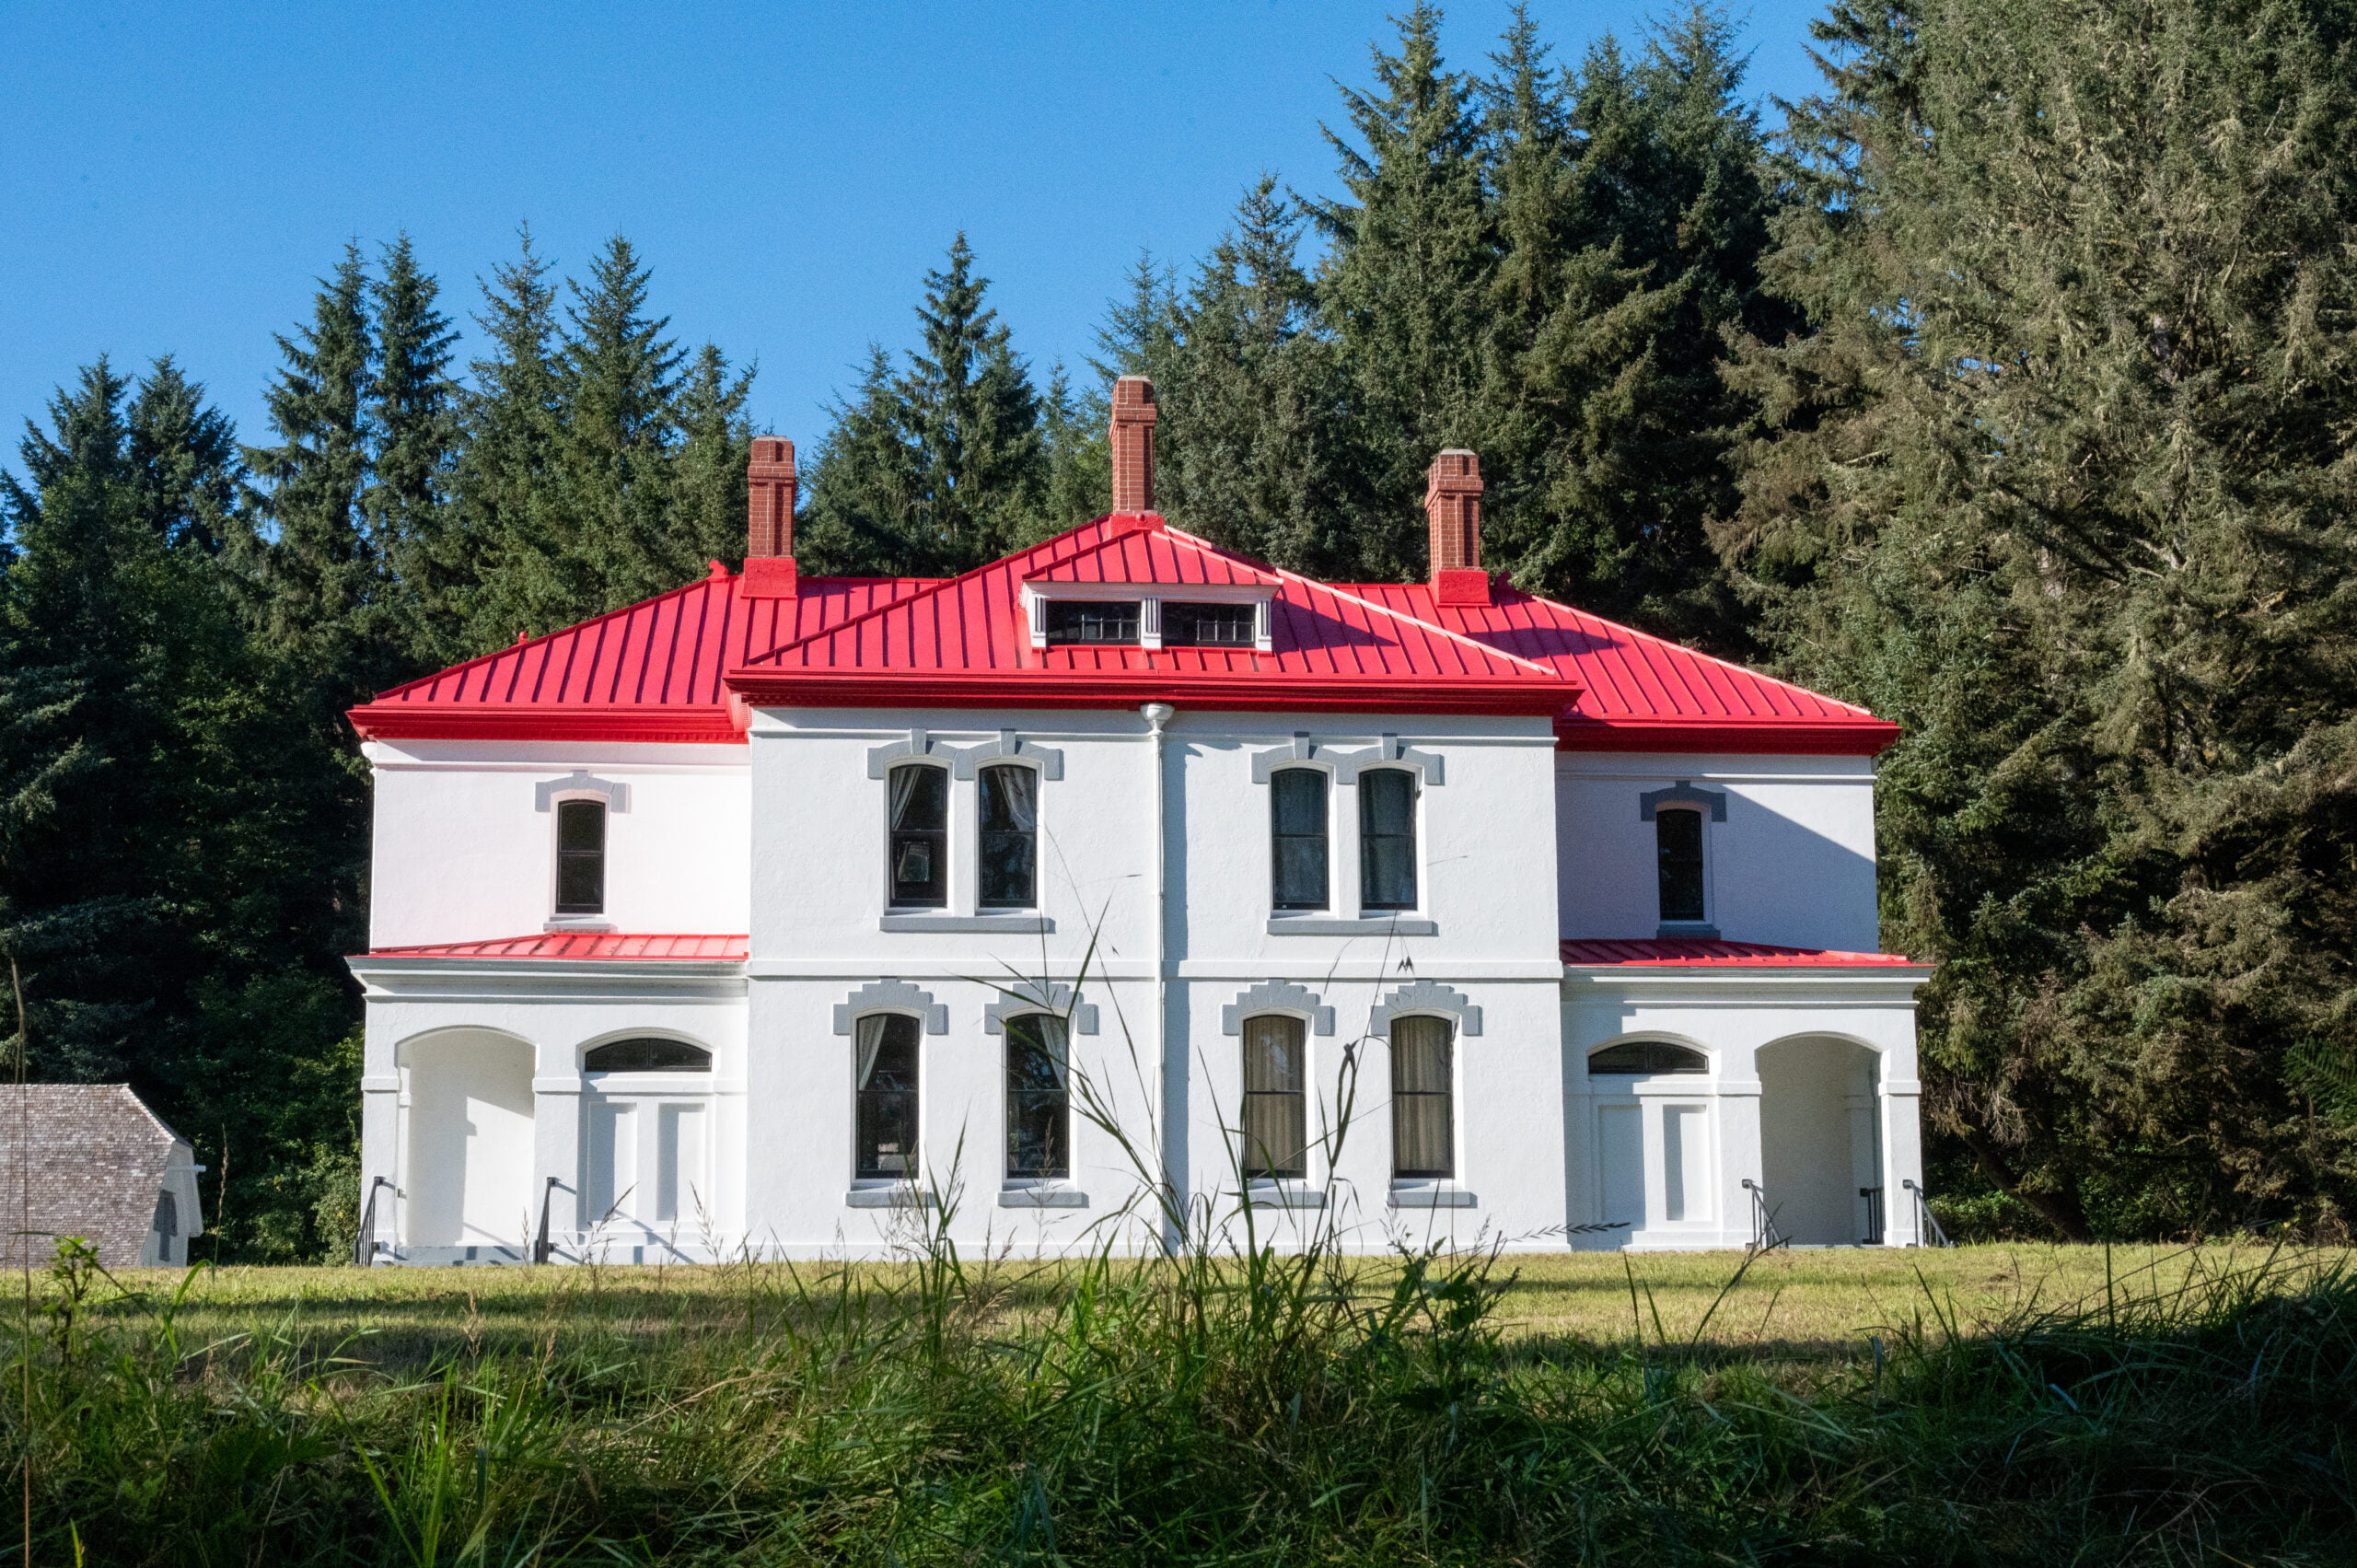
    In addition to seeing WWII sites along the trails, you can also visit Fort Canby and explore what’s left of this historical site. You can also tour the Lewis & Clark Interpretive Center and learn about two of our most famous explorers–Lewis and Clark! 

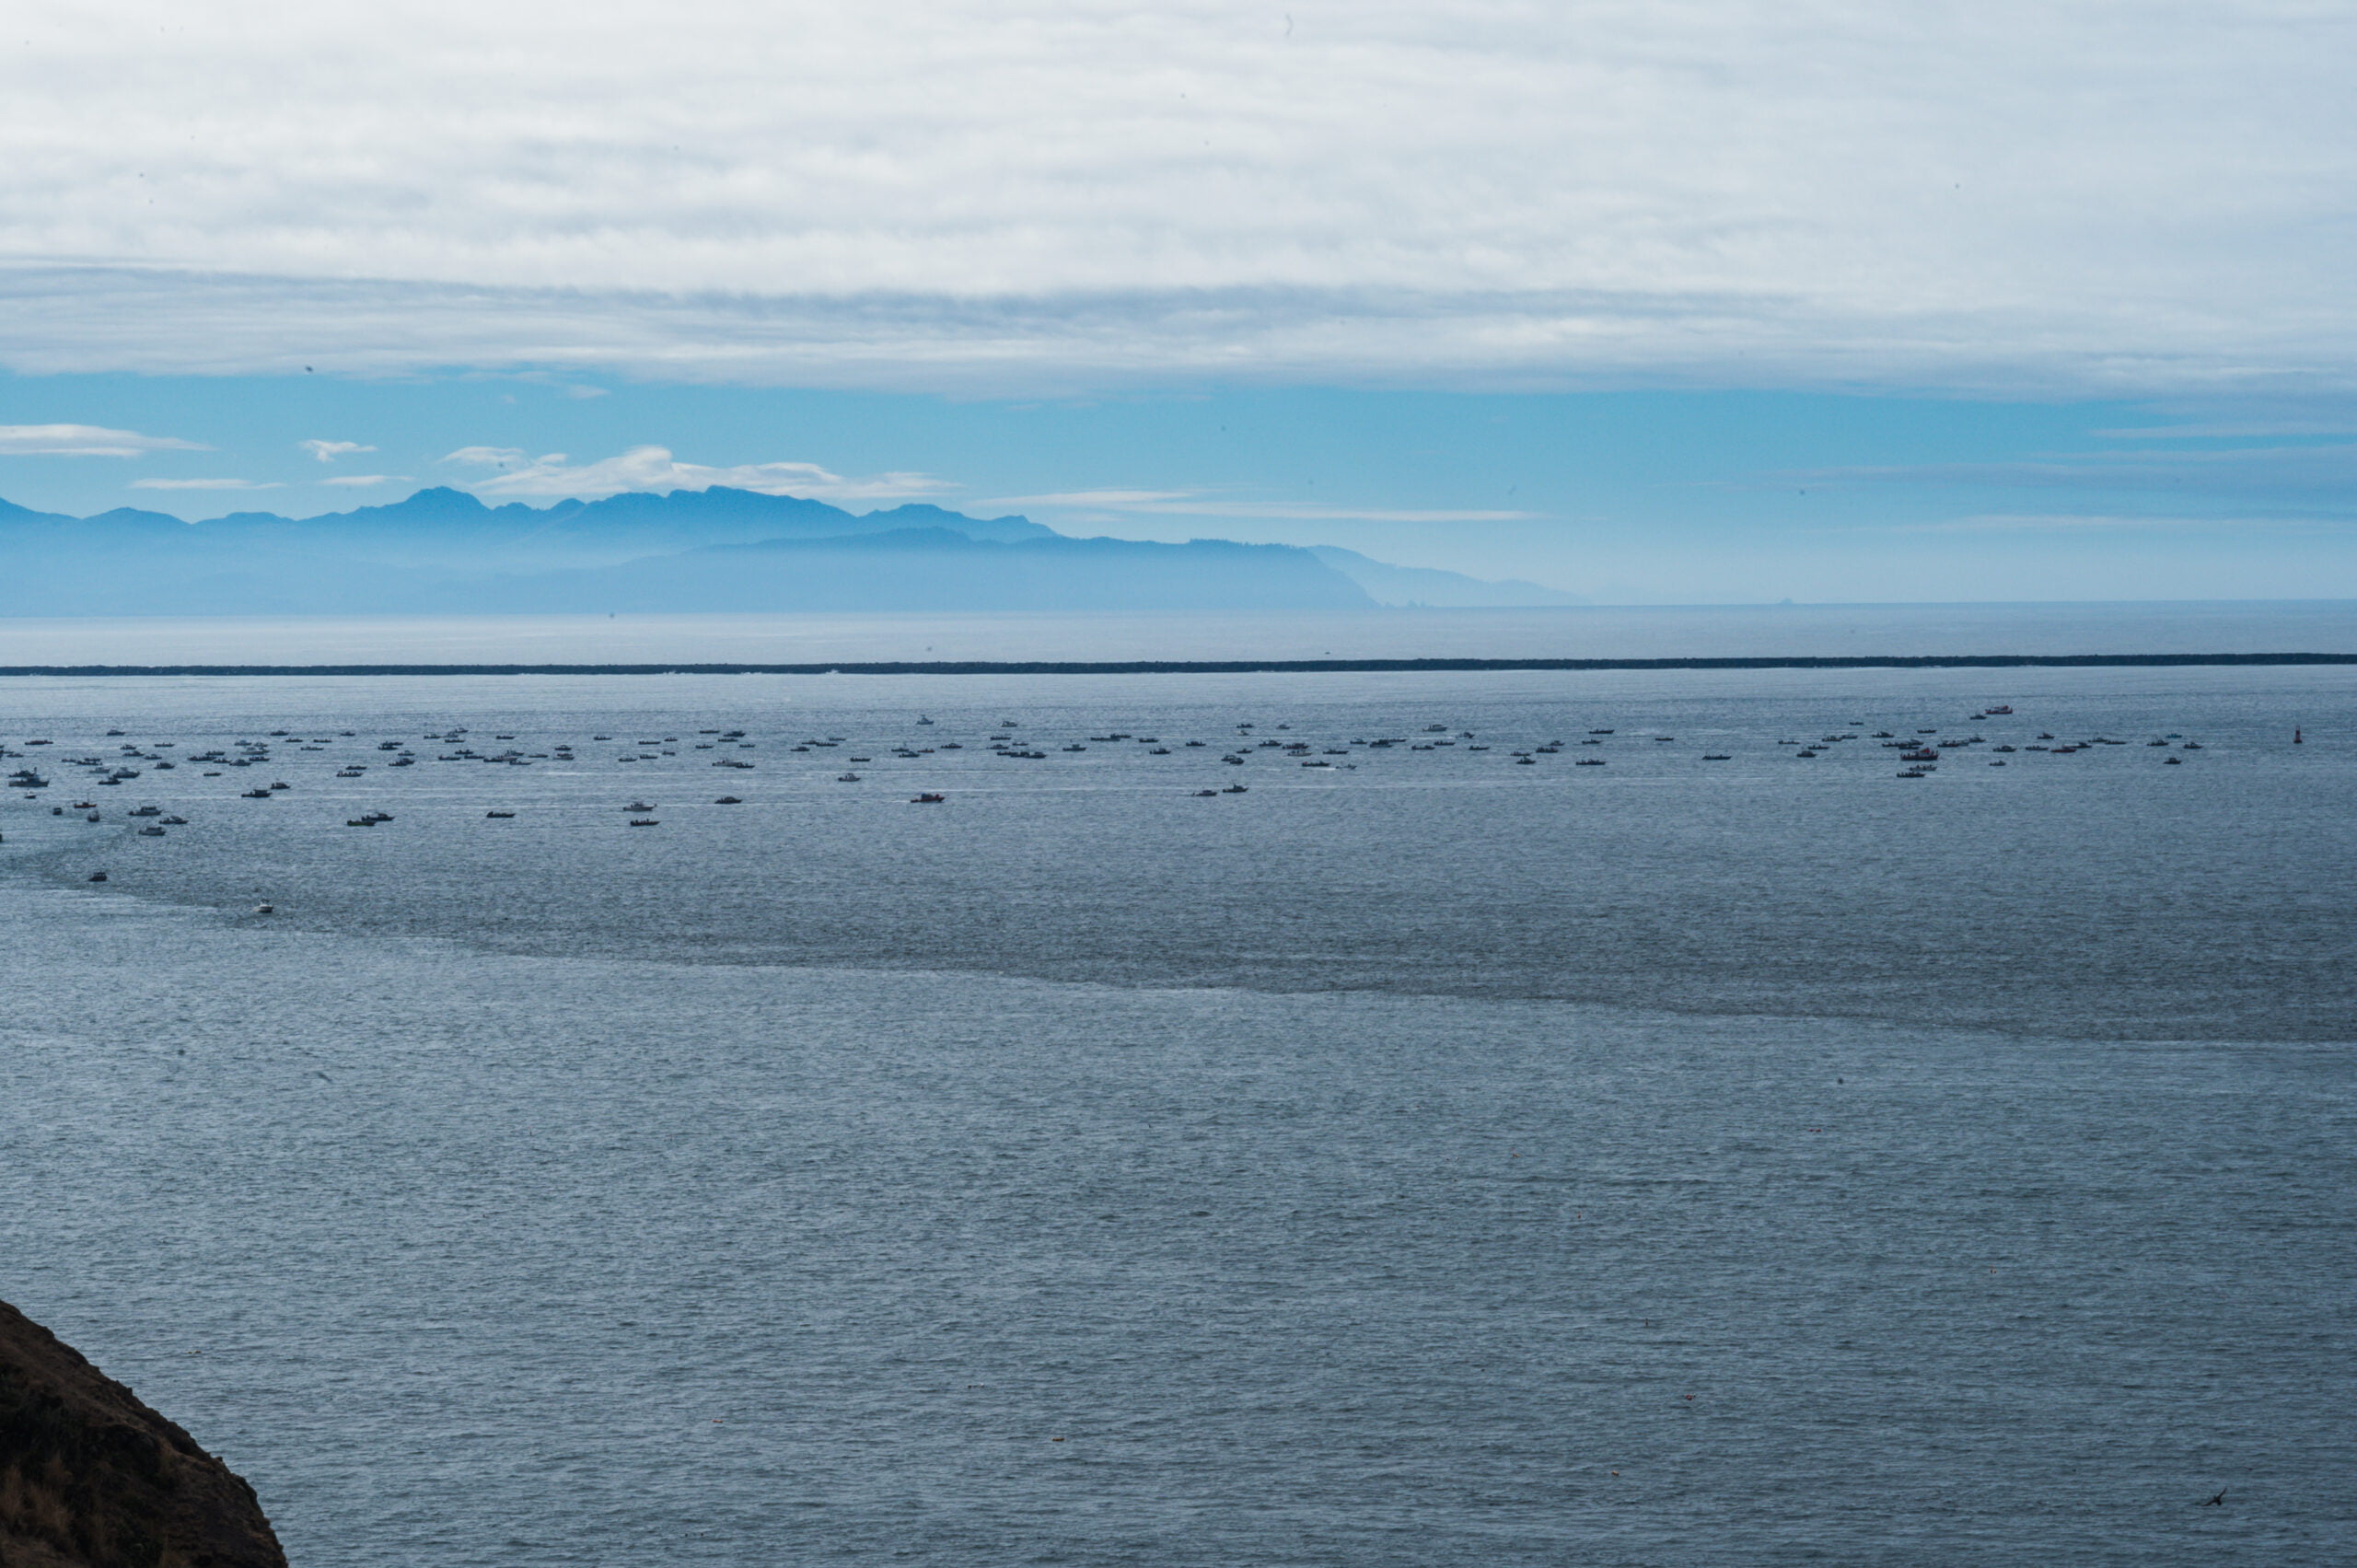
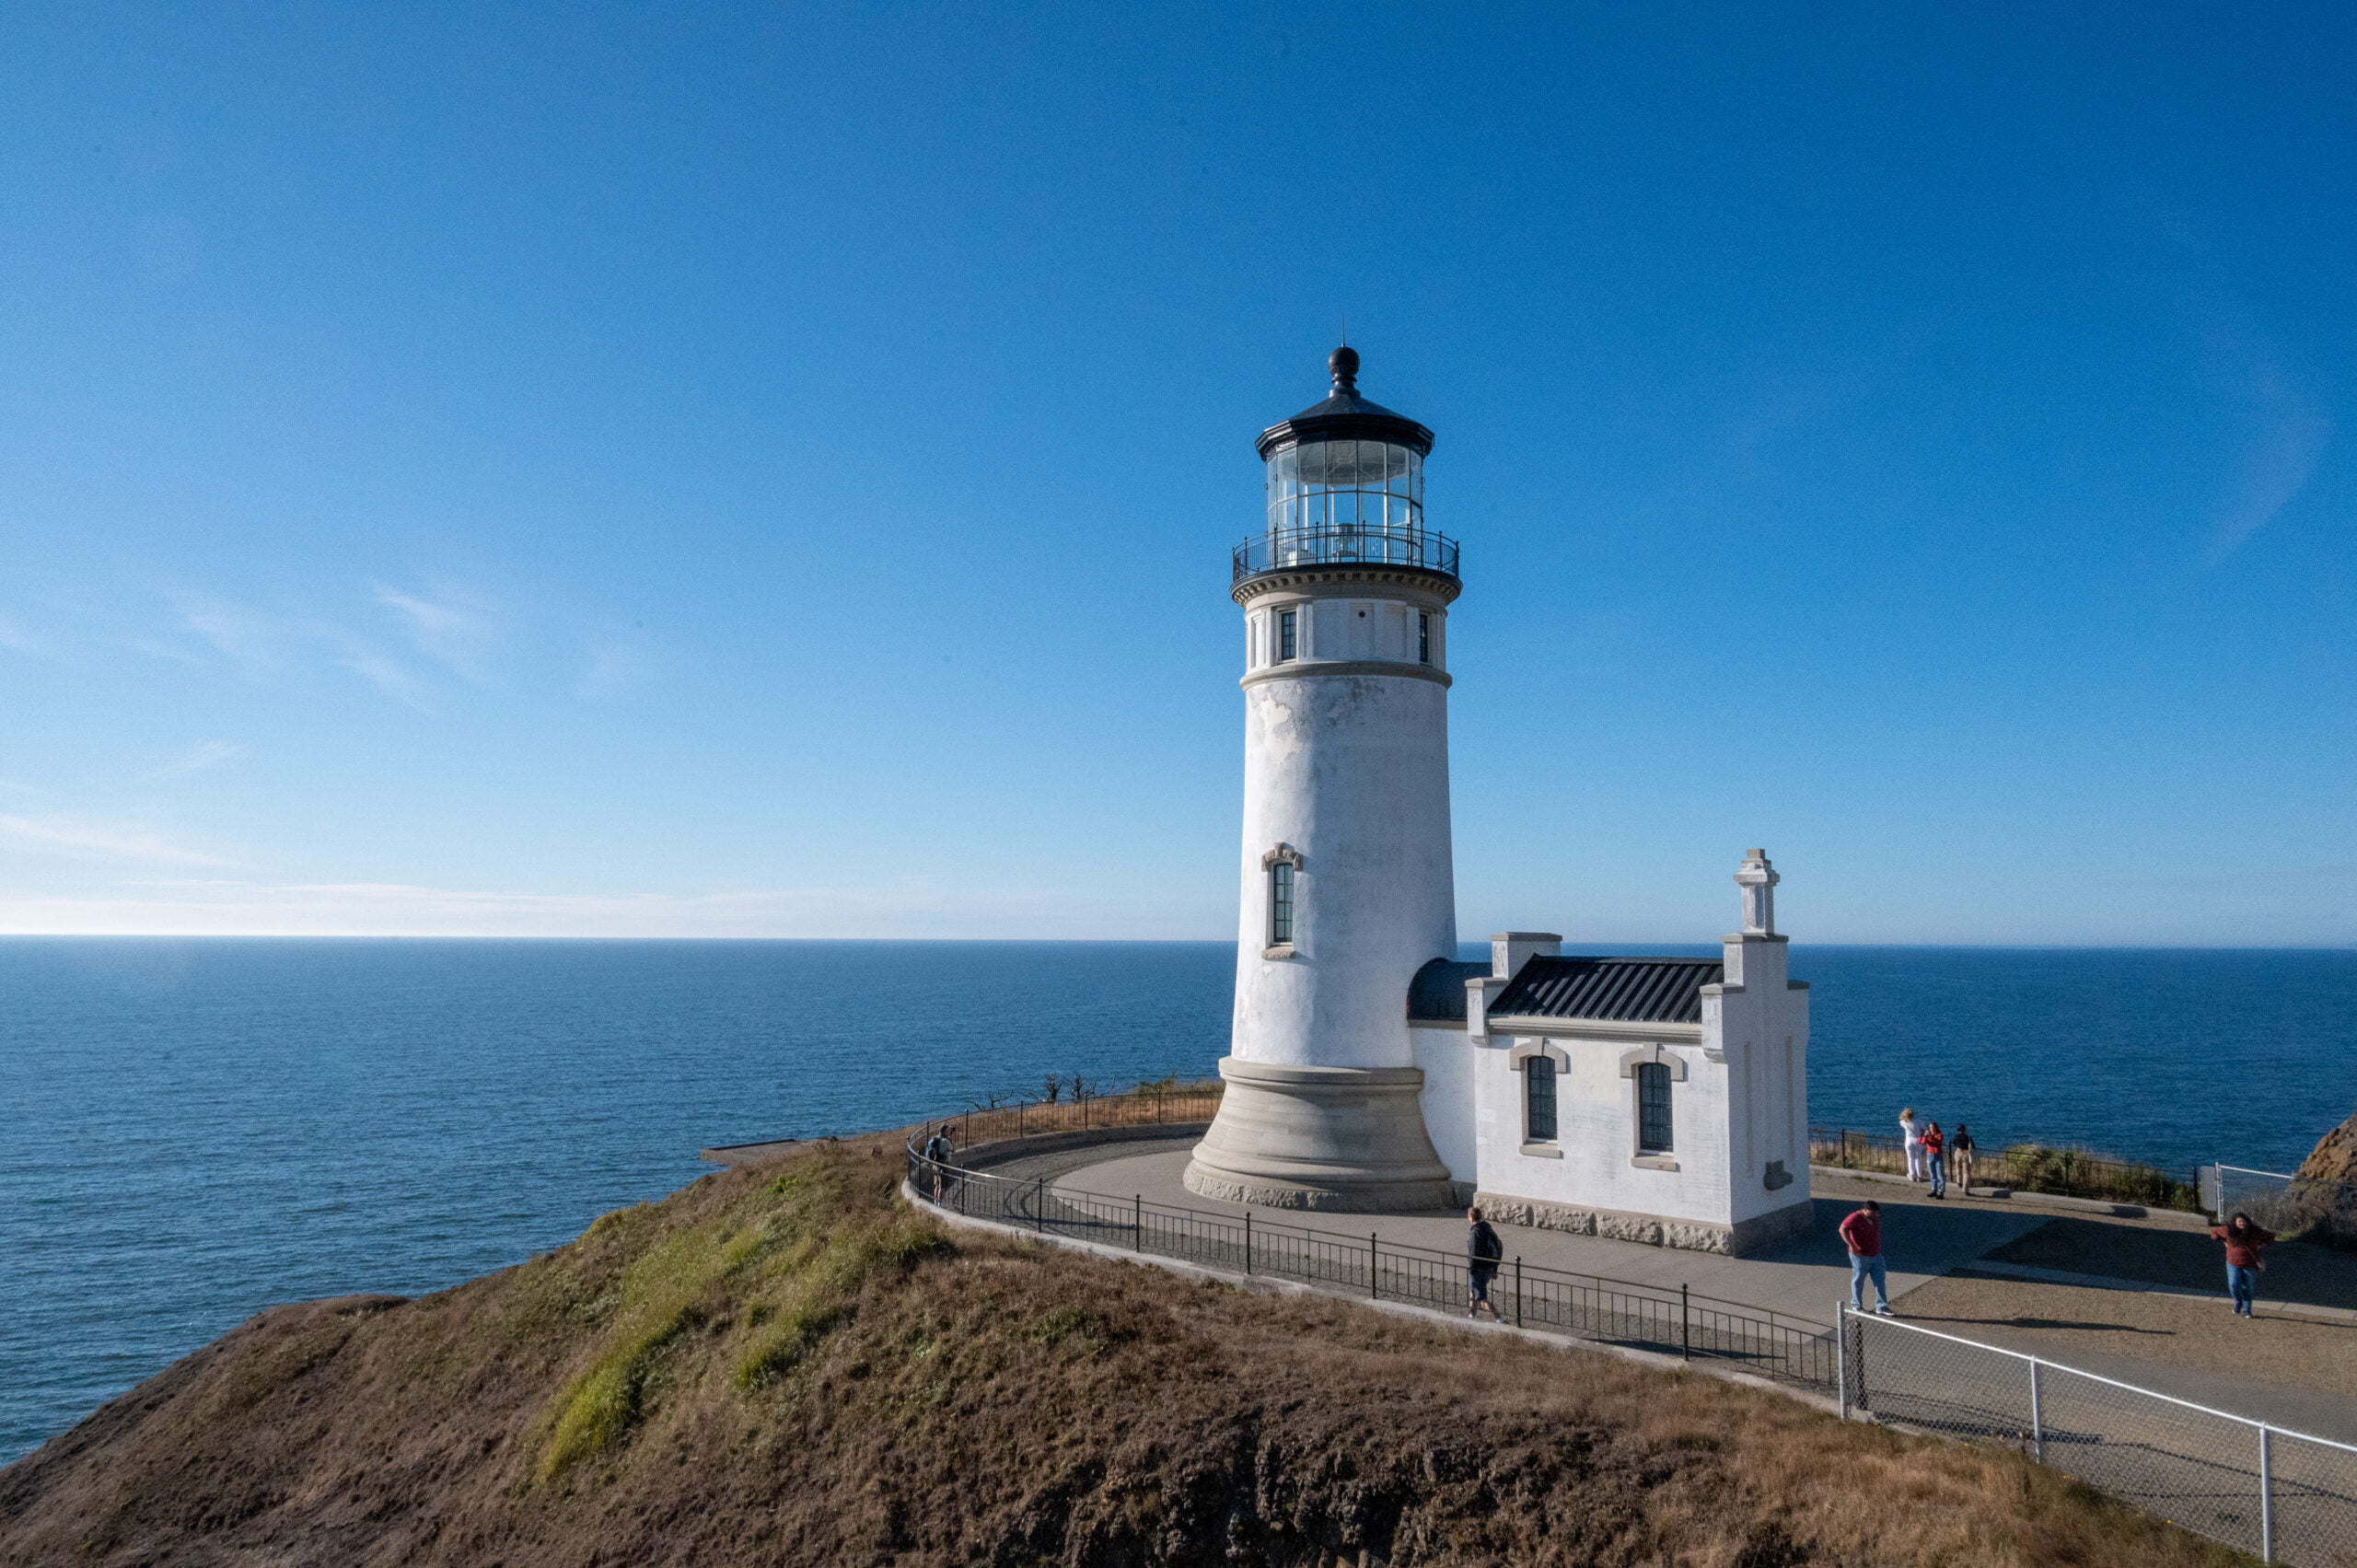
    The Lewis & Clark Interpretive Center is worth a stop, even if you aren’t sure about the historical exhibits.  Why? Because of the views!  The path in front of the interpretive center is one of the best spots in Cape Disappointment State Park to see where the Columbia River meets the Pacific Ocean.  It also offers a much closer view of the Cape Disappointment Lighthouse. 

    Fort Canby
    Fort Canby

    I think we stood along the viewpoint area in front of the Lewis and Clark center for at least 30 minutes, just seeing what we could see.  We watched double-crested cormorants as they searched for food, diving from the cliffs to the water and back again. Then we counted the 100’s of boats just past the line in the water created by the convergence of the Columbia River and the Pacific Ocean. 

    If that weren’t enough, though, the Interpretive Center is full of fascinating history and facts about lighthouses and early explorers.  The upper floor is free and worth taking a look around, and it has huge windows with views of the lighthouse and ocean.  

    Additionally, you can pay $5 to see the entire exhibit, which starts on the basement level. There is a wonderful video about Lewis & Clark’s incredible 4,000+ mile journey to come to their stopping point at Cape Disappointment.  I heard a small boy exclaim to his parent as he watched the video, “That’s here, that’s where we are!”  I saw history made real to him as he watched the video about Lewis & Clark’s journey.  That’s what it’s all about!

    Lewis & Clark Interpretive Center

    244 Robert Gray Drive Ilwaco, WA
    Ilwaco, WA 98624-8624

    Phone: (360) 642-3029

    5) Lighthouses

    Cape Disappointment State Park has two lighthouses within its borders.  This stretch of coastline was so dangerous they built not one but two lighthouses! I love looking at lighthouses. Their architecture and beautiful locations never disappoint (see what I did there). 

    During my visit, I learned that lighthouses were the original GPS. They not only emit light to keep ships from running ashore, but each one is uniquely painted, and they each emit a specific light pattern.  Sailors use these two distinguishing features to help them know where along the ocean they were. Pretty cool, right!

    Cape Disappointment Lighthouse 

    This is the lighthouse you see in the photos taken from Waikiki Beach.  It gets the huge waves crashing at its base during the winter. You can no longer access the lighthouse, but you can see it from both Waikiki Beach and in front of the Lewis & Clark Interpretive Center.

    North Head Lighthouse 

    Constructed in 1898 after continued shipwrecks along this rocky coast demonstrated the need for a second lighthouse.  The North Head Lighthouse is still used to aid in navigation today. It was currently closed for tours during my visit, but I’m optimistic it will reopen to the public again soon. The paved trail to the lighthouse is a beautiful walk, and you pass by the guesthouse for the Lighthouse Keeper.  You can stay here by reserving it online through the WA State Parks website.  Now wouldn’t that be a unique experience!

    North Head Lighthouse Cape Disappointment

    6) Cycling

    There are plenty of paved roads within the main campground areas for families to enjoy biking in a low-traffic area.  However, for a real adventure, consider cycling the Discovery Trail.  

    The Discovery Trail is a mostly paved 8.5 mile (one-way) trail that stretches from Cape Disappointment State Park to the town of Long Beach!  There are viewpoints along the route, historical markers, and even art sculptures to enjoy.  It is a beautiful trail, and even if you don’t feel like making the entire 16-mile round trip consider cycling at least a portion of the trail.  Here is a trail map that gives you an overview of the Discovery Trail route.

    Start the trail from the North Head Lighthouse parking area and ride toward Long Beach as far as you feel like, or if you have someone to drop you off, you could do a one-way shuttle. You could start in Long Beach and then cycle south back to Cape Disappointment State Park. No matter what you choose, you’ll enjoy this beautiful trail!

    crab on Beard's Hollow Beach

    7) Fishing

    You can go fishing and boating at Cape Disappointment State Park.  Although, if it were me, I think I’d try my hand at crabbing.  There were so many Dungeness crabs washed onshore here it made me hungry! 

    Fishing from the shore is allowed, but you can also bring a boat if you have your own. The Baker Bay Boat Launch is next to Cafe “D,” just across from the park’s main entrance. 

    Make sure to have all the appropriate licensing required for boating and fishing. Plus, you’ll want to check with the Washington Department of Fish & Wildlife to see what is currently open and allowed.  Some years the biotoxin levels close fishing here. 

    North Head Lighthouse Keeper's House

    Accommodations at Cape Disappointment

    Camping

    The best tent campsites are sites 1-180 toward the rear of the park.  There are a few tent sites in the D Loop near the main entrance, but these have less privacy and more road noise.  We ended up staying in one of these and could hear the loud ship horns and road traffic throughout the night.  There are also a lot of RV campsites, including those with full hookups.

    Rentals

    In addition to campsites, Cape Disappointment State Park also has cabinsyurts, and two vacation houses for rent. 

    Getting to Cape Disappointment State Park

    Cape Disappointment is a little over a 3-hour drive from Seattle, Washington, and a 2-hour drive from Portland, Oregon.

    You’ll either take Hwy 101-S from the Seattle area or Hwy 101-N if coming from the south/Oregon.

    For some reason, Google directions take you to the general area of Cape Disappointment State Park rather than to the entrance of the park.  So, the easiest way to get to the campground entrance and park’s pay station for Cape Disappointment State Park is to navigate to Cafe “D,” located directly across from the park’s main entrance.

    Cafe “D” Address: 243 Robert Gray Dr, Ilwaco, WA 98624

    Besides being a waypoint to the entrance of the park, Cafe “D” also offers Wi-Fi, miscellaneous camping supplies you may have forgotten, as well as ice cream cones and coffee.

    Cape Disappointment Sign

    ADA Accessibility

    The following had paved trails and parking areas suitable for walkers and wheelchairs.

    • The North Head Lighthouse trail
    • Lewis & Clark Interpretive Center and viewing area that looks at Cape Disappointment Lighthouse
    • Bell’s View
    • Beard’s Hollow (the paved trail ends at the beach)
    • Beard’s Hollow Viewpoint (parking area with an overlook)
    North Head Lighthouse Trail

    Restaurants to Try Near Cape Disappointment

    The Chowder Stop (Makes great chowder and can easily pack it to go too.)

    The Chowder Stop
    203 Bolstad W, Long Beach, WA 98631

    42nd Street Cafe and Bistro (Amazing breakfasts here, plus they serve beignets!)

    42nd Street Cafe
    4201 Pacific Way, Seaview, WA 98644

    The DEPOT Restaurant (If you eat out only once, make it The DEPOT Restaurant. Reservations required, but they can often squeeze you in same day if you call ahead.)

    The DEPOT Restaurant
    1208 38th Pl, Seaview, WA 98644

    Roots Drive-Thru Coffee (This is small coffee shop is in Ilwaco just outside the park boundary. It’s a quick drive in the morning to get your coffee fix!)

    Roots Coffee
    111 First Ave N, Ilwaco, WA 98624

    Weather at Cape Disappointment

    The weather at Cape Disappointment could be the best reason to call it such a name. It is the stormiest stretch of coastline, with hurricane-force winds during the winter and unrelenting rain. If you plan to tent camp here, I highly recommend you look ahead to the weather forecast before deciding to come. 

    I do not enjoy tent camping in the rain.  Rain and wind at Cape Disappointment can make tent camping miserable or, should I say, “disappointing.” You may decide a cabin or hotel in town would be better if your forecast appears to be stormy and grey.

    I used my new Coleman 4-Person Pop-Up Tent, and it did fine with the light rain we received early in the morning, however anything more, and we’d have had wet gear, I think. So plan to spray your tent ahead of time with waterproofing spray and pack some waterproof jackets for exploring.

    Sunset by Cape Disappointment Lighthouse

    Final Thoughts

    I loved visiting Cape Disappointment State Park! There is so much to do along the Long Beach Peninsula outside the park too. Washington State has some of the most beautiful coastline. I enjoy every opportunity I get to explore it.  I hope you will get a chance to visit here soon. Let me know if you have any questions regarding this area or if there’s a favorite activity here that I missed. 

    Here are a few articles that might interest you:


    Note: Travelffeine is reader-supported. This post contains affiliate links. When you make a purchase using one of these affiliate links, we get paid a small commission at no extra cost to you. And as always, all opinions are our own. Thank you!


    Happy Exploring!

    Cape Disappointment State Park
    North Head Lighthouse at Cape Disappointment
  • How to Easily Make French Press Coffee

    French Press coffee is one of the simplest ways to brew coffee, but it can be a little intimidating when you’re first getting started. I know my first attempts ended in bitter and acidic coffee that was not enjoyable to drink. However, with a few simple steps, I learned to make delicious French Press coffee in only about 5-minutes! It really is so simple, and it tastes great!

    So when a friend recently asked me how to make coffee in her new French Press, I decided to create this easy guide for how to brew French Press coffee to help her and others who are beginning their journey using this classic coffee maker.

    What You Need to Make French Press Coffee

    First things first, let’s go over what gear you need to brew French Press coffee.

    In the step-by-step instructions, I explain how to make French Press coffee if you are missing some of the gear.  For example, let’s say you have a French Press, but don’t have a hot water maker with a temperature gauge or a kitchen scale, don’t worry, you can still make French Press coffee.  I highly recommend you get the additional gear, as it makes a big difference in the quality. That said, it’s not a requirement.

    • A French Press(You can purchase in various sizes, a popular option is this 34oz Bodum.)
    • Freshly Roasted Coffee Beans (Quality coffee beans really do make a huge difference!)
    • Burr Grinder (Grinding your coffee right before brewing ensures the best flavor.)
    • Water
    • Wooden Spoon or Chopstick (most French Presses are made of glass, so a metal stirring utensil is not recommended.)
    • Kitchen scale (This is to weigh your coffee to get the best coffee to water ratio.)
    • Hot Water Kettle

    How to Make French Press Coffee

    Essentially brewing coffee with a French Press is as easy as adding coffee grounds and hot water to your French Press, waiting 4-7 minutes, pushing down the plunger, and voila! You’re ready to drink your coffee! However, small but important details like how much coffee to water you should use and getting the right temperature can make all the difference in getting it right.  The components that really set apart a good cup of French Press coffee are quality coffee beans, proper grind, water to coffee ratio, and brew time. So let’s get started!

    Here are the step-by-step instructions for how to make French Press coffee.

    Step 1: Heat Your Water

    If you have a hot water kettle that allows you to set the desired temperature, then set it to 200 degrees Fahrenheit. This is a good starting point. I use anywhere from 200ºF-205ºF when brewing French Press coffee. 

    If you don’t have a temperature gauge, then heat your water to boiling and remove from the heat for 1-2 minutes.

    Step 2: Pre-Heat Your French Press

    Fill your French Press with hot water to pre-heat it. Use hot water from the tap or take some water you boiled and swirl it around the carafe with the lid on to warm the glass. This way, when you add the water for brewing, your carafe isn’t cold and won’t affect the brewing temperature of your coffee.

    Step 3: Measure & Grind Your Coffee Beans

    When brewing coffee with a French Press, I found the 1:15 water to coffee ratio to be the best.  I’ve tried a 1:13, and it is too weak. 1:15 seems to be the sweet spot.  Use 1 gram of coffee per every 15 grams of water. Here are some of the amounts I use depending on how many cups/ounces I brew.

    • 12 ounces of water: 23 grams of coffee (size of my travel French Press)
    • 34 ounces of water: 64 grams of coffee (size of my regular household French Press)

    If you don’t have a coffee scale, the approximate amounts in cups are as follows:

    For a 12 oz French Press (Single-Serve French Press), I use 23 grams of course ground coffee, which equals about ⅓ cup.

    For my larger 32 ounce French Press, I use 63 grams of coffee which equals a heaping ¾ cup of coffee.

    Coffee Grind Size

    Grind your coffee to a coarse size about the size of sea salt crystals. I use the second notch of the course setting on my burr grinder.

    Step 4: Add Coffee & Water to Your French Press

    After you’ve ground and measured your coffee, empty any water in your French Press that you used to pre-heat it.  Then add your coffee to the French Press and give it a little shake to even out the coffee grounds.

    Pour in your hot water up to the silver line on your French Press. This usually sits about 1-2 inches below the top. I recommend you measure out how much water your French Press holds ahead of time so you’ll know exactly the water to coffee ratio needed.

    Gently stir it with a wooden chopstick or spoon before placing the French Press lid and plunger, so it is just resting on top with the plunger pulled all the way up. It should not be pushing down on the coffee at this point.

    Travel Size French Press

    Step 5: Wait for Your Coffee to Brew

    Set a timer for 4:00 minutes.  Typically, anywhere between 4-7 minutes will produce a medium to strong flavored coffee.  I prefer 4-minutes for a dark roast like this Portofino Blend and 5-6 minutes for a medium roast coffee like this Costa Rica Reserve.

    Optional: Bloom Time

    If you’ve read any of my other coffee-making tutorials, you’ll know I normally recommend allowing your coffee grinds to bloom before brewing. I tried making French Press coffee both with a bloom time and without and did not find a noticeable difference, so for simplicity’s sake, I skipped this step.  However, you are welcome to try it and see if you prefer adding it in or not.

    If you want to try blooming your coffee first, then follow these steps after completing Steps 1-3 as directed above:

    Add your coffee, shake it to level, then add enough water to cover the grounds. Wait 30 seconds, then add the remainder of the water, stir and wait for another 4-minutes before plunging/pressing.

    Step 6: Pressing & Pouring Your French Press Coffee

    After your 4-minute timer goes off, gently press the French Press plunger down slowly until you feel it touch the bottom, then stop. You don’t need to push hard or flatten the grounds at the bottom; resting on top is enough. Otherwise, you might stir up the coffee grinds resting at the bottom.

    After pressing, wait about 30 seconds for it to settle, and then slowly pour and enjoy!

    Pouring French Press

    Tips & Advice for Using a French Press

    Experiment with your brew times. As I mentioned, I do a 4-minute brew time for my dark roast and a 5-6 minute for medium roasts. The times and coffee amounts I provide are great starting points, but this is your coffee, so find your own personal sweet spot and make it the way you like it. 

    Grinding your coffee.  If you don’t have a burr coffee grinder, it is an invaluable tool for making coffee. It is essential to adjust your grind size to the brewing method you use (drip, pour-over, etc.). This can make a huge difference when making French Press coffee. If your grind is too fine, it can increase the bitterness of the coffee, and if your grind is too coarse, it can result in a highly acidic coffee.

    Coffee Sediment. A little coffee silt in the bottom of your cup is normal. That is part of the experience when using a French Press. It creates a strong, rich, flavorful cup of coffee. It is a more bitter flavored brew than an AeroPress or Chemex, which brew smoother less-acidic coffee.  I like both types, but for those that prefer a smoother, lighter flavor than using an AeroPress is probably going to suit you better.  Try the French Press and see what you think.  Brewing coffee with a French Press is so simple. It is one of the reasons I traveled with mine for many years.

    Don’t leave the coffee sitting in the press if you’re not drinking it right away. It will get more acidic and bitter.  It’s best poured right away or poured into an insulated carafe if you can’t drink it right away.

    French Press Coffee and plant

    What to Do With Your Used Coffee Grounds

    I recently read this article on ways to use your old coffee grounds. It has some great ideas like using it as compost for your garden. It’s also a good pest deterrent for slugs and mosquitos. You can, of course, empty your coffee grounds into the wastebasket, but whatever you do, don’t dump them down the drain. Coffee grounds swell up and stick to the plumbing causing your pipes to clog.

    My French Press Coffee Gear

    If you want to see the gear I use or purchase your own, here are links to what I use when making French Press coffee.

    Additional Uses for a French Press

    In addition to making a bold cup of coffee, you can use your French Press as a milk frother and make cold brew in it. It is a multi-purpose coffee-making tool!

    To froth milk using a French Press: Add heated milk to the French press, push the French press plunger into the milk, and with short quick and up and down movement, froth your milk until it has doubled in size. It’s so easy, but it froths milk really well to make DIY lattes at home.

    Here is a simple French Press cold brew recipe to start with. As with all coffee-making recipes, adjust the water and coffee ratio to fit your preference and always purchase quality coffee beans!

    Final Thoughts

    The French Press was my first coffee gear purchase as an adult. Before that, I grew up only trying coffee from a drip coffee maker or purchasing a latte from the local cafe.  Since purchasing that first French Press, I have added many other coffee makers and coffee gear to my arsenal of supplies. However, the French Press is still a go-to staple whether I use it for travel or a weekday pick-me-up.

    Let me know what you think of French Press coffee. If it is your first time trying it, I’d love to hear your thoughts.  Remember, this is about brewing coffee you love from the comfort of your home.  You are worth it!

    Au revoir! 

    Additional Articles That Might Interest You

     
    Note: This post contains affiliate links. When you make a purchase using one of these affiliate links, we get paid a small commission at no extra cost to you. And as always, all opinions are our own. Thank you!
  • Hiking to the Fire Wave at Valley of Fire

    The Fire Wave at Nevada’s Valley of Fire State Park is a gorgeous sandstone formation. With its swirling patterns of reds, pinks, and white, the Fire Wave makes for beautiful landscape photography.  In less than a 1-hour drive from Las Vegas, you enter a photographer’s paradise. Plus, for those looking for an alternative to “The Wave” in Utah, the Fire Wave at Valley of Fire makes a great choice! No special lotto is required. 

    The Fire Wave trail was one of my favorites during my day trip to Valley of Fire State Park. Below I share my experience hiking to the Fire Wave, plus information on an alternate route I discovered while hiking to the Pastel Canyon. 

    Getting to the Fire Wave Trailhead

    From Las Vegas, take I-15 N to Exit 75. After exiting, follow signs for Valley of Fire. It is about another 12 miles along the Valley of Fire Highway before you reach the entrance station for the park.  It takes about 1-hour to drive there from Las Vegas.

    After entering the park, and paying the park entrance fee, continue straight for about 2.5 miles. Make a left onto Mouse’s Tank Rd (you’ll see signs for the Visitor Center and White Domes). Continue up Mouse’s Tank Road for almost 5 miles before coming to Parking Lot 3 (P3 on the map). 

    The trailhead starts from the parking area on the right when heading north toward White Domes. Park in the gravel parking lot on the righthand side of the road. If that lot is full, you can check the parking lot on the opposite side of the road.

    About the Fire Wave Trail

    Trail Length: 1.5 miles (roundtrip)

    Elevation Gain: ~ 236 feet

    Trail Difficulty Rating: Easy

    Features: Colorful Sandstone and limestone, swirling wave-like sandstone rock formation, desert landscape and native plants

    Entrance Fee: There is a $15 day-use park fee per vehicle ($10 for NV plates)

    Restrooms: There are no restrooms at the trailhead. You can stop at the Visitor Center on the way to the trail.

    Open Hours: Sunrise to Sunset

    What to Bring

    Lots of water! This trail has only a small portion of shade at the beginning of the hike when you descend the sandy trail. After that, you are completely exposed to the sun for the rest of the hike. The Park rangers have closed this hike during extreme temperatures due to many hikers needing to be rescued for heat-related illnesses.

    I own a collapsible water bottle like the one below, and it’s great for traveling! You can easily stow it when you don’t need to keep water in it, and they’re great to bring to the airport and then fill up at the water fountain.

    Sunscreen. Make sure to apply sunscreen before the hike. Although the hike itself probably only takes about 1-hour, you are totally exposed to the sun. 

    Sunglasses and hat. Don’t forget your sunglasses. They are sunscreen for your eyes.  Also, a hat or some form of shade for your head is a good idea.

    Trekking Poles: If you’re unsteady on uneven ground, you may want to bring some hiking poles. 

    Overview of the Fire Wave Trail

    The trail to the Fire Wave is mostly flat. The first part of the trail has an initial descent, but after that, it is mostly a flat, rocky, and sandy trail. The trail is well marked in the beginning. However, after your initial descent, you’ll want to continue straight and look for the few trail markers scattered along the rocky stretch leading to the Fire Wave.  Chances are you won’t be alone, so you can also look ahead for other hikers.

    hiking trail marker

    Hiking to the Fire Wave

    The start of the trail is on the far side of the gravel parking area. It is a sandy trail leading you toward these giant red rocks rising above the desert. This rock formation is a guide for you to know which side of the road the trail starts on and guide you on your return hike to the parking lot.

    The trail curves around to the right of the giant red formation, and you follow it down a hill before it curves back around and to the right. From this point on, it is pretty much a straight hike to the Fire Wave.

    Start of Fire Wave Trail

    Follow the striped sandstone that makes up most of the trail. You’ll see a few trail markers scattered along this way, but mostly I looked for the direction other hikers were taking to keep me on track. 

    beautiful red rock near fire wave - Copy

    In about 20-minutes from the start of the trail, you’ll arrive at The Fire Wave. It is beautiful to see it sweeping before you and swirling around like a giant stone wave frozen in time. 

    You can hike down onto the Fire Wave or climb to the top for a better vantage point. You’ll probably need to get in line to do this, but be patient, and you’ll get your chance. Most people come and find a place to sit along the wave, admiring this unique and beautiful landscape. The red, pink, and white hues pop against the blue sky.  Most won’t stay too long as the sun is unrelenting here in the desert. 

    Hydrate for the Return Hike

    After enjoying the view and taking as many photo ops as you wish, head back toward those huge red rocks that mark the beginning of the trail. 

    If you’re like me, you’ll be surprised at how hot it gets and how an easy hike quickly becomes more difficult due to the heat. Drink some water, and then drink some more! It’s that final ascent where you’ll need to push yourself, but then you can return to the air-conditioned car and continue to more gorgeous hikes during your day at Valley of Fire State Park. 

    The Fire Wave is one of the most popular hikes, but make sure to take time for at least one more. My pick would be the White Domes Loop Trail. 

    looking back over trail

    Pastel Canyon – An Alternate Route to the Fire Wave

    Although I think the main trailhead is the best way to hike to the Fire Wave, there is one other way you can reach it. I discovered it when I was hiking to the Pastel Canyon.  This short, unmarked trail takes you through a small canyon with striped rocks colored in pastel pinks and yellows. 

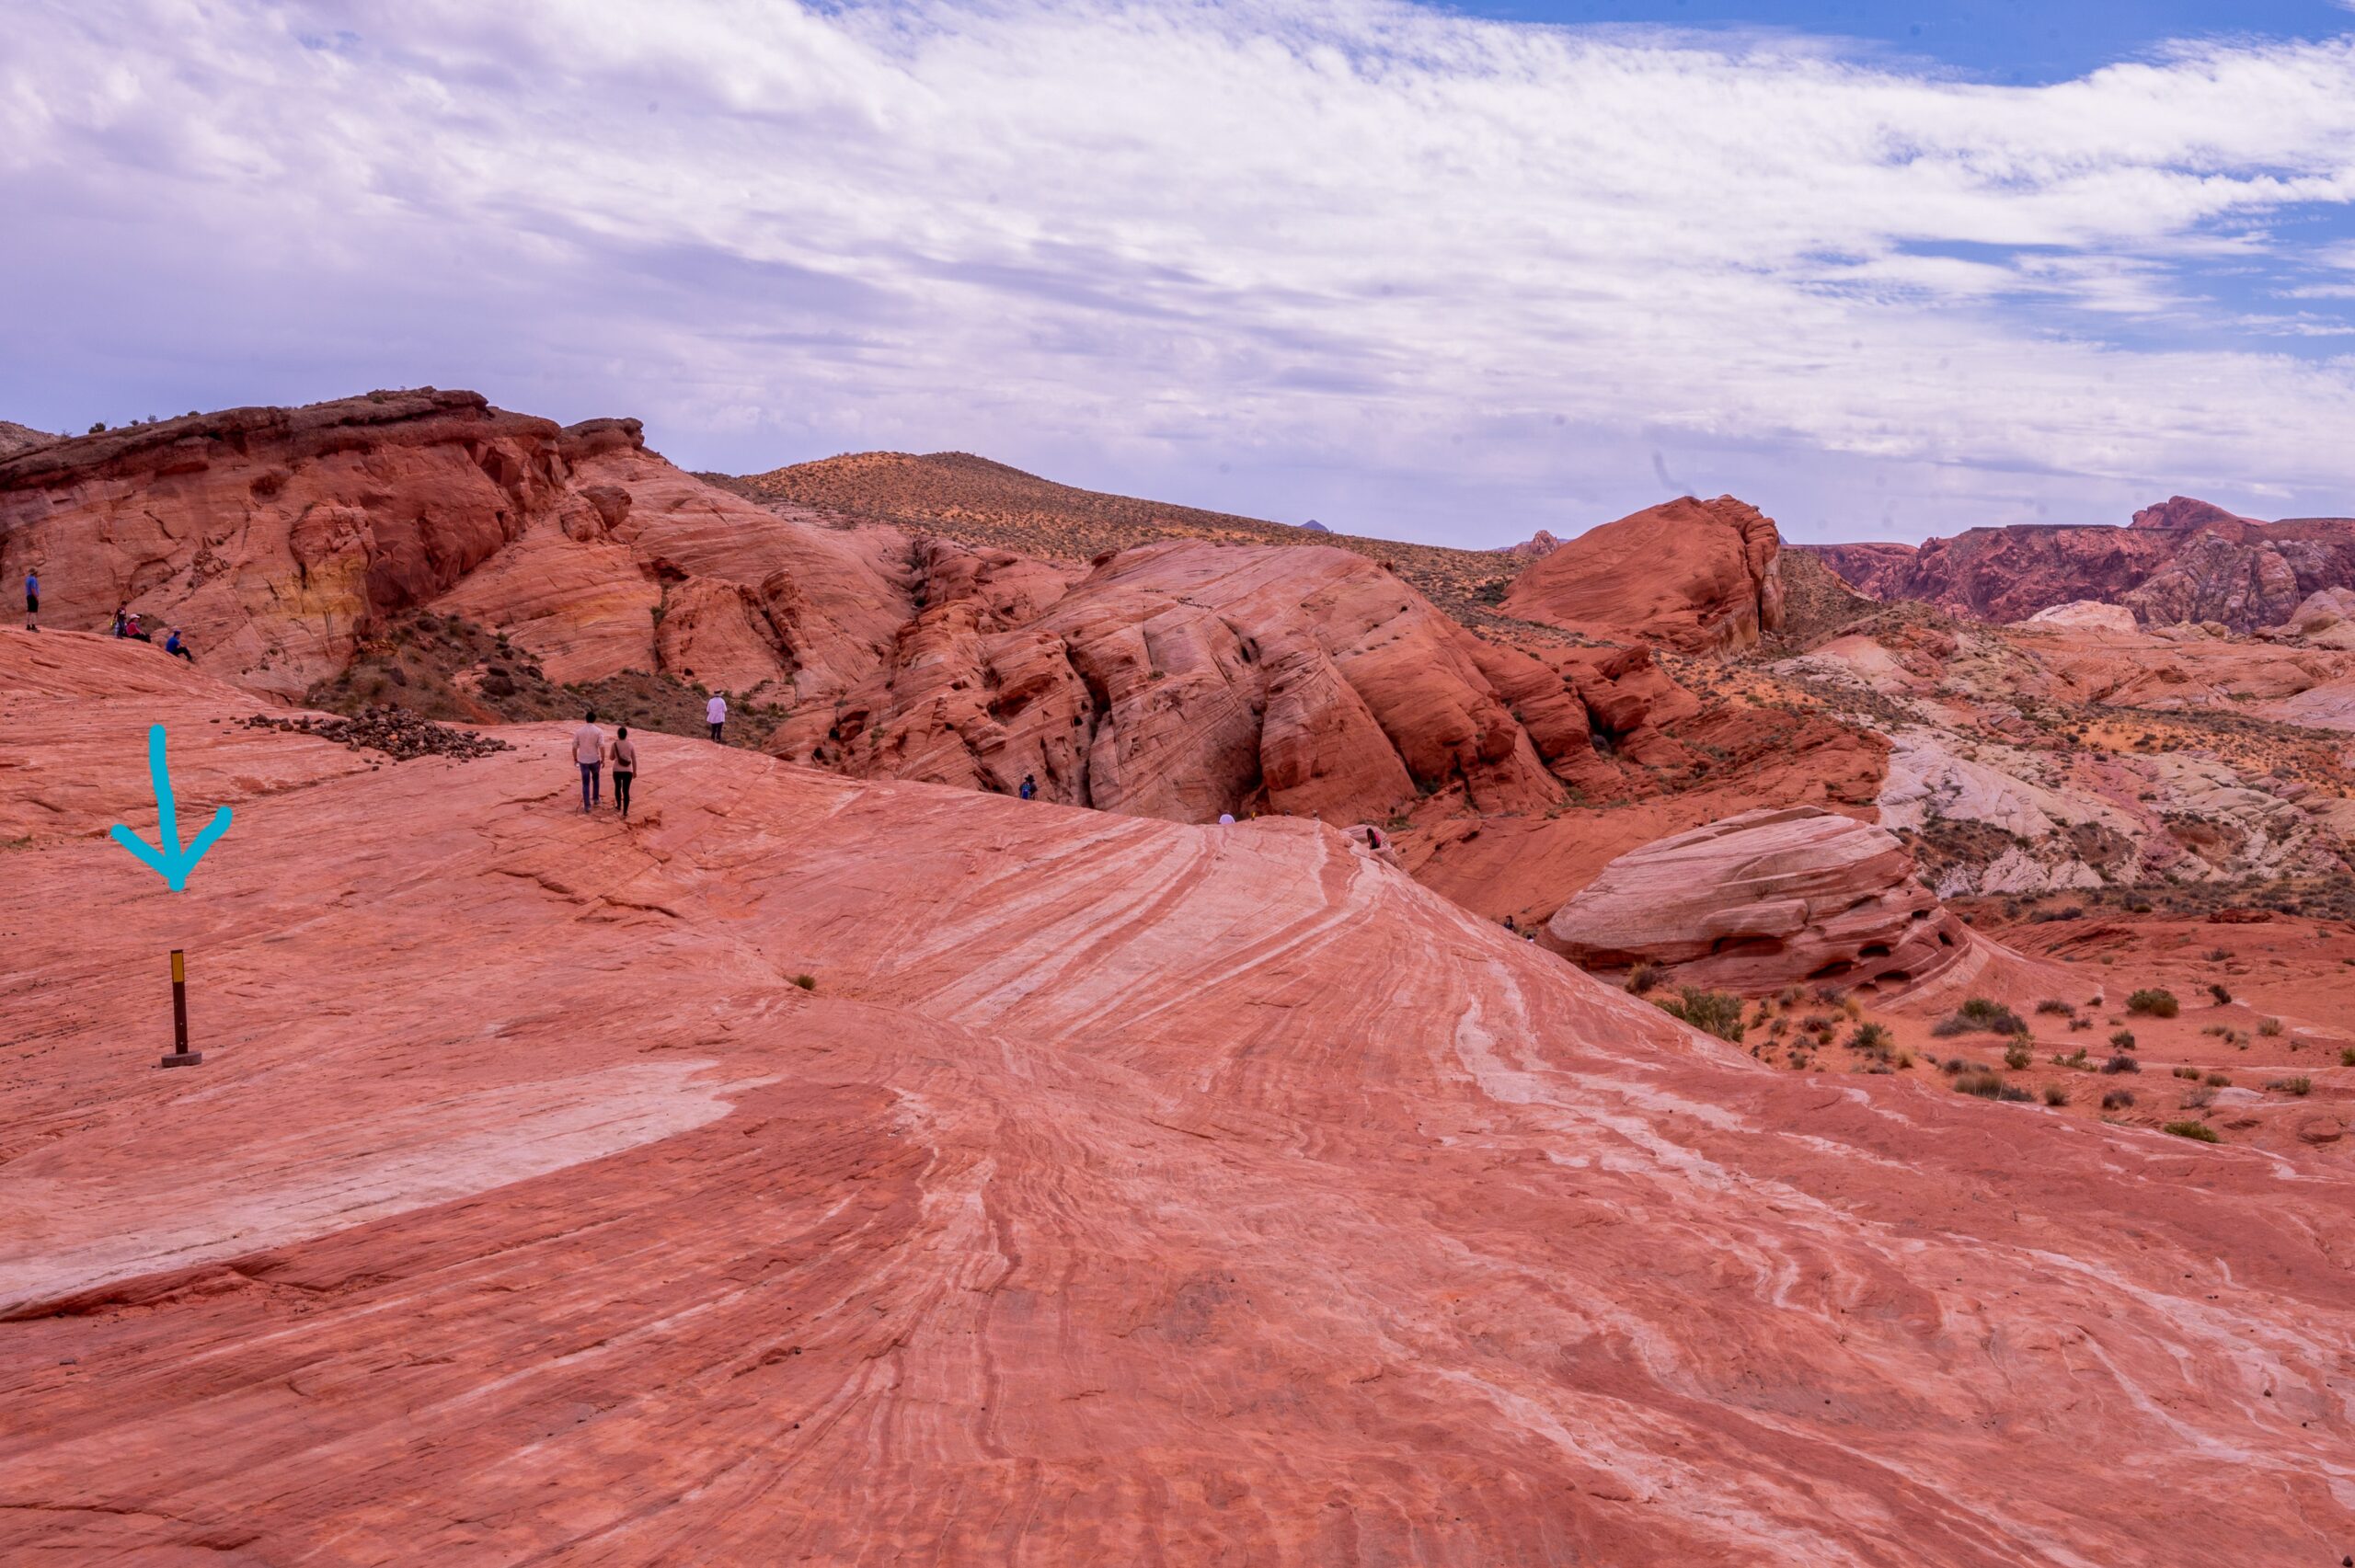
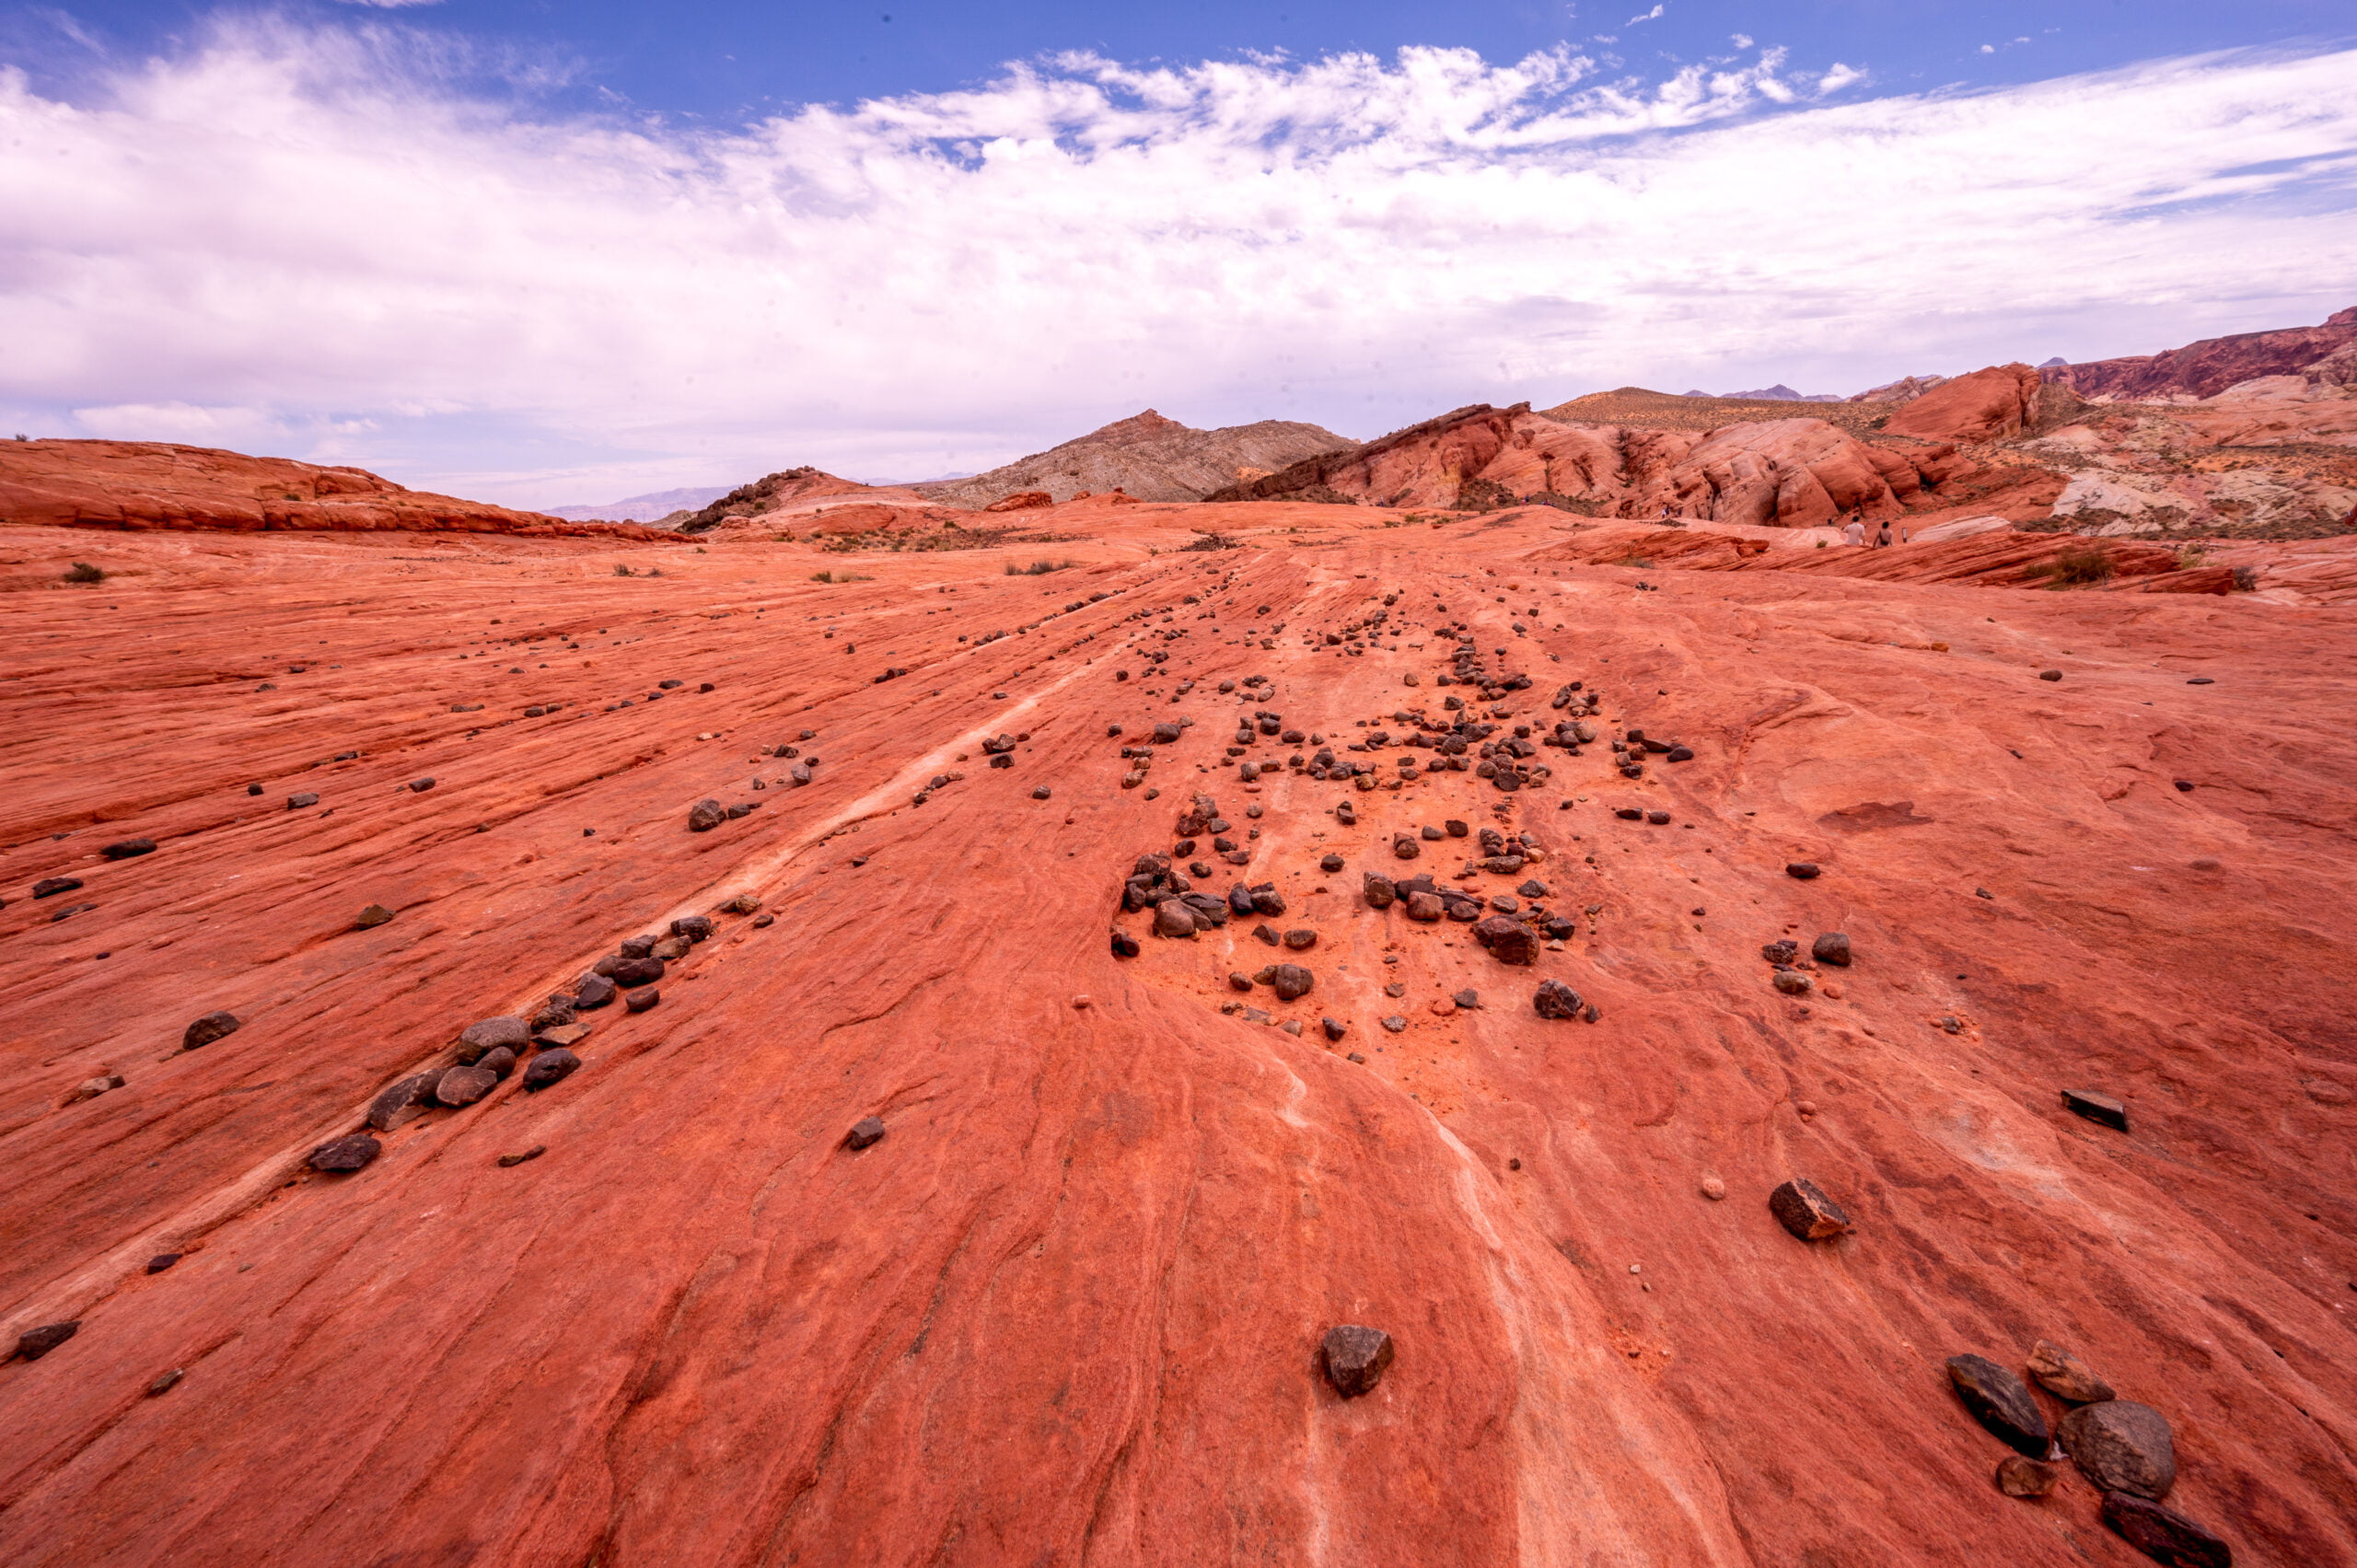
    If you continue along the wash that winds through the small canyon, you’ll soon come to a bend where if you look to your left, you’ll most likely see people standing around on top of the Fire Wave! Yep, with only about a 10-minute walk from the road through the Pastel Canyon and wash, you will arrive on the opposite side of the Fire Wave.  You can walk over and up the Fire Wave, where you’ll then see the large red rocks in the far distance that mark the start of the main trailhead.

    Outer Edge of Fire Wave in the distance
    You can see the edges of the Fire Wave in the distance.

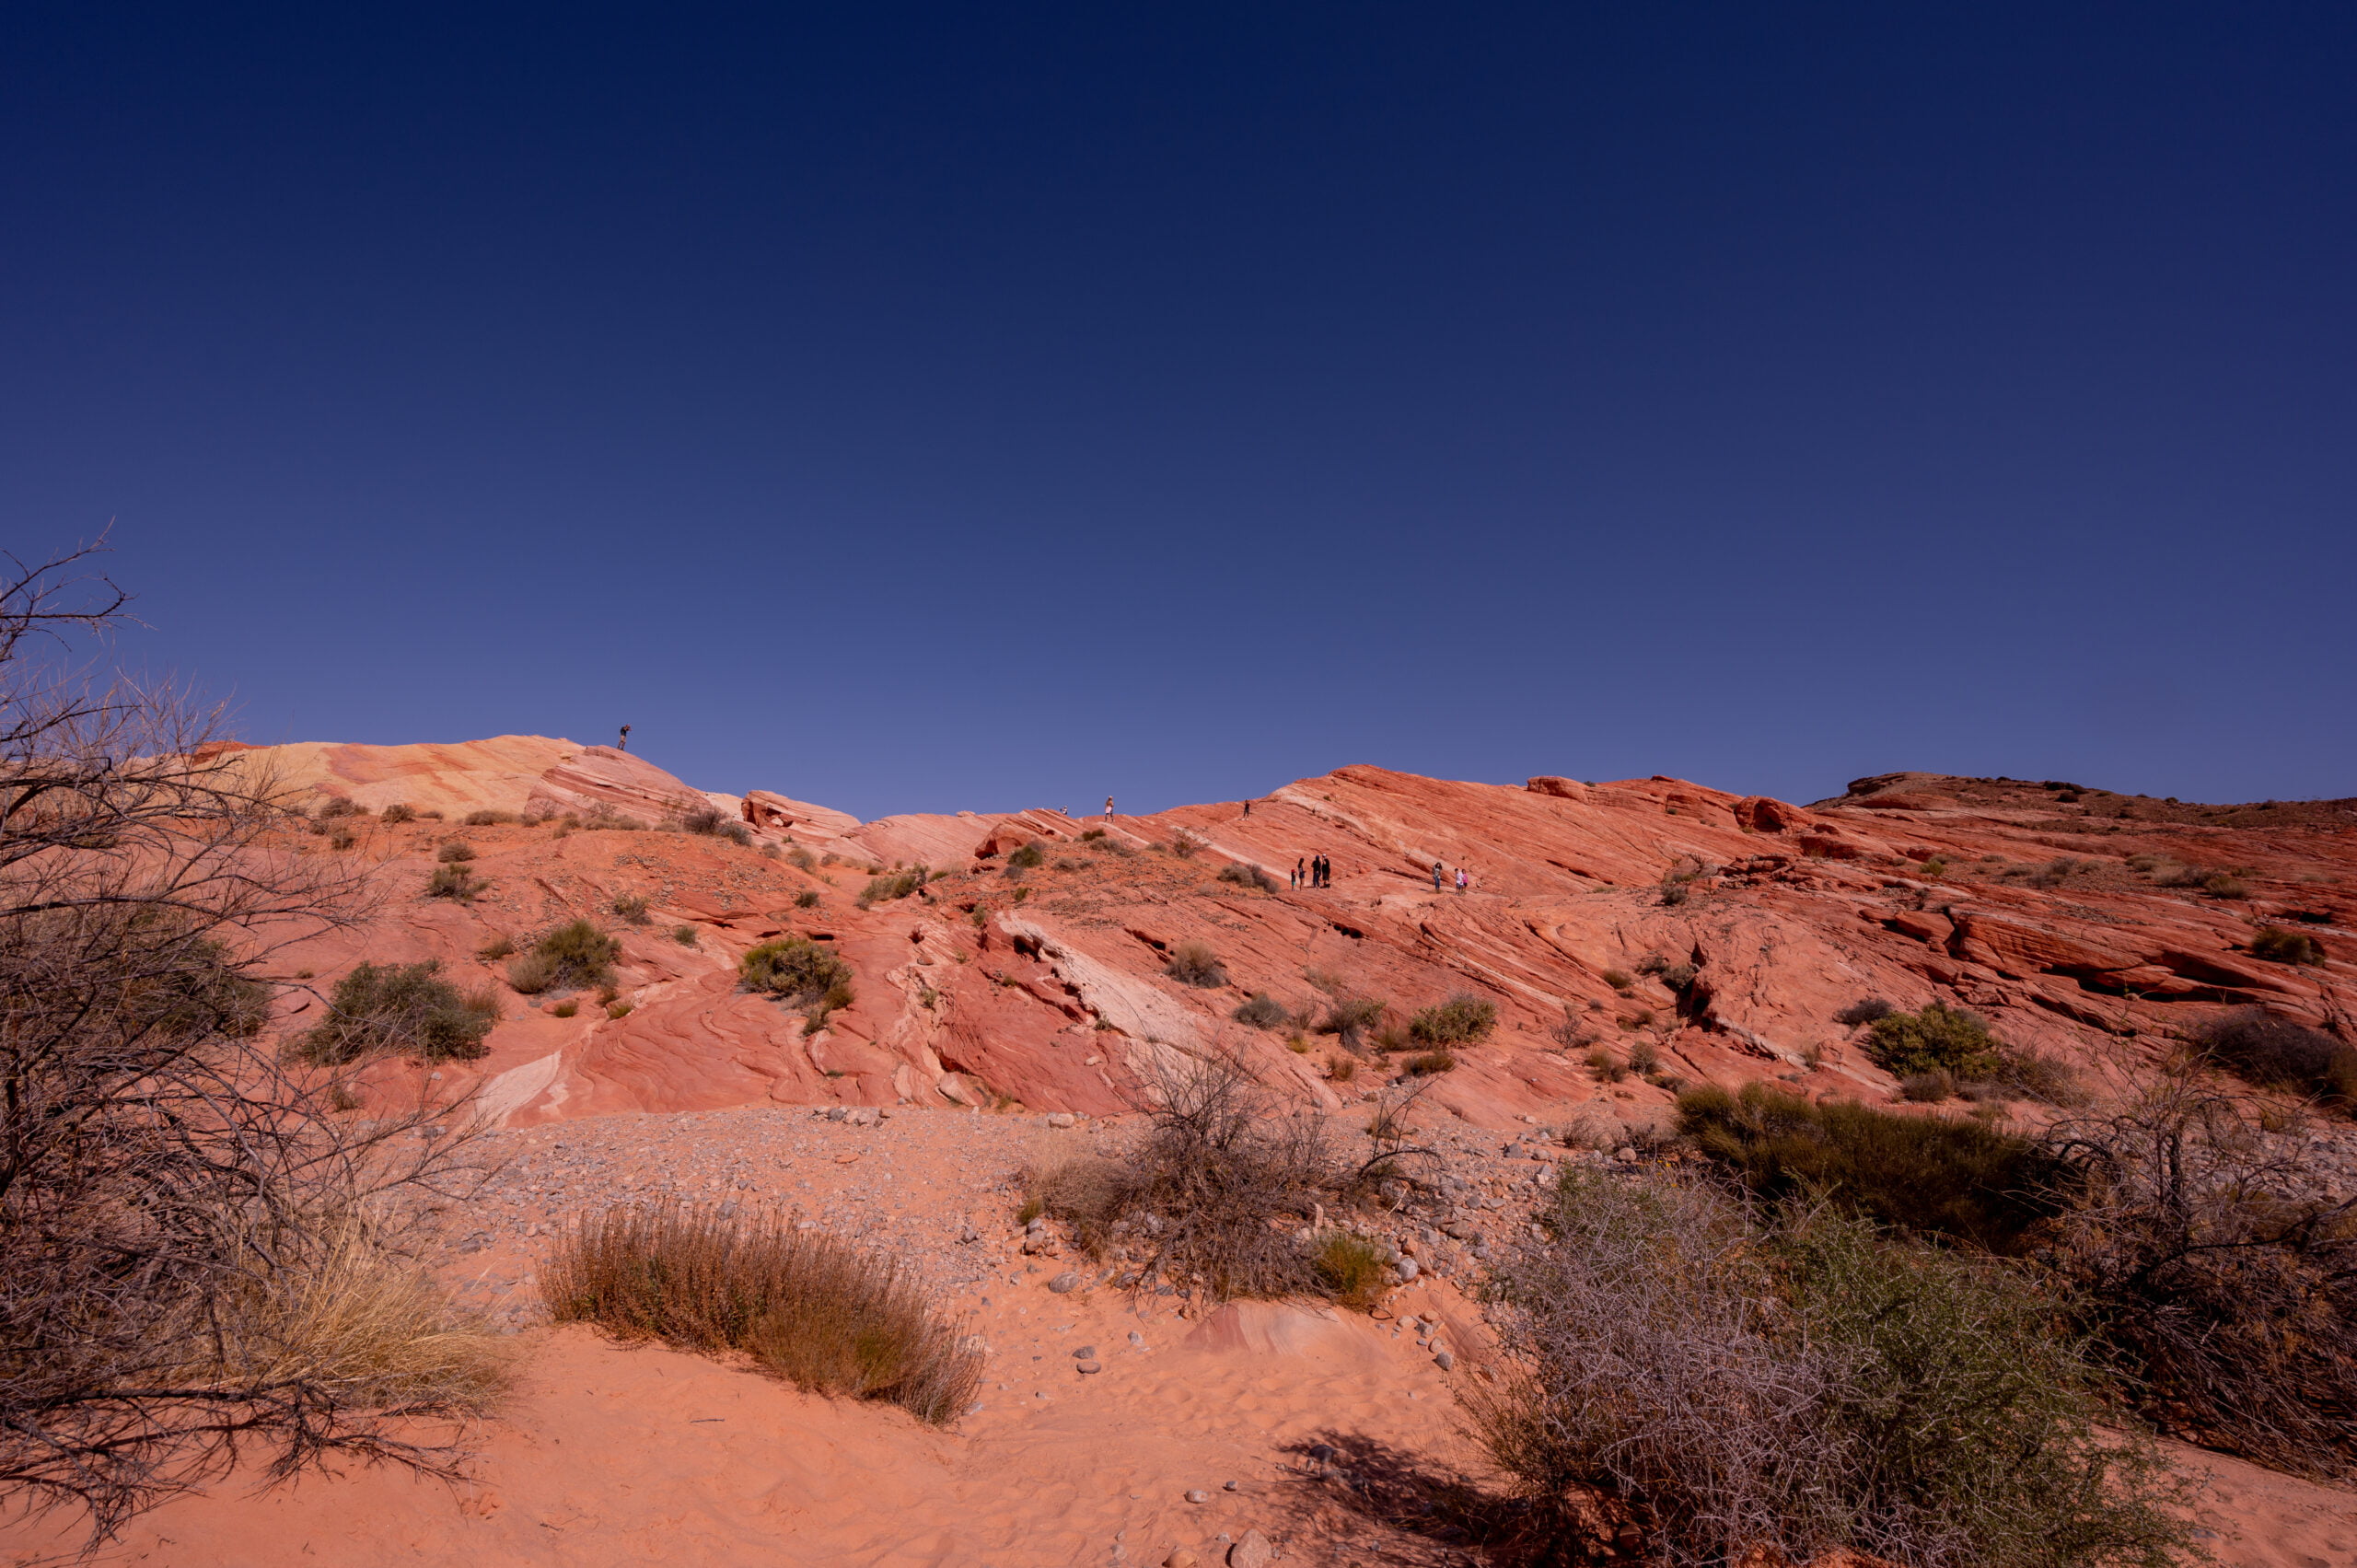
    If you can’t find parking at the Fire Wave trailhead or prefer the flattest and shortest route, you might look to see if there is any parking at the Pastel Canyon.  Just note there is no official parking here, only a small pull-out big enough for around 5-6 cars. 

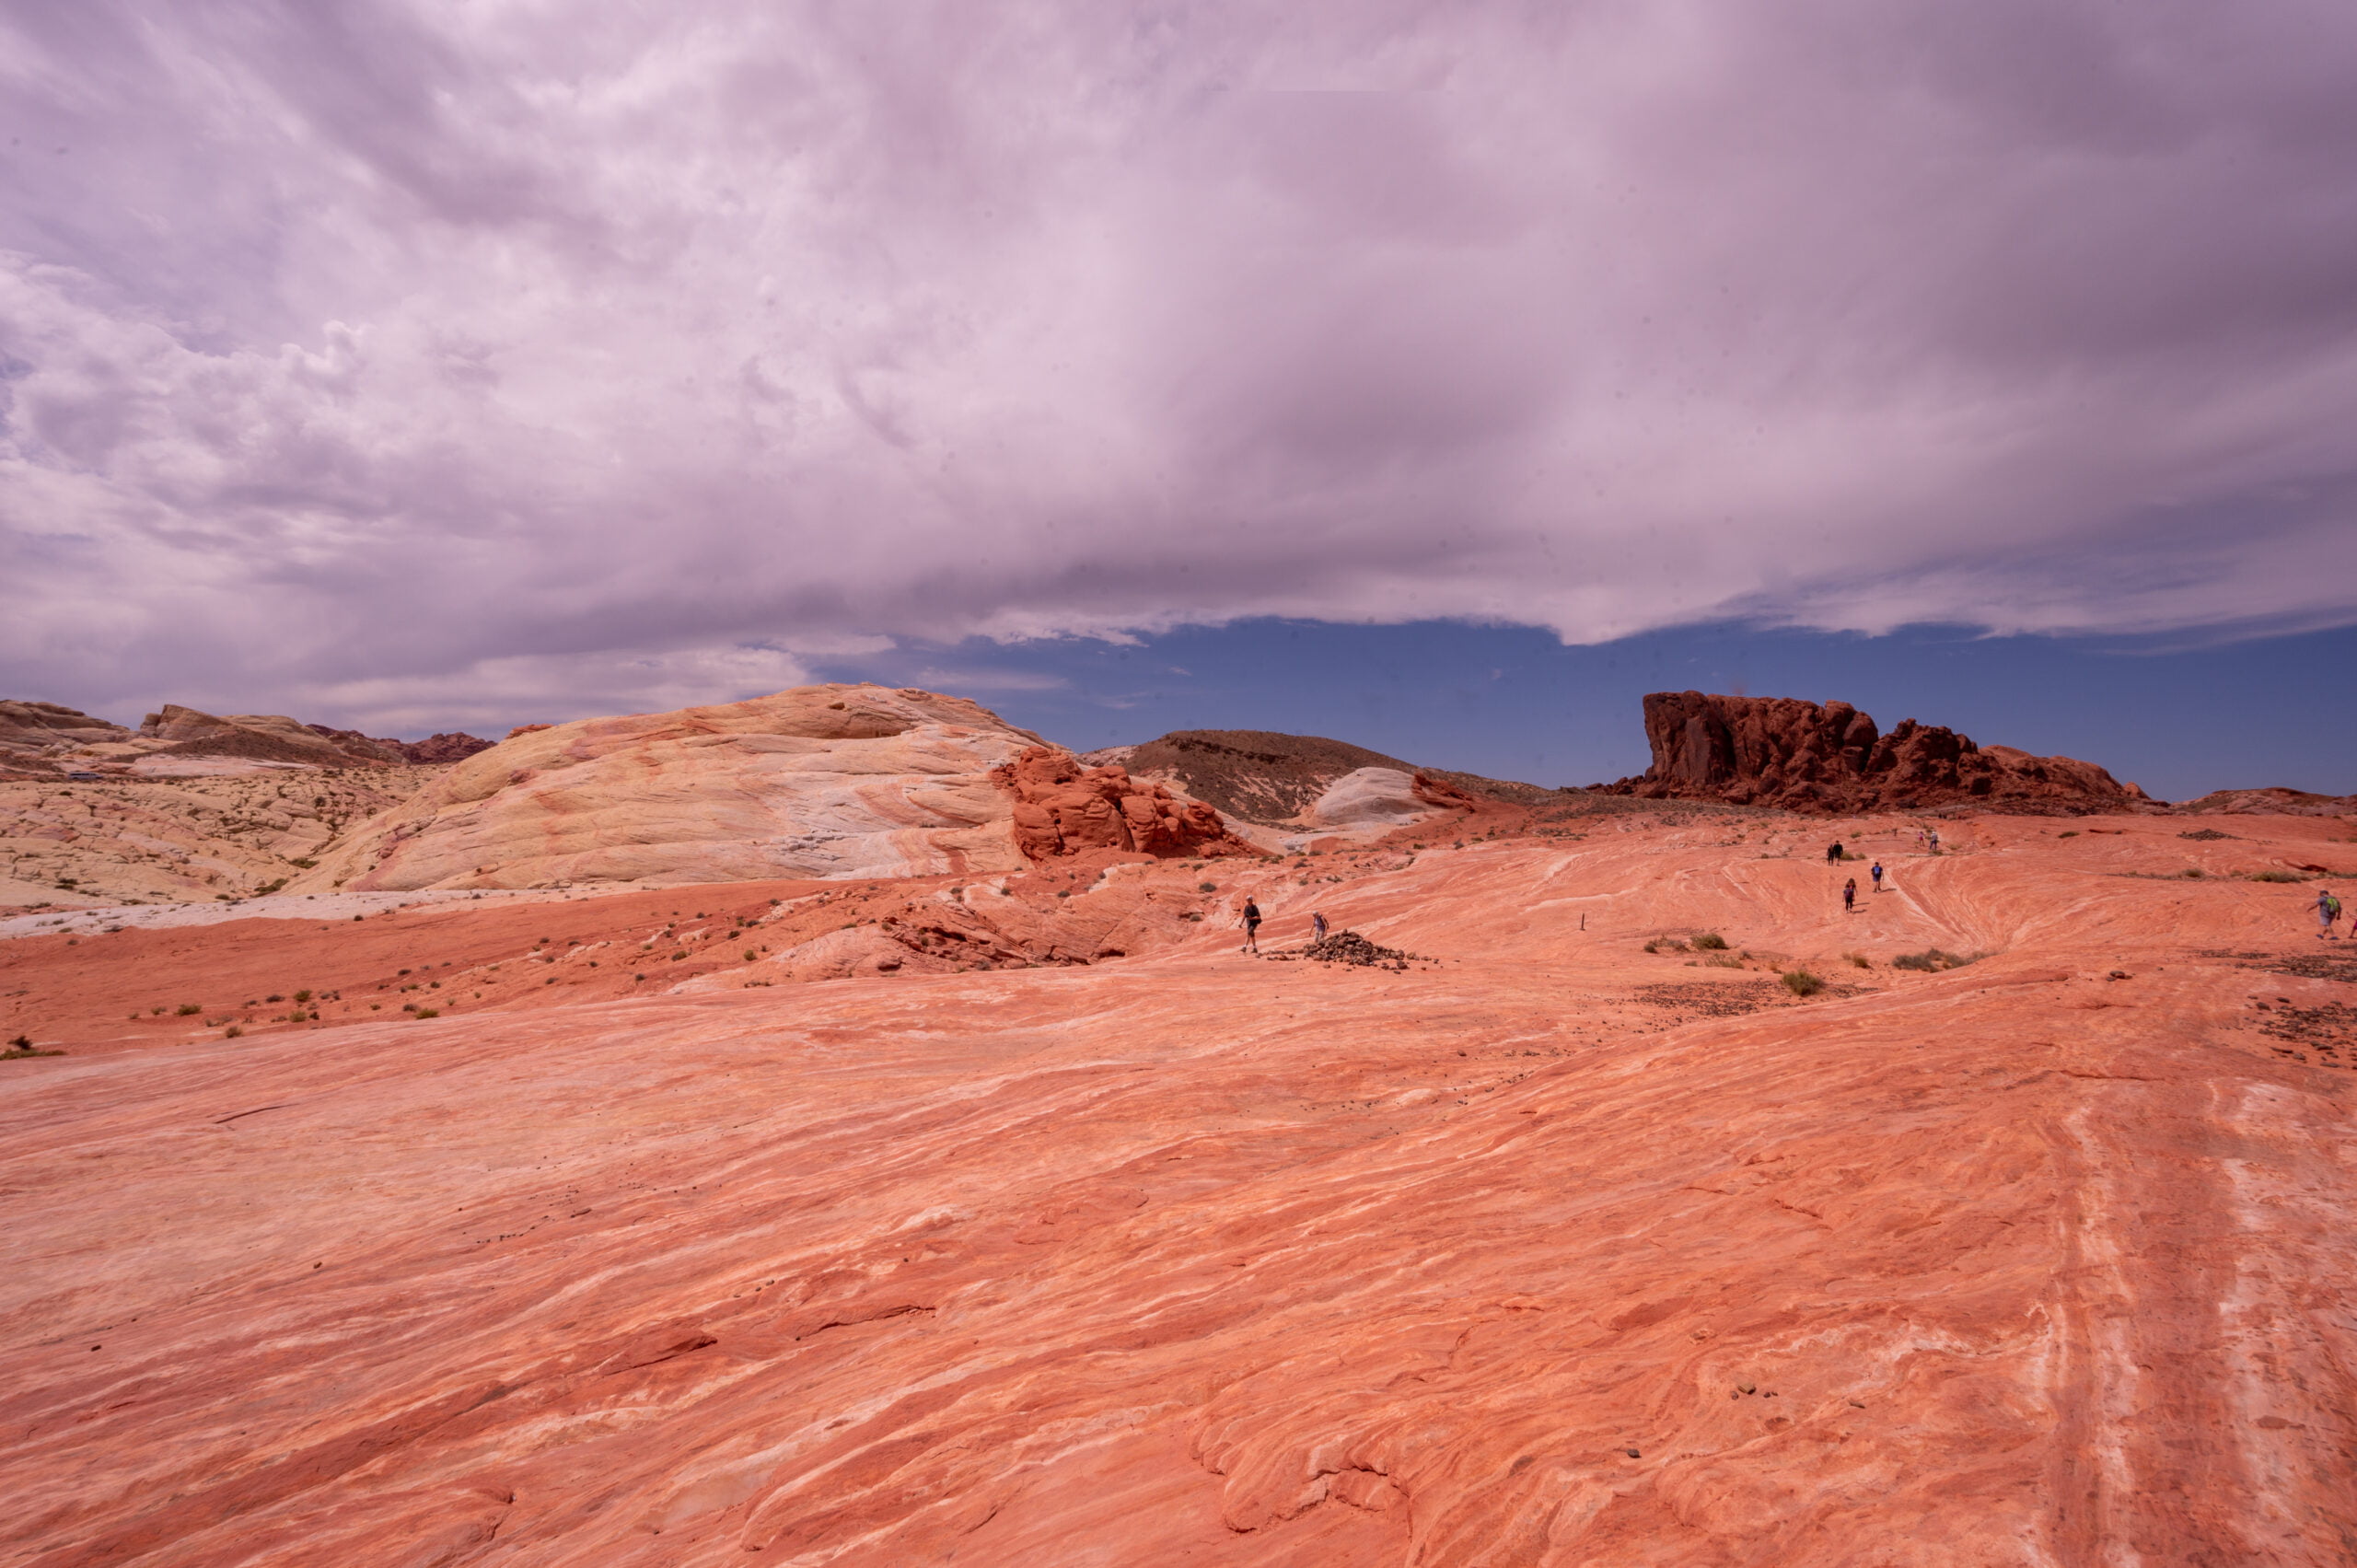
    The Pastel Canyon is worth the quick stop, even if you don’t hike to the Fire Wave from here.  It only takes about 10-minutes total to walk to the small canyon and admire its beautiful hues. There are no signs, though, so you’ll need to add it to your Google Maps. It is about 4 miles up the Mouse’s Tank Road and before you arrive at P3.

    Final Thoughts on Planning Your Visit

    There are no restaurants or food amenities inside Valley of Fire State Park. Make sure to plan ahead and bring lots of water, at least 1-gallon per person, for your day at Valley of Fire State Park. You will also want to bring snacks and a picnic lunch.  Please read my article on how to plan the perfect day trip to Valley of Fire and get tips on camping here as well as other hikes to do.

    Have a “rocking” day! (Sorry just had to throw that pun in there.)

    Note: This post contains affiliate links. When you make a purchase using one of these affiliate links, we get paid a small commission at no extra cost to you.