author.travelffeine.com

Tag: Road Trip

  • 5 Essentials You Need for Car Camping or SUV Camping

    Have you ever thought it might be nice to pull up to your campsite and not need to put up a tent? Perhaps you have visions of crawling into the back of your car and curling up in a cozy bed, all ready for you without any extra work.  Well, that’s exactly what I decided I wanted on my recent road trip where I tried camping in my SUV.  This is not to be confused with the typical type of car camping where you pack everything in your car and stay in a tent.  That is the type of camping I normally do, but I thought I would see how I liked actually sleeping in my car.  

    Below I share the five things I found to be extremely useful when camping in my SUV.  They were essential items I am so glad I purchased before I left for my trip and will continue to use in the future.  If you plan to try car camping or SUV camping, I highly recommend you consider getting these five things first!

    Facebook
    Reddit
    Twitter
    Pinterest

    5 Things You Need for Your First Car Camping Trip

    These are the main essentials I found to be helpful when camping in a car or SUV.  In the video above, I discuss some of these items and the pros and cons of my setup.  At the bottom of the article, I’ll also list a few “nice to have” options to consider getting in addition to these five essential items.

    1) Privacy & Shading When Car Camping

    Since you’re car camping and sleeping in your car, you will want to cover your windows with something to give you both privacy and shade from the sun and block lights from cars and other campers that might pass by your vehicle.  

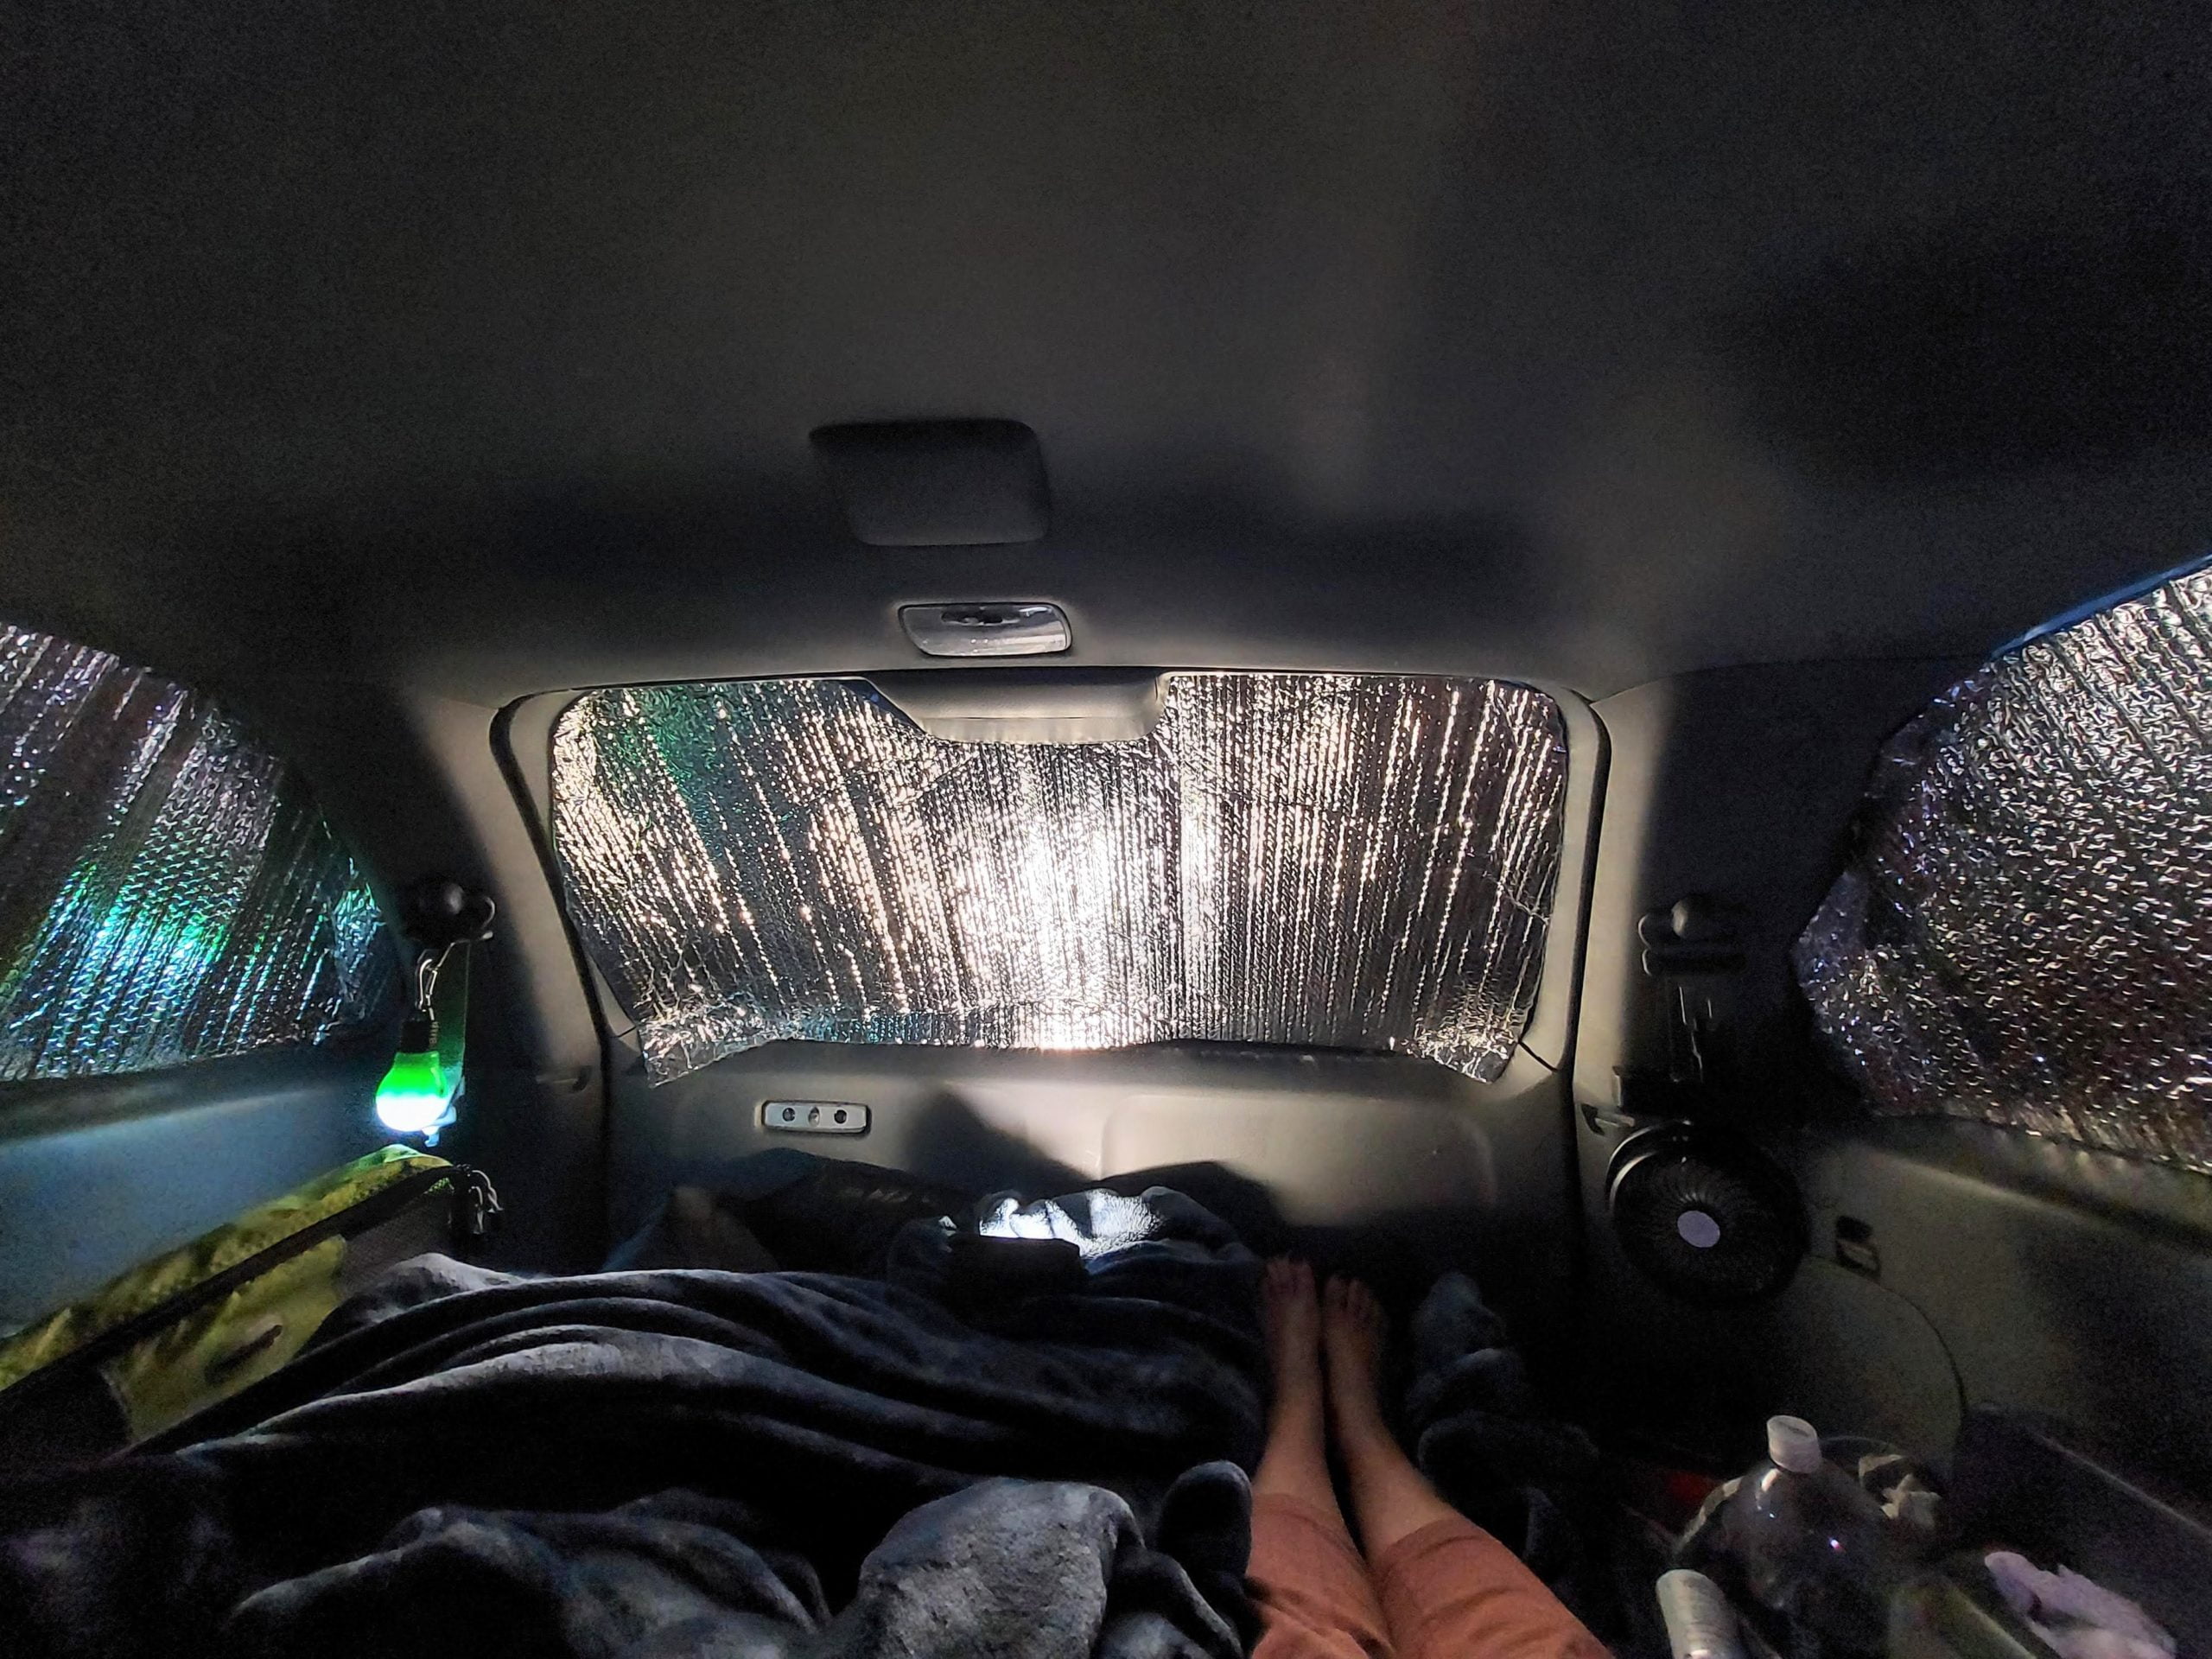
    I purchased a roll of Reflectix from my local hardware store, and it was a lifesaver!  I cut out shapes to fit all of my windows, except the front windshield and the front side windows.  

    Covering the rear door windows and back windows of the vehicle with Reflectix made a HUGE difference!  It made my vehicle dark at night, and it also helped create some shade for my car during the day.  

    This was incredibly helpful since I was camping in the desert!  I started in Joshua Tree National Park and then went to Death Valley National Park and then on to Utah’s national parks.  So, having some extra shade was really nice!

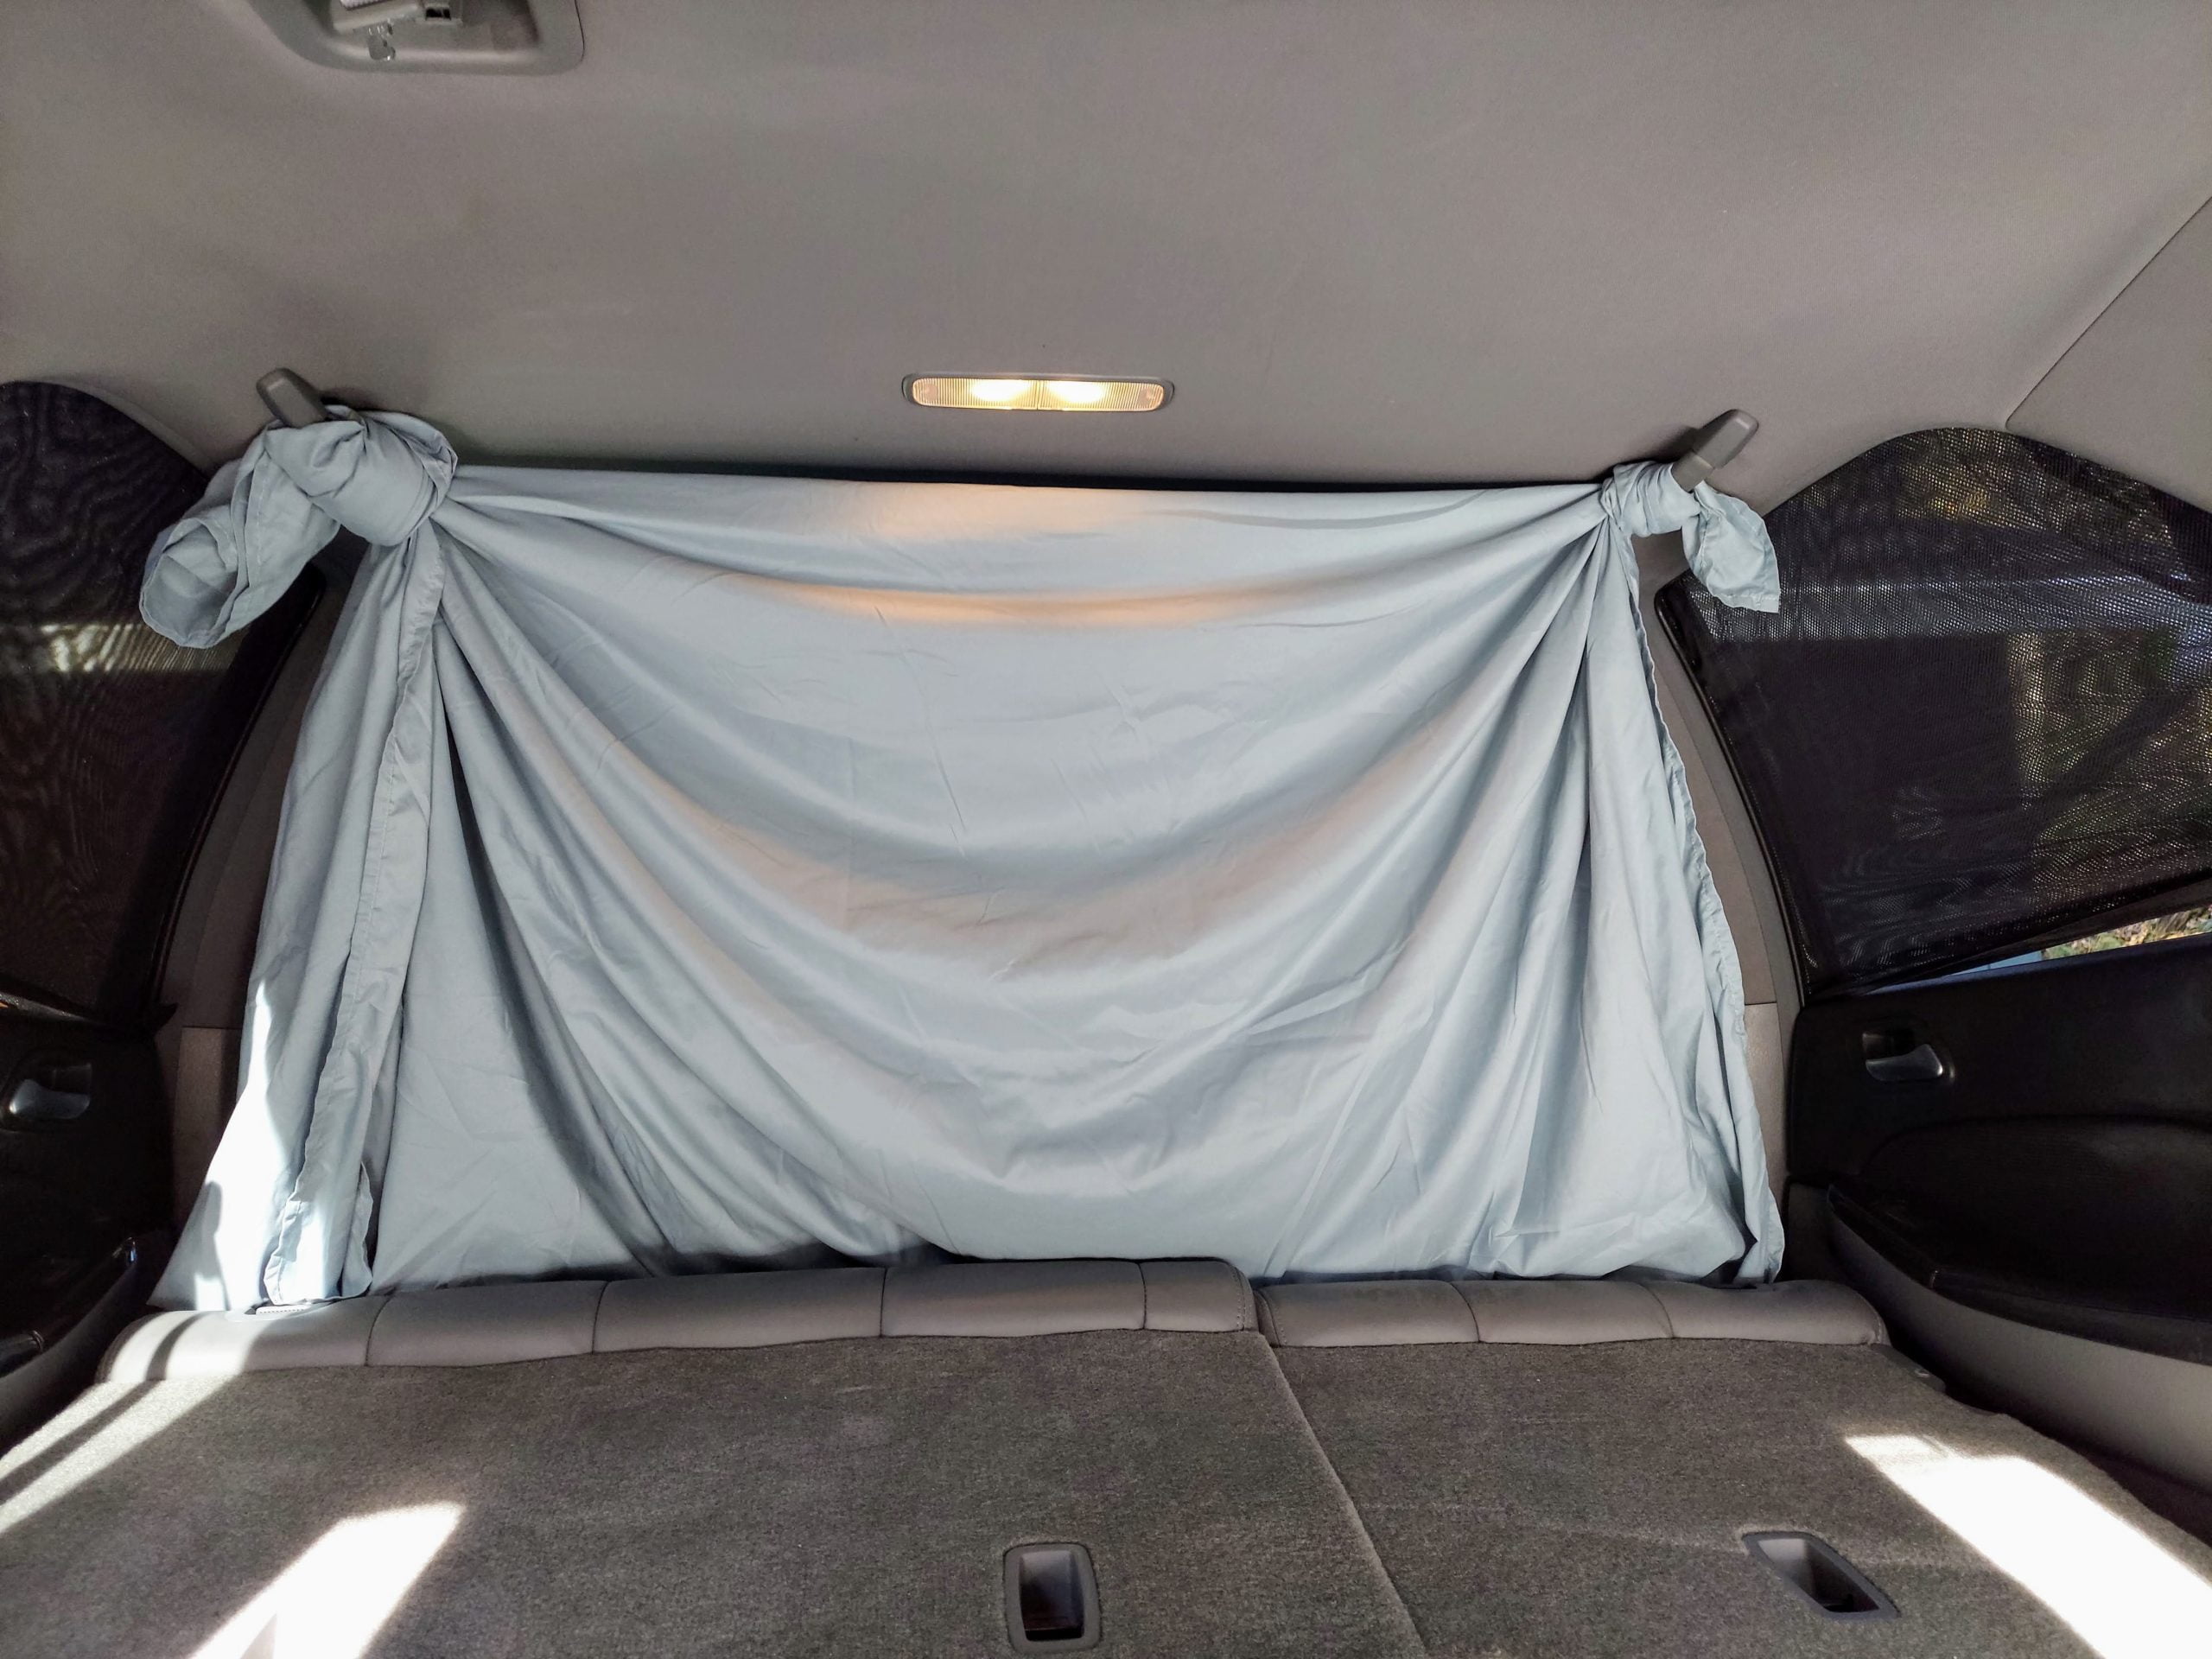
    In addition to the Reflectix, I had these windshield pop-out shades for the front windows.  I also used a sheet strung across the backs of the two front seats to give me more privacy since the two front side windows did not have any Reflectix.  

    For future trips, I’d cut out Reflectix for those as well.  I forgot those when making my window cut-outs and ended up using the sheet, as you can see in the photo below, for an additional layer of privacy.  The sheet was easy to put up and take down.

    2) Lighting

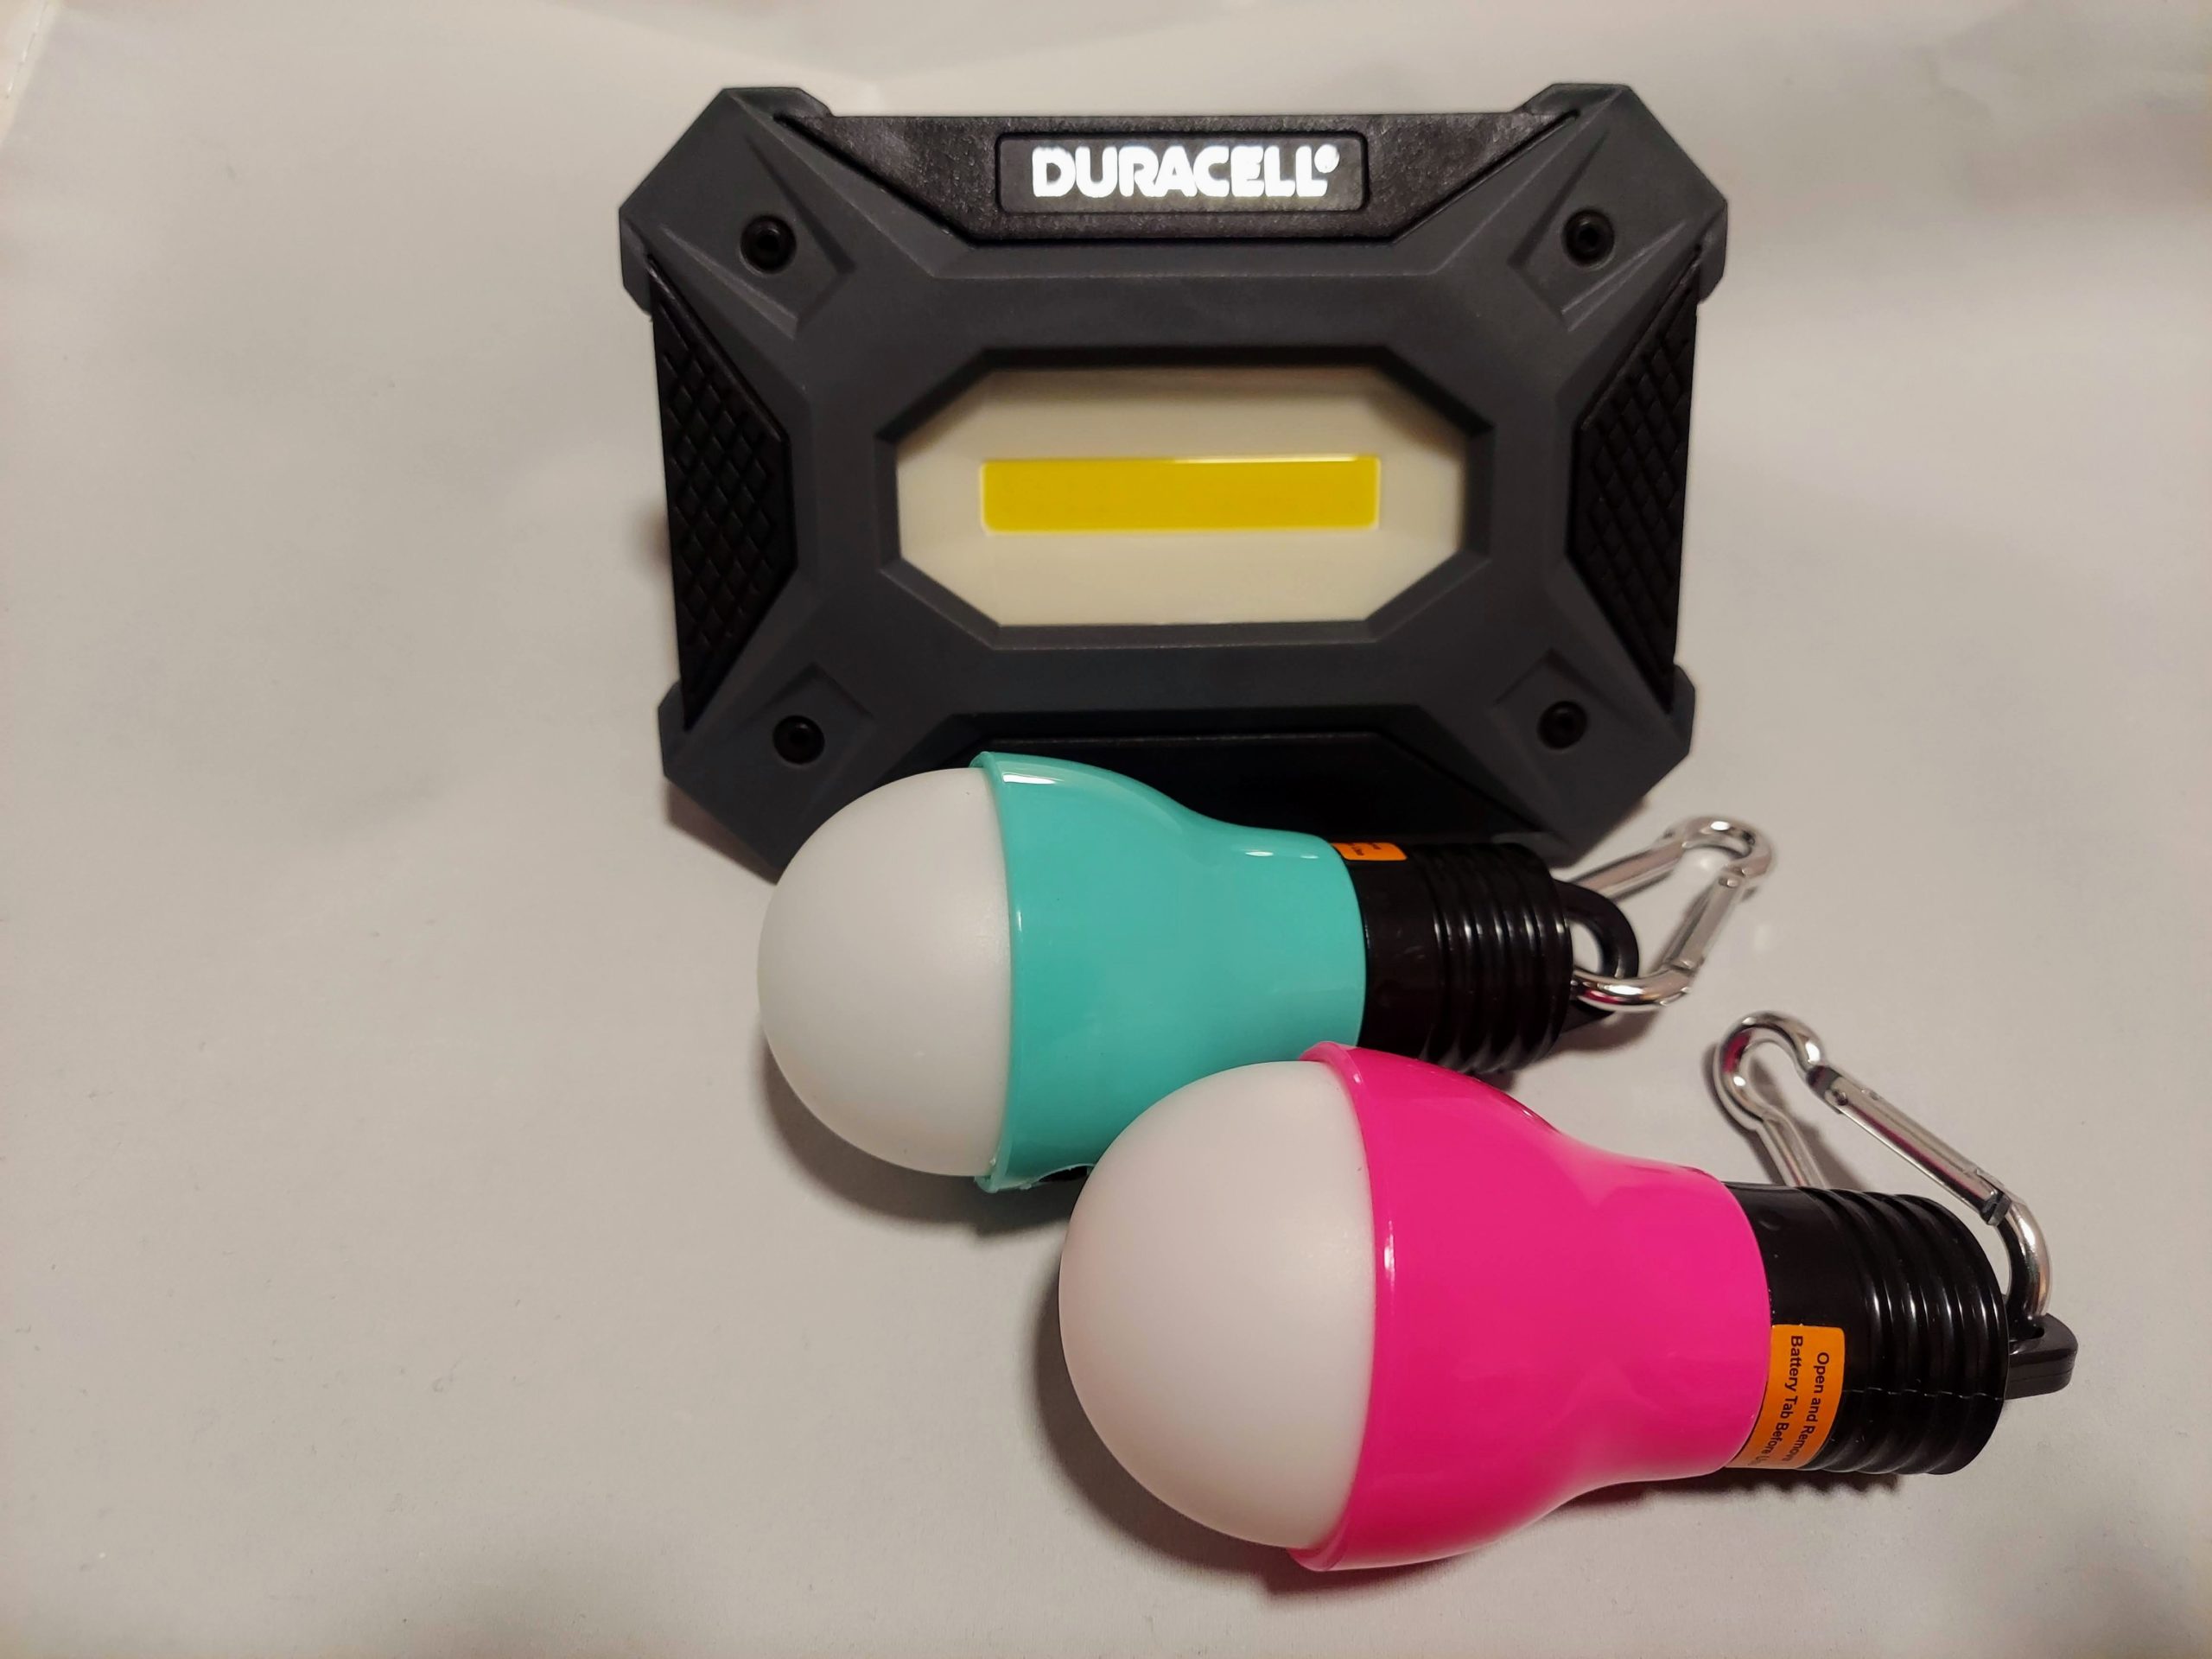
    I purchased these LED light bulbs from my local hardware store, and I loved them! You can also purchase similar ones on Amazon if you can’t find them locally.  They have little clips that make them easy to hang in different areas, plus even if you decide to sleep in a tent, they work well for clipping to the ceiling of a tent.  They have a high setting and a low setting when you want it a little dimmer.

    I also purchased these Duracell LED lights that have a built-in stand so you can set it down on the ground or set it on the floor of your SUV when you’re getting ready for bed or just sitting in the car reading at night.  If you face it toward the Reflectix, it really brightens up the vehicle!  

    I made sure to shut off my dome light to my car during my trip as I didn’t want to take any chances that I’d accidentally leave a door open. Also, when using the SUV tent attachment (read more below in #5), the rear hatch is left open, and thus the light on the hatch door stays on unless you shut off all dome and ceiling lights. So if your dome lights are turned on, your battery will most likely be dead by morning.

    3) Organization System

    This is a must when camping in your car! I felt like it was even more necessary than when I went tent camping. Each day, I’d need to move stuff from the rear passenger seats to my car’s front seats to lay down the rear seats and get ready for bed.  Then the next day, it would get moved back.  Needless to say, things got moved around a lot.  When it was just me, I could still lose track of things, but I pretty much knew where I kept everything.  However, when my husband later joined me on the trip, the organization became an even greater issue.  

    Totes

    Having totes to keep your food, electronics, and other miscellaneous supplies organized in will really help!  Label totes for one thing, such as a tote labeled “food” or a tote labeled “electronics” and so on.  That way, if you’re traveling with someone else, everyone will know where specific items go, and then when you need them, you’ll know where to find them.

    Zip Lock Bags

    I love zip lock bags.  I always bring these when I travel, whether it’s a trip abroad or a road trip close to home. There always seems to be a need for these.  When camping in your car, you might use these to contain food items like sugar or trail mix, or PB & J sandwiches. You can also use them to keep extra batteries, USB cables, headphones, etc.

    Cube Organizers

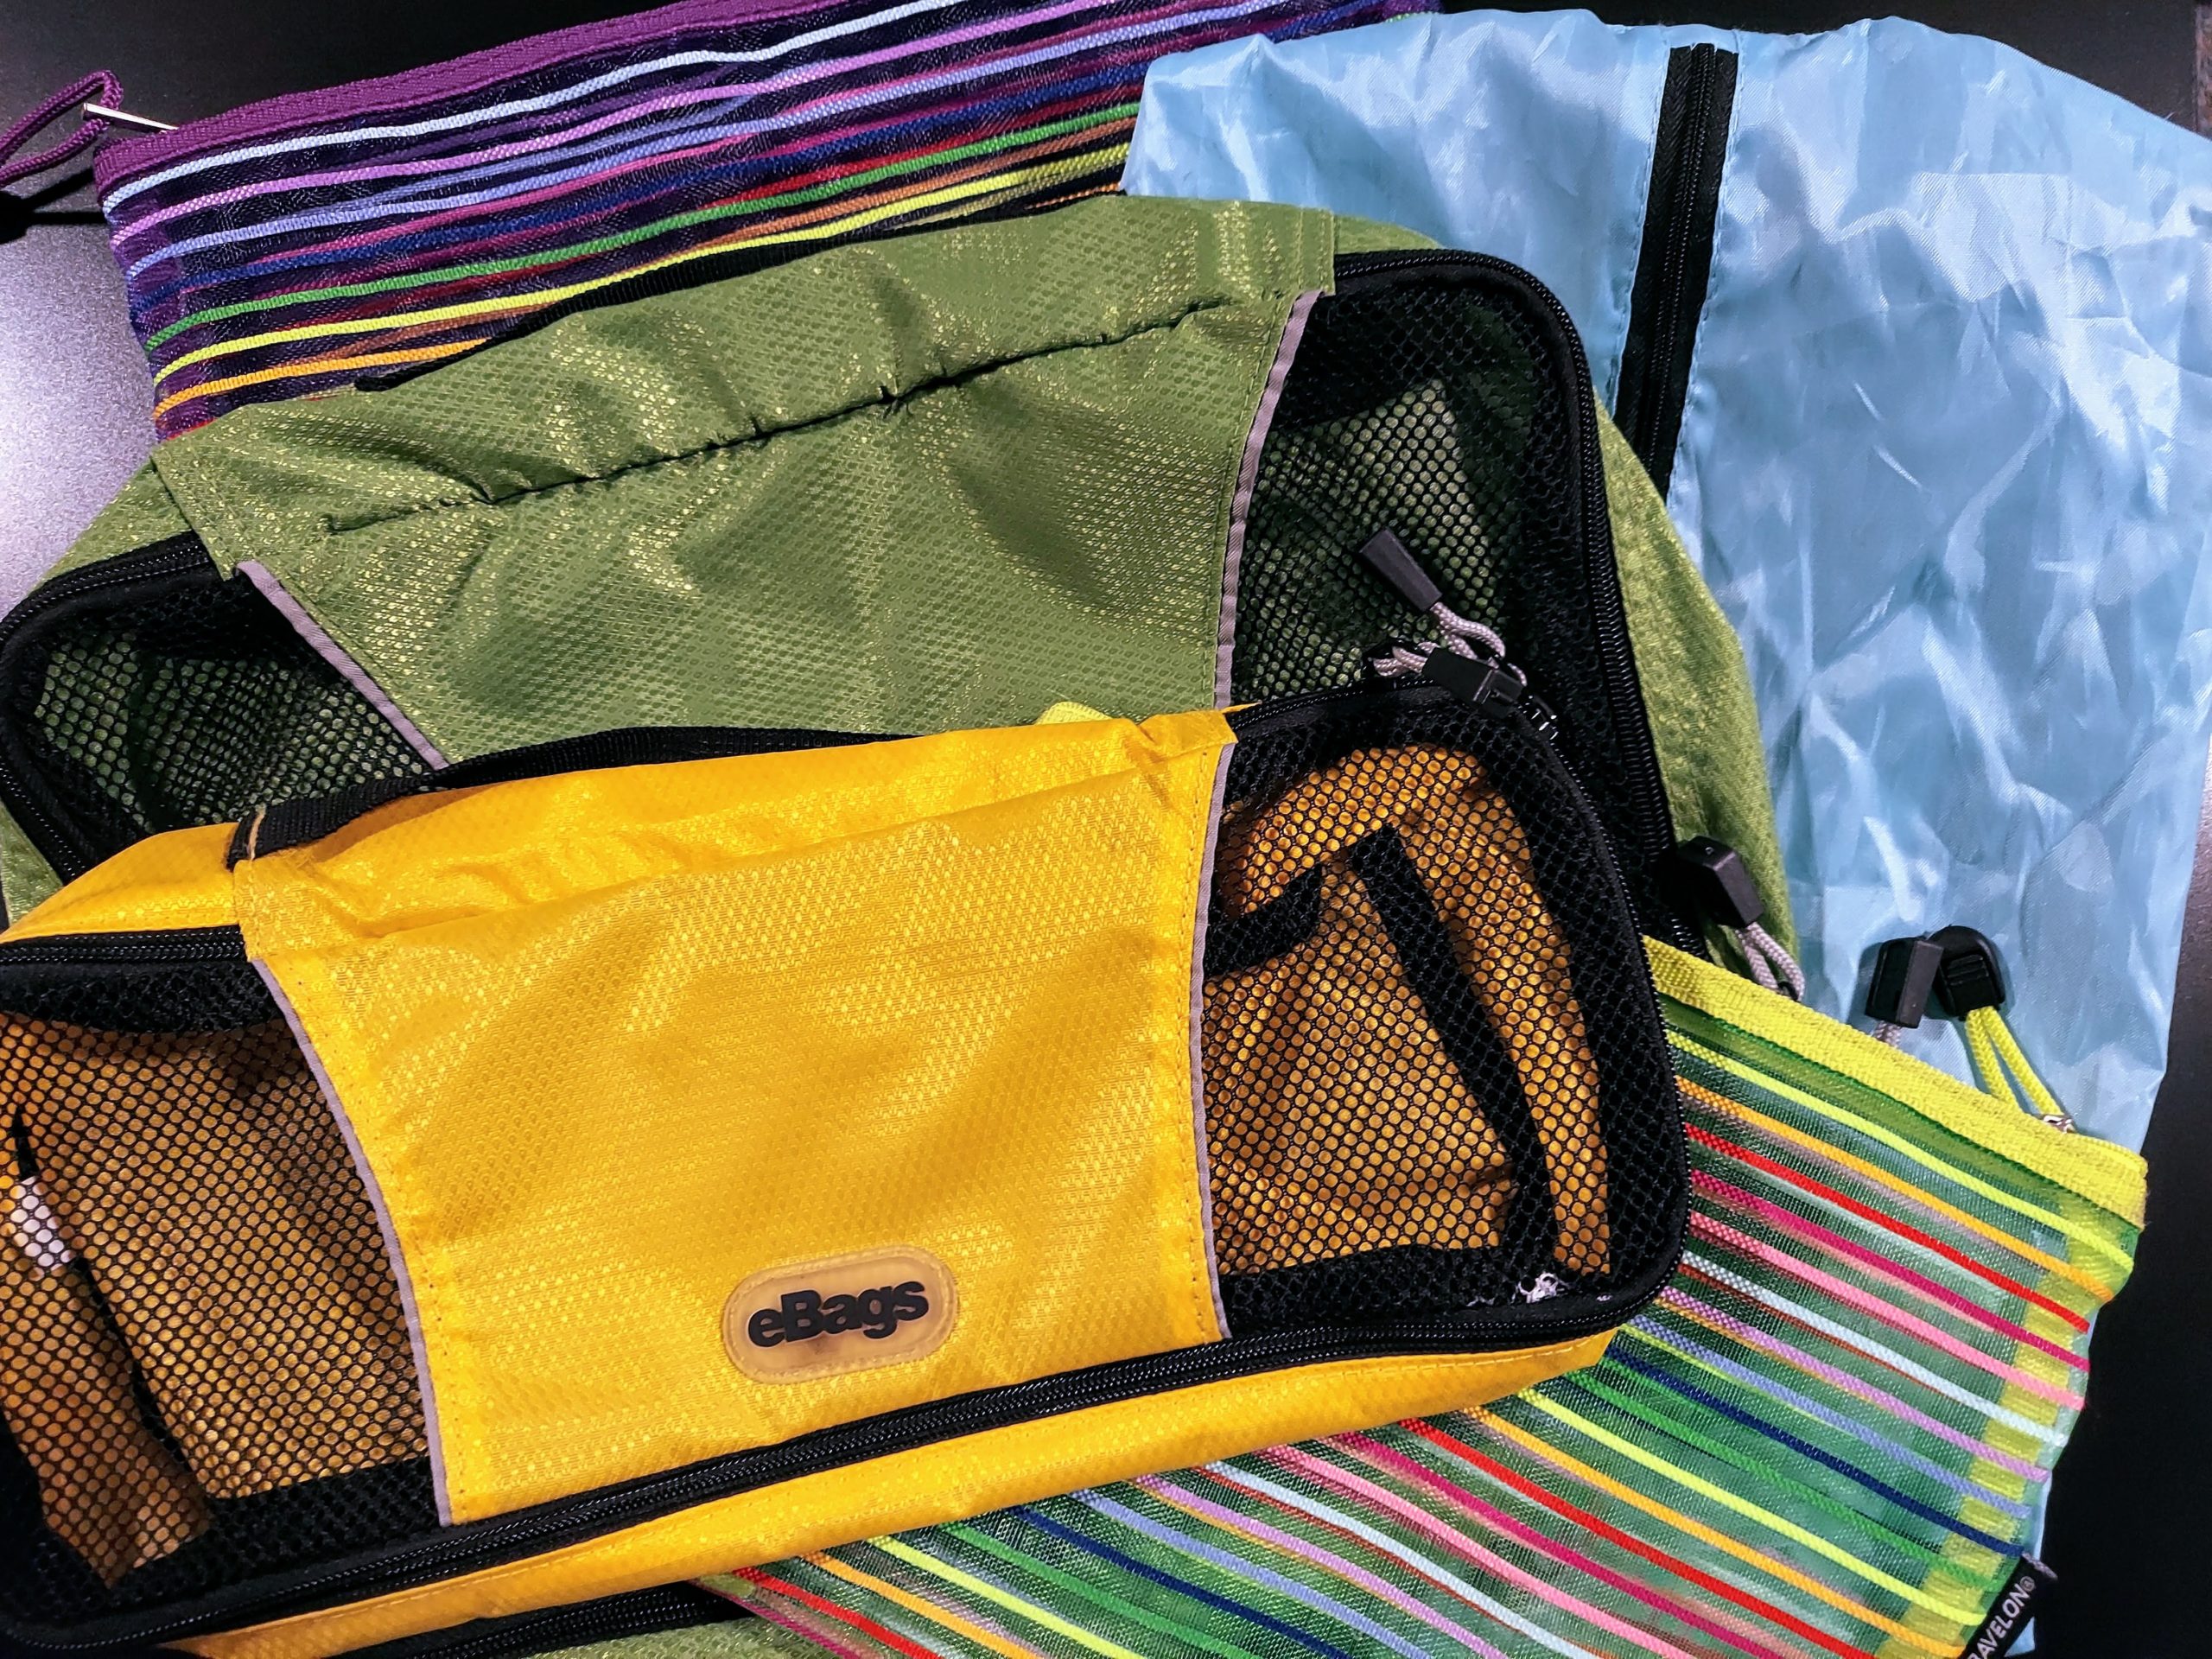
    These cube organizers for traveling are also great when camping in your car or SUV. I used them for clothing items as well as keeping certain electronics together.  For example, in one of mine, I put all my GoPro gear, chargers, gimbal, batteries, etc.  Then I always know where my GoPro accessories are.  “Oh, it’s in the green organizer.”  This sounds simple, but it really saves you a lot of time looking for things.

    Shoe Bags

    The last thing that sort of falls under organization is shoe bags. I use these when I travel to keep my shoes from getting my clean clothes dirty.  However, they are also useful for carrying extra shoes, like flip-flops (don’t forget to pack those for your trip around camp), and I also sometimes use them to store socks in.  So it makes socks easier to find rather than rummaging through a duffel bag.

    4) Portable Power for Car Camping

    You’re essentially living in your car when you’re car camping or SUV camping.  This means you’ll need some way to charge your camera batteries, cell phone, laptop, and any other miscellaneous electronics you travel with.  I purchased the Jackery Portable Power Station Explorer 300 before my trip, and I loved it!  

    I was able to charge my Nikon batteries, GoPro batteries, cell phone, laptop, drone batteries, and even power my little coffee grinder when I needed some freshly ground coffee beans.  

    You can charge the Jackery in the car when you are driving, or if you’re like me, you’ll probably want the occasional stay at a motel to take a real shower and feel a little more “human.”  Let’s face it, camping in your car is still camping.  

    Many of the campgrounds in the National Parks do not have showers, so eventually, you’ll need something.  So when considering your charging needs, you can plan to use a small generator like the Jackery and then use stays at a motel or KOA for extra charging as needed.

    If you plan to bring a portable shower and stay off-grid for longer periods of time where you won’t be driving (or staying at a motel) to charge your Jackery, then you might also consider purchasing one of their solar panels, which will charge your Jackery without needing to run your vehicle. 

    5) Airflow & Ventilation

    One thing you’ll notice if you crawl into the back of your car or SUV and close all the doors is how quickly things can get stuffy, and you’ll most likely find yourself wanting some airflow, especially if it is warm out. 

    Fans

    I used this rechargeable fan which, believe it or not, was really nice to have in the desert heat.  Even the small amount of air blowing on you at night when it’s hot will really help! Plus, it also has a built-in LED light. I liked that I didn’t need batteries for it either. I never had to recharge it on my trip, so it lasted a pretty fair amount of time between charges.

    Bug screen covers

    I purchased two different types of these, and I’ll admit, neither was perfect.  Getting ones that fit your vehicle just right can be a challenge.  The first set I purchased has larger holes which are nice as it allows more air in.  However, I also have to believe they could potentially allow some bugs in too. The second set was a thin, tight mesh material with perhaps too little ventilation as it didn’t seem to let much airflow in.  

    That being said, if it is really hot, you’re going to want some airflow; these allow you to keep your windows rolled down about halfway to allow airflow but keep the bugs out. You can see them in the photo above on the windows on either side of the sheet I had strung across the rear seats.

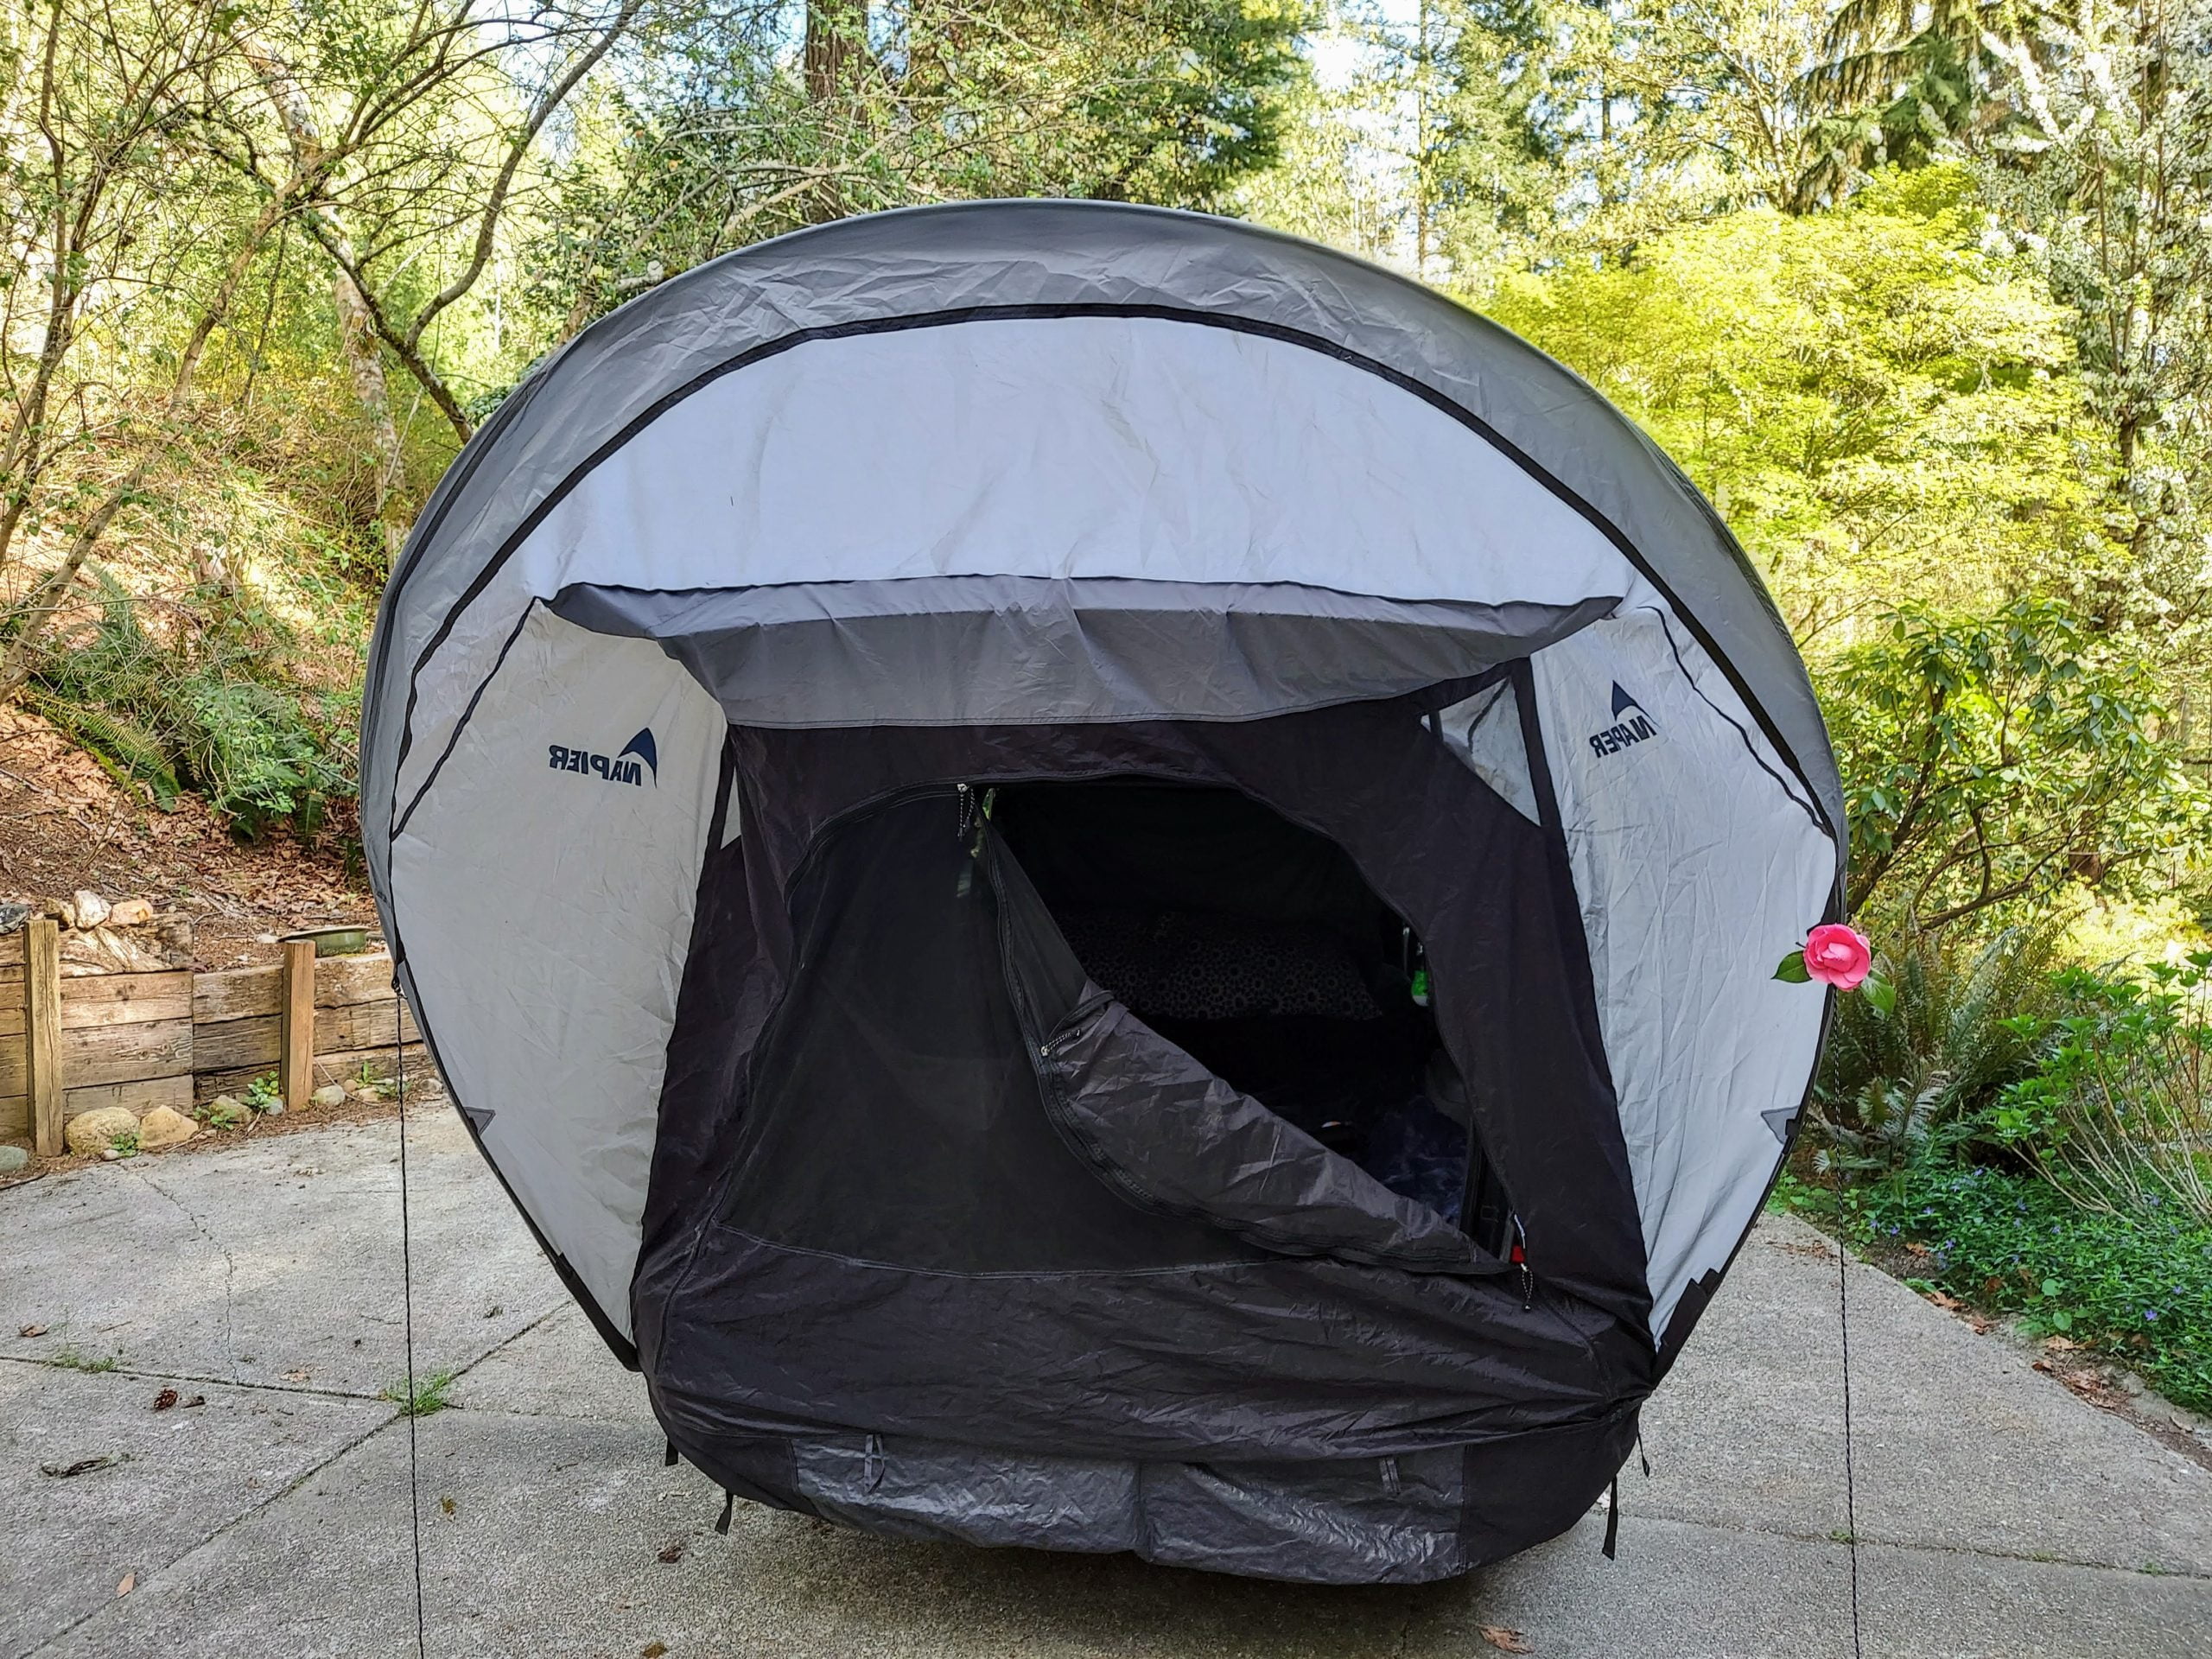
    SUV Tent for Car Camping

    The last item that I tried on this trip was an SUV tent attachment.  This turns your SUV into a tent.  It gives really nice airflow and also provides easy rear entry and access to your sleeping area.  This was nice because in my MDX, once I close the rear hatch, I can’t open it. I have to crawl out the side door when I want to get out again.  So with the SUV tent, you can unzip it like you would a tent and climb out the back.  As I mentioned before, if you use this, make sure to shut off your dome lights since the rear hatch is open when the SUV is attached.

    Napier sells this SUV Family tent which attaches to the back of your vehicle and can also be used as a traditional tent on its own.  It’s a bit pricey, but it would allow for a couple to sleep in the back of their vehicle while the kids or other companions slept in the tent portion.  It also has the added benefit of being used as a sitting area during the day to read or take a break from the sun.  So although pricey, depending on your needs, you may want to consider it.

    I used the Napier Sports Cove SUV tent, and it worked very well and was easy to set up. I’d say it takes about 5-minutes to attach to the vehicle and probably about the same to take it down.  I also demonstrate how it attaches to the vehicle and how easy it is to get in and out of the car in my video.

    Car Camping Wishlist Items: “Nice to Have”

    After taking my first maiden voyage of camping in my SUV, there are some changes I think I’ll make for future trips.

    One simple item I want to invest in is a mini-fridge.  I looked at these before I left but decided I wasn’t ready to spend the money.  However, trying to keep fresh ice in the cooler while spending almost a month in the desert was a little bit of an inconvenience.  With a mini-fridge/electric cooler made for cars, I can charge it in the car or use my Jackery to run it.  This eliminates my need to purchase ice.

    The other thing I plan to make before I take another SUV camping trip would be a platform for the bed.  I’ve seen lots of builds by people online (like this one), and I want to create something that would allow me to organize my belongings underneath my bed, thereby eliminating the need for me to move things around each day from the rear seats to the front seats to put my bed down.  With storage under the bed area, I could leave the bed in place during the entire trip.  That would be really nice!  

    If I planned to spend more time camping on BLM land, where typically you have no bathrooms or privacy, then I would consider getting one of these instant shower shelters.  You can use them for showering, changing, and I’ve read some people place a porta-potty in them for a makeshift restroom.

    Final Thoughts

    So there you have it!  These are things I highly recommend when car camping or SUV camping. You may also want to consider adding some of the wishlist items before you take your first car camping trip.  

    I know I don’t go into all of the gear I used, but you can rest assured I had my coffee camping gear with me!  Plus, I used RISE oat milk and almond milk as both don’t need to be refrigerated until after opening.  This is very convenient for storing!

    If you are a seasoned car camper and want to share what you have found useful when camping in your car, please drop your insights in the comments below.  I’d love to hear from you!

    Happy Camping!


    *Disclaimer:
    Travelffeine is a reader-supported blog. When you buy via links on this site, we may earn a small affiliate commission at no cost to you. 
  • An Incredible One Week Oregon Road Trip

    This one-week Oregon road trip explores some of the unique and lesser-known places to see in Oregon State. I wrote this itinerary based on my own road trip leaving from Seattle.  Customize as needed to guide you from your home to each of these places to see in Oregon.  I think one week is enough time to see each of the features listed on this Oregon road trip itinerary. However, some might complete it in less time, and others might prefer a slower pace.  For example, my hubby and I did all of the things listed on this itinerary, except the side trip to Crater Lake, in 4 nights and 5 days of driving.

    Oregon Road Trip Summary

    • Time Needed to Complete: About 1 week
    • Leaving From: Seattle, WA
    • Type of Activities: Hiking, Camping, Photography, Drone Photography, Exploring Oregon’s Natural Wonders
    • Approximate Total Miles (if leaving from Seattle): ~1400 miles

    Map of This Oregon Road Trip

    Click on the map to get driving directions to each location, feel free to customize according to your start/end points. 

    Overview of Stops on this Oregon Road Trip

    • The Alvord Desert

    • Oregon’s Painted Hills

    • Smith Rock State Park

    • Crater Lake

    • In-N-Out Burger (Yes, this is considered to be an important stop on this road trip.)

    The Alvord Desert

    This remote section of Oregon State is rugged and beautiful! Enjoy the drive through sagebrush dotted hills, deep canyons, mountain views, and gravel roads leading to the middle of nowhere.  Relax in the Alvord Hot Springs, embrace your inner race car driver, and soak in the desert sun. This is a destination for the adventurous! It is a highlight on this Oregon road trip itinerary and is a stop you won’t soon forget! Read my post Exploring Alvord Desert and Hot Springs in Oregon for more tips on planning your adventure here.

    The easiest way to navigate to the Alvord Desert is using the Alvord Desert Hot Springs address and then going into the desert from there.

    Alvord Desert Hot Springs
    36095 E Steens Rd
    Princeton, OR 97721

    *Optional Add-On: A day spent exploring Steens Mountain. There are beautiful hikes and viewpoints at Steens Mountain which borders the Alvord Desert. If the weather is good, consider spending the day exploring the scenic Steens Mountain Loop Road.  However, as with the Alvord Desert, prepare for driving on unpaved gravel roads with rugged terrain and little cell service.  

    Oregon’s Painted Hills

    Oregon’s Painted Hills is just another in this state’s selection of unique destinations. These brightly colored hills located in the John Day Fossil Beds National Monument are the result of ancient volcanic activity.  You’ll journey past rolling farmlands and suddenly find yourself surrounded by hills painted in bright reds and yellows. They really are an unusual find amongst the ranches and green pastures. This Oregon road trip stop surprised me as I never realized Oregon had so many fascinating natural features. I was left with a greater appreciation for this beautiful state.  Read Visiting Oregon’s Unique Painted Hills for more information on how to get there.

    John Day Fossil Beds National Monument- Painted Hills Unit
    37375 Bear Creek Rd
    Mitchell, OR 97750

    Smith Rock State Park

    You will love the rugged beauty of Smith Rock State Park. It’s craggy rock cliffs, sweeping vistas, and beautiful river walks winding through the park. If you’re into rock climbing, hiking, or mountain biking, this is the park for you! Smith Rock State Park was a favorite stop of mine along this Oregon road trip. We only spent a few hours here, but I could have spent days photographing its beauty and exploring all the trails. Read more about our hike at Smith Rock State Park: Misery Ridge Loop Trail.

    Smith Rock State Park
    Terrebone, Oregon 97760

    Crater Lake

    My hubby and I did not stop at Crater Lake on this latest Oregon road trip due to our time constraints. However, if you’ve got a week to make this road trip and you’ve never visited, then I recommend you include it in your route.  

    Just a word of warning before you go, the journey to Crater Lake is not for the faint of heart. You drive up the mountain with nail-biting drop-offs. Keep your eyes on the road, and soon you’re rewarded with gorgeous views of this volcanic lake.  It is such a unique natural setting that everyone should see it at least once.  I visited years ago on another road trip with a friend, and its gorgeous blue waters are a beautiful sight to behold. 

    Read the Department of Interior’s blog on 12 Things You Didn’t Know About Crater Lake for further inspiration. You can also visit the Crater Lake National Park website for information on road conditions, where to stay, and what’s open.

    Crater Lake Observation Station
    Rim Drive
    Crater Lake, OR 97604

    In-N-Out Burger

    If you’re from California, you might not understand why an In-N-Out Burger is highlighted as a stop along this Oregon road trip.  However, if you’re a Washingtonian like me, who loves In-N-Out, you’ll get it.  There are no In-N-Out Burgers in Washington State and it was only recently that we had the option in our neighbor state of Oregon.  So, I knew that no road trip to Oregon would be complete without including at least one stop at In-N-Out!  If you’ve never had In-N-Out then you’re missing out! 

    I love their cheeseburger with a strawberry milkshake.  Sometimes I ask for it animal style which means they give me a yummy grilled onion relish in place of the raw onion on the regular cheeseburger.  One of the things I love about In-N-Out Burger is their consistency.  I know no matter which location I stop at I will get a consistently good burger at consistently low prices.  Just trust me on this, and give them a try.  I’m starting to salivate just thinking about them, so I’d best move on.

    This is the address for the location we stopped at on this road trip.

    In-N-Out Burger
    6280 Keizer Station Blvd
    Keizer, OR 97303

    Final Thoughts & Tips

    Download an offline map of Oregon before your road trip. Since a lot of this road trip passes through Oregon’s remote areas, there is little to no cell service near many of these destinations.  Having an offline map is a huge help, especially when navigating places like the Alvord Desert.  Also, a printed road atlas is never a bad idea either, but at a minimum, have the offline map.

    Pack road trip essentials like extra water, road tunes, snacks, a good spare tire, jumper cables, an emergency kit, and a portable charger for electronic devices.  Also, make sure to keep your car fueled up as gas can be few and far between in some of these areas.  The Alvord Desert is the most remote of the destinations, so make sure to read my guide for visiting there and my tips for preparing for the trip. You may also want to read AAA’s guide to road trip car maintenance to make sure your car is ready for your trip.

    Places to Stay
    We camped at Alvord Desert, and then stayed in a hotel in Princeton for our visit to Oregon’s Painted Hills, and also stayed in a hotel in Redmond, Oregon for our visit to Smith Rock State Park.  There are two campgrounds at Crater Lake National Park open only in the summer. Check 
    the park’s website ahead of time for the latest information and how to reserve a spot.

    Talk to locals if you are unsure about areas that are okay to drive in, or for information about weather conditions, and places to see.  Locals know their area and are usually more than happy to share their first-hand knowledge.

    This Oregon road trip itinerary really highlights the variety found in this state. Prior to this road trip, most of my visits to Oregon were relegated to the coast, which is beautiful. However, there is so much more to Oregon than just its coastline.  I think you will be surprised to discover the natural beauty and unique volcanic features along this Oregon road trip.  

    Happy Exploring!

  • An Unforgettable Road Trip to Key West

    This post is a journal of the day’s sightseeing and experiences.  I also wrote some travel guides to help you on your next trip to the Florida Keys. You’ll find these linked at the bottom of this post.

    I visited Key West once before in the late ’90s; however, my husband had never been there before.  He told me he wanted to see the Seven-Mile Bridge as he had seen it in the True Lies movie with Arnold Schwarzenegger. 

    I’m sure vacations have been planned on less. So we drove from Orlando, where he had just finished with a business conference, to Islamorada. We spent the night there before continuing our road trip to Key West.

    Now before I continue, I thought I should put in a small disclaimer, just in case you’re reading this as a bedtime story to your kid or something.  

    Disclaimer: There are references to nudity and naked bodies in this post; if that bothers you, read one of my other posts instead.

    Morning of our Florida Keys Road Trip

    We packed up our camera gear, drone, swimming clothes, bottled water, and sunscreen and headed out the door!  First stop was coffee and breakfast at the Midway Cafe and Coffee Bar in Islamorada. 

    I order some avocado toast and key lime pie for breakfast and a bottomless cup of coffee. I love a bottomless cup of coffee.

    When I received my key lime pie, I was surprised to see it made with an actual pastry crust, not the graham cracker crust I was used to. You can read more about why that is in my post on finding the best key lime pie in the Florida Keys

    I enjoyed breakfast at the Midway Cafe and recommend you stop when you’re in the area. They have a little space where they sell handmade jewelry and other locally crafted items.  It’s a brightly-colored, sunny spot, perfect for enjoying some coffee before heading to Key West.

    midway cafe mug and key lime pie
    Some say this is the traditional way to make a key lime pie.

    After we finished, we went out to the car, where hubby was so excited to be driving a convertible Ford Mustang for our road trip.  He made sure I took a few photos of him driving, and of course, we had a Florida road trip playlist that included “Ice Ice Baby.”

    Back on the Road

     It was great fun driving with the top-down and the wind blowing in our hair.  However, I will say we didn’t leave the top down for our entire day of driving.  For one thing, it is just too hot! And second, my hair-whipping about into a frantic rat’s nest did get old after awhile.  It is still a lot of fun, and I recommend it if you get the chance for a free upgrade, like we did, to go for it!

    man driving in convertible
    Hubby loved driving with the convertible top down, wind in his hair.

    Photo Stop at Duck Key

     This one made me laugh, so I took a picture of the sign.  Little Duck Key, get it? Hmm, perhaps you had to be there.

    Little Duck Key road sign in Florida Keys
    I love the play on words. The Florida Keys have lots of interestingly named Keys, which is part of the fun!

    Hubby brought his drone, and we did a lot of research, including using apps that tell us whether it is okay to fly, what times of the day is better, and then we also read the local forums to find out where local Floridians went to fly their drones.  

    Unfortunately, there have been some not-so-bright drone owners who have flown their drones into restricted areas such as airports and other places most people would never dream of doing! This creates a very complicated and restrictive process for the rest of us drone owners.

    So, after doing our do-diligence, we found a spot along the old seven-mile bridge that, according to locals, was approved for drone flying.  We walked a little way up the bridge, away from other people (although there were some other tourists who at first gathered around hubby, as the drone always seems to bring spectators).  

    Once hubby felt we were a safe distance from people, and he had an open area to land when needed, he put the drone up in the air.

    man walking up old seven-mile bridge in Florida Keys
    Walking the old seven-mile bridge. Beautiful, but hot!

    The Heat Makes Me Crabby

    I’m not sure how long we were out flying, but we did walk as far as we could on this section of the old seven-mile bridge, and needless to say, when I left the car, I had not planned on spending so much time walking in the hot sun.  I didn’t put on sunscreen when I left this morning, as we headed to breakfast and then I thought I’d apply it afterward. I forgot.
     

    So, now my shoulders are turning a bright red, and my feet are tired from walking miles on concrete, and I’m getting a little crabby.  This always seems to happen when overheating. Hubby and I discussed this once when we were in Thailand. We were walking up the road in Koh Lanta, headed to a “secret” beach, and he mentioned how heat affects the way people act.  

    Sure enough, about 5 minutes into our walk, the conversation turned into a “whose idea was it to walk here anyway” argument.  However, soon, we reached the beach, and as soon as we cooled off in the beautiful turquoise water, our attitudes were miraculously back to cheery and chipper.  

    That was how my walk back on the seven-mile bridge went. Of course, after I got back to the car, drank some water, put on some sunscreen, and turned on the a.c., I adjusted my overheated attitude, and we were on our way again.

    This is, of course, the side social media doesn’t typically show.  You see us in the pictures smiling together and looking like we never have a care in the world.  Uh, no, we’re humans, only humans.

    Sombrero Beach in Marathon, Florida.
    Sombrero Beach in Marathon, Florida.

     Next stop Sombrero Beach

    Sombrero Beach is reportedly one of the best beaches for swimming in the Florida Keys.  For those of you who don’t know, the Florida Keys are formed from a protected reef system.  In short, there are very few swimmable beaches here. Often, sand is brought in to form man-made beaches.  So we headed for Sombrero Beach in Marathon, to check it out.

    When we arrived, we found it under construction.  The restoration project looked like it was in its final stages, and it appears to be a fantastic place to bring the family and spend the day.  The one area you could still access had people swimming and sunbathing, so I’m sure this beach is a popular one and even more so once the restoration project is complete.

    I hand hubby my camera for a little bit, not sure why.  He took this “artistic” photo. I’ll let you see if it speaks to you.

    plastic dinosaur on Sombrero Beach in Marathon Florida
    “Beach Art”

    Key West Here We Come!

    With all the time we’ve had in the sun, we now prefer to sit in the air-conditioned car.  So we decide to keep on rolling until we arrive in Key West. We can see anything we miss on the way back.  A road trip through the Keys is about the journey, not the destination.

    We Have Arrived!

    We arrive in Key West and make our way for Old Town. Usually, I drive closest to my first sightseeing stop and then find a parking spot. Since today is Saturday, I navigate hubby to the nearest public parking garage, where we park and instead to walk to our destinations.

    This was the best decision we could have made!  We didn’t discover until later, but we arrived in Key West during their Fantasy Fest.  The streets were blocked off for vehicle traffic, and crowds of pedestrians were everywhere!  So, although the heat felt unbearable to a Pacific Northwestern like myself, I was happy we had parked and didn’t get tangled up in the mess of crowds and closed streets.

    Lunch Stop

    We head for lunch at Caroline’s Cafe on Duval Street. Breakfast was a long time ago, and we are hungry! As we walk there, we notice people carrying folding chairs and dragging coolers behind them.  I say, “there must be a parade today.” Well, I was right, but it wasn’t quite what I expected.

    As we cross the street to Caroline’s Cafe, I notice two people walking across the road towards us.  I also see they have no clothes on. Their bodies are painted with patriotic “clothing,” stars and stripes “shorts” and giant “stars” up top. I think, hmm, that’s interesting, have we stumbled onto some Mardi Gras festival?

    Let me say before I continue, that lunch was fabulous!  I had the blackened chicken pasta, and it was SO good!! I highly recommend it if you are ever in Key West.

    blackened chicken pasta
    This blackened chicken pasta was so good! Hubby kept nibbling off of my plate as it was better than his Cuban sandwich.

    Lunch-time “Sightseeing”

    So, as we sit down to order, I notice the people at the table directly across from us, are also wearing painted “clothing.” Now, I’ve been to Europe, seen lots of statues, and even a few nude sunbathers, but this, this was not something I had seen before. We’re Americans. We don’t do public nudity.

    So as I notice more and more people with their painted on clothing.  Hubby leans across the table and tries to oh-so subtly tell me to look behind me. I think in my head, “Um, what could you possibly show me that I haven’t seen yet!” So I peer over my shoulder, in an “I’m not turning to look at you” sort of way and see another naked painted person.  

    It’s at this point that I realize my husband doesn’t know that he is surrounded by naked people.  This is quite funny to me. So I also oh-so-subtly give him the nod to look at the table right next to us.  A lot of glitter and paint–that is all my friend. Glitter and paint.

    I will note here though that the men all have a grass skirt or some other covering for their lower front regions.  Their backsides, not so much.  

    rooster under the table at Caroline's Cafe in Key West
    The resident rooster and vacuum cleaner at Caroline’s Cafe.

    The Emperor’s New Clothes

     So, as the realization hits my husband, he says, “they’re naked!”  Yep. Bingo! He thought they were actually wearing something. Nope. Nothing but paint.  He made a trip to the restroom while we waited for our check and saw the line of people waiting to be painted.  As you can imagine, the people in line were wearing, um–the Emperor’s new clothes. Of course, the difference between them and the childhood story’s character was that they knew they were naked. They were naked as j-birds.  

    After lunch, we discussed his newfound realizations, and we laughed as he and I certainly had a new experience on this trip to Key West.  We saw things we’d never seen before. I guess that’s what traveling is all about! We also discussed the problems that might arise from the lack of clothing.  

    Like where do they put their credit cards and wallet?  Does every painted person bring a clothed person with them to carry stuff?  What happens if they sweat or get wet? This question’s answer was discovered by hubby’s trip to the restroom, where he saw a sign stating that the paint was waterproof.  Phew! That could have caused some problems.

    Fantasy Fest

    Fantasy Fest was created over 40 years ago as a way to increase tourism during Key West’s slow season.  So every October for ten days, the city turns into a festival that is a mixture of Mardi Gras meets Halloween.  The final weekend of the festival, which we just happened to arrive on, is when they block off a section of the city, for an adult-only area in which nudity laws are “relaxed.” 

    This is only in the sectioned off portion of the city and only during Fantasy Fest.  We did not see any children in this area, or much at all, which of course makes sense.  So, should you plan to visit Key West, during the off-season, you may want to keep this in mind when making your travel plans.

    And in case you’re wondering how much people pay for their paint jobs, prices range from $100 to $1000. This depends on how much of your body is painted and how detailed of a design you want.

    Kapok Tree in Key West

    We left the restaurant and headed in the direction of our next stop, Ernest Hemingway’s former Key West residence.  As we walked there, the heat felt unbearable. Soon I began to think there might be something to wearing no clothes.

    Kapok tree Key West
    A Kapok tree in Key West.

    We passed this beautiful Kapok tree, which reminded me of the banyan trees in Maui.  It was a nice place to stop in the shade. We kept crisscrossing the street to follow the shady side of the road.  That is how hot it was in Key West. I later learned that they had a 234-day hot streak this year.  During that time, Key West had temperatures at 80 degrees Fahrenheit or warmer. 

    Ernest Hemingway’s Home

    When we finally arrived at Ernest Hemingway’s home, we discovered you had to pay in cash.  We did not have any cash, and I was okay skipping it (when I’m hot and tired, I tend to lose interest). However, hubby asked the woman at the ticket window, “is it air-conditioned inside?” She replied “yes” that it was, and there was also an ATM around back to get cash.  Well, that was enough for him. He heard the magic words “air-conditioned” and might have paid any price to get some reprieve from the heat.

    Ernest Hemingway's Home in Key West
    The former residence of Ernest Hemingway.

    So I got the cash, and we went inside where it was nice and cool. The inside of the home is decorated with some of Hemingway’s original furnishings. And on display are also some of his books, his typewriter, and movie posters from the many movies adapted after his books.

    There is a swimming pool outside the house that calls to you to jump in; however, this is, of course, not allowed.  We peeked inside Hemingway’s writing studio. I told hubby how nice it must be to have an entire studio dedicated to writing.

    Soon, our tour was over, and after another stop in front of a fan, we went out into the heat to continue our sightseeing.

    Southernmost Point in the Continental U.S.

    Because it was hubby’s first trip to Key West, I thought he should go to the Southernmost Point in the Continental U.S.–just to say he had.  As we walk, the sweat drips down our faces, and my husband assures me he does not need to walk all the way to the Southernmost Point.  However, we were almost there, so we might as well finish.  

    We arrive only to discover there is a line, a line of people who all want a picture with the marker that shows they are at the Southernmost Point in the Continental U.S.  It is crazy hot out! Hubby and I stand across the street in the shade, neither of us have any interest in standing in the hot sun for this photo opp. 

    Southernmost Point Key West
    The line stretches outside the frame. The heat is underrepresented in this photo.

    We also conclude that we are way too hot, tired, and sunburned to walk back across town.  It is at that moment, a man pedaling a rickshaw comes down the street, we ask him if he can take us to our next stop, the Key West Key Lime Pie Company. Thankfully, he says yes, and we hop on board!

    Our driver pedals away almost effortlessly and chats with us about Key West and all the local sites.  He said that this is cool, fall weather compared to the summer, where it can get over 100 degrees Fahrenheit, plus humidity!  Yikes! Note to self, never visit Key West in the summer.

    He takes us as far as he can before the closed roads prevent him from going further, and we thank him for the ride.  This is the best $20 I have spent in a long time. 

    Key Lime Pie in Key West

    We continue through the crowds, passing creatively painted people to make our way to the Key West Key Lime Pie Co.  The man behind the counter is so friendly and welcoming. We purchase one of their mini key lime pies to share. The man pipes freshly made whipped topping on it before serving it to us. Yum!

    Mini key lime pie from Key West Pie Co
    The freshly piped whipped topping was a nice touch to this mini key lime pie.

    We enjoy our pie and ice-cold water before walking down the street to our next stop, Kermit’s Key West Key Lime Shoppe.  Yes, I have more key lime pie, all in the space of 10 minutes. I’m pretty sure I’ll sweat the calories off anyway!  

    We sit down to share a slice of key lime pie at Kermit’s. The pie at Kermit’s is everything I looked for in a key lime pie.  Wonderful tart lime flavor with a buttery graham cracker crust–delicious!  

    Driving Back Through the Florida Keys

    It is late afternoon, and with the parade just around the corner, we both agree we’d rather not get stuck in traffic. Although we may not have hit all of the sights in Key West, we certainly have had a unique experience. So we make our way in the heat to the parking garage, excited to turn the air conditioning on and begin our drive back to Islamorada.

    We enjoy the drive back through the Keys, put the top down again, turn up some fun Latin music, and pretended to be carefree teenagers. Of course, we had to stop for selfies at this giant lobster, and we weren’t the only ones. Another man in a red convertible Chevy Camaro stopped and asked if we’d take his picture with the giant lobster too. Nothing like sunshine and warm breezes to make you feel like a kid again!

    selfie with giant lobster
    Who can pass up a selfie with a giant lobster?

    We end the evening with a gorgeous sunset while watching a thunderstorm across the water in the distance. It was a fun day!  

    One thing is for sure if you travel with me, things are bound to be interesting! This was undoubtedly one unforgettable road trip to Key West. Here are some more ideas for what to do during your trip to the Florida Keys and make sure to discover where to get the best key lime pie in the Keys too.

    Collect Memories, Not Things!

  • Road to Hana: An Unforgettable Maui Day Trip!

    The Road to Hana is one of the best day trips you can take while in Maui.  No Maui itinerary would be complete without including the road to Hana. The drive is an adventure in itself. It has 620 curves in its short 52 miles!  You will see gorgeous waterfalls, hike thru dark lava caves, walk across black sand beaches and so much more!

    How to Plan for the Road to Hana

    Plan the whole day for your drive to Hana. Make sure and get up early to beat the crowds and tour buses. You won’t regret getting an early morning start when you have one of the many waterfalls all to yourself. Also, the sooner you go up, the more time you have to enjoy all the stops along the way and still be able to make it down before dark.  I think you’ll find, it’s a road you prefer to drive in the daylight.  So first things first, fuel up!  There is only one gas station in Hana, so fuel up before heading up the mountain.

    Getting to Hana

    It’s about 1 hour to mile marker zero from Lahaina and around 40 minutes from Kihei.  The beginning of the road to Hana starts just outside the town of Haiku. Haiku is where my recommended supply stop, Jaws Country Store, is located. You can use the embedded map below to get driving directions from your hotel or condo and plan for how long it will take you to get to the starting point. Even though it may only take around 3 hours to drive straight to Hana from West Maui, you will be making lots of stops along the way, which is why you need to plan for this to take up your whole day. And I can’t stress enough how important it is you get an early start!

    What to Pack

    If you are prone to motion sickness, I would recommend bringing Dramamine and riding up front if possible. Pack a picnic lunch (see my recommended stop below) as well as extra water and snacks. You have a full day ahead of you and it’s good to be prepared for any delays or emergencies that could come up. I also like to wear my swimsuit underneath a pair of shorts and a t-shirt, that way I am always ready to jump in the next swimming hole that tickles my fancy. Additionally, some of the hikes are best suited to strap-on sandals or tennis shoes, so bring something good for hiking as well as your flip-flops.

    Road to Hana Packing Guide
    Swimsuits
    Rain Jacket
    Sunglasses
    Tennis Shoes or Strap-on Sandals
    Sweatshirt
    Hat (sun protection)
    Flip-flops
    Drinks/Water
    Dramamine
    Cameras
    Bug Spray
    Hairbrush/comb
    Towels
    Snacks
    Smartphone
    Sunscreen
    Picnic Lunch *Jaws Country Store on the map
    *Optional Change of Clothes (for dinner that evening)

    Self-Driving Guide

    I have included some of my favorite stopping points along the road to Hana on this Google Map. You may also want to download a self-driving guide from the app store. Shaka Guide or GyPSy Guide to Hana are both excellent app choices. You can download these to your phone for offline use. This saves battery and you will avoid losing connection in case your cell service doesn’t work on the road to Hana. These apps are great as they will not only recommend areas of interest along the road to Hana, but they will also give you historical information that you would otherwise miss on your own.

    Stops Along the Road to Hana

    How to use this map: Click on the star to the right of “Road to Hana” to add this to your own Google Maps. You can also click on the icon to the left of “Road to Hana” for a drop-down menu of all the places I have marked on the map. Click on any of the icons on the map to pull up driving directions and specific information.

    Jaw’s Country Store

    This one is actually before the official start of the road to Hana, however, it is a great place to pick up that picnic lunch I mentioned before. It is the perfect one-stop shop to begin your drive to Hana.  Chances are you missed breakfast in your effort to get an early start.  No problem!  Jaw’s Country Store has you covered!  Get your coffee fix and breakfast while you pick out your picnic lunch for later today.

    Twin Falls Maui Waterfall

    I stopped here on my very first trip to Maui and although I had a lot of fun here, I recommend you skip this on your way up to Hana. There are so many great waterfalls along the road and this one takes a bit of time walking to it and back. It can also get busy with tour buses stopping here.  So continue past it and instead stop if you have time on the way back and want to see one more waterfall and swimming hole.

    Garden of Eden

    I stopped here with my husband on our first trip to Hana and we had the whole place to ourselves (thanks to an early start). It was such a beautiful garden to wander thru, admiring the views, the bamboo “forest” and an array of native plants. They have chairs you can lounge in and relax before returning to your drive to Hana. It was well worth the stop!

    Kaumahina State Wayside

    This is a great rest area to stop and use the restroom. Enjoy the scenic viewpoint and stretch your legs before continuing on your journey to Hana.

    Ke’anae Lookout

    This stop is a small detour off of the road to Hana, but I think it is well worth the extra effort.  Turn off the Hana Highway on to Ke’anae Road and follow the road all the way to the end where you will turn around and come back the same way when you are finished.  Make sure to stop at the different viewing areas to watch the waves crash against the shore.  Towards the end of Ke’anae Road, you will find the Lanakila Ihiihi O Iehowa Ona Kava church, it is the only building to survive the massive tsunami that wiped out this village in 1946.

    Take time to read the plaques posted that share information about this historic event. This short, beautiful detour, is full of historical significance.  Oh and in case you didn’t take a bathroom break at Kaumahina State Wayside, they do have public restrooms.  There is also a food stand where you can get banana bread and shave ice in case you need a snack.

    Keanae Church on the road to Hana
    The historic Lanakila Ihiihi O Iehova O na Kaua Church.

    Ching’s Pond

    If you’ve been anxious to go for a swim, here’s your chance.  If you can handle the “refreshing” (aka very cold) water at Ching’s pond it is a beautiful spot for a quick swim and waterfall photo opp. This is a popular swimming hole with locals and visitors alike.  The climb down is a little steep, so I recommend wearing your strap-on sandals or sneakers for the climb down. This is a fun stop on the road to Hana and I think it’s worth the icy plunge! Don’t expect to spend too much time here though, it’s more of a quick jump in, take photos, get back to the car and warm up, kind of stop.

    Pua’a Ka’a State Wayside & Falls

    The Pua’a Ka’a State Wayside is another great rest area stop along the road to Hana.  There are restrooms and picnic tables, not to mention more waterfalls, making this a great option to eat that picnic lunch you brought.  Eat lunch and enjoy the waterfalls (and lots of feral cats roaming around) before continuing towards Hana.

    Waterfalls on the road to Hana
    Exploring the Pua’a falls after our picnic lunch.

    Hana Lava Tube

    This was one of my favorite stops on the Road to Hana.  I mean, how often do you get a chance to walk thru a cave that was carved out by hot lava?  You get a chance to experience the darkness of the lava tube as well as discover some interesting facts about what has learned to live in these dark tunnels. This will be a fun stop for adults and kids alike!

    Waianapanapa State Park

    You definitely cannot miss stopping at Waianapanapa State Park!  This beautiful state park is famous for its black sand beach.  It also has a blowhole, multiple hiking trails, and campground. Stop here and enjoy the blowhole, take photos of this gorgeous stretch of coastline and if you want, go for a swim off the black sand beach. Just be careful as there are no lifeguards and the waves are big and the currents often strong, so use caution! Additionally, you can take the short paved trail to the Wainapanapa caves.  Wainapanapa State Park is your last stop before reaching Hana.

    black rock beach at Wainapanapa State Park in Hana
    The black sand beach at Wainapanapa State Park.

    Hana

    You made it! Pat yourself on the back! Now check out this town that had a highway named after it.  If you need more snacks or drinks for the trip back, try Hasegawa General Store or the Hana Ranch Store. For most people who drive the road to Hana, this is where they turn around to head back down the mountain.

    However, for some, they have one more stop on their list– the Pools of O’heo or the Seven Sacred Pools. Now I only recommend doing this, if you left early enough in the day, as it adds a little over 1-hour round trip drive time from Hana. Plus another 30-minute round trip hike to see the pools and then any additional time should you decide to swim (conditions permitting).

    Tip:To see the Seven Sacred Pools at Ohe’o before the crowds arrive, drive all the way here first, then see all the sights in reverse order back down.  Better yet, camp at Wainapanapa State Park (reservations required) or snag a first come first serve site at Kipahulu Campground.

    Pools of Ohe’o (aka Seven Sacred Pools)

    To get to the Kipahulu Visitor Center, and the trailhead for the Kūloa Point Trail which takes you to the Pools of Ohe’o, you will need to drive about 40 minutes past Hana.  You will also need to pay an entrance fee for Haleakala National Park. If you plan to see the sunrise in Haleakala National Park, make sure to hang on to your receipt and as long as you go during the 3-days your receipt is good for, you won’t need to pay the entrance fee a second time.  This, of course, works the other way as well, if you just visited Haleakala for the sunrise, and have a valid receipt, you can use that here and avoid paying another entrance fee.

    Driving Back Down

    Hopefully, you started your day early enough that you are now driving back with some daylight to spare.  Either way, make sure to take it slow, watch out for pedestrians and be mindful of the locals who live on these roads.  They tend to drive a lot faster and know the roads much better than we do.  So if you see them wanting to pass, and can give them any space, go ahead, but otherwise, don’t worry, when they feel they can pass they will, whether you pull over or not.  Once you have made it all the way back down, you can then officially congratulate yourself for surviving the road to Hana!

    Tip: Plan ahead and reserve a table at Mama’s Fish House for dinner, it will make a wonderful ending to your day.  Just don’t forget to reserve ahead of time and to pack that *optional change of clothes I listed.

    Safety Tips for the Road to Hana

    Fuel up in Paia before beginning the drive to Hana.  There is one gas station in Hana, but it’s going to cost you! It makes a lot more sense to fuel up before starting your drive. Plus, it’s always a good idea to start any road trip on a full tank of gas.  If you get to Hana or take the extra trip to the Pools of Ohe’o, check your fuel levels then, and you can decide whether you need to fuel up again before making the drive back.

    Drive carefully and pull over when it is safe to do so to let other drivers pass.  Locals who live off the Hana Highway are often on their way to work or on their way home, so give them preference. Do your best to get an early start for your drive to Hana so you can make the return trip before dark.

    Swim with caution. There are some fun spots for swimming, but this area gets a lot of rain and the currents can be dangerous.  So if in doubt, stay out.

    When parking on the side of the road and walking to see waterfalls, exercise caution and watch out for vehicles.  And the same applies when you are in your car, watch out for fellow pedestrians and take it slow around the 600+ curves as you never know what’s on the other side.

    Final Thoughts on the Road to Hana

    Driving the road to Hana and seeing the sunrise at Haleakala are both day trips that shouldn’t be missed on your visit to Maui.  They are worth the extra effort. Just plan ahead and remember, the road to Hana is about the journey, not the destination. And what a journey it is!