I first learned about the Wieliczka Salt Mines reading the book 501 Must-Visit Destinations. Upon viewing the photograph of the salt chandeliers in the book, I knew I needed to see them for myself. After touring the Wieliczka Salt Mines, I feel I gained a new appreciation for salt and miners in general.
Imagine a tour that combines history, salt, sculptures, miners, and royalty, all from a dark labyrinth beneath the earth. Well, that’s what you get on a tour through the Wieliczka Salt Mines. This guide will help you plan your trip to the mines so you can see the salt carved chandeliers, walk on floors made of salt, and even taste the salt for yourself.
Brief History of Wieliczka Salt Mines
The Wieliczka Salt Mines are over 900 years old and still in operation today. Their history spans kingdoms and world wars and various periods of technological advancement. They are an impressive example of ingenuity and creativity. There are nine levels to the mine, and they descend to a depth of 327 meters (over 1,000 feet). Your tour will allow you to see only 2% of the mine. After you complete your visit, you will realize the significance of that and the vastness of the Wieliczka Salt Mine. Thankfully you are always with a guide. Otherwise, it is easy to see how one could get lost amidst the labyrinths of salt carved tunnels.
The Tour Experience
First off, let me say, if you struggle from claustrophobia or a fear of dark places, you may want to reconsider visiting the mines.
Although there are plenty of open spaces within the mine, you will need to travel down (and back up) in a somewhat cramped elevator and, in my case –an extremely crowded elevator. Then you’ll descend a lot of stairs to go even deeper into the mine before your guide will take you along paved pathways and into the various chamber areas.
You’ll have your choice of two tours in the mine. The Miner’s Tour and the Tourist Route. Both of these tours are approximately 3 hours in length.
The Miner’s Tour
As the name suggests, it focuses more on the mining aspect of the Wieliczka Salt Mine. You receive working suits and miner’s gear before you’re taken on a mining adventure! You’ll get to “mine” for salt and learn firsthand about the life of a salt miner. This tour is not suited for those with disabilities, and children need to be ten years old and older and accompanied by an adult. Reservations are recommended for this route and can be made online.
The Tourist Route
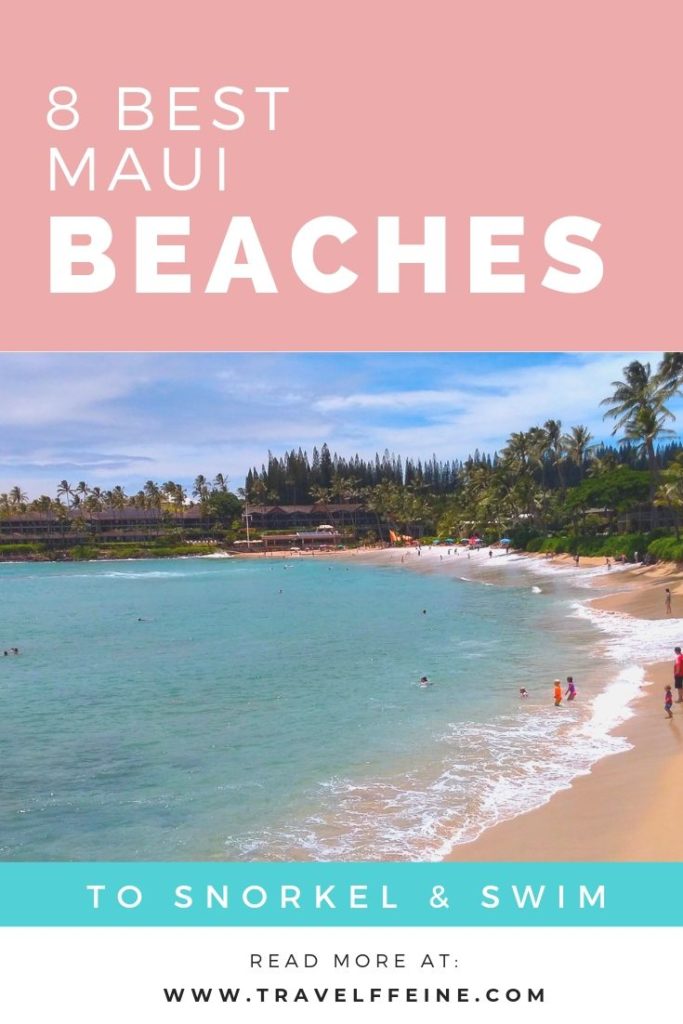
This is the route I chose during my visit. The tour gives you an overview of the history of mining and the technological advancements over the years. There are various displays along the way to illustrate what mining would have looked like during the early years. You’ll also tour beautiful chapels carved by miners throughout the mine’s history. You’ll see saline lakes and admire the raw black salt used to carve the many sculptures, artwork, and chandeliers.
Our guide was very knowledgeable and had a great sense of humor. The pace of the tour is steady, but not too rushed. If you want more time taking photos, then move to the back of the tour group so you can take your pictures and then catch back up.
Looking down into St. Kinga’s Chapel.
St. Kinga’s Chapel
The highlight of the tourist route is a visit to St. Kinga’s Chapel. St. Kinga’s is the largest underground chapel in the world (there are 20 total chapels within the mine). You’ll descend stairs into this enormous space 350 feet underground. Everywhere you look, you see salt. You walk on floors made of salt and admire sculptures and chandeliers carved from rock salt. It’s stunning!
Please note that this tour requires you to descend 800 stairs. Children are allowed on the tourist route. If you have disabilities, please contact the mine ahead of time so they can create a specialized tour, as only certain portions are wheelchair accessible. Reservations are not required for the tourist route.
Luggage Storage
Plan to store your bags in the provided luggage lockers. Small purses (35cm x 20cm x 20cm or smaller) are allowed, but no large day bags—plan to pack your camera gear and jacket and leave the rest in your locker.
Tips on Touring Wieliczka Mine
Photographs
Due to the dim nature of the mine, you may find it challenging to take photographs. Try to steady yourself as best you can. A monopod or walking stick will help immensely (if you have one). The main thing is that you don’t rush taking your shots; otherwise, you will end up with blurry photographs. It is important to aim for in-focus shots, and then you can always edit later for brightness.
Eating
There is a cafeteria inside the mine with a variety of dishes, desserts, and beverages to choose from should you get hungry. Plus, how often can you say you ate lunch at over 400 feet underground?
How Much Time You Need
Each tour takes around 3 hours, plus any extra time you may spend eating in the cafeteria, or looking at souvenirs. So I recommend you plan for about 4 hours for your visit to the Wieliczka Mines. Additionally, you’ll want to factor in at least 1-hour round trip travel time getting to/from the mine.
What to Wear
Depending on which tour you choose, you will walk between 1-2 miles during your visit, so make sure to wear comfortable walking shoes. Additionally, the mines are around 57-60 degrees Fahrenheit, so you may also want to pack a light jacket.
Restrooms
There are two restrooms within the mine that your tour will take you past. Your tour guide will give everyone a chance for a break about midway through the tour, and then you’ll have an opportunity again toward the end of the tour.
Getting to Wieliczka Salt Mine
Most people visiting the Wieliczka Salt Mine come from Krakow’s city center. Wieliczka is on the outskirts of Krakow and takes 30-40 minutes by bus from Krakow’s touristy areas. You can take bus #304 to get there, and it lets you out just a short walk from the main entrance. The same bus route will return you to Krakow’s city center.
Another alternative to the bus is using Uber. My friend and I did this going to the mine and then took bus #304 when returning to our Airbnb. Uber is surprisingly affordable in Krakow, especially if you can split the cost with a traveling companion.
Hours of Operation
Make sure to check the Wieliczka Salt Mine website in advance to see what their current hours of operation are and plan accordingly.
Final Thoughts
A tour of the Wieliczka Salt Mines is certainly something you’ll never forget. It is an excursion the whole family will enjoy as long as you are prepared for it in advance. As mentioned before, the mine is dimly lit, and for those suffering from claustrophobia, you may not find it to be an enjoyable experience.
Visiting the Wieliczka Salt Mine is an adventure you are unlikely to experience anywhere else and I highly recommend it for any visit to Krakow.
Visiting the historic D-Day sites is an unforgettable way to spend the day. It is one of those bucket list trips that leave you better for having made them. June 6, 1944, is one of the most historic dates in world history. The victory achieved on D-Day changed the course of the world.
The freedoms I have today are in large part due to the battles fought on the shores of Normandy. If you have an opportunity to travel to France, take some time to visit the D-Day sites in Normandy. You’ll never forget it.
In this post, I share my one-day self-guided itinerary to some of the D-Day sites in Normandy, France. You’ll get a chance to learn about my experience and also see how easy it is to plan your own trip to this historic region. Although I would have preferred a minimum of 2 days for my visit, even with only one day to see the D-Day sites, you can cover a lot of ground and still have an unforgettable trip.
Overview of Our One-Day Itinerary to D-Day Sites in Normandy
We took a direct train from Paris to Caen, where we’d booked our hotel and rental car. In addition to spending one day seeing the D-Day sites, we also spent one day driving to Mont-Saint-Michel. For our one-day D-Day itinerary, we drove from our hotel in Caen to our first stop, the Airborne Museum in Sainte-Mere-Eglise. Then we worked our way back in the direction of Caen for the remainder of the itinerary.
Tip: You could easily make this trip in reverse, and depending on what time of year you go, you may want to. We discovered during our visit here in October, that places open later and close earlier in the fall and winter.
So in the case of our route, we arrived at the Airborne Museum, thinking it opened at 9:00 a.m. (according to Google) only to discover it did not open until 10:00. Thus, we could have started at the Normandy American Cemetery, which opened at 9:00 and closed at 5:00 and then saved the Airborne Museum for last, which closed at 6:00 p.m. Live and learn!
Benefits of a Self-Guided Road Trip to See D-Day Sites
By driving yourself to the D-Day sites, you have more flexibility and choices in which places you see and how long you spend there. Driving in France was easy for me since they drive on the same side of the road as we do in the U.S. As long as you can drive a car with a manual transmission, it is pretty much the same as driving in the States. The road signs may look a little different, but all in all, it’s a very similar experience.
However, if you’re not comfortable with driving on your own in France, there are a lot of tour companies that will drive you around to the historic D-Day sites. You can take 12-hour day trips from Paris, or local tours starting at Caen and Bayeux. So decide on whichever option works best for you and your itinerary.
A Little Background About This Trip
My visit to Normandy, France, was a part of a 2 1/2 month backpacking trip I took with my friend through Europe. As I planned our route and the “must-see” stops along the way, I knew that visiting Normandy, France, and the historic D-Day sites was a must for me. Our visit to Normandy was during the final three weeks of our trip through Europe.
Before arriving in Normandy, we toured the house where Anne Frank hid in the attic before being captured by the Nazis. We visited Berlin and walked over what was once Hitler’s underground bunker and wandered through the Memorial to the Murdered Jews. Then we traveled to Krakow, Poland, where we took a day trip to the Auschwitz-Birkenau concentration camps. Finally, we went to Normandy, France, and visited some of the historic D-Day sites.
It was a journey through World War II history, starting with the atrocities that forced people into hiding and ultimately led to the death of millions of people. Our travels brought us full circle to Normandy, and the history surrounding D-Day, the battles leading up to it, and the battles fought afterward.
Although the history surrounding D-Day was one of tragedy, it was also one of triumph and hope. I saw the bleakness of death at Auschwitz, which only made my visit to the D-Day sites all the more impactful. The price was high, the sacrifice great, but freedom demands we risk everything or end up with nothing. I am so grateful for those who gave their lives so I could live in freedom.
Site 1: Church of Sainte-Mere-Eglise
We started our day of sightseeing in the town of Sainte-Mère-Église. We arrived a little after 9 a.m. and found that the Airborne Museum didn’t open until 10 a.m. So we wandered over to the Church of Sainte-Mère-Église, where a mannequin of a paratrooper’s body hangs from the church steeple.
John M. Steele
We learned more about the paratrooper represented on the church steeple during our visit to the Airborne Museum. His name was John Steele, and he was a paratrooper with the 82nd Airborne Division. During the drop into Sainte-Mère-Église, one of the houses caught fire, which unfortunately illuminated the night sky, and thus the paratroopers dropping in.
John Steele was hit in the foot on his way down and lost control of his parachute. His parachute caught on the church steeple. He hung there for around 2 hours, pretending to be dead before German soldiers came up and brought his body down. They took him as a prisoner, but three days later, he escaped and returned to his division. He survived WWII and returned home after the war was over.
A beautiful stained glass window in the Church at Sainte-Mere-Eglise.
There is so much more to John Steele’s story and to the paratroopers that dropped that night. For any of you who have watched “The Longest Day,” you might remember seeing the scene of the paratroopers dropping in.
The real story is full of heroism, as one of his fellow troopers on the ground gave his life to save John’s. The chaos was compounded by the house fire, which lit up the sky and made them glowing targets.
Go inside the church and take a look around. There is a beautiful stained glass window created in memory of the paratroopers that lost their lives here. There is also another one portraying the angel Michael surrounded by the symbols of the various Allied forces who fought to free Sainte-Mère-Église.
Time Spent Here: (~ 30 minutes) Location: Church of Sainte-Mère-Église, Rue Koenig, 50480 Sainte-Mère-Église, France Commute Time to Next Site: ~ 1-minute walk across the parking lot.
Site 2: The Airborne Museum at Sainte-Mere-Eglise
The Airborne Museum is a thoughtfully designed museum made up of multiple buildings as well as an outdoor area. At the ticket desk, you receive a tablet to carry with you as you make your way through the different areas. The tablet provides additional information about the exhibits and includes interactive features, which if you have kids, they will especially enjoy this feature. For the most part, you won’t need the tablet. However, it guides you in a particular order throughout the museum complex.
The first building we entered after purchasing our tickets was the building designed like the inside of a big parachute. Inside there are numerous displays of paratrooper’s gear, mementos, and stories of some of those involved in the liberation of Sainte-Mère-Église. The museum does a beautiful job portraying the details of what these paratroopers must have gone through to prepare for their mission.
In the next building is a large display of an airplane, and on one side is a mannequin of President Eisenhower and a printed copy of his D-Day order. Many of these guys were barely out of high school. They didn’t have much training, and yet they were going into one of the biggest and most important battles in US history. They would be some of the first boots on the ground for the US military in Normandy, France.
“You are about to embark upon the Great Crusade, toward which we have striven these many months. The eyes of the world are upon you. The hope and prayers of liberty-loving people everywhere march with you.” ~ General Dwight D. Eisenhower
One of the Airborne Museum’s life-sized displays.
In another room, audio speakers play the sounds of battle along with a display of an aerial view of Sainte-Mère-Église. I also learned during my visit here, that the paratroopers had to carry packs that weighed anywhere from 90 lbs to 180 lbs! Can you imagine jumping from a plane with a pack the size of a human strapped to your back?
The Soldier’s Stories Helped to Connect on a Personal Level
It was incredible to hear their stories and to take a glimpse into what those men went through. It was heroic yes, but also scary. Real courage isn’t without fear. It’s acknowledging the fear and moving forward in spite of it. Courage understands what’s at stake.
We watched a touching film that showed the images of Holocaust survivors and also the piles of dead bodies. Tears sprang to my eyes as it put in perspective what was being fought for. All of our future freedoms were at stake if Hitler, and the other countries fighting against democracy, had not been stopped.
I highly recommend making the Airborne Museum a part of your itinerary when visiting D-Day sites in Normandy. They took excellent care to make it a moving and thoughtful museum and memorial to 82nd and 101st Airborne Divisions.
Time Spent Here: (~ 1.5 hours) Location: Airborne Museum, 14 Rue Eisenhower, 50480 Sainte-Mère-Église, France Commute Time to Next Site: ~ 30-minute drive
The entryway in the German war cemetery at La Cambe.
Site 3: La Cambe German War Cemetery
Our next stop is the La Cambe German war cemetery. It is a simple and somber graveyard, and it is also the largest war cemetery in Normandy. There are over 21,000 bodies buried here as compared with the less than 10,000 buried at the American cemetery in Colleville-Sur-Mer.
As you walk through the entrance to the cemetery, you notice straight in front of you, a mound of raised earth (also known as a tumulus). Sitting on top is a giant dark stone cross with a man and a woman on either side. I assume this represents the mother and father of the dead. I recommend you walk to the top and get a bird’s eye view of the enormous size of this cemetery.
Most of the graves are marked with simple bronze-colored stones set in the ground. There are also rows of dark stone crosses spaced here and there across the cemetery. As I pass by the markers, I notice that most of the soldiers buried here were only 18 or 19 years old. According to the cemetery, most of the soldiers buried here died between June 6, 1944, and August 20, 1944.
The German soldiers buried here were teenagers sent off to war by the command of their country. A surviving German soldier said that some of the soldiers enlisted in WWII were only 16 years old, forced to go to war, scared to death, wanting to run, but told they’d be shot if they did. They had families who loved them and mourned their loss. War is ugly no matter which side you’re on.
A view of the German cemetery at La Cambe from atop the tumulus.
A Comparison of Two Cemeteries
My visit to the German war cemetery at La Cambe provided a thoughtful comparison with my visit to the Normandy American Cemetery at Colleville-Sur-Mer. I left the La Cambe cemetery feeling sorrow at the tragic loss as a result of this war. Although there is still certainly a sense of loss at the American cemetery, I left it feeling a sense of pride and gratefulness. It was a cemetery that celebrated and thanked those buried within, rather than only mourning their loss.
Time Spent Here: (~ 30 minutes) Location: La Cambe German war cemetery, Les Noires Terres, 14230 La Cambe, France Commute Time to Next Site: ~ 20-minute drive
Looking down the path to the memorial for the fallen Rangers at Pointe du Hoc.
Site 4: Pointe du Hoc
Next, we drive to the parking area for Pointe Du Hoc. Near the parking area is a memorial to the Army Rangers who gave their lives during the bloody battle fought here. It is a moving tribute to their courage and sacrifice. It tells the story of the Ranger’s persistence to scale the cliffs soaking wet in the middle of a storm while being gunned down by Germans from above.
What courage and commitment it took for them to continue scaling the almost 100-foot cliffs! Their fellow soldiers were dying one after another, and yet they continued to climb until at last some of them reached the top and claimed Pointe du Hoc as an Allied stronghold.
The same cliffs at Pointe du Hoc the Rangers once scaled.
This, of course, is the short version. The entire story of what occurred at Pointe Du Hoc on June 6, 1944, is an incredible tale of heroism. It is almost unbelievable, like something out of a Hollywood movie, and yet it’s true. These men defied unbelievable odds.
The craters from the aerial bombings dot the landscape.
Lunar Landscape
From the memorial near the parking lot, you continue down a trail leading to the very cliffs these Rangers climbed on that dark and stormy night. You walk past large craters from aerial bombings and get a chance to step inside the bunkers the Germans built to house their 155mm arterial guns. These guns could target ships up to 12 miles offshore! You can understand why it was so crucial for Allied forces to overtake these strongholds to win the fight on D-Day.
The walk to the stone memorial overlooking the water is memorable in itself. It gives you a scope of the type of battle fought here. Kids will enjoy exploring the craters and empty bunkers. The walk from the parking lot takes about 10 minutes. Make sure to wear sturdy walking shoes and give yourself enough time to explore the grounds before heading on to your next stop.
Time Spent Here: (~ 1 hour) Location: Pointe du Hoc, 14450 Cricqueville-en-Bessin, France Commute Time to Next Site: ~ 15-minute drive
The National Guard Association Monument built atop a former German pillbox.
Site 5: National Guard Association Monument at Omaha Beach
The National Guard monument located along Omaha Beach is an inspiring monument dedicated to the soldiers of the National Guard who fought not only in World War I but also in World War II. That was one of the things written on the monument that stuck out to me. It mentioned how the sons of the National Guardsmen would fight for freedom in WWII just as their fathers had fought for freedom during WWI. What a powerful legacy.
Take time to read the words and quotes engraved on each side of the monument. Close to the monument is another memorial of a National Guardsmen carrying his fellow soldier out of battle. This memorial is in tribute to the National Guardsmen of the 29th Division’s 116th Infantry Regimental Combat Team.
They were some of the first to land on the area that is now referred to as “bloody Omaha.” They came with brothers, and boyhood friends, never to return home to their families or to live out their lives. They were so young and so courageous. The soldiers who fought in WWII are true superheroes.
The tribute to the National Guard titled “Ever Forward.”
Walk along the beach while you’re here and look up at the cliffs. Imagine what it was like for the soldiers who landed on these shores, wet, cold and disoriented, being gunned down in the water before they even had a chance to fight. No matter what, they wouldn’t be stopped. They knew what they had to do, no matter the cost!
Time Spent Here: (~ 15 minutes) Location: National Guard Monument (Secteur Charlie), 12 Boulevard de Cauvigny, 14710 Vierville-sur-Mer, France Commute Time to Next Site: ~ 5-minute drive
Site 6: Omaha Beach Memorial
We drove along the waterfront for another 5 minutes before reaching the parking area for the Omaha Beach Memorial. The wind was blowing and the cold air bit into our skin. The skies were blue and clouds dotted the horizon. It made me think of the weather conditions the soldiers dealt with during the early morning hours on June 6, 1944.
I tried to imagine a much darker and stormier scene. The first wave of soldiers arriving soaking wet, many drowned before they ever made it to shore. Gunfire raining down from German soldiers perched on the cliffs and the beach. This was war, ugly and chaotic with freedom on the line.
I live in the light of victory, but on D-Day, victory was still being fought for. It was a scene of tragedy, and decades later, many survivors would continue to have a hard time talking about it. I’ll never truly understand the full cost, but I’ll do my best to live gratefully.
A stone memorial at Omaha beach commemorating D-Day.
Next to the parking lot, there is a large stone marker, which is a memorial to the Allied forces landing here on Omaha Beach on June 6, 1944. On one side of the stone memorial is the inscription: —No mission too difficult —No sacrifice too great. Duty First. Forced Omaha Beach at dawn 6 June. The other is etched with the images of soldiers and reads: Erected in memory of those —The 116th RCT 29th Infantry Division AUS landed here June 6, 1944.
Les Braves
Just behind it is a beautiful metal sculpture rising out of the sand just off the shore. The sculpture created by French sculptor Anilore Banon is titled “Les Braves.” According to Banon, the sculpture consists of the following three elements:
The Wings of Hope – So that the spirit which carried these men on June 6, 1944, continues to inspire us, reminding us that together it is always possible to change the future.
Rise Freedom! – So that the example of those who rose against barbarity, helps us remain standing strong against all forms of inhumanity.
Wings of Fraternity – So that this surge of brotherhood always reminds us of our responsibility towards others as well as ourselves. On June 6th, 1944, these men were more than soldiers, they were our brothers.
“Les Braves” sculpture on Omaha Beach.
The people of Normandy are still very grateful to the American and Allied forces for freeing them from the Germans.
If you have extra time and want to stop, there is the Omaha Beach Museum about a 5-minute walk from the Omaha Beach Memorial.
Time Spent Here: (~ 1 hour) Location: Omaha Beach Memorial, Avenue de la Libération, 14710 Saint-Laurent-sur-Mer, France Commute Time to Next Site: ~ 15 minute drive
Lunch Break
We ate lunch at the D-Day restaurant across from the Omaha Beach Memorial parking lot. It was a choice of convenience. However, it was warm and cozy inside the restaurant. My lunch consisted of some toast topped with ham and cheese. It was a warm break from the chilly weather outside.
I recommend packing snacks and water in your car, and possibly a picnic lunch if you’re able to. I didn’t see too many dining choices along this route. However, that may be due in part to the time of year when we visited. In the summer, you might find more options available.
Location: D-Day House, 1 Rue Désiré Lemière, 14710 Saint-Laurent-sur-Mer, France
This beautiful cemetery dotted with white crosses is a serene resting place for the heroes buried here.
Site 7: Normandy American Cemetery & Memorial
Next, we drove to the Normandy American Cemetery and Memorial in Colleville-sur-Mer. Due to the delay at the Airborne Museum, we only had about an hour to spend at the cemetery before it closed at 5:00. So we quickly parked and headed down the long path. We bypassed the visitor’s center, knowing what little time we had and instead continued to follow the path towards the ocean, along the infinity pool, and then curving around to the cemetery.
The beautiful mosaic on the chapel ceiling.
The rows and rows of white crosses stretched out almost endlessly in front of us. People were milling about through the rows of crosses, searching perhaps for the grave of a loved one. As you walk throughout the Normandy American cemetery, you feel almost as though you are in a park and not a cemetery. The setting is so lush and green. It is very peaceful.
Sculptures & Artistic Tributes to the Fallen
Make sure to stop in the cemetery’s chapel. It is the rotund building at the center of the cemetery. Step inside the small chapel and admire the beauty and thoughtfulness put into the gorgeous mosaic on the chapel’s ceiling. American painter Leon Kroll created this beautiful portrait symbolizing American on one side, sending out her son to battle and France on the other side, taking our fallen soldier in her arms. It is such a beautiful image.
After you finish your walk around the cemetery, make your way to the large reflection pool where you’ll see a tall bronze statue rising above from the far end. This beautiful sculpture created by Donald Harcourt De Lueis titled “Spirit of American Youth Rising from the Waves.” It bears an inscription at the bottom that reads “Mine eyes have seen the glory of the coming of the Lord.” On the walls close to it, you’ll find huge maps displaying all of the various forces along the shore and their routes. It is awe-inspiring!
“The Spirit of American Youth Rising.”
If you have time, walk along the shores of Omaha Beach below the cemetery. Make sure to stop in at the visitor’s center for more helpful information regarding those buried here and to view the beautiful infinity pool. They have volunteers on staff who can also help you locate any loved ones who are buried here.
Normandy American Cemetery in Colleville-sur-Mer is a beautiful park-like setting, very peaceful. A wonderful resting place and memorial to these soldiers.
Time Spent Here: (~ 1 hour) Location: Normandy American Cemetery, 14710 Colleville-sur-Mer, France Commute Time to Next Site: This was the final stop, and it was about a 45-minute drive back to Caen.
The reflection pool at Normandy American Cemetery.
Tips & Recommendations for a Self-Guided Tour of D-Day Sites
Planning Tips
Always check the hours for each museum directly on the museum’s website. Google is not always up to date on its listing for hours and operations.
Pack snacks and drinks in the car to keep your energy up in between stops.
Make sure you can drive a manual transmission before renting a car in Europe.
Organize your day, so you have the most time at the sites you want to see. Then if you can’t make it to all the stops on the list, you will at least have seen the ones most important to you first.
Wear layers and sturdy walking shoes.
How Much Time To Spend Here
There is so much to see that you could spend days or possibly weeks here, depending on your interests. However, with only one day, you’ll need to pick the top sights you want to see and save the rest for your next trip. One site I would have liked to have fit into our day was Utah Beach. I guess I’ll save that for my next trip!
Getting Here:
You can take a direct train from Paris’ Saint-Lazare station to Caen. This takes approximately 2 hours, 15 minutes. You can also take a train from Caen to Bayeux if you prefer to stay there. In Bayeux, bus #70 takes you to many of the D-Day sites if you prefer not to drive. You can also, of course, book a tour of the sites. Caen also has an airport so if you’re coming from somewhere other than Paris, you might check to see if they have flights that go through it.
Recommended Apps to Download Before Your Trip
Google Maps:This invaluable tool will help you get to each destination along your journey. If you plan to do a self-guided driving itinerary, then you will want to install Google Maps on your phone ahead of time and also download it for offline use.
Normandy D-Day 1944 (by Spot on Locations Ltd): This Normandy D-Day app provides the names and locations for all the various D-Day sites in Normandy. It gives historical details associated with each area and includes over 500 photos and 100 locations. If you like learning more about the history, then consider downloading this app before your trip and looking through the areas you’ll visit and read up on the history associated with each.
Rick Steves Audio Europe: Consider downloading this app before any trip you take to Europe. If you enjoy self-guided tours, then you will appreciate this app. Just put your earbuds in, and Rick Steves will guide you on your walking tour to whichever destination you’ve chosen on the app.
So say you choose France, you will then see a list of all the audio guides the app has for France. Look for the one titled “Normandy: D-Day Sites” and listen to this before your trip to D-Day to get an idea about what there is to see and learn more about the history of the region. The app has not only audio walking guides, but also interviews with local experts on a variety of subjects relating to each location.
Roses and flowers left by crosses. Reminders that they are not forgotten.
Closing Thoughts on D-Day
Visiting the D-Day sites in Normandy was like walking through the history books. It is one thing to read about this incredible date in history, but it is something else to see the area firsthand. To see the graves of the thousands of soldiers who lost their lives here, and to read about their individual stories is an incredible and moving way to spend the day.
Visiting sites like D-Day or even Auschwitz remind me of the beauty of the human spirit. Yes, there is an ugly side to humanity. However, there is also resilience and a determination to overcome even the worst odds for the good of mankind.
I hope you plan a trip to visit Normandy, France, and the historic D-Day sites. However, if you can’t do that right now, why not visit a local Veteran’s Cemetery or museum near you, dedicated to those who gave so we could have freedom. Say thank you the next time you see a veteran, and let’s use our freedom to show compassion and grace to everyone we meet.
On the border of Normandy and Brittany, Mont-Saint-Michel rises above the bay like a bastion. This medieval fortress is chiseled into the granite that formed this small island. One look at it and you can understand its allure. There is something so unique about this little island. Mont-Saint-Michel is just one of the many historical treasures found in Normandy. It may take a little extra work getting here, but the historical significance and beauty of this region are well worth your time and effort!
Discover for yourself why over 2 million people visit this island every year. This article includes everything you need to plan your visit to Mont-Saint-Michel, whether you’re visiting from Paris or another area of France. Don’t be put off by the extra effort to visit this remarkable destination. It’s easier than you think!
Mont-Saint-Michel is a UNESCO Heritage Site. It reportedly dates back to 708. The story is that the Bishop of Avranches had a vision from the Archangel Michael telling him to build a sanctuary here. So one of the first things you might notice when looking up at Mont-Saint-Michel is the golden spire with the Archangel Michael rising high above everything else.
Benedictines settled in the abbey in the 10th century, where the town began to grow outward on the rocky island, and by the 14th century, it reached the foot of the rock. It was used as a stronghold during the Hundred Years War and became a symbol of national identity. The Germans also occupied Mont-Saint-Michel during World War II, bringing with them thousands of German tourists seeking to visit this incredible place. So, as you can see, this small island is rich with history!
Explore the area around Mont-Saint-Michel at low tide.
As you explore the village of Mont-Saint-Michel, you will discover what a feat of engineering it is. The walls are built into the granite rock that makes up the island. This was certainly not the most natural choice of terrain for construction, and that is what makes it so extraordinary!
The tides at Mont-Saint-Michel are another aspect that makes this island fortress so remarkable. The highest tides in all of Continental Europe are observed here! Access to the island is restricted during “spring tides.” This is when the tide is the highest. You can view the tide charts for the whole year and also check Mont-Saint-Michel’s website for dates when they are closed.
Arriving at Mont-Saint-Michel
Whether you arrive via bus or car, you will still need to either walk the remaining 1.5 miles across the causeway to the island from the car park or take the complimentary shuttle.
This is the most water we saw surrounding Mont-Saint-Michel during our low-tide visit.
Parking at Mont Saint Michel:It costs around 9€ to 15€ to park for 24 hours at Mont-Saint-Michel. Prices vary depending on what time of year you visit.
Walking to Mont-Saint-Michel: It is approximately a 40-minute walk (~1.5 miles) from the parking lot at Mont-Saint-Michel to the main entrance into the walled city. There are signs posted along the trail telling you how long from “this” point the walk will be.
Complimentary Shuttle:You can walk over to the complimentary shuttle area following the signs from the parking lot or bus stop (if arriving via bus) and wait for the next free shuttle to transport you across the causeway.
My Recommendation:
If the weather is nice and you’re able to do it, I recommend walking. You have beautiful views all along the way to Mont Saint Michel. It gives you time to soak in the size and location of this walled island and the abbey rising from the top. You can always choose to ride the shuttle back at the end of your visit.
My friend Angela and I chose to walk the 1.5 miles, and although it was a cold day, the walk was beautiful. It helps that it is a flat, easy walk. There were lots of people out walking with us too. Oh, and of course, we chose to walk it before realizing that it would be a 40-minute walk in the cold. However, in the end, I’m glad we didn’t know how long it was, otherwise we would have missed out on admiring and photographing the views as we walked. So skip the shuttle and walk to the island, then take it back when you’re ready to leave.
Things to Do at Mont-Saint-Michel
La Grande Rue
Enjoy exploring the narrow streets of Mont-Saint-Michel.
Upon arriving at Mont-Saint-Michel, you’ll pass by public restrooms and enter the archway on to La Grand Rue. This narrow street is the main street in the village. This is where you’ll find souvenir shops, hotels, cafes, and restaurants. Continue up this street to visit the abbey. I recommend you do that first, then take your time stopping at the shops and sites along La Grand Rue on your way back down.
Mont-Saint-Michel Abbey
This is the one attraction you must see while visiting Mont-Saint-Michel. If you only pay for one, make this it. The historic Mont-Saint-Michel Abbey crowns the top of this rocky fortress. The Benedictine abbey was built around the 10th century and was used as an abbey until the French Revolution when it later became a prison; this lasted until 1863. Then in 1874, it became a historical monument. It took over 1300 years to build the abbey!
The climb up to the abbey is a steep one. However, it is fascinating to look up at this magnificent medieval structure rising and towering over everything surrounding it. It also makes your neck hurt!
Looking up at the Abbey can be a real pain in the neck!
The price of your ticket includes a guided tour (during certain hours). You can also purchase an audio guide for an additional 3€ and take a self-guided tour. There are a lot of stairs to climb as you make your way to see the abbey. However, the view from the top is worth it.
The Mont-Saint-Michel Abbey Church as seen from the terrace.
Terrasse de l’Ouest
Don’t miss this stop on your visit to the abbey. The terrace is located outside the abbey church and has incredible views! You can walk down the backside of the abbey from the terrace to return to the main town. I highly recommend you do this! There are also restrooms at the terrace. Soak in the views before exploring more of this unique island.
My friend, Angela, met the woman she was studying French with online before our trip, at Mont-Saint-Michel and we toured it together. It was fun to meet a local and get a chance to learn more about French culture. The French people I know are warm and funny, and yes, they love food! I love getting to learn about a country from the locals.
Travel, and be prepared to have your preconceived ideas forever transformed in the light of reality.
One of the gifts of travel is friendships made around the world!
Église Saint-Pierre
Step inside this small chapel just off the La Grand Rue and enjoy a quiet break. Make sure to also stop at the cemetery just up from the church. It is a unique setting with views of the bay below. This local parishioner’s church provides a more simplistic and less touristy space in which to have a quiet moment. Admire the beautiful stained glass windows as well as an impressive statue of the Archangel Michael slaying a dragon. You are welcome to join them in mass during its observed hours.
La Chapelle-Saint-Aubert
This small chapel was built towards the foot of Mont-Saint-Michel, you can access it via a path near the front entrance to La Grand Rue. It is best seen during low tide, though, due to its low position. Although you may not be able to go inside, you can look around the outside and take a peek in the windows.
Explore the Sandy Bay at Low Tide
Check with the Tourist Information Center to see whether or not there are any guided tours of the mudflats surrounding the island. Also, make sure to check the tide charts and ask the tourist information center about when it is safest to explore. Even if you can’t take a tour, you will have fun walking around the outside perimeter of the island, examining it from the ground level.
A view of the bay at low tide and the causeway leading up to Mont-Saint-Michel.
Getting to Mont-Saint-Michel
You have a lot of options when traveling to Mont-Saint-Michel. I will focus on the two most common options.
Fastest Route to Mont-Saint-Michel from Paris by Train:
If you’re coming from Paris to Mont-Saint-Michel on the train, the quickest route will take you about 3.5 hours to get to Mont-Saint-Michel. Take the train from Paris’ Montparnasse Station to Rennes and then a shuttle bus from Rennes to Mont-Saint-Michel. You can book the entire trip ahead of time online. Prices start around 50€ to travel from Paris to Mont-Saint-Michel (one-way).
In addition to passing through Rennes, there is also an option that takes you to Dol de Bretagne. Then it’s just a 20-minute shuttle from there to Mont-Saint-Michel. The travel times are similar for both options leaving Montparnasse Station. Visit SNCF’s website to view a timetable for the day you wish to travel.
You don’t have to book your shuttle bus from Rennes Station to Mont-Saint-Michel ahead of time either. You can always purchase your ticket at the Rennes train station. They schedule shuttle buses in conjunction with the arriving trains from Paris. Upon arrival at the station, you can purchase your ticket for the next departing shuttle (or purchase ahead of time online at SNCF). The ticket price from Rennes station to Mont-Saint-Michel is 30€ for a round trip ticket.
Here are some additional train options, as well as shuttle bus information if you’re arriving from Pontorson.
Car Rental Option from Caen:
Another option when traveling from Paris to Mont-Saint-Michel is to take a train from Saint-Lazare Station to Caen. If you plan to visit other sites in the Normandy region of France, such as historic D-Day sites, then Caen makes an excellent starting destination for your trip to Mont-Saint-Michel.
This is the option I chose for my trip. My friend Angela and I planned to see D-Day sites the following day, and we also had a flight scheduled from Caen to Toulouse, so it made the most sense for our trip. Our car rental experience turned out to be far more of an adventure than we had planned! However, renting a car in France is pretty much the same process as renting one in the States.
They drive on the right side of the road, so there’s no learning curve for American drivers. You do, however, need to know that when you rent a car in Europe, you will get a car with a standard transmission, unless you specifically request an automatic (subject to availability). So if you don’t know how to drive a clutch, learn before you go, or plan for another option.
With Google Maps, it is easy to navigate from Caen to Mont-Saint-Michel via their freeway systems. We had no issues getting lost, and there are lots of signs along the freeway for the major tourist sites too. We used our rental car to drive to all the D-Day sites, and the flexibility it provided is worth any extra hassle, in my opinion.
Side Note: If driving from Paris, make sure to choose the “avoid tolls” option with Google Maps, so you aren’t surprised by any huge toll fees. I’ve read they can be surprisingly high.
Thoughts on Driving vs. Public Transportation:
It depends where you are driving from, but for the Normandy region of France, unless you’re booking through a tour company, I think renting a car makes the most sense. A car gives you the most flexibility, and it is an easy area to navigate using Google Maps.
It will depend on your trip plans. If you’re going to be in the area for 2-3 days at a minimum, then renting a car probably makes the most sense, however, if you are planning this for a day trip only, then you may want to take the train and shuttle option or book through a tour company. If you’re traveling solo, this will most likely save you money. However, if you’re in a group, then a car rental might save you some money.
Approximate Travel Times:
Train from Paris to Rennes leaving from Montparnasse Station: Approximately 2 hours
A shuttle from Rennes to Mont-Saint-Michel: Approximately 1 hour 10 minutes
Train from Paris to Caen leaving from Saint-Lazare Station: Approximately 2 hours and 15 minutes
Drive time from Caen to Mont-Saint-Michel: Approximately 1 hour 40 minutes
The cloister at Mont-Saint-Michel Abbey.
Tips for Your Visit to Mont-Saint-Michel
Best Times to Avoid the Crowds:
Spring to Fall is the busiest time to visit Mont-Saint-Michel, with summer being the absolute peak. If you can visit in the off-season (mid-October to February), you will be rewarded with fewer crowds. However, as I discovered during my visit there at the end of October, it can be frigid, so plan ahead and wear layers. Pack a scarf and gloves if you plan to visit during the colder months of the year.
Plan to arrive between 9 a.m. and 10 a.m. to avoid the crowds brought in on the tour buses. This is especially important during the peak season. When I visited in October, I didn’t arrive until around noon, and although crowded, it wasn’t unbearable.
Weather is typically the best April thru September. If you plan to explore outside and photography is one of your primary reasons for visiting, then I’d research weather patterns ahead of time to give yourself the best chance of good weather.
Where to Eat:
If you don’t plan ahead and pack a lunch or don’t plan to wait until you are off the island to eat, here are a couple of options for dining while at Mont-Saint-Michel. Just know that the prices and quality at most establishments here reflect the tourist-generated economy. In plain English: Prices are high, and food quality tends to be lower.
Au Pelerin: This is one of the more reasonably priced options off the Grand Rue at Mont-Saint-Michele. They serve baguettes and pizza and are a casual family-friendly establishment.
La Sirene: If you wish to try the local dish of galette bretonne (which I recommend you do while in the area), then this is a good choice. The galette bretonne is a savory style crepe filled with ham and served with an egg. It is a simple but delicious meal!
Make sure to eat a galette bretonne while in the area.
What to Wear:
Wear comfortable walking shoes as the climb up to the abbey is a steep one with lots of stairs. Additionally, if you plan to explore the area surrounding the island during low tide, you’ll want shoes that you’re okay with getting a little muddy.
If coming during the spring or fall, you’ll want to pack a light jacket, at least, plus a scarf. Even in summer, I’d pack a rain jacket. In the late fall and winter, you’ll want to dress in layers and wrap a scarf and gloves and perhaps a hat too.
How Much Time Should You Plan to Spend Here:
Plan to spend around 4 hours here. That allows you time to explore the village, tour the Abbey, and grab a bite to eat if you wish. You can also take time to explore the mudflats if the tide is out. However, make sure to check with the tourist office and tide charts first!
Consider spending the night if you want to see the tide at different levels and experience what it would be like to live on a small fortified island. You will also get a chance to explore the village at night and early in the morning without the crowds.
Mont-Saint-Michel at Night:
You may want to consider visiting here in the late afternoon and then plan to stay for the sunset and views of Mont-Saint-Michel lit up at night. Seeing the island’s lights reflecting off the surrounding sand and water makes for beautiful photographs and treasured memories.
Final Thoughts and Tips
This small island is built out of a large mound of granite. This means that they only had one way to go–up! This is the way you will go too. The streets are narrow because once again, this is a small town built on a small island chiseled from rock. So expect it to get crowded and to take things slow.
Your climb up to the Abbey is a rather steep one, especially towards the top, but take it slow and stop for breaks as you need to.
The goal is not to speed through this medieval village, but instead to take it all in, slowly meandering through the streets, stopping at whatever strikes your interest. Mont-Saint-Michel is a unique destination. I have not visited any other place like it. So give it some time and try to imagine what it was like 500 years ago.
If you’d like to read about Angela and my surprising discovery in the parking lot at Mont-Saint-Michel, then read Misadventures in Normandy France. If you have any questions about the trip that aren’t covered here, please don’t hesitate to ask!
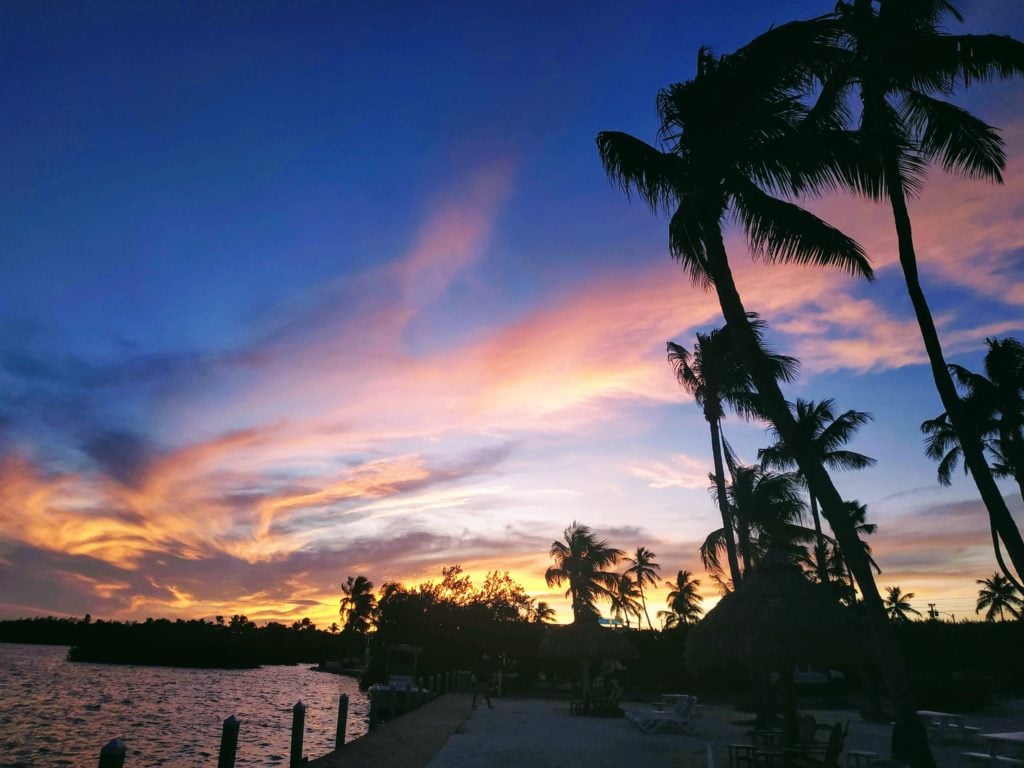
Driving to Key West is a sun-filled, top-down, only-in-Florida kind of road trip. Just remember when you’re road tripping through the Florida Keys, that it is about the journey rather than the destination. Yes, there is plenty to see in Key West, the end of the line for a Florida Keys road trip, but half the fun is getting there.
Driving to Key West should be a series of stops in whichever Key grabs your fancy, eating huge amounts of key lime pie, photo ops, and listening to your favorite road trip music.
Where to Start Your Road Trip to Key West
My hubby and I just finished a road trip from Orlando to Key West. We stayed two nights in Islamorada and spent one full day driving to Key West. We also stopped in Miami and spent a fun-filled day there before heading back to Orlando to catch our flight home.
I recommend spending at least one night in the Florida Keys and giving yourself one full day to drive to Key West. Here are some examples of non-stop drive times to Key West:
Orlando to Key West ~ 6 ½ hours
Miami to Key West ~ 3 ½ hours
Key Largo to Key West ~ 2 hours
Marathon to Key West ~ 1 hour
It’s About the Journey, Not the Destination
This should be a relaxed road trip, with lots of time for stopping whenever it strikes your fancy, and extra time to spend sightseeing in Key West. I mean, you’ve taken the time to drive all the way there, might as well spend a couple of hours before returning to the car and starting the adventure in reverse.
Driving to Key West is not a trip of speed. US Hwy 1 is a mostly two-lane highway with lots of traffic. So you shouldn’t take this trip thinking you’ll speed all the way to Key West. It’s not going to happen. Enjoy the journey.
I’ll cover things to do in the Florida Keys, places to eat, and where to find the best key lime pie. Now put the top down or crank up the a.c. and let’s hit the road!
Top Things to Do On Your Drive to Key West
Americana Photo Ops
This is one thing I love to do when taking a road trip in the U.S.! Stop and see the world’s largest ball of yarn, or a giant talking cow, these are a part of the quintessential American road trip. The Florida Keys have lots of fun ones like this giant crab at the Rain Barrel Artisans Village in Islamorada. Keep a lookout, and you’ll see a billboard-sized mermaid, a large conch shell, and other fun stops to take photos of when driving to Key West.
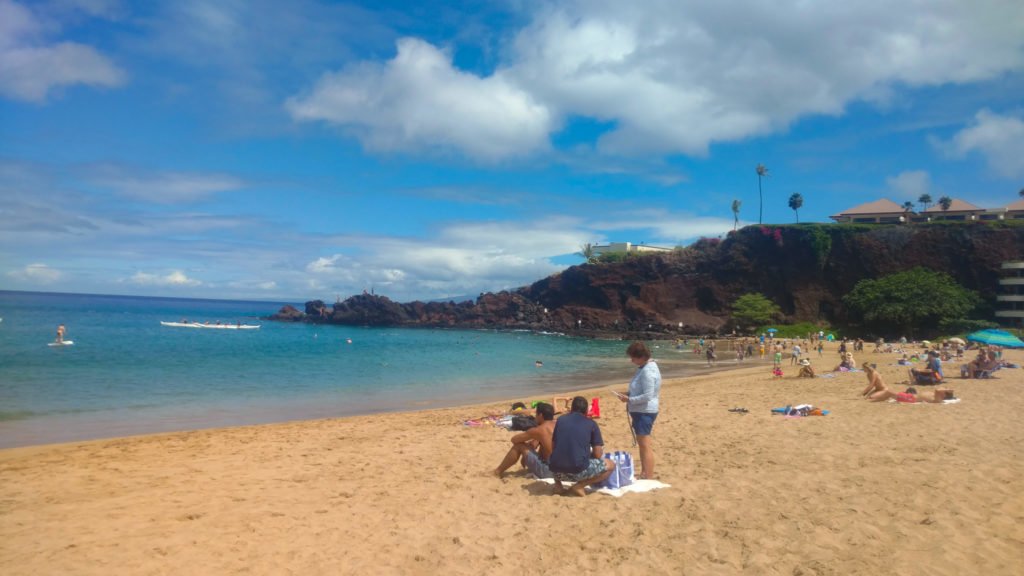
Stop at a Park and Enjoy Some Beach Time
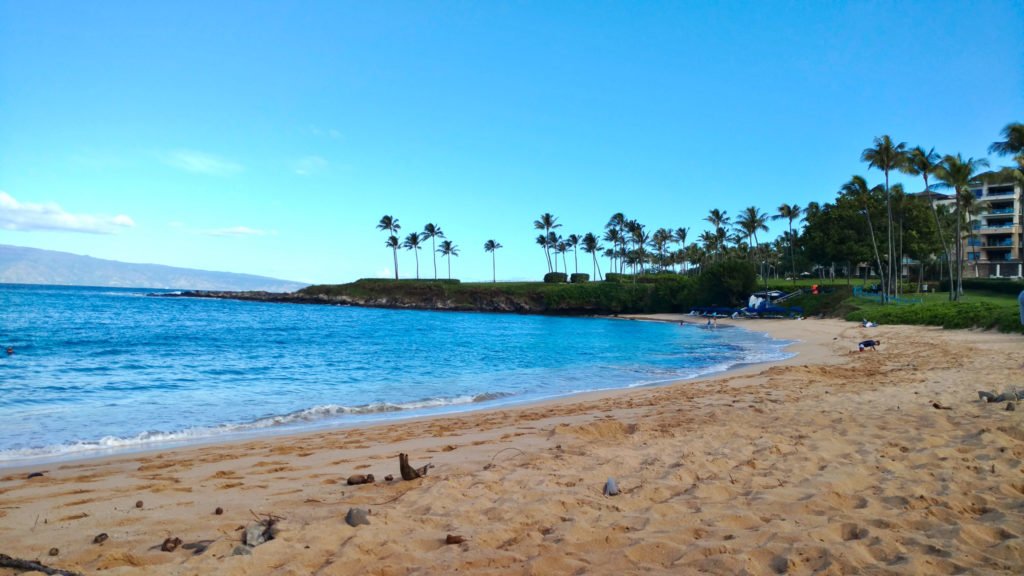
Although the Florida Keys aren’t known for their traditional beaches, you can still find a sandy shore or two to walk along the water, rent kayaks, snorkel the reefs or even go for a swim if you can find a spot deep enough.
Due to the reef system that protects the Florida Keys, it prevents the large waves from coming in and creating the large sandy beaches most people are accustomed to finding. Sand is often brought in to develop man-made beaches in the Keys. This barrier of protection also creates a shallow bottom, but there are some areas you can still go for a swim or wade out for deeper waters.
Don’t forget your sunscreen and also bring water shoes if you have them as the shoreline can be rocky due to the reef system that makes up the Florida Keys.
John Pennekamp Coral Reef State Park and Bahia State Park are two great choices when looking for a park to spend some time by the water in the Florida Keys.
Another beach that makes a great place to go for a swim is Sombrero Beach in Marathon. The park has been completely renovated and is a beautiful park to spend the day snorkeling and swimming. It has bathrooms, showers, playgrounds, picnic areas, and a lovely beach area for sunbathing and relaxing.
If you prefer, you can always save the beach time for your ride back through the Keys after visiting Key West.
Feed the Tarpon at Robbie’s in Islamorada
Stop at Robbie’s on your drive to Key West and create some fun memories feeding the giant silver tarpon. It costs $2.25 to gain access to the feeding dock. You can buy a bucket of fish for $4.00 to feed the tarpon, or you can watch others feed the fish from the pier. Visit Robbie’s to watch a video of what it’s like to feed a tarpon.
Stop on Little Duck Key (yeah that made me smile too) at the parking lot for the boat launch and old 7 Mile Bridge near mile marker 40. The old 7 Mile Bridge is now a pedestrian walkway, and it runs parallel to the new 7 Mile Bridge. Walk along it and enjoy some beautiful views of Little Money Key. Take time to watch people fishing, look for starfish, sea turtles, and to spot fish swimming below. Enjoy a stroll in the sun in a unique setting you probably won’t find anywhere else.
Visit the Dolphin Research Center on Grassy Key
If you love dolphins, then consider stopping at the Dolphin Research Center and learn about the dolphins they have rescued and the rehabilitation efforts of the facility. You can also book a dolphin encounter and get in the water with the dolphin. Depending on your interest level or program you want to do, you’ll need to book in advance and plan for a few hours here. So keep that in mind if you only have one day to drive through the Florida Keys.
General Admission Fees: $28 for adults and $23 for kids. Program fees vary with each program you choose. Visit the Dolphin Research Center to learn more about all the plans they have to offer and to book your experience.
Dolphin Research Center address: 58901 Overseas Hwy, Grassy Key, FL 33050
Eat Key Lime Pie at Kermit’s Key West Key Lime Shoppe
You’ve finally made it to Key West! Your drive to Key West has been a full one so far, why not congratulate yourself with some key lime pie for a trip well done, or whatever reason you can create to tell yourself its okay to eat another piece of key lime pie.
I tried key lime pie from breakfast to dinner during my day in the Florida Keys, and Kermit’s was one of the best pieces of pie I ate! You can read all abut the amazing key lime pie I ate, plus an unexpected, but delicious key lime creation that was a favorite of mine on Where to Find the Best Key Lime Pie in the Florida Keys.
Visit Ernest Hemingway’s house in Key West
Take a glance into the life of this famous American writer. Enjoy a break from the sun inside the air-conditioned house of what was Ernest Hemingway’s former residence. Hemingway lived here from 1931 to 1939.
The house is full of memorabilia from the many movies inspired by Hemingway’s books as well as his original possessions. One of his typewriters, books he owned and you can peer into his writer’s studio, his own space to create his masterpieces.
You can wander around the grounds as well. Look at the refreshing swimming pool, but don’t give in to its call to jump in. The grounds around the house offer lots of shaded spots for sitting and thinking. There is also a bookstore on the backside of the house where you can purchase souvenirs.
General Admission is $14 for adults and $6 for children. It’s important to note that they don’t accept credit cards for tickets. They do, however, have an ATM by the bookstore in case you need to get some cash for payment. There is also an optional 30-minute guided tour included in the price of general admission.
Address: 907 Whitehead St, Key West, FL 33040
Hike to the top of the Key West Lighthouse
Across the street from Ernest Hemingway’s house is the Key West Lighthouse. You can climb the 88 stairs to the top to get a bird’s eye view of Key West. This historic lighthouse was built in 1848 and was one of the first to have a woman as its Keeper. You will have a chance to tour the lighthouse as well as the Keeper’s Quarters and learn a little more about the history of the Key West Lighthouse.
General Admission is $12 for adults and $5 for kids. Address: 938 Whitehead St, Key West, FL 33040
Walk Around Old Town Key West
Enjoy walking around town, shopping at the small boutique shops, and admiring the beautiful buildings in Old Town Key West. You can start at Mallory Square and walk down Duval Street to the Southernmost Point. Stop by the historic cemetery or visit Mile Marker Zero. Old Town is a fun area to park the car and spend your time on foot.
Tour the Truman Little White House
Get a chance to see where President Harry S. Truman spent his winters. It seems like a pretty excellent alternative to winter in Washington D.C.! Learn more about this historic house and its use since constructed by the U.S. Navy in 1890.
General Admission is $21.45 for adults and $10.75 for kids. If you purchase your ticket online, you can save a couple of dollars.
Address: 111 Front St, Key West, FL 33040
Stop at the Southernmost Point in the Continental U.S.
Enjoy another photo op, however just know that you may have to get in line to take your photo with the marker stating it is the Southernmost Point in the Continental U.S. There isn’t any shade either. So you can decide just how important this photo op is to you.
The Drive Back Thru the Florida Keys
If you didn’t get a chance to spend some time on the water, now would be an excellent time to visit one of those parks I mentioned earlier. It’s also a good time to grab some more key lime pie and decide where to watch the sunset.
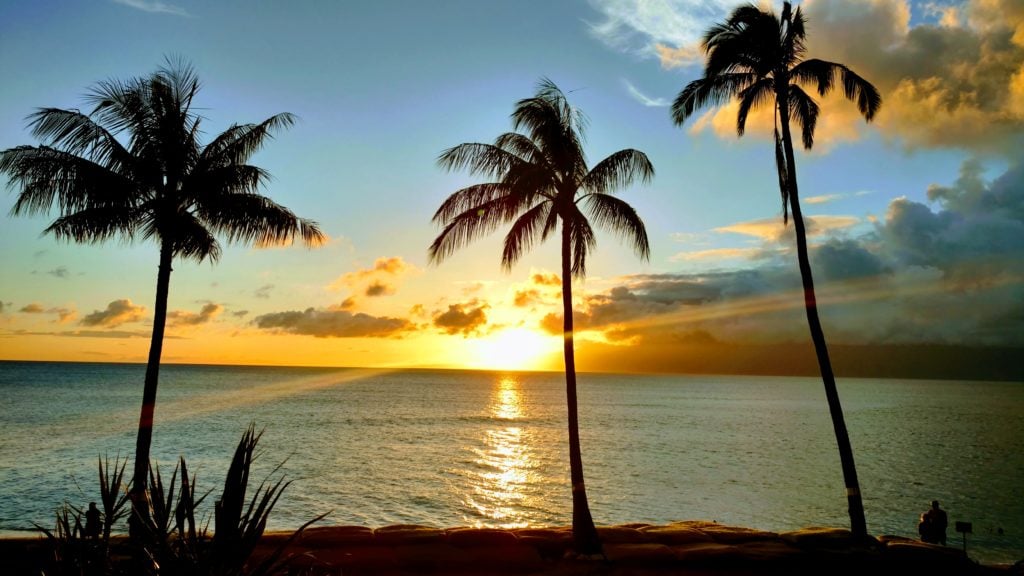
Watch the Sunset
Wherever you happen to be in the Florida Keys, make sure to enjoy a beautiful Florida sunset. Here are a few options for places to watch the sunset either in Key West or on your drive back.
Sunset Tiki Bar and Grille (at the Galleon Resort): 617 Front St, Key West, FL 33040
Lorelei Restaurant and Cabana Bar: 96 Madeira Rd, Islamorada, FL 33036
You have so many choices for where to stay. I’d pick one based on where you’re traveling to next. Marathon is an excellent choice for a Key close to Key West, but outside the busy Key West party scene. Islamorada was a great stop for us as we were heading to Miami the next day, so it was a good midway point. If you want choices galore and don’t mind driving the full length of the Florida Keys in one day, then you might research options in Key Largo.
For a unique option, you might consider one of these Air BnB options:
As I stated at the beginning of this post, driving through the Florida Keys, is not a race to the finish, but more like a leisurely Sunday drive. It should be full of sunshine and fun stops and road trip memories to last a lifetime.
Pack sunscreen, beach towels, extra water, flip flops, maybe a change of clothes, depending on your dinner plans and your favorite road trip music. I suggest some fun hits like “Ice Ice Baby” to get everyone laughing and then throw in some upbeat Cuban music that’ll have you dancing in your seats. Smiles for everyone!
One day in Miami is certainly not enough time to explore this lush and vibrant city. There are so many things to do in Miami, pick a few interests, and plan your day around those. Then make time for relaxing at the beach or people watching off the boardwalk. If you try to pack in too much sightseeing and then completely miss time at the beach, did you even visit Miami at all? I’ll do my best to give you tips on things to do as well as make room for beach time in this one-day itinerary for Miami. So let’s get started!
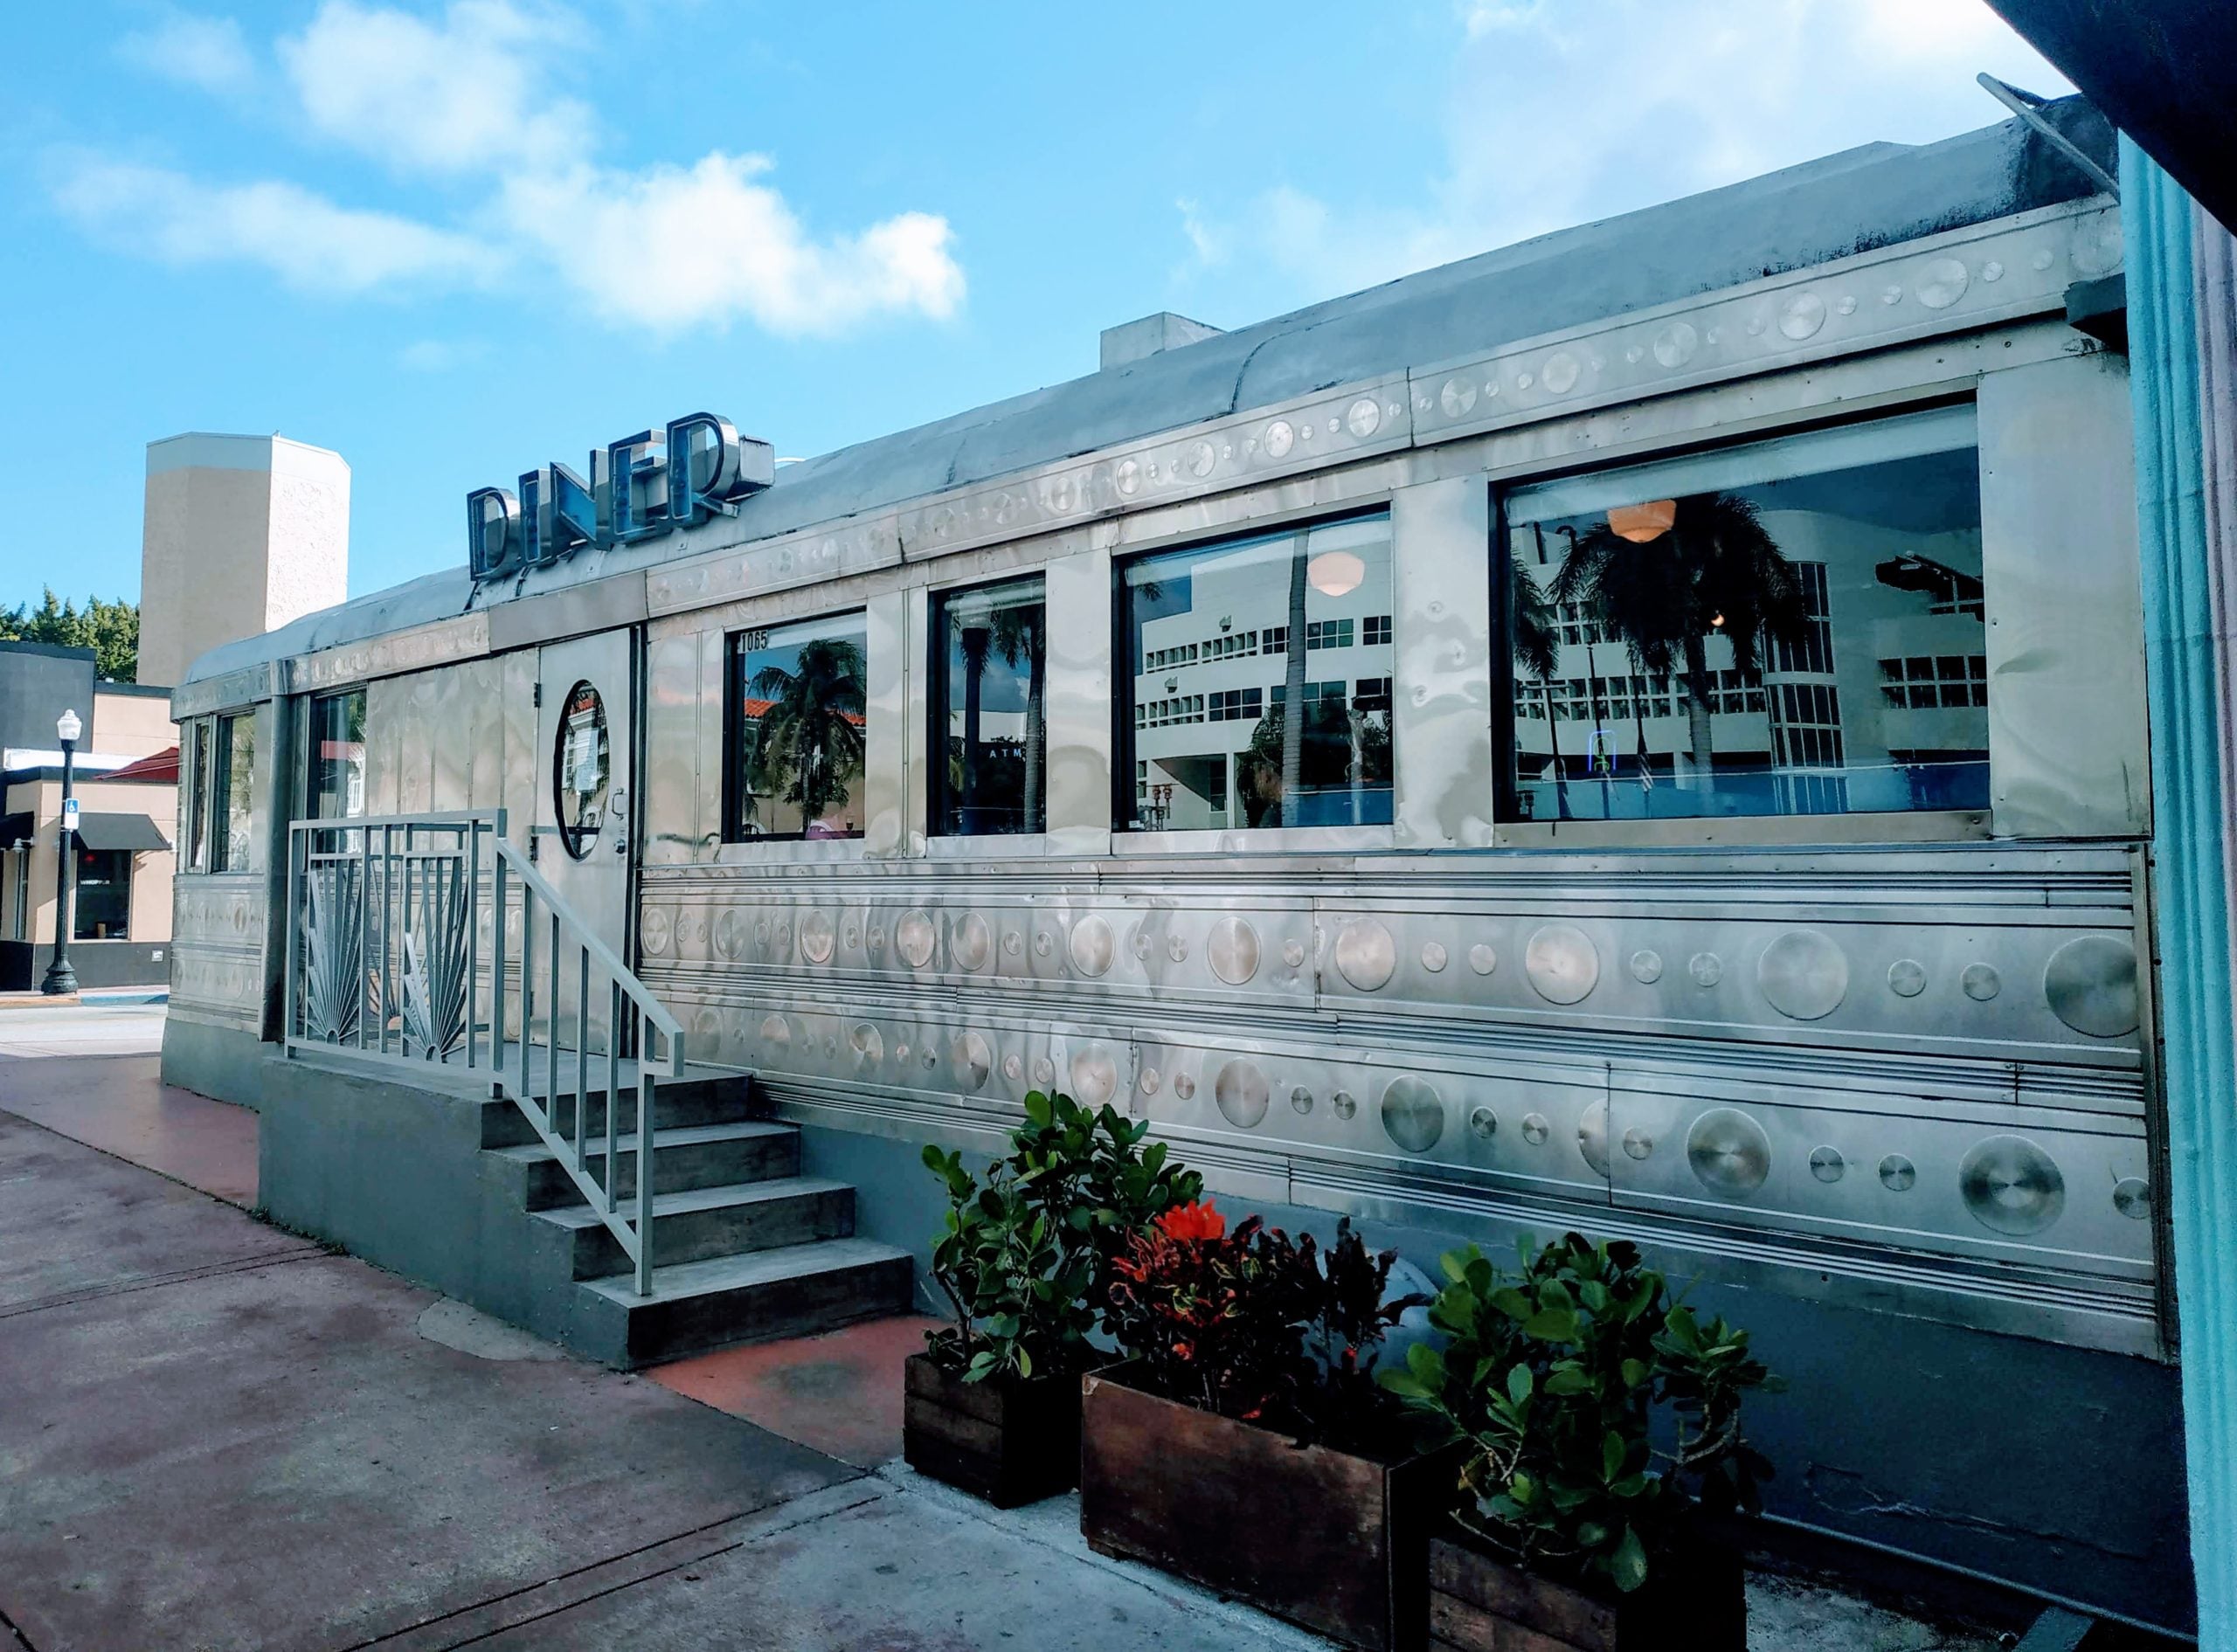
Don’t skip breakfast this morning as you want to be fueled up for a full day of fun! Make sure to pack your swim clothes, beach towels, flip flops, sunglasses, and sunscreen before heading out. Then grab some breakfast. I recommend breakfast at the 11th Street Diner in Miami Beach. This retro-styled railroad car diner is a fun way to kick off your day of sightseeing in Miami.
My second choice would be to grab breakfast at the 24 hour News Cafe, a diner that sits across the street from Lummus Park. Enjoy views of the boardwalk and the swaying of palm trees while you enjoy your breakfast. There is indoor and outdoor seating available.
Now that you’ve had some coffee and breakfast, you are ready to start this full day of sightseeing and soaking in the hot Miami sun!
Things to Do with One Day in Miami
Art Deco Architecture
Let’s walk off breakfast and explore the Art Deco architecture that Miami Beach is so famous for. If you’re interested in learning more about the area’s history and more about Art Deco Architecture, then catch a walking tour at 10:30 a.m. in front of the South Beach Museum on Ocean Drive at Lummus Park. If you’re looking for something a little more casual, walk along Ocean Drive at your own pace, admiring the Art Deco pastels and sunny vibes before cooling off at the beach.
Art Deco Tour Options:
Art Deco Welcome Center Walking Tours: These 90-minute tours cost $30/adult ($25 for seniors and students). The tour allows you to step inside some of the buildings and learn more about Art Deco architecture and how it started in Miami as well as other cultural points of interest.
They also offer this tour as a self-guided audio tour, and you can walk at your own pace while listening to the audio guide. It is $25 for adults ($20 seniors and students). Location: 1001 Ocean Drive and 10th Street, Miami Beach, FL 33139
The Art Deco Welcome Center.
DIY Walking “Tour” Along Ocean Drive: If you would rather casually walk around and admire the buildings on your own, then the two main areas you’ll want to walk down are Ocean Drive and Collins Ave. Although you won’t see every example of Art Deco here, you will get a good feel for the style.
Try to find parking at the Miami Beach Municipal Parking Garage at 1301 Collins Ave, Miami Beach, FL 33139. It is a short walk to Lummus Park, the Art Deco Welcome Center, and the beach! After you park, make your way to Ocean Drive and begin your DIY Art Deco Walking Tour, starting with the Cavalier South Beach Hotel. Then continue south along Ocean Drive, admiring all the Art Deco along the way.
Cavalier South Beach Hotel:
The Carlyle: 1250 Ocean Dr, Miami Beach, FL 33139. (You may recognize this from movies such as Bad Boys 2, The Birdcage, and Scarface).
Enjoy the cheerfully painted Leslie: 1244 Ocean Dr, Miami Beach, FL 33139
Art Deco Welcome Center: 1001 Ocean Dr, Miami Beach, FL 33139. Even if you’re not taking a tour with them, it’s still an excellent place to stop in to learn a little more about the Art Deco architecture style.
Edison Hotel (across the street from the Art Deco Welcome Center): 960 Ocean Dr, Miami Beach, FL 33139
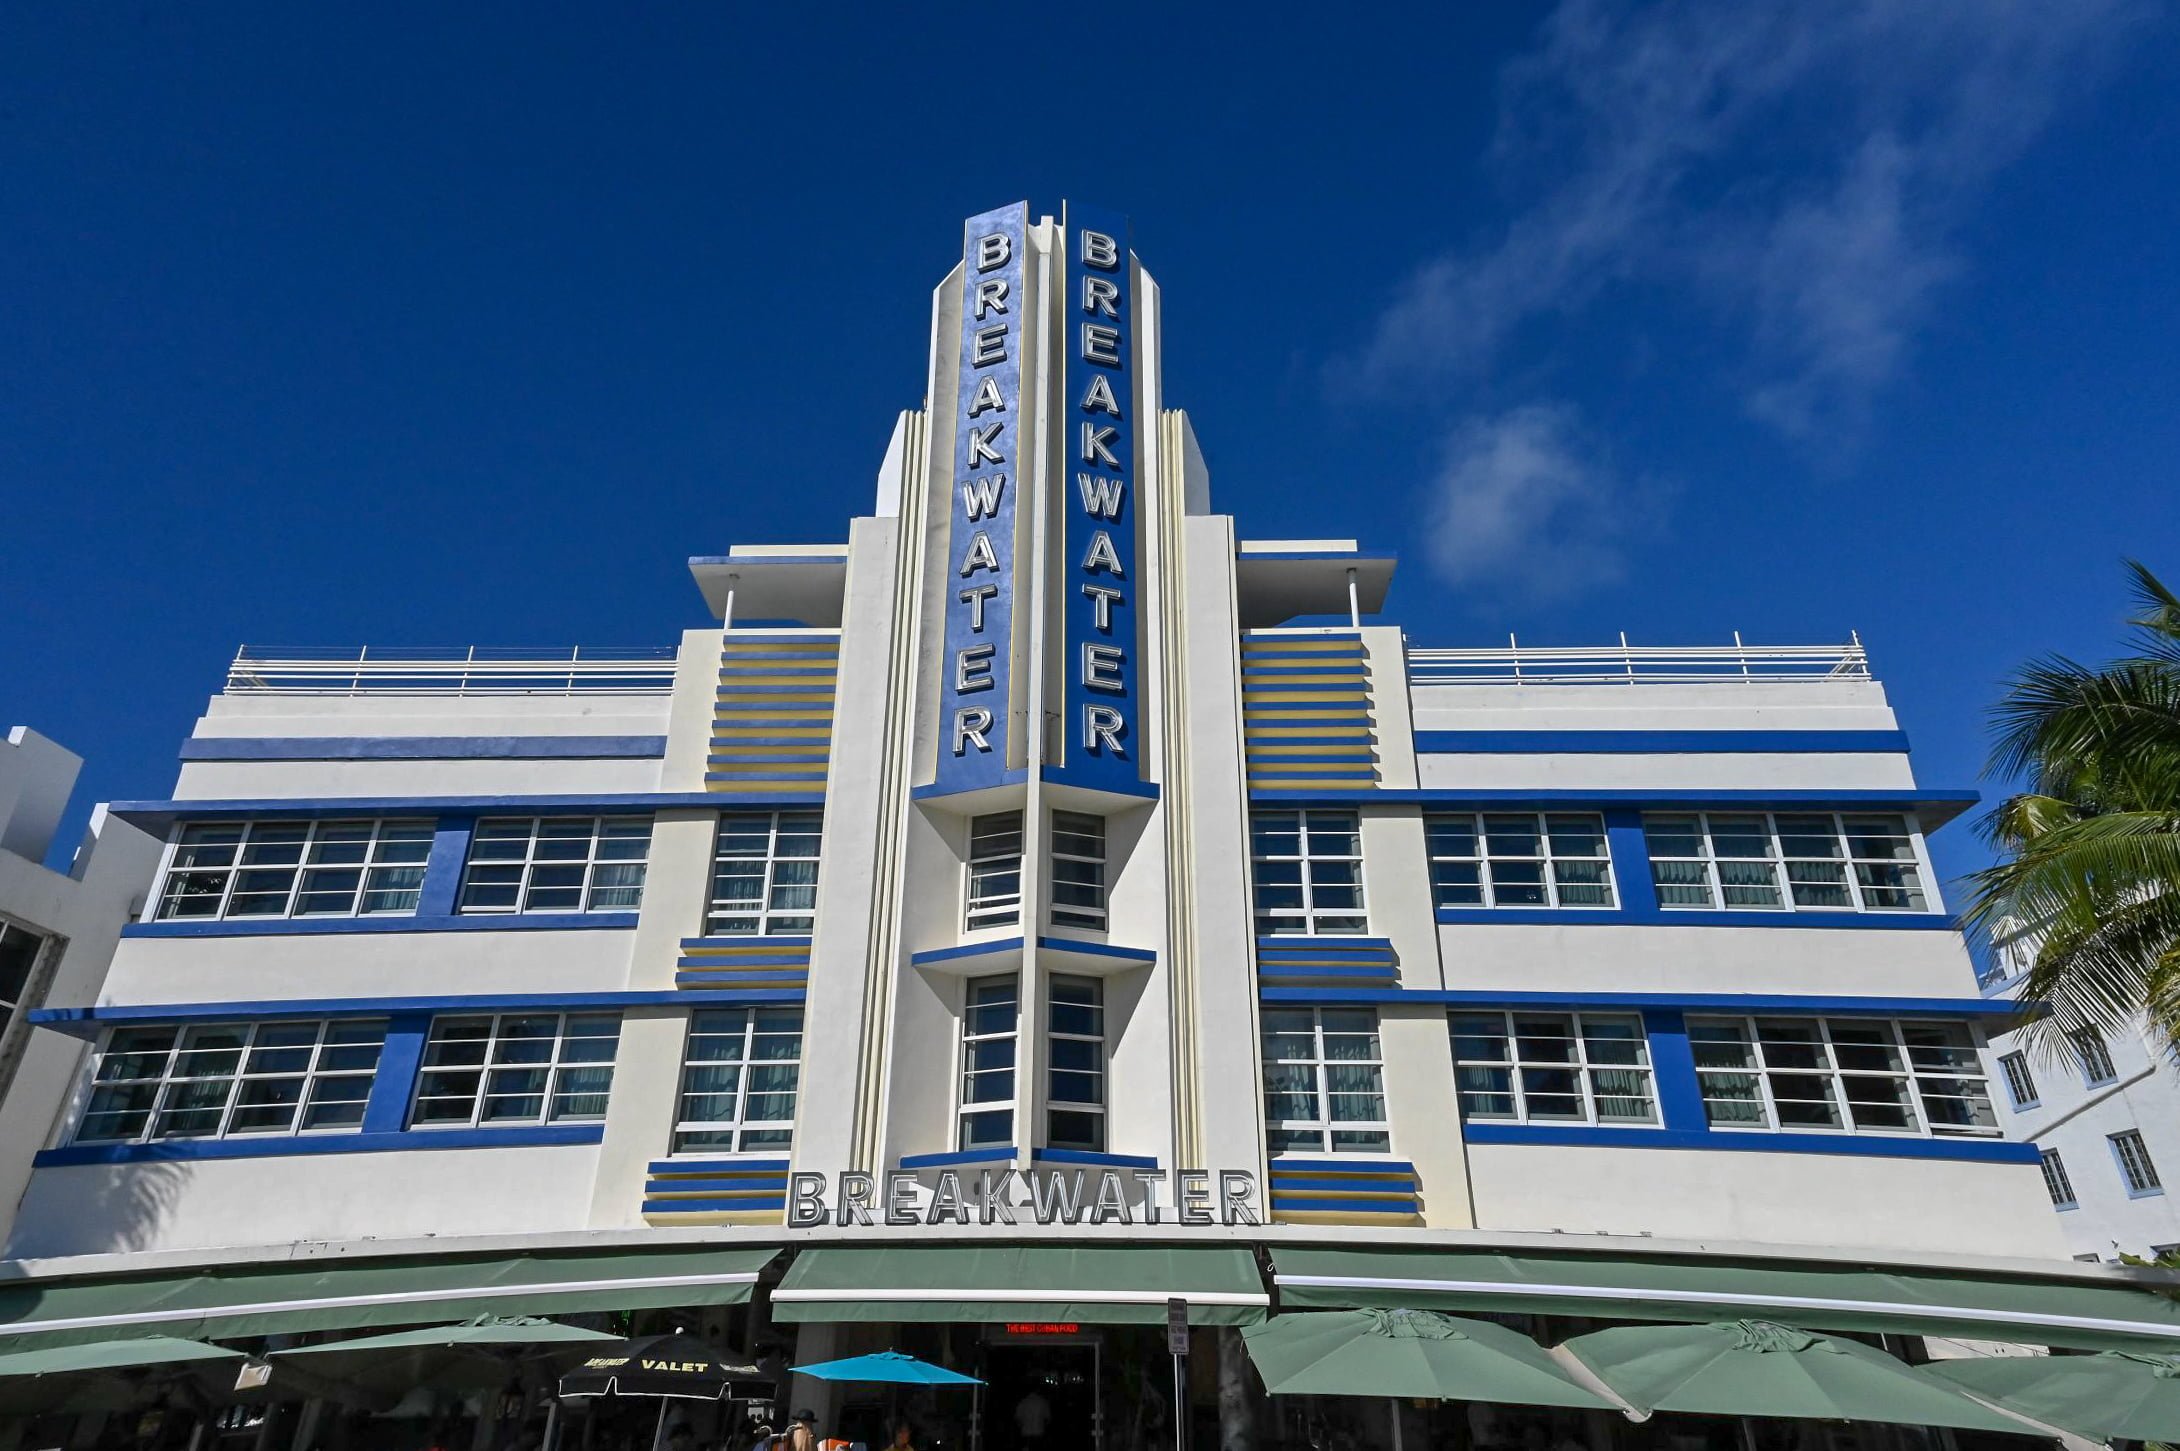
Hotel Breakwater South Beach (another block down from the Edison): 940 Ocean Dr, Miami Beach, FL 33139
Starlite Hotel (enjoy it’s pastel yellow and purple vibes): 750 Ocean Dr, Miami Beach, FL 33139
The Avalon Hotel (see photo at the top of the page with the classic car): 700 Ocean Dr, Miami Beach, FL 33139
For more Art Deco architecture styles, you can cut over two blocks west to Collins Avenue (A1A) and admire more Art Deco architecture as you circle back to your car to get your beach gear.
Top Miami Beaches
You can’t spend a day in Miami and not go to the beach. So now that you’ve worked up a sweat walking around and seeing Art Deco Architecture, why not take a swim and cool off at one of Miami’s beautiful beaches! The following beaches are some great options off the A1A.
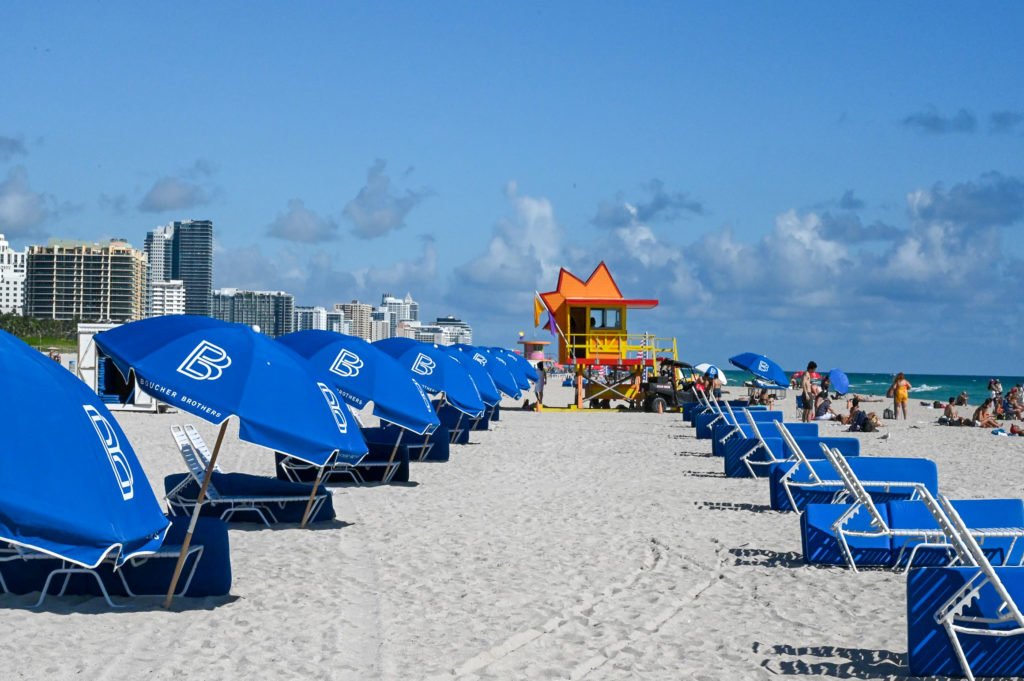
Miami Beach: Come here if you want a massive beach with options to rent chairs and umbrellas, purchase drinks and food close by and have a long stretch of beach with lifeguard huts scattered up and down the beach. Miami Beach is a massive stretch of sandy beach. However, be prepared as parking can be challenging to find.
Location & Parking: There are several parking garages all along Ocean Drive that you can choose from. Due to their proximity to this popular area, they are often quite expensive. If you’re willing to walk a few blocks, you might be able to find some street parking a little further out. For parking garages, try Miami Beach Municipal Parking Garage, Miami Beach Parking Garage, or 953 Florida A1A Parking Garage.
Enjoy the colorful lifeguard huts along Miami Beach.
Allison Park, 6500 Collins Ave, Miami Beach, FL 33141: Come here if you want something a little quieter and a little cleaner than Miami Beach. This park has a playground area, workout equipment, clean bathrooms, and a beautiful beach. The only downside is limited parking. There is a small shaded parking lot for Allison Park, and if you’re lucky, you’ll snag a spot there. However, if you are unable to find a parking spot, don’t worry, you can always try one of the other beaches listed here.
36th Street Park, 3501 Collins Ave, Miami Beach, FL 33140: Come here and enjoy walking along the Miami Beach boardwalk. This beachfront park has a clean beach and is away from the crowds of Miami Beach. There are bathrooms and showers here. Park at the Miami Beach Parking lot or find street/metered parking nearby.
North Shore Open Space Park, 8328 Collins Ave, Miami Beach, FL 33141: Come here for a large park full of picnic tables and BBQ grills, multiple restrooms, outdoor showers, and just a short walk to the beach. The beach here is not as extensive as Miami Beach; however, there are lifeguard huts here, and you will find it to be a lot less crowded than South Miami Beach. There is lots of street parking for North Shore Open Space Park. There are also several parking garages nearby.
Lunch Break to Regroup and Recharge
Now that you’ve had your fill of Vitamin D, it’s time to take a break from the beach. Grab lunch at any of the many options along Ocean Drive or drive down to South Pointe Park Pier and enjoy more of the boardwalk and beach area. You may prefer to instead grab a quick bite and squeeze in a shower at your hotel before heading to our next stop. Do what works best for you. Here are some lunch options just in case you want to sit down to eat before moving on.
Lunch Options:
The Local House: 400 Ocean Dr, Miami Beach, FL 33139
The Lobster Shack: 40 South Pointe Dr #104, Miami Beach, FL 33139
Bocas Grill Brickell (option close to the Vizcaya Museum): 2525 SW 3rd Ave, Miami, FL 33129
Zuuk Mediterranean Kitchen (cheaper option near Vizcaya): 1250 S Miami Ave #105, Miami, FL 33130
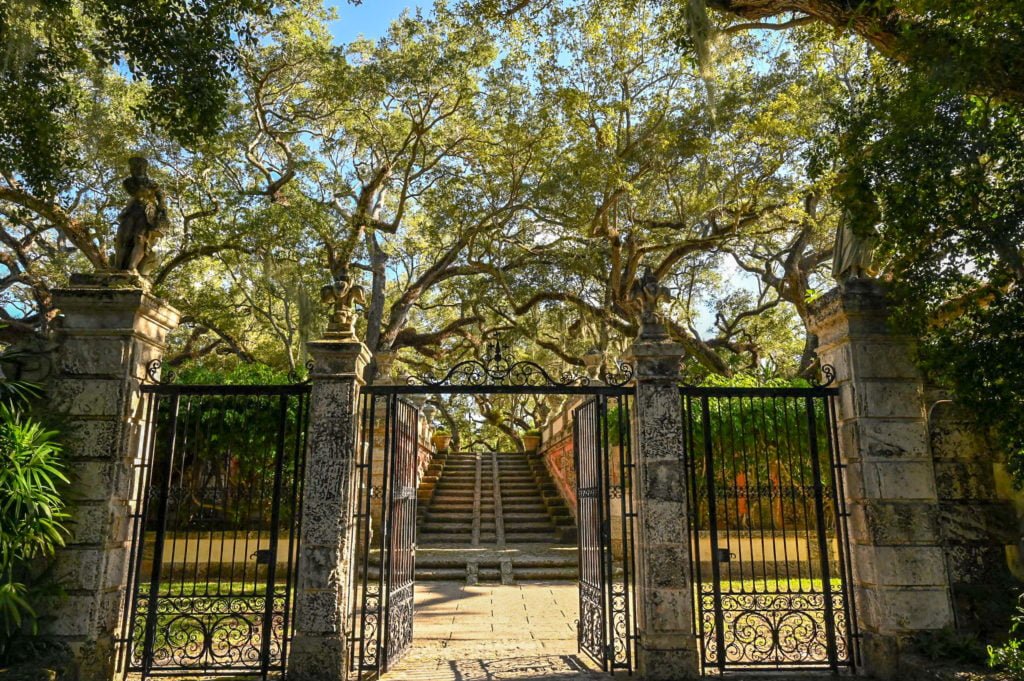
Vizcaya Museum & Gardens
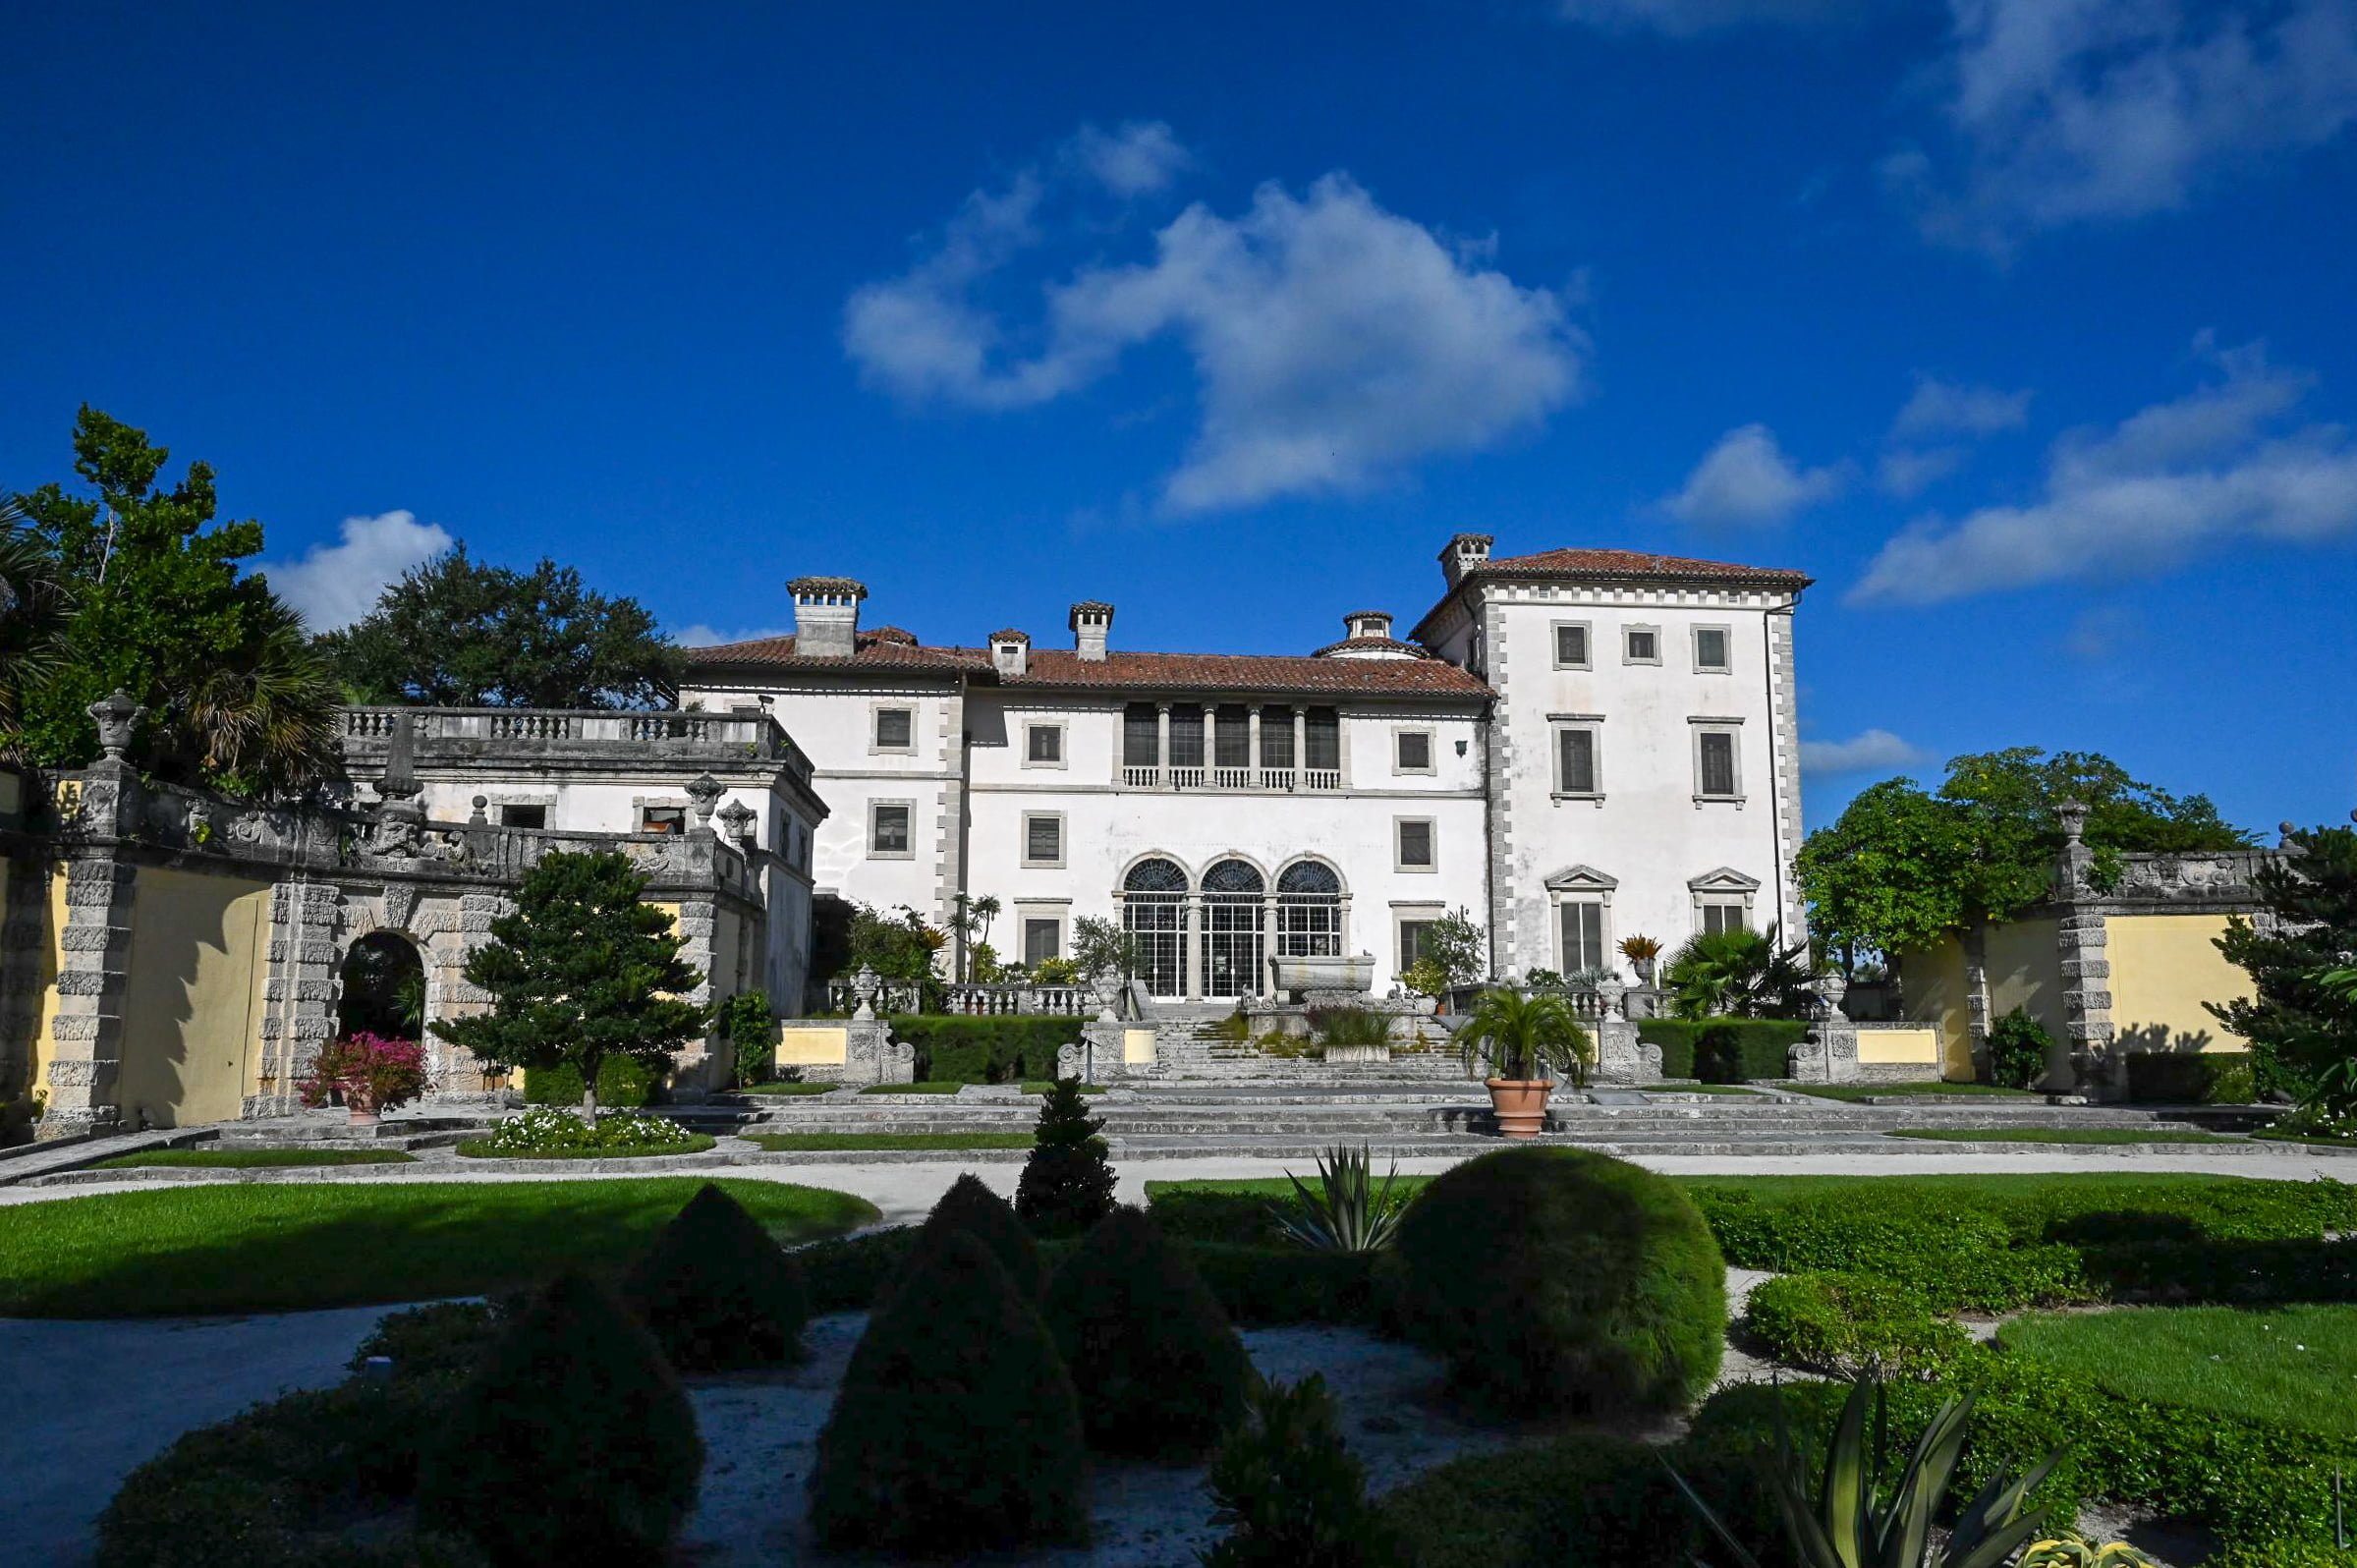
You may only have one day in Miami, but that will be enough for you to recognize that there are a lot of wealthy people who call Miami home. So why not explore how they live with a trip to Vizcaya Museum and Gardens–a Miami mansion turned museum.
If you’ve ever wondered what it’s like to live in one of Miami’s mansions, here’s your chance to peer into the lives of the wealthy. Villa Vizcaya was once home to James Deering, who spent almost ten years building this beautiful home.
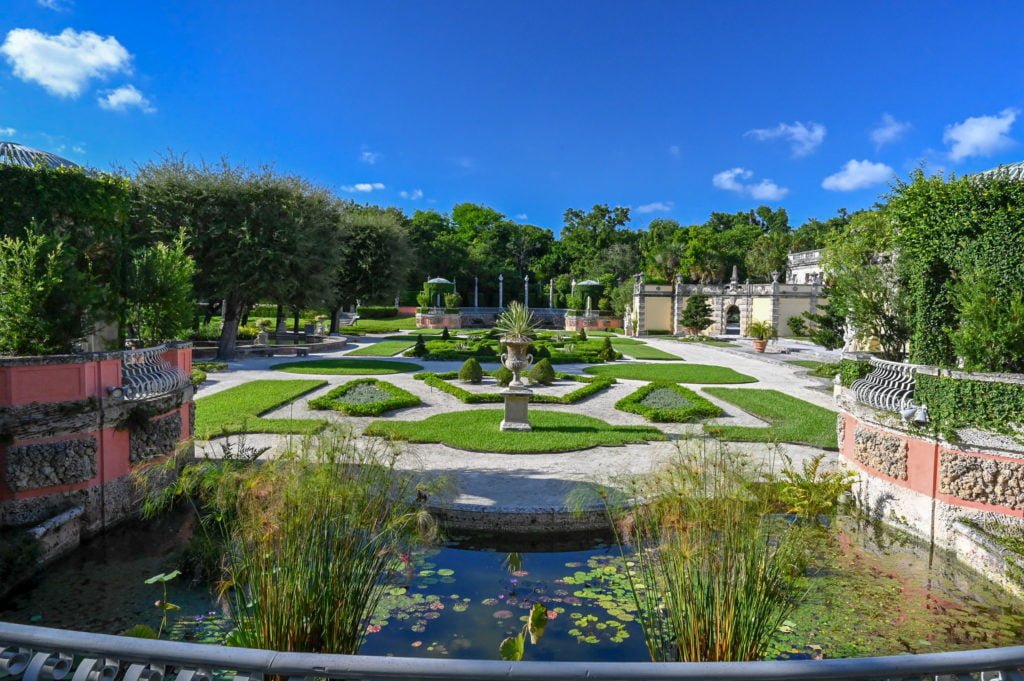
Gaze upon the Italian inspired architecture and beautifully decorated rooms, and you may feel as though you’ve traveled to Italy, rather than a mansion in Miami. The Venetian inspired barge and boat docks stole the show for me, not to mention the gorgeously manicured gardens.
One of the beautiful gardens at Vizcaya Museum.
The house is stunning. However, I wonder, did James Deering enjoy it? He only lived a few years after its completion before bequeathing to his nieces. Did they feel inspired as they wandered over their beautifully manicured gardens or looked out over the water? I hope so. I know I was.
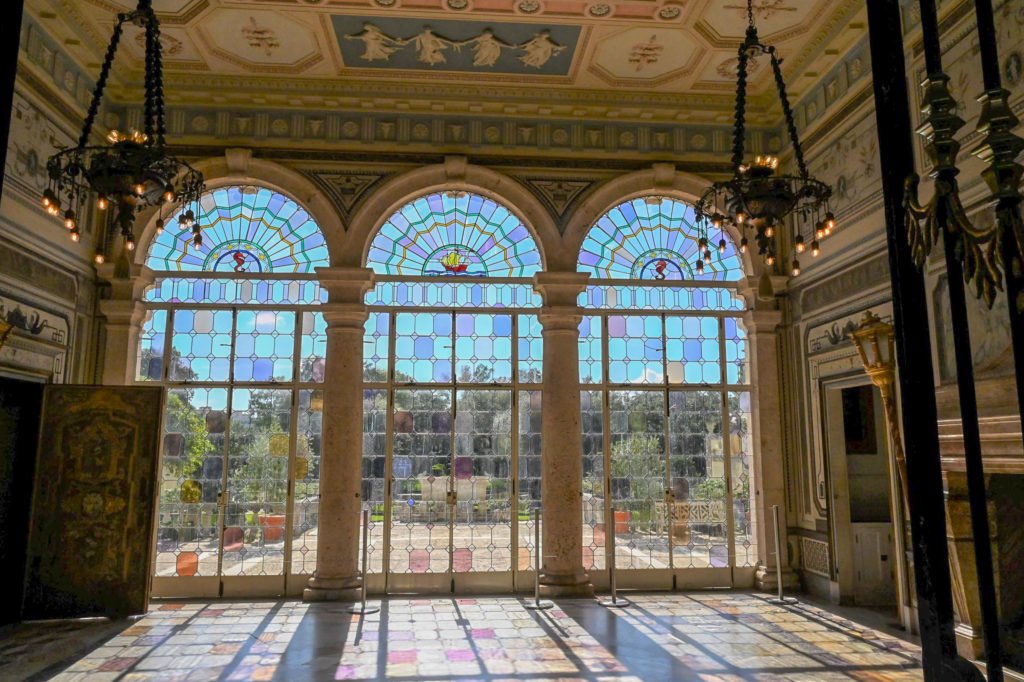
Beautiful stained glass windows and doors leading out to the Vizcaya Gardens.
One of the unique things about the Vizcaya Museum and Gardens is that they house the original antiquities purchased by the Deering family. See the house as the original owner decorated it and learn what inspired its builder.
One of the rooms, still decorated with the original antiques from the Deering family.
I think the Vizcaya Museum and Gardens are worth a stop during your one day in Miami. It is set on 50 acres of land and allows you to peer into the lives of the Deerings as well as give you a sense of the eclectic nature that is Miami. Don’t miss it!
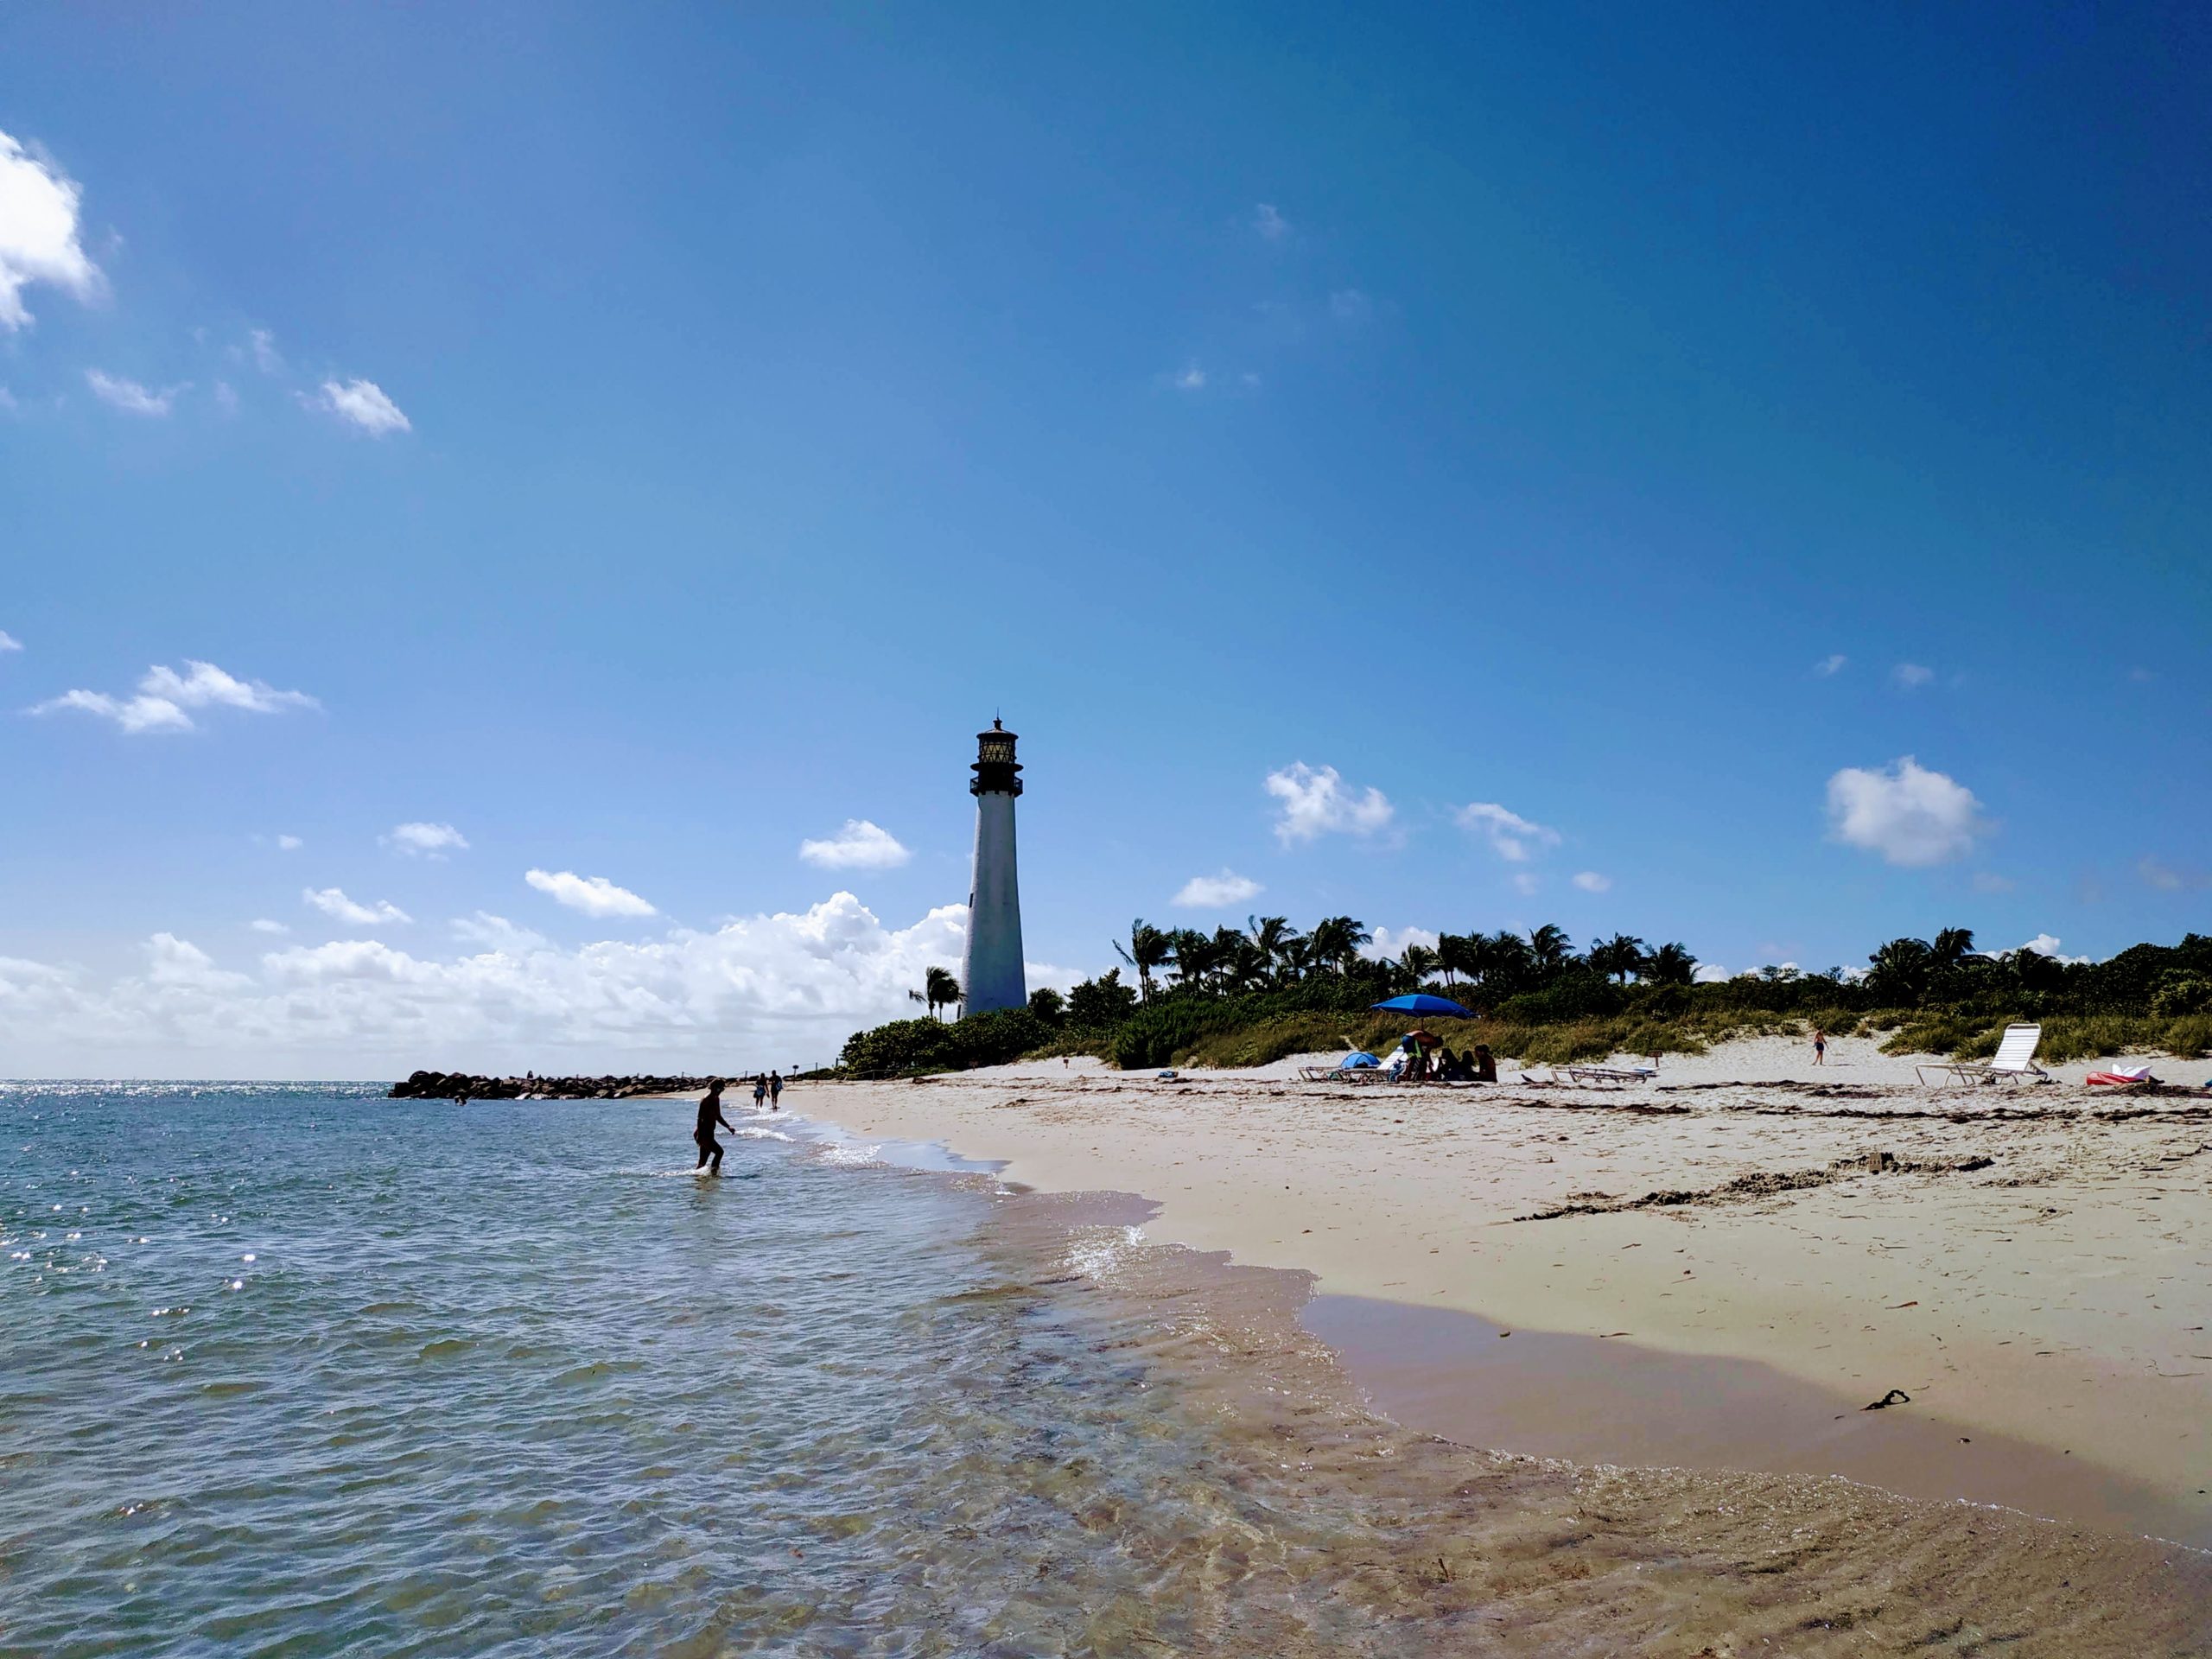
Bill Baggs Cape Florida State Park
After visiting the museum, if you have time, consider making a trip out to Key Biscayne and the Cape Florida State Park. Its beach is one of the top 10 in the US! So if you didn’t get a chance to swim earlier, why not tour the lighthouse and then go for a swim while enjoying views of the lighthouse.
Cape Florida State Park is full of history. It was once used for the underground railroad. Runaway slaves would hide on its dark beaches until they could make the passage for the Bahamas. This continued until the lighthouse was built–illuminating the once dark beaches of Cape Florida.
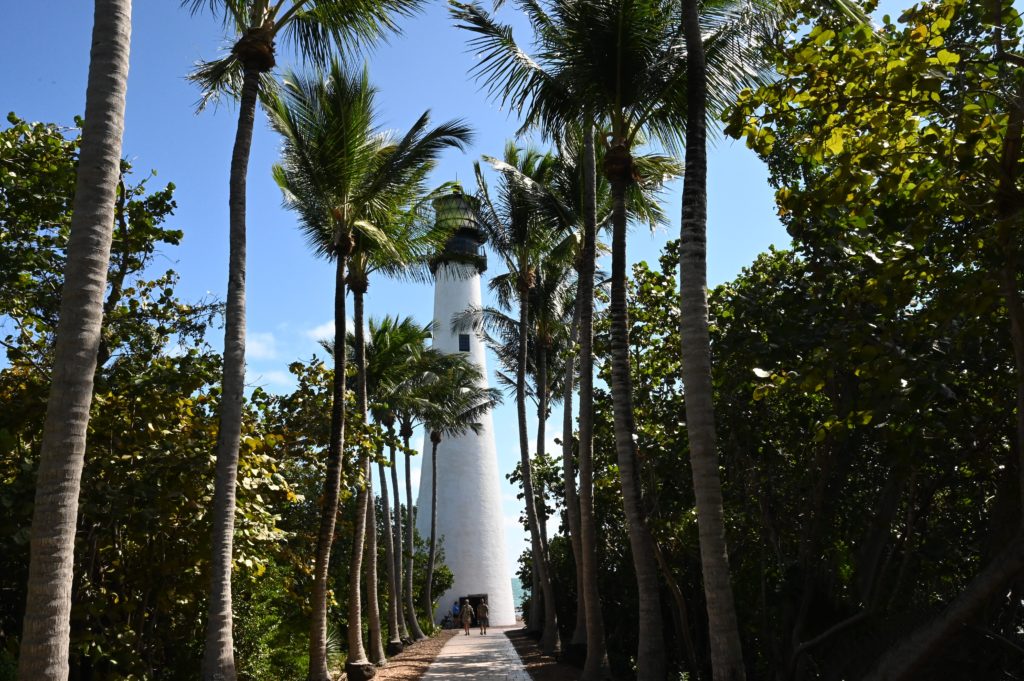
The lighthouse was built in 1825, and according to the park, it is the oldest structure in Miami-Dade. You can climb the 112 stairs to the top and admire the gorgeous views over the bay. The Lighthouse tower and its surrounding complex are open Thursday through Monday from 9:00 a.m. until 5:00 p.m. Guided tours take place at 10:00 a.m. and 1:00 p.m. and include a visit to the Light Keeper’s House. Tours are free and begin at the entrance gate in front of the lighthouse.
There are lots of picnic areas at the park, restrooms for changing, and a cafe where you can grab a bite to eat or rent bicycles and ride around the park. Make sure you don’t leave any food lying around unattended as there are a lot of raccoons here as well as iguanas and birds. Visit the park’s website to learn more about all the amenities offered at Bill Baggs Cape Florida State Park.
Address: 1200 Crandon Blvd, Key Biscayne, FL 33149 Park Hours: The park opens at 8:00 a.m. and closes at sunset. Fees: It costs $8 per vehicle to enter the State Park.
The Historic Cape Florida Lighthouse.
Dinner in Little Havana and An Evening in Miami
Head to Versailles Restaurant in Little Havana and dine with locals and tourists at a traditional Cuban restaurant. Make sure to leave room for dessert or at least stop in at their adjoining bakery after dinner to grab some yummy key lime pie or pastries to go. Stroll through the neighborhood, and if you saved room and want some ice cream, stop in at Azcura ice cream for a treat.
The evening is yours to spend how you want. Relax by the pool or see what nightlife Miami has to offer, it all depends on what you like to do!
If you’re up to it head back to Miami Beach to see the Art Deco buildings on Ocean Drive lit up in neon lights. It really has that feeling of Miami you’ve seen in the movies with the palm trees & neon lights.
You can also stroll through the Lincoln Road pedestrian shopping and dining area or visit one of the hottest neighborhood’s in Miami and shop at The Shops at Mary Brickell Village. If shopping isn’t your thing, consider visiting Wynwood Walls and enjoying some art murals before it gets too dark.
Lincoln Road Shopping District (pedestrian street in Miami Beach): Lincoln Rd, Miami Beach, FL 33139
The Shops at Mary Brickell Village: 901 S Miami Ave, Miami, FL 33130
Wynwood Walls: 2520 NW 2nd Ave, Miami, FL 33127
Gates to one of the many gardens at Vizcaya Museum.
Closing Thoughts and Tips
As I mentioned in the beginning, there are so many things to do in Miami that you can’t possibly seem them all in one day. I recommend a mixture of sightseeing and relaxing as the best way to get a feel for this luxurious city.
Choose where you stay, based on whether you want to participate in the Miami nightlife or prefer a more quiet area to sleep. If you like to be right in the midst of the noise and the hustle and bustle, then you might choose to stay in South Beach. However, if you prefer to sleep at night, select one of the quieter neighborhoods, Coral Gables, Brickell, or Coconut Grove make good choices.
We stayed in the Coconut Grove neighborhood and loved it. There are a lot of great coffee shops nearby, plenty of restaurants and parks and it felt safe.
Make sure to familiarize yourself with the beach flags on Miami’s beaches. Talk to a lifeguard if you are unsure about the conditions.
If you’re looking for more great destinations in Florida, consider visiting St. Augustine, the oldest city in America. Read about my day trip to St. Augustine from Orlando to learn more about this historic city. Whatever you decide to do, soak in the sun, and have fun!
If you’re planning a trip to Florida, consider adding St. Augustine to your travel itinerary. I found myself in Orlando with some extra time and decided to take a day trip to St. Augustine. I am so glad that I did! There are so many things to do in St. Augustine that you could easily spend a few days here. However, with a day and some careful planning you can get a good feel for this historic city.
You will be delighted by its rich history and beautiful architecture and of course it doesn’t hurt that it is located on one of Florida’s beautiful coastlines! In this post, I’ll cover some of the top sights that you can see on a day trip to St. Augustine, and perhaps you’ll find yourself returning for a night or two in this amazing city.
A Little Background on St. Augustine, Florida
St. Augustine is the oldest city in America. How cool is that! The Spanish first settled St. Augustine in 1565, and you will notice the Spanish influence in the architecture of many of the buildings here. St. Augustine has a unique story and history buffs will love learning about the chronology of events that led to Florida becoming an American territory. Pirates, wars, and oil tycoons all played a part in the story of St. Augustine.
Even if you are not a big fan of history, you will undoubtedly be able to appreciate the beautiful buildings and unique setting. Plus, who doesn’t want to visit the site of the Fountain of Youth? I mean, maybe, just maybe, your sip from the fountain will be “the sip.” Don’t you at least want to try?
Making the Most of your Day trip to St. Augustine
Start early. I recommend you arrive no later than 9:00 a.m. If you’re like me and making the day trip to St. Augustine from Orlando, the drive takes a little over 2 hours one-way, if you’re staying on the coast, say in Daytona, then your trip will be around 1 hour. I recommend grabbing a quick bite and a coffee for your drive and then planning another coffee break once you’re in St Augustine.
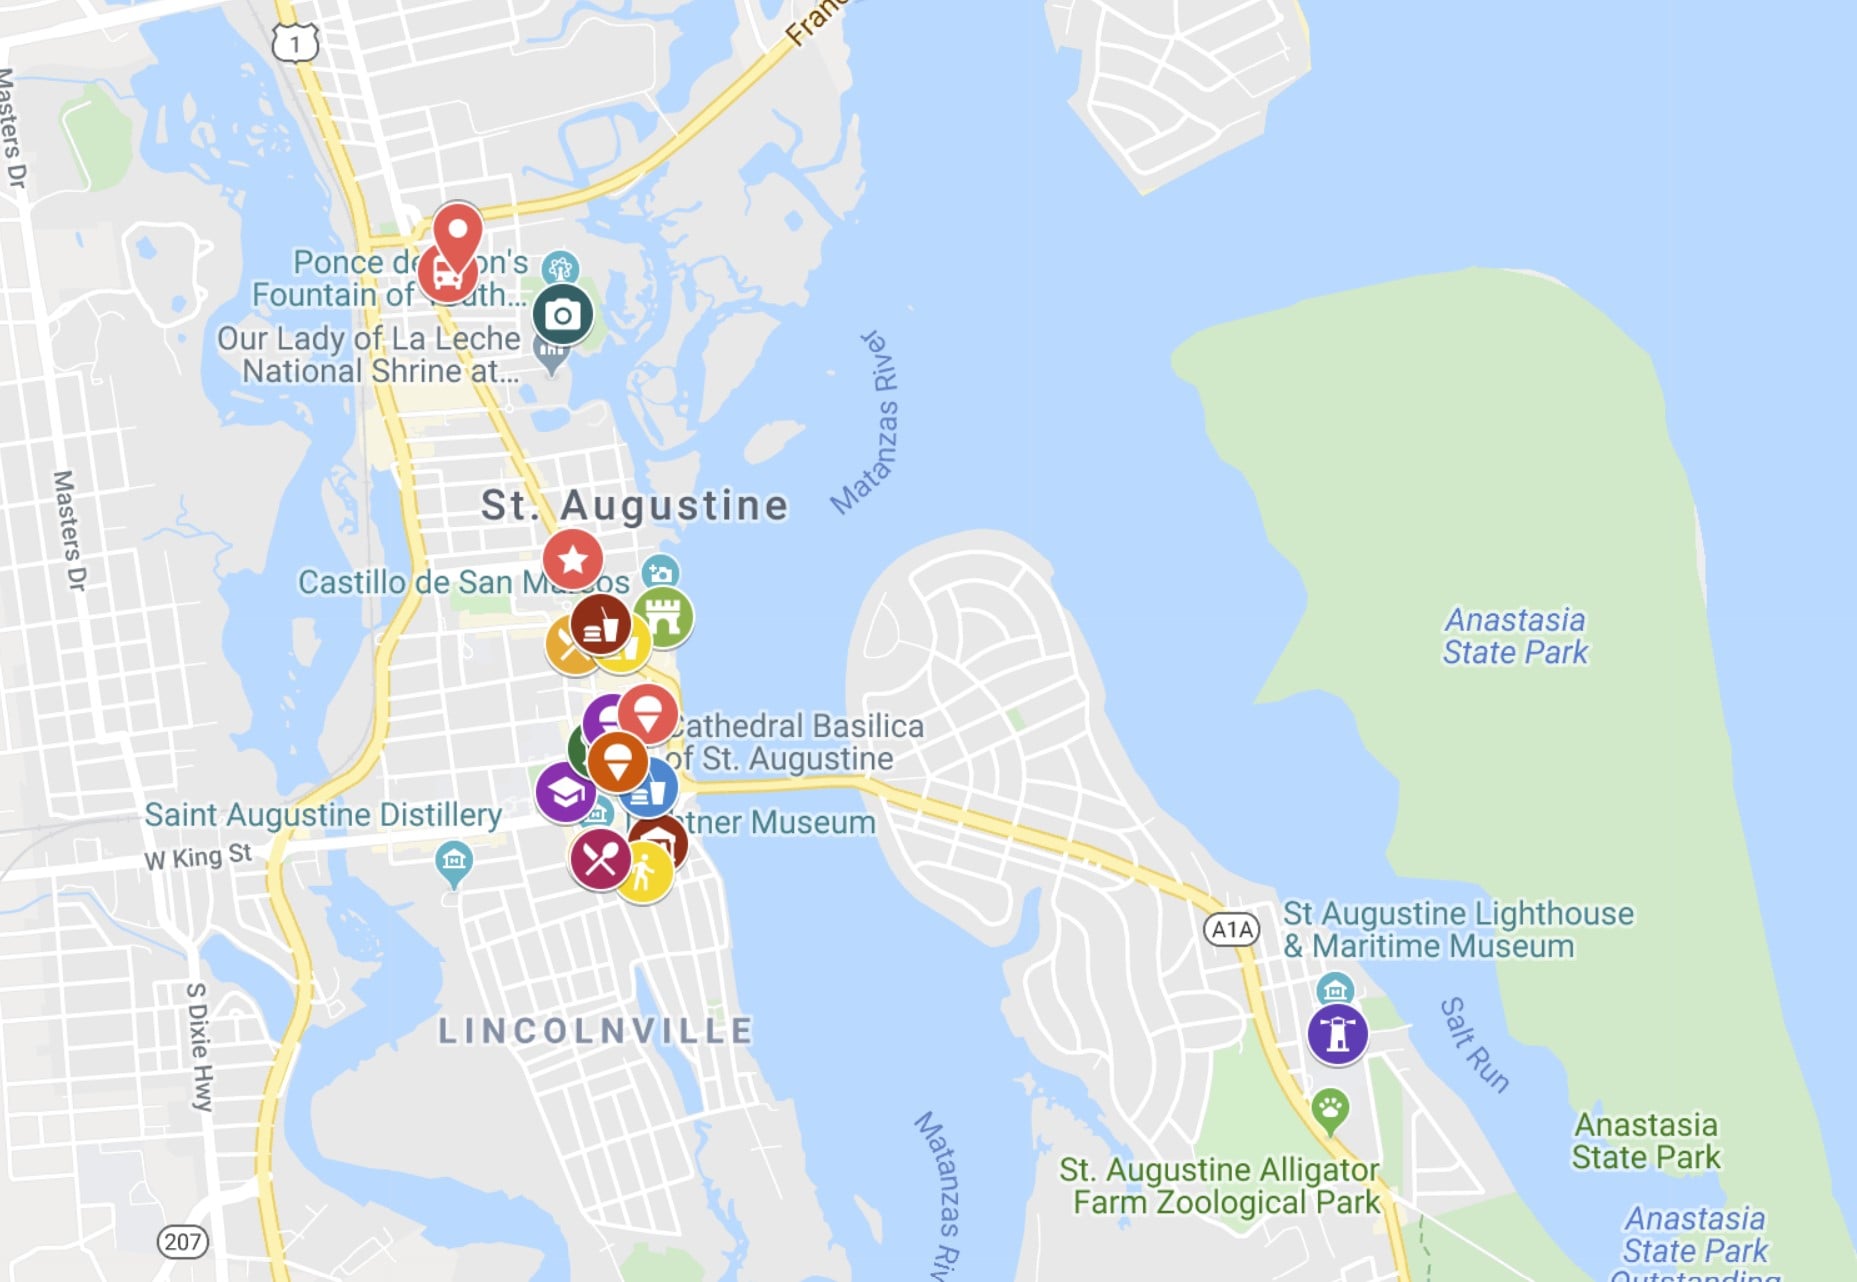
Getting Around St. Augustine, Florida
You have a couple of options for getting to the sights in St Augustine.
Walk & Drive to the Sights: Park at the Visitor Center Parking Garage and walk to the various attractions. It is $15/vehicle for the day. The main attractions are about a 10-15 minute walk from the parking garage. Please note that most places close at 5:00 p.m., so plan your sightseeing accordingly and make sure to pick up a free map at the Visitor’s Center.
There are a few sights you will want to drive to, however they have their own free parking, so you won’t need to pay for parking twice. In the post below, I will explain which ones those are, and how I recommend ordering your day trip to St. Augustine.
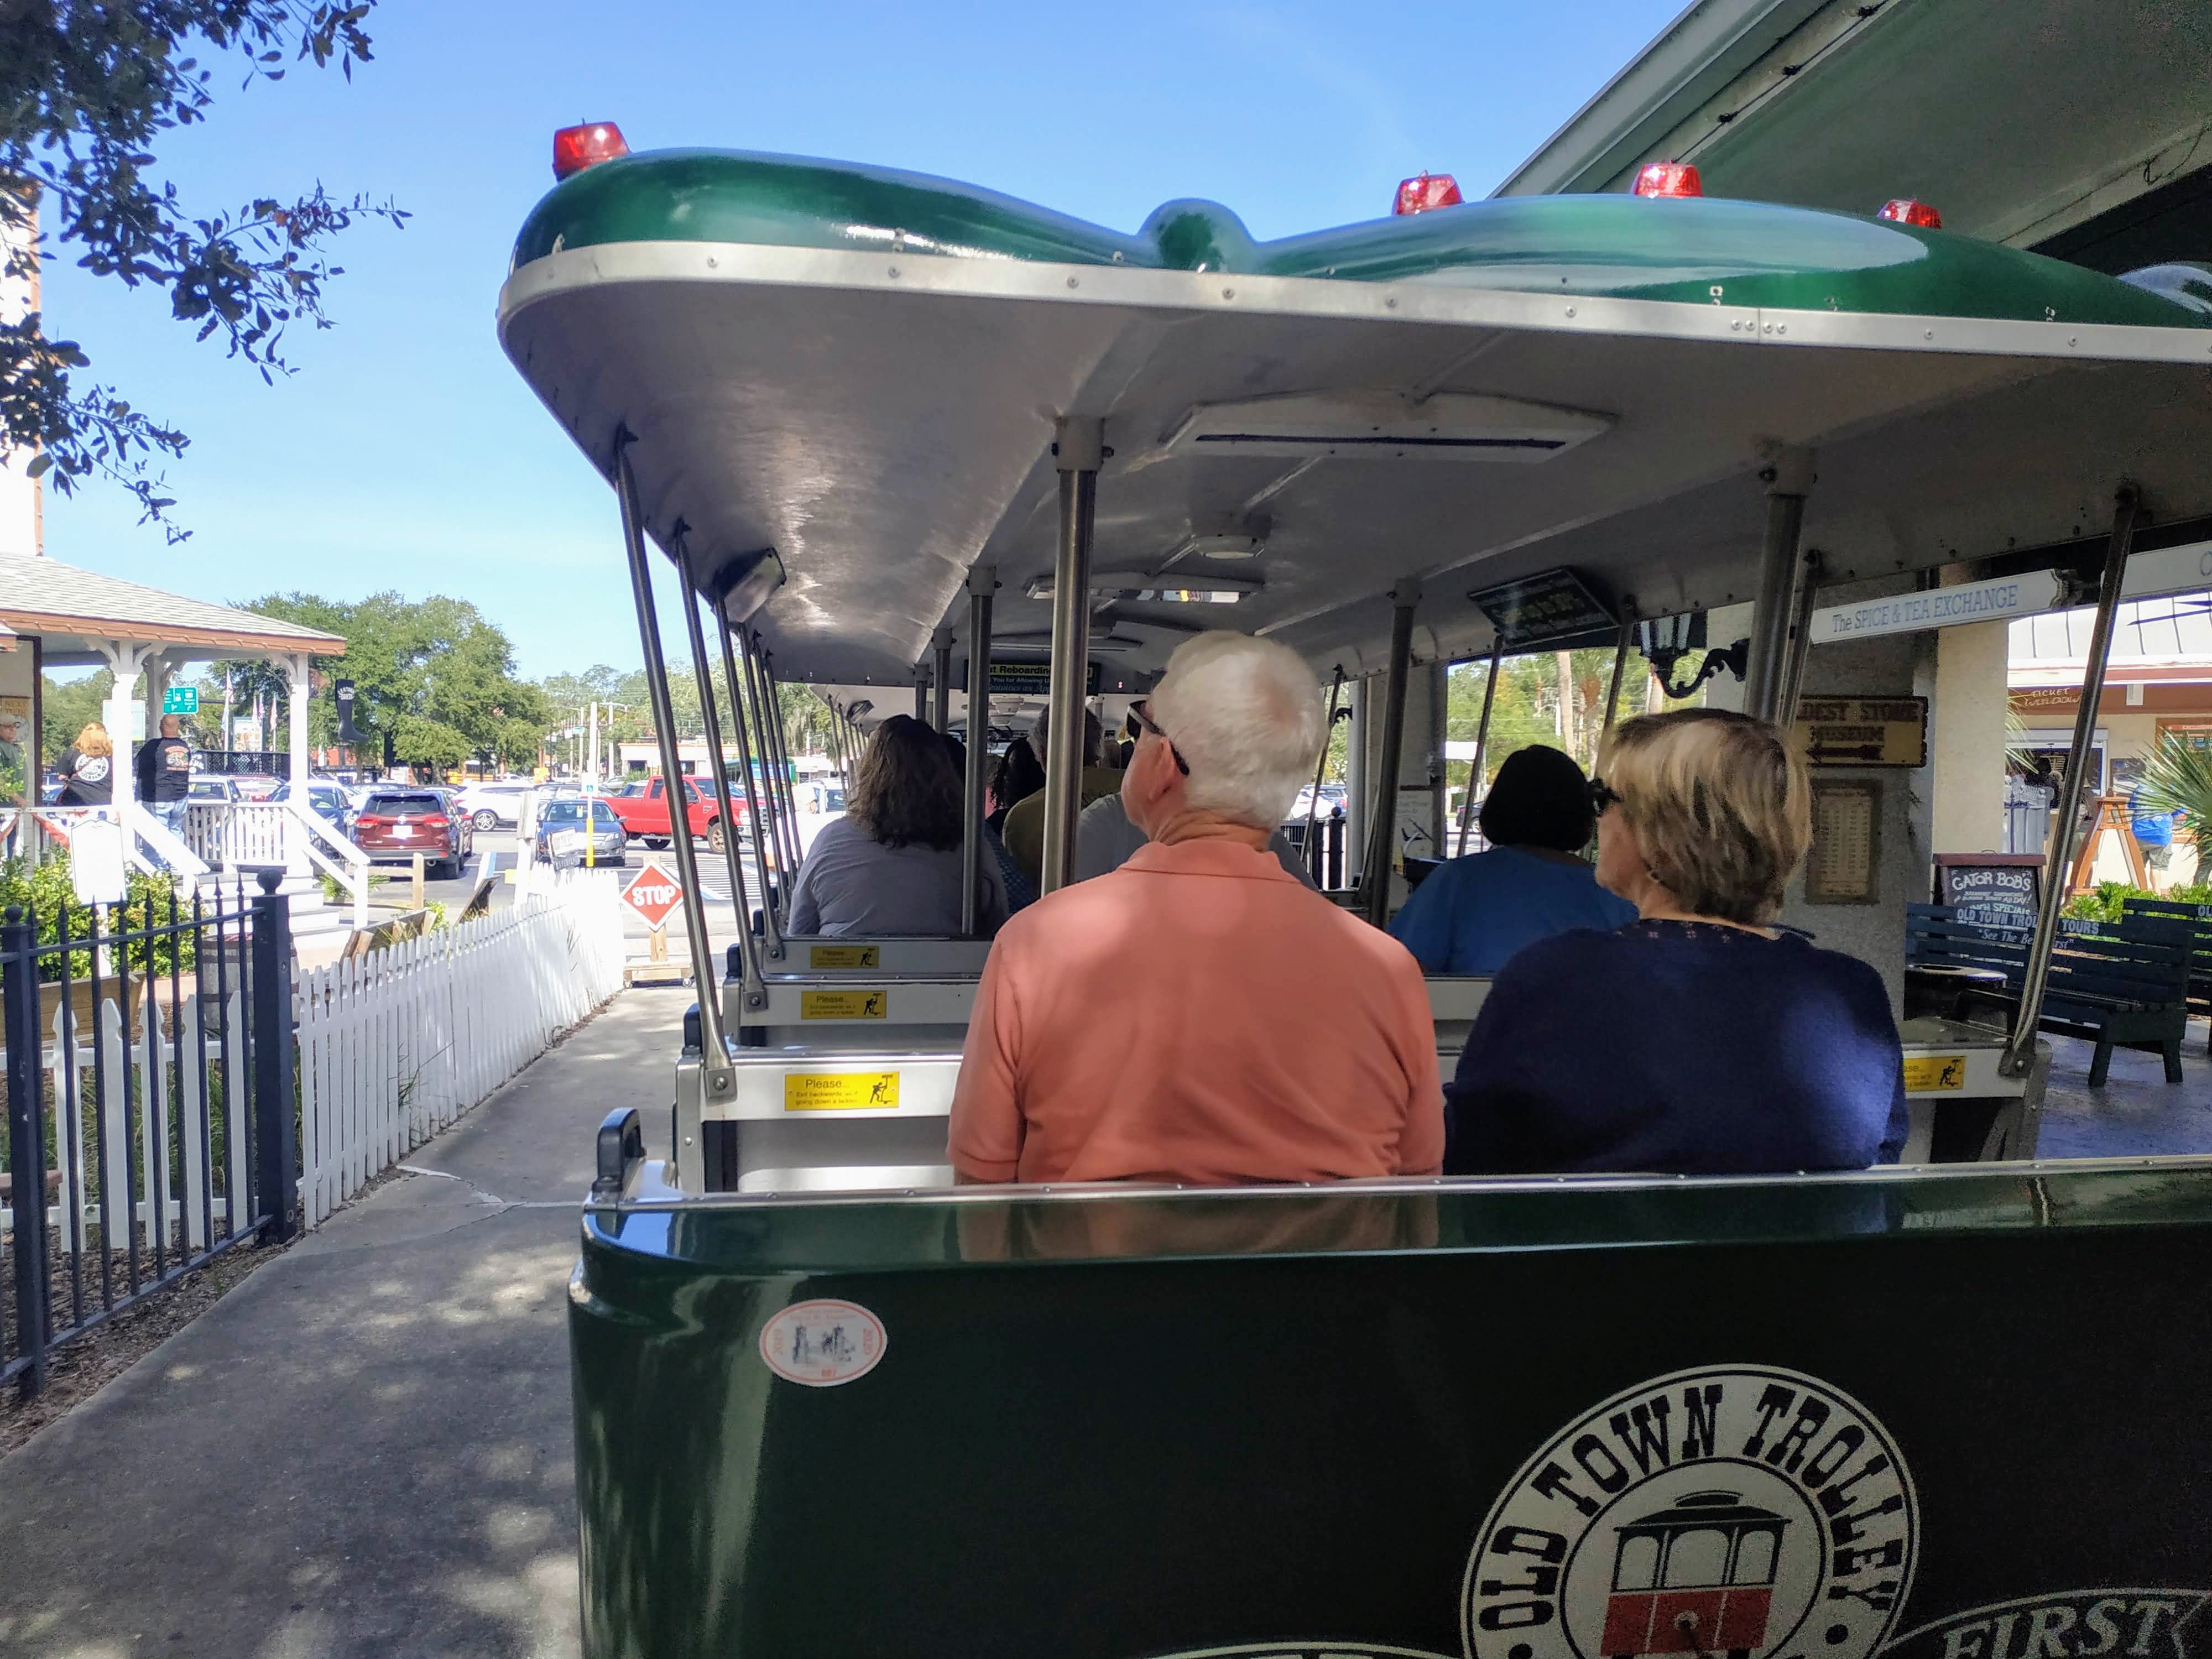
Take a Trolley Tour: Old Town Trolley Tours stops at 23 different stops along their route. Your ticket is good for the whole day. Your legs get a rest, and you get some shade over your head on those hot sunny days. Plus, you get to hear about the history of the area as you ride from stop to stop. And of course, if you have any mobility issues that hinder your ability to walk for extended periods, this is the way to go.
Your budget will help determine which choice you take. If you purchase your ticket online (no printer required), the one day trolley ticket cost around $25. This is what I did. However, if I were in a group, I would choose the more budget-friendly parking option and walk. As it was, I did a fair amount of walking anyway, as things were close, and I didn’t always want to wait for the next trolley.
How to Organize Your Sightseeing
With only one day, you will want to look at some of the options ahead of time and then structure your day in order of what is most important to you. Try to see the sights in order of what’s most important to you to least important. That way, if you run out of time, you’ll have at least seen your top picks.
Below I will highlight my choices for my day trip to St. Augustine. However, I will also list a few additional options should you have more time. You can click on the links below to jump to a section to learn more about that site.
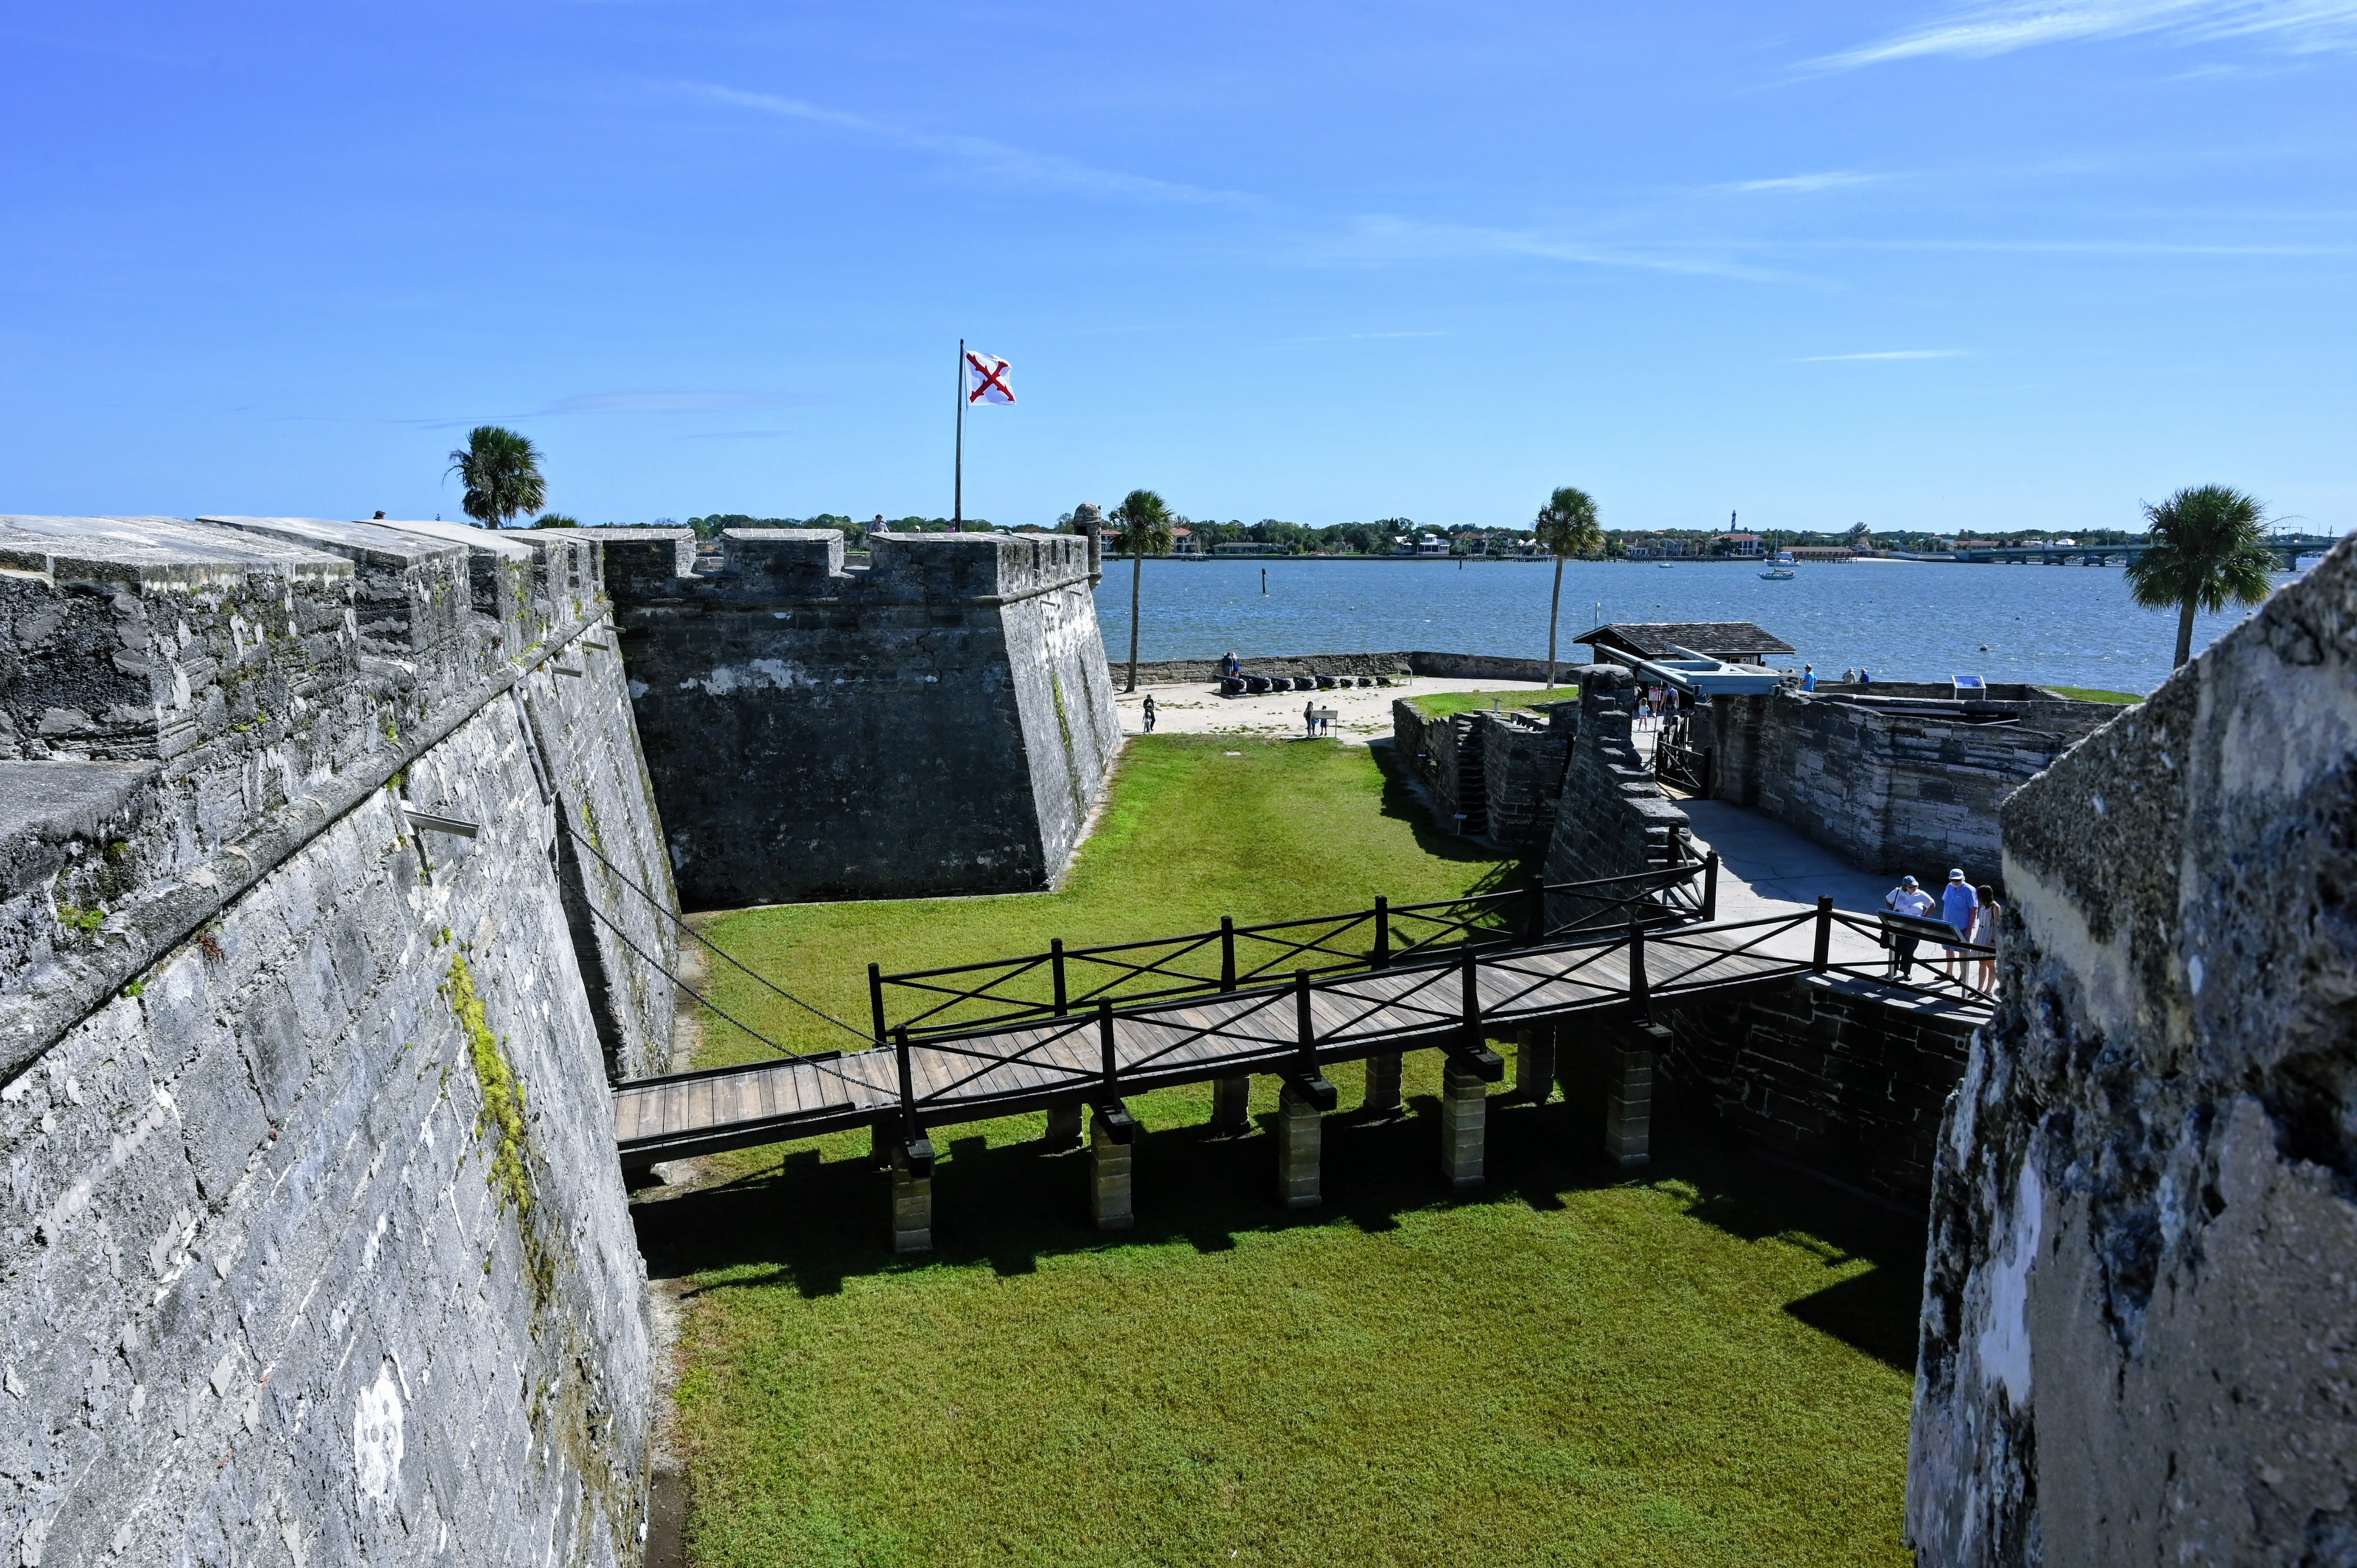
My first stop was Castillo de San Marcos. It is just up the street from the Visitor Center and close to the Colonial district and St. George Street. I stopped at the Colonial Quarter across the street from the Castillo de San Marco for a coffee and a snack before walking over to Castillo de San Marcos.
Construction on the Castillo de San Marcos began in 1672. Talk about history! History buffs will love learning about the fort’s history through the centuries. It was a refuge, storehouse, military defense, and now a historic landmark. They also shoot real cannons on Fridays, Saturdays, and Sundays.
Even if you are only mildly interested in history, it’s worth a quick tour inside to learn more about this fort that has been here for over three centuries! However, if your budget is tight, or you have other sights you don’t want to miss, you can always save this for later in the day and then decide if you have time. You can also take a walk around the outside and enjoy views of the water.
Time Spent Here: I spent less than an hour here, however for history buffs who want to watch the videos and participate in discussions with the park rangers, you might want to allow yourself two hours.
Colonial Quarter & St. George Street Pedestrian Area
As I mentioned above, the Colonial Quarter is across the street from the Castillo de San Marcos. If you need a cold drink or an ice cream before you get started with more sightseeing, then pop in here. The Colonial Quarter is also the home to America’s oldest schoolhouse. The pedestrian-only St. George Street walking area also begins here. This stretch of road is a great area to shop for souvenirs or grab a bite to eat.
Lightner Museum
Spend any amount of time in St. Augustine, and you will see the influence of Henry Flagler on the city. Flagler was the co-founder of Standard Oil. He was extremely influential in the development of Florida’s coast and also founded a railroad company. He was a man who saw what he wanted and had the means and the vision to make it a reality. Flagler visited St. Augustine, fell in love with the area, but determined it needed a hotel, and it needed a transportation system to get people there. So, he built both.
The Alcazar Hotel, was one of Flagler’s extravagant hotels that catered to the uber-rich. It is now home to the Lightner Museum. The Lightner Museum is a gorgeous building, and although it is a small museum, it is absolutely worth your time. They have an eclectic collection of antiquities that makes for an interesting and unique visit.
The inner courtyard at Lightner Museum.
The Lightner Museum has a beautiful courtyard and three levels to the museum. My favorite floor was the first floor with its extensive collection of seashells and antique musical instruments. They offer daily antique mechanical music demonstrations at 11 a.m. and 2 p.m. The musical instruments date back to the late 1800s.
In addition to the beautiful artifacts, Lightner Museum also houses one of the best spots for lunch in St. Augustine. Cafe Alcazar is a restaurant in what was once the swimming pool of the original Hotel Alcazar. Now how often can you tell someone that you dined in a swimming pool? They are only open for lunch between 11 a.m. and 3 p.m., so you’ll want to plan accordingly.
Time Spent: Less than 1 hour.
Flagler College
Flagler College, once the home of the Ponce de Leon Hotel, is across the street from the Lightner Museum. Completed in 1888, it was the first hotel that oil tycoon Henry Flagler built in St. Augustine, and it is a stunning piece of Spanish architecture. Henry Flagler was a detailed man, and you can see the excellent care he took with every detail of this hotel.
It is home to one of the largest collections of Tiffany glass still housed in their original location. Flagler had 79 stained glass windows installed in what is now the college dining hall, and those original 79 Tiffany glass windows are still there today.
Flagler College Tour
You can take a 1-hour tour of the college. They provide a lot of fascinating history as to Henry Flagler and the Ponce de Leon Hotel. The tour takes you to the dining hall to view the collection of Tiffany stained glass windows, and you’ll also explore the courtyard with its frog fountain that also doubles as a sundial.
The frog fountain and sundial in the courtyard at Flagler College.
You will finish out the tour by viewing what was once the women’s grand parlor. It is here you will see beautiful Austrian crystal chandeliers and a clock made from the largest piece of solid white onyx in the western hemisphere.
Our guide was a college student who was very proud and knowledgeable about the history of her school. She offered fun historical information regarding the period in which the hotel operated. I found it quite comical to learn that women weren’t allowed to stay in the same room while the men paid for their room, as seeing so much cash, might cause them to faint or become ill. So they were taken to a women’s sitting room for their protection. How thoughtful.
Even if you don’t take the tour, stop in to admire this beautiful ceiling at Flagler College.
Time Spent: 1 hour 30 minutes. The tour is 1 hour. However, I took a little extra time taking photographs and admiring its beauty. If you don’t have the time or aren’t that interested, you can skip the tour and pop inside the main hall entrance to take a look at the beautiful woodwork and stunning ceiling.
The Ponce de Leon’s Fountain of Youth Archaeological Park
I did not get to tour this park or drink from the Fountain of Youth. Unfortunately, during my visit, their credit card machines were down, and since I rarely carry cash, I was out of luck! So I guess I will have to live out my mortal life like the rest of the human race. However, it wasn’t all for nothing, as I was able to walk down Magnolia Avenue. Covering Magnolia Avenue is a live oak canopy draped in Spanish moss. Even if you don’t plan to visit the Archaeological Park, take the 5-minute detour to drive down this beautiful stretch of road.
Time Spent: Less than 30 minutes. However, if you can tour the park, I’d estimate you’ll need an hour or more, depending on your interest level.
St. Augustine Churches
If you’re walking to the various sites, make sure as you make your path towards Lightner Museum and Flagler College that you pass by the following two churches on your way. Henry Flagler constructed Grace United Methodist Church, and you will notice the similarities in its design and that of Flagler College. Visitors can typically stop in to tour it during the week from 1 p.m. to 3 p.m.
Flagler Memorial Presbyterian Church is another church built by Henry Flagler. This one has a much different design than the Grace Methodist Church and was constructed as a memorial to his only daughter Jenny. They offer self-guided tours Monday through Saturday from 11 a.m. to 3:45 p.m.
Even if you don’t want to tour the interiors of the churches, they are worth a glance as you walk or ride by on the trolley. If I were to choose one to take the time to walk thru, I would select Flagler Memorial Presbyterian Church for its unique design and background.
St. Augustine Lighthouse & Maritime Museum
Here’s another excellent museum option that families will enjoy. It is full of historical significance and beauty. I was fascinated to learn how close the German U-boats came up this coastline. In addition to highlighting the lighthouse’s participation in WWII, they also have a wonderful exhibit on the US Coast Guard with beautiful paintings portraying the heroics of this vital branch of our military.
I would have been happy to visit here for the ability to tour the lighthouse all on its own. However, this stop offers a lot more than just the lighthouse. It gives a glance into the lives of lighthouse keepers, history on the lens used to reflect the light, its use during WWII, exhibits on building wooden boats, and there is even a walking trail and garden area. I feel that it is worth your time, even with only a day trip to St. Augustine.
The view is worth the 219 stairs I had to climb.
The volunteers at St. Augustine’s Lighthouse and Maritime Museum are so helpful and full of knowledge regarding this lighthouse and the history surrounding it. Make sure to ask them any questions you might have. And to pass along a tip given to me by one of the workers here, if you want a beautiful sunset photo of the lighthouse, then drive across the street to the Marina and walk out along the long dock for views of the lighthouse.
Getting Here: This is one of the sites you will need to drive to. I saved it for last since it was outside the town area. It is about a 10-minute drive from town, and there is plenty of free parking at the museum.
Time Spent: Approximately 1 hour, including a stop at the marina across the street.
Additional Sites if Time Allows
Old Jail: If you have extra time and want to visit the Old Jail, it is located just a few blocks from the Ponce de Leon’s Fountain of Youth Archaeological Park. It is also the main headquarters for Old Town Trolley Tours. So if you use the trolley, you can always tour this if you have time at the end of your trolley ride through town. Some might consider it “cheesy”; however, if you have kids, they will enjoy this fun stop.
Ximenez-Fatio House: This museum house is on the National Register of Historic Places. They have taken great care to preserve and display the home in a way that is true to its original period. The tour takes around 30 minutes. If you can make the time, I highly recommend it!
Fort Matanzas National Monument: Okay, this one isn’t actually in St. Augustine. Depending on where you’re coming from on your day trip to St. Augustine, you might pass right by it. This option is excellent for a couple of reasons. One, if your budget is tight, you could visit this historic fort, which is free to enter and skip Castillo de San Marcos. Second. Second, they have boat tours to the fort as well as a beautiful boardwalk along the waterfront.
As I write this, the boat ramp and boardwalk are closed due to recent storms. So check their website ahead of time and make your own decision on whether you want to stop or not. If it is already along your route, and you have the time to spare, then you may want to pop in since it’s free.
Where to Eat in St. Augustine
Coffee Breaks:
St. Augustine Coffeehouse 6 St George St #107, St. Augustine, FL 32084
City Perks Coffee Co. 15 St George St, St. Augustine, FL 32084
The Kookaburra 24 Cathedral Pl, St. Augustine, FL 32084
Ice Cream Breaks:
Mayday Ice Cream Historic St. Augustine 100 St George St Suite J, St. Augustine, FL 32084
Cousteau’s Waffle and Milkshake Bar 15 Hypolita St, St. Augustine, FL 32084
Kilwin’s Chocolates 140 St George St, St. Augustine, FL 32084
Lunch:
Cafe Alcazar 25 Granada St, St. Augustine, FL 32084
Pizza Time (quick budget option) 124 St George St, St. Augustine, FL 32084
Dinner:
The Floridian Restaurant 72 Spanish St #3638, St. Augustine, FL 32084
MOJO Old City BBQ 5 Cordova St, St. Augustine, FL 32084
Sample Itinerary for a Day Trip to St. Augustine
Arrive and park at the Historic Visitor Parking Garage by 8:30 a.m. Stop in at the Visitor Information Center located at the front of the parking garage near San Marco Avenue and get your free visitor’s map.
Walk to the Colonial Quarter and get a coffee and a snack to go. St. Augustine Coffeehouse or City Perks Coffee make excellent choices close by.
Go across the street to Castillo de San Marcos, which opens at 8:45 a.m. Spend 45 minutes walking around the fort.
Head to Flagler College and take the 10 a.m. tour. Walk by the Grace United Methodist Church and the Memorial Presbyterian Church on your way.
After the tour, walk across the street to the Lightner Museum and try to catch the 11 a.m. antique musical demonstrations. Then tour the rest of the museum before getting lunch at Cafe Alcazar on the basement level of the Lightner Museum.
After lunch, make your way to the Ximenez-Fatio House Museum to catch the next 30-minute tour, they begin every half hour.
After the tour, head to St. George Street and walk down it on your way to the parking garage. Take time to shop for souvenirs and certainly make time for ice cream!
It should be somewhere around 3:00 p.m., depending on how long you’ve taken at each stop. So get your car and head over to the Ponce de Leon’s Fountain of Youth Archaeological Park to learn about the early beginnings of St. Augustine.
Leave the park with plenty of time to make the 15-minute drive to the Maritime Museum and arrive no later than 5:00 as the park closes at 6:00 p.m.
Head back to town and have dinner before leaving town.
Final Thoughts Regarding a Day Trip to St. Augustine
As you can see there is a lot to cover in this remarkable city. You cannot see it all with only one day. There are just too many things to do in St. Augustine to fit them all in. So pick your top choices and enjoy the day. Whatever you miss, is just one more reason to come back.
I knew nothing about visiting Kanazawa prior to my first trip to Japan. However, I am so happy I included it in our 14-day itinerary there as it was a favorite stop on our journey!
Kanazawa dates back to the 1500s and is fortunate enough to have been spared a lot of the destruction caused by WWII. So the city remains well preserved. Walk back in time when samurais ruled, and temples had secret trap doors, geisha wandered the streets and ancient castles governed from their high defensive positions. You will find all of this and more in Kanazawa, Japan.
In this article, I share the things we did during our day of sightseeing in Kanazawa, as well as additional options you can choose if you have extra time.
Getting Your Bike
Kanazawa is relatively flat, and because of this, it makes a perfect place to explore on foot or a bicycle. There are bike rentals for use throughout the city. Machi-Nori is the company that provides these bicycles, and you will see their name on the bike rental stations. You can also search for their stations on Google Maps to find the various locations. I provide a map at the bottom of the page that marks the closest options to the sights listed in this article.
You pay 200 yen (about 2 USD), and you receive a code that unlocks the bikes from a locking bike rack. Check the bike back in at another bike station in less than 30 minutes, and you don’t pay anything extra! It is a very affordable way to get around the city. Because Kanazawa is reasonably flat and the attractions densely located, it is easy to bike from destination to destination.
There are enough bicycle checkpoints that we never had to pay more than the initial 200 yen. It’s not too crowded, and the traffic isn’t bad if you stick to the side roads. I wouldn’t try bicycling in Tokyo, but it was so much fun to do in Kanazawa. Read Misadventures in Kanazawa Japan, to learn more about our bicycling experience. It’s all fun and games until someone doesn’t get a bike!
One Day Itinerary in Kanazawa, Japan
This one-day itinerary is full of interesting sights, but it isn’t so packed that you feel rushed. Bicycling to all of the stops adds in a care-free element that makes the journey between stops an adventure! And the gardens you visit on this one-day itinerary provide a peaceful place for a relaxing stroll.
First Stop: Kenroku-en Garden
Find a bicycle rental and then you’re ready for the first stop of the day. Kenroku-en Garden connects to Kanazawa Castle and Park. There are multiple bicycle rental stations close by, making it easy to check one in and out before and after your visit.
Kenroku-en is one of the “Three Great Gardens of Japan.” It is a vast garden, immaculately cared for, with unique trees and beautiful views. There is also a tea-house dating back to the 1700s in the garden. This garden is worth the stop! Kenroku-en can get very busy, but by starting here in the morning, you will beat most of the crowds. Plan to spend at least 1 hour strolling through the grounds, visiting the different buildings, ponds and more.
Kanazawa Castle and Park
Next stop is Kanazawa Castle & Park. They offer free guided tours by the ticket desk, and I highly recommend getting a guide. They are extremely knowledgeable and make the whole tour far more interesting. Without knowing the history, you miss out on so much. It’s just a quick walk around an empty castle, but with a tour guide, you take a trip through history. Learn about how they got the rocks that they built the foundation out of and the advanced engineering that went into this historic castle. You will leave feeling amazed at the human ingenuity and technology from so many centuries ago.
Lunch Break
After you complete your tour of the castle and wander around the park for a while, it’s an excellent time to take a lunch break. There are a lot of wonderful udon noodle restaurants close by, so walk to one in the direction of your next stop and enjoy a much-deserved break! A hearty meal of homemade udon noodles and perhaps a side order of tonkatsu will fill you up and keep you going the rest of the day!
Myōryū-ji (Ninja Temple)
Myōryū-ji (Ninja Temple) (Ninjadera) is your next stop. There aren’t any bicycle rentals for a few blocks, so you may need to return your bike to the nearest rental facility and walk the rest of the way. Also, I recommend that you make reservations in advance, before your arrival in Kanazawa.
However, if you were unable to do this, sometimes they will have same-day reservations, so it is still worth calling or stopping by. If they have spots available, they will fit you into one of their groups. They offer tours in English. No photography is allowed; however, it is a fascinating temple tour with hidden doors and traps. You’ll feel like you’re on the set of a martial arts movie.
Before finding the next bike rental station, you may want to stroll through the Nishi Chaya District before continuing to the next stop. It is only about a 5-minute walk from Myōryū-ji . You can admire the beautiful architecture from the Edo-period as you make your way to the home of one of the samurais who lived during this period.
Nomura Clan Samurai Home
Find the nearest bike rental station and continue riding to the Nomura Clan Samurai Home. This home is an example of a samurai home during the Edo-period that spanned from the 1600s to 1800s. Walk thru the house and use your imagination to picture how this wealthy samurai family must have lived. The size of the home and proximity to the castle were relative to the samurais rank. It is a fascinating period in Japanese history, and Kanazawa is a great place to explore this.
Optional Sightseeing Stops if You Have Time:
Higashiyama Higashi Chaya District: If you aren’t too tired after your day of sightseeing, take some time in the evening to visit this old part of town. There are many traditional tea houses you can visit, watch geisha performances or shop for beautifully crafted souvenirs. You could plan to have dinner here and combine it with some evening sightseeing. Higashi Chaya is another well-preserved section of the old city. It is worth seeing if you feel up to it!
Omicho Market: If you like markets, this one is not too far from Kanazawa Castle. It closes around 5:00 p.m. though so you’d have to make an effort to squeeze it into your day of sightseeing. However, I don’t feel like it is something you will regret if you miss it. Japan is full of wonderful markets, such as the one in Kyoto and the many choices in Tokyo. So I would not miss out on the other sights listed in this article to make time for this market.
Dinner
If you want to try something other than traditional Japanese food, Spice Box Indian Restaurant is delicious! It is a small restaurant though, so reservations are recommended. If you’ve never tried Indian dosas, they are yummy! Kind of like a burrito with a thin, crispy wrapping and filled with potatoes and vegetables in a curry sauce. My husband became a new fan favorite after eating his first one here.
Getting Around Kanazawa, Japan
We used bikes and walked around Kanazawa. It is a compact city that is easy to navigate without the use of other transportation methods. However, they do have a bus system you could also use if that better suits your needs.
If you are biking or walking, I recommend downloading Google Maps before your trip. If you have Google Maps for navigation and a SIM card with a data plan, you are set! You can also stop at the top-notch Kanazawa Station and get a tourist map at their tourist information center.
Take pictures of the maps at the bicycle rental stations so that you have an easy way to see where all the various checkpoints are across the city.
There are bicycle stations near all the major attractions. I think the furthest we walked was a few blocks. Click on the map below to open up Google Maps to all the stops listed here for one day in Kanazawa, as well as the closest bicycle rentals.
Getting to Kanazawa Japan
Depending on where you are coming from, there are many train options when traveling to Kanazawa, Japan. If you’re coming from Kyoto or Tokyo, you will have high-speed train options allowing you to reach Kanazawa within 2-3 hours.
We came from the town of Takayama, stopping in Shirakawa-go on the way. To go this route, you will need to take the bus, and it takes around 3-4 hours from Takayama to Kanazawa and about 2-3 hours if you’re coming from Shirakawa-go. There are approximately 10 round trip buses that leave daily from Kanazawa to Shirakawa-go. If you have an extra day, you could even make a day trip there from Kanazawa.
And I would always recommend to anyone visiting Japan to purchase the JR Rail Pass. Purchasing the JR Rail Pass was one of the best decisions we made for our two week trip to Japan. It will save you a lot of money and time in booking individual train tickets. There are a few rules you need to know, such as which trains require advance seat reservations, but instructions are included with your rail passes. You can also use the Japan Official Travel App or Japan Travel App to navigate their public transportation system.
Final Tips for Visiting Kanazawa, Japan
Kanazawa is worth the stop during your trip to Japan. Especially for anyone who loves history, architecture and beautiful gardens. And of course, anyone who enjoys a good bike ride too! You will have fun exploring this beautiful city. To me, Kanazawa had a lovely laid back feel of a local town back home. It was a great way to spend a day, and I am so glad we didn’t skip this unique city!
Plan to spend at least one night in Kanazawa and as mentioned earlier, it makes a great base to take a day trip to the historic town of Shirakawa-go.
Give yourself around 1-2 hours at each attraction I have listed, and you will have plenty of time not to feel rushed when going from site to site.
If you are looking for a campground close to Seattle, look no further than Kalaloch Campground. This campground is sure to become your family’s favorite getaway destination. Long weekend? Summer vacation? Head to Kalaloch Campground. It is the perfect Northwest getaway.
You’ve got miles of sandy beaches, piles of driftwood for building forts, tide pools for exploring the sea life, whale watching (depending on the time of year) and so much more! And who doesn’t love waking up to the sound of the ocean? Keep reading as I share my favorite things to do when camping at Kalaloch Campground and why I keep returning year after year.
1) Explore the Tide Pools
This is one of my favorite things to do, even now as an adult. I didn’t grow up near the ocean, so when I moved to Seattle at age 18, I had my first experience exploring tide pools. The ocean fascinates me. It is a beautiful “world” that we have barely explored. I know kids and adults alike will get excited seeing the sea anemones, colorful starfish, and barnacles in the many tide pools found at Kalaloch. You’ll see tiny crabs crawling out from under rocks, and you might even see the occasional sea otter foraging for food by the tide pools!
2) Make Sandcastles on the Beach
Okay, what’s a trip to the beach without time spent building sandcastles? I happen to believe that no trip to the beach is a success unless your suitcase comes home with a little sand in it.
3) Visit the Tree of Life at Kalaloch Campground
The Tree of Life is one of the unique treasures found at Kalaloch Campground. It is a beautiful tree suspended above the ground with its roots growing down below. I’m not sure how long it can continue to hang on against the eroding soil around it, but while it is here, you definitely need to check it out!
4) Watch the Sunset on the Beach
Sunsets on the beach are beautiful at Kalaloch Campground. You have a vast sandy beach that reflects the light of the setting sun and casts orange and red light across the crashing waves. I love watching the sunset over the ocean. Whether I am here or in Maui, I’m a sucker for a good sunset!
Oh, and in case you’re wondering, sunrises on the beach at Kalaloch are also spectacular! Cotton candy pinks mixed with baby blues reflected off the sand while the sunlight shimmers on the water. You feel the ocean breeze blowing in your face, and the glow of the sun warms you. Yep, sunrises here are pretty great too!
5) Hiking at Kalaloch Campground
The Kalaloch Creek Nature Trail connects to Kalaloch Campground. It is a short walk thru the beautiful wooded area surrounding the campground. The hike is less than a mile and is accessed from the campground’s Loop A. Follow signs and be very careful when crossing Highway 101.
The rangers also offer guided hikes depending on the time of year you go. So definitely check in with them to see what is happening while you’re there. I think it is fun for adults and kids alike to go on a guided walk with a ranger who knows the area. You learn fun facts and interesting information about the local habitat.
6) Fly Kites on the Beach
Plan ahead and pack your kite! Now sing along with me: “let’s go fly a kite, up to the highest heights…” Okay, if you haven’t seen the original Mary Poppins, stop reading now, watch it and then come back and finish reading this post. Flying kites is such a fun family activity, and the beach in front of Kalaloch Campground is perfect for this at low tide. You will have a huge sandy beach to fly your kites to your heart’s content!
7) Go Stargazing
One benefit of taking a family vacation away from the city is viewing the stars at night. Away from light pollution, you begin to see the vast sea of stars above you. Grab a blanket and some hot cocoa and find an open spot to admire these twinkling lights. We have made trips to Kalaloch just for this purpose.
My husband loves stargazing, so we bring a small telescope, along with our cameras and tripods and practice our astrophotography. You can stargaze at the Kalaloch Campground day-use parking lot, or if it’s low tide, then the beach makes a great place to bring your thermos of cocoa and blankets. Just don’t forget your flashlights!
8) Build a Fort on the Beach from Driftwood
There is so much driftwood on the beaches surrounding Kalaloch campground, and with some teamwork and ingenuity, perhaps you will build yourself a fort that is discussed inside family circles for years to come! Come on, think big!
9) Watch Whales Migrating
Depending on the time of year you can watch grey whales migrating from the beach in front of Kalaloch Campground. It is so much fun to watch them breach and see water shoot up from their blowholes. Bring some binoculars so you can enjoy them close up. Typically the months of May, October, and November are the best months to watch grey whales at Kalaloch. However, believe it or not, we got to see them once during a camping trip at the end of August! So you never know!
10) Build a Bonfire on the Beach
Who doesn’t love a good bonfire on the beach? This is the only time you can use driftwood for your fires. You are not allowed to bring driftwood off the beach to use for your campfire, but you can use it on the beach. So bring your marshmallows and supplies for s’mores and enjoy a bonfire on the beach. Check with the rangers at Kalaloch Campground earlier in the day to make sure there are no fire restrictions during your stay.
And of course, practice safety and make sure to extinguish your fire before leaving. Be careful to cover all the hot coals with sand so that no one accidentally steps on them, during their nightly stroll on the beach.
11) Wake up to Sunlight Streaming thru the Trees
This is one of the joys of camping. Waking up to the sounds of birds, the smell of fresh air and sunlight streaming in thru the trees. It says, “it’s going to be a great day!” Everyone starts stirring around; you grab a cup of coffee as you get the fire going for breakfast; it is a magical time in the stillness of the morning.
12) Biking Around Kalaloch Campground
If you have the room to bring bikes, this is something fun that kids will enjoy. Biking around Kalaloch campground. It is something I see no matter where I go camping. Kids off on their own adventure just cycling around the campgrounds with the carefree hearts that camping brings. They have huge smiles on their faces, and they are usually laughing and talking with each other. I have even witnessed young kids who are just learning to ride their bikes for the first time. It is fun for both them and their parents.
13) Hanging out at the Campsite
One of the things kids love to do is hang out at their campsite and explore the area surrounding it. Climbing trees, playing hide-and-seek and of course playing in the tents. I love watching their happy faces as they enjoy being outdoors. It makes the work involved in planning a camping trip all worth it!
Important Information for Camping at Kalaloch Campground
Make reservations in advance! This is a favorite campground for people who live in the Seattle area, and it fills up quick during the summer months. So plan ahead and reserve your campsite months in advance, if possible. I booked our campsite in May, for an August visit. The reservation period is from May to September, and you can reserve your spot online during this time frame. During the off-season, they don’t accept reservations. During this time, campsites are assigned on a first-come-first-served basis.
You can purchase firewood at Kalaloch Lodge which is about a 1/2 mile from Kalaloch Campground. They also have a small store where you can buy snacks, drinks, and miscellaneous supplies you may have forgotten to pack.
Always check the tide charts posted at the campground when making plans for your daily activities. You never want to get caught on the beach during high tide. Besides the strong currents, there are lots of large trees and driftwood that could easily knock a person out if you were to be hit by one. So know when low tide and high tide are and stay safe!
Getting to Kalaloch Campground
Kalaloch Campground is located off Highway 101 about 34 miles from the town of Forks, Washington. It is around 3-4 hours drive time from Seattle. Depending on where you’re coming from you will either head north thru Bremerton and over to Highway 101 or south thru Olympia, cutting over to Highway 101. I find driving south past Olympia and then cutting over to Highway 101 around Montesano is the quickest way for me.
Kalaloch Lodge Address is: 157151 US-101, Forks, WA 98331 (Kalaloch campground is about a half-mile north from the lodge.)
Conclusion
No matter what you decide to do when visiting Kalaloch Campground, there is a lot to occupy your time and so many fun ways to create wonderful memories with your family. If you need more ideas for things to do near Kalaloch Campground check out these awesome beaches near Kalaloch.
If you were to ask me to recommend a place by the ocean, but close to Seattle. I’d tell you to drive to the Olympic Coast. And then I’d share with you my favorite spot to visit year after year, for the past 20 years. It is my happy place near Seattle, my ocean fix when I can’t travel to Maui.
My favorite go-to spot on the Olympic Coast is Kalaloch. It is a beautiful area about 40 miles south of Forks, Washington. I fell in love with the whole area around Kalaloch on my first visit. It has some of the most beautiful beaches along this stretch of coastline. Windswept trees, ocean-carved rocks, and incredible forests of old-growth cedars. I am positive if you visit, it will become a favorite of yours too.
Top 5 Olympic Coast Favorites near Kalaloch, WA
Kalaloch Beach and the Tree of Life
Just below the Kalaloch Campground and Kalaloch Lodge is Kalaloch Beach. This long, wide, sandy beach is perfect for a leisurely stroll or a morning run. Make sandcastles with the kids, have a bonfire or if you’re lucky enough, watch whales as they surface just beyond the shoreline. And the bonus for this beach is an incredible tree that is often overlooked.
It is called the Tree of Life. The tree is suspended above the ground with its roots hanging down below. You can walk underneath the tree and admire its unique beauty. It is a rare sight and should not be missed when visiting the Olympic Coast.
Location: The Tree of Life is located down a short trail from the Kalaloch Campground parking lot. Walk down the trail in front of the parking lot and make a right at the bottom. Walk just a little further down the beach and you will see it on the right.
Don’t miss this incredible tree! You never know how long it can keep hanging on.
Kalaloch Beach 3
In addition to Kalaloch Beach, heading north along Highway 101 you will see signs for Beach 3. Kalaloch Beach 3 has some fantastic rock formations for climbing and exploring the tidepools. Wander along the coast and admire all the uniquely shaped driftwood that has come ashore with the latest tide.
Location: Approximately 3 miles north of Kalaloch Lodge on Highway 101. Look for signs for Beach 3 and a little pull-off area alongside the road. Kalaloch Beach 3 only has a dirt area to pull off on the side of the road and park. Then you follow a trail down to the beach. Make sure you’re wearing good shoes for walking as it can get a little steep.
Tip: Always check the tide charts before heading out. Besides the strong currents along the Olympic coast, entire trees are washed ashore and the waves are full of debris. If you need help understanding the tides and when it is safest to explore the beaches ask a Park Ranger, they will be happy to help!
So many beautiful pieces of driftwood along this beach. This tree must have been huge!
Kalaloch Beach 4
Kalaloch Beach 4 has tidal pools, incredible rock formations, and a small “island” (for lack of the proper word) for climbing just off the beach (only accessible at low tide). At low tide, you can climb up to the top of this island (only advised for older kids and fit adults) for views of the beach and the Destruction Island lighthouse. Even if you don’t feel comfortable making the climb, the tidepools are fun to walk around, with sea anemones, barnacles, and starfish.
To reach the best of the tidepools, you will cross the bridge at the end of the trail (small children will need help getting down) and then turn right and walk up the beach, past a bunch of rocks in the water and around the tip of land that juts out. You will see the large landmass rising out of the water and a bunch of smaller rocks around it. The kids will have a blast exploring here!
Kalaloch Beach 4 has the best parking of the numbered beaches. It also has restrooms and picnic tables. It is important to know that at the bottom of the trail there is a bridge that was built using some of the rock formations as a platform. This creates a somewhat difficult descent to the actual beach. You need to be able to climb down some rocks at the end of the bridge. It is probably around a 3-foot difference from the bridge to the beach. For most this will not be a problem, but for those with mobility issues, it is not recommended.
Location: A little over 3 miles north of Kalaloch Lodge. Or about a 1/2 mile past Kalaloch Beach 3 up Highway 101. Look for the Beach 4 sign and you’ll see a pull-off to the paved parking area and trailhead.
View from the top of the “island” on Beach 4 with tide pools.
Ruby Beach
If I had to choose only one of these Olympic Coast beaches to visit on a single trip, I’d probably choose Ruby Beach. It is hard to choose one as they all offer something special. Ruby Beach is a gem though. See what I did there? Okay, sorry, but it is really is such a treasure. Okay, that was the last one, I promise.
Ruby Beach is full of colorful driftwood and it has an inlet of water that is protected at low tide so even children can splash around in it. Ruby Beach also has an island that is only accessible at low tide. It is a beautiful stretch of beach, perfect for spending a few hours during low tide. My family always enjoys exploring the island and the boulders that surround it, looking for colorful starfish and crabs darting around. It is so much fun!
Location: Approximately 8 miles north of Kalaloch Lodge. Watch for signs for the Ruby Beach turn-off. You will turn down a dirt road and follow it to a large dirt parking area where you will see a trailhead sign for the beach and lookout areas.
Ruby Beach at high tide in the winter. You can see the little island thru the trees to the left. At low tide, this is a sprawling sandy beach perfect for exploring.
The Giant Cedar Tree
Okay, I know this one isn’t a beach, but I had to list it since it is in such close proximity to these beaches and because these trees are just too beautiful to miss. First up on this trail you will find the Big Cedar Tree. Unfortunately, it has partially fallen, but it is still a magnificent tree to admire, straining your neck to gaze upward at it’s top.
When your neck stops hurting, continue down the trail to find more stunning trees, some of which had to be the inspiration behind the Keebler Elves treehouse. This is a very easy flat trail and makes for a fun variation to your beach time on the Olympic Coast.
Location: About 4 miles north of Kalaloch Lodge. You will pass Kalaloch Beach 3 & Beach 4 and go about one mile. You will see signs for the turn-off, follow the dirt road all the way to the end and park near the trailhead.
These old-growth cedars have so much character.
Where to Stay on the Olympic Coast
The wonderful thing about Kalaloch is its close proximity to Seattle. In a little over 3 hours, you can go from the city to the rugged Olympic Coast. It makes a great getaway no matter what time of year you go.
Kalaloch Lodge
In the winter I stay in the cabins at the Kalaloch Lodge, also a part of the Olympic National Park. In addition to their cabins, they also have rooms in the lodge. You need to make reservations in advance. It is such a cozy spot to stay, especially in the winter. The cabins come with fireplaces stocked with wood and the lodge has a warm fireplace with comfy chairs. The park rangers are always willing to share advice on places to hike or see closeby. And if you get a chance to have breakfast at the Kalaloch Lodge, you absolutely have to try their Dungeness crab benedict. It is SO good!
Address: 157151 US-101, Forks, WA 98331
Kalaloch Beach Campground
In the summer I like to camp at Kalaloch Campground. It is one of two campgrounds within the Olympic National Park that accept reservations. You will need to book these out well in advance though, as word has got out about this incredible spot on the Olympic Coast. They do have a few first come first served spots. So if you want to try to snag one of those, I’d say to come early on a weekday for your best chance at getting a spot.
Location: Approximately 1/2 mile north on Highway 101 from Kalaloch Lodge.
Tip: If you can’t get a spot at Kalaloch Campground, you can always try South Beach Campground which is south of Kalaloch Campground. You won’t have the beautiful forested sites, but you’ll still get to fall asleep to the sounds of the ocean.
How to Get Here
You can either come around from the North thru Bremerton and Port Angeles. Or down and around from the South passing by Olympia before cutting over. Typically going down towards Olympia and then cutting over to the coast is the fastest way. It will depend on your starting destination and time of day. Use the above Google Map to get directions and plan your trip. You can always drive in one way and back the opposite to see new scenery.
Important Things to Know
Kalaloch and all the areas I have mentioned are within the Olympic National Park, which means no drones are allowed. You can build a fire on the beach using driftwood, but you cannot collect driftwood for your campfire. Always check with the rangers first to make sure there are no fire bans in place.
One of the most important things is to always check the tide charts! Make sure you know when it will be low tide and when it will be high tide. Then make sure you get off the beach with plenty of time to spare before high tide. The ocean is powerful and along the Olympic Coast, it is full of enormous logs and other driftwood materials. Watch from high above the coast where it is safe.
Perfect Getaway to Make Some Memories
The Olympic Coast makes a perfect place for a family vacation or weekend getaway. Kids and adults alike will enjoy exploring the tidepools, sorting through beach wood and looking for the perfect rock souvenir. It is so much fun! On the Olympic Coast, you get the best of Western Washington — the trees and water all in one beautiful place.
One of the top things to do when vacationing in Maui is to go to the beach! It is the primary reason most people visit Maui and the Hawaiian islands. This article will go over the best Maui beaches for both snorkeling and swimming. There are some incredible beaches in Maui, but just because one is good for snorkeling, doesn’t mean it’s also good for swimming and vice versa. So I am here to share some of my favorite beaches in Maui no matter what you want to do. Most of the beaches in Maui that I list here are located in West Maui. So plan ahead if you are commuting from South Maui.
*How to use this map: Click on the star next to “Best Maui Beaches” and save this to your personal Google maps or click on the icons to pull up more info and driving directions.
Best Maui Beaches for Swimming
D.T. Fleming Park
This park is a great place to spend the day. It has shade trees at the back of the beach, picnic tables, BBQ grills, restrooms and lifeguards on duty. There is also the Burger Shack for food, and if you want, you can walk up to the Ritz-Carlton and eat at The Banyan Tree restaurant. D.T. Fleming Park also connects to the Dragon Tooth Trail which has beautiful views of the ocean and some incredible volcanic rock formations. It is a favorite stop of mine for any Maui itinerary. It has a beautiful stretch of white sand perfect for sunbathing. Make sure to bring your beach gear and enjoy one of the best beaches in Maui!
Address: Lower Honoapiilani Rd, Lahaina, HI 96761
Tip: Check out Maui Babe’s browning lotion and after browning lotion (I use this for sunburns too). It works great! And make sure you always wear sunscreen!
Napili Bay
This is a beautiful stretch of beach! It is on my list of best Maui beaches because of its sandy beach, and mostly rock-free water (in the center, not on the sides). It is located next to my favorite breakfast spot in Maui! The Gazebo restaurant. Just thinking of those piles of hot pineapple macadamia nut pancakes have my mouth watering. Depending on the time of year you visit, the waves can get really big. I mean REALLY big.
It is so much fun to body surf here, but be safe and respect the ocean’s power. When the weather is calm, it is a perfect place to go for a swim. I suggest you grab breakfast at The Gazebo, then drive over to Napili Bay and snag a good spot on the beach. You can relax here while you let your breakfast settle. There is parking for Napili Bay on the street leading down to the beach. The limited parking is probably the one drawback of this beach. However, you can usually find a spot along the road and then it is just a short walk to the end of the road where you’ll find the trail to the beach.
Address: 53 Hui Dr, Lahaina, HI 96761
Napili Bay. Keep your belongings as high up on the beach as possible to avoid getting wet. Even then, it may not be high enough.
Pohaku Park
This small park is sometimes referred to as S-Turns. It is a great place to watch the sunset and sits across from the island of Molokai. It is also a great area to go whale watching in the winter months. And sea turtles are often frequently spotted here. For swimming, I recommend you swim to the right of the park to avoid the rocks. Kahana Beach, which is just to the right of Pohaku, is a great stretch of beach for swimming. You will see the Kahana Beach resort next door to Pohaku Park.
There is a public access trail to Kahana Beach in between the Kahana Beach resort and the Sands of Kahana. This long sandy beach is great for swimming! It gets deep immediately in front of the Kahana Beach resort, but if you have kids or prefer a shallower entry, move a little further down the beach in front of the Sands of Kahana, and you’ll have a shallow entry.
Address: 4085 Lower Honoapiilani Rd, Lahaina, HI 96761 (*Pohaku has a few picnic tables and only a porta-potty for a restroom)
Pohaku Park at sunset.
Best Maui Beaches for Snorkeling
Kapalua Bay
Just a little further north from Napili Bay is Kapalua Bay. I go to this beach every time I visit Maui. It has excellent snorkeling (go in the morning) and such a picturesque setting. There are restrooms as well as an outdoor shower. It has a nice sandy beach with a few shady spots, plus it is alongside the Kapalua Coastal Trail so if you get tired of laying on the beach, you can go for a beautiful “hike” along this trail.
I think this beach is a little too rocky for swimming, but it is a favorite for snorkeling. I’ve seen turtles, eels, and all sorts of colorful fish here. They also rent kayaks and stand up paddleboards.
Address: Kapalua Coastal Trail, Lahaina, HI 96761
Kapalua Beach in the morning before the crowds arrive.
Tip: Snorkel early in the morning between 7 a.m. to 11 a.m. for the calmest and clearest snorkeling conditions.
Honolua Bay
Honolua Bay is an amazing snorkel spot in a marine life conservation area. It’s a bit of a drive to get to this protected bay, but it’s worth the trip! You have a short walk through a “jungle” before reaching the rocky beach. This is not your typical sandy beach either; it is covered in rocks, so be careful as you enter the bay. Its limited facilities and rocky beach make it best suited for snorkeling.
Snorkeling is best on the right side of this protected bay. You have to swim about 600 feet offshore to get to the reefs, so I recommend you wear a life vest if you have any concerns at all about swimming that far. Plus sometimes it is very shallow over the vast reefs, so I like a life vest as it helps me float over the reefs and avoid touching them.
There are portable toilets at the beginning of the trailhead, but no other facilities at the beach. Make sure you’ve got all your essentials packed in a beach bag, including good walking shoes.
Address: Bay Drive, Lahaina, HI 96761
Tip: Purchase a rashguard before coming to Maui. You will be so grateful to have this extra bit of sun protection when you’re out snorkeling for hours at a time.
Olowalu
Olowalu at mile marker 14 is another excellent option for snorkeling. You can book kayak tours here or rent a stand-up paddleboard and paddle out to the reef. The best snorkeling is about 100 feet offshore. So I would recommend bringing a life vest. There is also a blacktip reef shark nursery here; however, I have gone here multiple times and have never seen one. I have, however, seen turtles and plenty of interesting coral and colorful fish. Afterward, get some of the best pie in Maui at Leoda’s Kitchen & Pie Shop.I highly recommend the banana cream pie and coconut cream pie.
Address: Olowalu, look for dirt parking at Mile Marker 14. Leoda’s: 820 Olowalu Village Rd, Lahaina, HI 96761
Lava rocks at Dragon’s Tooth Trail near D.T. Fleming Park. It’s easy to see where the name came from.
Best Maui Beaches for Both Snorkeling and Swimming
Ka’anapali Beach & Black Rock
This is one of the largest and most popular beaches in Maui. This beautiful sandy beach stretches for almost a mile. It is also where the famous Black Rock is located. Get an early start and snag a free parking spot if you can. There are a few public parking areas scattered along Ka’anapali Pkwy. Look for beach access signs near the parking garages to find your way to the beach. Additionally, you can park in the parking garage for Whalers Village, where you can get a 3-hour validation if you purchase something at one of the stores.
There is excellent snorkeling at Black Rock when the conditions are calm. Just be careful as this area can also get some massive waves and currents near the rock. Watch the adventurous people who make the climb up Black Rock to jump off. Be careful if you are snorkeling and keep an eye on those jumping to make sure you don’t get in their way. I have seen eels, shark, turtles, octopus, and lots of fish all around Black Rock. Even if the snorkeling isn’t great during your visit, it is still a spectacular beach for swimming and sunbathing.
Ka’anapali is the perfect beach to spend the day. Sunbathing, swimming, snorkeling, and reading your favorite book are all perfect ways to spend the day here. There are also lots of restaurants and places to eat at Whalers Village, in addition to shopping. So make a day of it!
Address: 2525 Kaanapali Pkwy, Lahaina, HI 96761 (the beach is in front of a row of resorts, look for public parking signs along the Ka’anapali Pkwy)
Black Rock at Ka’anapali Beach. Snorkeling is best near the rock and around the tip. Just be careful of the currents near the rocks.
Kamaole Beach I, II or III
The Kama’ole beaches are a great set of South Maui beaches in Kihei. You will enjoy easy access to good food and shopping in addition to some of the best Maui beaches. Each beach offers its mix of swimming and snorkeling. I think Kama’ole I and Kama’ole II are better for snorkeling than III.
There are lots of unique lava rock formations in the water where you’ll find all sorts of fish, turtles and perhaps even an octopus all curled up. The beaches also have showers, bathrooms, and lifeguards. Depending on the time of year, you may find these beaches better for boogie boarding than snorkeling or swimming. They are worth checking out when in South Maui.
Address: S Kihei Rd, Kihei, HI 96753
Tip: Make sure you purchase reef safe sunscreen. In 2021, Hawaii will implement a ban on the sale of sunscreen containing the coral-harming chemicals oxybenzone and octinoxate.
Maui Sunset looking across at the island of Molokai
Funny Beach Experience You May Wish to Avoid
In case you’re as “lucky” as I was, to be on the beach in Maui on the first working day of the month, you may hear a loud siren. Yep, I was in the water snorkeling to my heart’s content at Kama’ole Beach II when I heard this loud siren go off. My first thought was “SHARK!” You have never seen anyone swim so fast to the shore! My husband says I pushed a young boy out of the way in my hurry, I, of course, deny that. Everyone in the water was scrambling for the beach like mad!
By the time I made it to the beach, I had overheard a local Hawaiian telling a visitor that it was “just” a tsunami drill. I am sure they are entertained each month to watch visitors race for the shore each time they test this essential warning system. I appreciate that they have the system in place, and honestly when my heart stopped trying to pound out of my chest, my friends and I all had a good laugh at each other and our moment of panic. It’s funny, but the thought of a tsunami didn’t scare us as much as the thought of a shark did!
What to Bring to the Beach
snorkel gear (rent or pack from home) sunscreen bug spray water bottles (I like to freeze some the night before) chapstick snacks rashguard (the Hawaiian sun can be brutal) hats beach umbrella (most condos supply these) beach mats & towels underwater cameras good book sandcastle building set beach bag swimsuit cover-up flip-flops sunglasses picnic lunch (optional) beach ball baby shampoo (use this inside your snorkel goggles to keep them from fogging)
Final Thoughts
Maui has many incredible beaches. As always, please make safety your priority. Don’t swim or snorkel alone; it’s always nice to have a buddy. When in doubt, stay out. If the waves look too big, or the situation doesn’t feel right, don’t go in. Ask a local, read weather reports, and take the necessary precautions to give yourself the best possible trip to Maui.
This list of beaches is what I consider to be the best Maui beaches for swimming and snorkeling. However, you should discover for yourself your favorite Maui beach. You’re going to want to return, so why not begin creating your future list of favorite places. If you’re like me, Maui will soon feel like your home away from home.
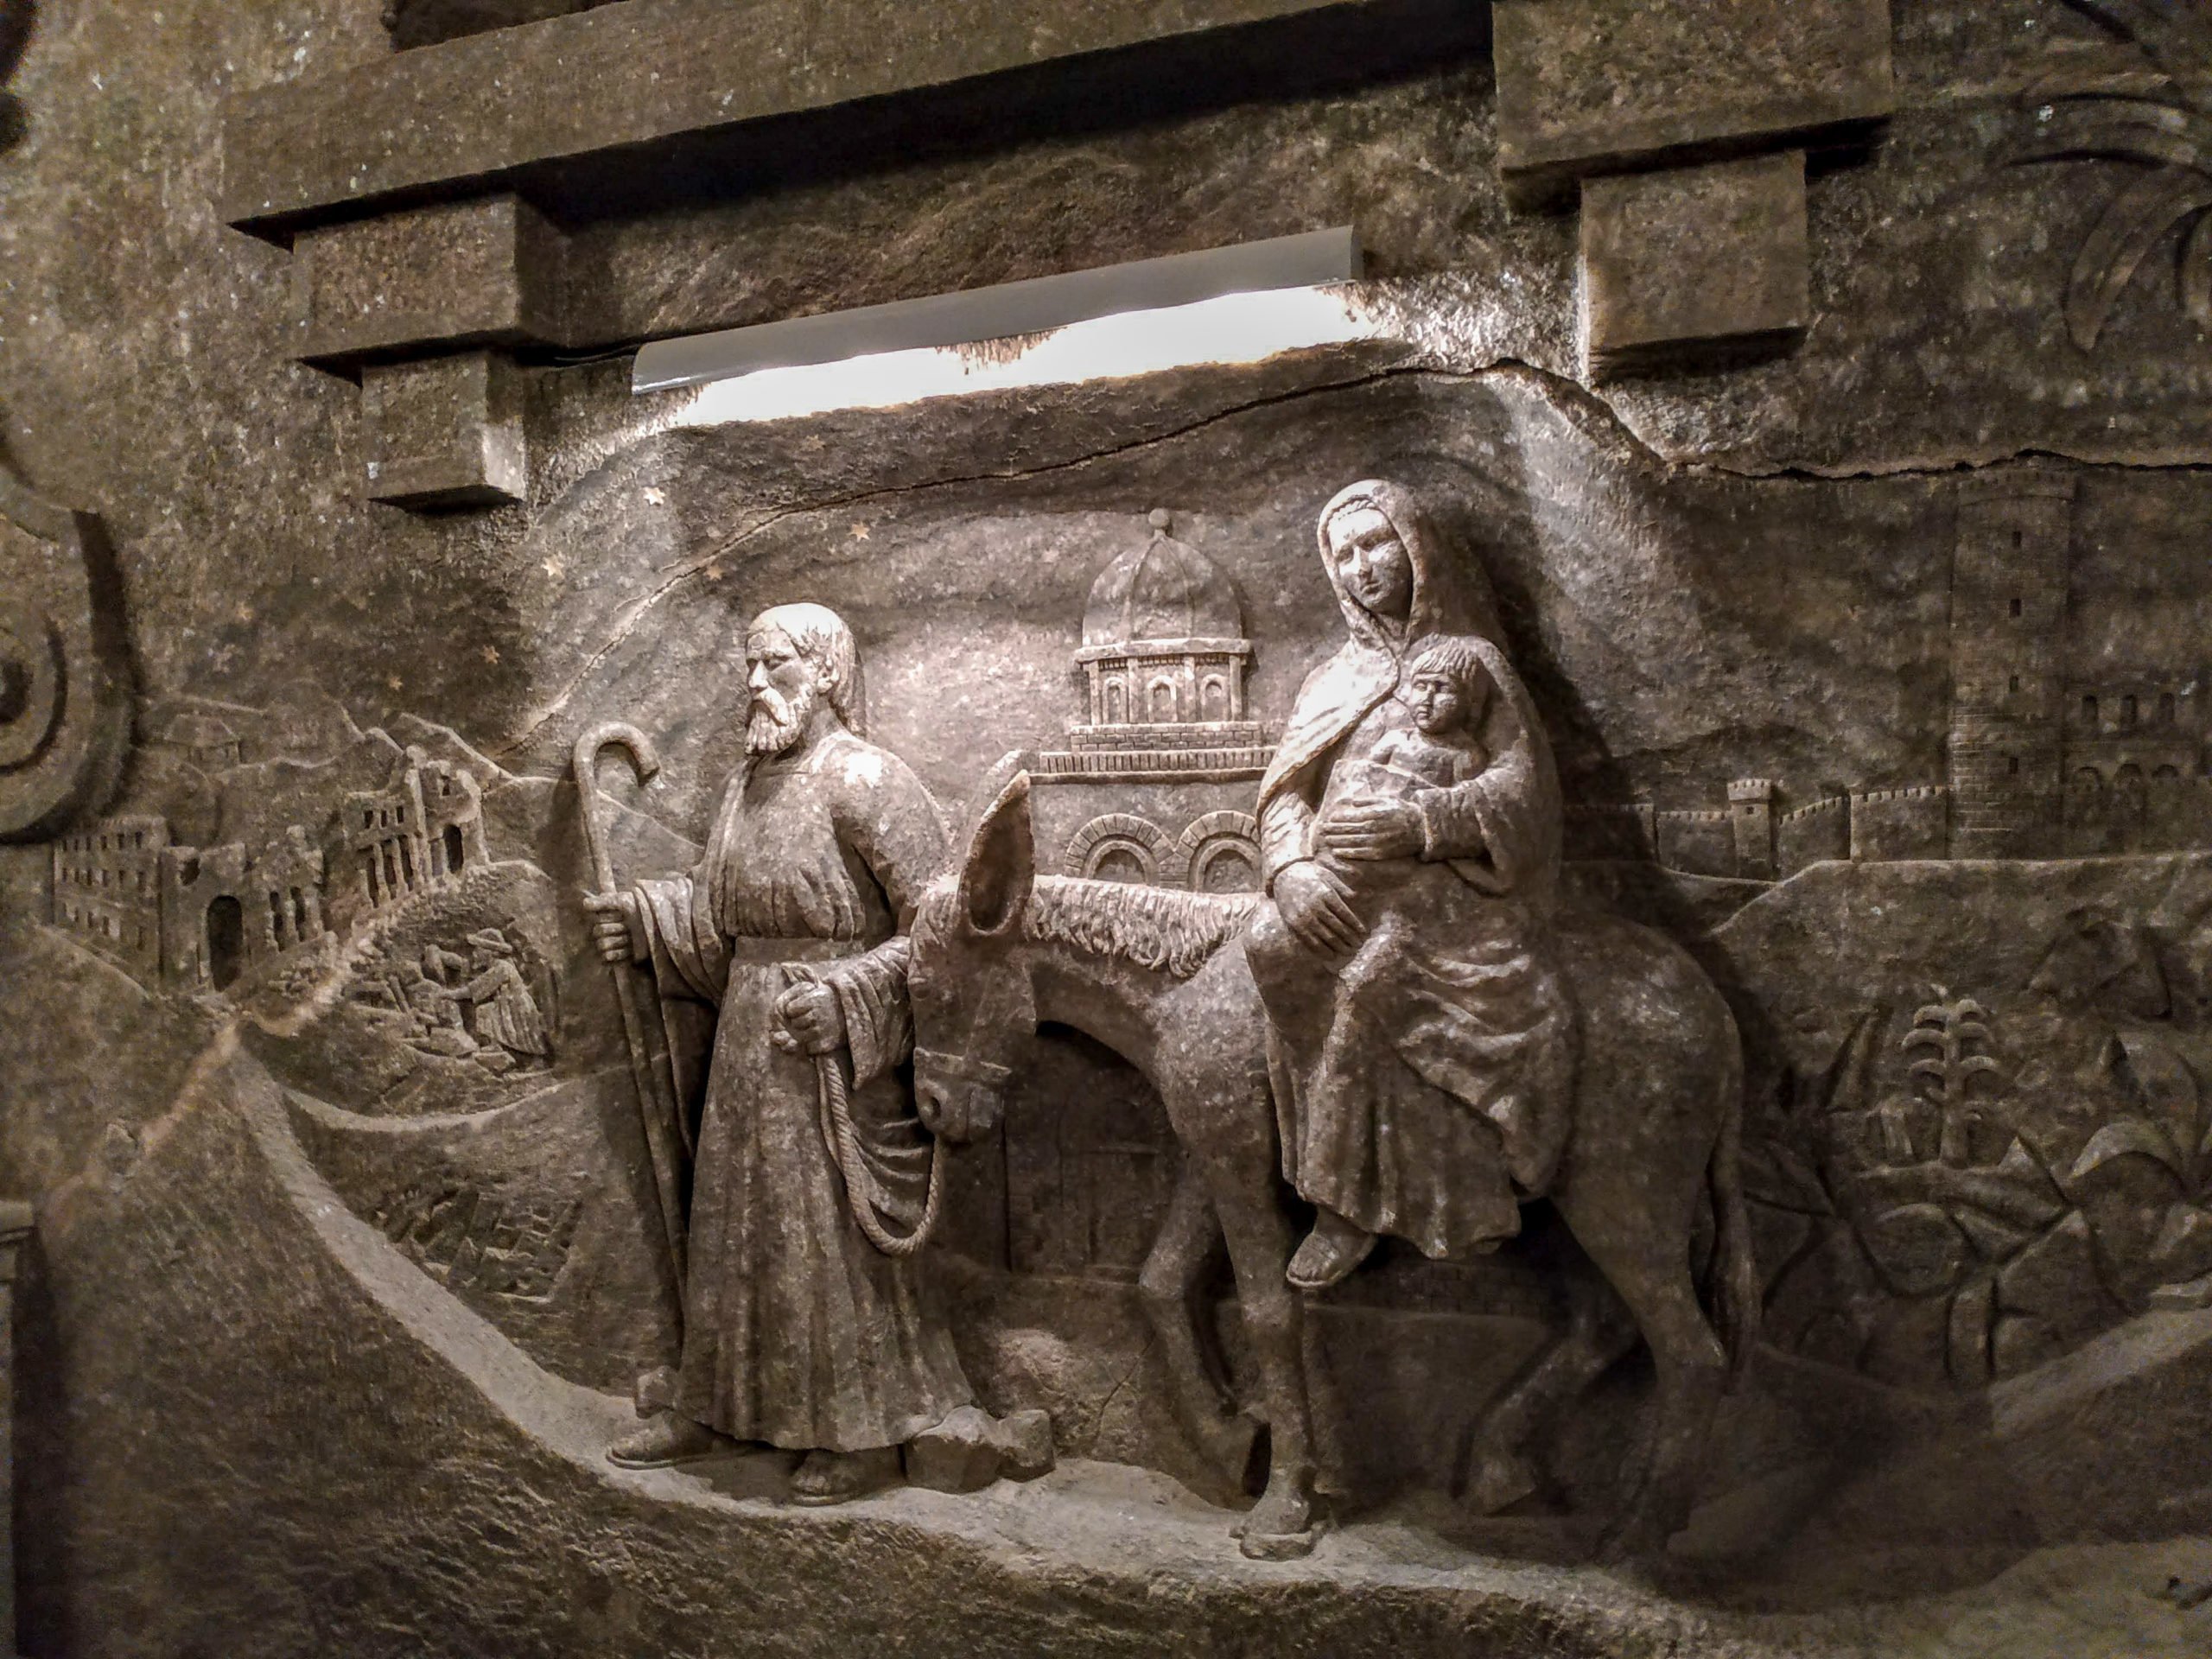
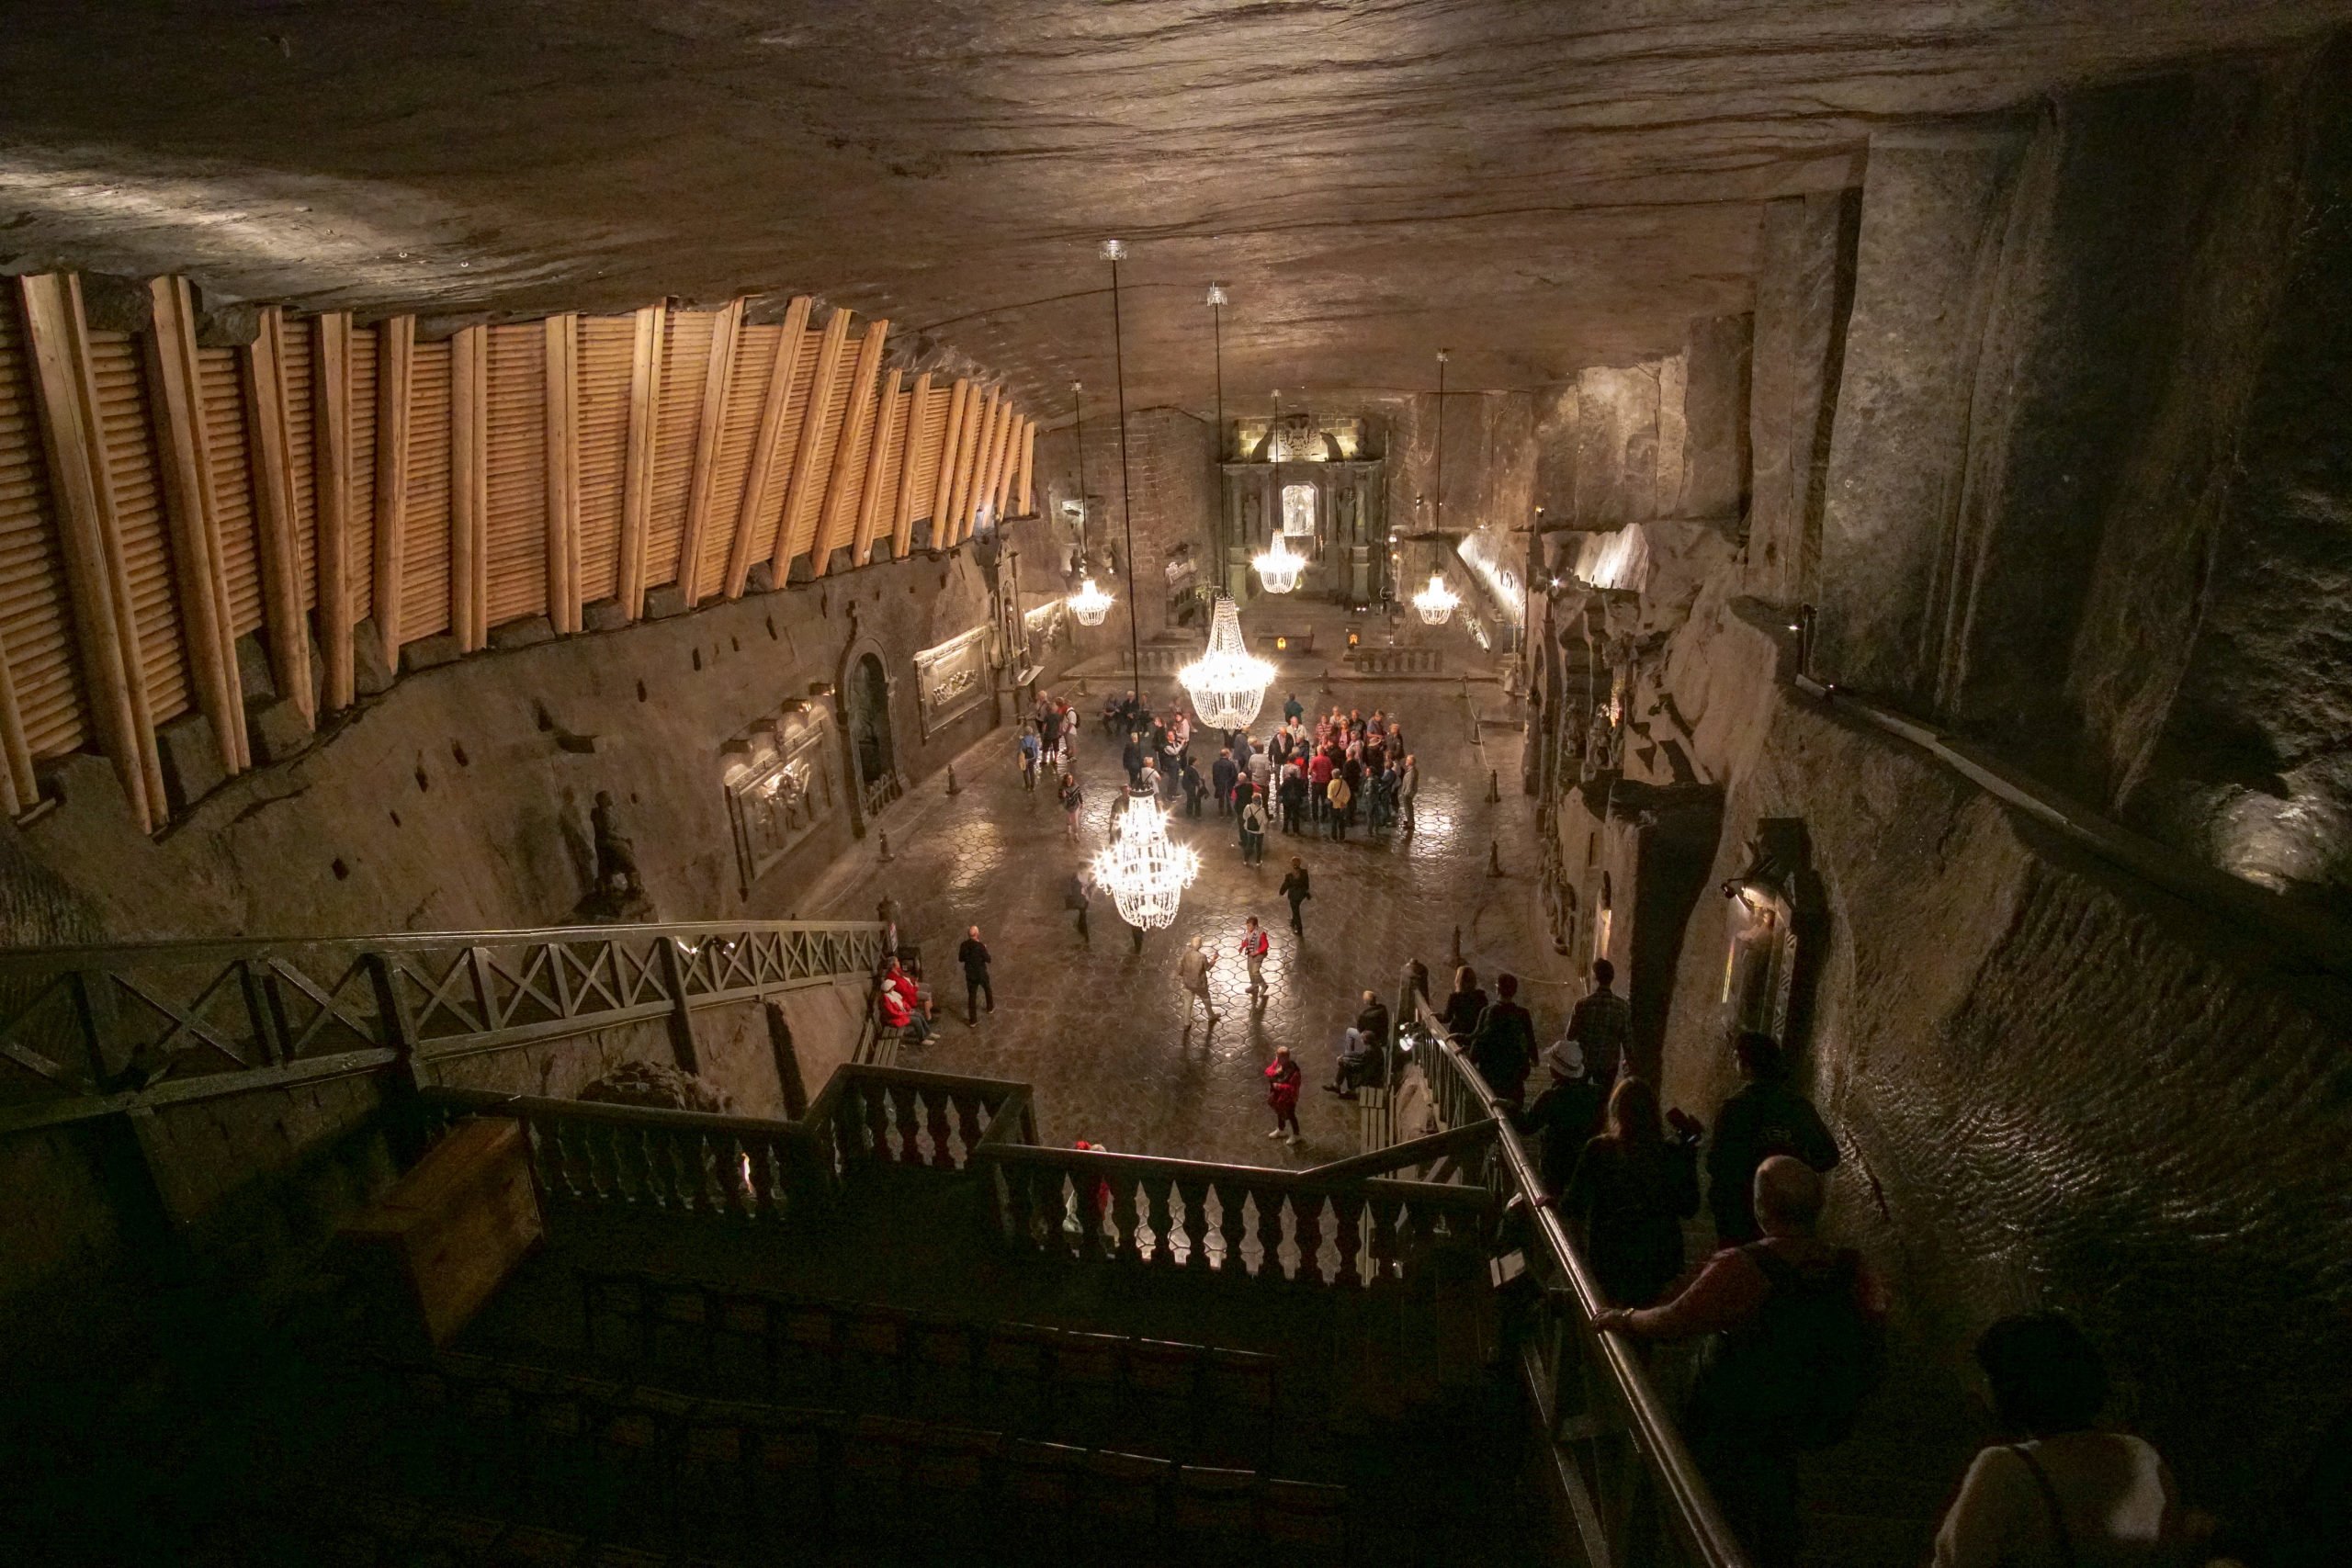
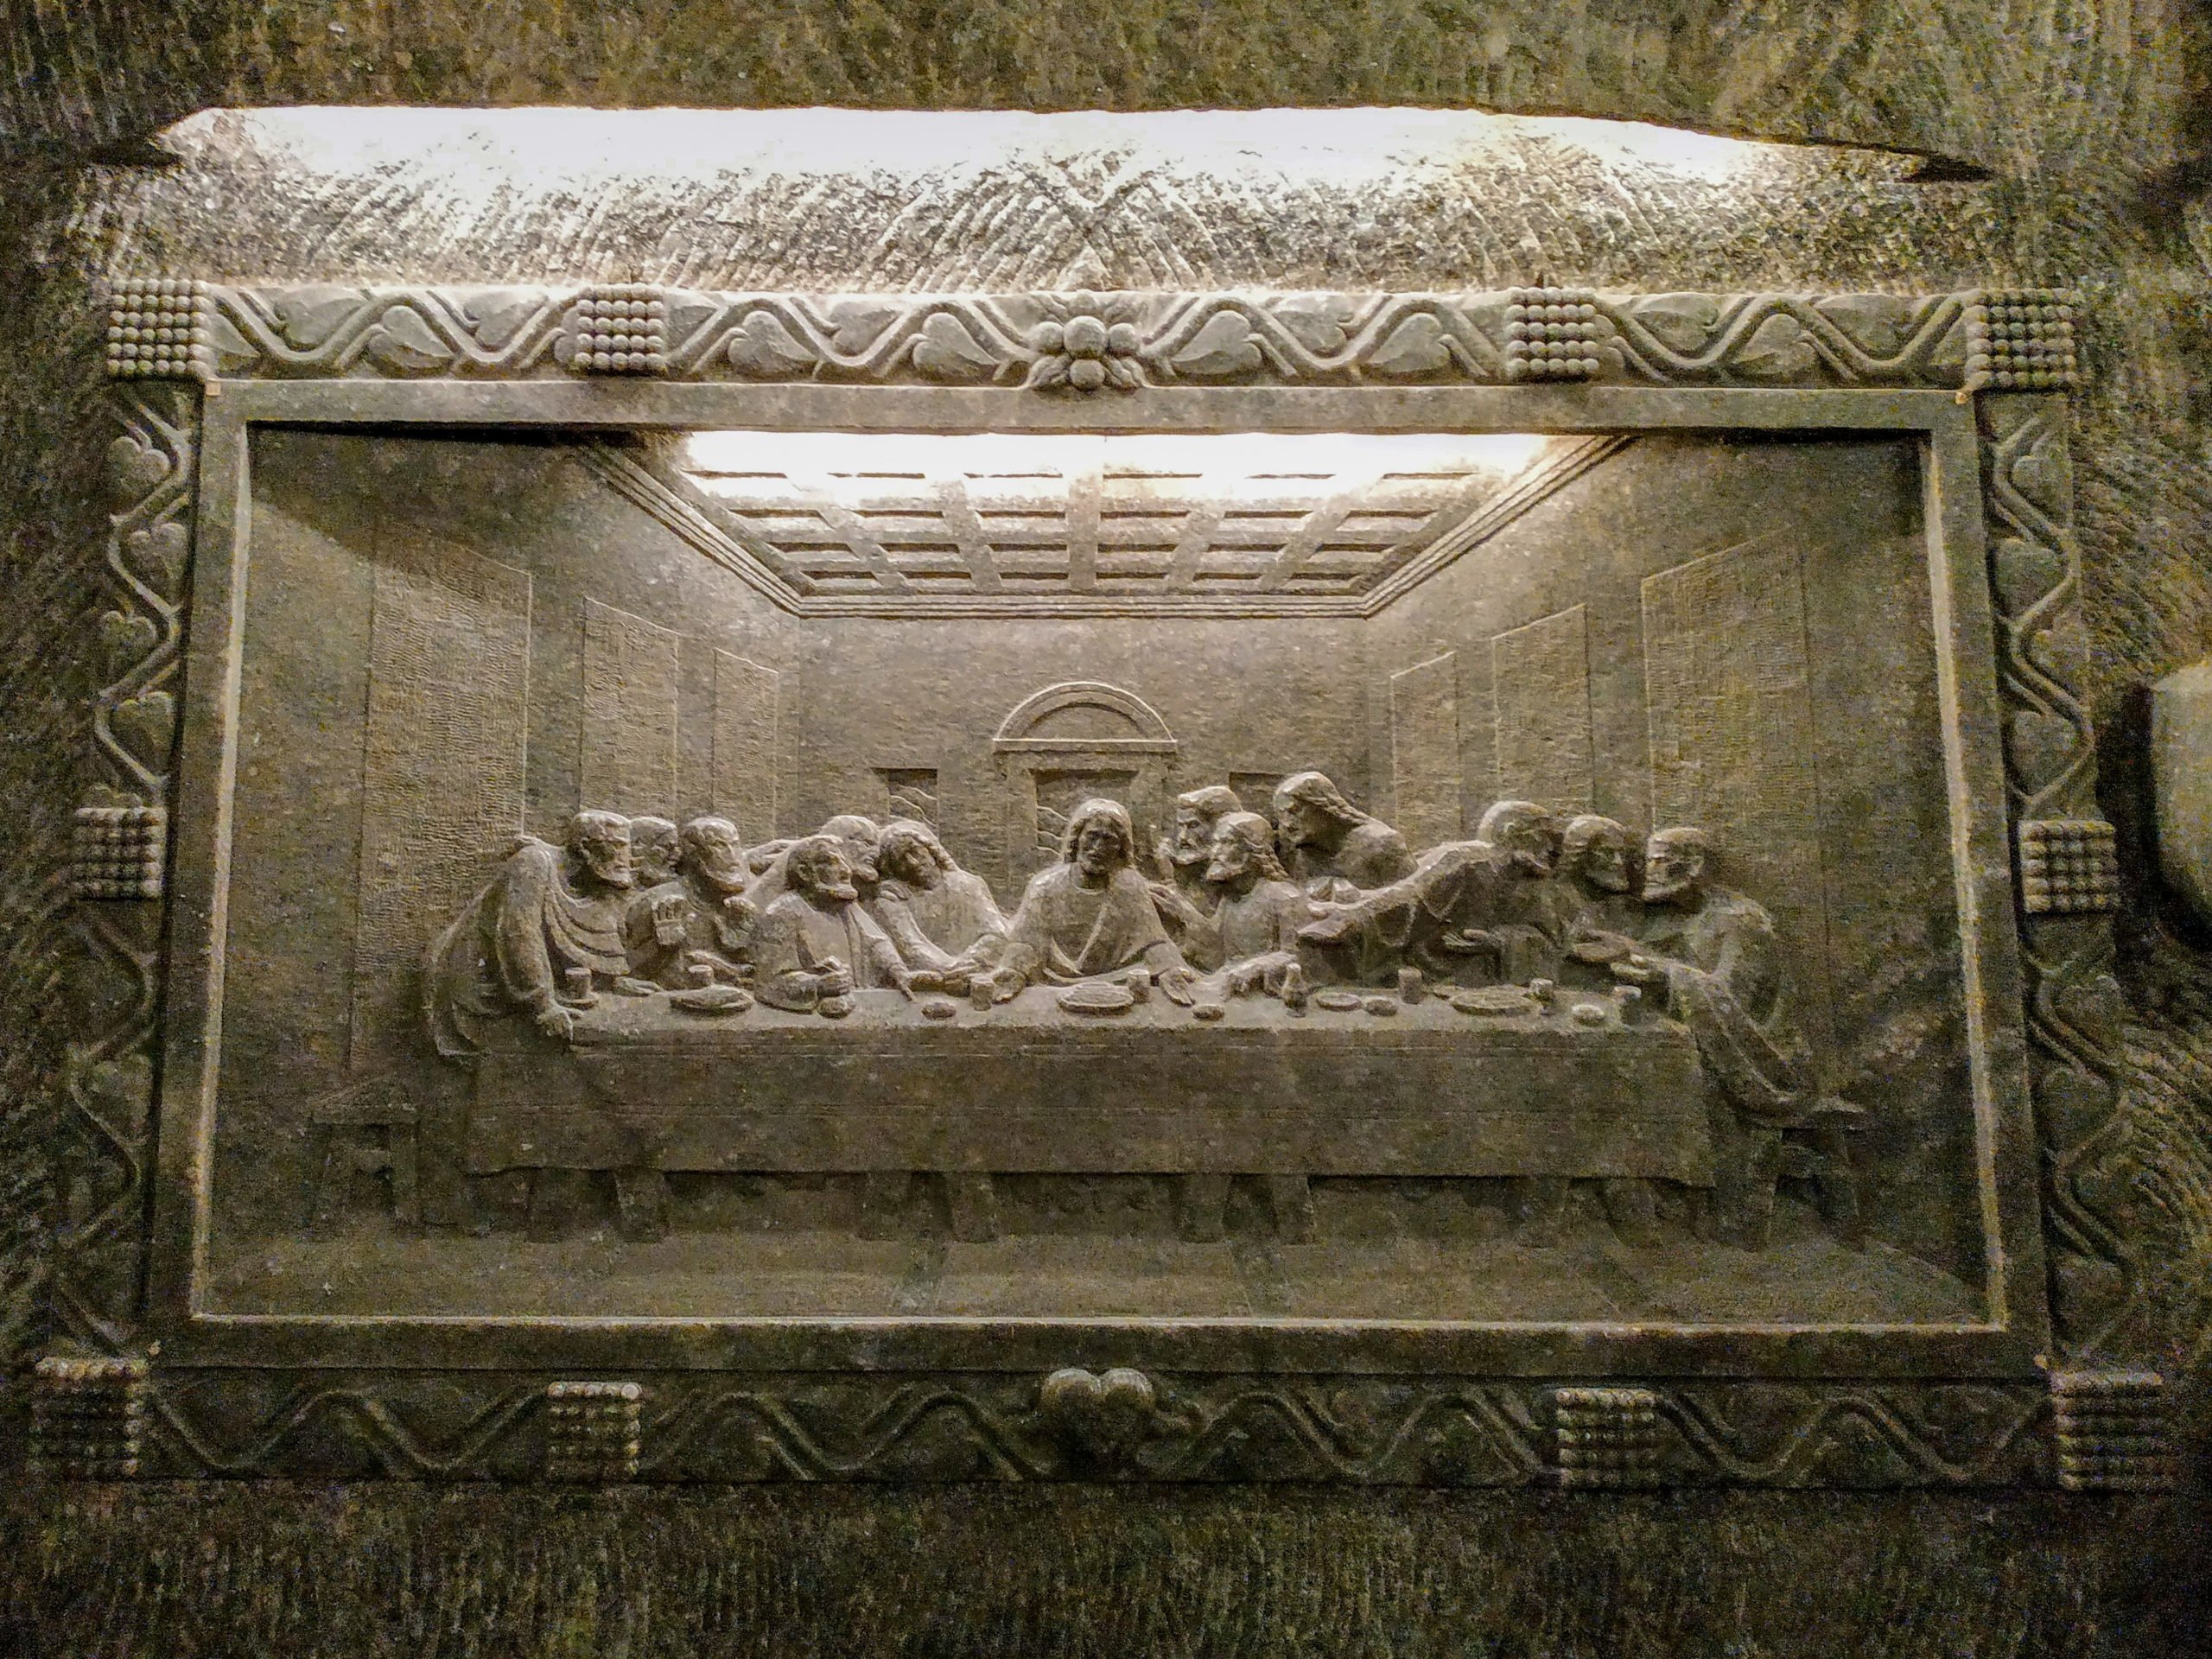
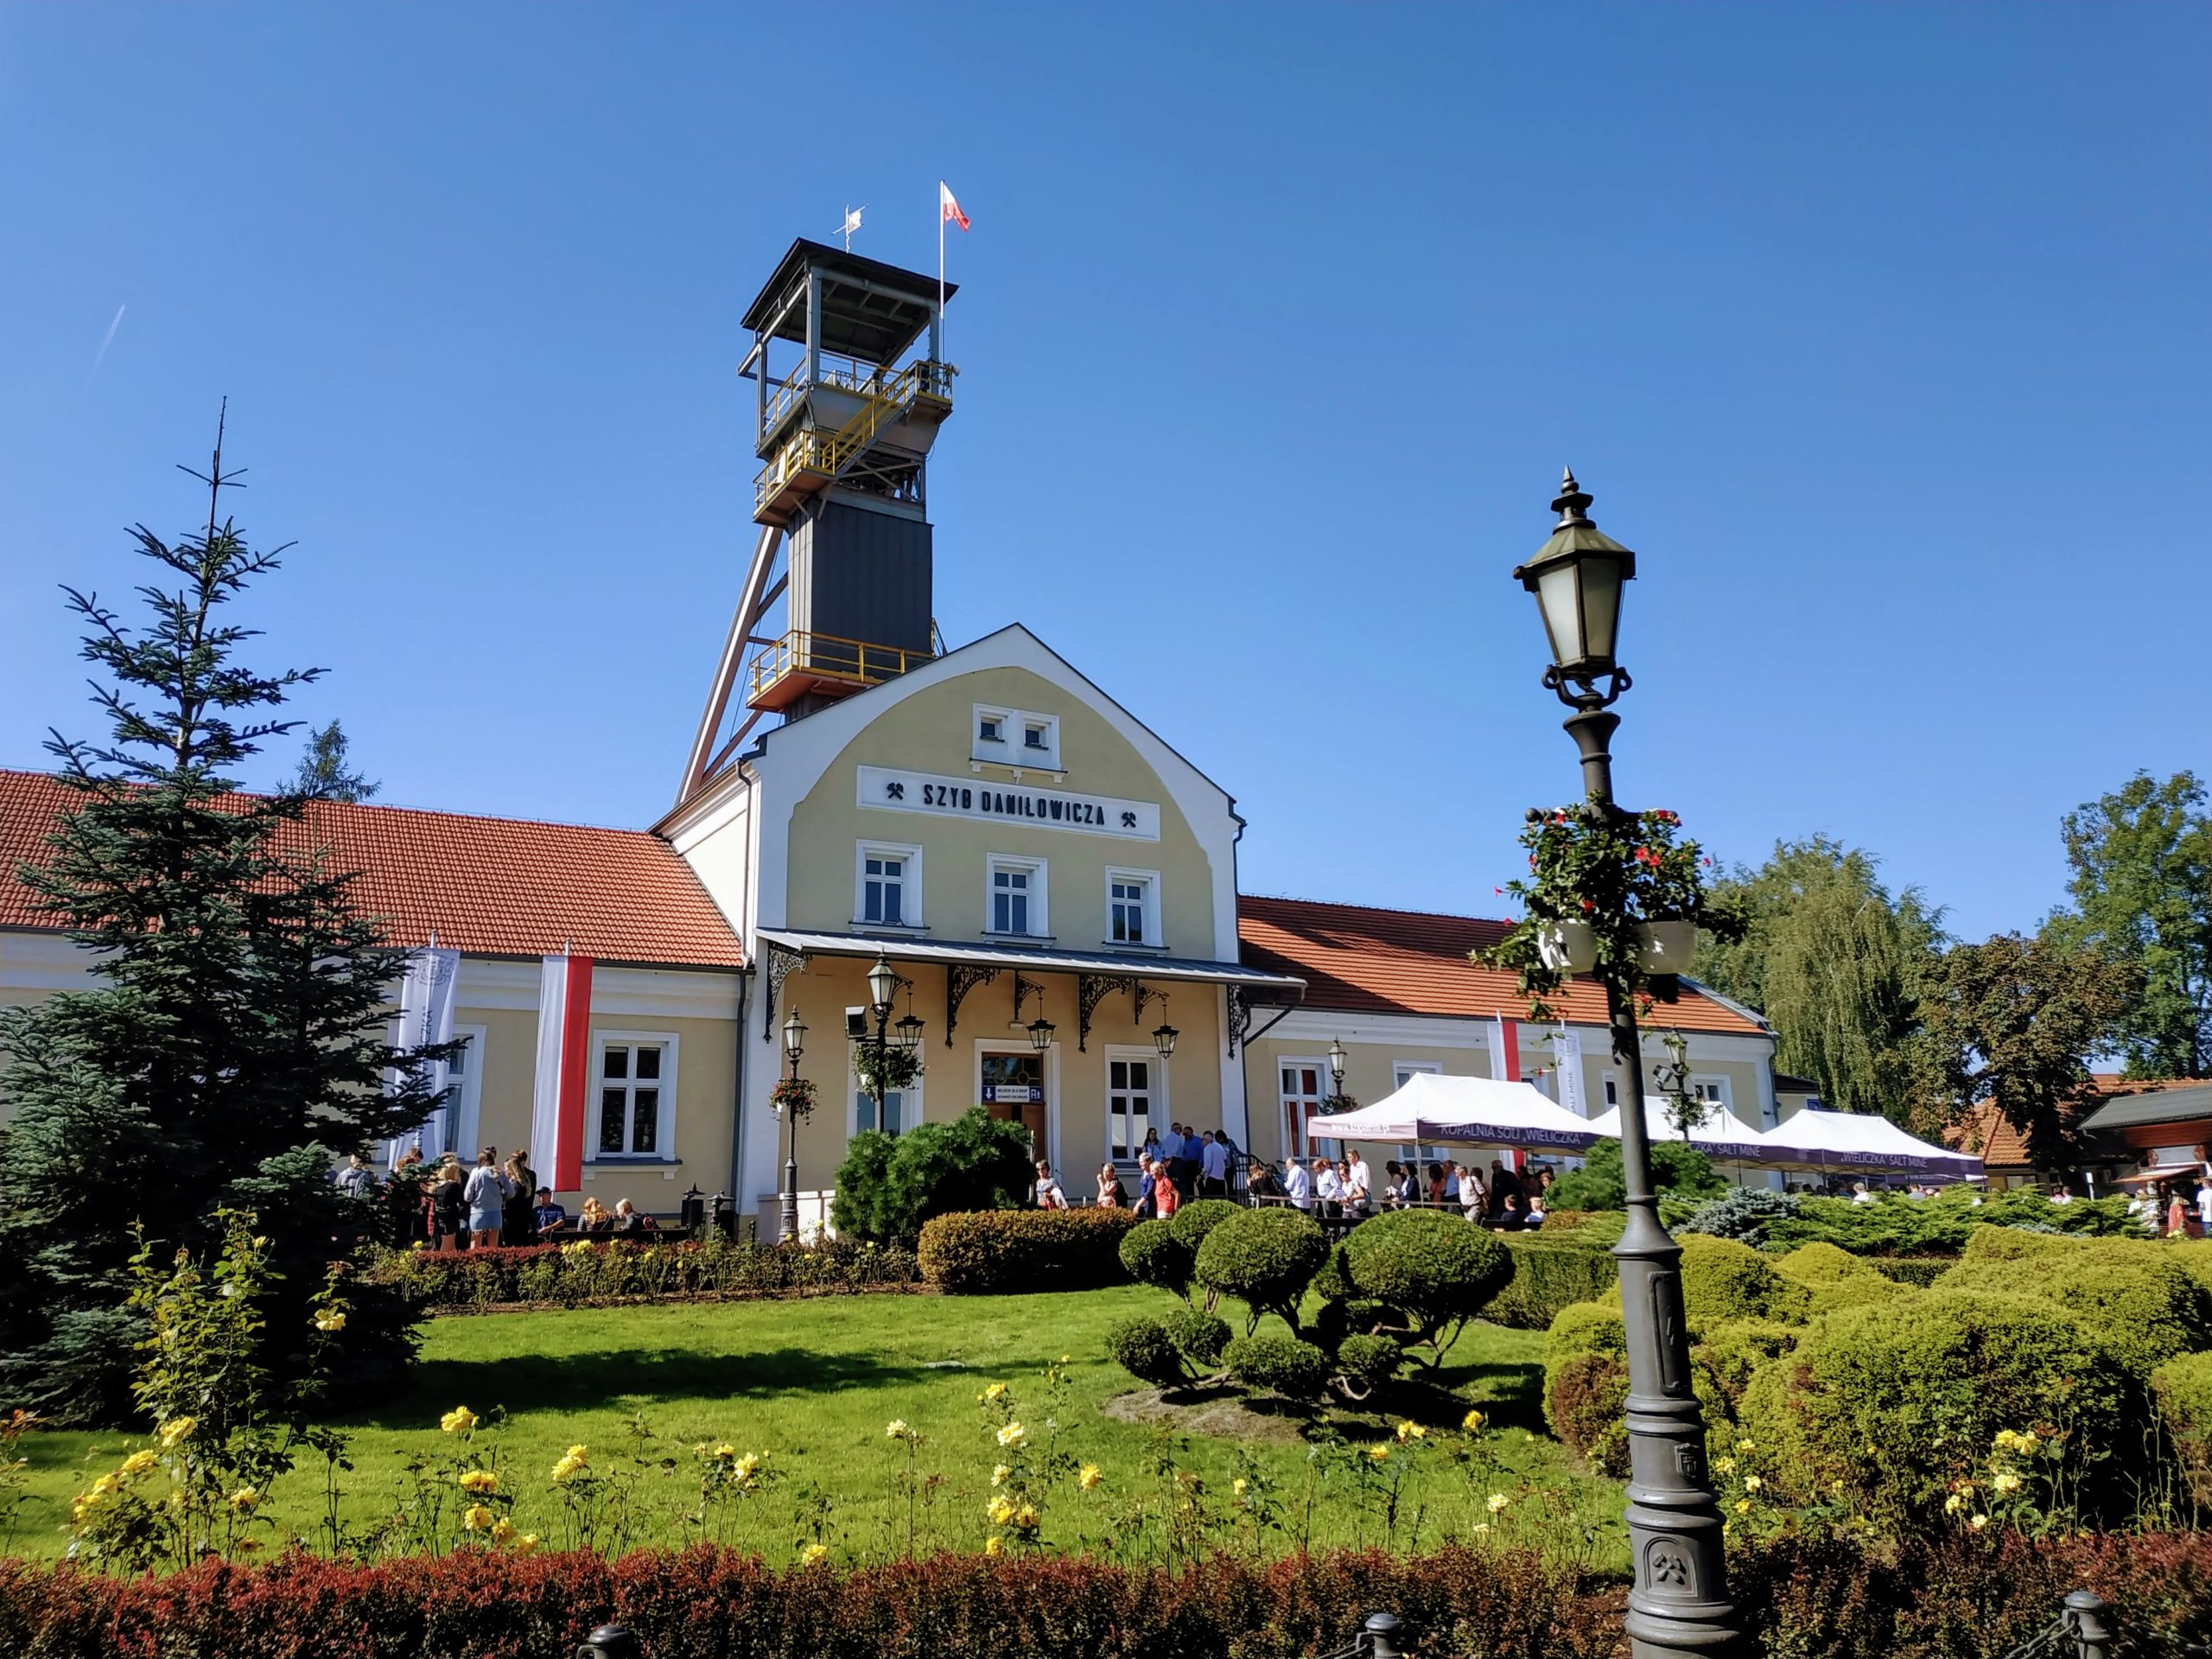
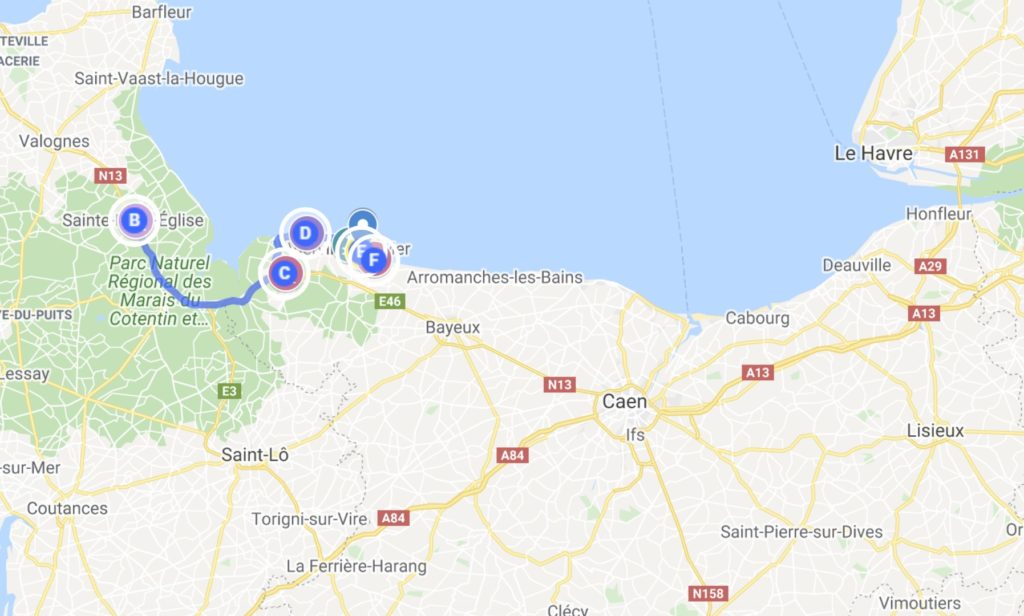

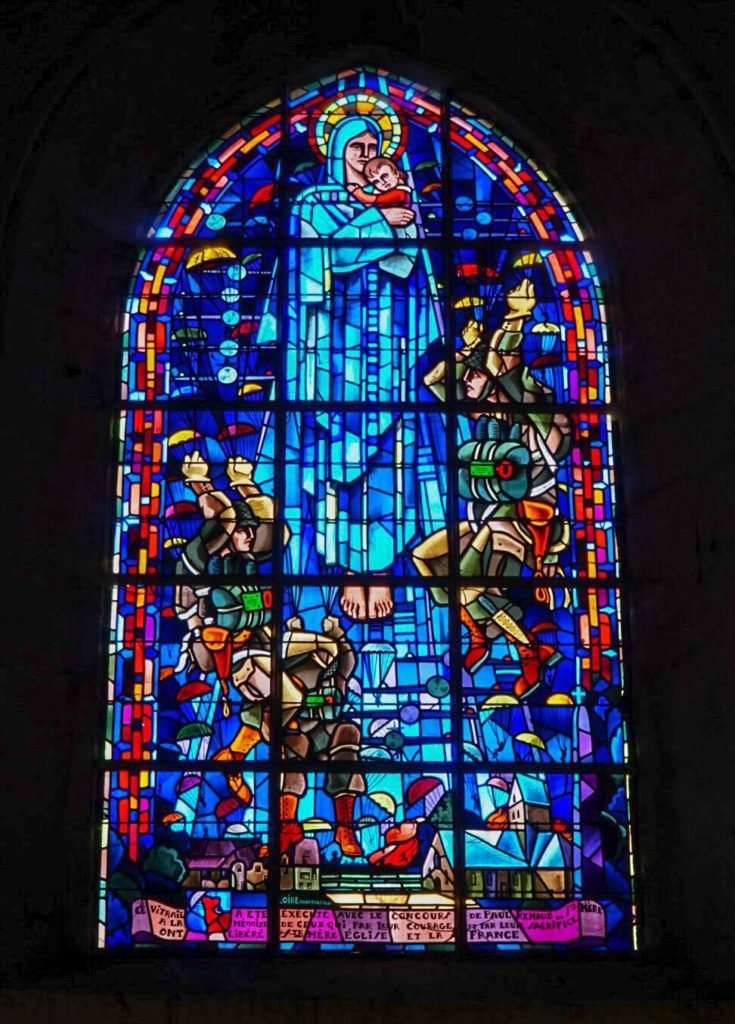
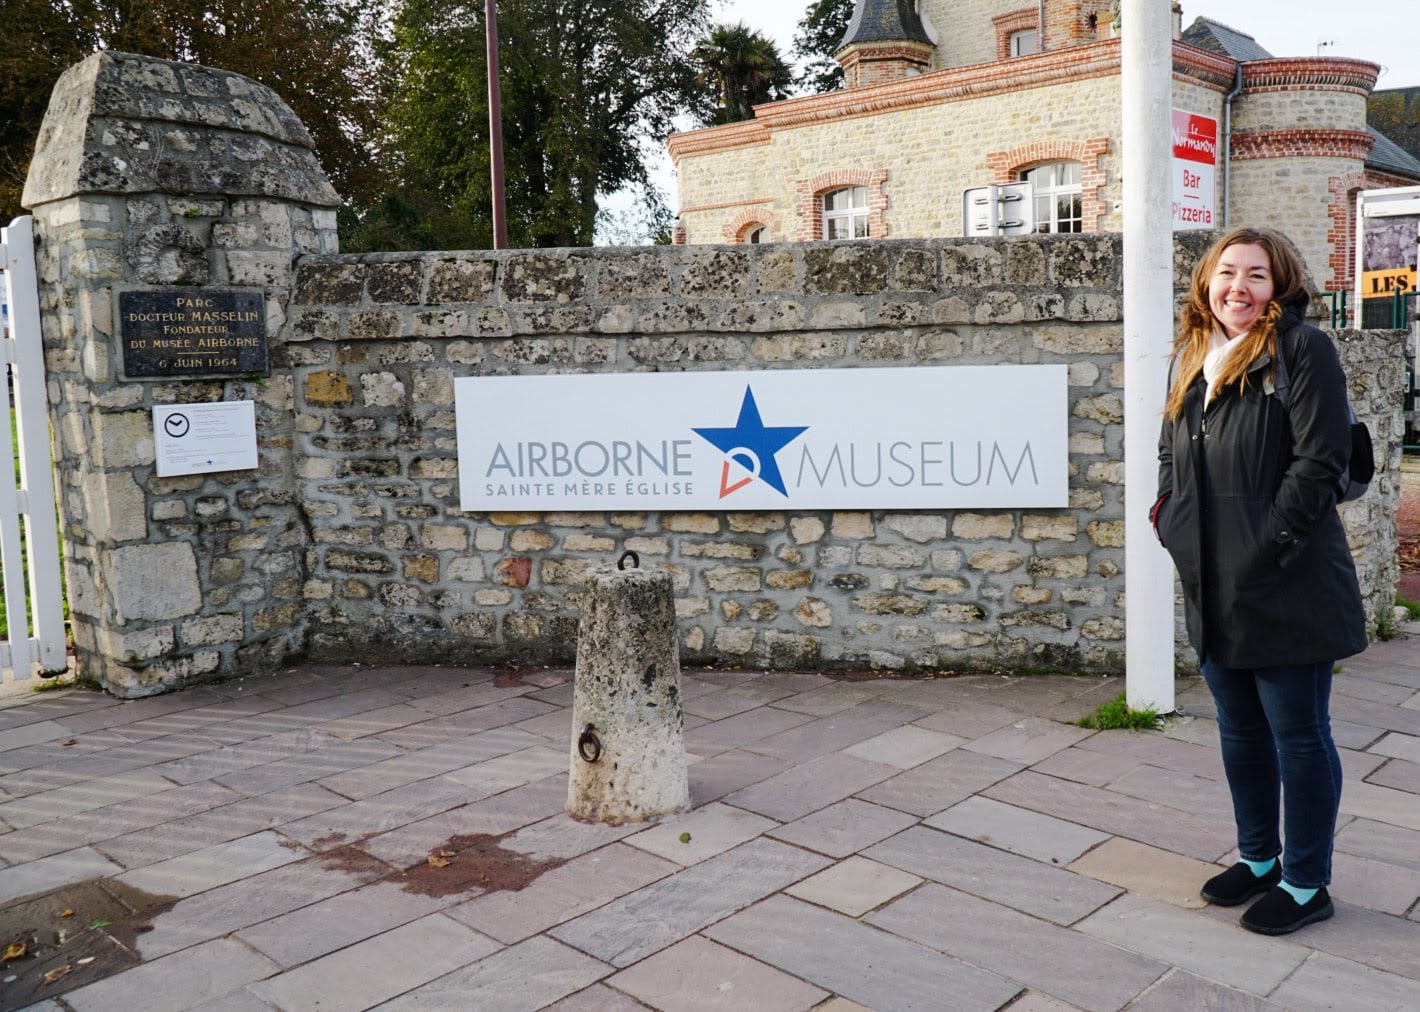
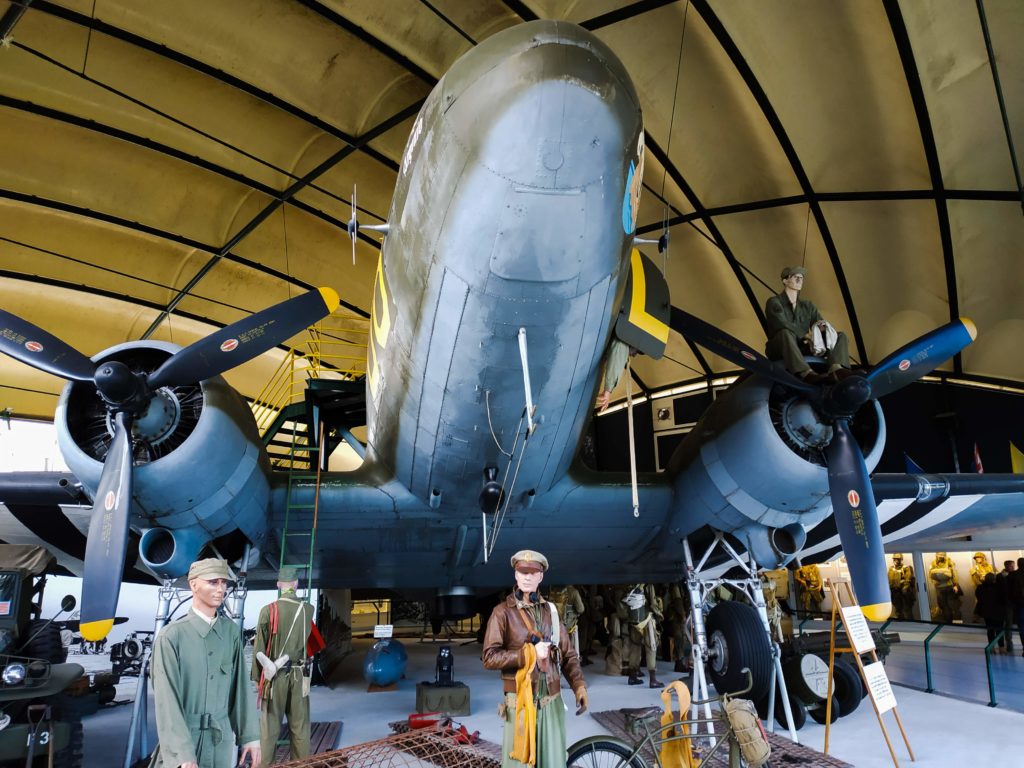
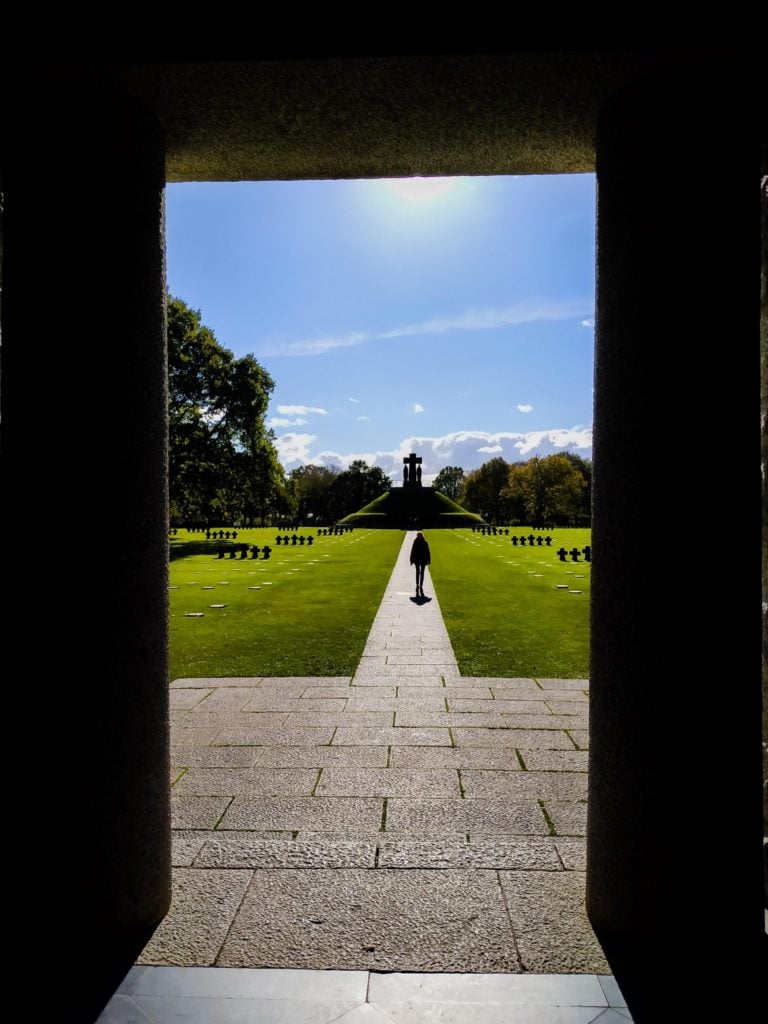
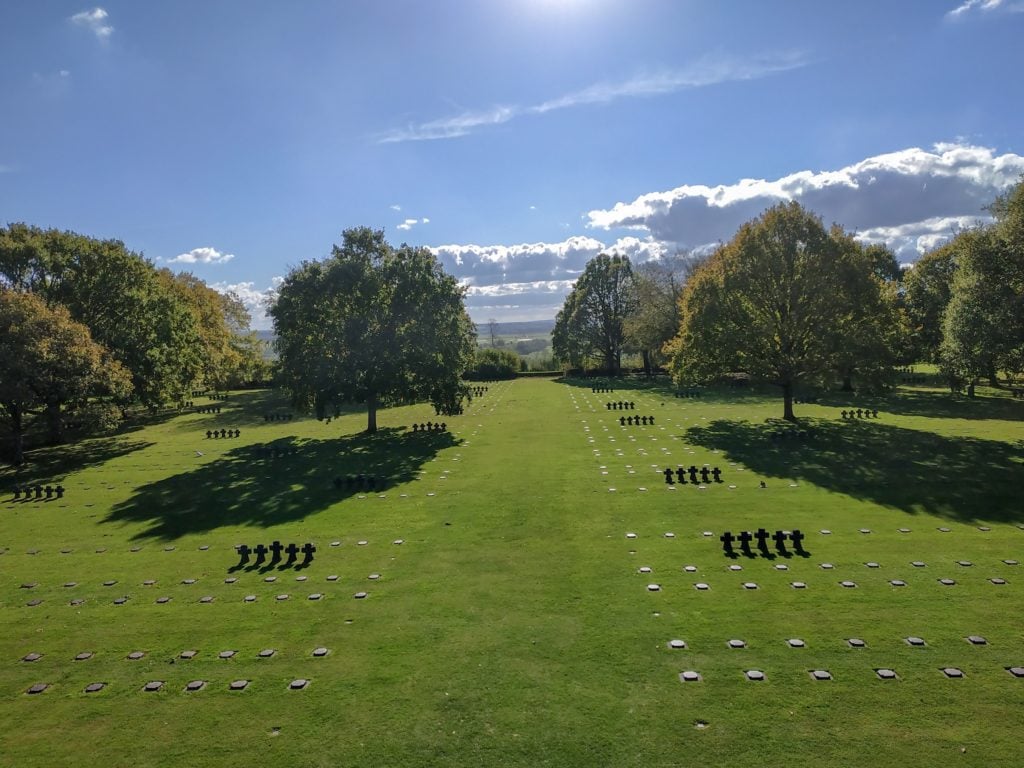
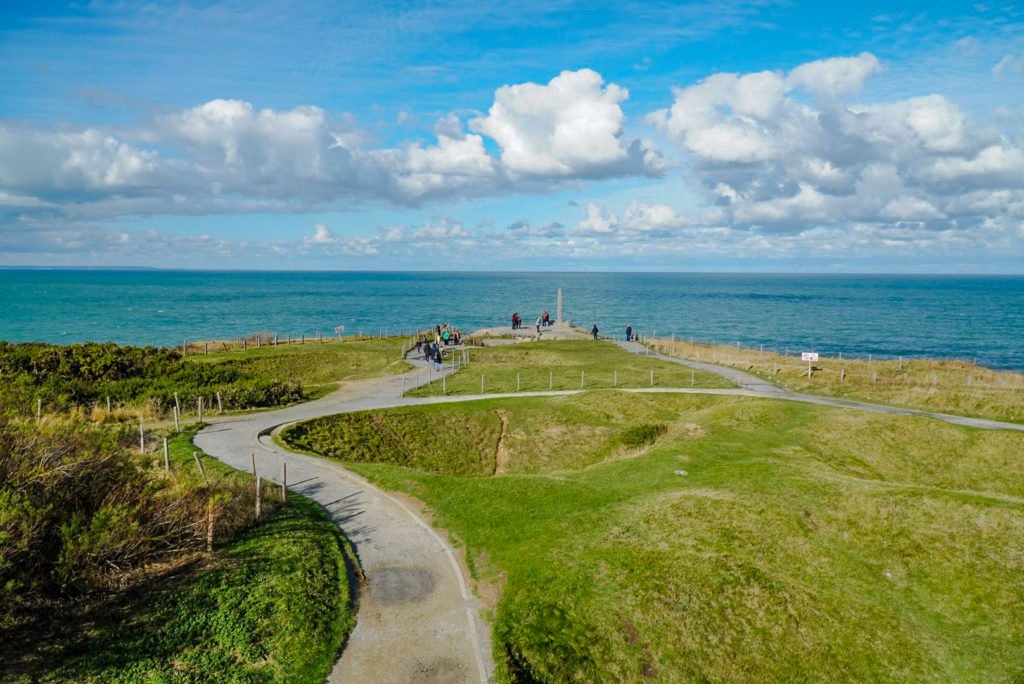
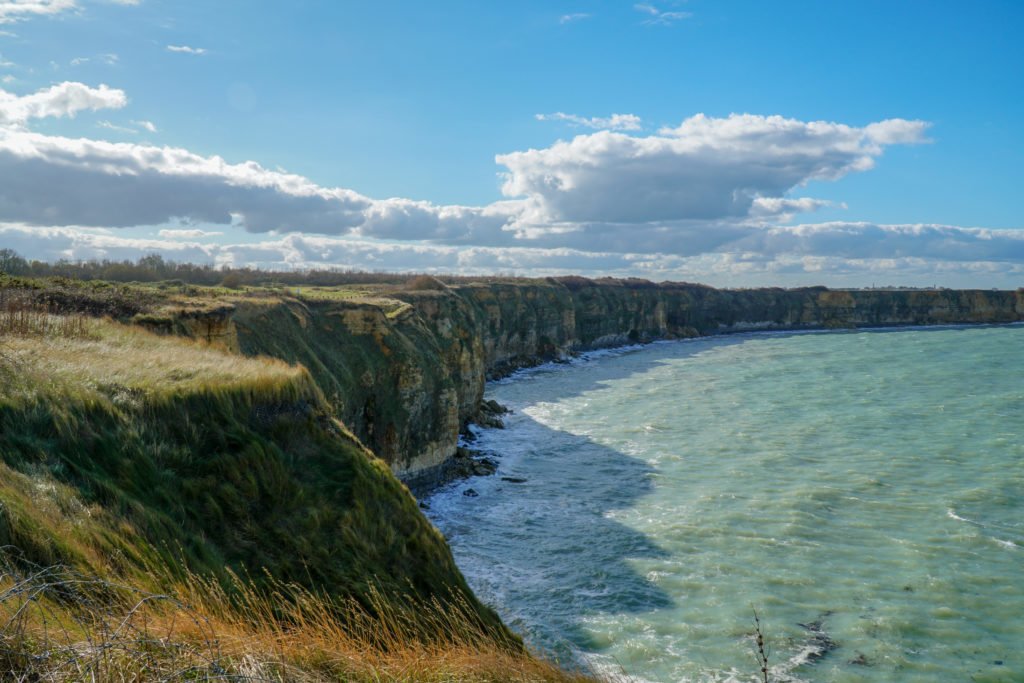
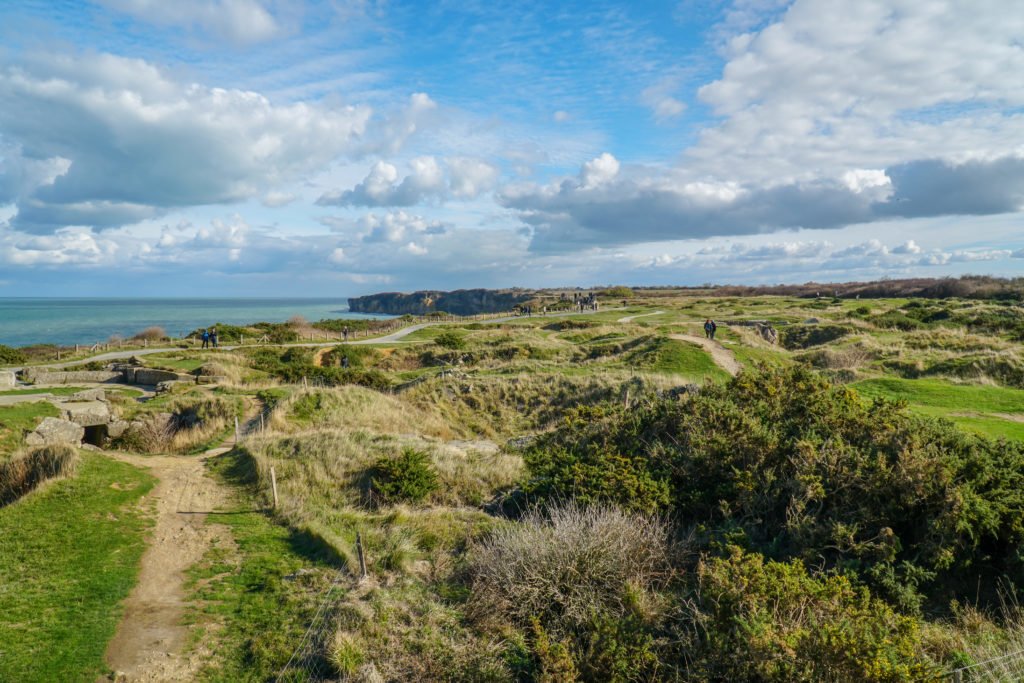
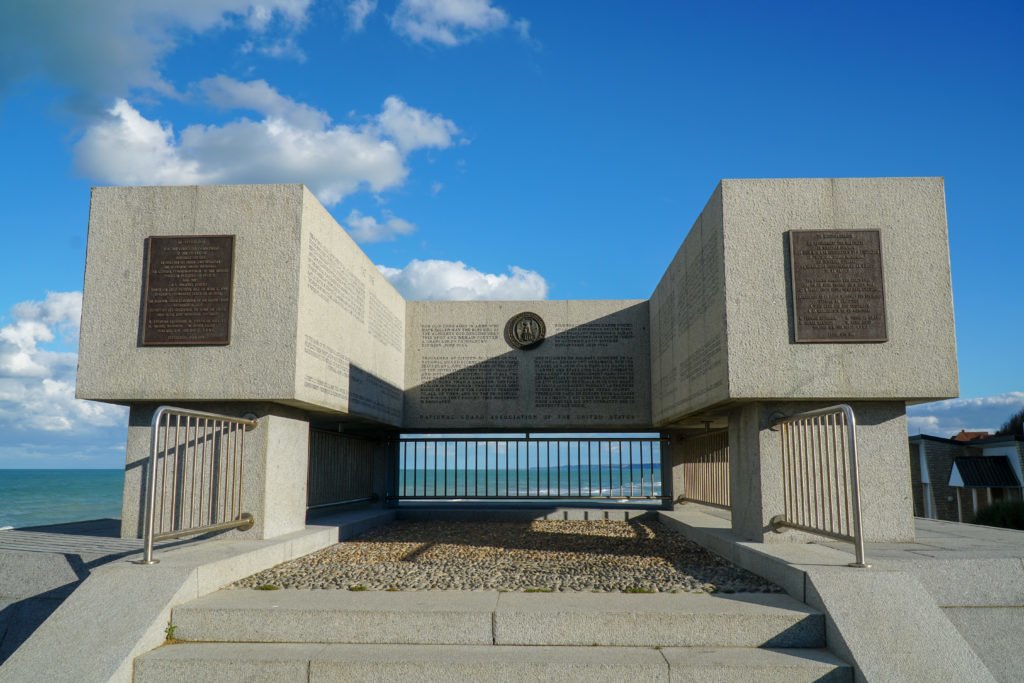
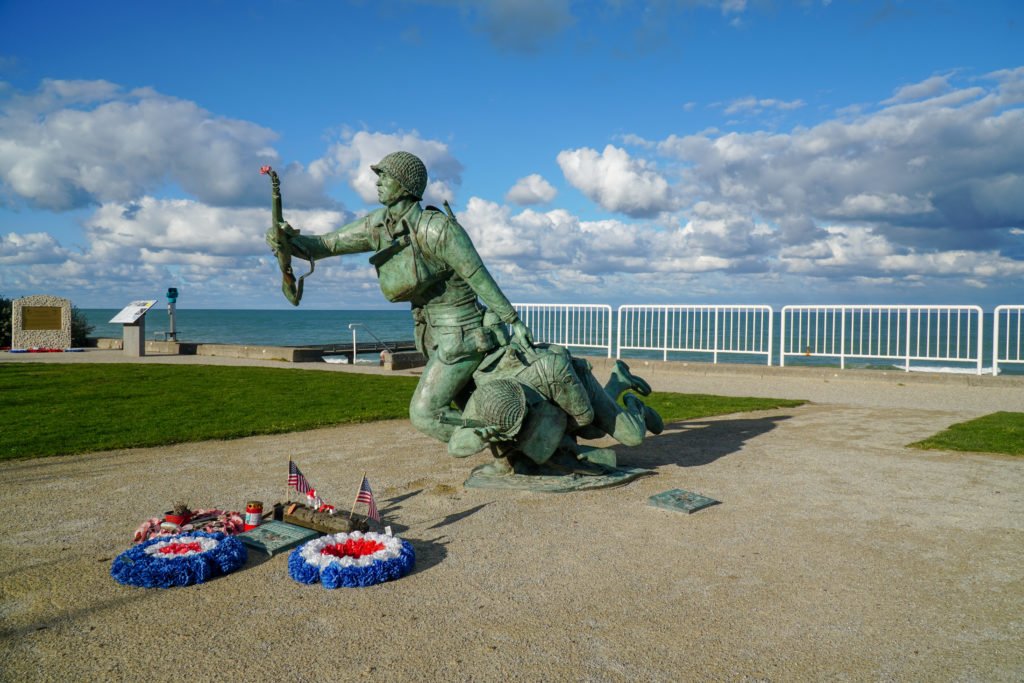
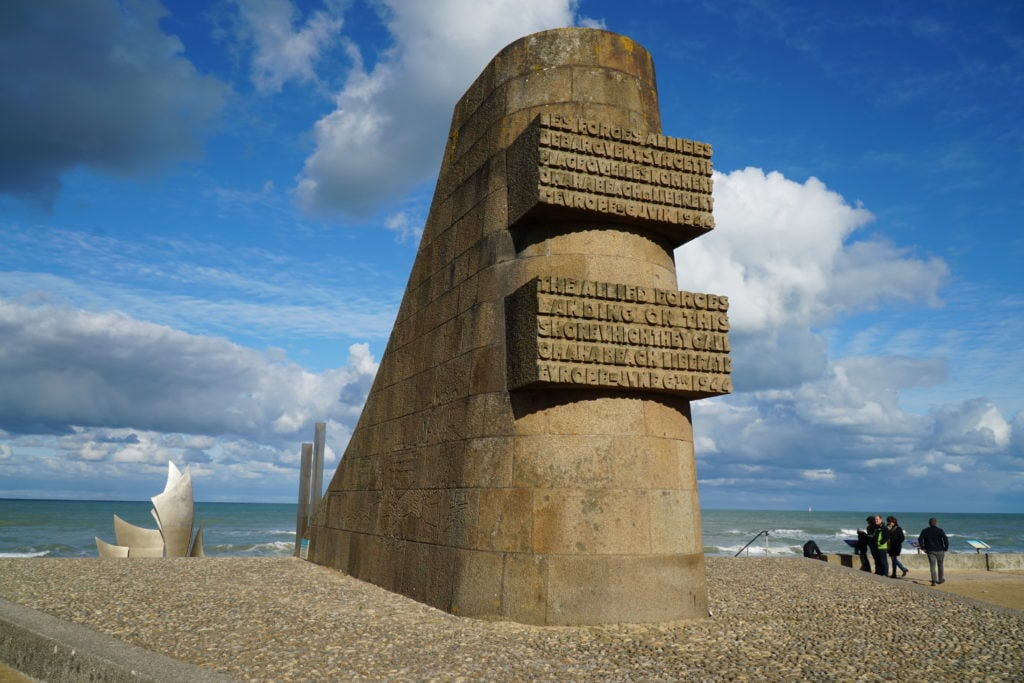
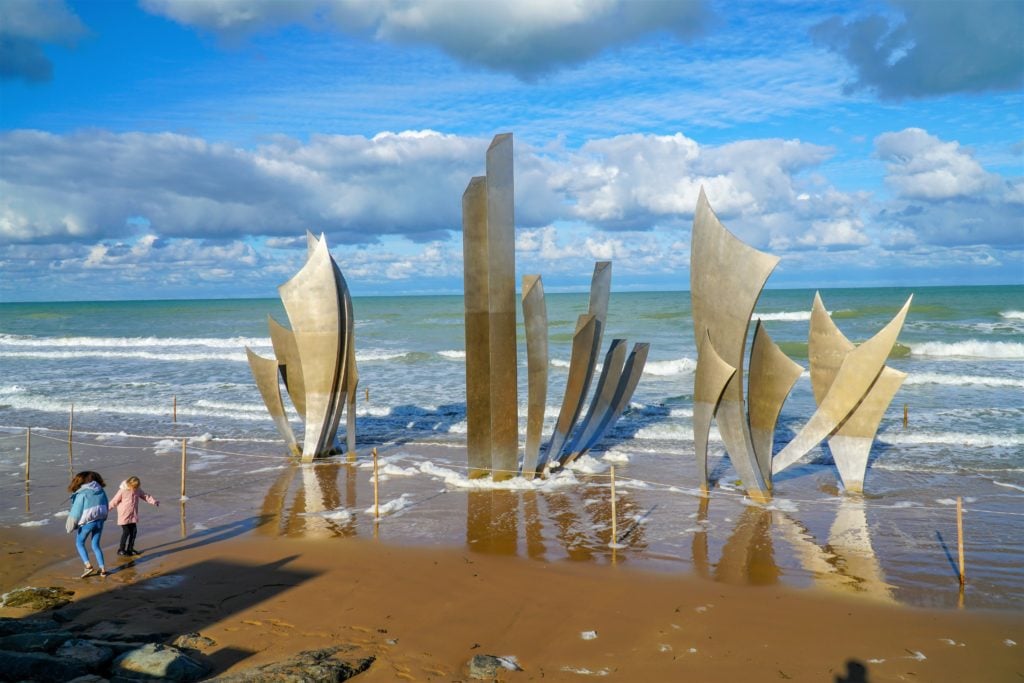

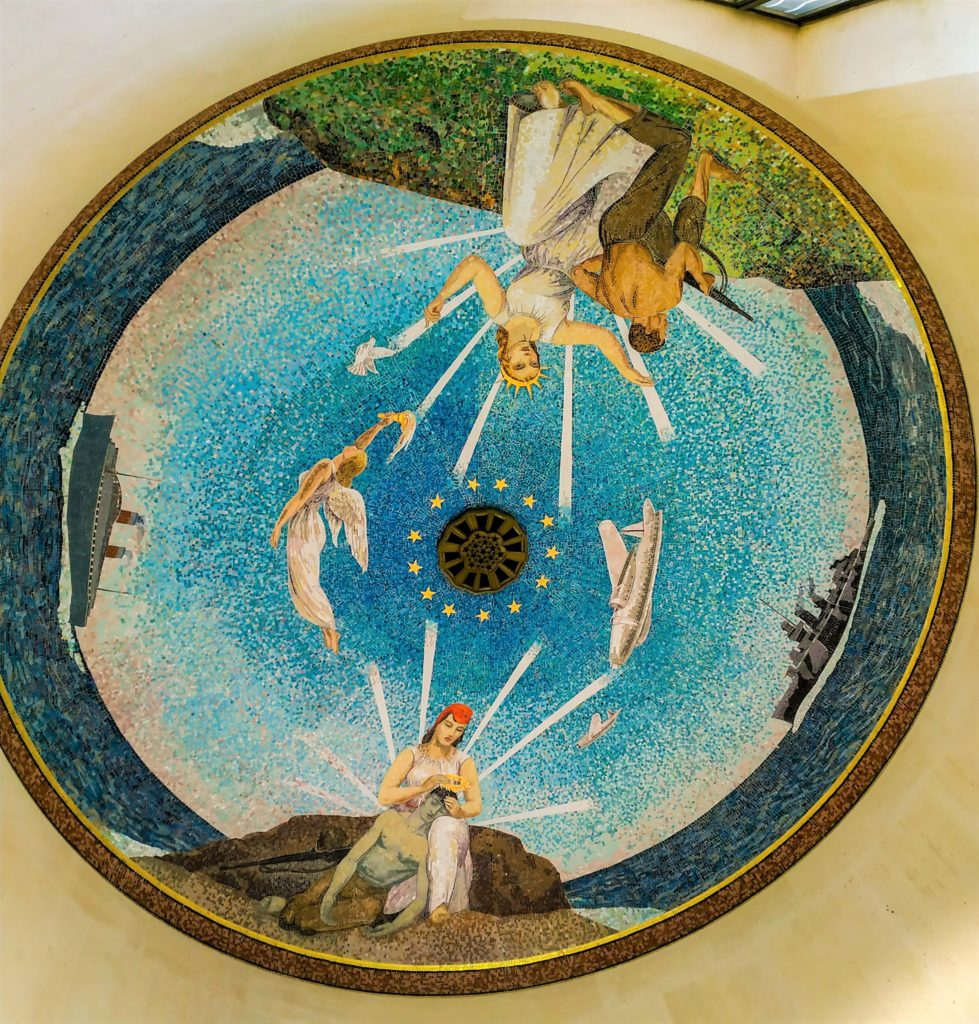
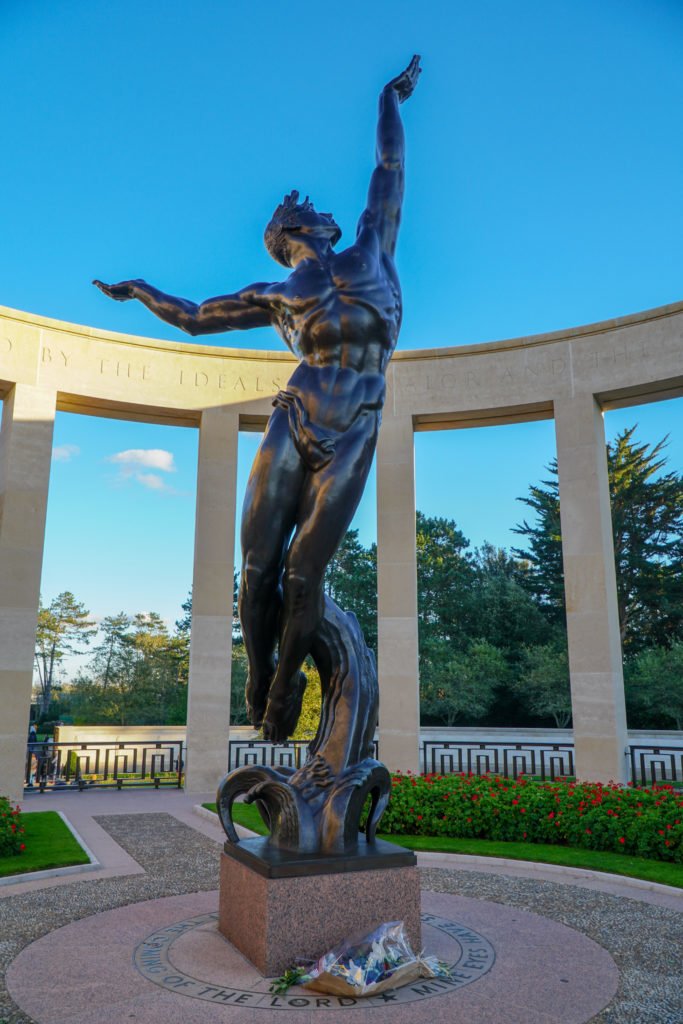
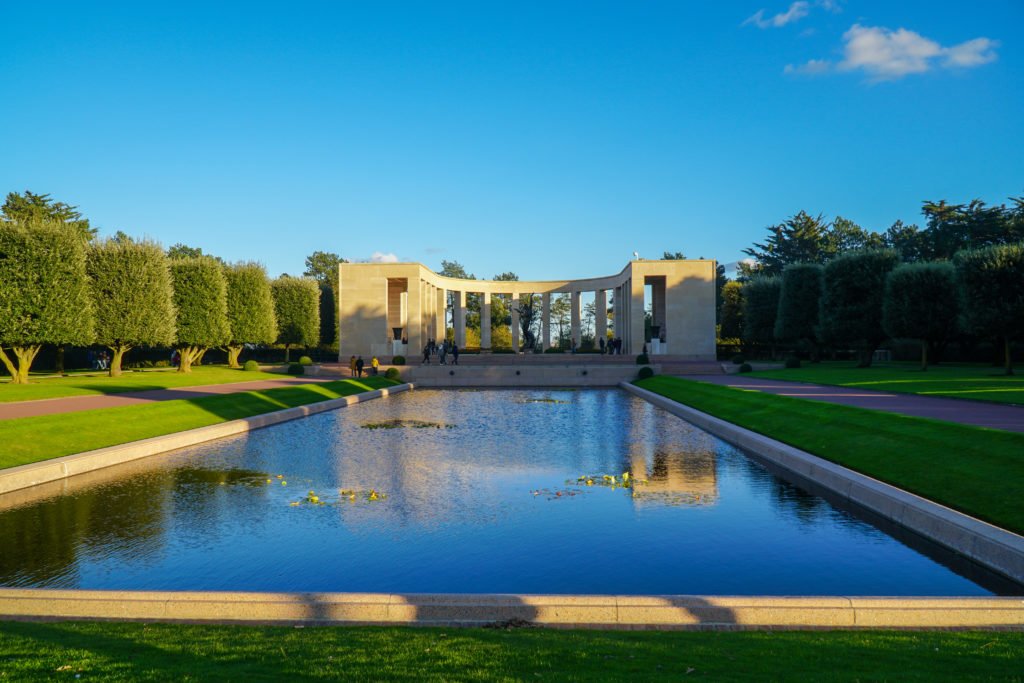
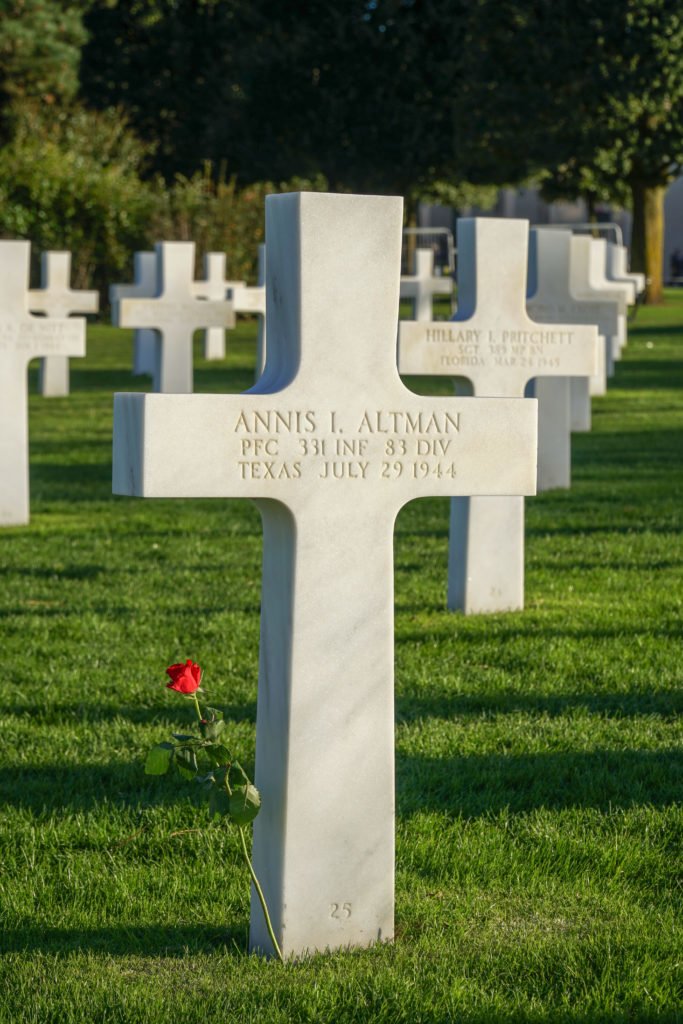
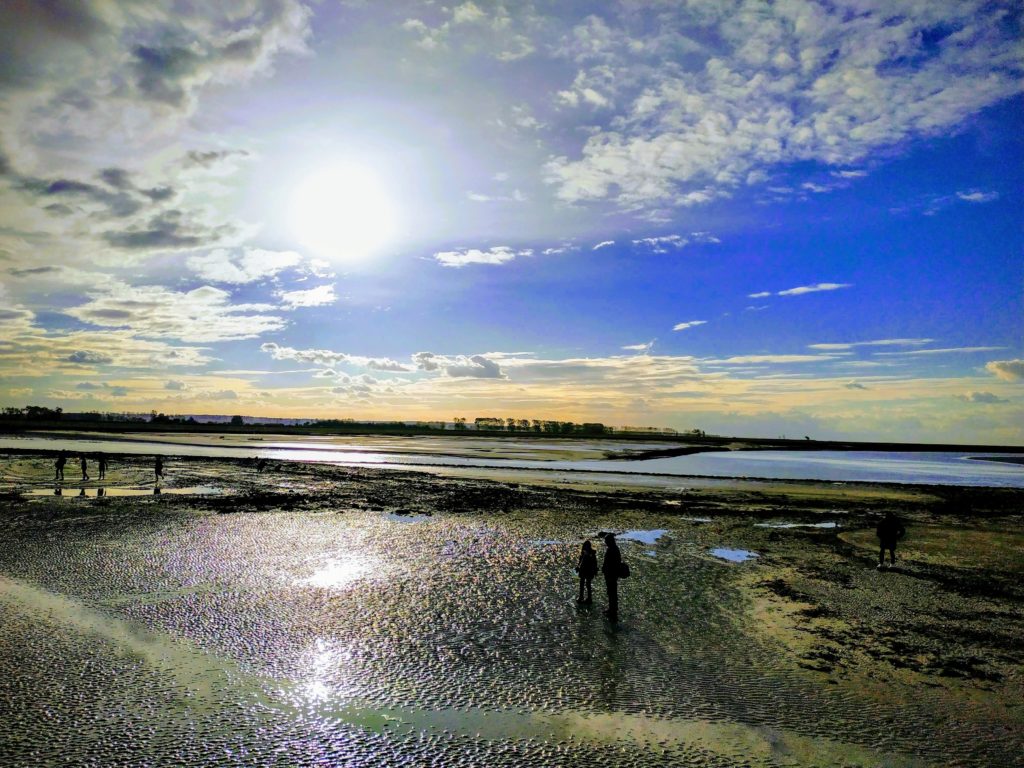
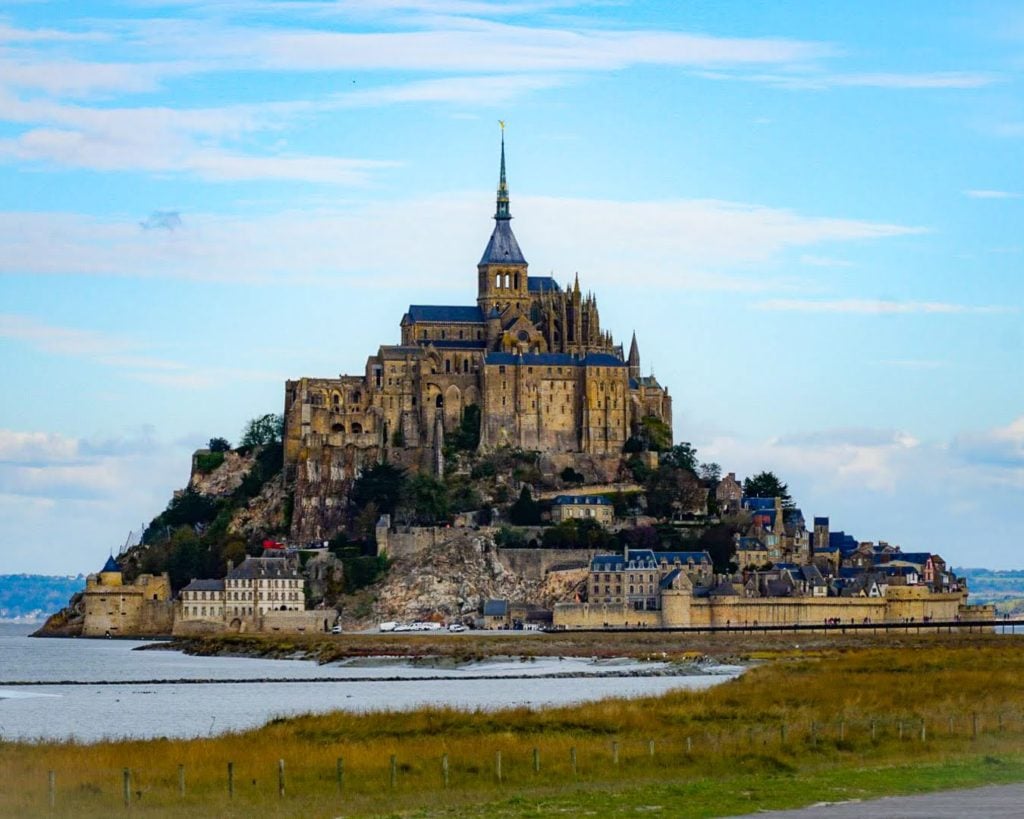
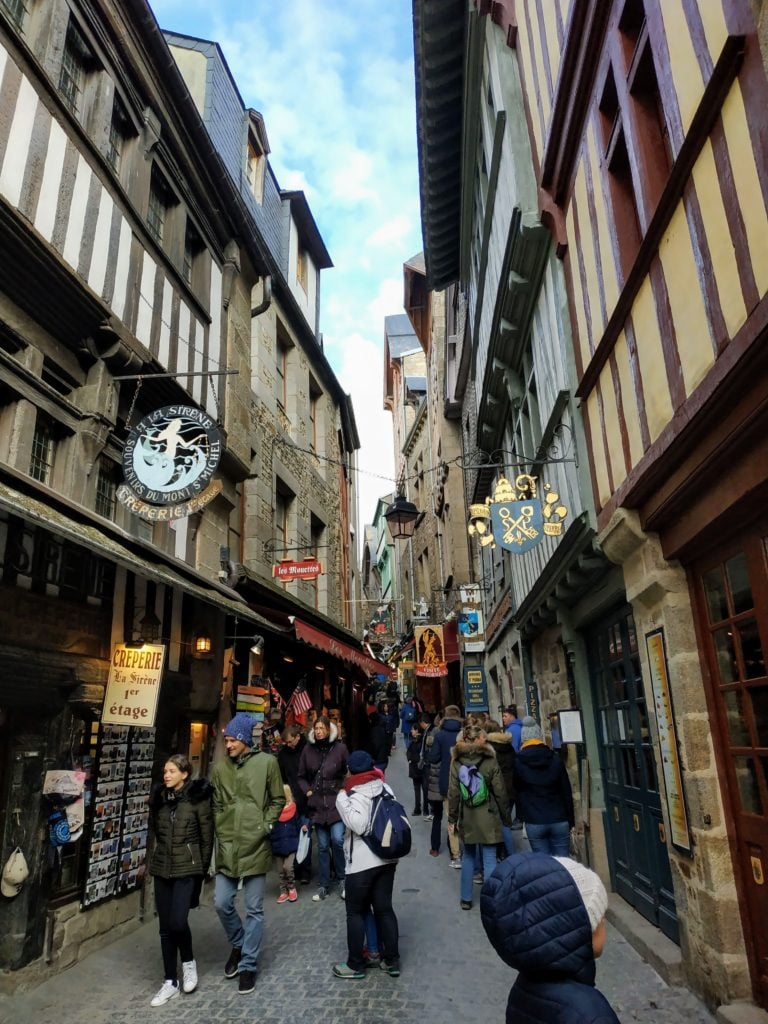
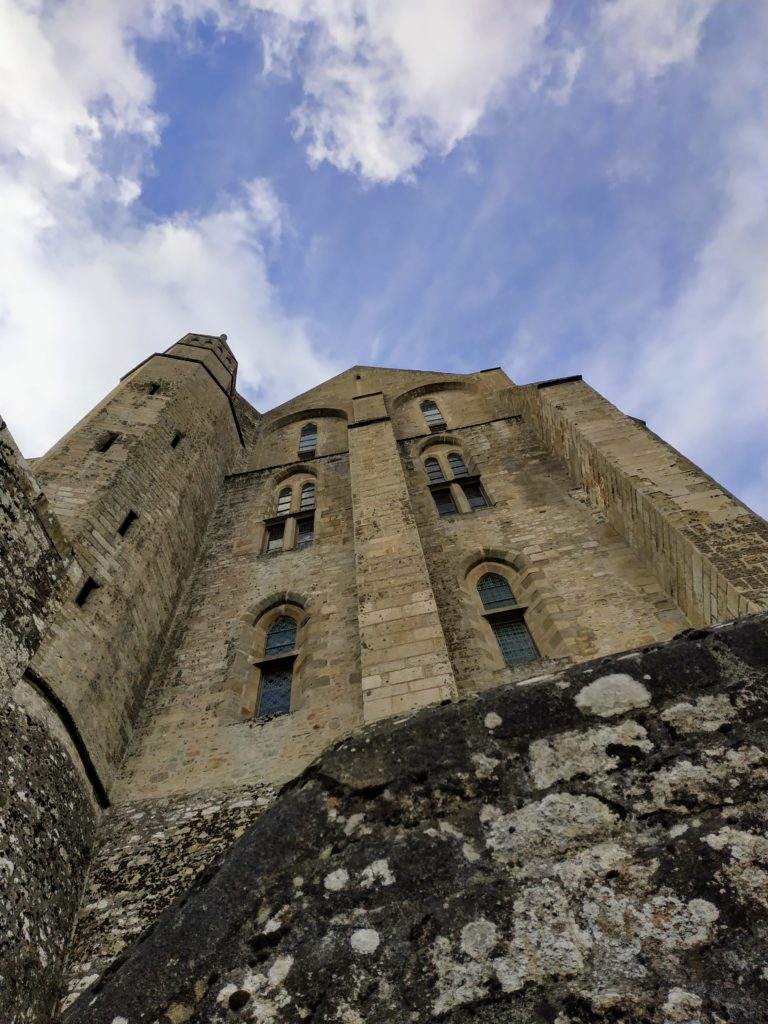
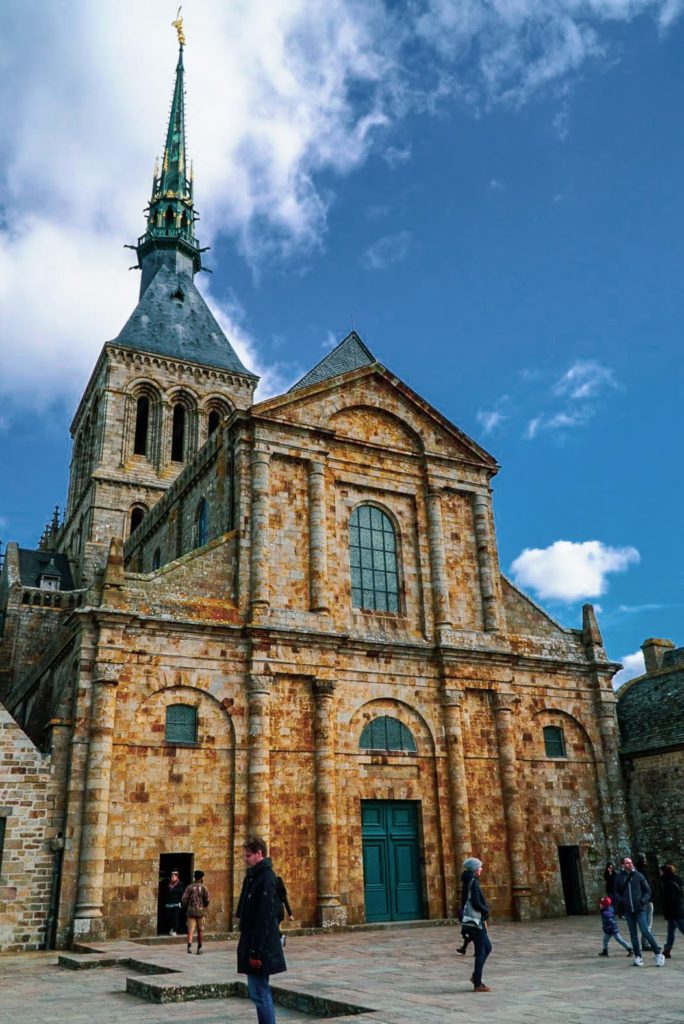
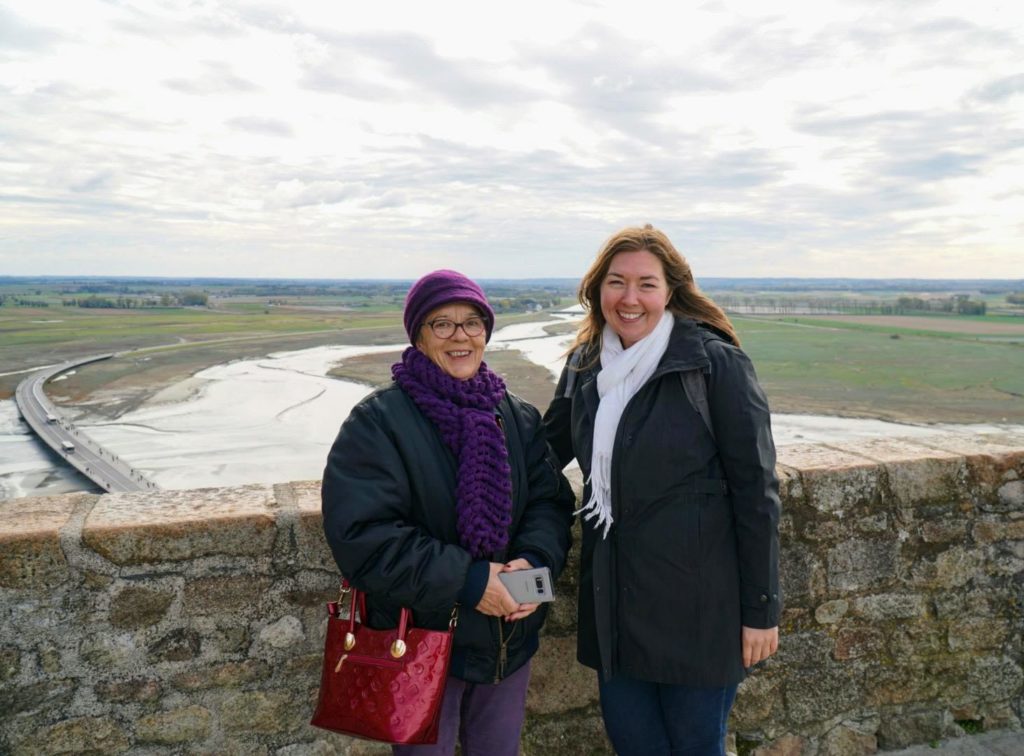
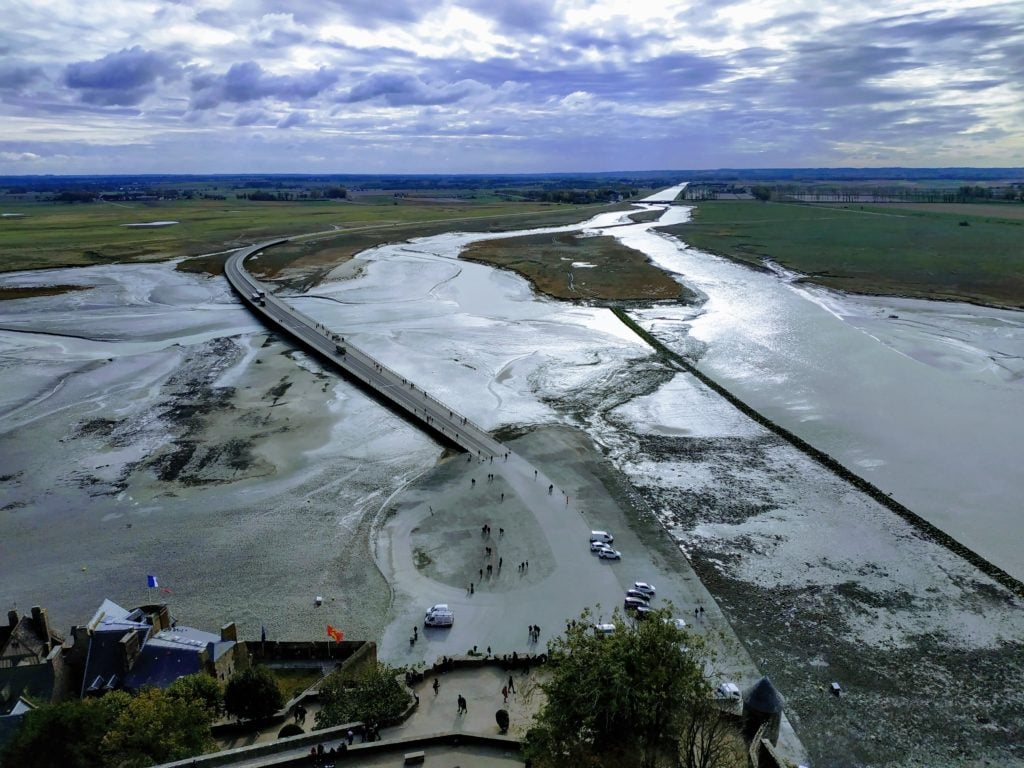
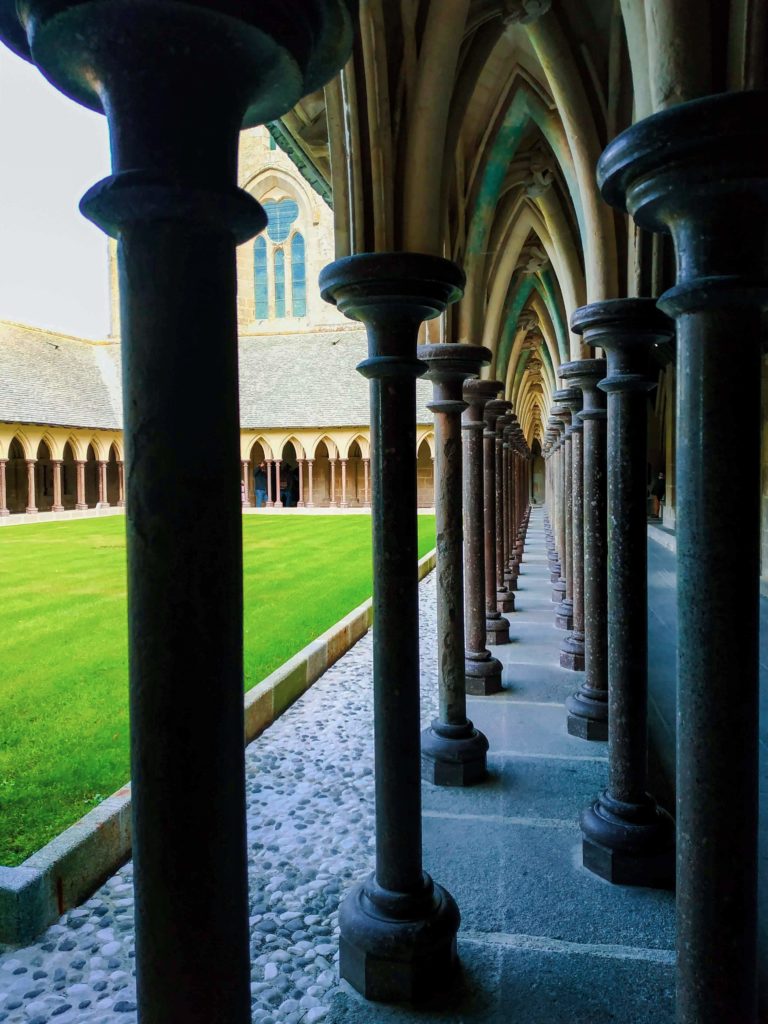

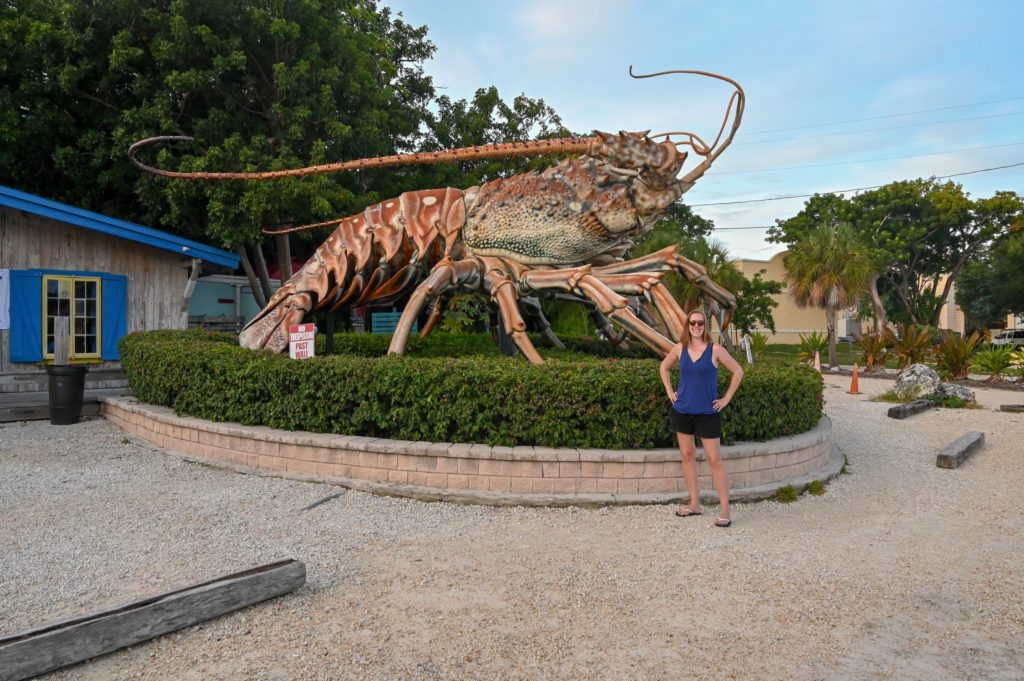
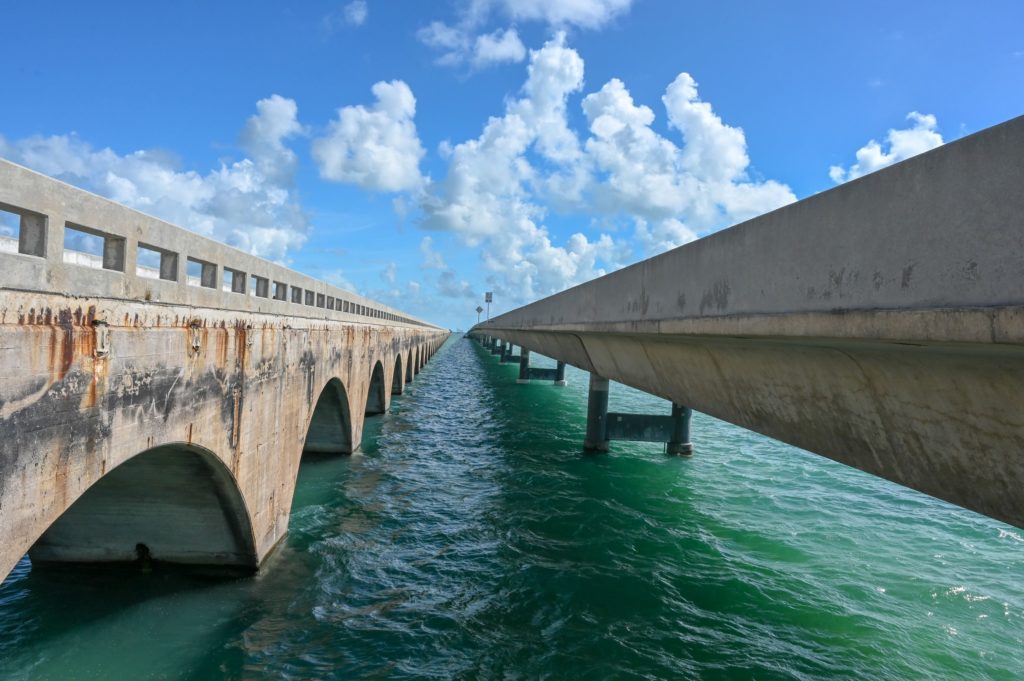
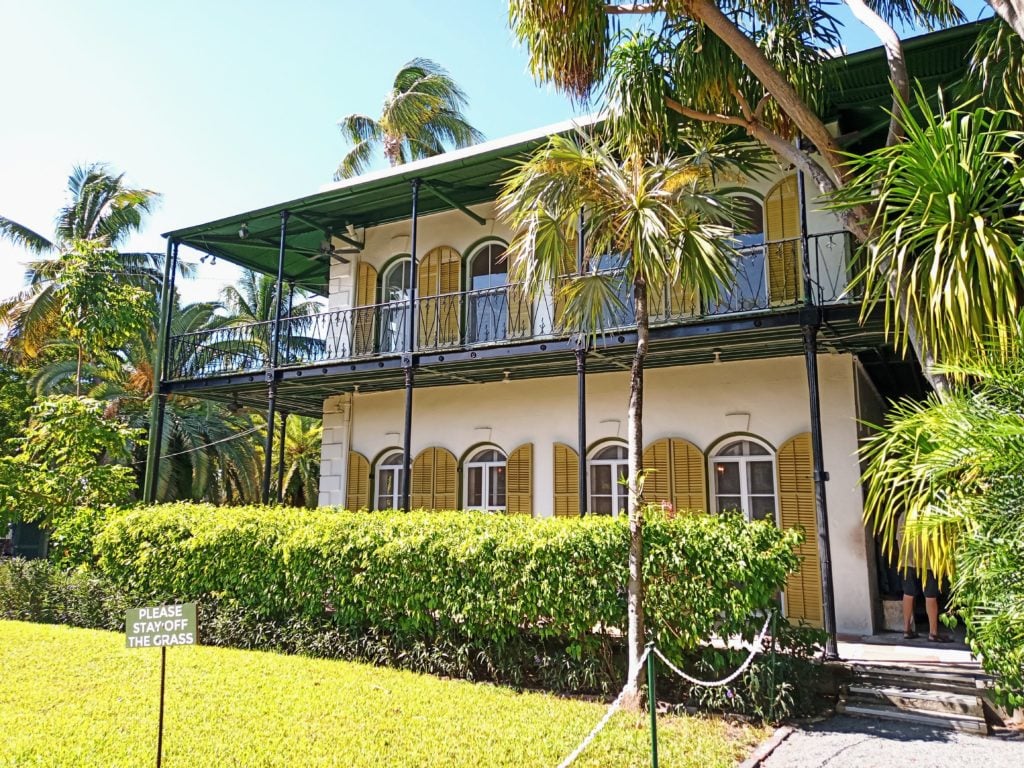
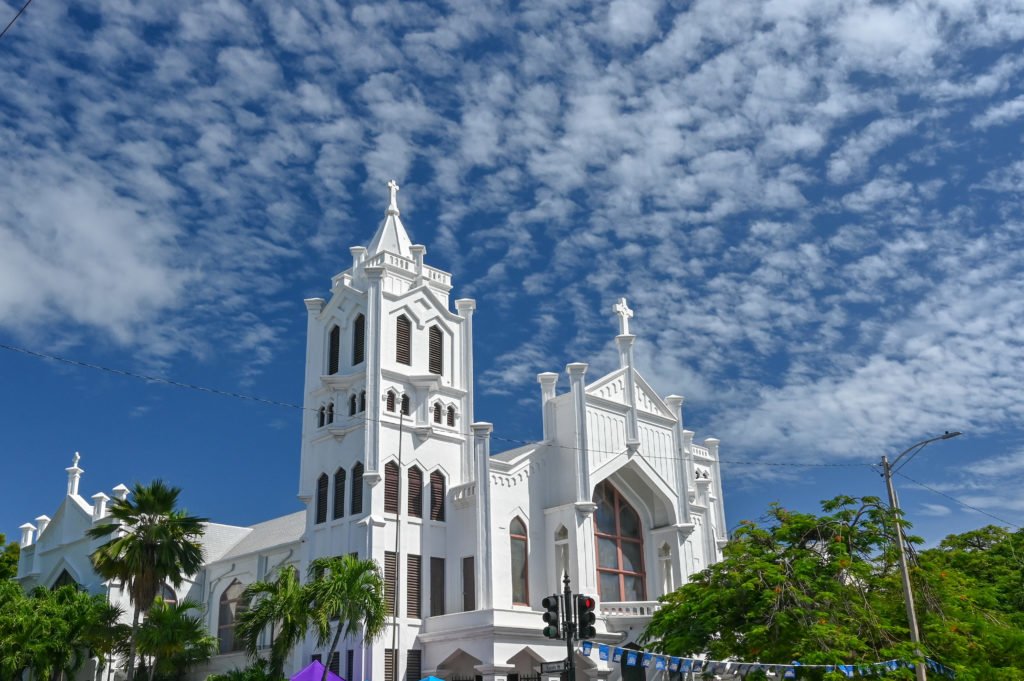
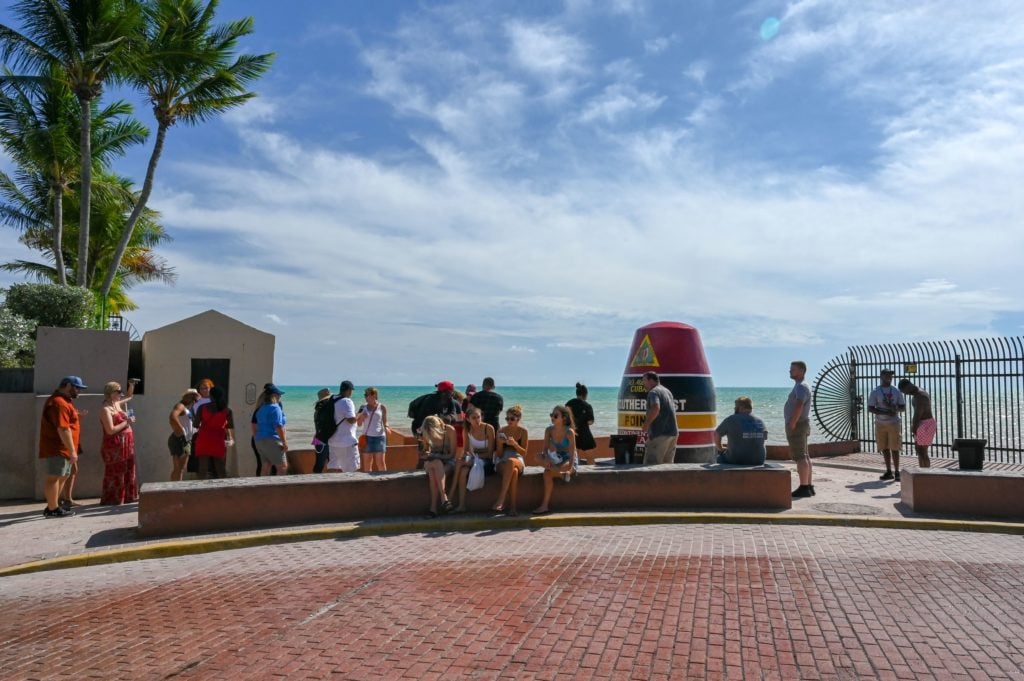 Enjoy another photo op, however just know that you may have to get in line to take your photo with the marker stating it is the Southernmost Point in the Continental U.S. There isn’t any shade either. So you can decide just how important this photo op is to you.