**Update** The Gnomes Trail has relocated to 25719 Maple Valley Black Diamond Rd SE, Maple Valley, WA 98038. This is also the parking area for the Maple Valley Farmers Market. Read my updated post on the NEW Gnome Trail here.
Facebook
Pinterest
Reddit
Twitter
Email
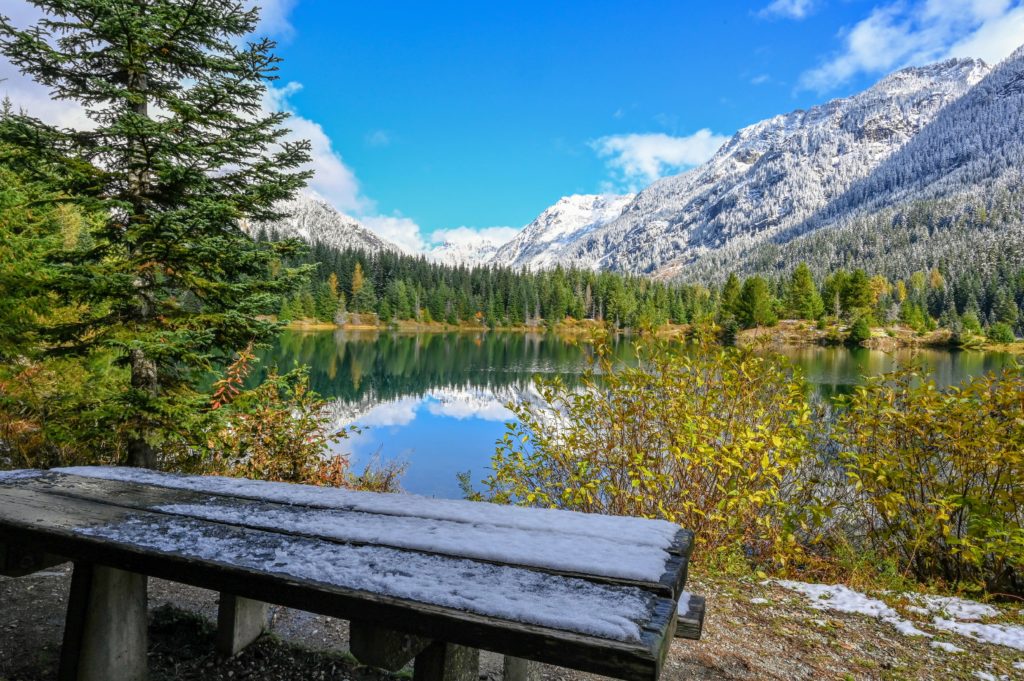
If you’re looking for a fun, family-friendly hike, then look no further than the Gnomes Trail in Maple Valley, WA.
Explore this whimsical trail located within Henry’s Ridge Open Space. Henry’s Ridge Open Space is a network of trails that extend within the Maple Valley and Ravensdale areas.
The Gnomes Trail is an easy 2-mile roundtrip hike suitable for all ages. The trail is mostly flat and has a very mild elevation gain of only about 150 feet. I saw people of all ages and fitness levels hiking this trail. So if you are new to hiking or have younger kids, the Gnomes Trail is a great place to start.
Getting to the Gnomes Trail
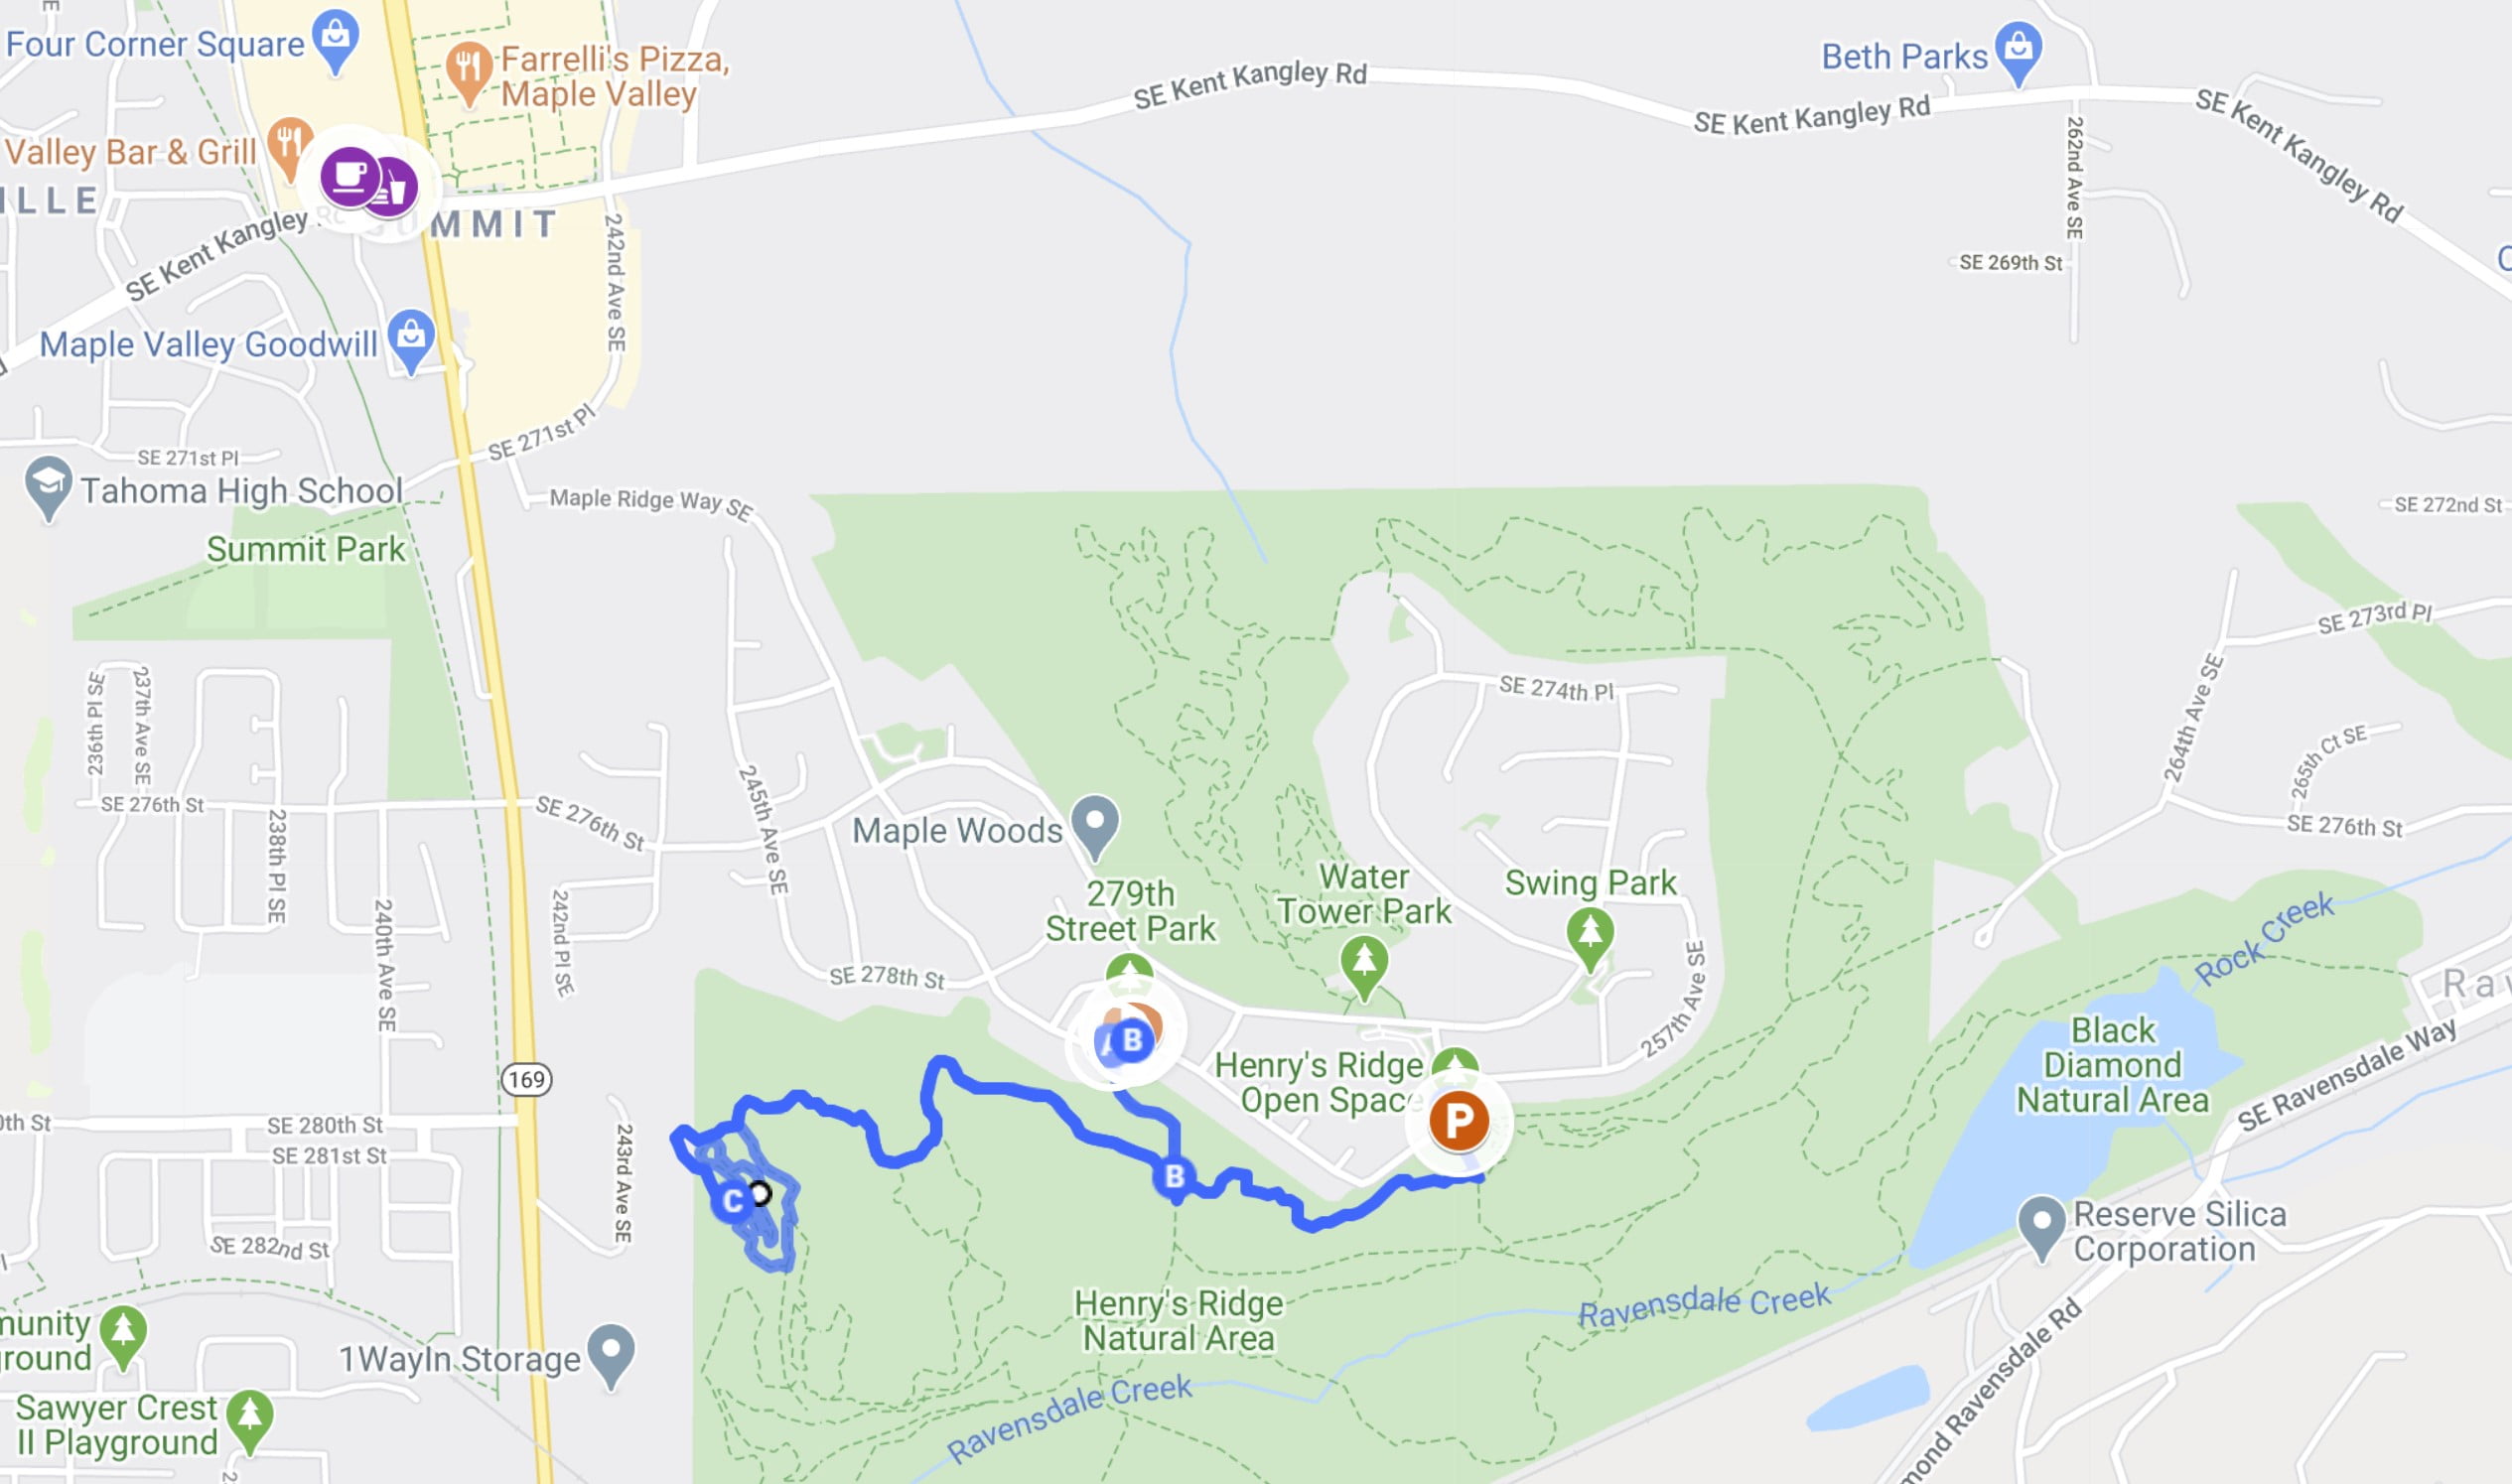
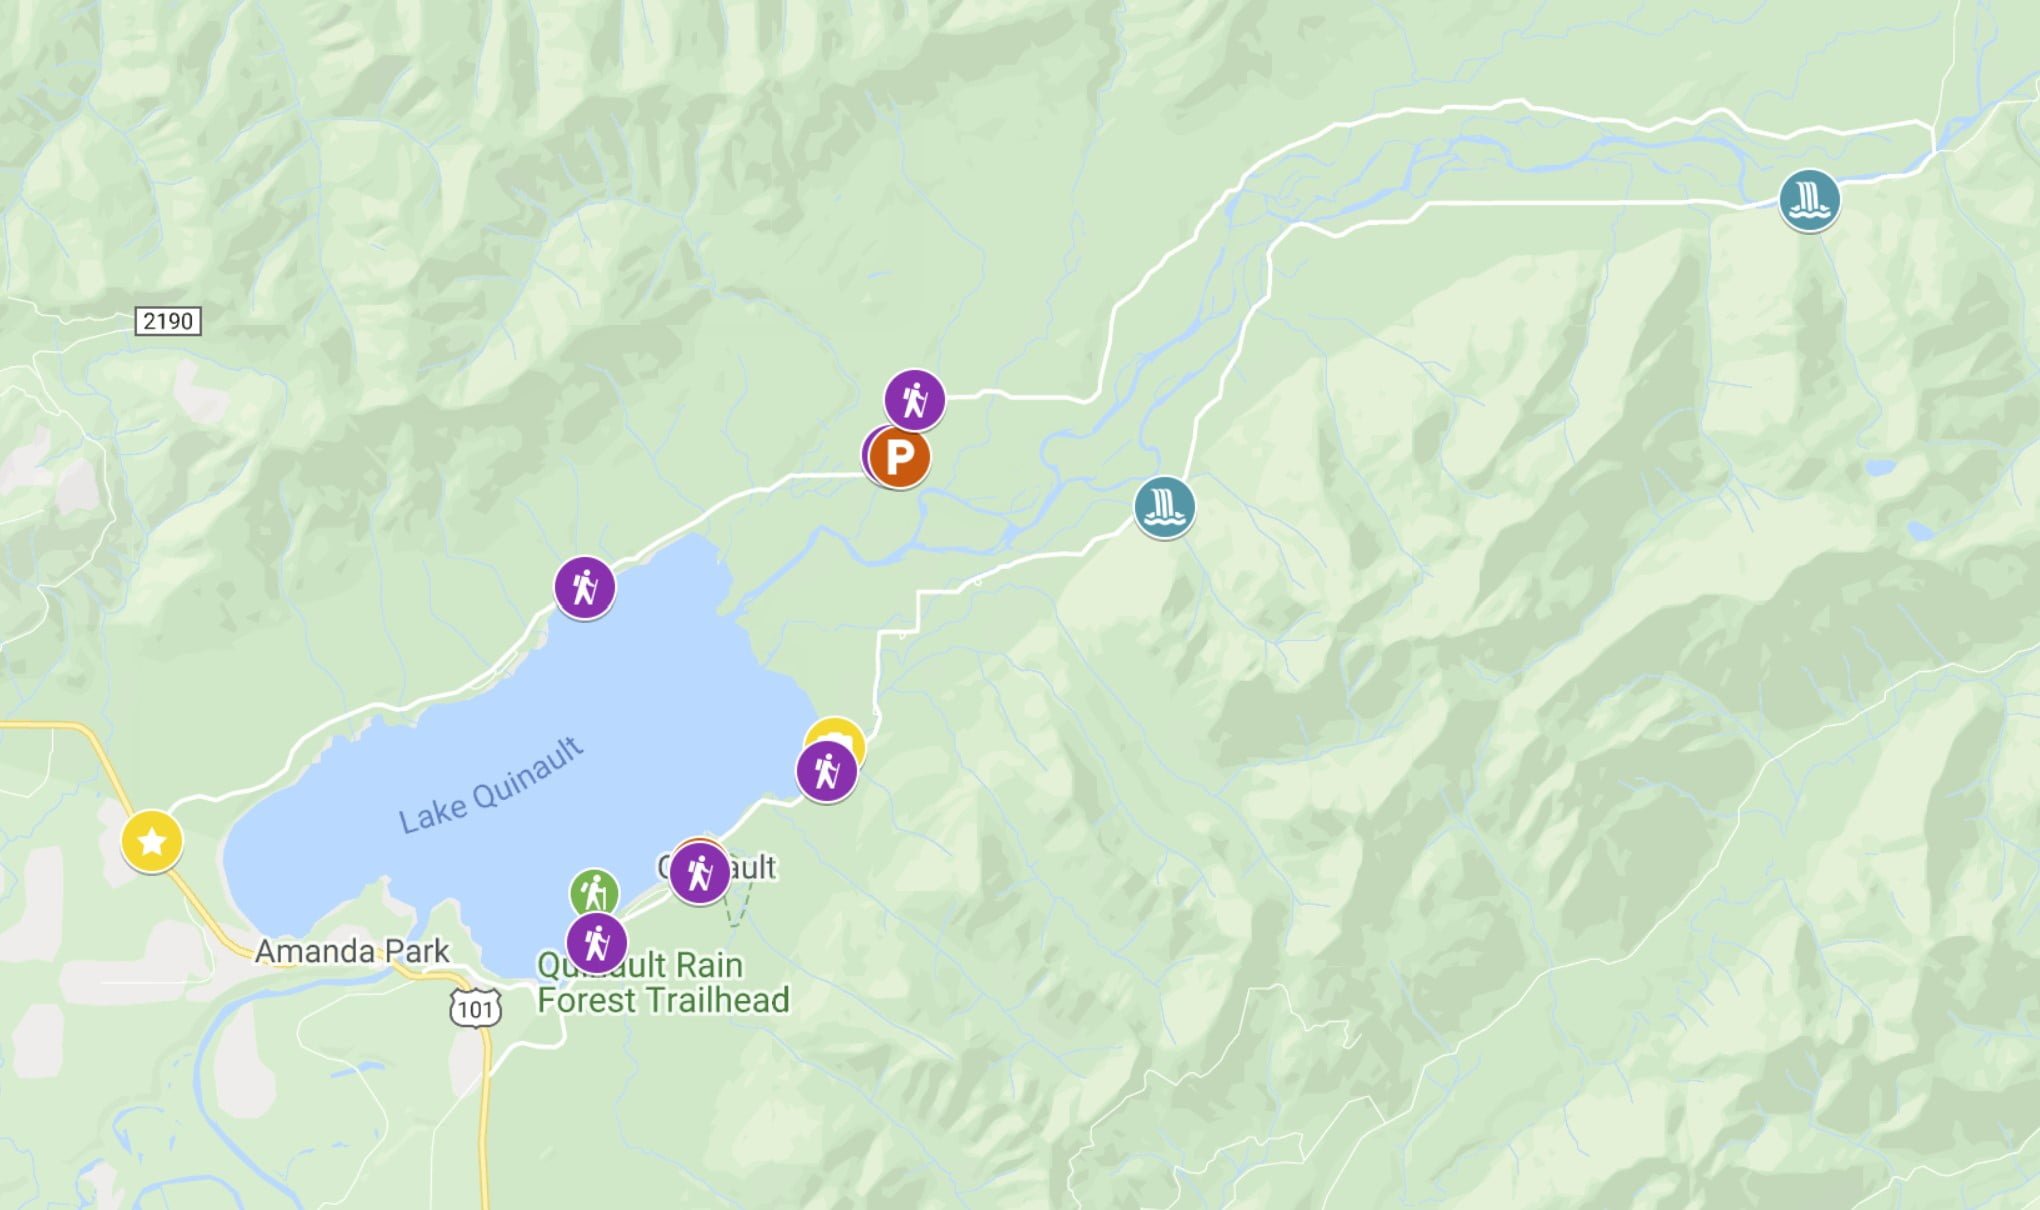
There are two starting points for the Gnomes Trail in Maple Valley.
279th Street Park: Maple Ridge Way SE, Maple Valley, WA 98038
Henry’s Ridge Open Space: 253rd PI SE, Maple Valley, WA 98038
I chose to start my hike at the 279th Street Park. However, you can also start the hike from the Henry’s Ridge Open Space trailhead off of SE 281st Way and 253rd Place SE.
Click on the map and see the two trailhead parking areas as well as the mapped trail routes. I recommend downloading the Google Map for offline use before leaving for your hike.
Google Maps will give you walking directions from whichever parking area you choose to start the hike. Google Maps displays the trail and shows you which path to take. You can refer to the map all along the way to make sure you’re on the right track.
Parking for the Gnomes Trail
Whether you choose to start from the 279th Street Park or Henry’s Ridge Open Space, just know that there is only street parking at both trailheads.
I found the 279th Street Park to have less traffic and more parking areas than at the trailhead for Henry’s Ridge Open Space. You can always go to one, and if you can’t find parking, then try the next trailhead. Refer to the above map for directions.
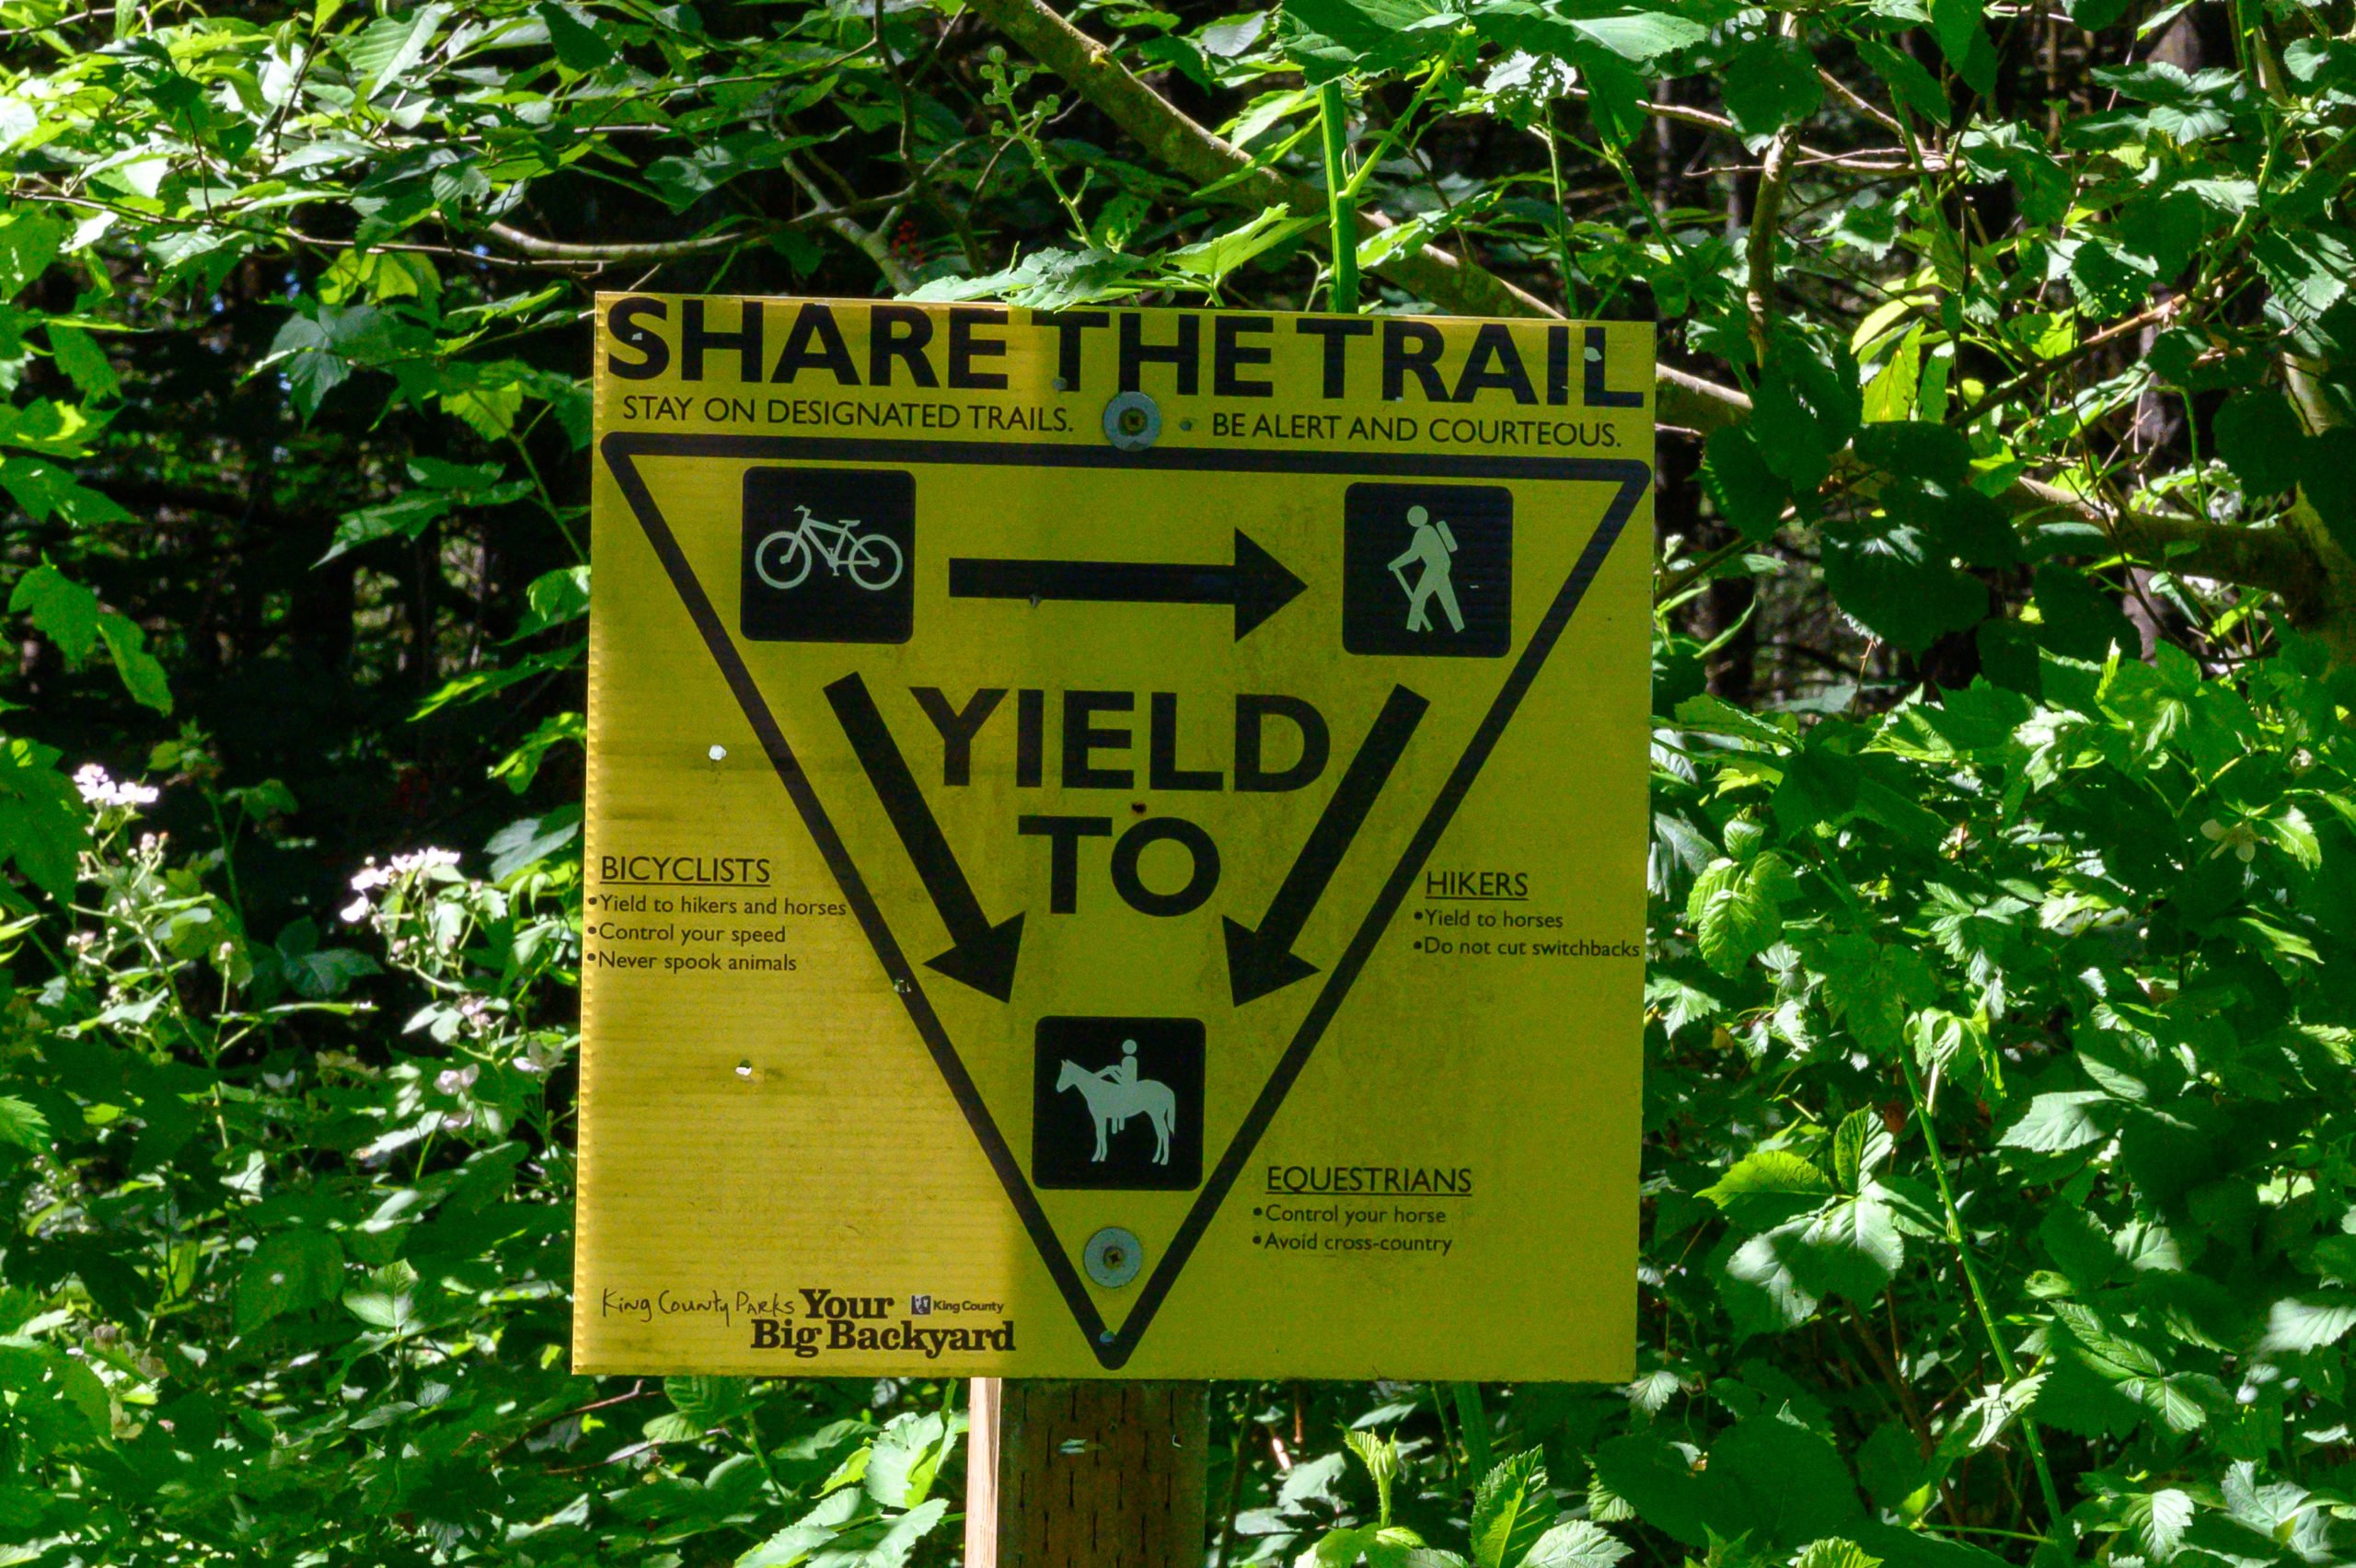
Sharing the Trail
The Henry Ridge Open Space is a multi-use trail system. This means that you are sharing the trails within this natural space with bicyclists, horses, and other hikers. So yield to horses and move over for the bicyclists. I know the sign says bicyclists should yield to both hikers and horses, yet, I find as a hiker it is easiest for me to move out of the way.
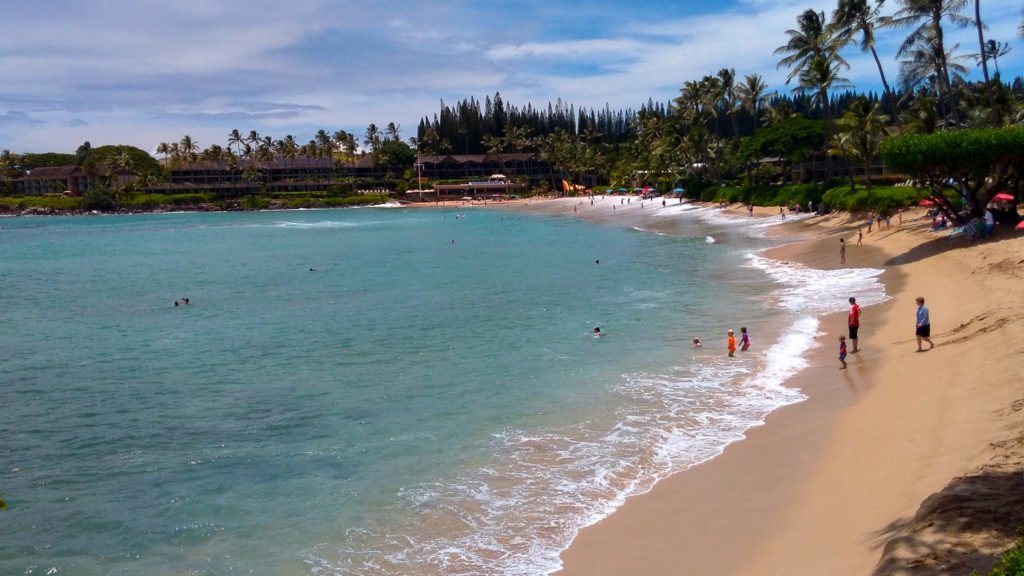
Hiking the Gnomes Trail in Maple Valley, WA
I started my hike from the 279th Street Park, but if you choose to start from the Henry Ridge Open Space trailhead, the directions are the same once you reach the Once Upon a Time trail.
It’s important to note that not all of the trails are clearly labeled, so use this guide to help you navigate. Additionally, download an offline map from Google Maps for directions before leaving home.
Route 66 and the Once Upon a Time trail (left). You make a left onto the OUAT trail if coming from Stinger or a sharp right if coming from the 279th Park.
Starting from the Henry Ridge Open Space Trailhead
You’ll access the trailhead next to the road and continue straight (pass the Old Mike trail) until you reach the Stinger trail where you’ll make a right. Follow Stinger until you reach a wide gravel trail, this is Route 66, turn right on to the path. In about 20 feet, you’ll cross the road and make a left onto the Once Upon a Time trail (OUAT). From here the directions are the same as if you were starting from the 279th Street Park.
Starting from the 279th Street Park
Park alongside the 279th Street Park and then cross the road to the trailhead. This gravel path is called Route 66 on the map.
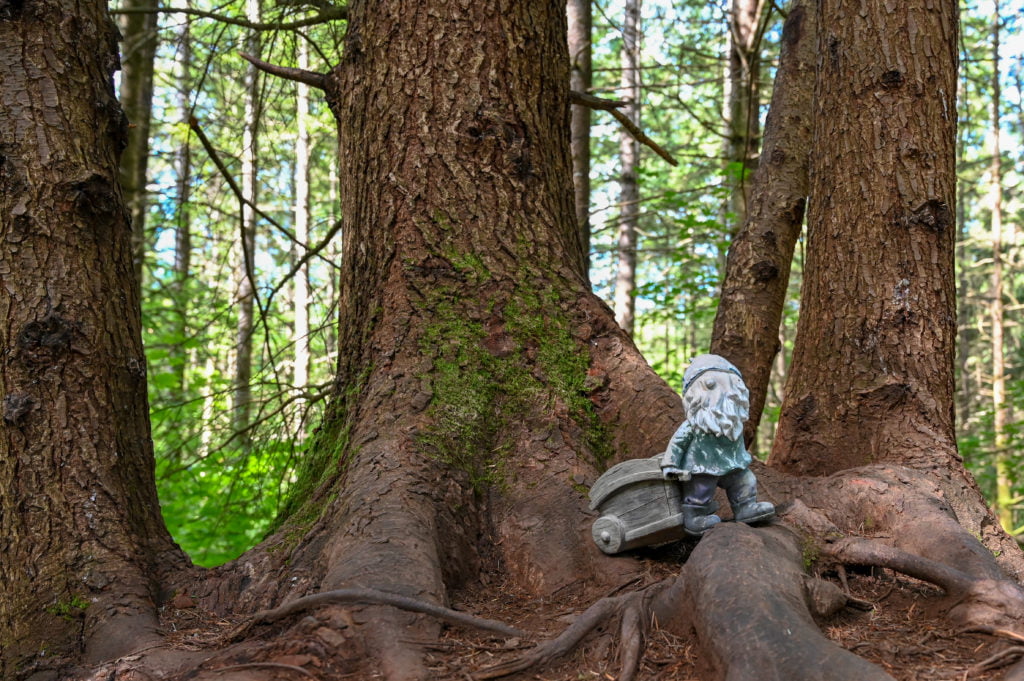
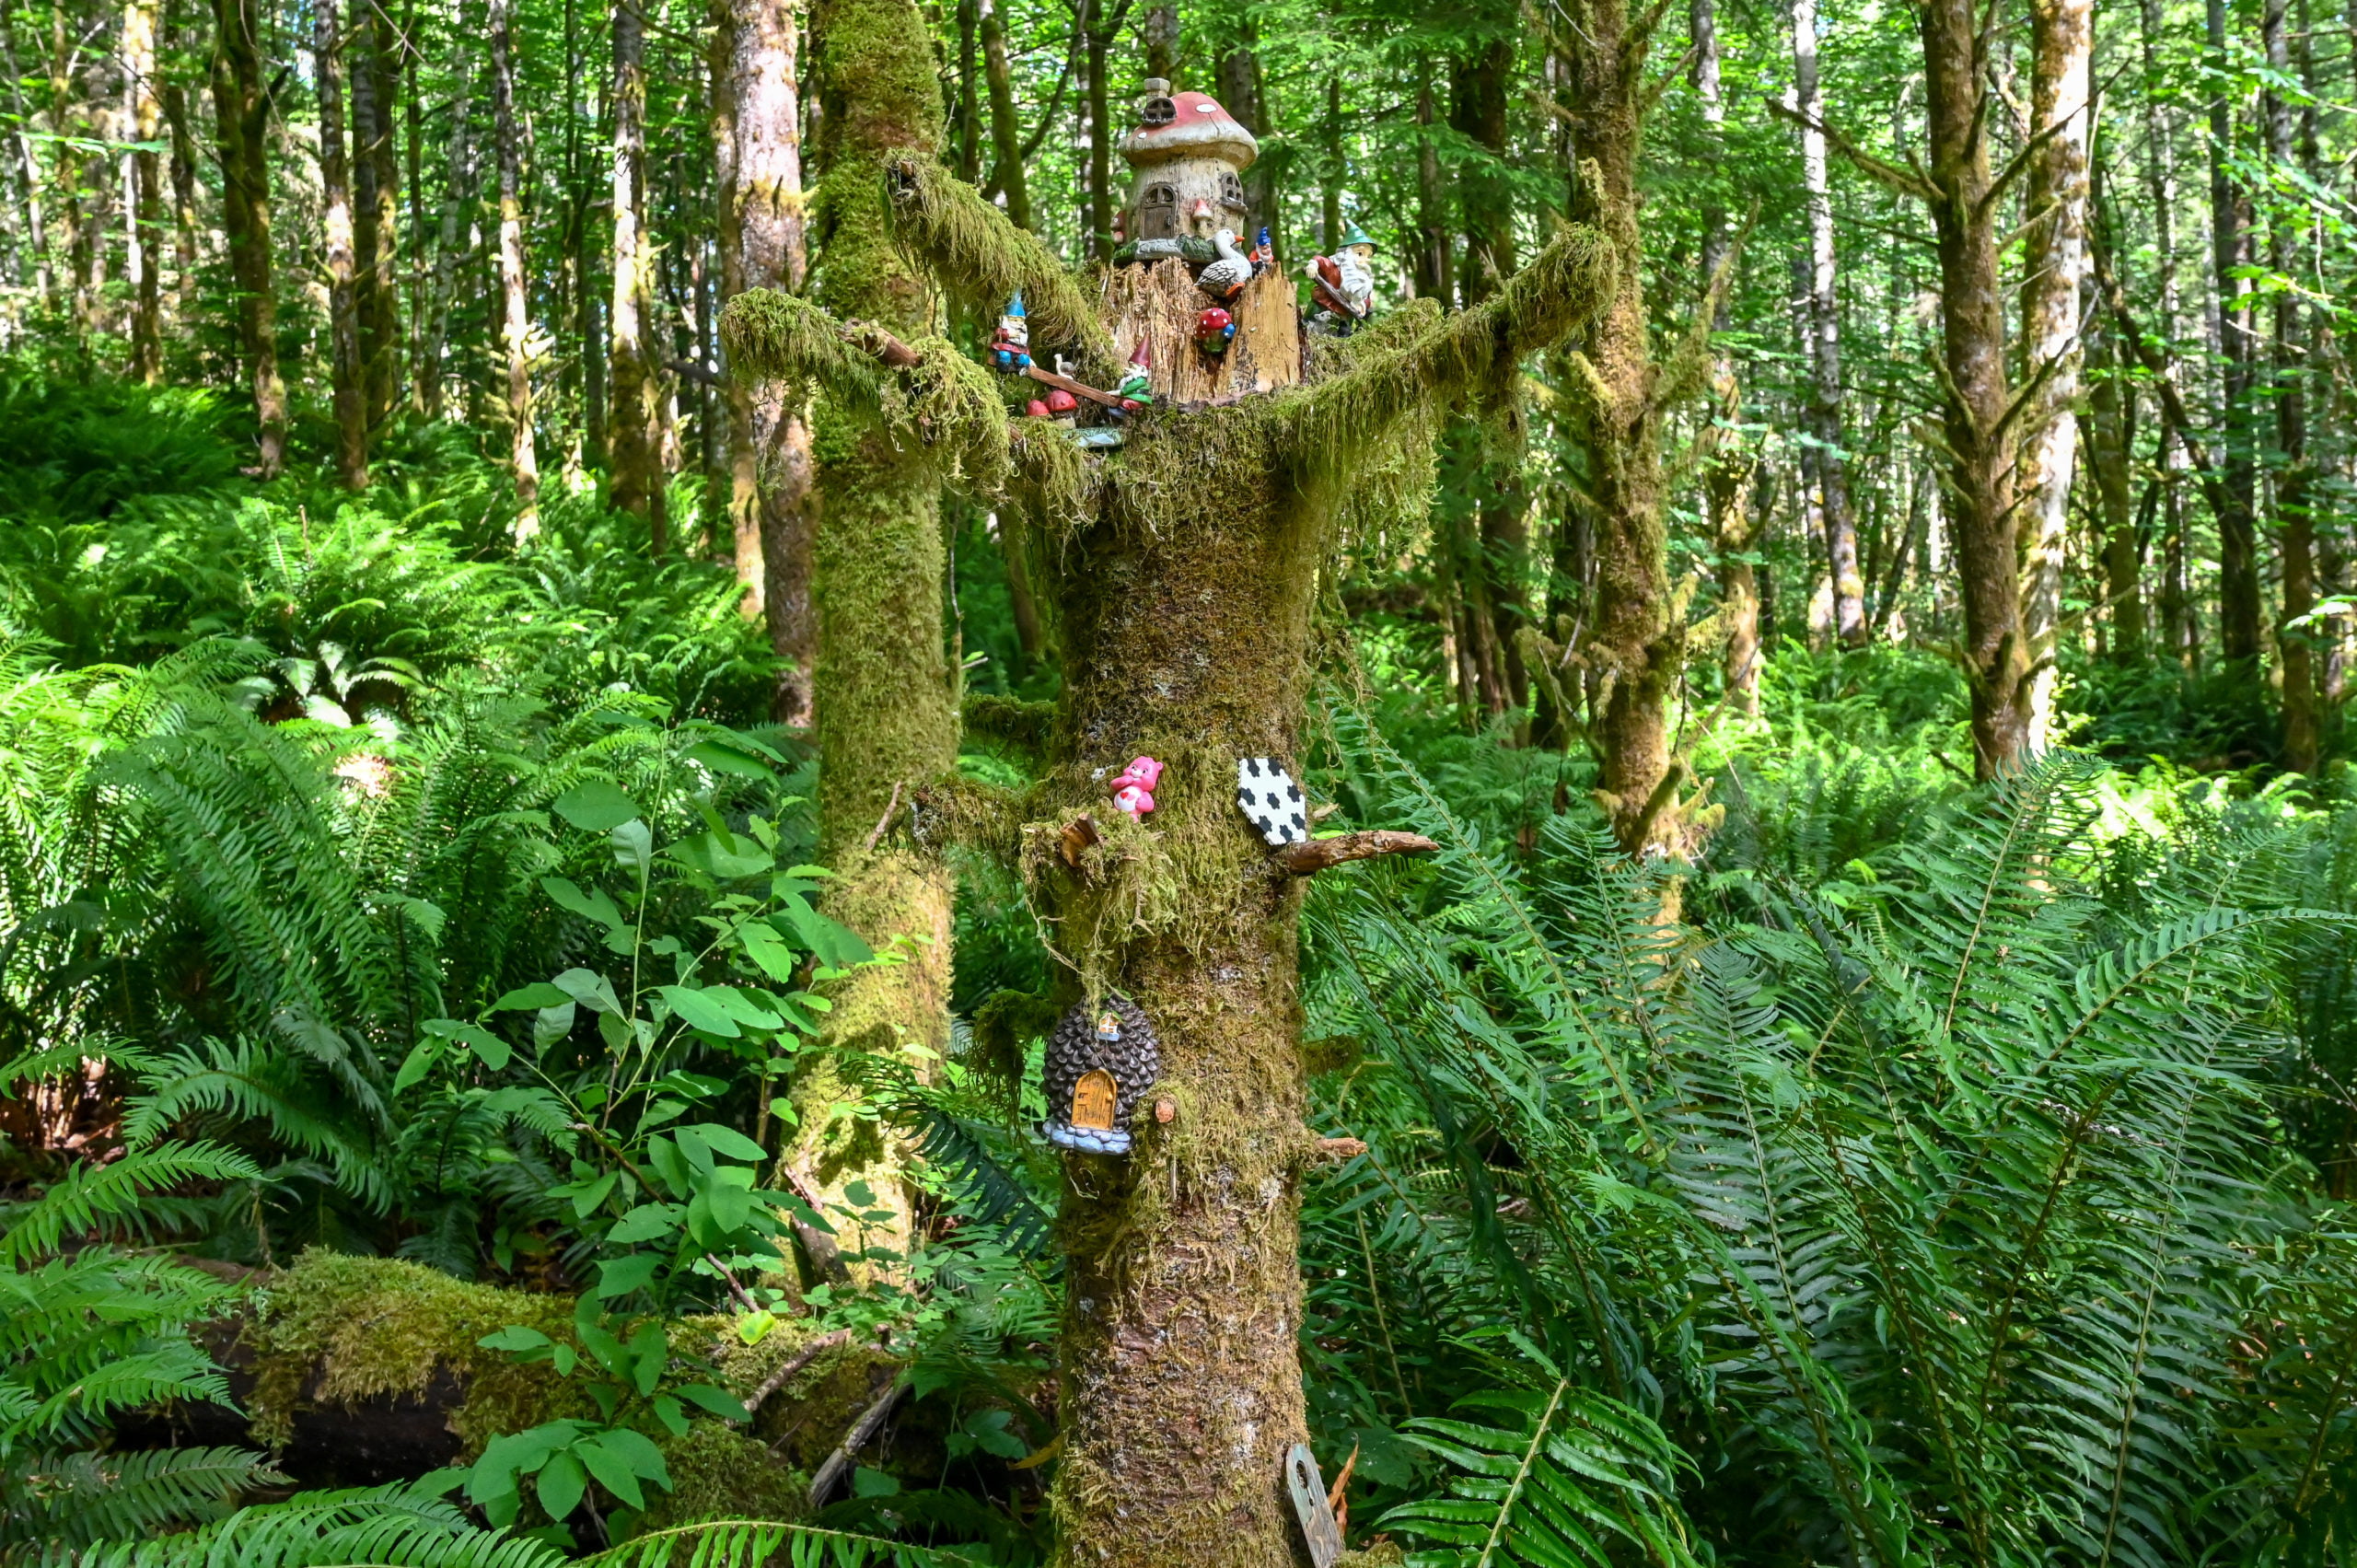
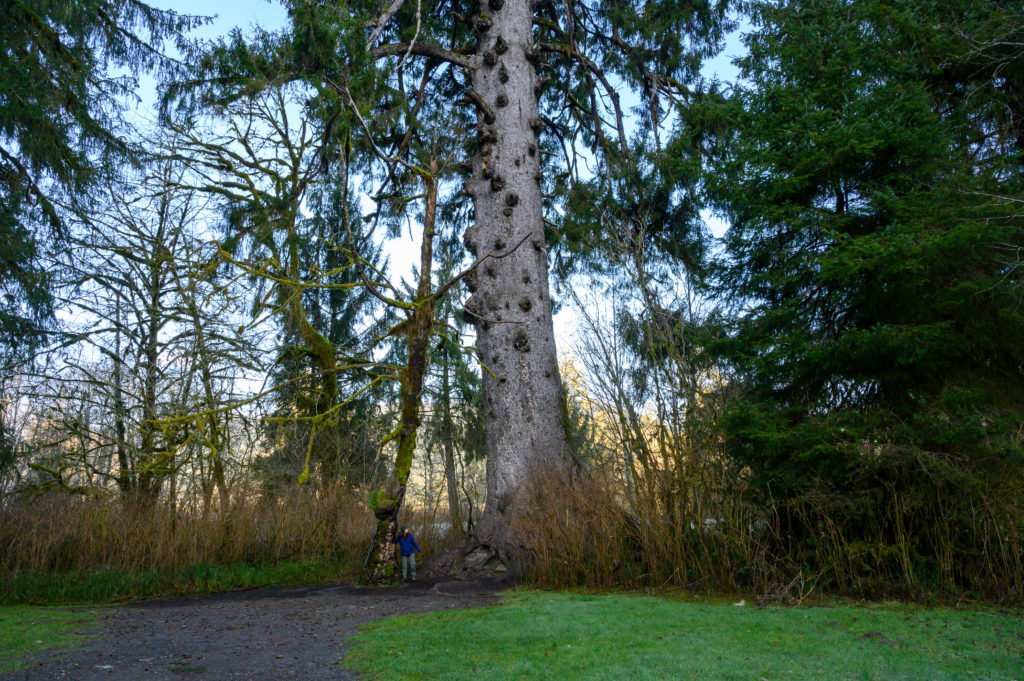
Follow Route 66 for less than a quarter-mile before making a sharp right onto the Once Upon a Time trail (OUAT). You’ll spot your first gnome shortly after starting this trail. I think he’s there to let you know you’re heading the right way.
This is the first gnome to greet you on your hike.
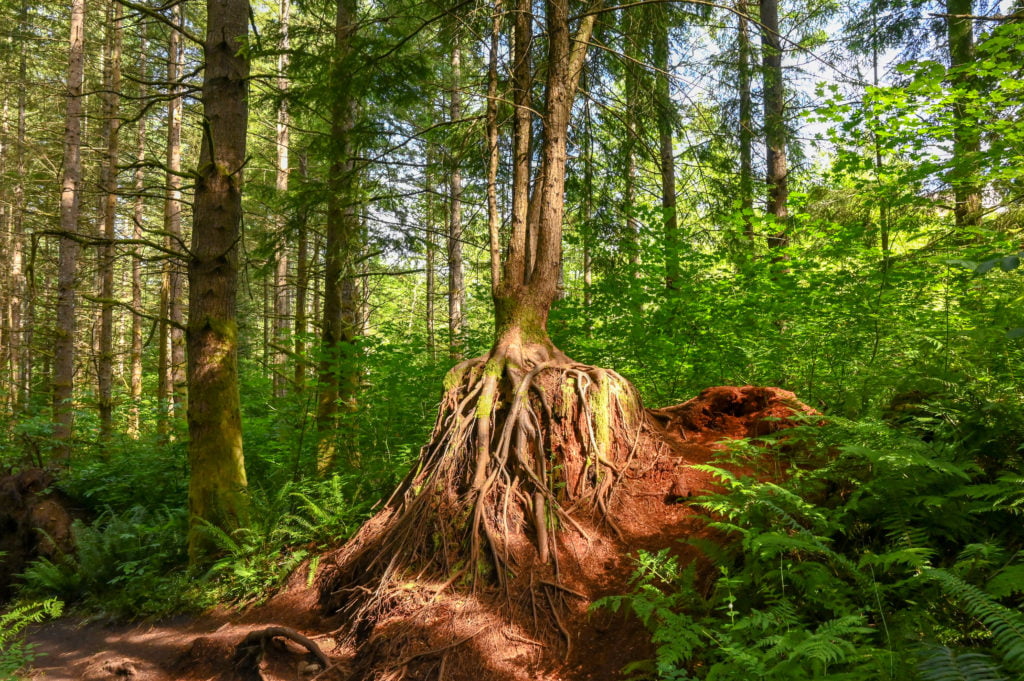
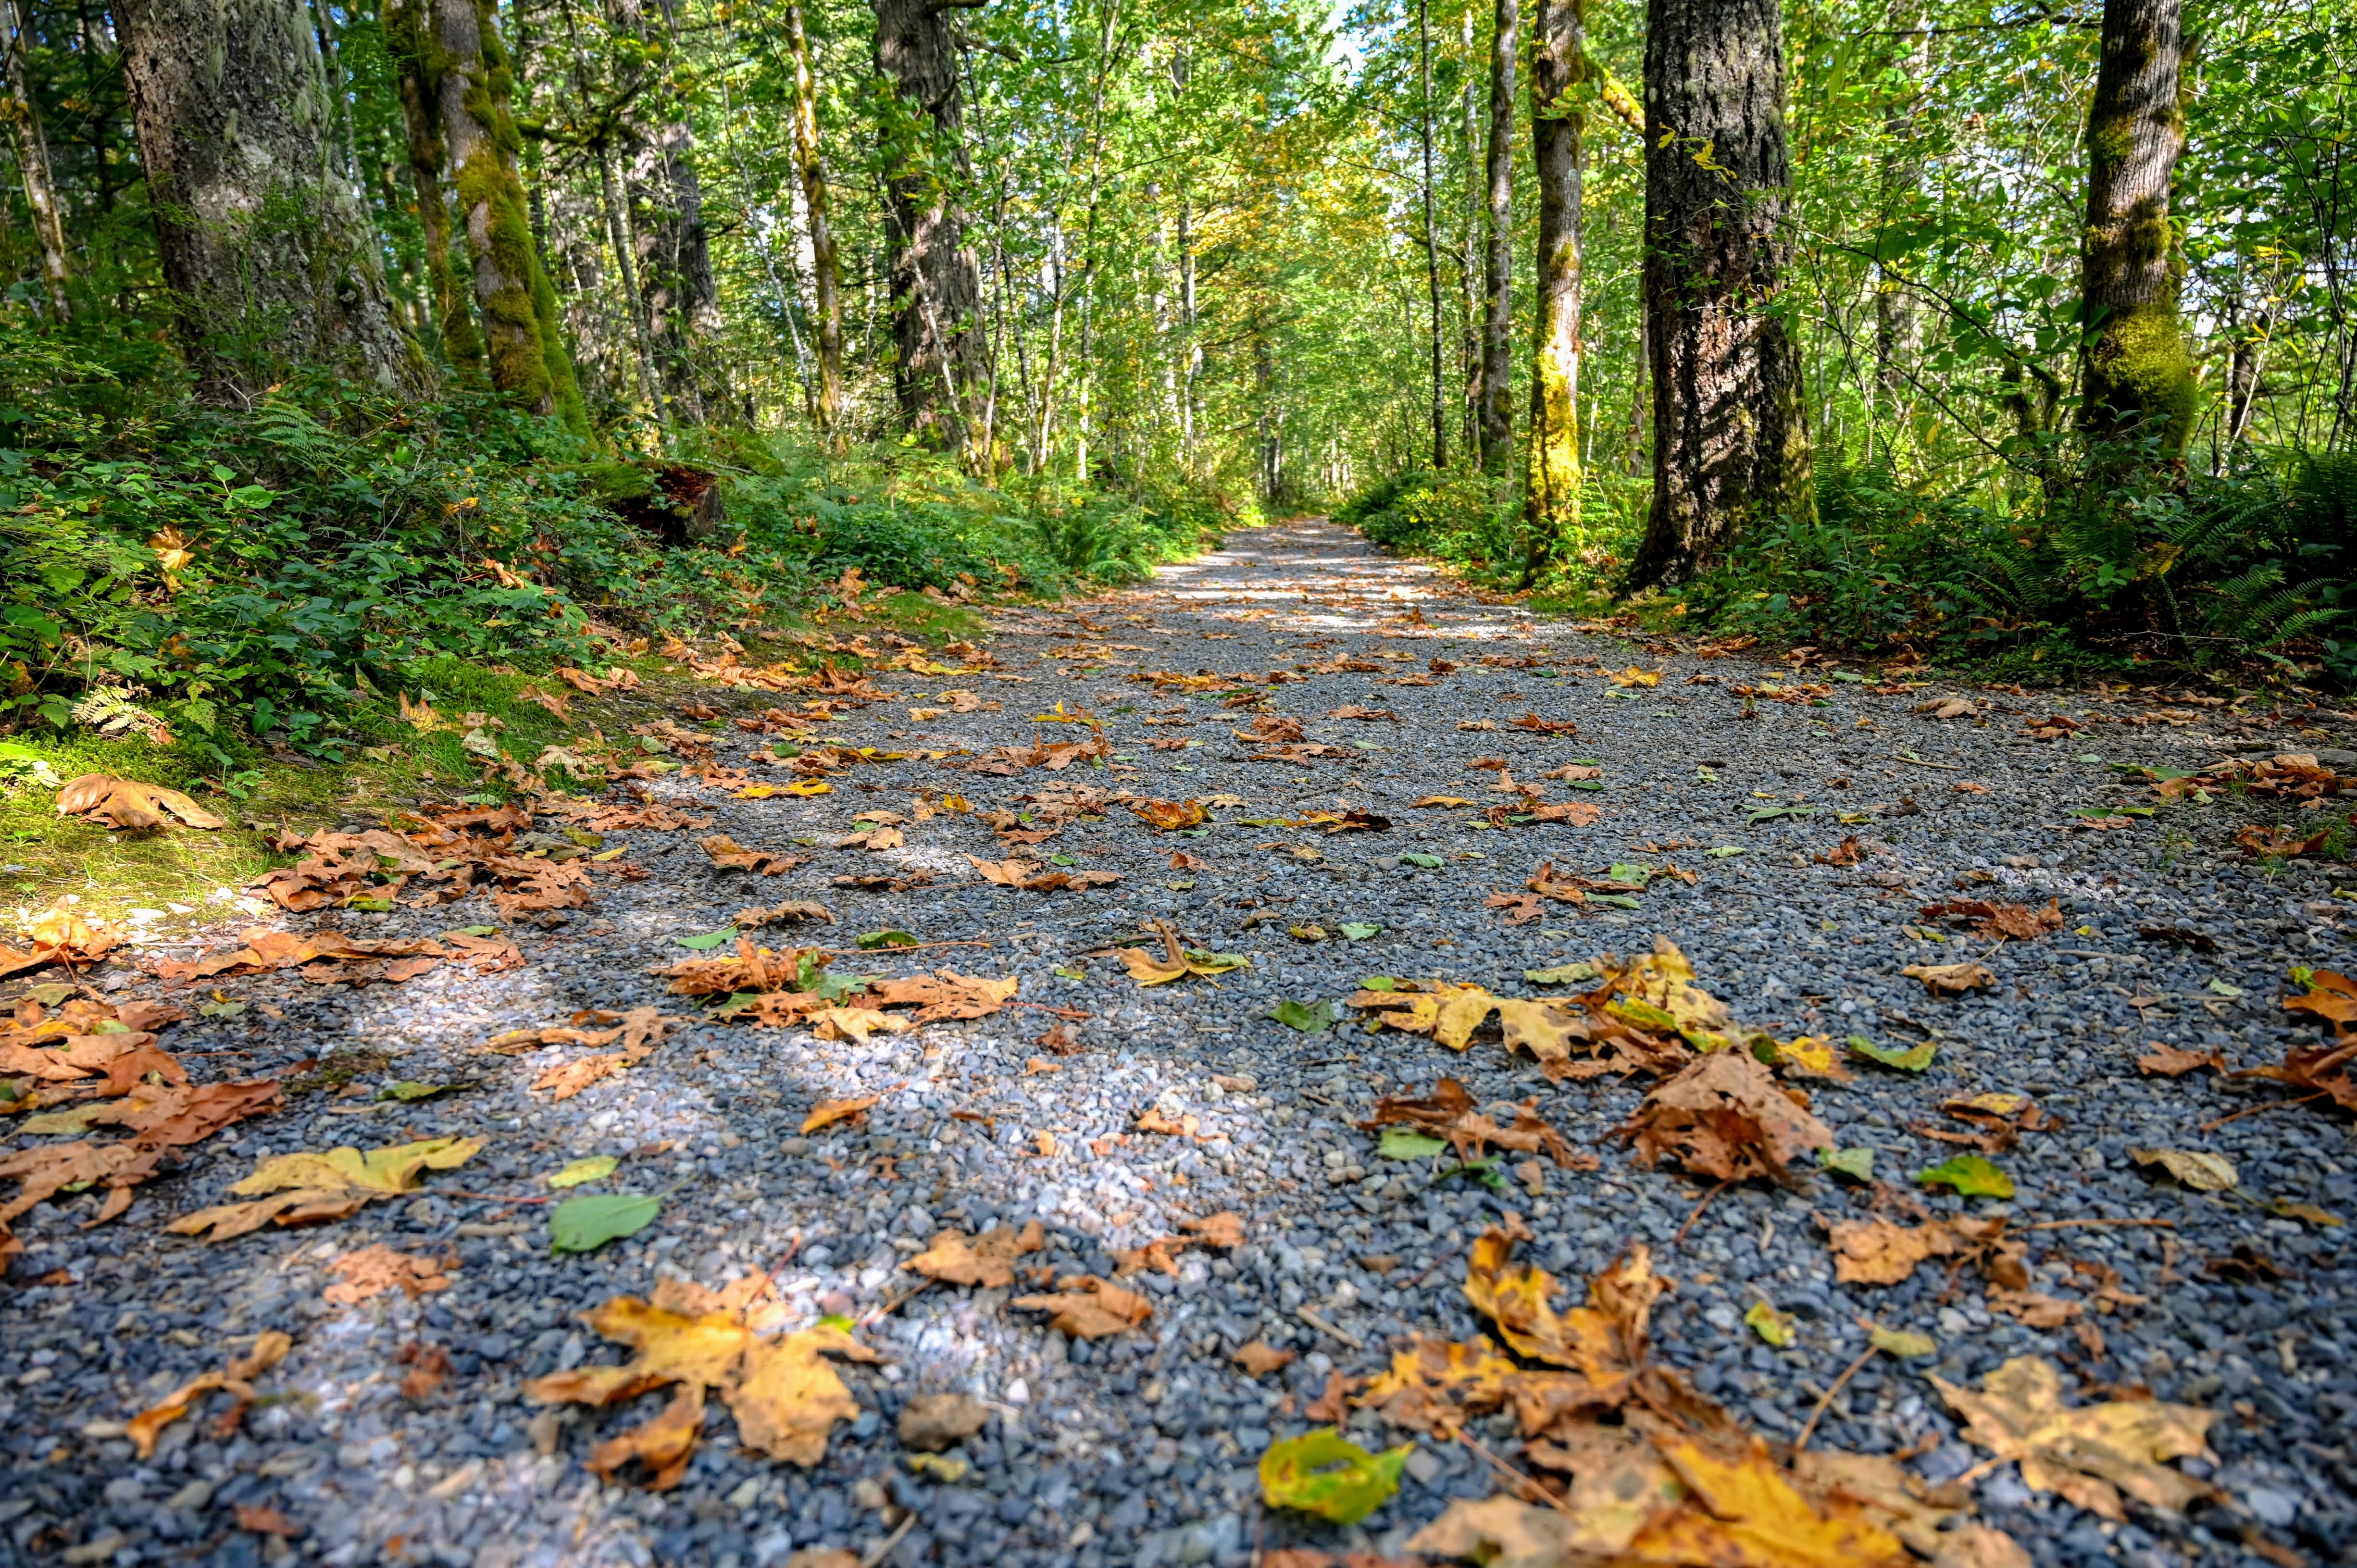
This portion of the hike is a dirt trail with rocks and roots here and there, but ample space to stop on the side to let people pass when needed. Enjoy the forest with its moss-covered trees and stumps left from larger trees that once grew there.
I liked this tree growing over the old stump.
The Derailer Trail and Two Choices
Eventually, you’ll come to a fork in the path, and if you look right, you’ll see a diamond-shaped sign and a sign above it that reads “Derailer.” You can go right or left here.
If you go right on the Derailer trail, you will follow the path as it loops around and links up with the Lorax trail. Make a right onto the Lorax trail. (Skip to the asterisk (*) past the directions for making a left to continue.) (The instructions from that point on are the same whether you make a right or left at the Derailer fork.)
If you go left at the fork where you see the Derailer trail sign, you will continue a short way down the trail before reaching another fork in the path. Make a right here to continue on the OUAT trail (Bad Wolf is to the left). In about 250 feet you’ll make another slight right onto the Lorax trail (I don’t recall seeing a sign). You’ll continue down the Lorax trail and soon pass the fork for the Derailer loop, just stay to the left.
*Continue along the trail, and soon you reach a footbridge made out of a fallen tree. There are two bridges, I stuck with the larger one on the left, but both link you back to the same trail.
Cross the bridge and follow the path as it curves left; shortly up ahead, you’ll see the welcome sign for the Gnomes trail.
The Gnomes Trail
Take the Gnomes trail on the right and stay right to follow the trail’s loop. The Gnomes trail loop is around 0.5 miles.
At the entrance to the Gnomes trail, you’ll find a welcome area and a trailhead sign. Continue up the path enjoying the gnomes scattered everywhere. Make sure to look up in the trees and under shrubs. You could make it a game for the kids to see how many gnomes they can find.
Speaking of games, there is also a geocache hidden not too far from the entrance to the Gnomes trail. If you’ve never been geocaching, it is a lot of fun for kids and adults alike! You can download the app and look up geocaches near you to find more.
Click on the photos below to view a larger image. These are some of the signs that greet you near the entrance of the trail.
The Gnomes trail loop is a series of switchbacks curving right and left and then right and left again as it winds its way up, and then down, and then back up before looping you down and around to the main entrance of the Gnomes trail.
You see a huge variety of gnomes in the first part of the trail, there are even a few fairies, dwarfs, and I also spotted a troll. The gnomes appear to enjoy many of the same activities we do, such as camping, sports, gardening, and so on. You’ll have fun spotting all the unique gnomes along the way.
Here are some of the ones I found during my hike. Make sure to visit and discover your favorites too!
After the first series of switchbacks, you find yourself back near the main entrance, however, the trail curves right here and begins climbing up again. The gnomes will appear less and less as you continue along this portion of the trail.
You’ll pass another trail junction, make sure to stay left, and soon you’ll come to a “T” in the path where you’ll make a left onto what is called the Ogre trail. Soon you’ll see a fork on the right for the Ogre trail but continue straight and don’t turn right where you see the sign that reads “Ogre.”
You’re looping back, so you’ll want to stay left, and soon you will be back at the main entrance to the Gnomes trail. From this point on, you backtrack the way you came to return to your parking spot.
Useful Information to Know
There are no restrooms at either the parking areas/trailheads or anywhere along the trail. So make sure to take a pitstop before you come.
The hike is a little over 2 miles roundtrip, and it took me a little over an hour to hike it. If you have small kids or a large group, plan for it to take 1.5 to 2 hours for the roundtrip hike.
The Gnomes trail is an easy hike with minimal elevation gain, but it is narrow in spots with rocks and roots and overgrown bushes along the way. So wear the appropriate shoes, and if you have any mobility issues, you may want to bring a hiking stick.
The trail is too narrow in most spots to accommodate a stroller, so plan accordingly.
Dogs are allowed, but make sure to pack your poo out as there are no garbages along the trail. This goes for all trash. This trail system is within a neighborhood, and we must be respectful of the community and the trails.
Bring bug spray! The mosquitos were quite bad on the trails, and I sadly forgot to apply bug spray before leaving.
Download an offline map through Google maps of the area, and Google can give you walking directions for the trail. You can also use any favorite maps apps you might have, such as AllTrails or BackCountry Navigator, if you want to track your hike.
The Henry’s Ridge Open Space trails are designed in loops. So don’t panic if you do take a wrong path as it will link up with another one. There are multiple ways to get to the Gnomes Trail. I am only sharing a couple of options.
Recommendations for a Post Hike Treat
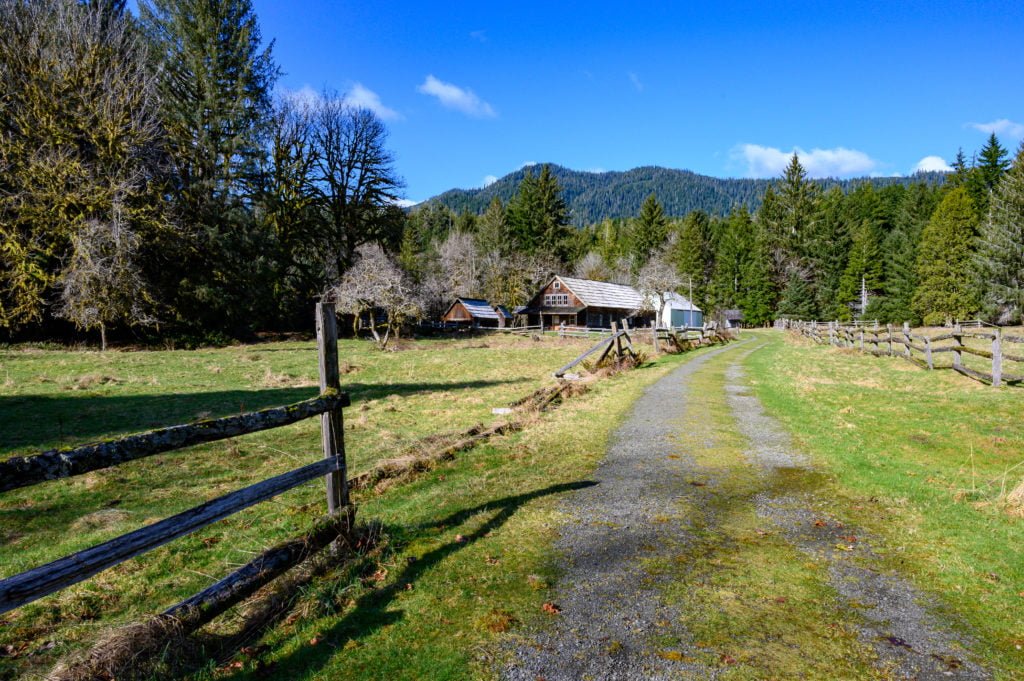
If you’d like something refreshing after your hike, why not head to Dairy Queen for a delicious ice cream treat or perhaps go through Gravity Coffee’s drive-through for a little pick-me-up for the ride home. I’ve marked both of these on the map at the beginning of this post. There are a ton of other options for food in the Maple Valley/Four Corners area if you want to grab a bite to eat.
Dairy Queen 23924 SE Kent Kangley Rd, Maple Valley, WA 98038
Gravity Coffee 23912 SE Kent Kangley Rd, Maple Valley, WA 98038
I’d love to hear from you if you have hiked the Gnomes trail and what you thought about it. If you have any questions, please feel free to send me an email or post them in the comments section below.
For more hikes in Washington read the following posts:
The beauty of the Quinault rainforest is something you need to see for yourself. It is breathtaking! The good news is, there are a lot of excellent choices for hikes around Lake Quinault, no matter your skill level. Whether you have younger kids or are just a beginner hiker, these Lake Quinault hikes offer you gorgeous displays of the area’s natural beauty with minimal effort.
Additionally, the drive around Lake Quinault is a beautiful adventure on its own. So, if you are unable to do any hiking at all, consider making the drive around the lake instead. In this post, I go over some of the easiest and most accessible hikes around Lake Quinault. The scenic drive around the lake combined with a hike in the Quinault rainforest will be a day you’ll never forget!
Quick Overview of Rainforests
We are very fortunate here in Washington state to have a part of the largest temperate rainforest ecosystems in the world, right in our own Olympic National Park. According to National Geographic, rainforests are Earth’s oldest ecosystems and home to over half of the Earth’s plant and animal population!
The Olympic National Park covers almost 1 million acres and includes some of the most well-preserved temperate rainforests in North America. For those of us living in Seattle, we have something truly unique in our own backyard–we shouldn’t take that for granted. Instead, we should explore it and protect it.
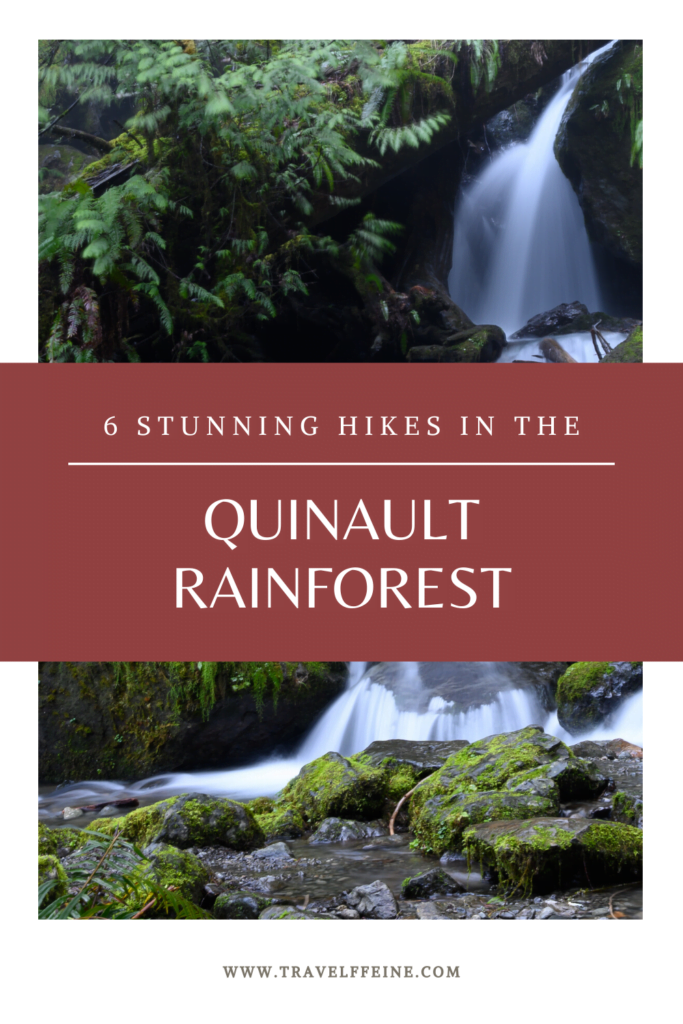
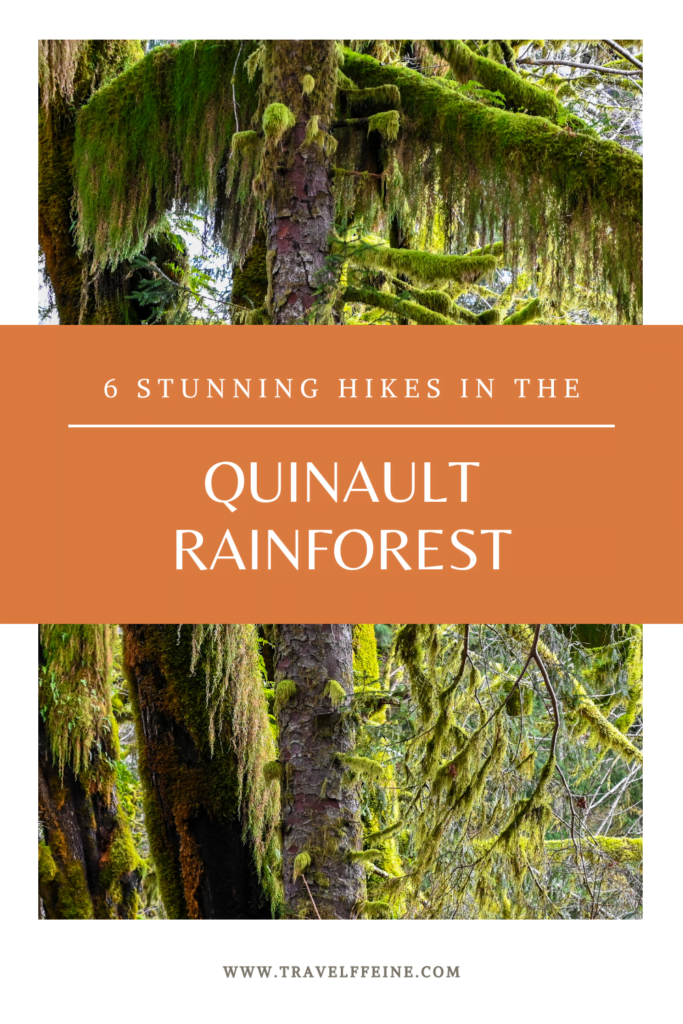
6 Easy Beautiful Hikes in the Quinault Rainforest
1) Maple Glade Rainforest Trail
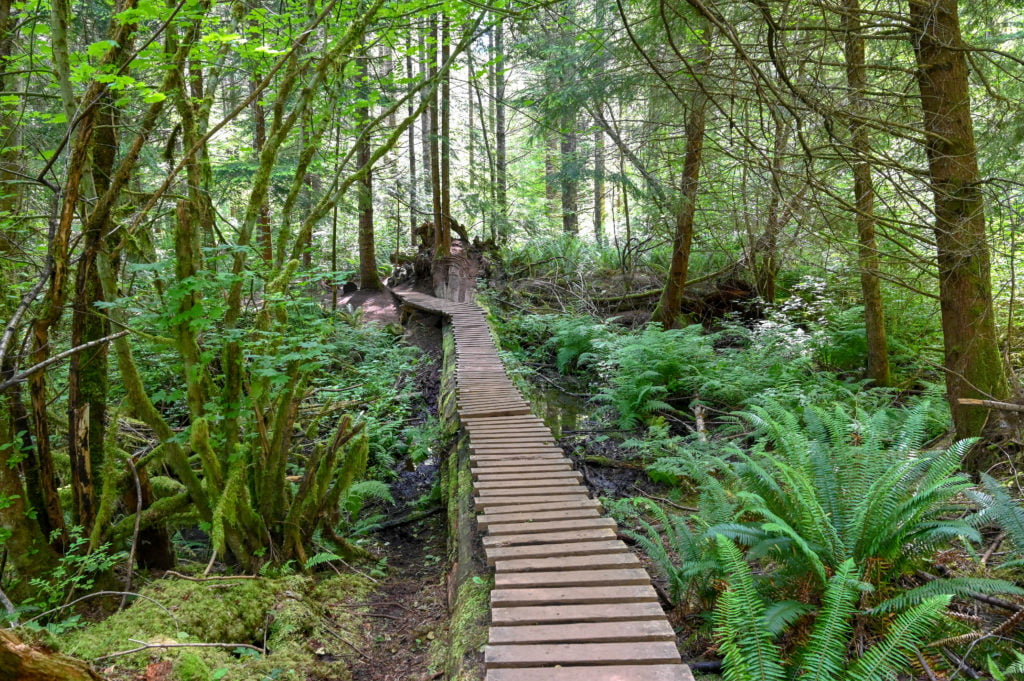
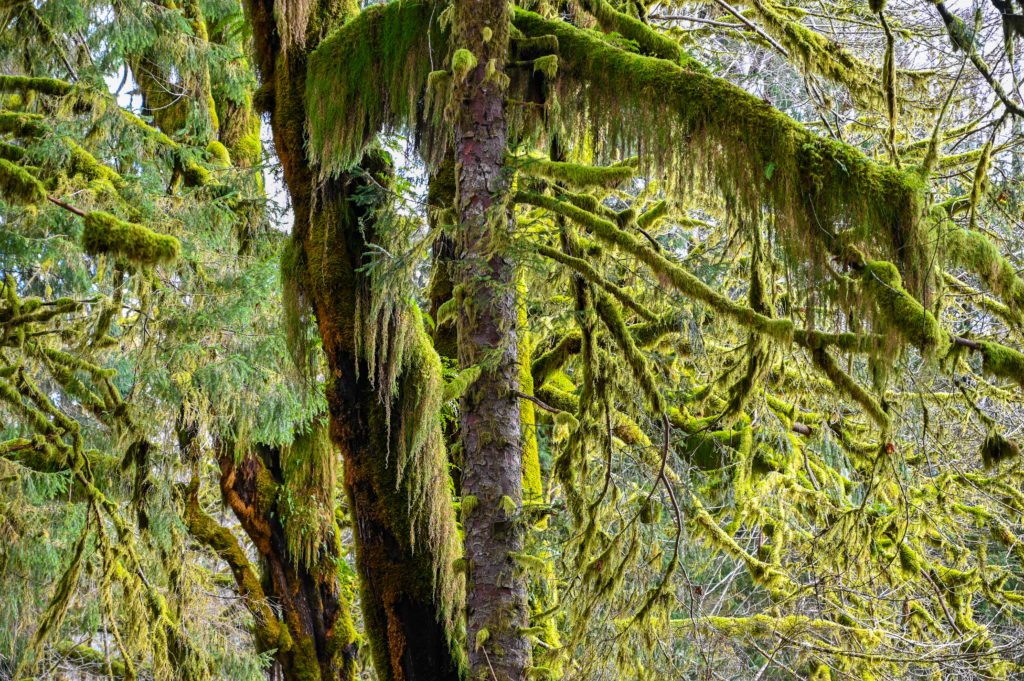
This short 0.5 mile loop trail is probably my favorite out of all of the Quinault rainforest hikes I list in this post. I felt like I entered another world. It was as if I was on the set of Avatar or Endor, the forest moon inhabited by Ewoks. The wonder and beauty of the rainforest all in this short 1/2 mile walk.
Walking the Trail
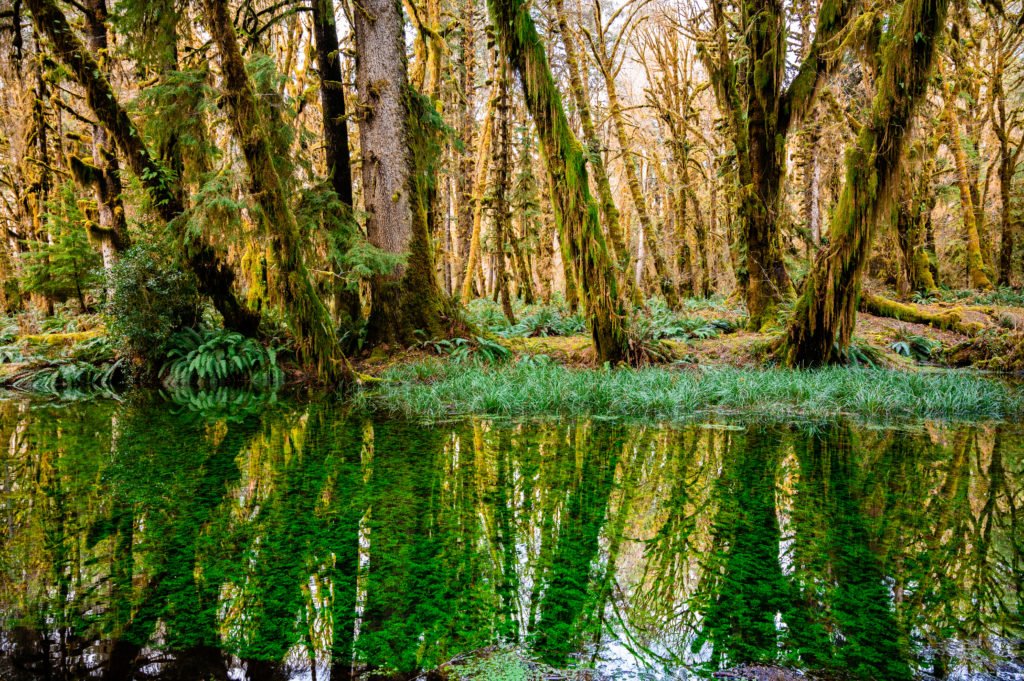
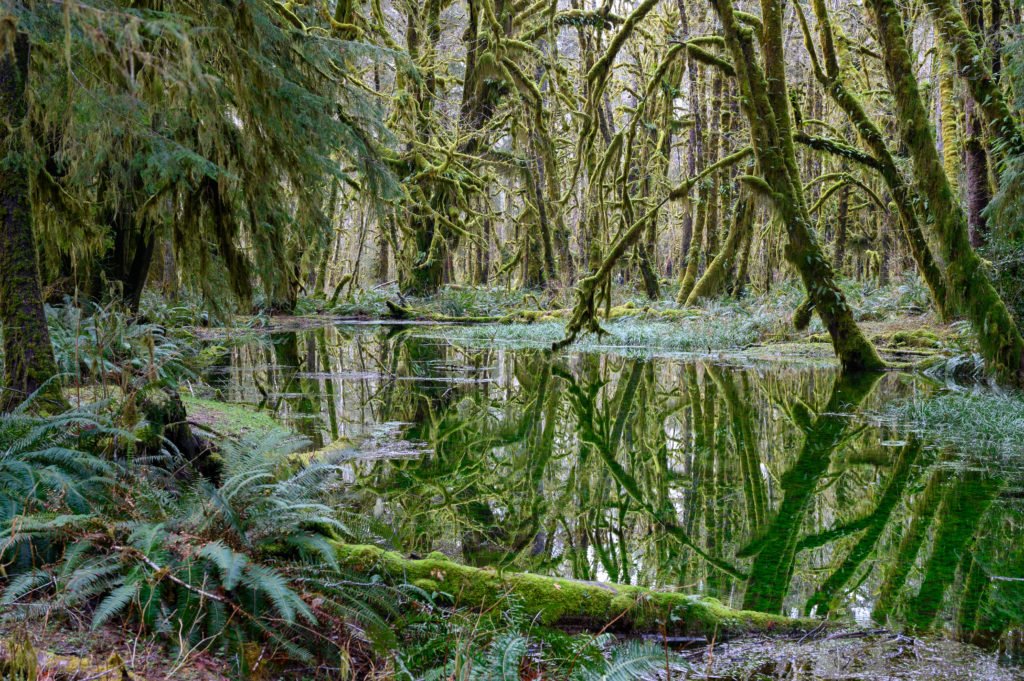
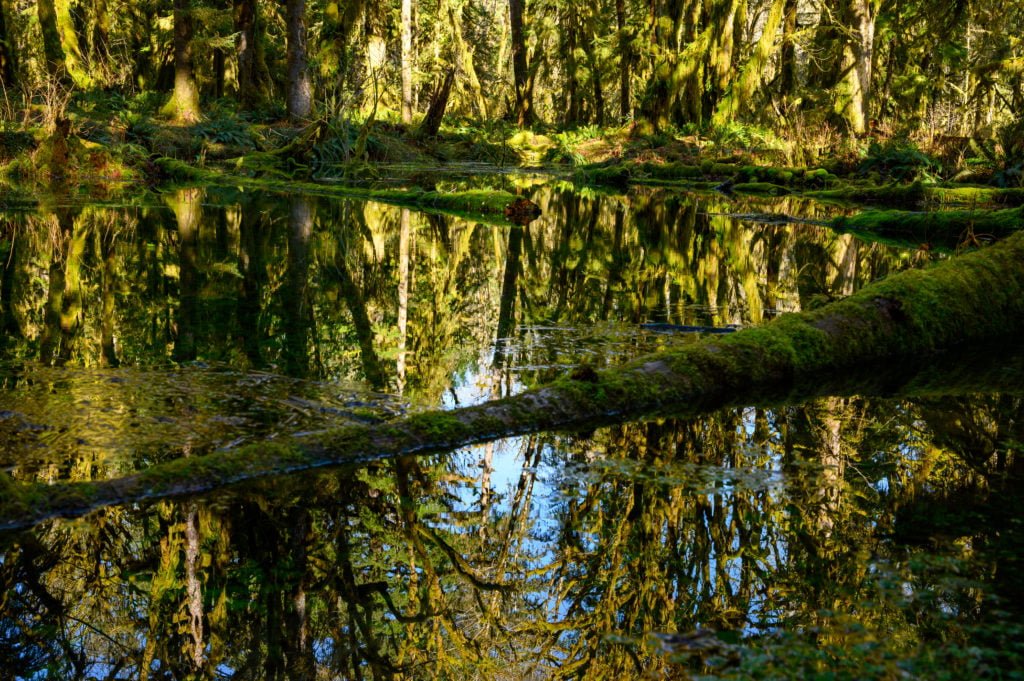
You’ll start by the Maple Glade Rainforest sign and walk across the wooden bridge to begin. Follow the trail as it curves left and winds its way past giant Western hemlocks and redcedar trees. Soon the path meanders around and then curves left where it opens up alongside a small body of water. This bog or pond, or whatever it is called, most likely connects to the Kestner Creek.
This is the area of the Quinault rainforest, where I feel as though I’ve entered another planet. There are mossy trees everywhere, forming an emerald canopy overhead, and small green plants that live under the water make it appear as a bright green pool of liquid. I really can’t describe it justly, you’ve got to see it for yourself. It is one hike I’d do on any day, rain or shine. It is stunning.
The trail loops around to the left and circles back to the trailhead. However, you can fork to the left and hike to the Kestner Homestead if you’re up for it. See my notes on this hike below. Make sure to stop and sit on the trail bench as you make your way back to the parking lot. The Maple Glade Rainforest trail deserves a slow meandering pace, filled with a lot of gazing upward in awe at the staggering beauty surrounding you.
Accessibility
This trail is marked as an accessible trail, although not fully meeting ADA accessibility guidelines. It is a flat trail with no real elevation change. However, when I hiked it, the path was not wide enough to push a wheelchair through it, plus it gets muddy due to all the rain. So, it’s certainly a flat, easy trail, that one can take very slowly, perhaps with a cane, but probably not with a wheelchair.
Getting Here
Turn onto N Shore Rd from US-101. There is a small grocery store on the corner where you turn. Then stay on N Shore Road for about 5.5 miles. You’ll see the turn for the Quinault Rainforest Ranger Station and trailhead parking on the left. The Maple Glade Rainforest Trailhead is also shared by the Kestner Homestead Trail, which I discuss below.
Facilities
There are accessible toilets by the Quinault Rainforest Ranger Station as well as picnic tables. The ranger station is only open part-time during the summer when it is; I recommend you go in and speak with the rangers on staff to learn more about the area.
2) Kestner Homestead Trail
The Kestner Homestead Trail is a 1.5-mile loop trail that starts from the parking lot at the Quinault Rainforest Ranger Station. The trailhead parallels Kestner Creek to the right, with the Maple Glade Rainforest Trail on the left. Look for salmon in the creek before starting the trail. I saw two huge salmon here when I visited in February. If you combine this hike with the Maple Glade Rainforest trail, it is about 2.0 miles roundtrip.
The Kestner family moved here in the late 1800s, and the homestead has a variety of structures left behind from these early homesteading days. There is also a large picnic area underneath one of the large barn-like structures—lots of space for kids to run around and explore.
Tip: If you don’t want to hike the 1.5 miles loop to the Kestner Homestead, you can also make a left out of the Quinault Rainforest Ranger station parking lot and follow the road about 0.5 miles.
You’ll see a small parking area on the left-hand side of the road near a gate. You can park here and then walk to the Kestner homestead from here. This option is wheelchair friendly as you have a wide dirt road and open paths that will easily accommodate a wheelchair.
Getting Here
Turn onto N Shore Rd from US-101. There is a small grocery store on the corner where you turn. Then stay on N Shore Road for about 5.5 miles. You’ll see the turn for the Quinault Rainforest Ranger Station and trailhead parking on the left.
Facilities
There are accessible toilets by the Quinault Rainforest Ranger Station as well as picnic tables. The Kestner Homestead does not have any toilet facilities, but it does have a picnic area.
3) July Creek Trail
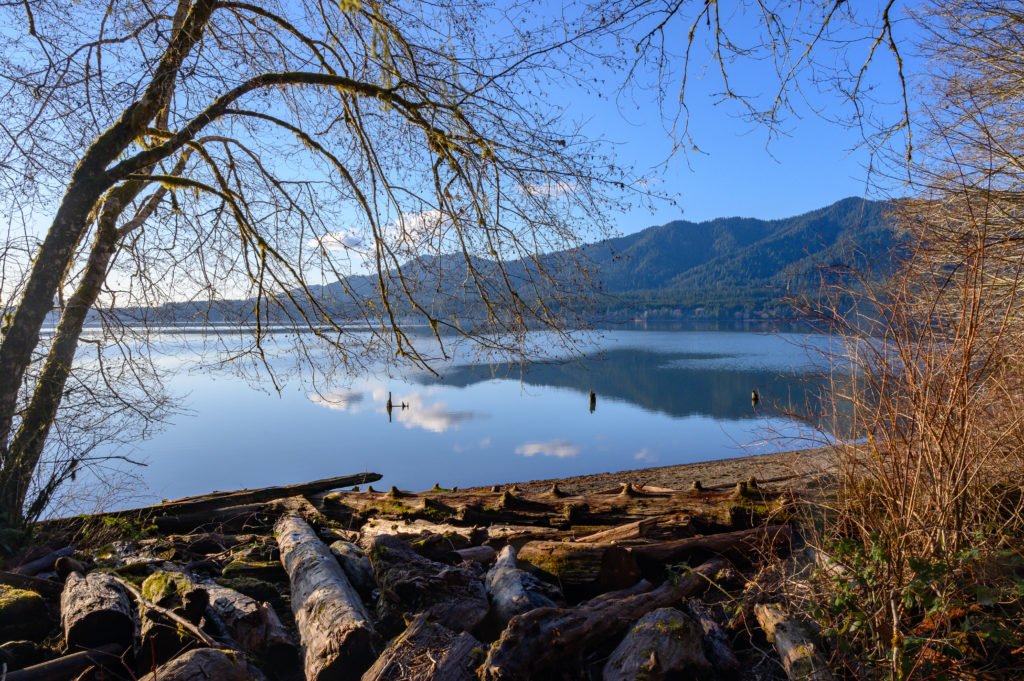
This loop trail is at the July Creek Picnic Area about 3.5 miles down the North Shore Road when coming from US-101. You will see the parking area for this day-use picnic area on your right. It’s a very short “hike,” but I feel that the giant trees you find here make it well worth your time! You also have access to Lake Quinault from the picnic area.
It is a great place to enjoy a picnic by the lake or to take the short hike past towering Douglas firs and cedar trees. As you continue down the trail, past the main picnic area, you’ll cross July Creek and pass a few more picnic areas with views of the lake before the trail connects with the road.
You can walk up the road back to the parking lot from here, or, turn around and loop back up the side trail you passed earlier when crossing the creek bridge, and this will connect you back to the parking lot as well.
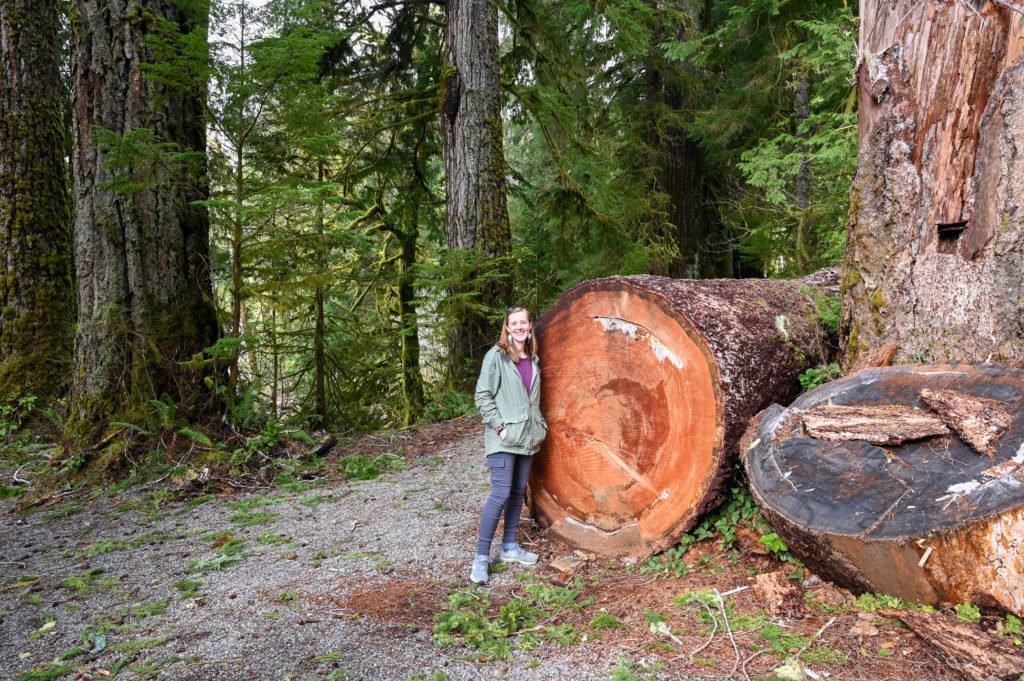
The picture below is of me standing by a fallen tree that is probably about 6’0 in diameter, and someone wrote the number of rings, the last marking I could read was “800” so I guess that means the tree was 800 years old? Either way, these are massive trees and so beautiful to admire.
Getting Here
Turn on to North Shore Rd from US-101. There is a small grocery store on the corner. Then drive about 3.5 miles east on North Shore Rd before you see the parking area for the July Creek picnic area.
Facilities
There are vault toilets here and lots of picnic tables scattered along the trail.
4) Quinault Rainforest Nature Loop
This 0.5 mile interpretive trail is on South Shore Rd about a mile from the Lake Quinault Lodge. The Quinault Rainforest Nature trail gives you a great sample of the rainforest ecosystem. You’ll gaze up at the towering giants around you and listen to the roar of the creek while admiring some waterfalls along the way.
This short hike packs a lot in! Stop and read the signs along the trail, explaining more about this unique area. There are some connecting trails you can choose from should you decide to extend your hike, look at the trail map before you begin to plan out the best route that loops you back to your car.
Getting Here
Turn on to the South Shore Rd from US-101 and drive about 1.5 miles to the trailhead parking lot, it will be on the right side of the road.
Facilities
There are restroom facilities here and a few picnic tables near the parking area.
5) World’s Largest Sitka Spruce
Be on the lookout for the trailhead to the Largest Spruce Tree. There is a small sign on the left side of the road when heading east on South Shore Rd. A large dirt parking lot is on the right side of the road. There are no toilet facilities here, so plan ahead.
This is a 0.3 mile trail, and it’s a beautiful walk down a path with moss-lined trees on each side before reaching a beautiful crystal clear creek where you’ll gaze across at the towering spruce. It gets even more impressive close-up!
Getting Here
Turn on to the South Shore Rd from US-101 and drive about 1.5 miles to the trailhead parking lot, it will be on the right side of the road.
Facilities
There are restroom facilities here and a few picnic tables near the parking area.
6) Quinault Lodge and Cascade Falls Loop Trail
This trail goes by a few different names. You might see the trail name as the Lodge Trail to Cascade Falls Loop or as the Quinault Lodge Trail. The trailhead begins across the street from the Lake Quinault Lodge. If you want more information about the trails in the area, go inside the lodge to the front desk, and they will be happy to answer your questions.
The hike is about a 2.0-mile loop that returns you to the lower side of the Lake Quinault Lodge. It is an easy and mostly level trail with only small elevation changes. The path rewards you with views of the Cascade waterfalls as well as some time walking along Lake Quinault.
Getting Here
Turn on to the South Shore Rd from US-101 and drive about 2.0 miles where you’ll see the Lake Quinault Lodge on the left-hand side. There is a dirt parking area on the right side of the road. Look for the trailhead sign to begin your hike. (You can also refer to the Google Map I linked at the top of the post.)
This trail is one of the trails I mentioned under the Quinault Rainforest Nature Loop that connects with that .5 mile trail. For an optional longer hike, from the Rainforest Nature Trail parking lot, you can take the Quinault Loop Trail #854, which connects the trail systems to create a 4.0-mile loop trail.
Facilities
There are restroom facilities at Lake Quinault Lodge and also at Falls Creek Campground. Also, the Lake Quinault Lodge front desk has trail maps and useful information regarding things to do in the area.
Quinault Rainforest Loop Drive
If you choose to drive the approximate 31 miles around Lake Quinault, here are a few things you should know. It takes almost 2 hours to complete the entire loop, and only half of the loop is paved. The pavement ends a little past the Quinault Rainforest Ranger Station on the North Shore Rd.
The pavement ends shortly past the Colonel Bob Trailhead turn off on the South Shore Road. The rest of the loop is a graveled dirt road with large potholes scattered here and there. It is doable in a car, but you will need to take it slow.
Where to Stay at Lake Quinault
There are several campgrounds scattered around Lake Quinault. However, these are closed during the winter months. You can also choose to stay at the Lake Quinault Lodge on the South Shore or Locharie Resort on the North Shore. There are also some RV park options on the South Shore Rd, one of them, the Rain Forest Resort Village RV Campground is next to the World’s Largest Sitka Spruce.
Additionally, you can drive about 30 minutes north on US-101 to Kalaloch and either camp at the Kalaloch campground or stay at Kalaloch Lodge. Both are excellent choices for ocean views.
Tips for Hiking at Lake Quinault
What to Pack
Make sure to pack rain gear (rain jacket, layers for warmth). The Quinault rainforest reportedly gets between 10-15 feet of rain each year! Also make sure to pack sturdy hiking shoes, preferably waterproof or water-resistant, although not required, your feet will appreciate this.
It’s always a good idea to pack extra water and snacks. Even though these are shorter hikes, if you combine a few of these or even a drive around the lake, you’ll appreciate having a little extra food for the journey. I like to pack peanut butter and jam sandwich fixings to make in the car.
Also, don’t forget to bring your camera gear and tripod if you wish to photograph some of the waterfalls, capture the sunset, or take group shots. A tripod is a handy thing to have! Plus, none of these trails are that long, so the extra weight shouldn’t be too much of a hassle.
Wildlife
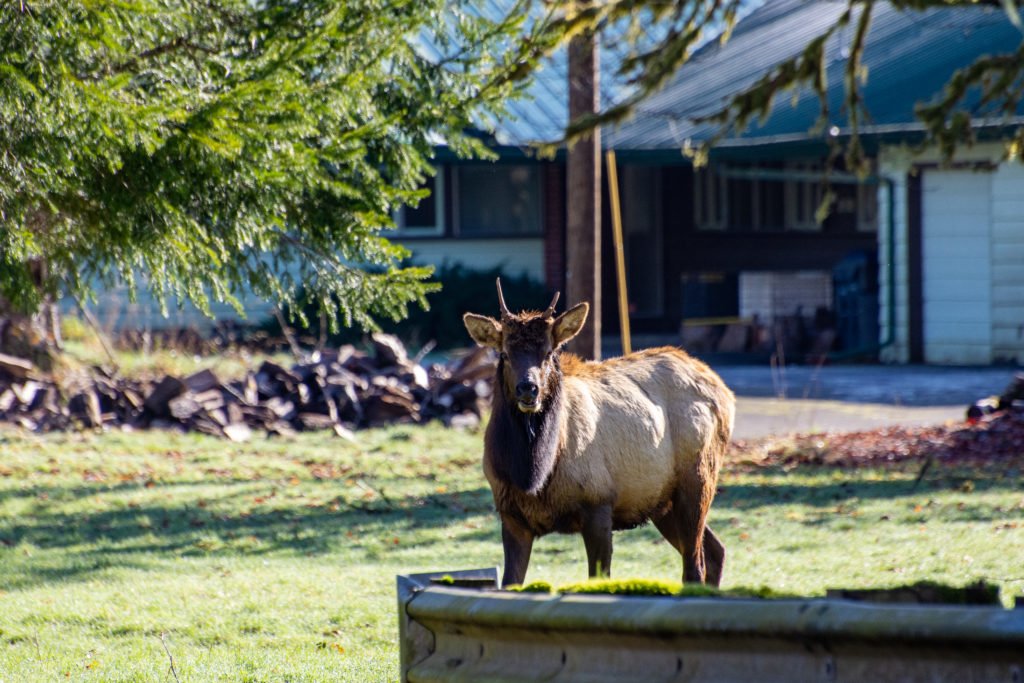
Be prepared to see Roosevelt elk during your drive and hikes in the Quinault rainforest. This area is a popular feeding area for the elk, so your chances of seeing one are pretty good. I saw the one below while driving on South Shore Road.
You’ll also have excellent opportunities to see eagles, bears, coyote, salmon, and other wildlife that calls the area home. As always, remember these are wild animals, give them a safe distance and do your best not to disturb them.
Technology Needs
In addition to packing your camera and any extra batteries and chargers you’ll need, it’s also important to know how to prepare your cell phone. There is no cell service around Lake Quinault, so plan for this by downloading your Google Maps ahead of time, and if you use a hiking app (such as BackCountry Navigator), download the topography maps ahead of time too.
Related Articles
Here are more articles related to this post and the area around Lake Quinault.
If you’ve never visited the Olympic rainforest before, then take the opportunity to do it this year. It’s only a 3-hour drive from Seattle, and there are lots of great places to camp as well as lodges and private resorts, and even a few Air BnB options around the lake.
This area of US-101 and the Olympic National Park is someplace you need to visit at least once. Consider making a week of it and stop at a few of the park areas along the way, such as Lake Quinault, Kalaloch, Lake Crescent, and Sol Duc Hotsprings. You’ll be amazed at the natural beauty of this area.
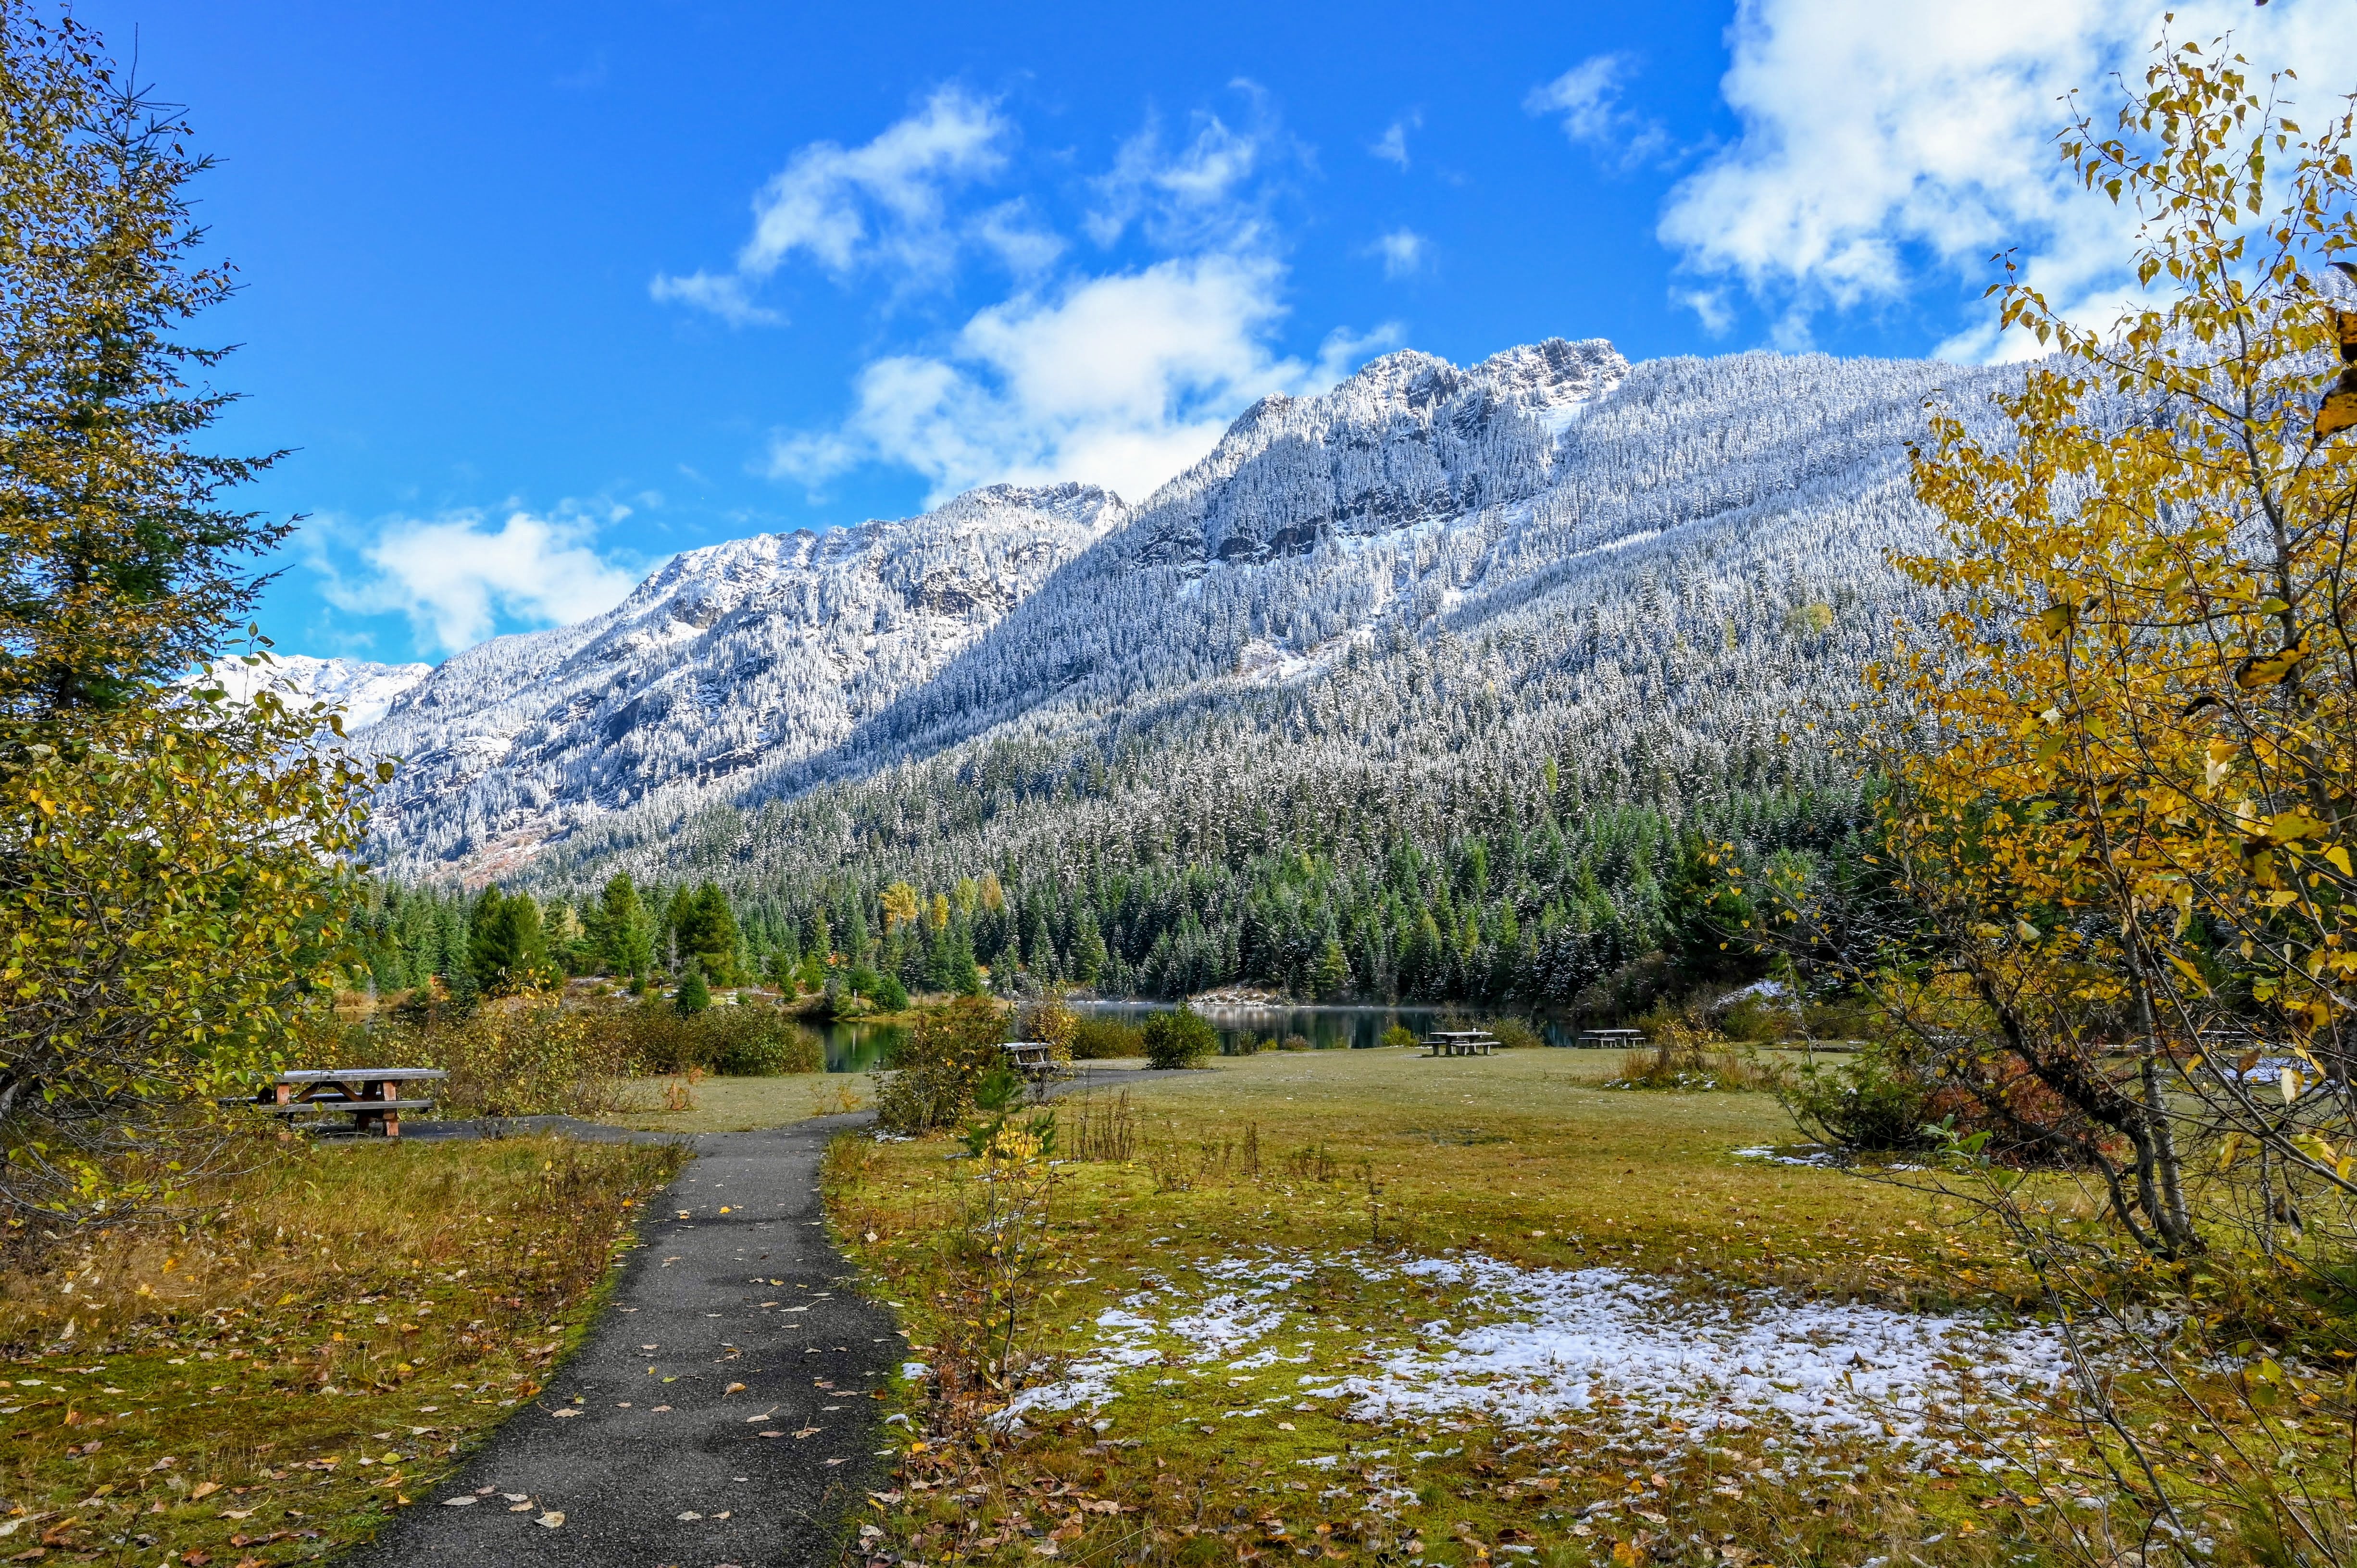
If you’re looking for an easy trail with beautiful views, a picnic area, ADA accessible and close to Seattle–look no further! The Gold Creek Pond Trail is a 1.1 mile loop trail that circles the Gold Creek pond. It is a relatively flat, paved (with a few boardwalk bridges) trail that circles this very large alpine lake of a pond. Keep reading to discover why this trail is worth the trip!
A Little History About Gold Creek Pond
As you look at the photographs of Gold Creek Pond, try to imagine that back in the ’70s and ’80s, this pond didn’t even exist. Instead, this area was a gravel pit supplying the construction of the I-90 freeway. Since that time, a restoration project began and is still underway, to develop the area around Gold Creek. It is such a beautiful location now, as you look out over the water, it is incredible to see the transformation from pit to pond.
A Snowy Surprise
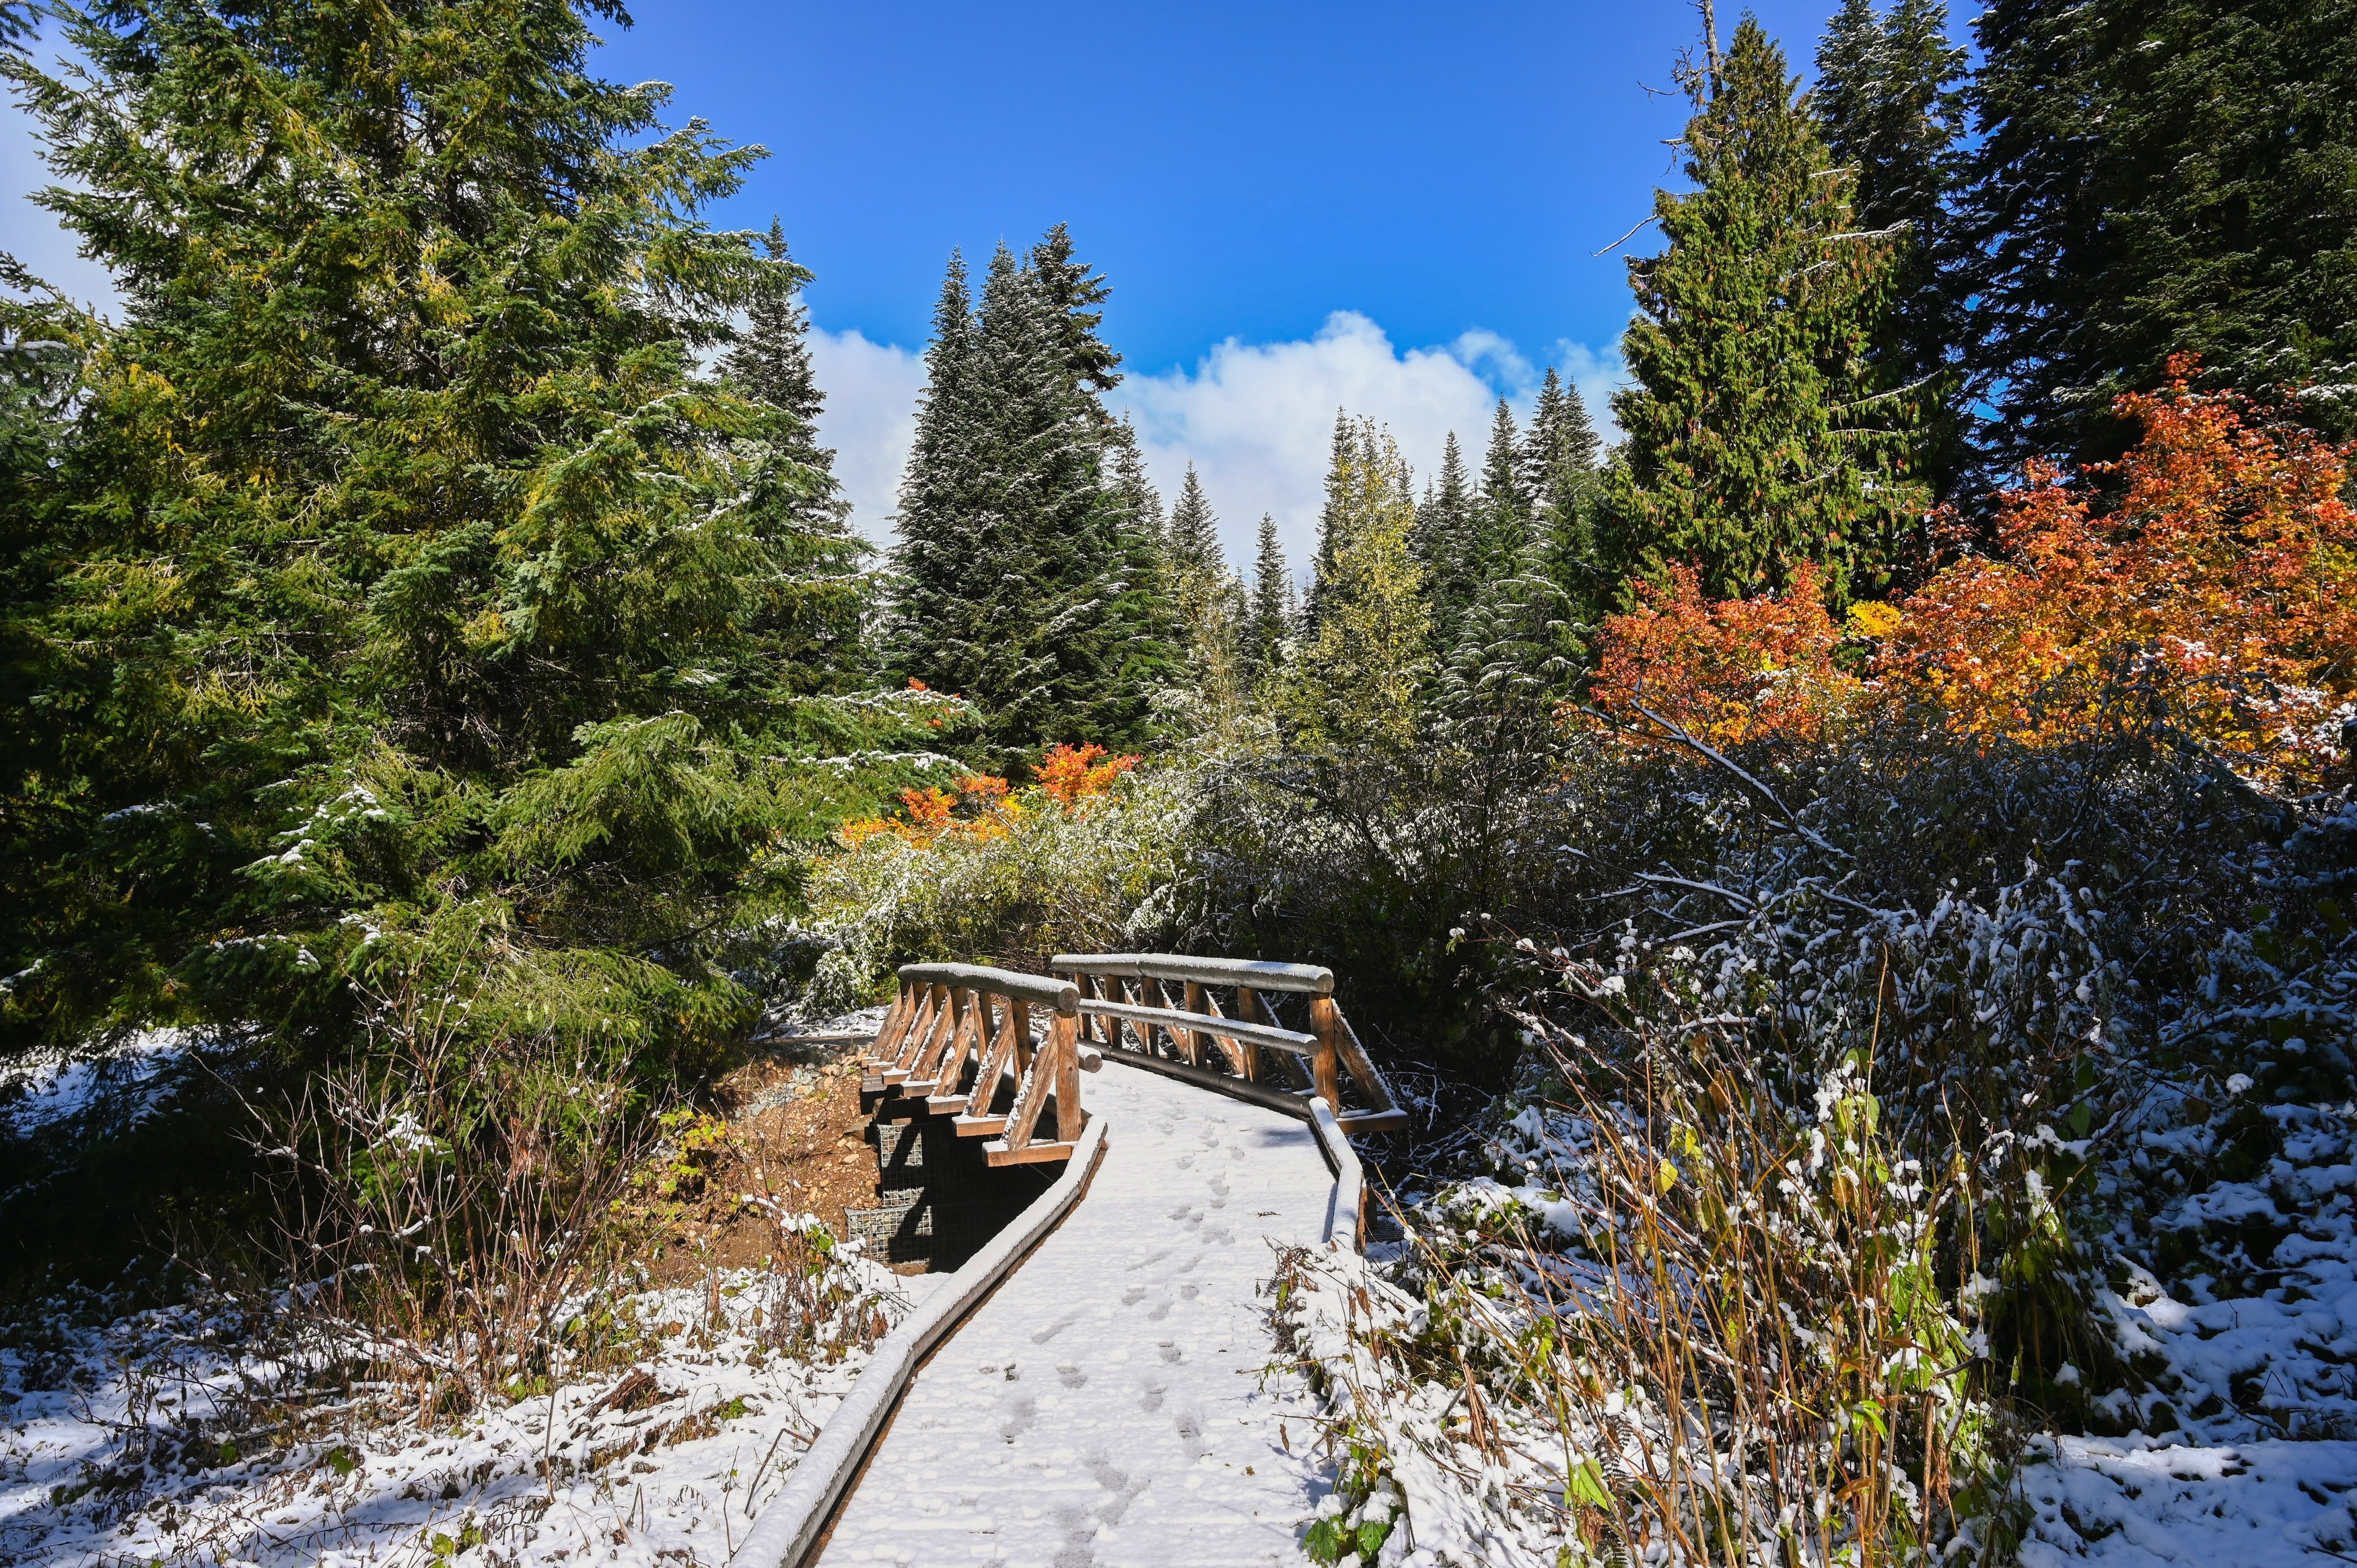
The night before I visited Gold Creek Pond, I had plans to take my camera and go hunt down some fall foliage. When I got up the next morning, my phone’s weather report showed it was 36 degrees out! Let me tell you for Seattle fall weather–this is cold!
Honestly, one of the things I love about the Seattle area is our mild weather. Typically in early October, it is often sunny and in the 60s! I had initially planned on driving to Leavenworth; however, with my late morning start, I knew I’d need to adjust my plans. Gold Creek Pond Trail was on my radar for a while, and it was only an hour’s drive, so I decided to head there.
Imagine my surprise when I discovered Snoqualmie Pass (Gold Creek Pond is near the summit) had snow! Snow. And it’s barely October! This was odd, but I figured if I didn’t get any photos of fall colors, at least I’d get some snowy fall photos?
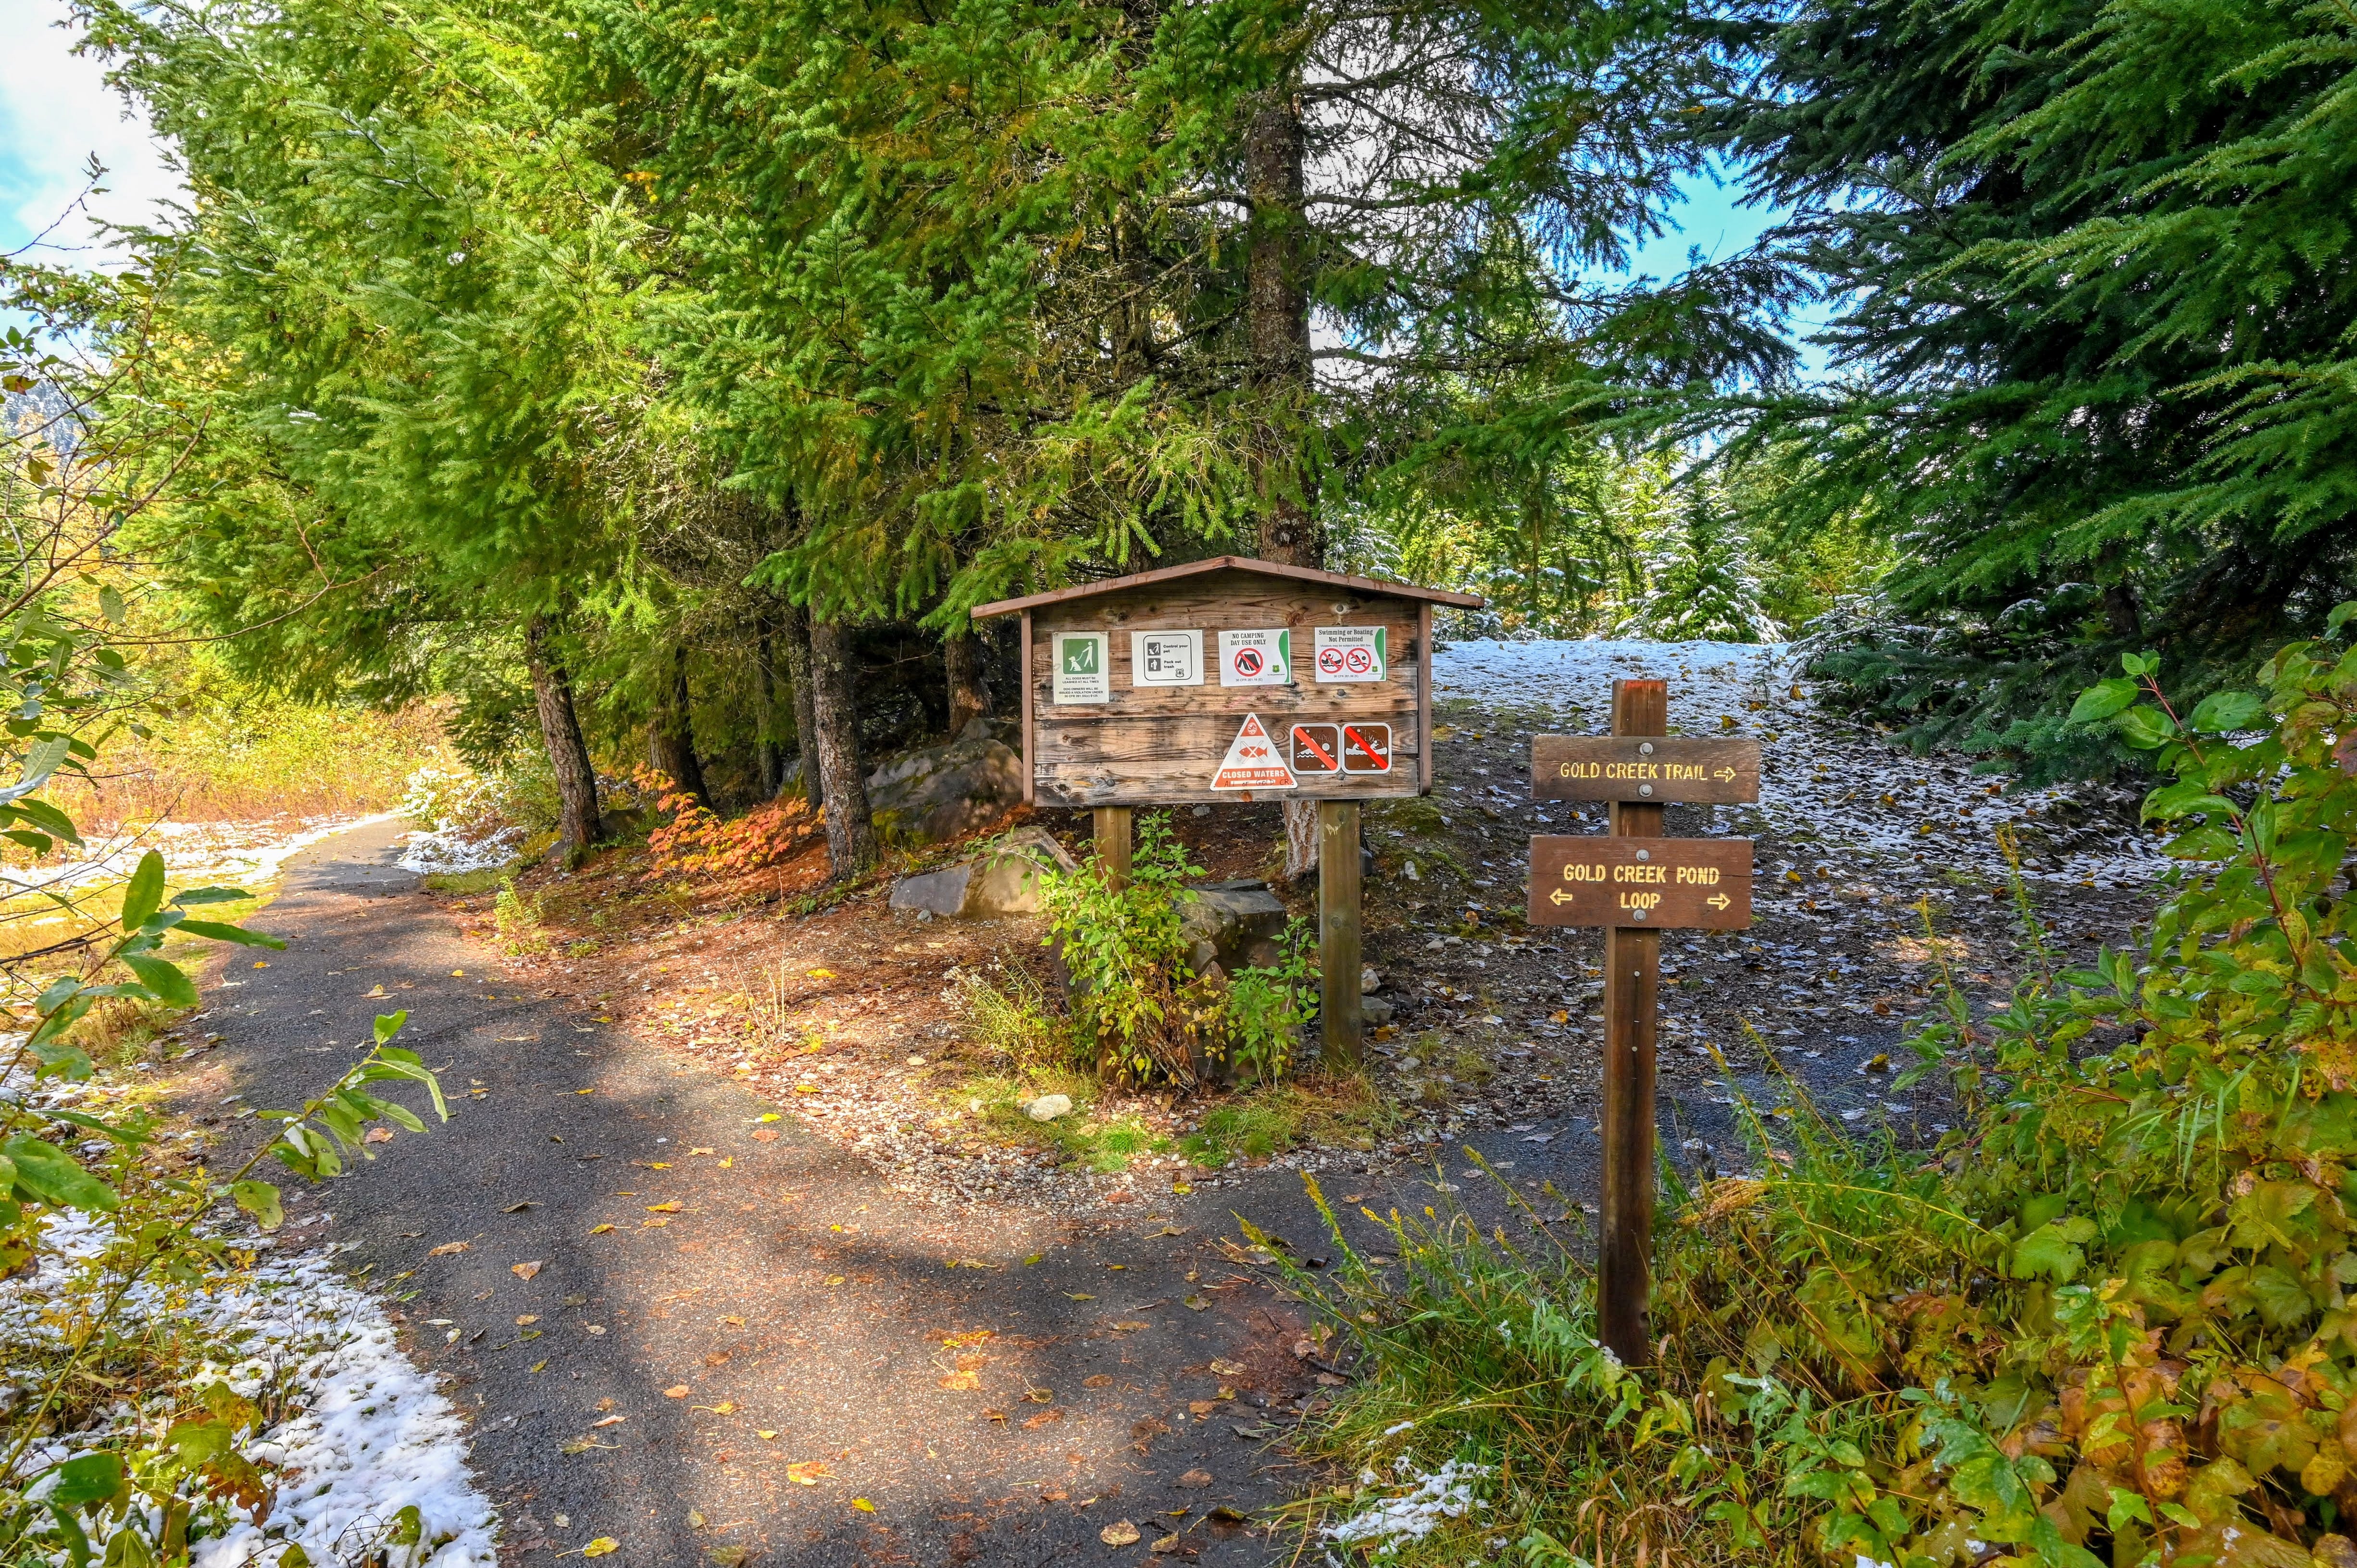
Gold Creek Pond Trail
After you arrive at the parking lot, you will see a pit toilet on the right and an information board in the center. Follow the path to the left of the information board. Soon you will arrive at the above trail sign.
If you go right, this will also lead you to the trailhead for Gold Creek Trail, which takes you to the Alpine Lakes Wilderness Area. However, for this hike, you can go either right or left as you make your loop around the pond. If you come here for a picnic or BBQ, go left as this is the quickest way to the picnic area.
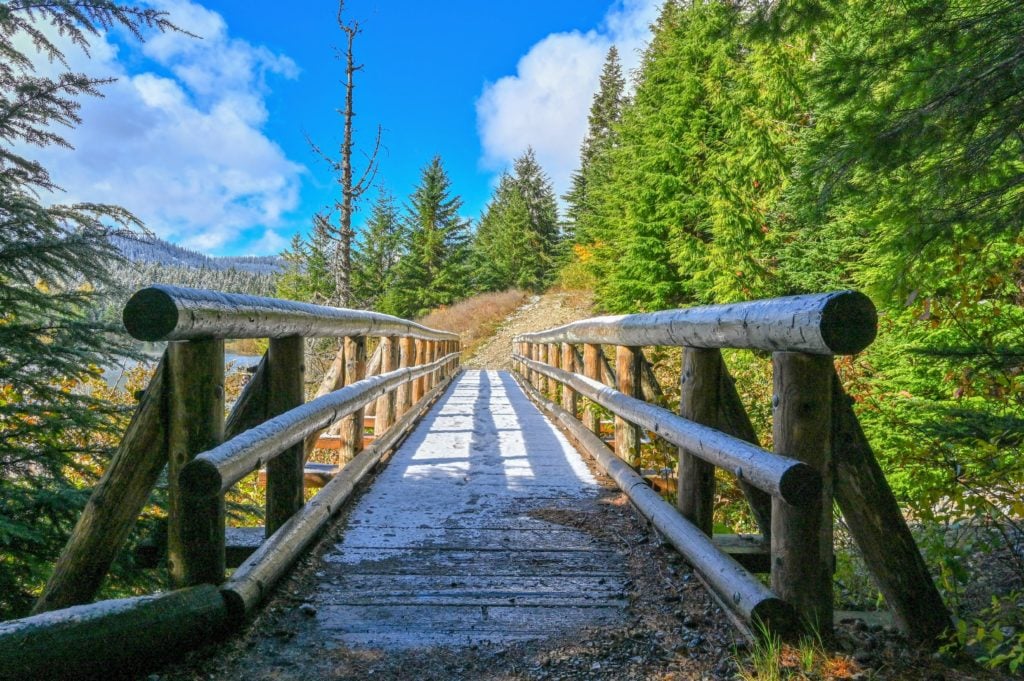
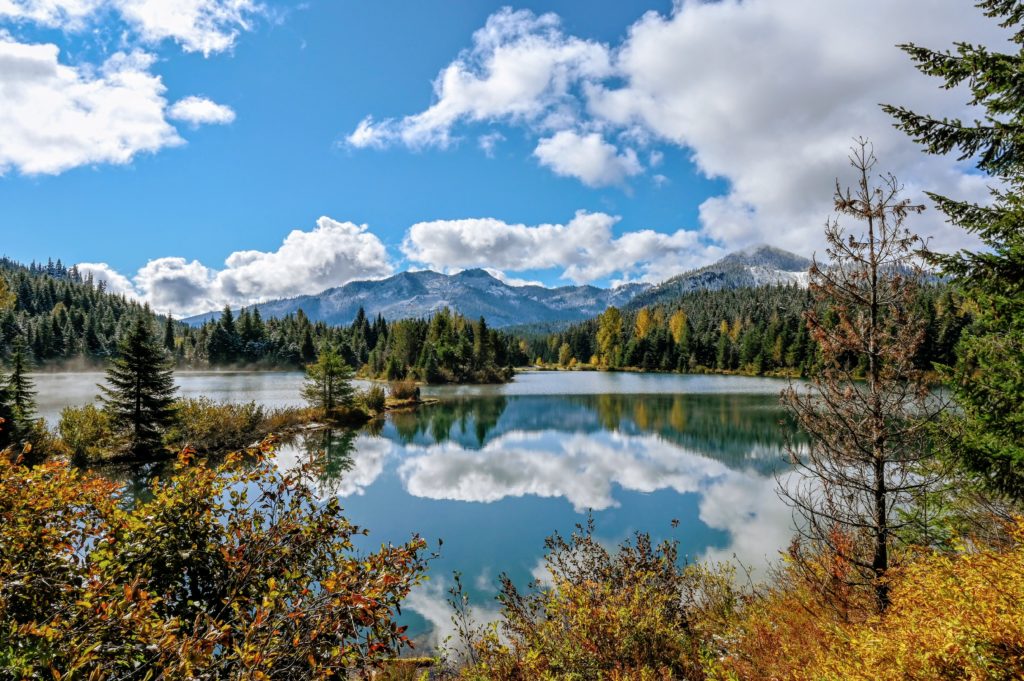
There are a couple of small wooden bridges that you will cross as you make the 1.1-mile loop around Gold Creek Pond. The wooden planks were icy when I visited, so I took it slow when crossing. If you make the loop counterclockwise, as I did, you will walk alongside Gold Creek through a wooded area before seeing Gold Creek Pond.
As I walk, I hear the sounds of the water rushing over the rocks in the creek. The crunch, crunch of snow under my feet, and the faint laughter of someone on the other side of the pond greet my ears. I smile at the beauty this odd snow day had brought.
One of the wooden bridges you will cross on the loop trail around Gold Creek Pond.
Making Friends on the Trail
About halfway around Gold Creek Pond, I came across the two hikers who I had heard earlier. They laughed and had fun as they splashed water and captured it in slow motion with their cell phones. I like meeting people on the trail and seeing their enjoyment of nature.
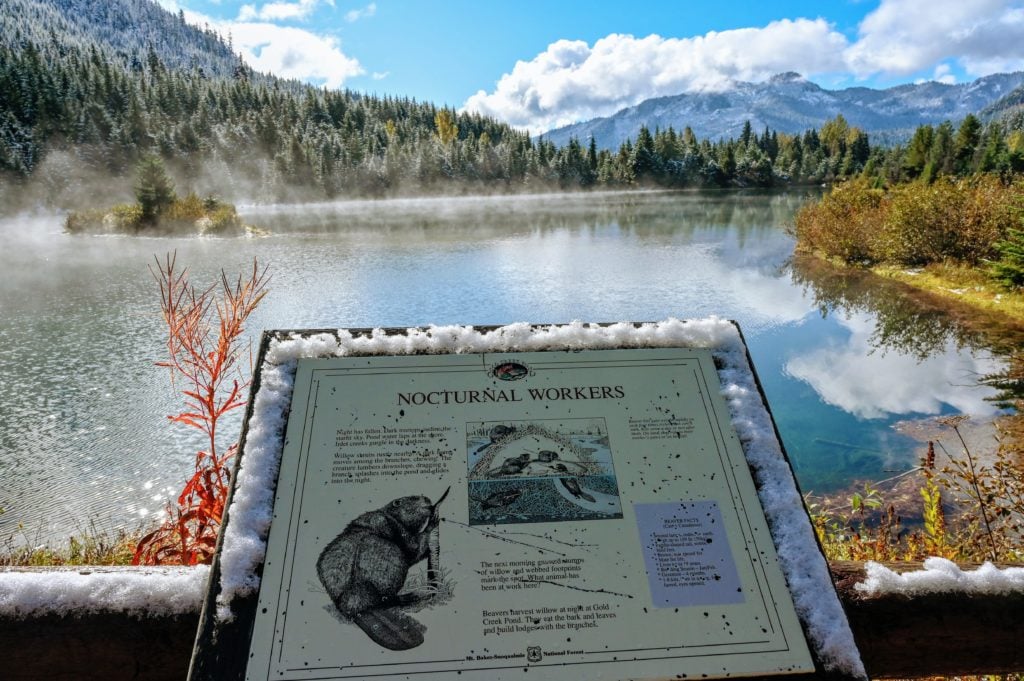
There are a few informative signs scattered around the trail.
Later I met a lovely woman who was out hiking with her dog. She said she comes out here during each season and takes a photo. In wintertime, she uses crampons or snowshoes and said it is beautiful to see then too.
Then I met a photographer who was seizing the opportunity to find snowy mushrooms, something you wouldn’t usually see. And later towards the end of the loop trail, a nice man and his wife let me know when I crossed the creek that if I looked down, I could see salmon swimming below.
So you see, besides enjoying the beauty of nature, you get to meet all sorts of friendly people. It’s a perfect way to relax and remember what a beautiful world we live in.
Make sure to walk out to that tip by taking a short trail that splits off the main one just past the beaver sign.
Taking Time to Soak in Nature’s Beauty
Make sure to locate one of the many benches scattered along the trail. There are a few right next to the water that would make the perfect resting spot.
And if you’re lucky, you might even spot a great blue heron. You are almost certain to see ducks and Canadian geese and of course, the frequent sightings of a mischievous squirrel or two.
Perhaps another time when winter hasn’t beat me to the seat.
Getting to Gold Creek Pond Trailhead
It’s only about a 1-hour drive from Seattle to Gold Creek Pond. And what a beautiful drive it is!
Take I-90 E to Exit 54 for the Hyak ski area.
Turn left at the stop sign.
Make a right at the first road passed the I-90 on/off ramps (Forest Service Rd #4832).
Drive parallel to I-90 for about 1 mile before making a left at the sign for Gold Creek Rd and Trail.
Then continue another quarter mile before making a left onto the pavement and into the parking lot.
Useful Information
Road Conditions: The road leading to the trailhead parking lot is a dirt road that is full of potholes. So take it slow, and you should be fine. Once you make the final left, it returns to a paved road as you enter the parking area.
Parking/Fees: You need a Northwest Forest Pass to park here. Please note that in the winter, a Sno-Parks permit is required — which is different from the Northwest Forest Pass. If you don’t already have a Northwest Forest Pass, you can purchase a day pass at the parking lot trailhead. For winter use, buy the appropriate sno-parks permit ahead of time.
Trail access: Gold Creek Pond Trail is ADA accessible, and I saw one woman in her motorized wheelchair here, even with the snow! Some parts of the trail, when I visited, were overgrown a little on each side, so the path got a bit narrow. I love that we have this beautiful trail accessible to those with mobility issues.
Facilities: There is a pit toilet at the trailhead. Make sure to bring your hand sanitizer, as there was none provided when I visited. On the left side of the pond, you will find a large picnic area with lots of picnic tables and even a few grills scattered here and there.
Don’t miss this beautiful and family-friendly trail. It is a short drive from Seattle, and if you have extra time and want to explore more of the Snoqualmie area’s beauty, make sure to stop and see the Snoqualmie Falls.
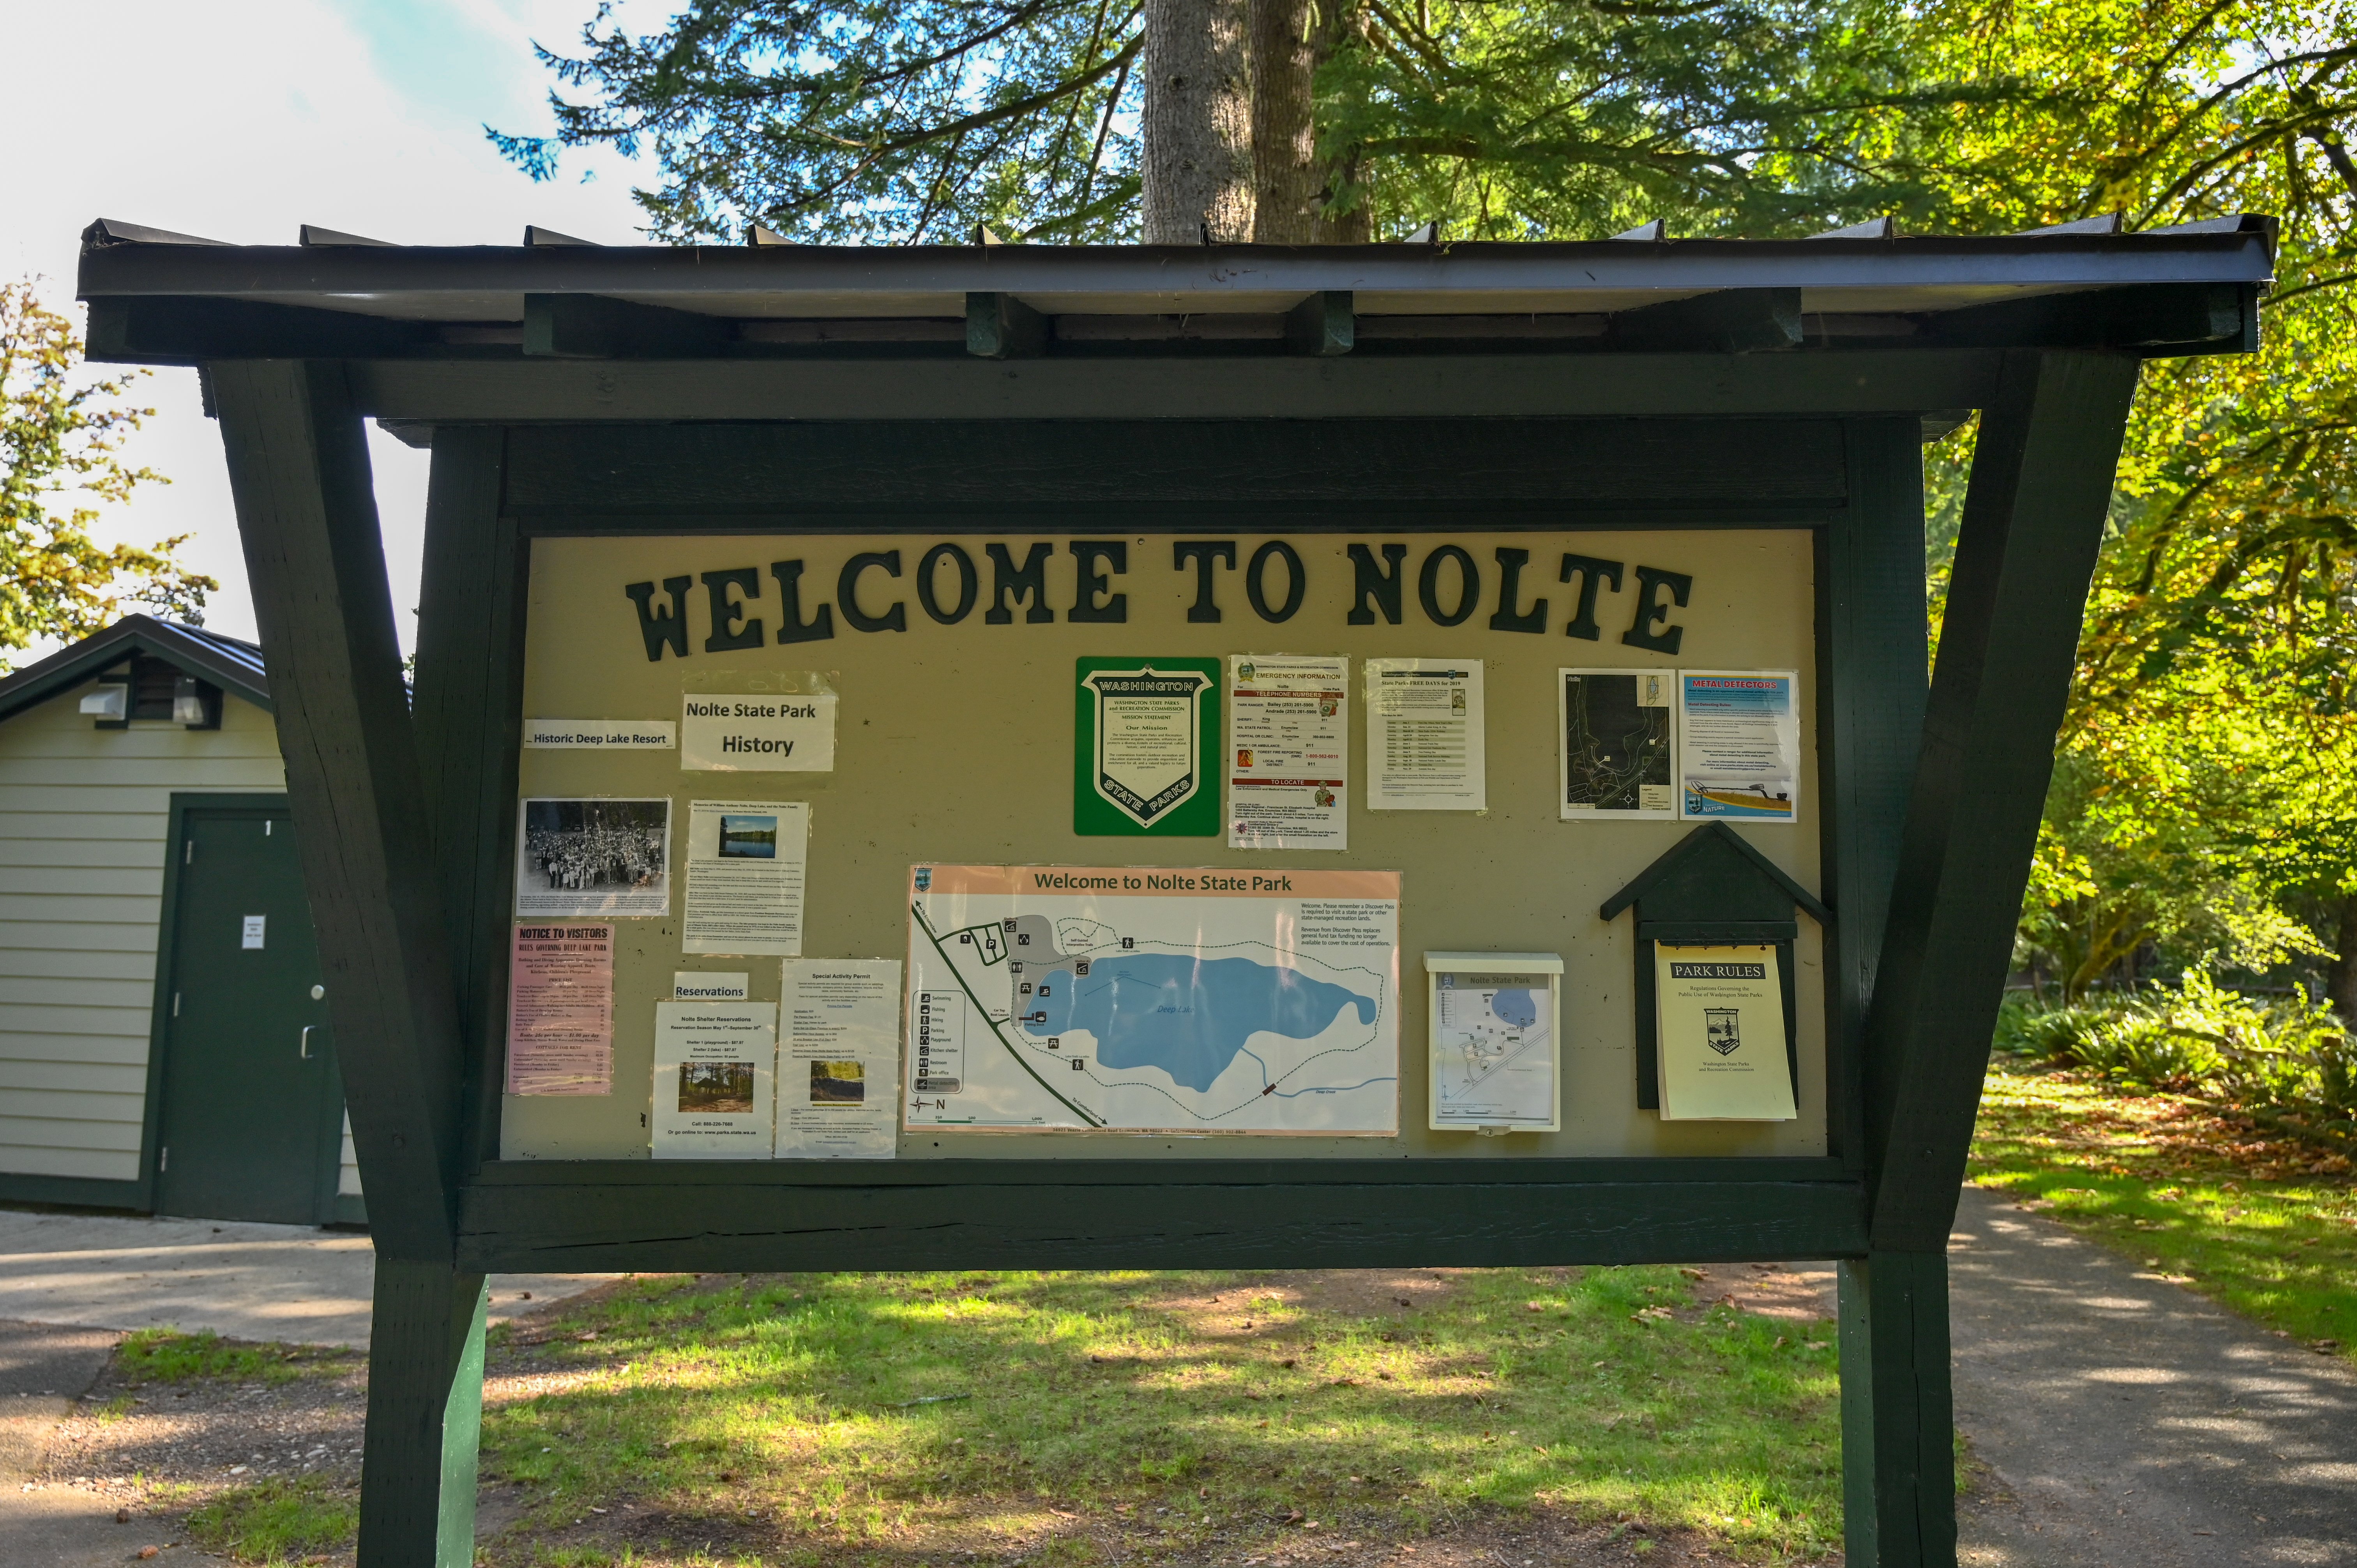
Nolte State Park is a hidden gem in the Pacific Northwest. This Washington State day-use park makes a perfect place to get away for a few hours or even the whole day! When you feel like you need to escape the hustle and bustle of the city it provides the perfect natural setting to get away and think. And when you want a park to take the whole family to for some fun in the sun, Nolte State Park makes the perfect choice!
Below I list all the activities you can enjoy at Nolte State Park, and I hope you will take the time to visit it soon. You will feel like you have stumbled upon a retreat in the woods. It might even become your new favorite park, and perhaps you’ll want to keep it a secret too!
Activities at Nolte State Park
Feel free to click on links below and jump ahead to the various activities and information found in this article.
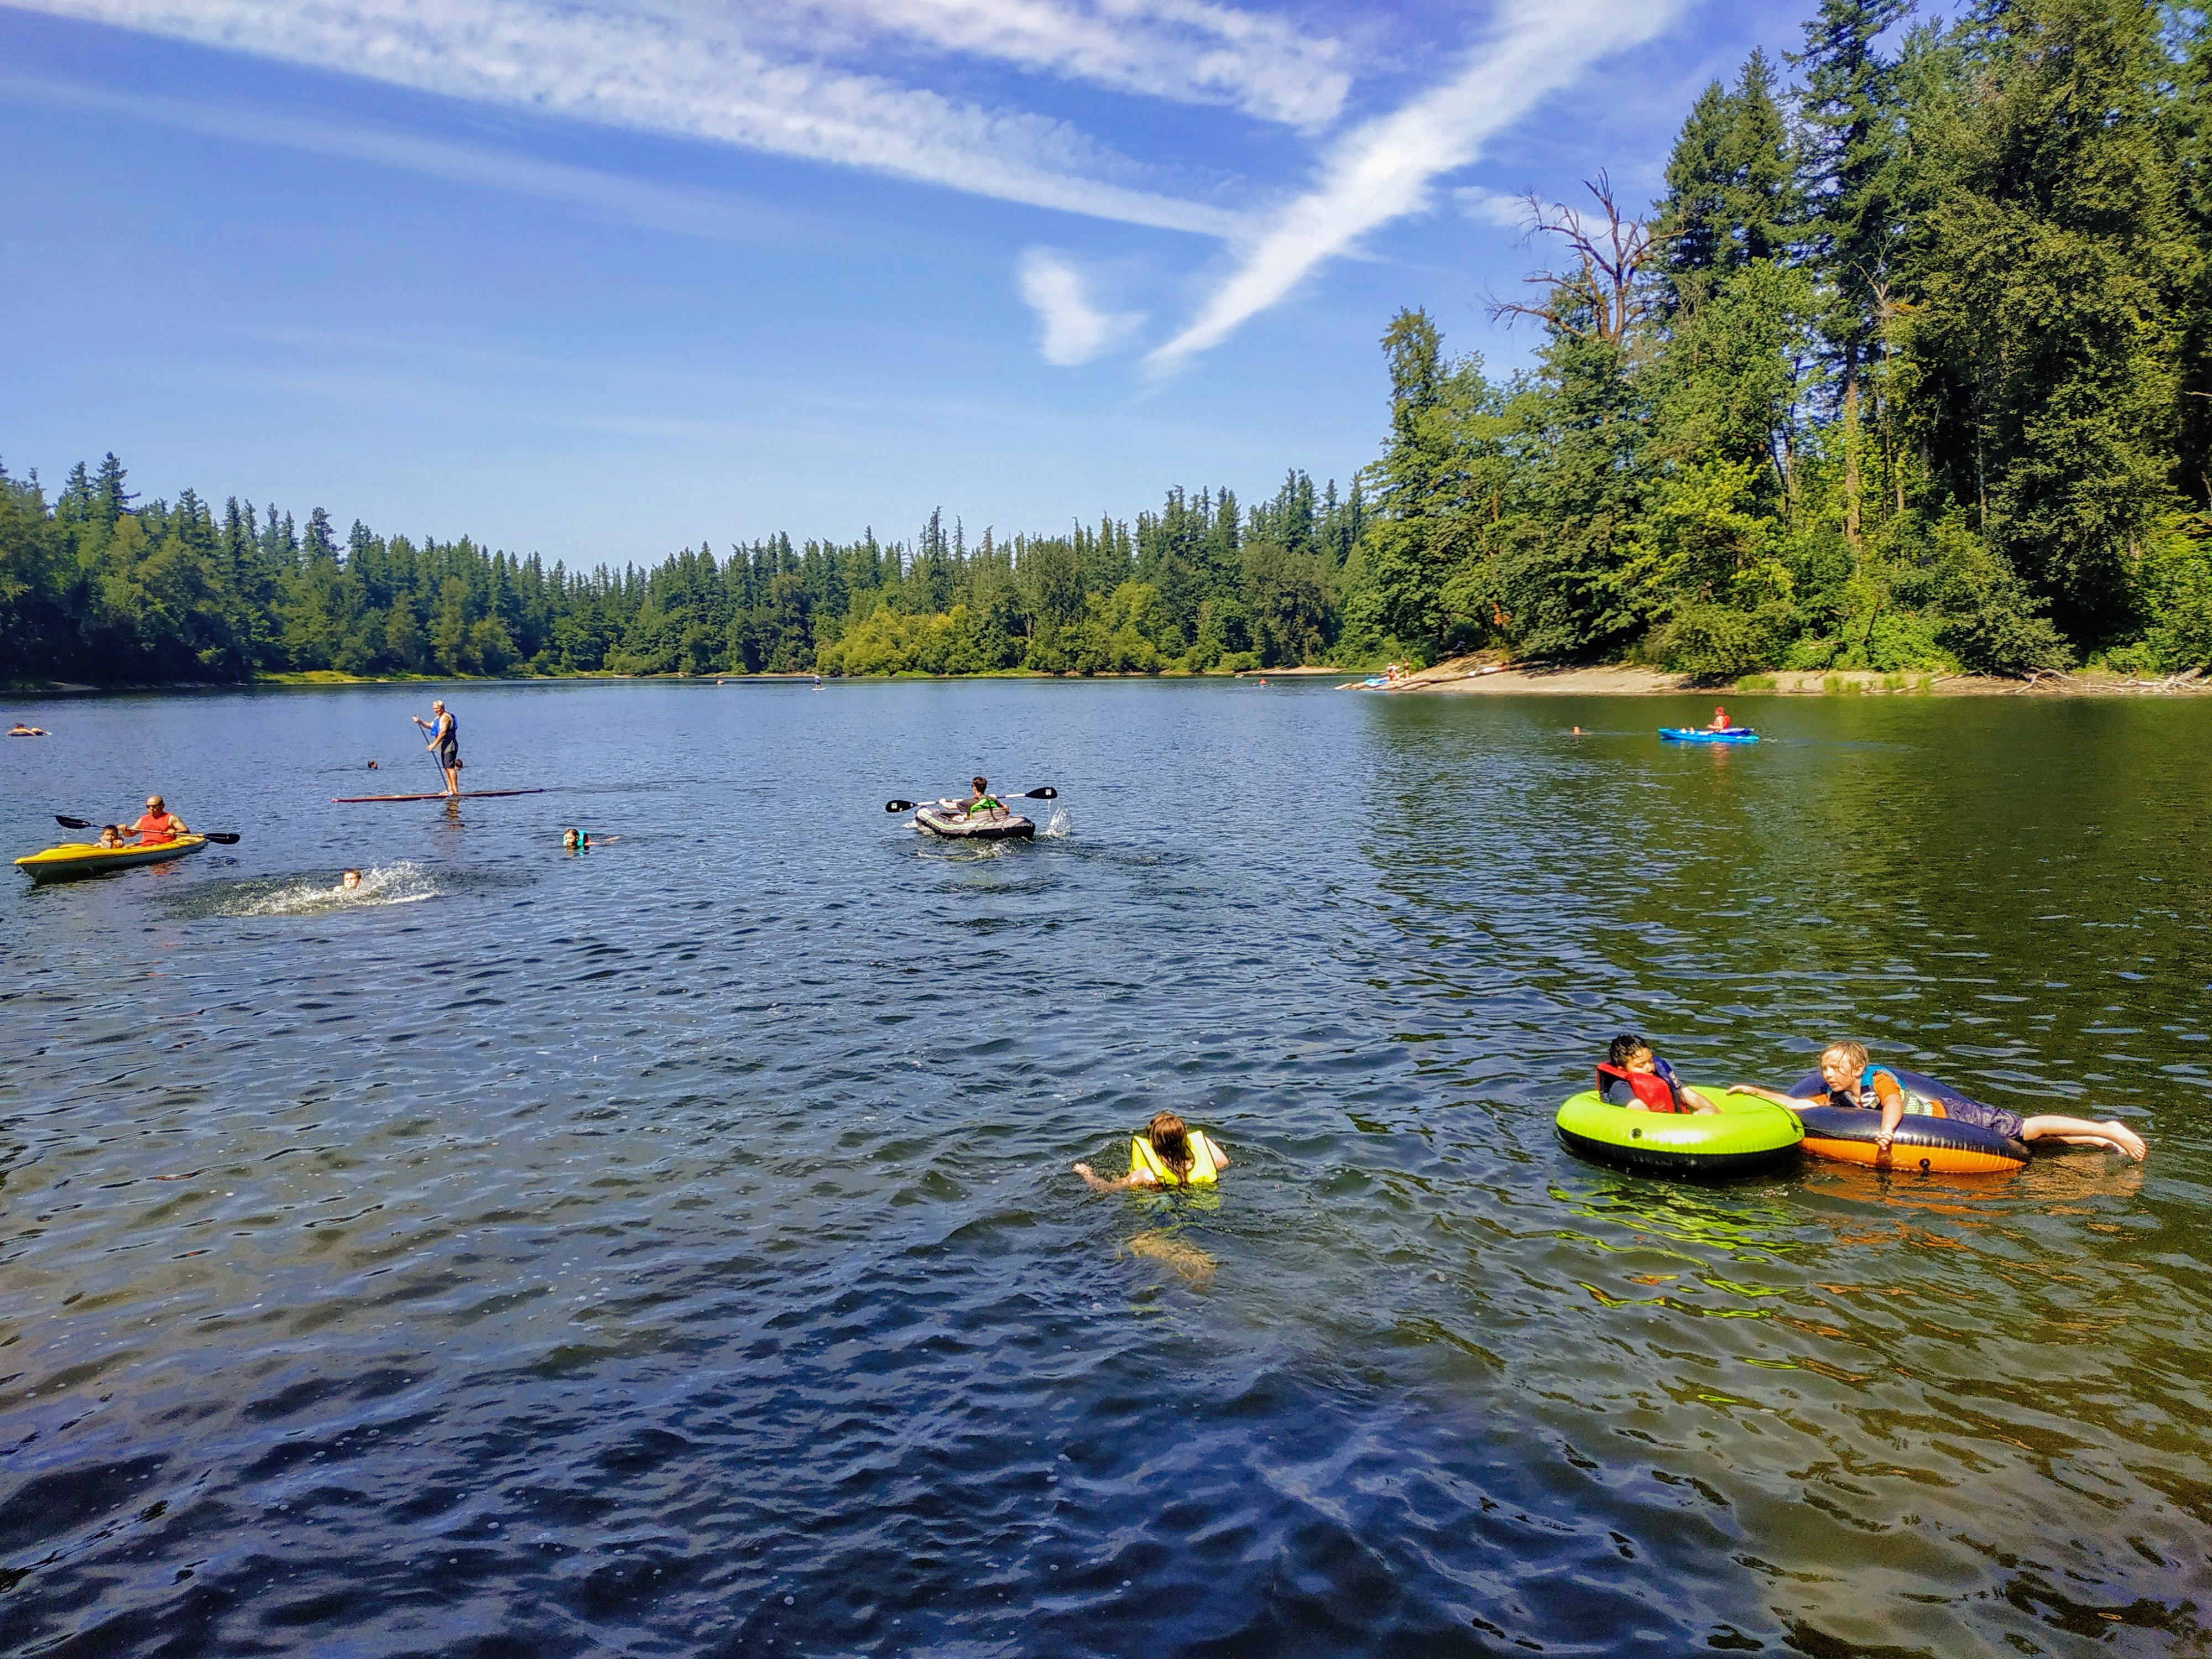
I had heard of Deep Lake and Nolte State Park for years. However, I had never taken the time to visit it. Then this year, my hubby and I purchased some inflatable stand up paddleboards (SUPs). So I started researching some places we could try them out around the Seattle region, and that’s when Nolte State Park popped up on my radar again. I am so glad we decided to check it out! It is such a beautiful lake for both stand up paddleboarding and kayaking. Please note that only non-motorized boating is allowed on Deep Lake.
Besides boating around the lake, if you enjoy fishing, Deep Lake is a stocked lake that is open to fishing year-round. You can catch rainbow trout, cutthroat trout, kokanee, yellow perch and more.
The first day we paddled out on our stand up paddleboards here, fish were jumping everywhere! Honestly, I was a little concerned one might jump up and knock me off my SUP! Now that would have made for a good story!
In addition to bank fishing, Nolte State Park also has a fishing dock, and of course, you can always bring your non-motorized boat for fishing too. The dock can sometimes get busy with other anglers and in the summer it is often commandeered by a large crowd of kids who test out their cannonball skills. So finding a spot along the bank is often the best choice.
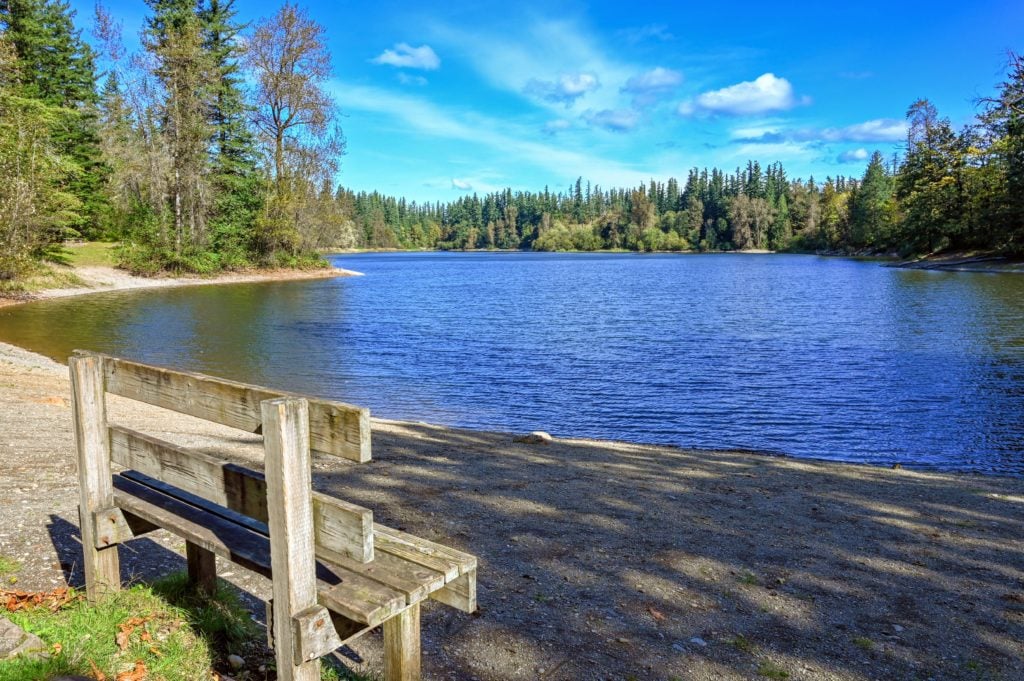
If you prefer an activity that doesn’t require getting wet, take a peaceful stroll around Deep Lake. You will find the start of the 1.4-mile loop trail by following the path that goes alongside the playground area. I really this trail. It feels as though I’m miles away from the city as I listen to the wind gently blowing in the trees. I admire all the beautiful trees and meander down so many of the side paths that lead to the lake, that a man once lapped me 3 times!
One thing I love, is that this trail makes for a beautiful walk no matter the time of year. Even on a rainy day, you can just put on your raincoat and enjoy a quiet walk in the rain. Make sure to have fun exploring all the different side paths that take you down the lake. Pick one and find your favorite thinking spot or perhaps your favorite fishing spot. Pull up a rock and enjoy the sound of wind rustling through the trees.
If you have kiddos who need to run off some energy, why not do a few laps around Deep Lake. Allow them to expend some energy while getting a little fresh air. There are multiple benches along the way for resting or for enjoying the serene surroundings. Also, the gravel path is stroller friendly!
However, if you have mobility issues that make the path too rough for you, there is a short paved path alongside the large picnic area that has views of the lake and a grassy area with lots of picnic tables and grills that overlook Deep Lake.
In addition to boating, fishing, and hiking, there is also a horseshoe pit and a kids’ play area. And there is a small field next to the kids’ play area where you can toss a frisbee or football. There is really everything you could want to create a day full of memories. We created fun memories with our nephews and niece. They loved swimming, boating and fishing — all in one day!
Reservable Group Shelters
Nolte State Park also has large kitchen shelters that can be reserved for groups ahead of time, and there are BBQ grills at almost every picnic area. Most BBQ grills are located in the central area overlooking the lake, but there are also a few on both sides of the lake, so make sure to look around and find the perfect spot for you and your group.
Fees: You need a Discover Pass to park at Nolte State Park as it is a part of the Washington State Park system. You can purchase a day pass at the park for $10 or buy an annual pass for only $30. I think the ability to go to all of Washington’s State Parks as much as I want for a year is worth the price. Skip a few trips to the coffee store, or purchasing your favorite snack for a month, or whatever.
And if the budget is still too tight, make sure to check out the WA State Park website for their free park days. They have multiple days throughout the year, where no Discover Pass is needed.
Swimming in Deep Lake: There is no lifeguard on duty. There is a rapid drop off after you enter the lake when it becomes deep. Make sure all kids (and anyone who isn’t a strong swimmer) have life vests on at all times. It would be far too easy for a child to drown here as there isn’t much of a shallow entry before it becomes too deep to touch bottom. So please take the necessary safety precautions to ensure everyone has a fun and safe visit!
Nolte State Park Hours: 8 a.m. to dusk
Fishing at Deep Lake: A Washington State fishing license is required to fish here for anyone 15 years or older. Visit the Washington State Department of Fish and Wildlife for further information.
Restrooms: There are multiple restrooms with sinks and soap. Additionally there are drinking water spouts in a few different spots around the park.
Take I-90 E to Exit 17 for Front Street/Issaquah-Hobart Road Southeast, turn right onto Front Street and follow this road for almost 9 miles, (Front Street becomes Issaquah Hobart Road), continue following the road for another 5.5 miles as it becomes 276th Ave SE, and then also Landsburg Rd SE. Then turn left at the 2-way onto SE Kent Kangley Rd and follow for about 1 mile before making a slight right onto Retreat-Kanaskat Rd/Retreat Kanasket Rd SE.
Stay on this for about 3 miles before turning right onto Cumberland Kanaskat Rd/Cumberland Kanasket Rd SE. After about 4 miles this becomes Veazie-Cumberland Road SE, continue anther 1.5 miles before making a right into the main entrance (pass the boat launch entrance) for Nolte State Park.
From Tacoma:
Take I-5 N to WA-18 E towards Auburn. Then take the WA-164 E exit toward Enumclaw and turn left onto WA-164 E/Auburn Way S. Stay on this for about 7 miles. Then turn left onto SE 400th St/Krain-Wabash Rd and follow for another 7 miles before making a slight right to merge onto SE 392nd Street. Continue for about a mile before making a left onto Veazie Cumberland Rd Se. After about 1.5 miles make a left into the Nolte State Park entrance.
During the summer, Nolte State Park can be very busy. So plan to come early in the day to get a parking spot as well as pick out your area on the beach and picnic area if you want to barbecue. And if you have a large group, make sure to reserve a group shelter ahead of time. There are a few parking spaces on the shoulder of Veazie Cumberland Rd SE if the parking lot is full.
Take a little walk down the paths along the sides of the lake to see if you can find a picnic table nestled in the trees or closer to the lake. I think as you come here and explore the path around Deep Lake, you will soon discover “your” spot.
Don’t forget to pack sunscreen and possibly bug spray. I haven’t had an issue with bugs here, but you never know! If you do forget something, Enumclaw is only about 7 miles away.
Pack it in and pack it out. Please make sure to pick up all your garbage when you finish enjoying your time here. I appreciate the efforts that the park’s custodians go to, to keep this park so clean, so let’s all do our part too!
One of the best activities at Nolte State Park is finding a bench and enjoying the views!
Nolte State Park makes the perfect getaway for the day. Bring your family and friends and spend the day creating fun memories by the lake. Oh, and if you’re lucky, you won’t have any cell service here either. So you really can get away from it all!
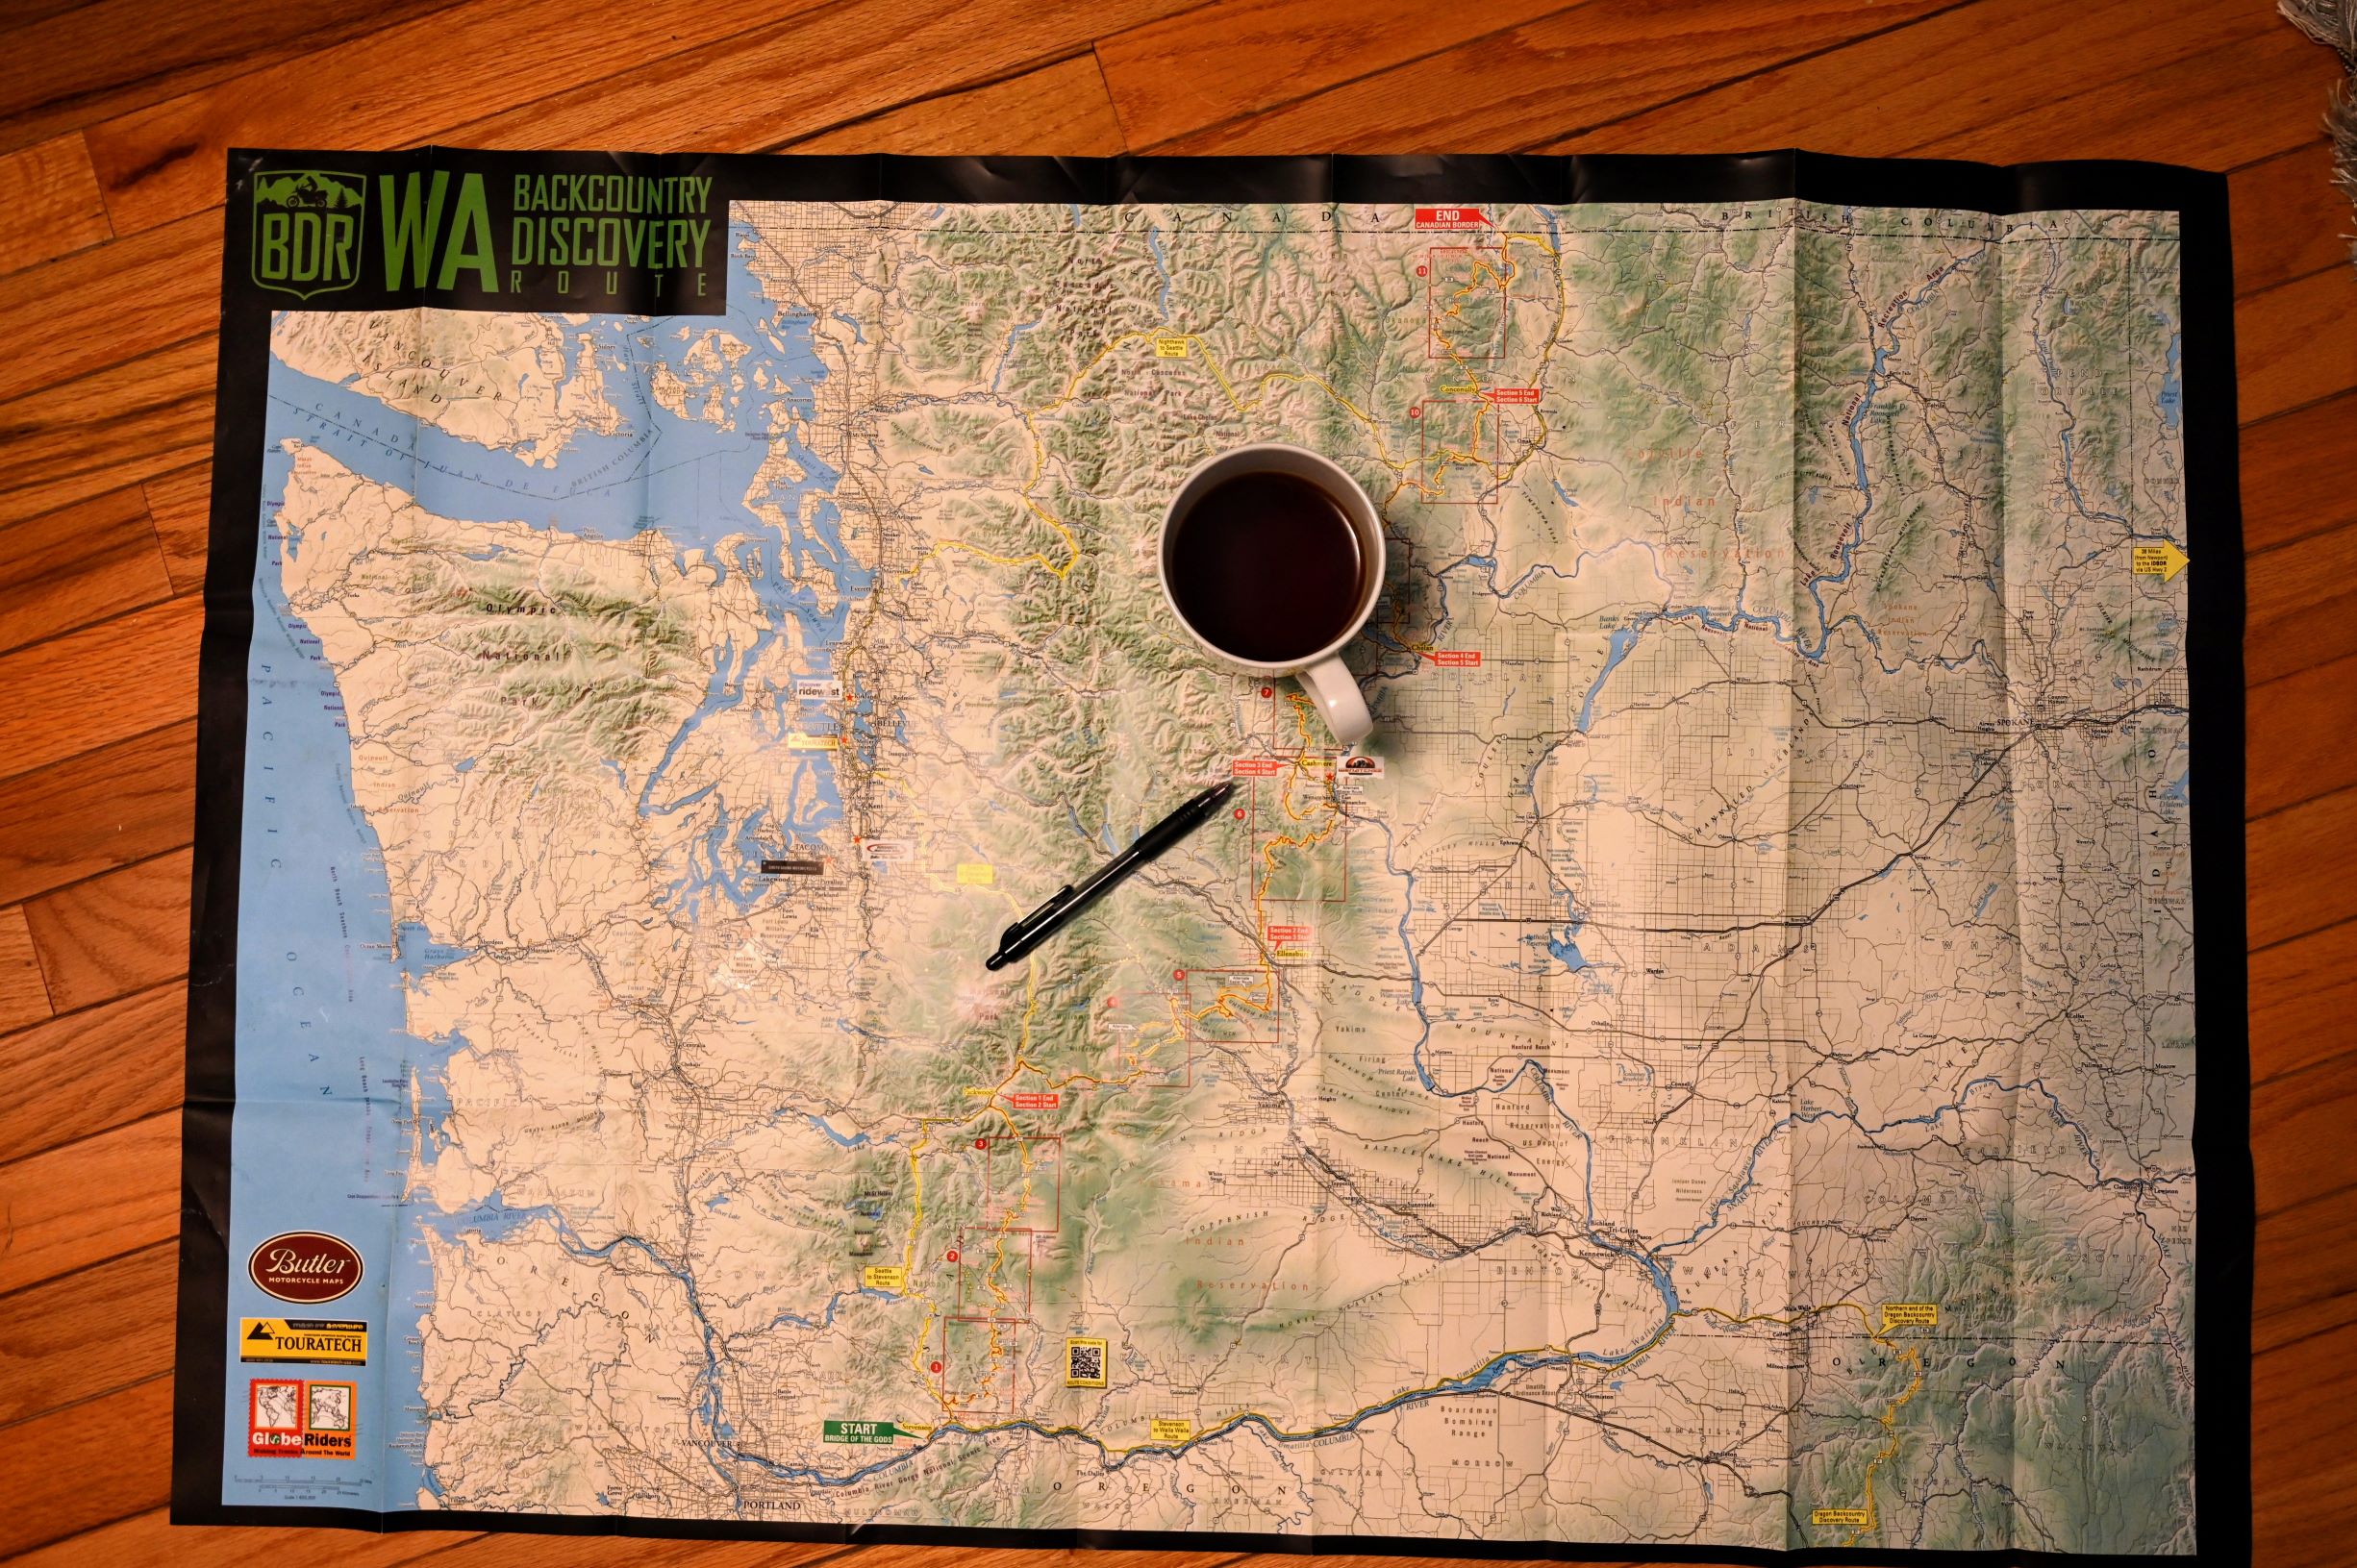
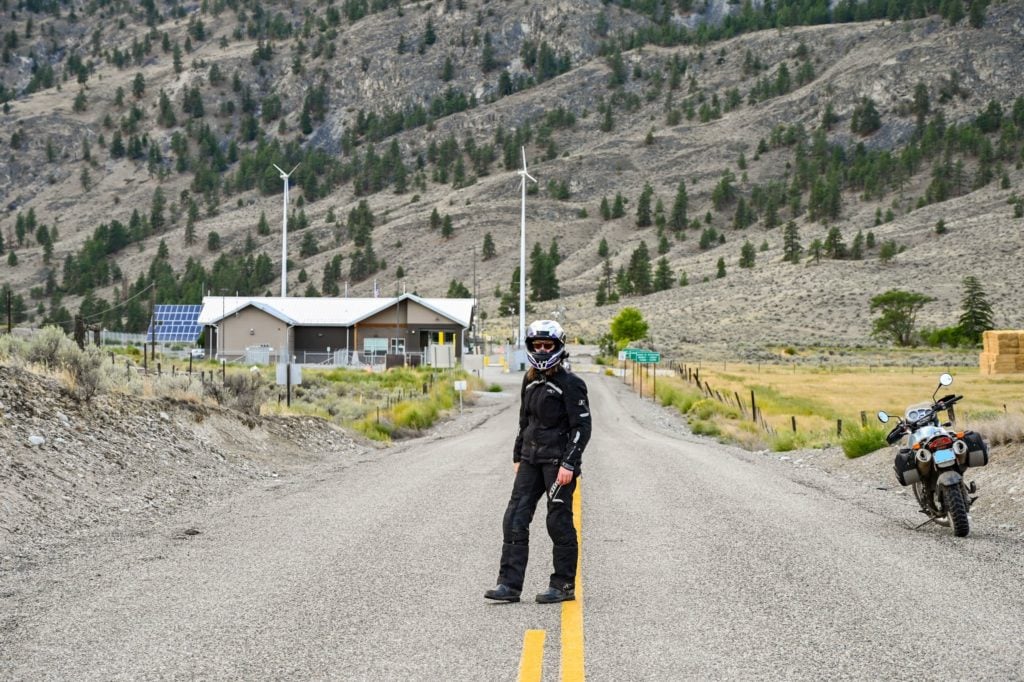
My husband and I recently returned from an off-road motorcycle adventure. It was our first multi-day moto trip where we camped off our motorcycles. We were riding sections 4, 5, and 6 of the Washington Backcountry Discovery Route (WABDR). This beautiful off-road route stretches from the Oregon/Washington border and up to the Washington/Canadian border.
The WABDR is a mixture of challenging fire service roads as well as the easier and more maintained gravel forest service roads. The Washington Backcountry Discovery Route is full of adventure with spectacular scenery all along the way. In this post, I share how I planned the trip as well as what gear I packed for moto camping. First, let me give you a little background on my motorcycle experience.
My Motorcycle Riding Experience Thus Far
I grew up learning to ride motorcycles on a Honda 50. All of my siblings did, and to this day, all of their kids learn on the same Honda 50. It is a fun legacy, and this Honda 50 is a beast! It rarely ever needs any work and keeps going and going — take that Energizer!
I eventually outgrew the Honda 50 (although let’s be honest, all of us adult kids still like to ride it once in a while, just to say we can). I transitioned into riding a Honda 250 and a Yamaha 400–all lightweight off-road motorcycles, always intending to get my motorcycle license eventually.
One day while in Seattle at a motorcycle store (can’t remember why), my husband and I learned from the owner, that WA state had a new motorcycle endorsement program. They provided the motorcycles and put you through a course to get your license, and all it takes is one weekend.
When we left, my husband said: “let’s do it!” And so we did. It is a great program that teaches a lot of excellent road safety techniques. By the end, you take the motorcycle driving test, and pass (hopefully) and then head to the DMV, get a new mugshot, and you are officially a motorcyclist
Beginning Our Off Road Adventure Riding
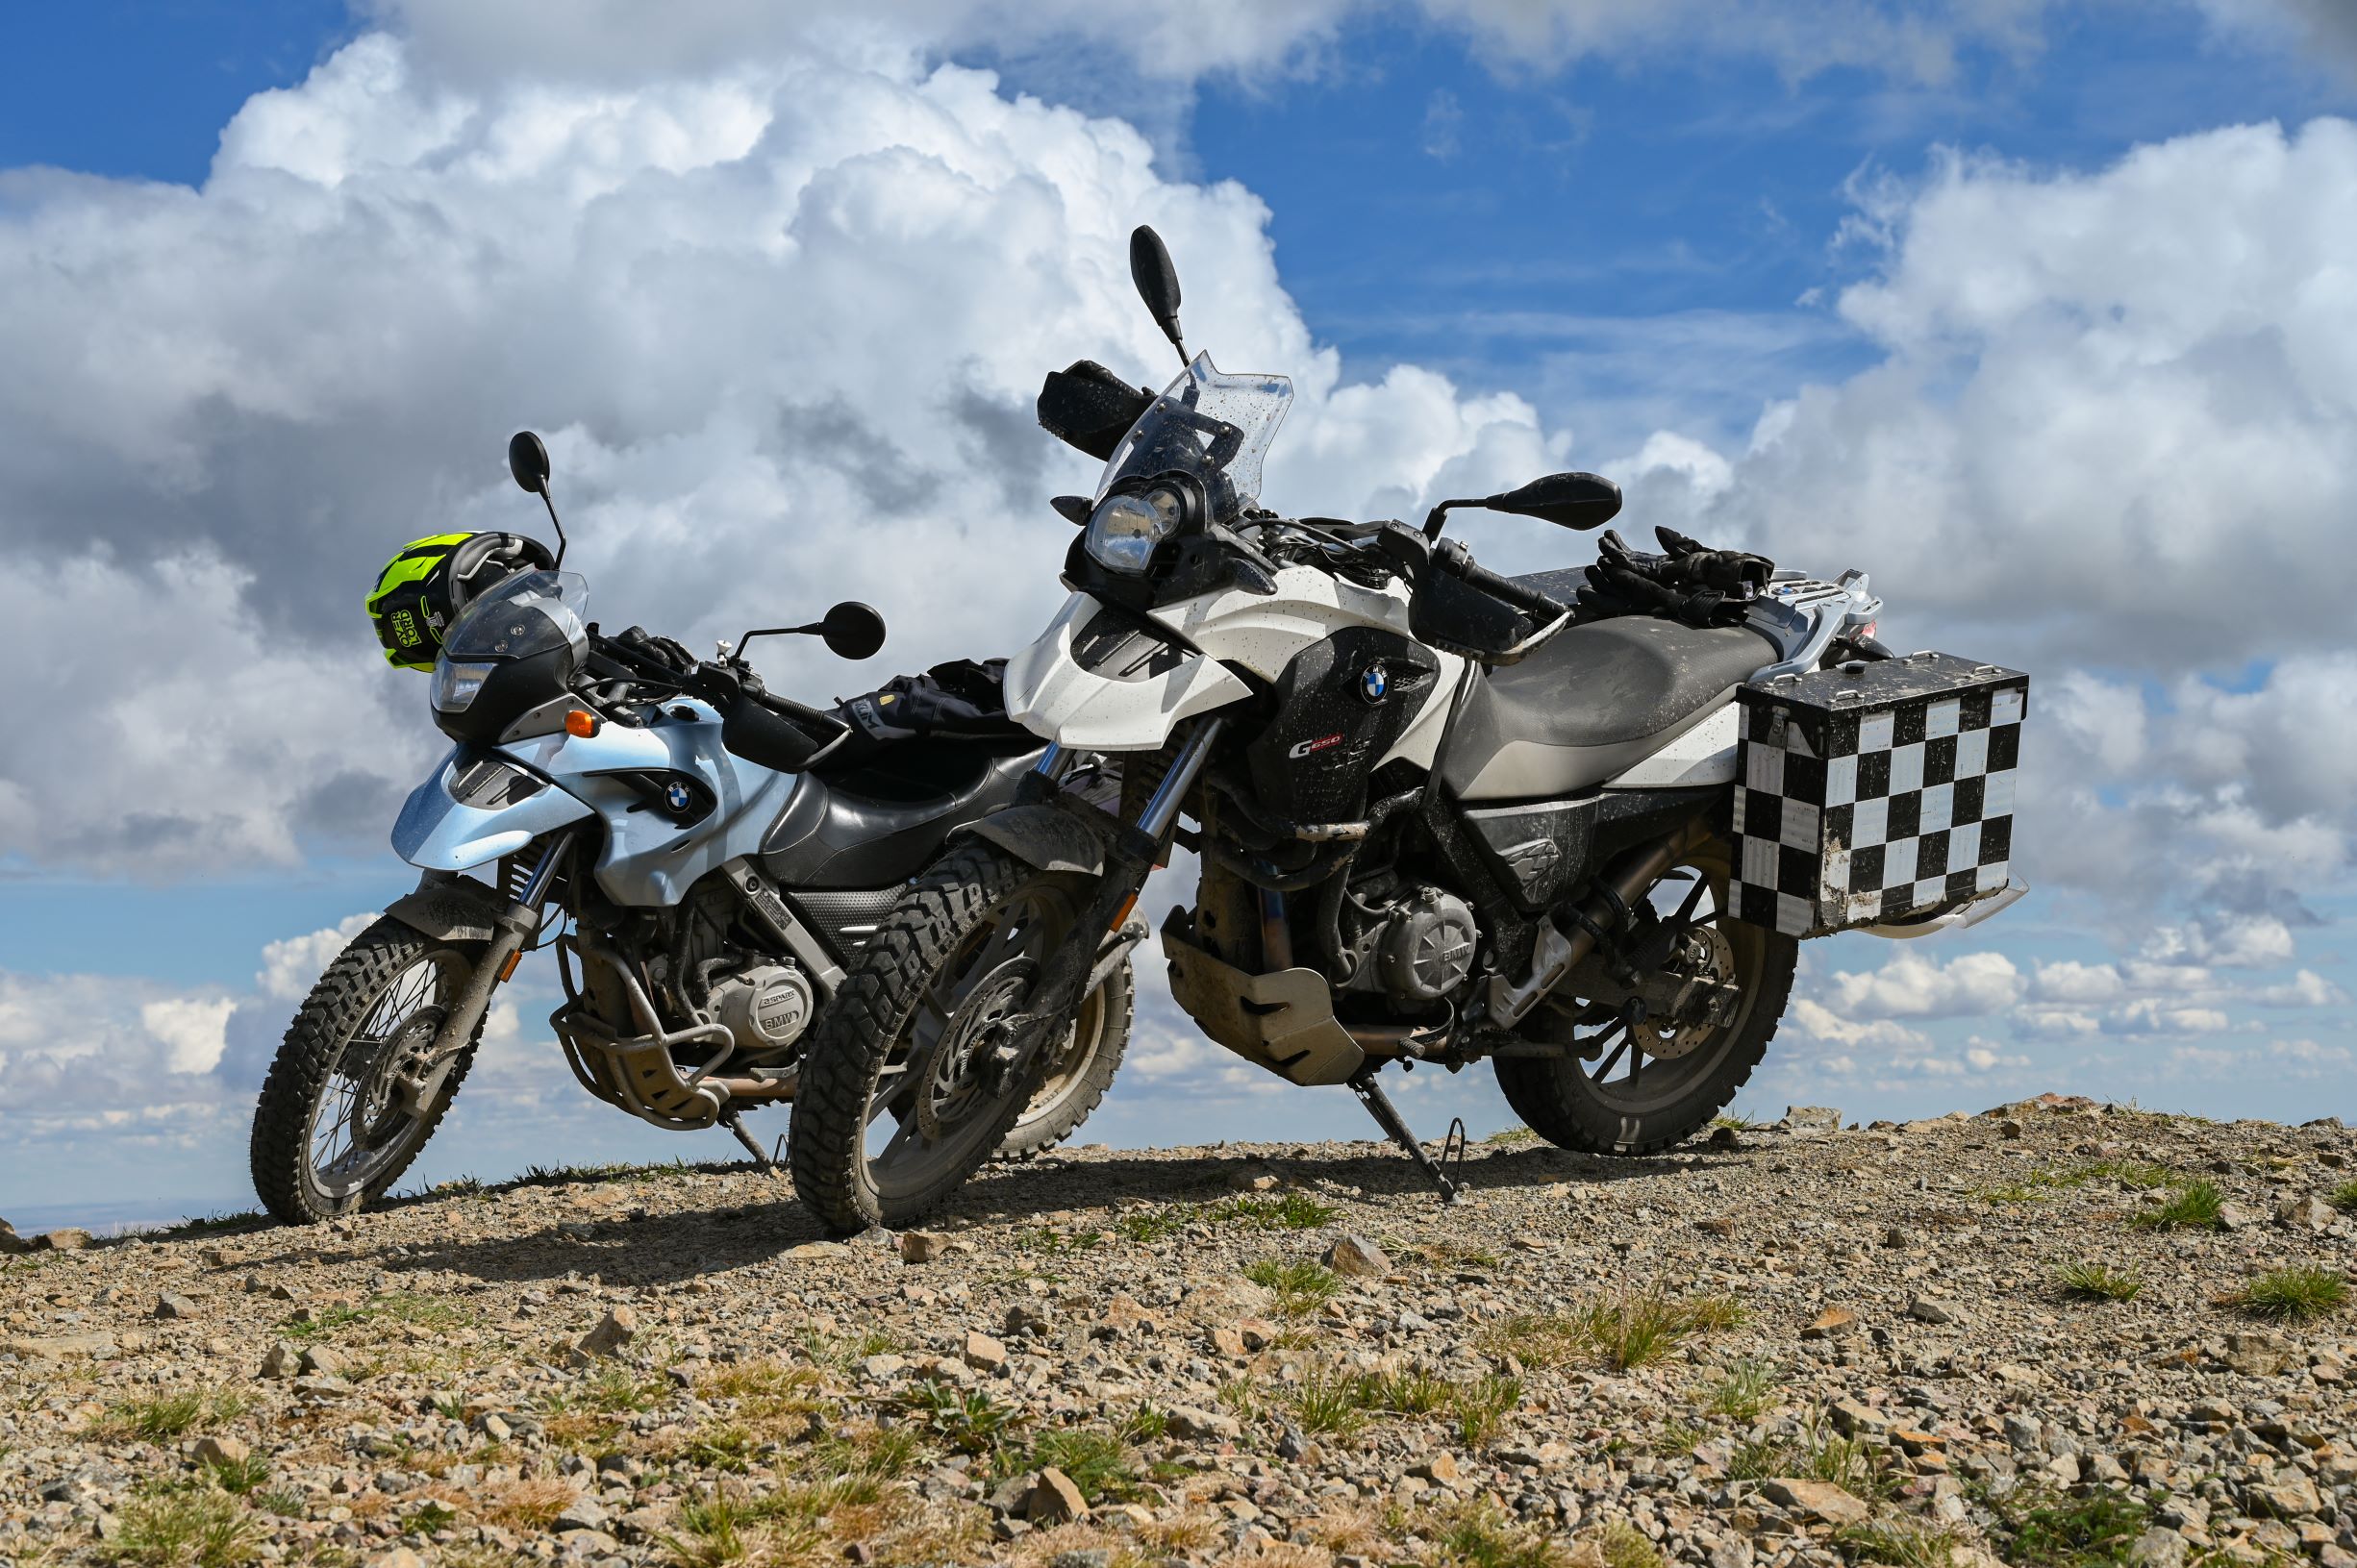
That was over five years ago. We purchased motorcycles right after getting our licenses and have been getting road experience ever since. We bought a BMW F650GS and a BMW G650GS, both dual-sport motorcycles. This means you can ride on and off-road. We did some off-roading with my brother when he’d visit, but it was mainly just dirt or gravel roads, nothing too technical.
We learned about the Washington Backcountry Discovery Route in 2015 and decided we’d ride the last half of the route when my brother came over for his annual summer vacation. Wildfires had a different plan, and due to the forest fires burning all over Washington state, we had to cancel our trip plans.
Fast forward four years, and we have the best fire season we’ve had in a long time! A former UW classmate of mine posted his pictures of completing the WABDR in his 4×4 Toyota, and I told him how I’d planned to do the route. He said, “you should do it this year.” And I thought, “yeah, he’s right!” There is no guarantee we’ll get another year with so few fires, why not seize the moment and do it!
So I contacted my brother, told him my idea to do the last three sections of the Washington Backcountry Discovery Route in September, and he said to let him know the dates, and he’d put in for his vacation. Next, I convinced my husband that this was a great idea, and soon we had our dates picked out.
Planning our Off Road Motorcycle Adventure
Now, it is essential to note that this decision was made right in the middle of our crazy hectic summer. Which meant I was busy planning camping trips, and get-togethers with friends and family and did not give our ride my usual planning attention.
So this trip felt a bit more spontaneous than my trips usually are. I skimmed a few websites on the subject of riding the WABDR, and we bought the official WABDR printed map. I downloaded the GPS tracks and a free GPS app for my phone. From my minimal research, I determined that we should only need one day of riding per section. So I reserved some campsites for our ride and continued making plans with our group.
We live in the Seattle area, and my brother lives in North Central Washington. So we decided to meet in Leavenworth the night before we began our ride. Also, my brother and his wife would be riding in their Toyota 4Runner for sections 4 and 5, so he agreed to pack extra water for our group and to carry any gear that might lighten the load in our panniers. That was wonderful! When you’re riding an adventure bike off-road, reducing the weight in your panniers is always helpful.
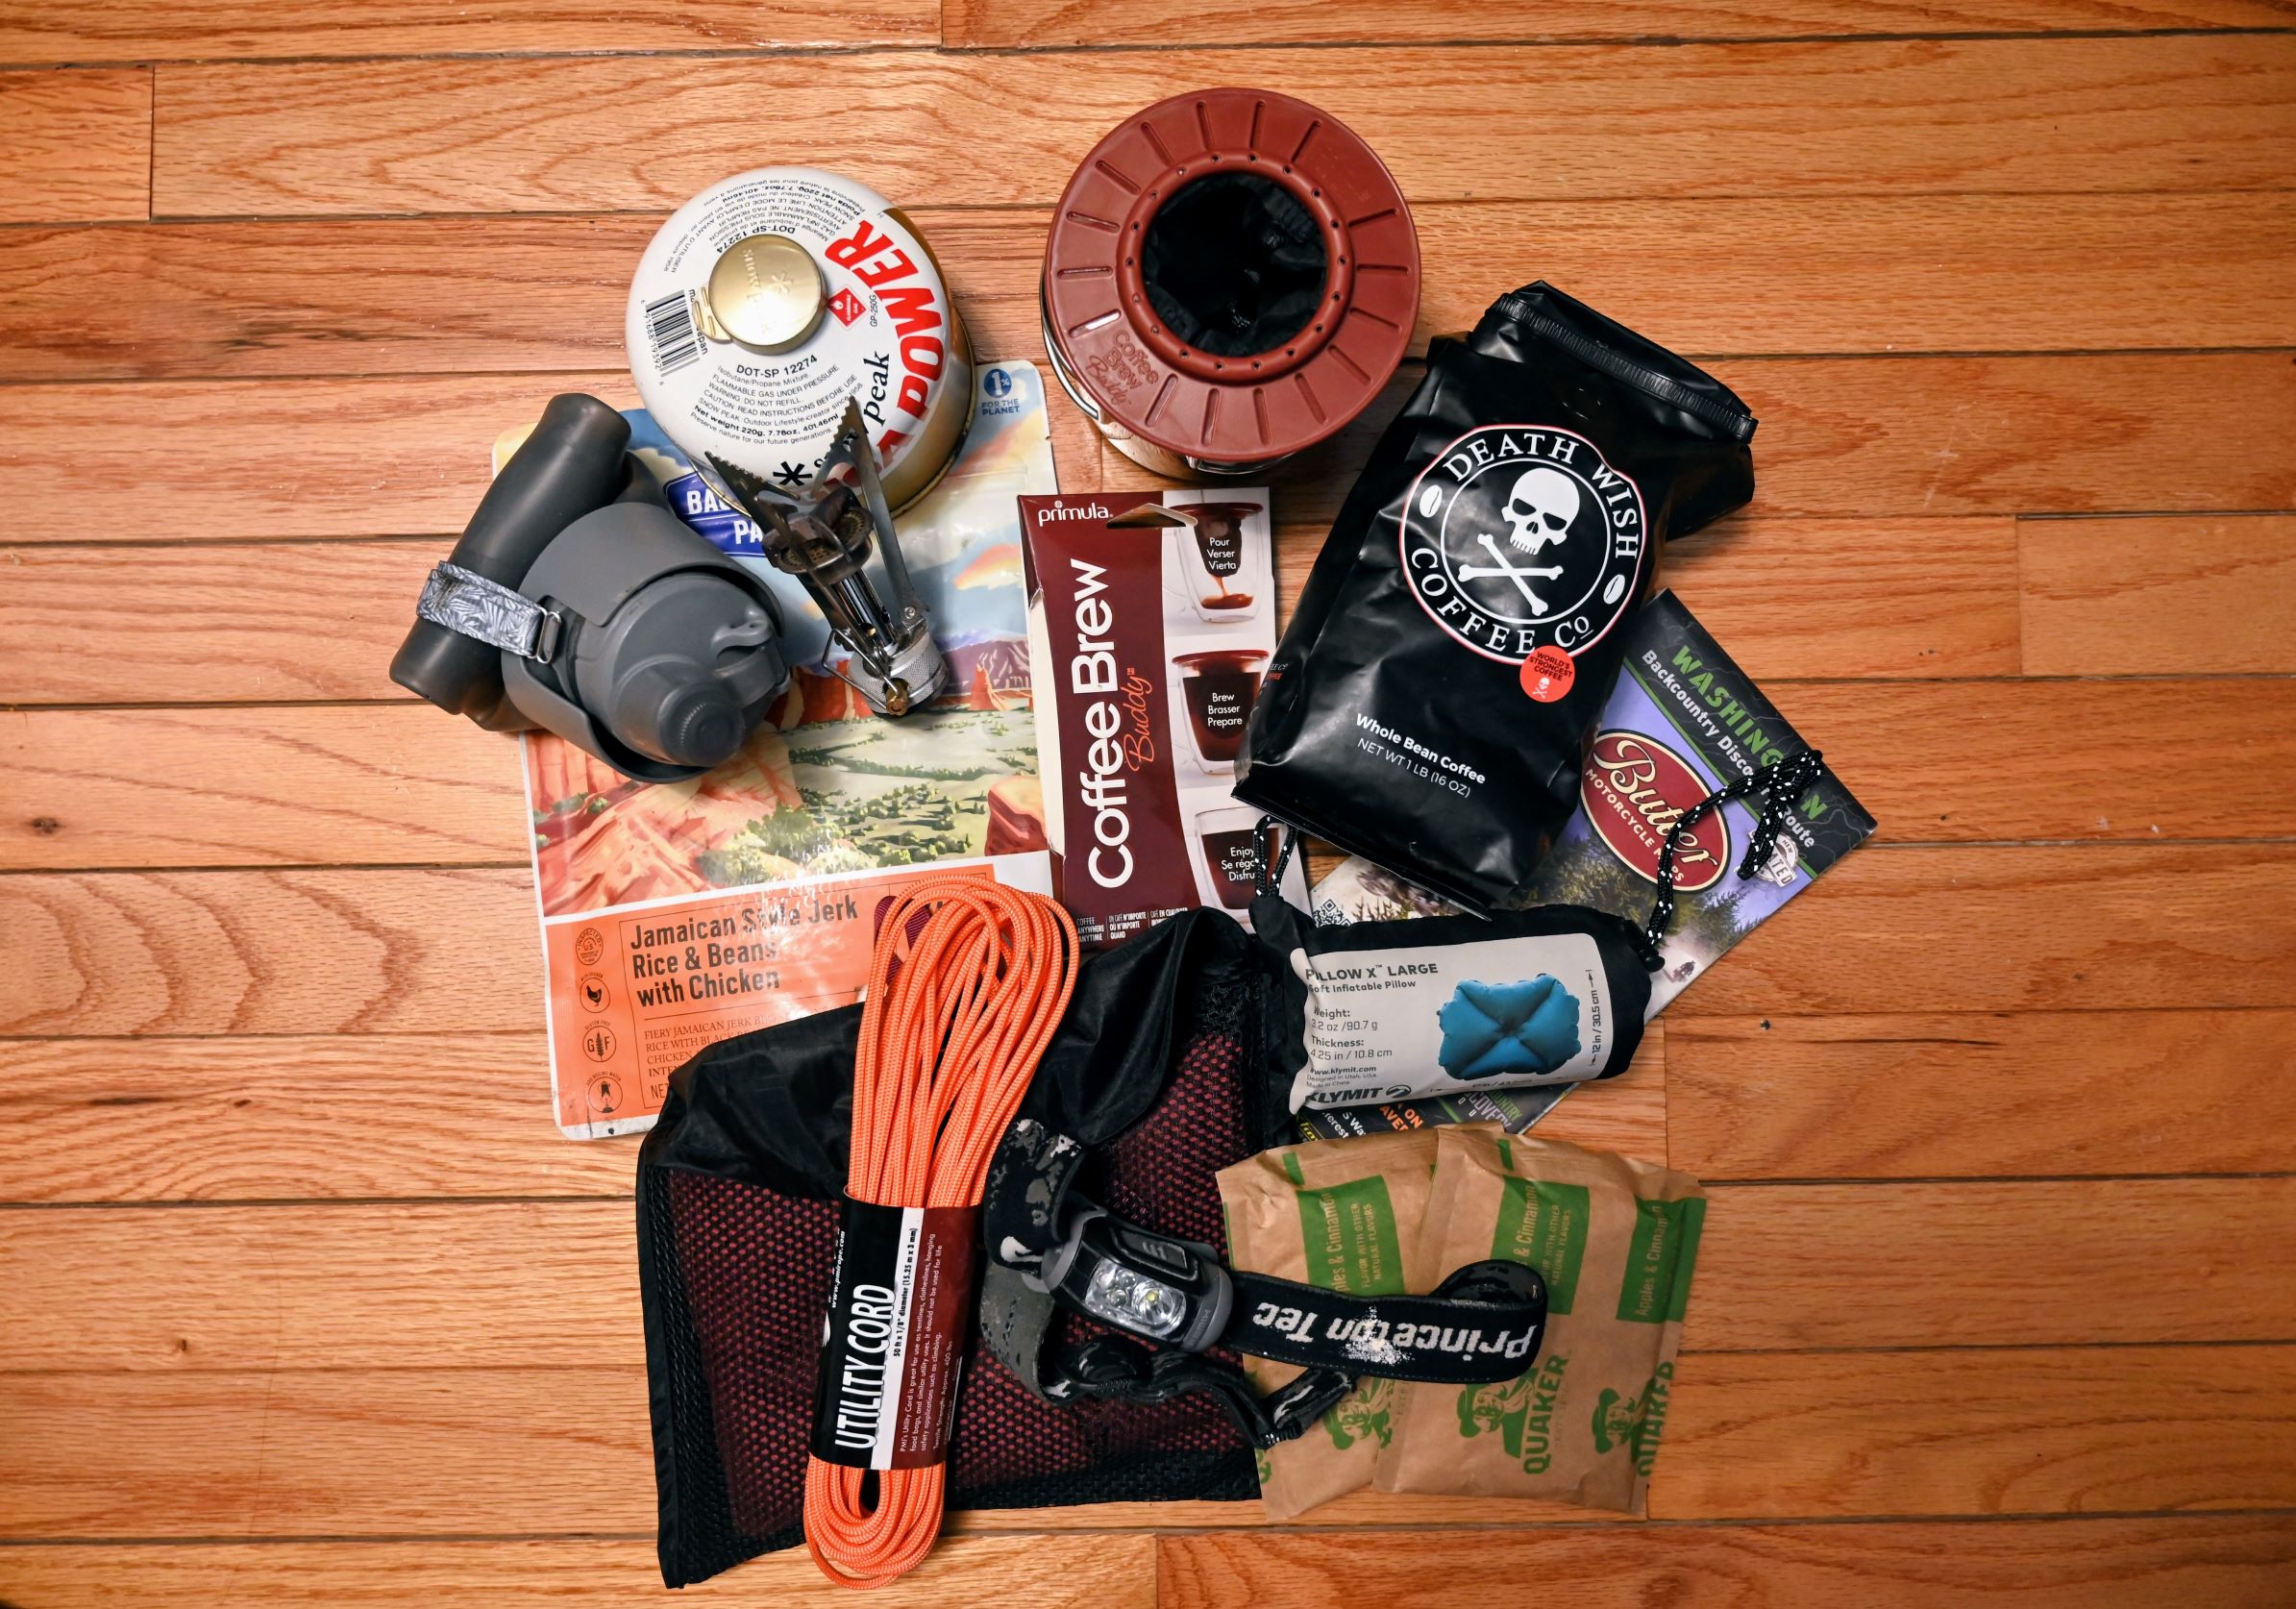
Easy, Lightweight Food Options
I packed our backpacking propane burner and some dehydrated meals that you can prepare right in their pouches. And I also packed oatmeal packets and coffee for breakfast. To make each meal, all I needed to do was to boil water on our tiny propane stove.
I used a new style of lightweight coffee filters to make coffee on this trip as they took up less space than my usual french press options. I like them, but I need to practice more to get the right strength. The first cup was a little too weak. My husband then decided to triple that amount in his cup and oh my goodness! Way too, acidic! So I will perfect it, but overall I am pleased with my purchase.
So in addition to a lightweight propane burner and dehydrated food, I also packed jerky and snack bars. I planned for these to be both our lunch and our snacks. And that was it for food.
Breakfast: oatmeal and coffee. Lunch: jerky and snack bars. Dinner: Dehydrated meals. Remember, you want to keep your motorcycle as light as possible when off-roading.
Packing Essentials: Camping Gear & Supplies
I packed the same gear I used for backpacking and used it for this off-road motorcycle camping adventure. I think these two “hobbies” really compliment each other. You need lightweight gear for backpacking, and you need the same type of equipment for moto camping. The backpacking gear was small and lightweight and fit great inside our panniers. In addition to backpacking gear, I also packed motorcycle emergency supplies and of course, our riding gear.
Packing List
Lightweight, fast-drying towel
Moisture-wicking clothing
Smartwool or riding socks of choice
Flip Flops or Tennis Shoes (when you’re at camp or in town, it’s nice to have a break from your riding boots)
Hat (for when you’re off the bike — to hide helmet head or to keep warm)
Sunglasses
Balaclava (great for cold morning rides)
Thin fleece pullover (great for layering in the morning and at night)
Waterproof riding gear
Jacket
Pants
Gloves
Riding Boots
Backpacking tent (lightweight, easy to set up)
Pillow (or use clothing) (we had inflatable pillows from backpacking)
Backpacking sleeping bag (you want something smaller than your standard car camping bag)
Sleeping Mat (it’s incredible what even an inch of padding can do for a rocky surface)
Ziplock bags for toiletries (at higher altitudes these may leak)
Packing Cubes — These are a great way to organize gear in the panniers and be able to grab out what you need quickly.
Paper Maps (GPS is great when it works, can cause real problems when it doesn’t)
Bungees (for tying down the gear to the back of your bike or panniers)
Zip ties (always useful)
Multi-purpose tool
Spare Fuses
Engine Oil
Spare Tire/Tube or patch kit of some kind
Duct Tape
Fast Acting JB Weld
Loctite Threadlocker Blue
Tylenol/Ibuprofen
Allergy Medicine
Bug Spray
Hand Sanitizer
Chapstick
Raincover for your packs and sleeping bags
Small handsaw
Toolset for motorcycle
Waterproof Matches
Toilet Paper
First Aid Kit
Headlamp/flashlight
WD-40
Phone/GPS/Comms Charger (powerpack)
Charging cables
Communication Devices (we use the Sena SMH10 and loved the ability to communicate direction, needs of the group and sightseeing all along the ride)
Camera (bring proper padding and rain protection)
Passport (if needed)
Packing Tips
Practice packing up your motorcycle at least a day in advance, so you know how everything fits. Make sure the weight in your panniers is evenly distributed so that it doesn’t throw the balance of your bike off.
Also, when packing the day before, I reduced the weight even further by taking a second look at what I was packing. I discovered more items I could leave behind. This tends to be the case. You can usually do without that extra shirt or shorts or “just-in-case” gadget.
Pack the miniature version of whatever you can — miniature brush or comb, travel size shampoo, small flashlight and so on. Moisture-wicking clothing is great because you can wear it for multiple days and easily wash it the night before a ride and hang to dry to wear the next day.
Also, you will eventually pass through towns during your off-road adventure whether you’re on the Washington Backcountry Discovery Route or some other adventure touring ride. So typically, you can purchase additional items, if you find you need them later.
I try to ask myself if I need the item in question. And if for some reason I discovered I did need it later on the ride, could I purchase it then? If the answer is at first “no” I don’t need it and “yes” I could buy it later, then leave it at home. Chances are you won’t miss whatever it was.
Final Tips for Planning Your Off Road Adventure and What to Expect
If you are a beginner, like I was, you’re going to be really sore. I highly recommend you start exercising ahead of time. Build up your shoulder muscles and your quads. I would say these were the two sorest areas for me after a full day of off-road riding.
You should stand most of the time while riding off-road. If you haven’t built up your stamina yet, you will most likely be alternating between standing and sitting. This equates to doing squats. By the end of the first full day of riding my quads were on fire, and it hurt to sit and stand up.
Give yourself extra time. Yes, we could have done each section in one day, however, when you’re just a beginner at off-road adventure riding, it’s better to give yourself more time than you think. Plan to have downtime at your campsite. Rest, relax, discuss the day’s ride, and go over tomorrow’s trip. This will make your off-road adventure far more enjoyable.
I made the mistake of not giving us enough time, and I will not make that mistake again. I made too many assumptions about the trail and our abilities. These assumptions proved incorrect, and it made for some very stressful riding conditions. So learn from my mistakes and add rest time to your schedule.
It’s also good to have extra time for any emergencies or detours that might come up. When you are riding off-road things get a bit more unpredictable. And help is a lot further away.
Drink plenty of water while riding and keep your energy levels up. And have fun!! You can read Misadventures on the WABDR for more information about the route and our ride.
I attempted the Washington Backcountry Discovery Route sections 4, 5 and 6 in early September. You will learn more about why I say “attempted” as you read along. The Washington Backcountry Discovery Route (WABDR) is 575 miles of (mostly) off-road riding that goes from the Oregon/Washington border to the Washington/Canadian border.
Read how I planned and what I packed. And if it is your first time planning a similar ride, I hope you will learn from my mistakes. In this post, I will journal our experiences on this motorcycle adventure, my expectations before the trip and my confrontation with reality after day one of our journey.
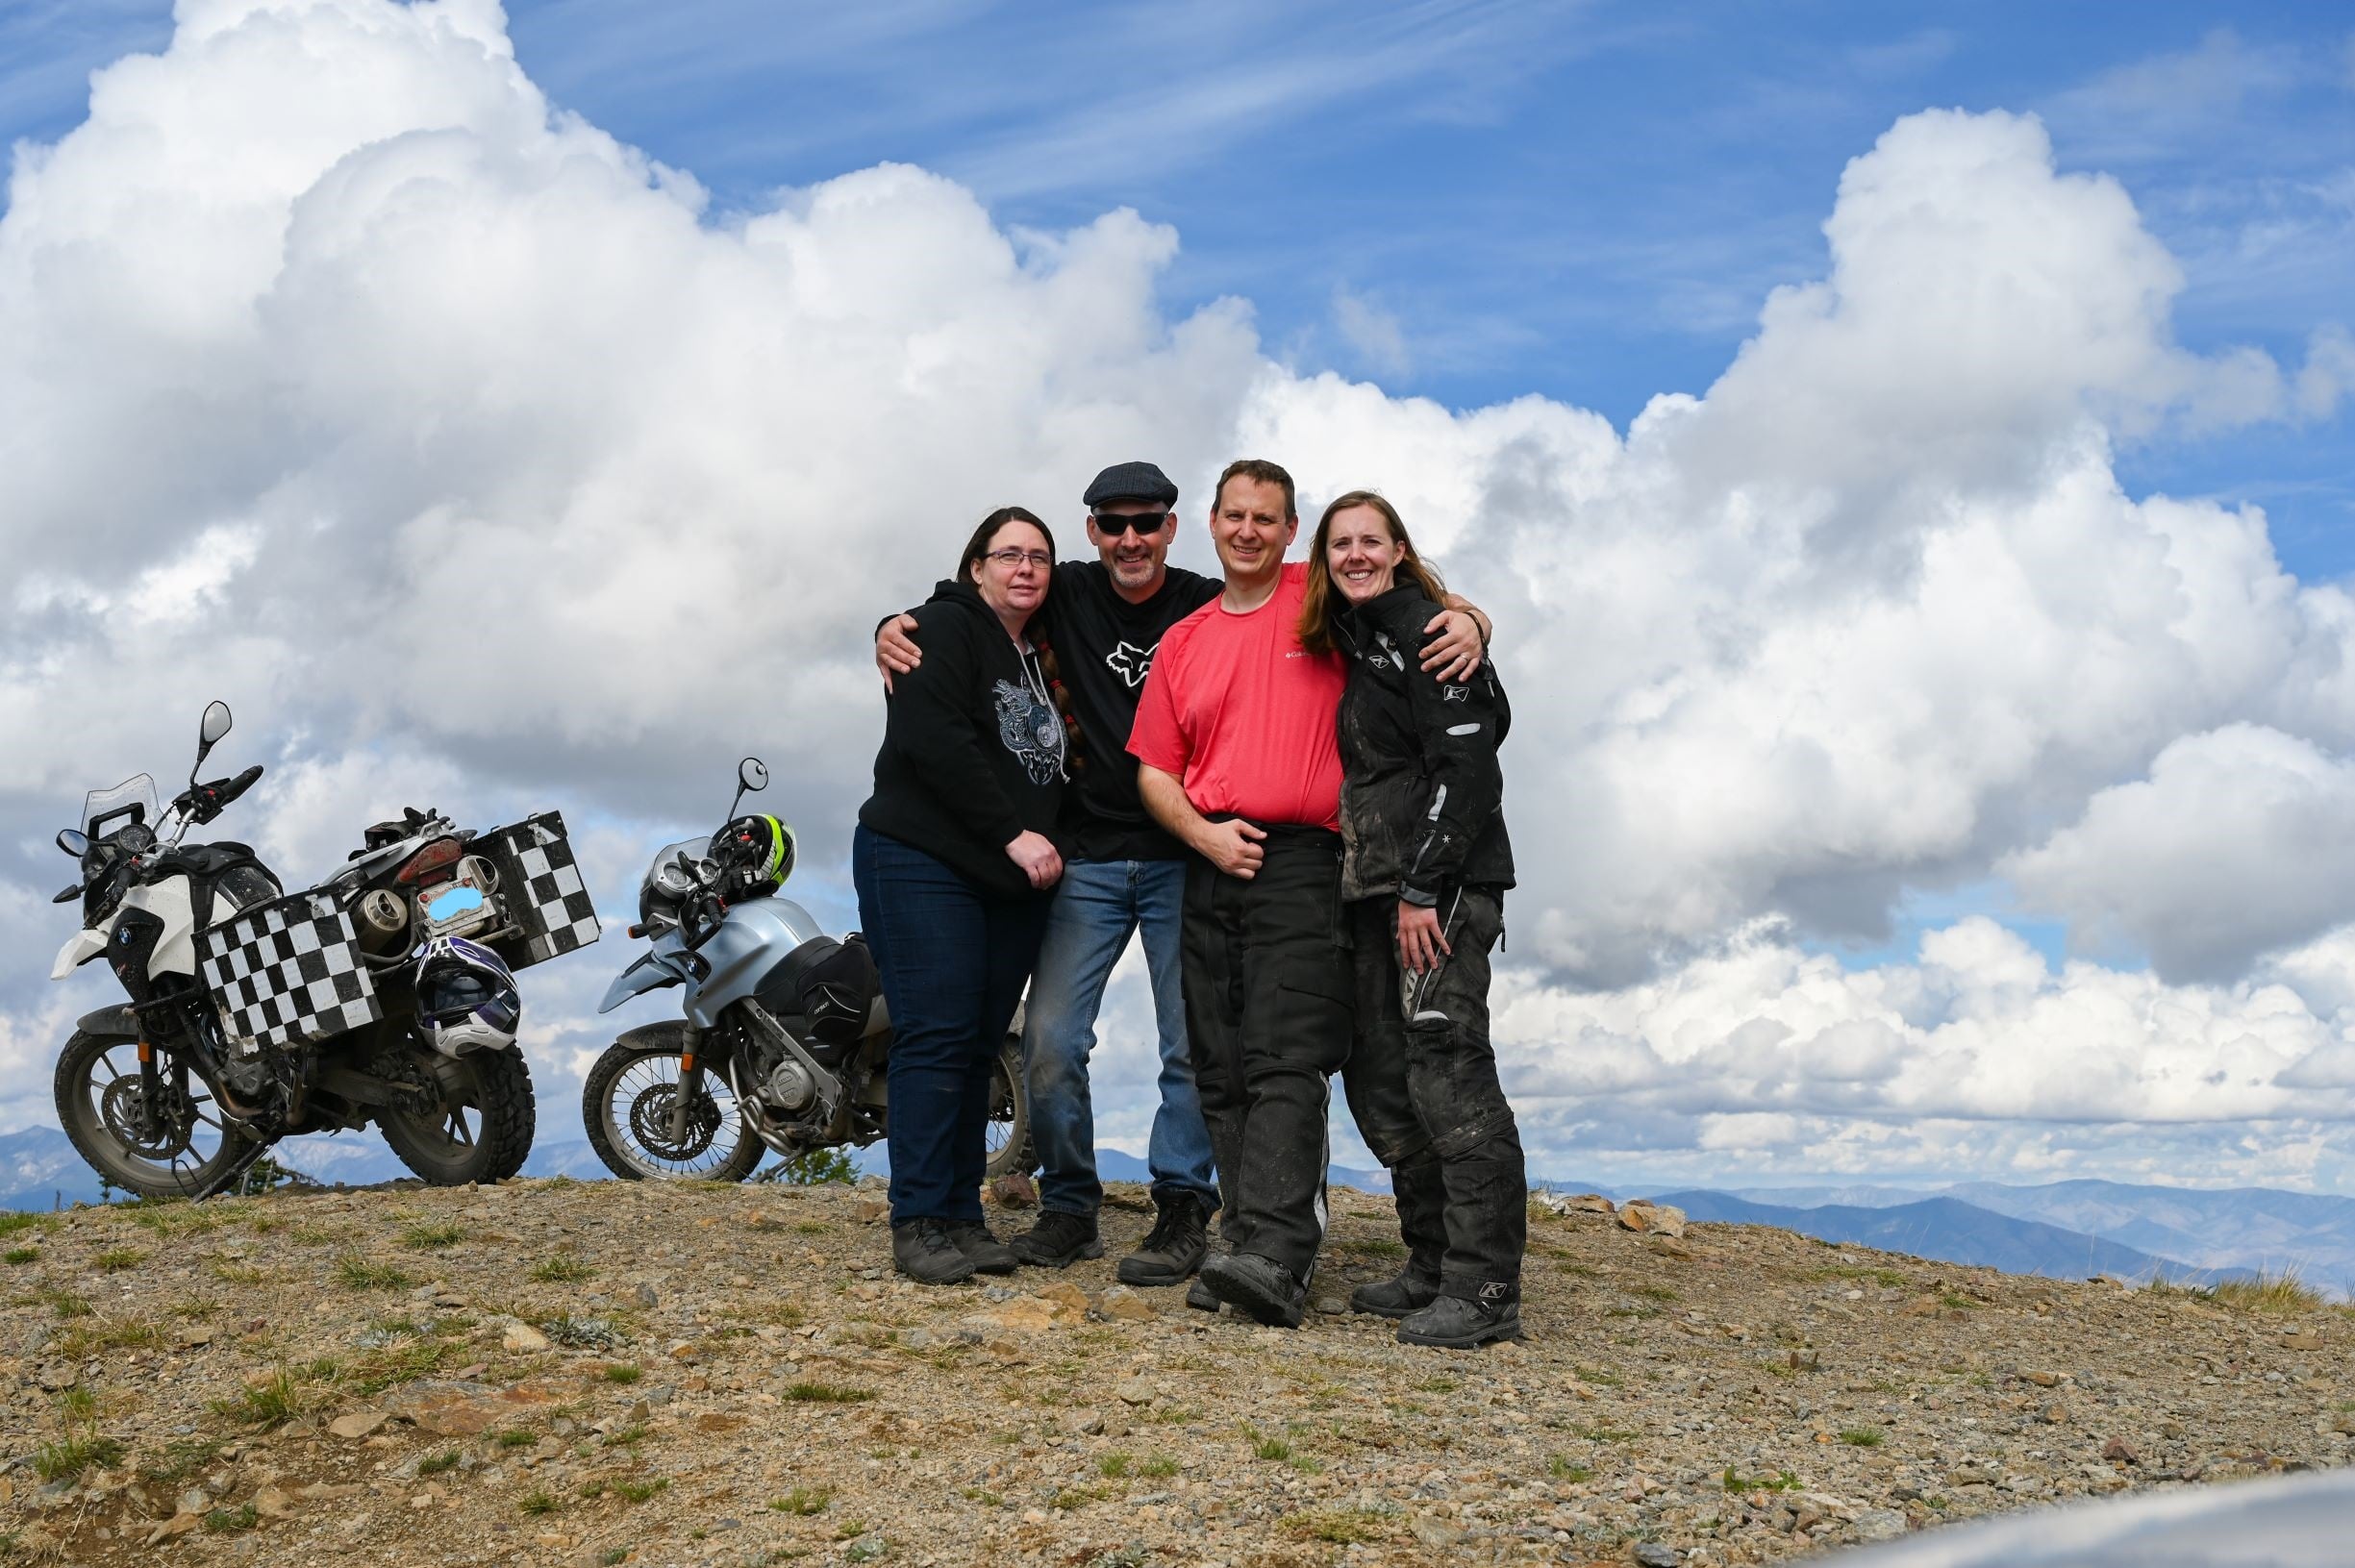
Meeting Our Group the Night Before
I am riding sections 4, 5 and 6 of the Washington Backcountry Discovery Route with my hubby, brother, and sister-in-law. Section 4 covers backroads from Cashmere to Chelan. Section 5 is Chelan to Conconully, and Section 6 is Conconully to the border crossing at Nighthawk. These three sections total to approximately 273 miles. We plan to spend one day riding per section.
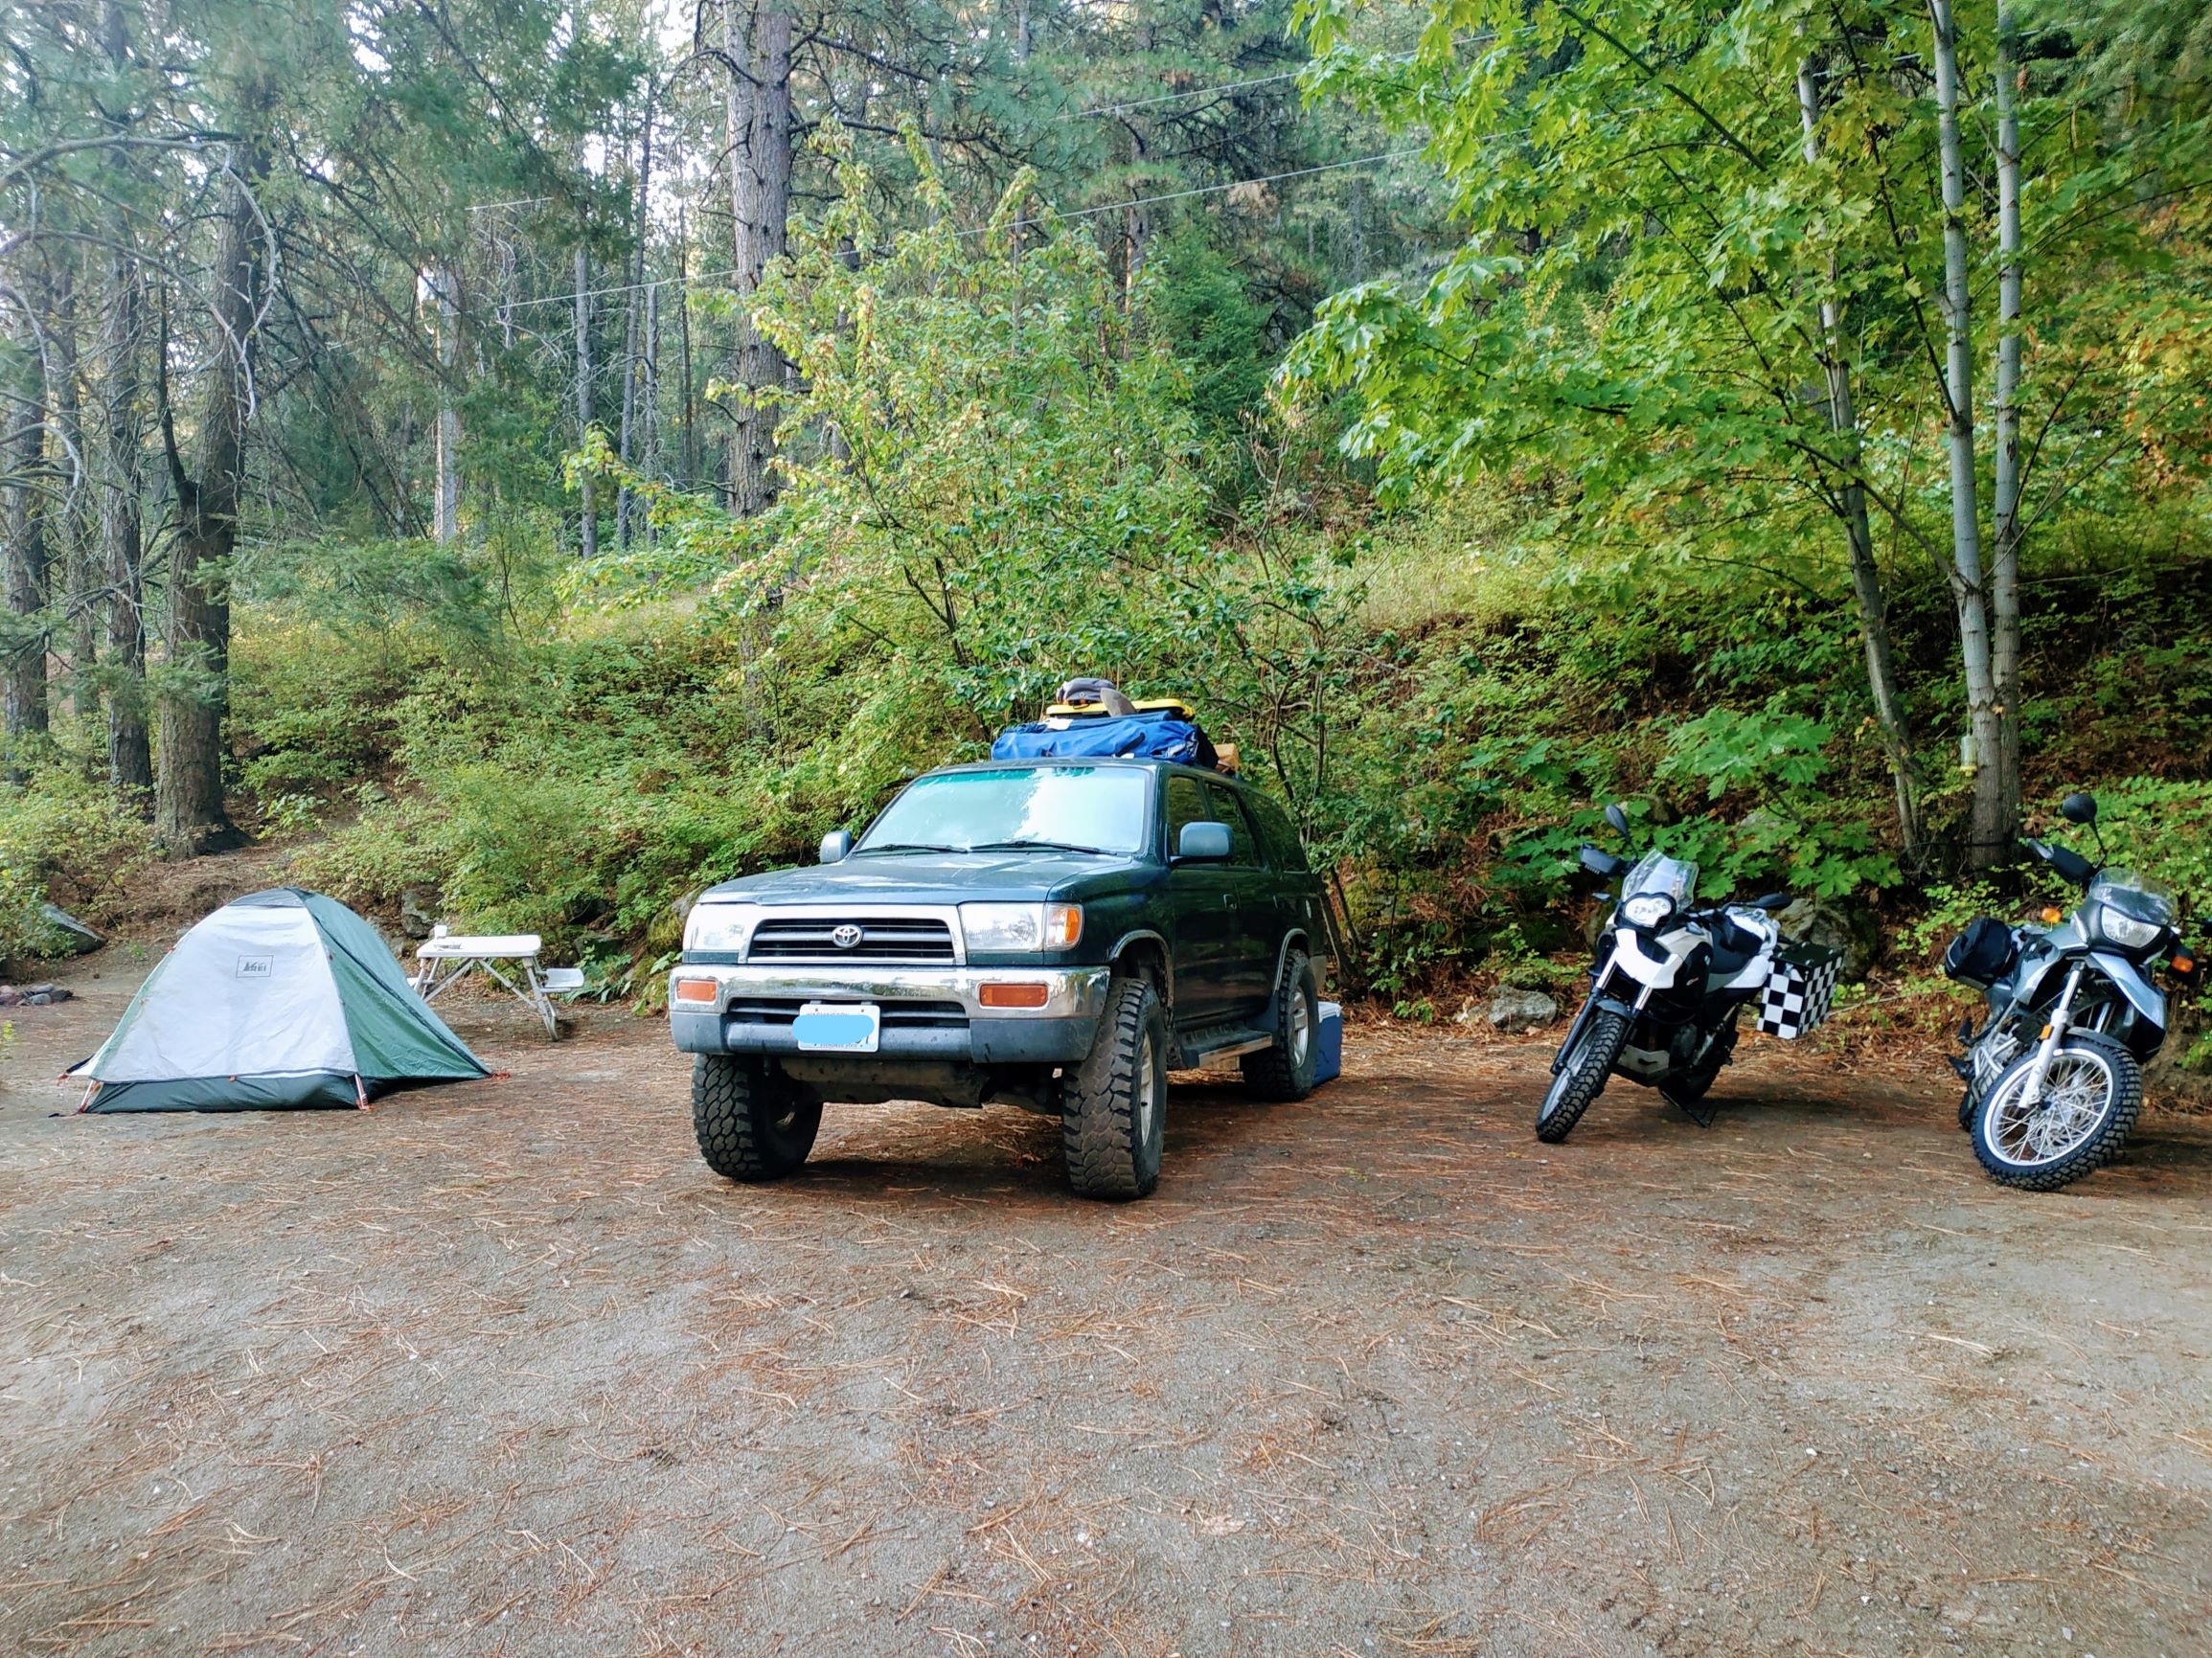
My hubby and I rode over from Seattle Tuesday night after work to meet my brother and his wife in the town of Leavenworth, Washington. We reserved a campsite and planned to get dinner with them before getting some rest for our ride on Section 4 the next day. We had a great evening hanging out in Leavenworth, and everyone’s spirits are high and our hearts full of adventure.
Day 1: Section 4 of the Washington Backcountry Discovery Route
I was up around 6:30 a.m. No one else is awake, so I walk up the road to get coffee. Typically when we go camping, I make coffee at camp, but today’s campsite is conveniently located down the street from Starbucks. The campsite is still quiet when I return, and no one else is up yet. I read, and I journal, I drink more coffee and finally decide to wake up my husband. It is now almost 7:45 a.m., and the rest of the group is finally getting up.
This is the first in a series of lessons where my expectations meet reality and lack of planning. I should have discussed with the group, the night before, what time we all thought we should leave. Then set the alarm and made sure everyone was up and getting ready on time. However, I assumed that the day’s ride would only take 4 or 5 hours, so I wasn’t panicked. That was lesson two in setting expectations.
We decided (against our better judgment) to go into town for breakfast. By the time we got into town for breakfast, it was already after 10:00 a.m. I knew we should have just eaten at camp or stopped at a place along the route, but again, I thought today’s ride wouldn’t be that long.
So long story short, we don’t end up starting the ride until almost noon! Yeah, that was a big mistake!
In the Beginning, There Was a Puddle
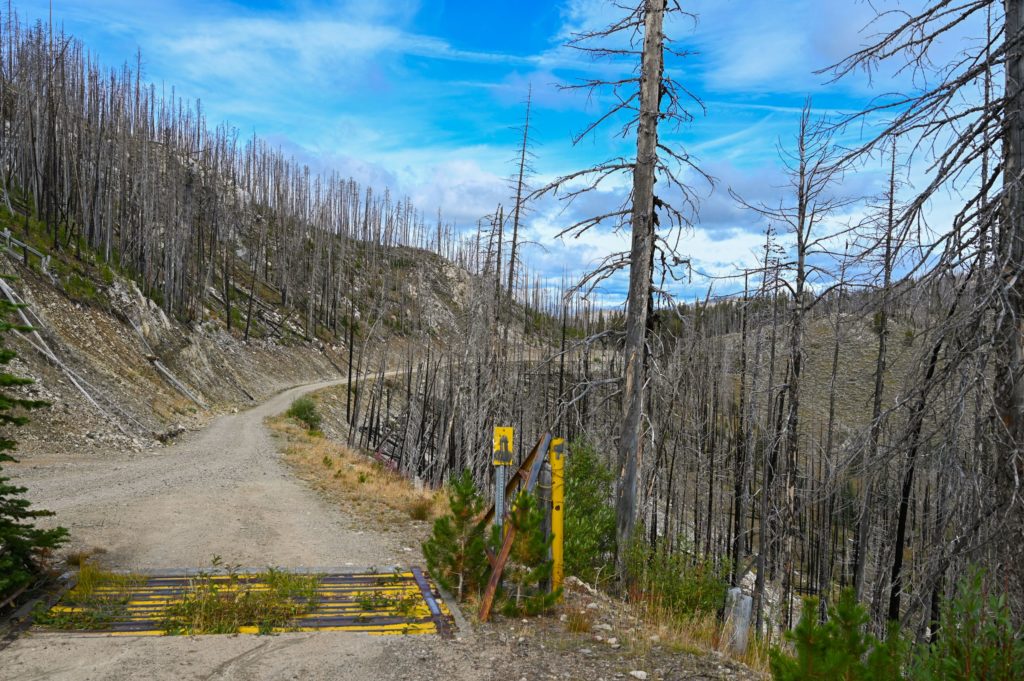
In the few days preceding our ride, the area had received heavy rain and flash flooding. So shortly after starting the off-road portion of Section 4, we run into the mother of all mud puddles. Think crater filled with water and mud. Then after you cross said crater, you must traverse along a thin stretch of dirt like a tightrope walker to avoid getting stuck in the large muddy ruts on each side. The grooves were so deep in places that if I were to get stuck in them, my panniers would hit the sides of the rut.
Hubby is in the lead, and he makes it through the mud puddle (crater) and safely to the other side. I, however, stopped at the edge of the mud crater– that was a mistake. And then I let that pit get in my head and psych me out — another mistake. My brother gets out of his 4Runner to give me some pointers on crossing the puddle. He offers to ride it for me, but I say no, I need to do this myself. So I proceed to descend into the muddy pit only to shortly thereafter lay the bike over.
Puddle Wins 1-0
My husband said he heard “glub, glub, glub” on the communication system. Yes, that was me and my helmet immersed in muddy puddle water. I ask my brother to get my bike up quick. The last thing I want is for it to take in water. So he gets in and soaks his feet and legs to help me get my bike up. He’s a good big brother. I’m unhappy at this point and frustrated with myself for letting this puddle get the best of me. And I am also not happy about just starting the ride and being soaking wet!
But, I get back on my bike, and now I am staring down the deep ruts on either side, willing myself to look forward to where I want to go and not at those deep ruts where I don’t want to go! (There’s probably a life metaphor in there somewhere.) My brother once again helps me, as I’ve slid into a rut, and after he helps me out, I make it safely across to where my hubby is waiting.
Oh, and a quick note about our communication devices. We purchased Sena SMH10s for this ride, and we loved having comms! It was invaluable to be able to communicate directions and needs while riding. Additionally, besides the mud puddle, we also road in heavy rain on our way back to Seattle and the comms seemed unaffected. I highly recommend you consider a communication system when doing a group ride.
If A Tree Falls In the Forest
And now the irony of it all, no one thought to take any pictures of the muddy crater, the huge ruts, me dripping wet, nothing. So I ask you: If you ride off-road and take a plunge in a huge mud puddle, but no one captured it on camera, did it even happen?
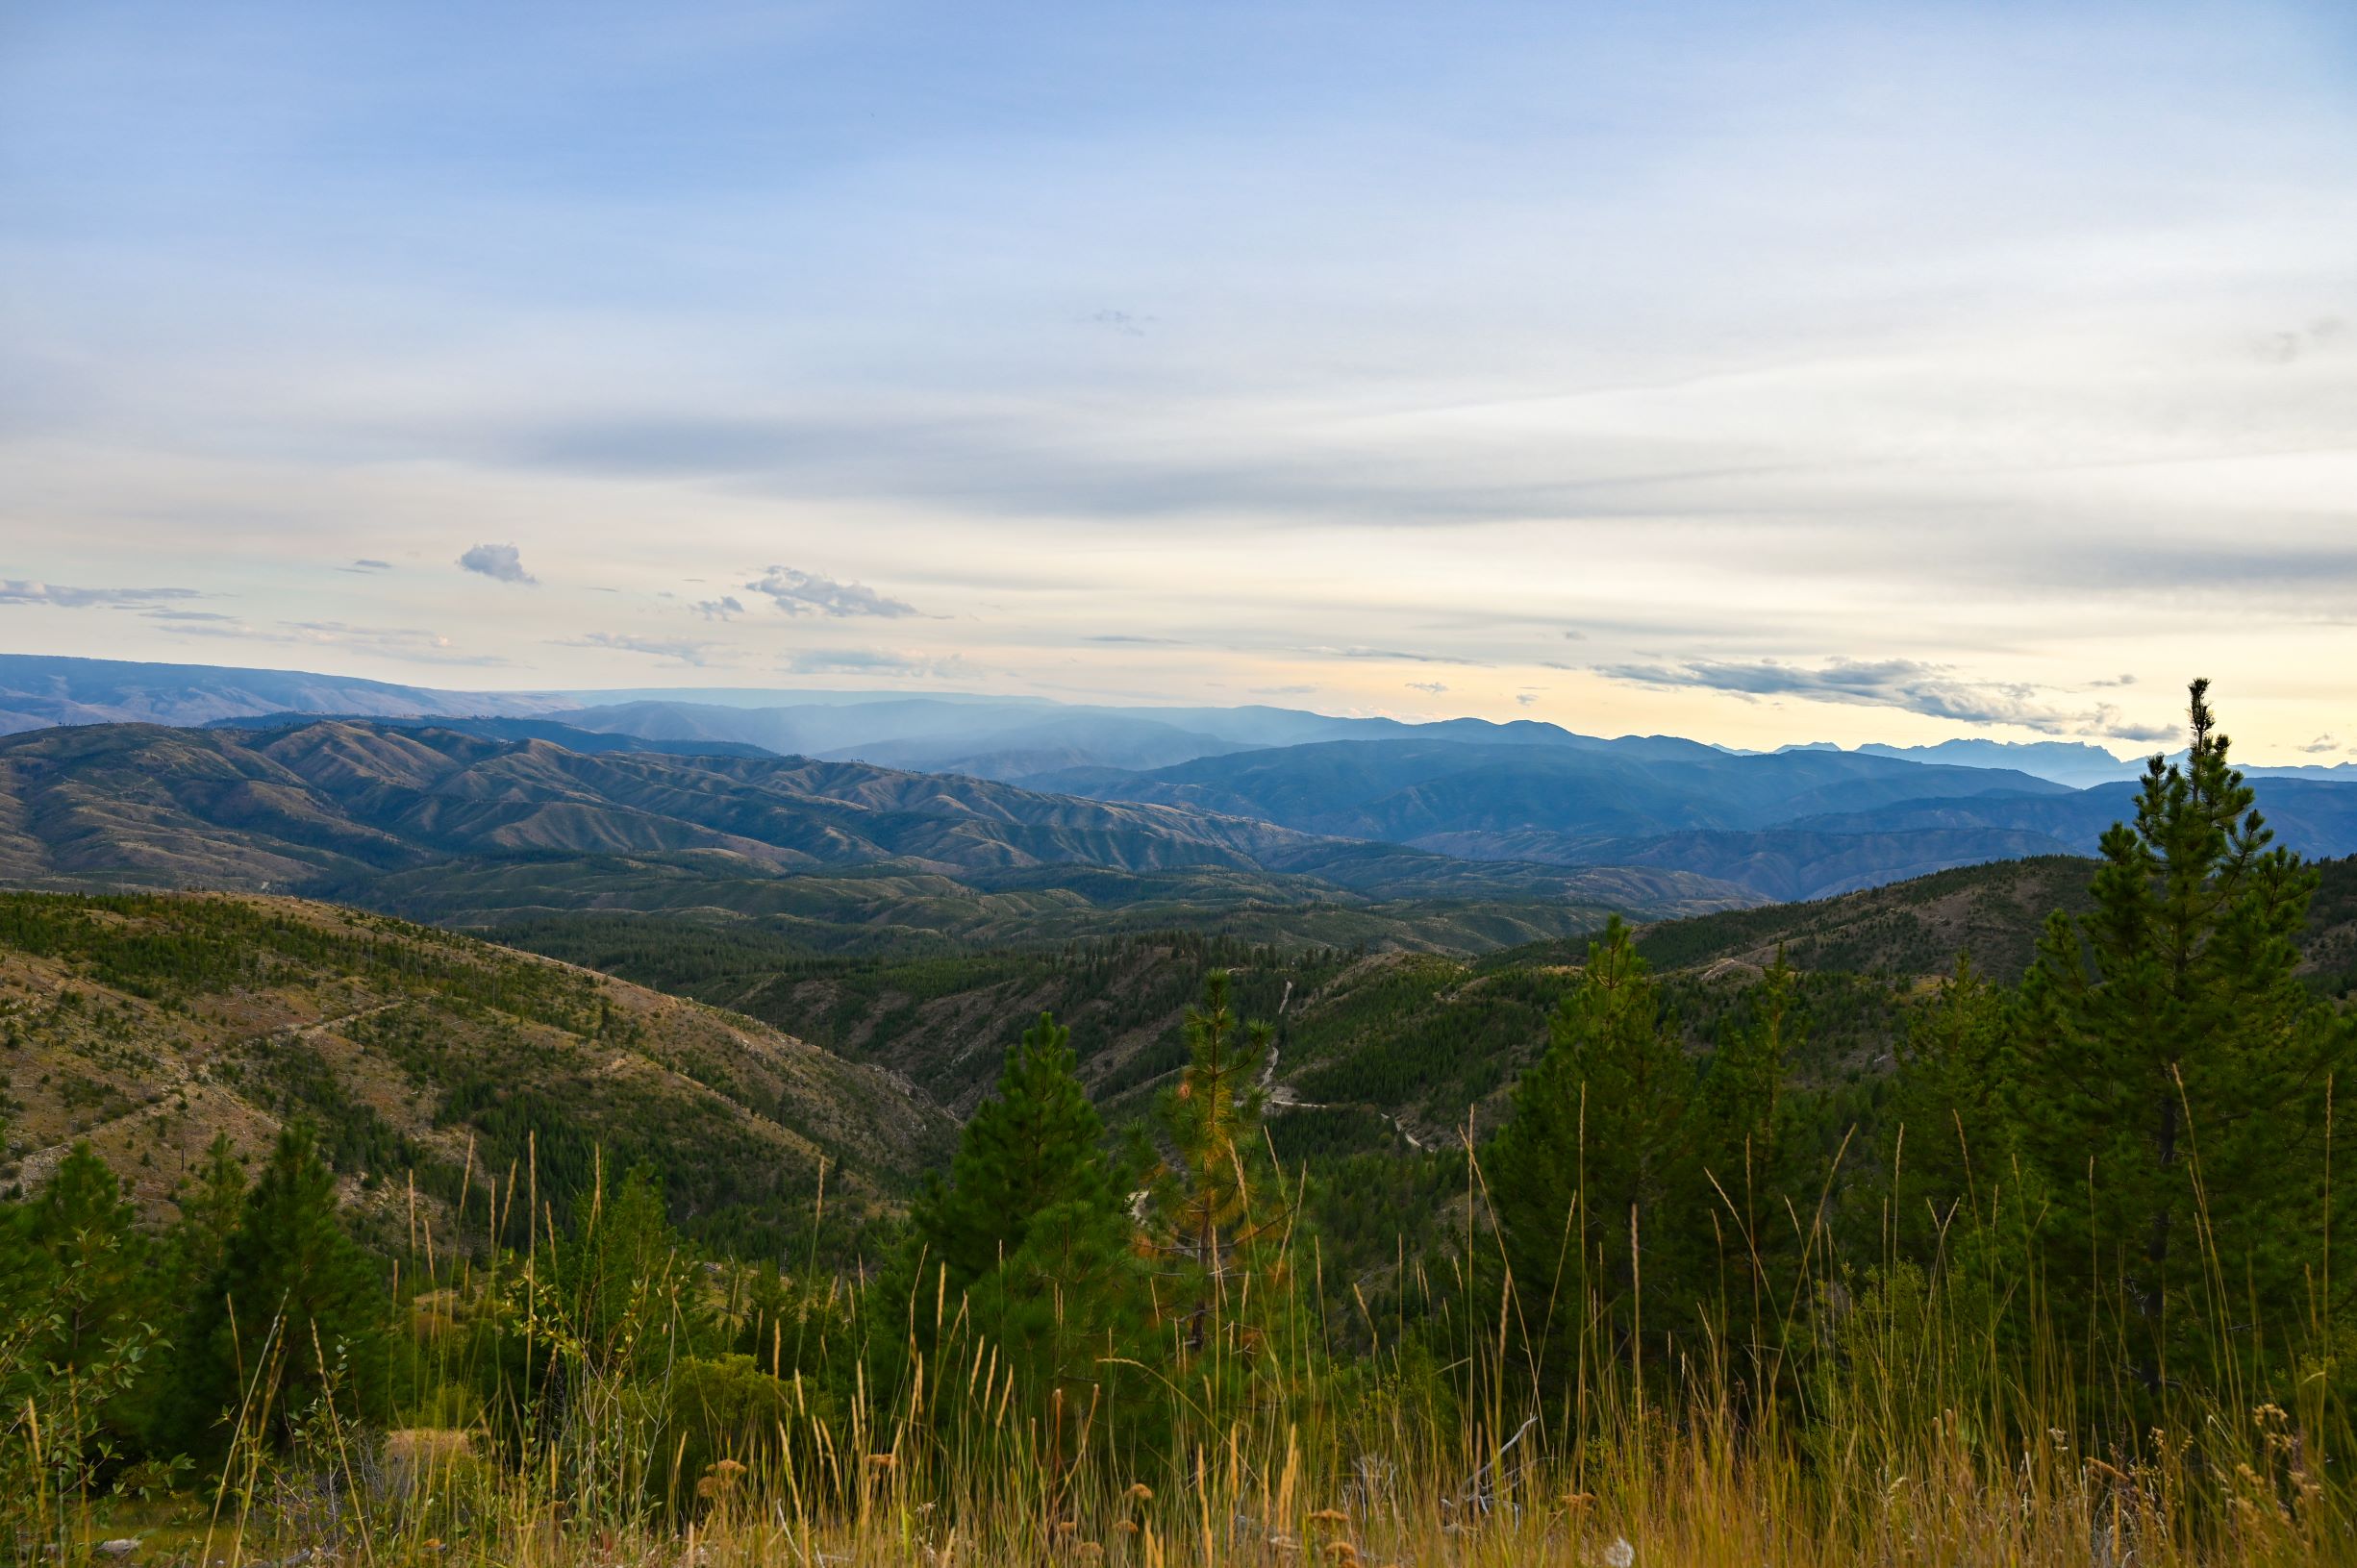
Little did we realize, but the puddle was just a taste of what this day would hold. There were more deep grooves and washouts, rocky ascents and descents, road closures and detours all culminating in a dark and rocky ride down to the town of Chelan.
Chumstick Mountain Summit to Ardenvoir
We make it to the summit of Chumstick Mountain, elevation 5,810 feet and take a break and enjoy the views. Our spirits are high, and we’ve had a great time riding thus far. Each puddle I’ve encountered since “the” puddle has been easily crossed or avoided, and we’ve been gaining confidence and experience. I’ve heard “whoops” and “wahoos” over the comms and enough corny jokes to last a lifetime. This is what the journey is about.
As we enjoy our break, we notice a fire in the distance, and we hope that we won’t need to ride through it. We don’t and are happy about that. We eat a snack and continue our ride to the next waypoint in the town of Ardenvoir.
As we are about to hit pavement for our ride into Ardenvoir, a “road closed” sign is blocking our path. We followed the detour signs, and it felt like we were backtracking in the direction we had already come. After the initial detour, we came to another fork in the road with another detour sign. According to the map, the detour would not take us where we wanted to go, so we continued straight to stay on NF-5801. It was around 1 to 1 1/2 hours later that we arrived in the town of Ardenvoir.
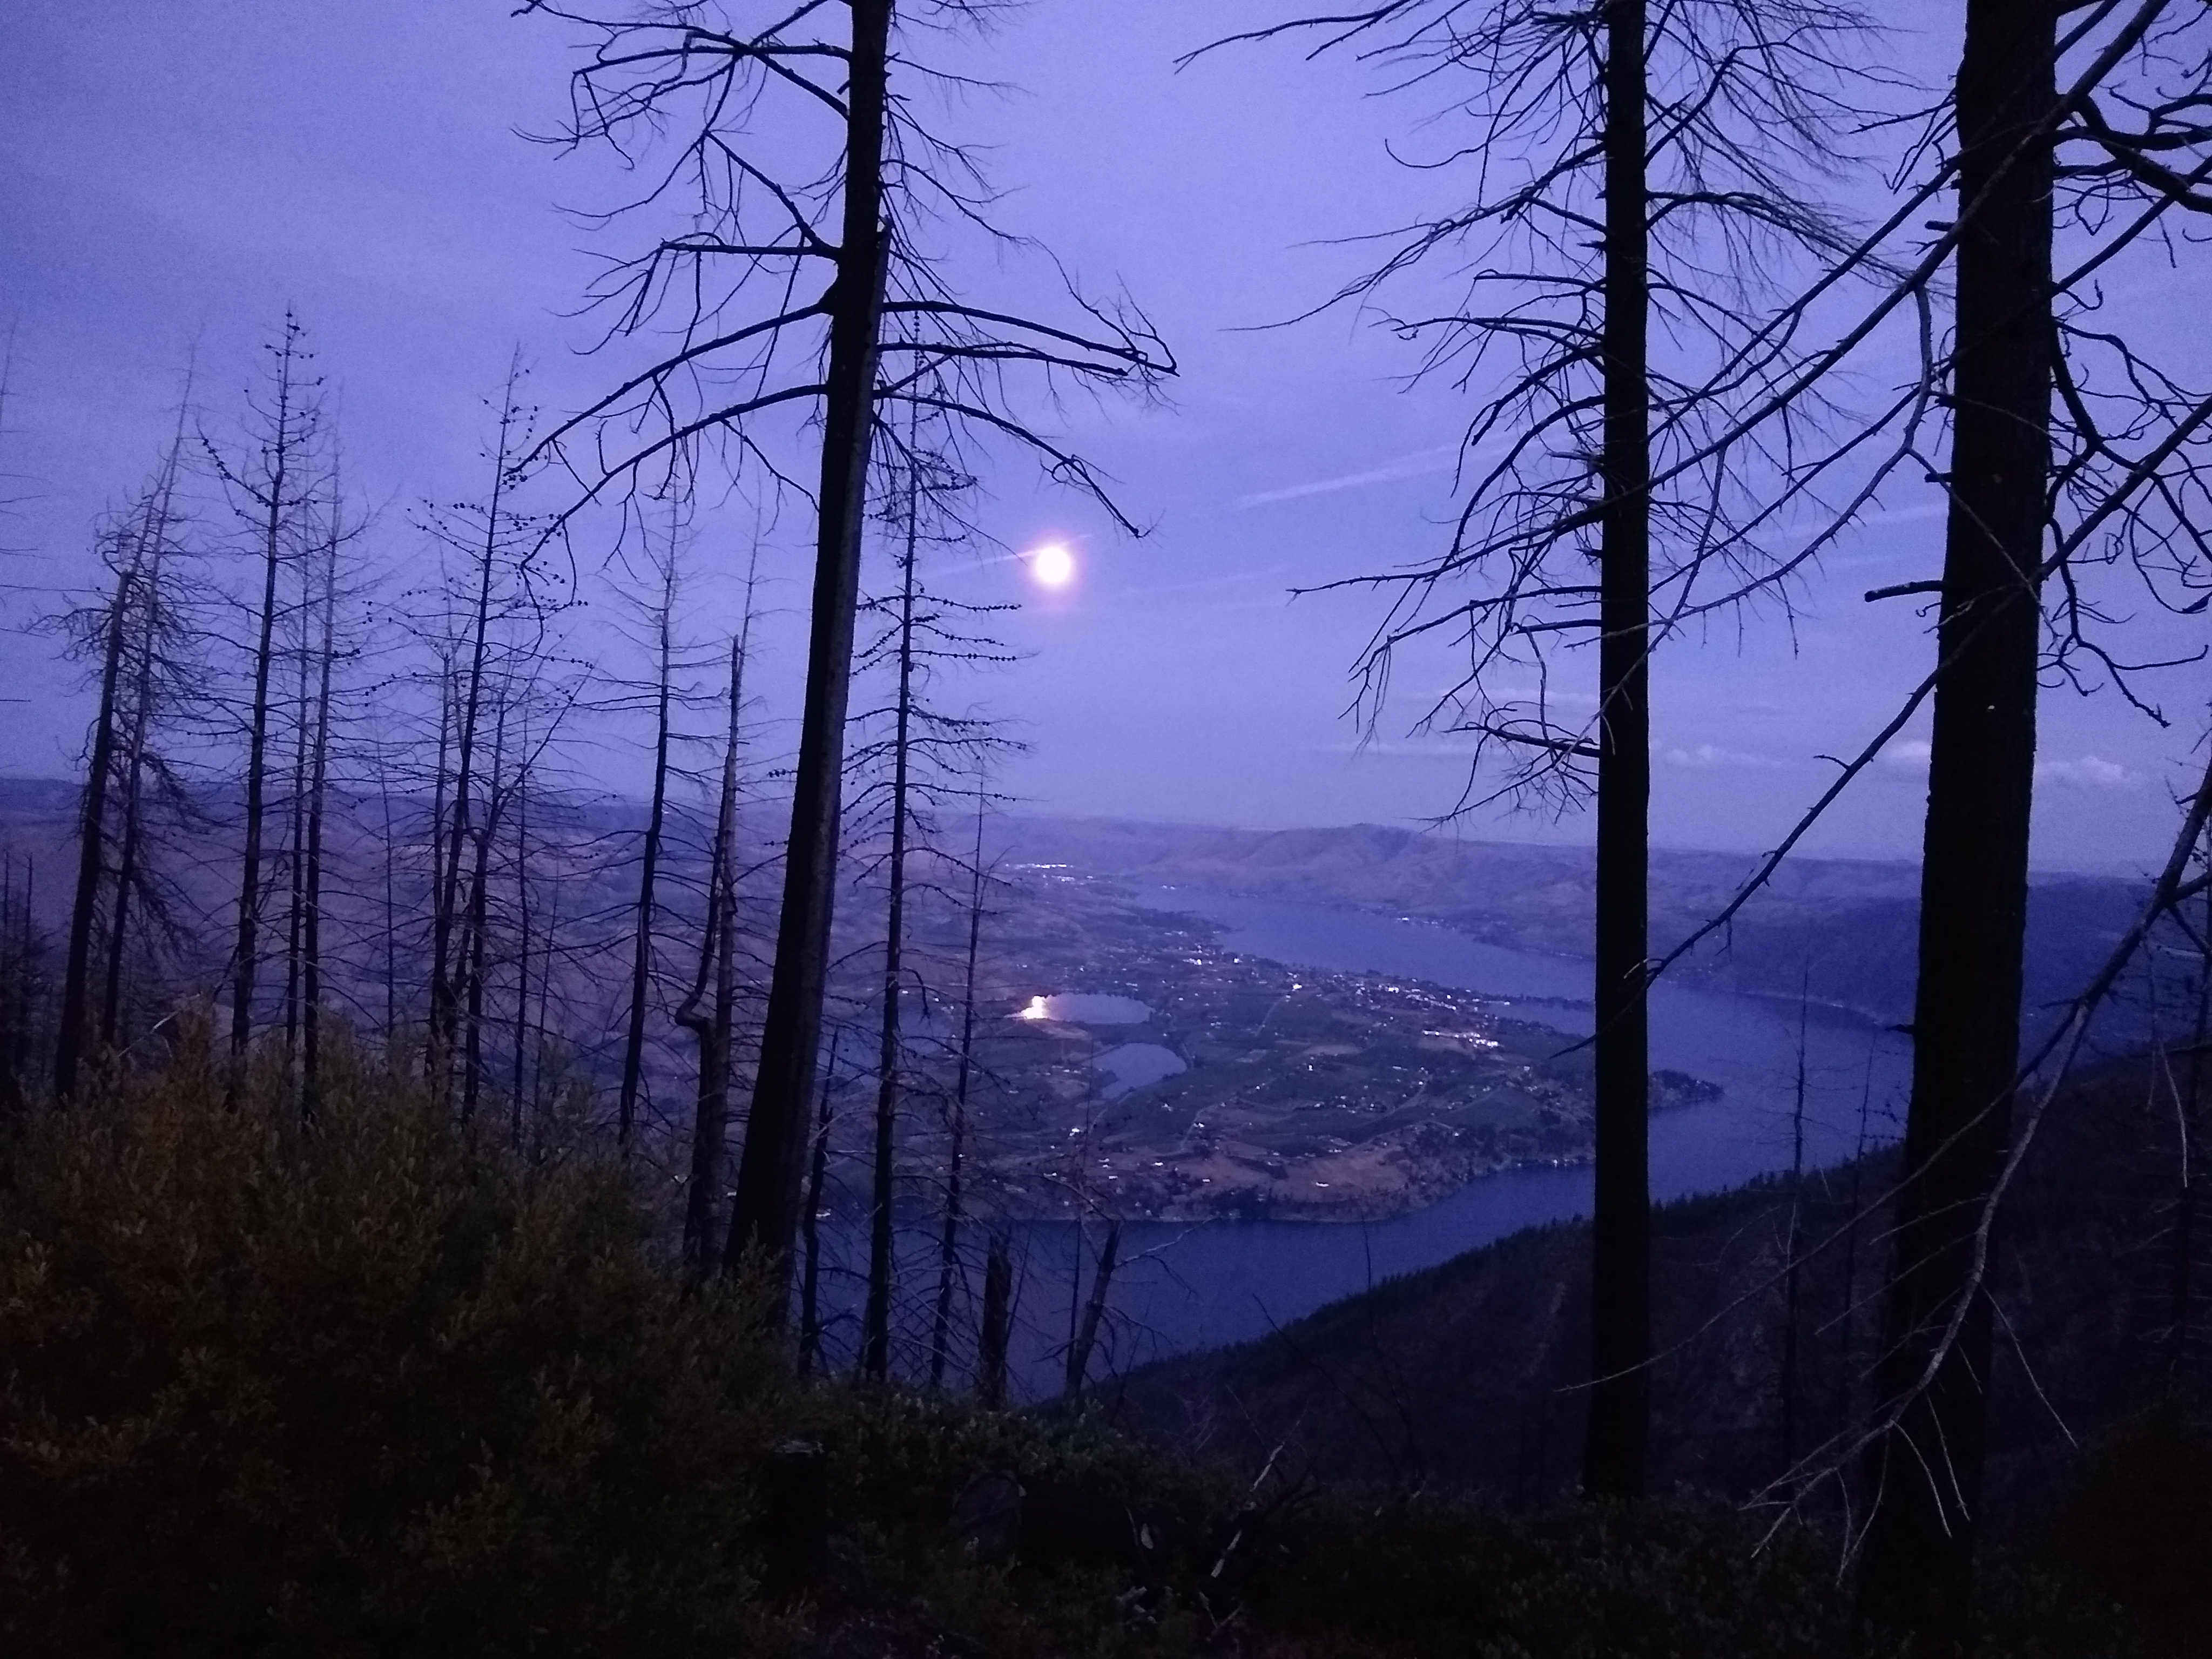
The gas station is closed, because, you know, it’s Wednesday. So we decide to keep going. It is now about 5:30 p.m. as we start our ascent of over 4,000 feet to reach McKenzie Ridge. After that, we will ride down Slide Ridge and hopefully reach Lake Chelan before dark.
McKenzie Ridge Meets Misguided Expectations
Oh, the optimism and the naivete I held at that moment. I was sure we could make it to Lake Chelan before dark.
As we reached McKenzie Ridge, we saw beautiful views of Lake Chelan. And it filled us with hope. We could see our destination, and it felt closer than it actually was.
The lake calls to us as we begin our descent down Slide Ridge, telling us, we were close. We were not close enough. Soon daylight turned into dusk and dusk to darkness.
Riding in the Dark
We continue our ride down the mountain in the dark, passing primitive campsites along the way. I call out to my hubby, who was in the lead, “we can camp here.” He continues riding, his reply, “I just want off this mountain.”
We are exhausted and sore and riding down that rocky road full of ruts took every ounce of concentration and strength. On top of that, my husband’s rear brakes overheated and were no longer working. This meant he had to use a combination of riding his clutch and applying soft front brake pressure in the steep areas.
I, on the other hand, had not taken the time to clean my visor from my initial fall in the mud puddle. So I was riding with my visor up, all the while praying that those bats that kept flying across my path would not fly into my helmet. Standing up in the rough parts now took every ounce of strength I could muster.
We skip the optional “jungle” on section 4 and take the easier alternate route down.
I thoroughly regretted my foolish assumptions at this point. Assuming things would take less time and assuming our skill levels were higher. I was feeling bad that I had pressured my hubby into continuing the ride from Ardenvoir when he had doubts about it — and desperately wanting to get off the mountain safely. Off-road motorcycle riding at night was not part of the plan.
Pavement Oh Sweet Pavement How I Missed You
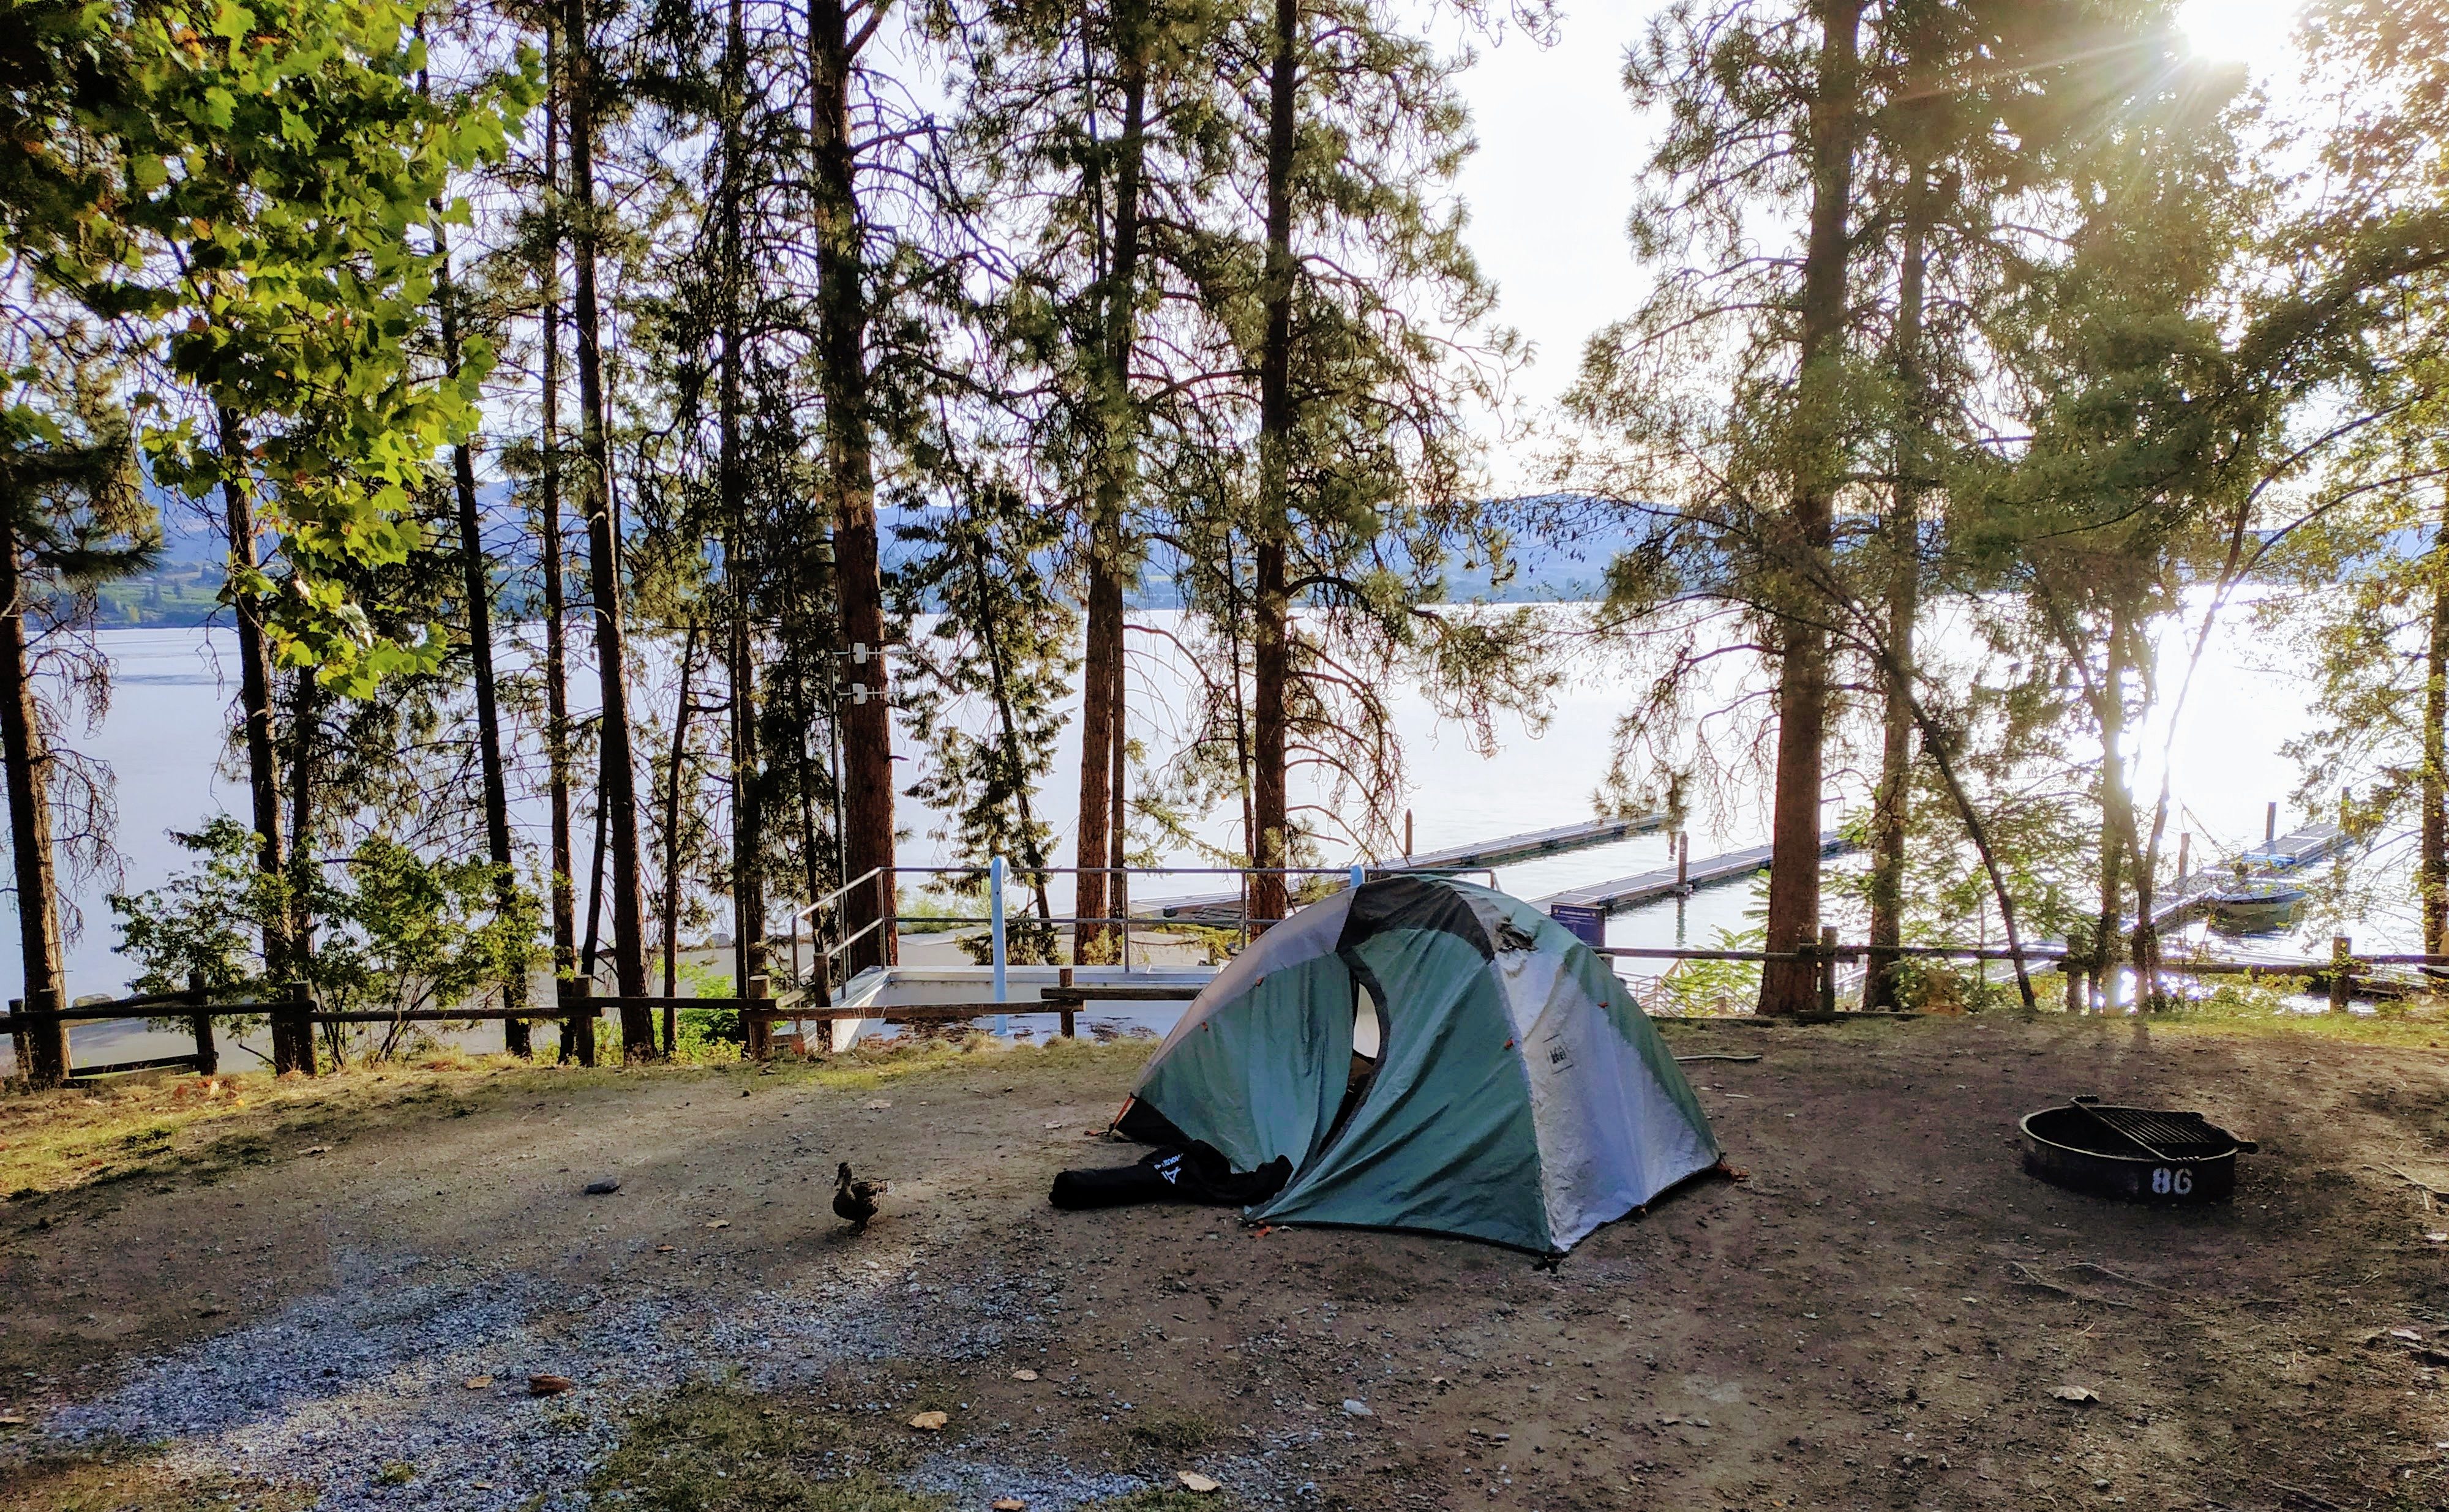
We rolled into our campsite at Lake Chelan State Park around 10:30 p.m. After over 10 hours of riding, we were never so happy to see pavement as we were that night. I didn’t know if I’d be able to walk the next day. I was completely spent.
Riding is a workout, and riding off-road is both physically and mentally demanding. Choosing your lines and hours and hours of standing and sitting (think of doing squats for an entire day) and being pounded by rough and rocky road conditions. Even my brother and sister-in-law in the Toyota were feeling it.
I realized that day that I was not in the physical shape, I needed to be in, and I overestimated my stamina and ability. I should have planned to camp on the mountain and split section 4 into two days rather than one. We are beginners, not seasoned adventure riders. What I want to be and what I was at that moment were two very different things.
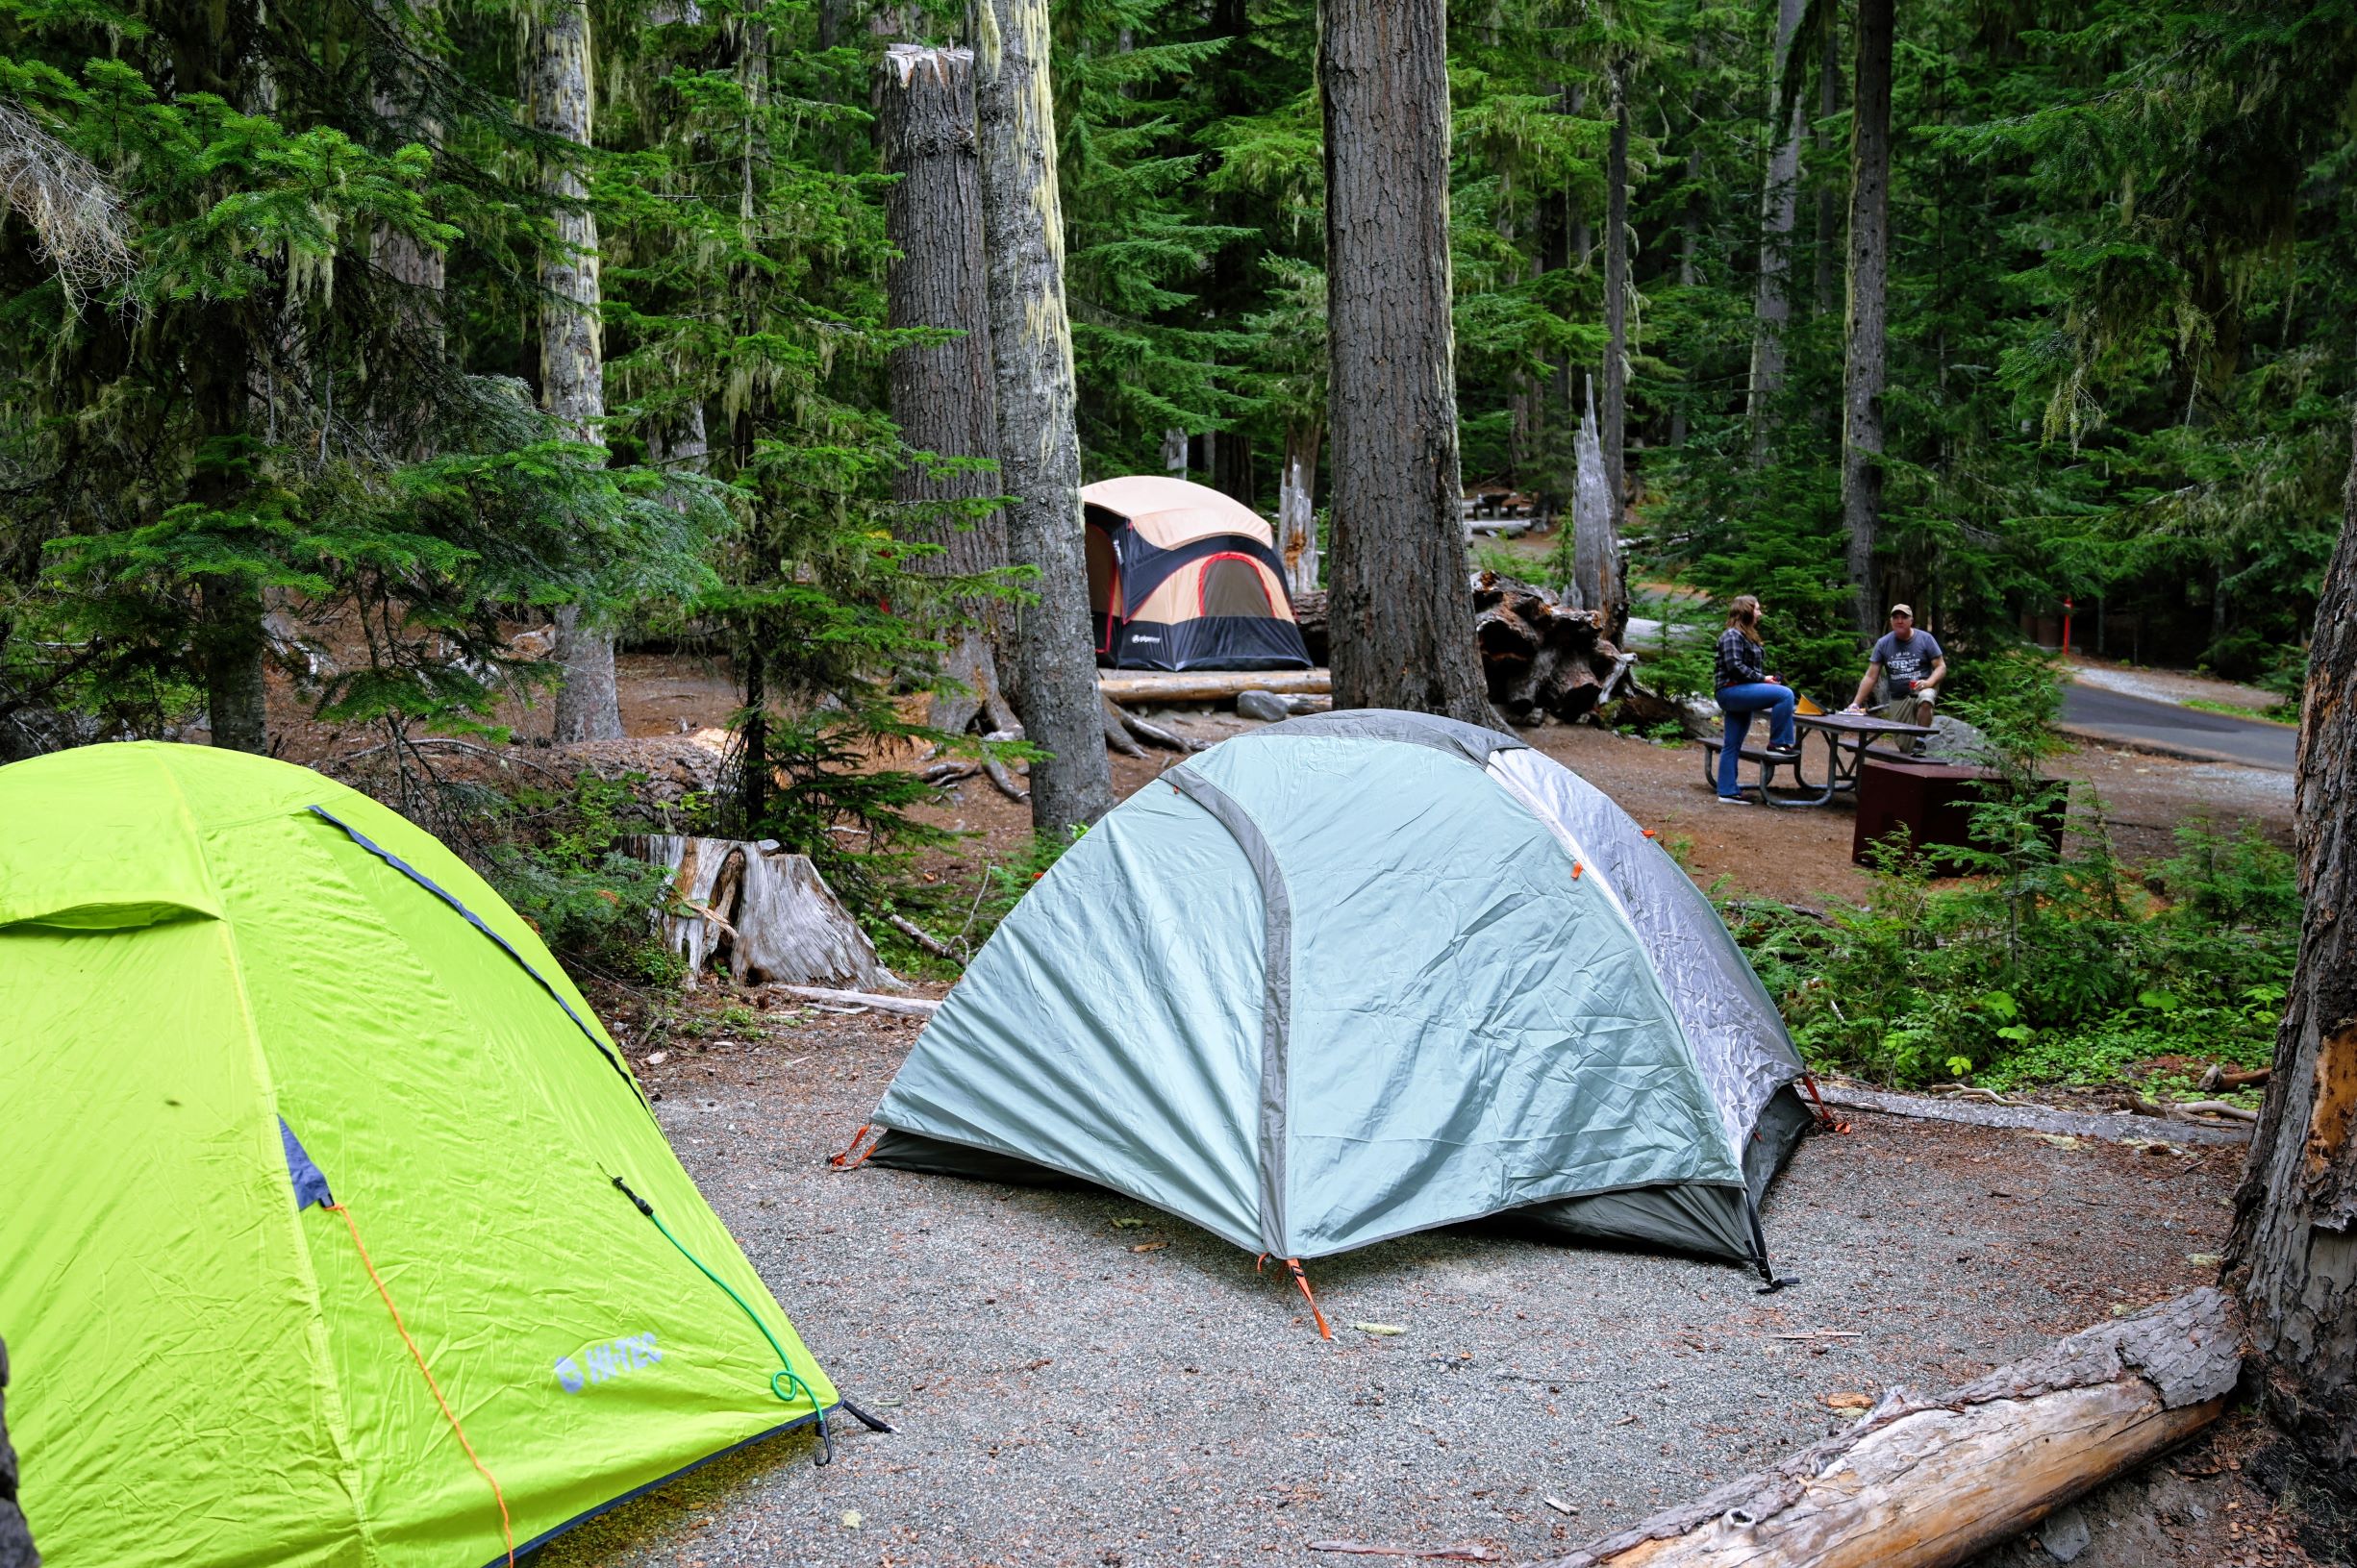
We set up camp in the dark, my brother quickly grills up some hot dogs, and we crawl into our sleeping bags.
Day 2: Section 5 of the Washington Backcountry Discovery Route
We get up around 7:00 a.m. this morning. I can move, and I can walk, so I’m thankful for that. My quads are really feeling the workout from yesterday. My brother fixes some pancakes and eggs on his grill, while I get the coffee going. We eat and then pack up camp before taking a quick stroll down to the lake.
It’s after ten, and we’re finally leaving camp. However right after leaving, we discover the communication devices aren’t working correctly and neither is the GPS. We fuel up and re-sync the comms again. The GPS signal keeps dropping. We continue driving in the direction of Section 5, and my sister-in-law tells me thru the comms that it keeps saying, “GPS signal lost.”
Then it said re-routing when it connected again. So we turn off where the GPS instructs us, and soon we hit gravel roads. We stop again to re-sync the comms as my brother can hear me, but I can’t hear him. GPS is still acting up, but we’re just going to try to follow the line on the map.
The Road Less Traveled
The ride starts with a grated gravel road and then turns into a fun climb up dirt roads. The stress of the previous night is behind us as we enjoy riding along this new path. There’s nothing quite like standing on your bike, wind in your hair, and a little dirt under your tires.
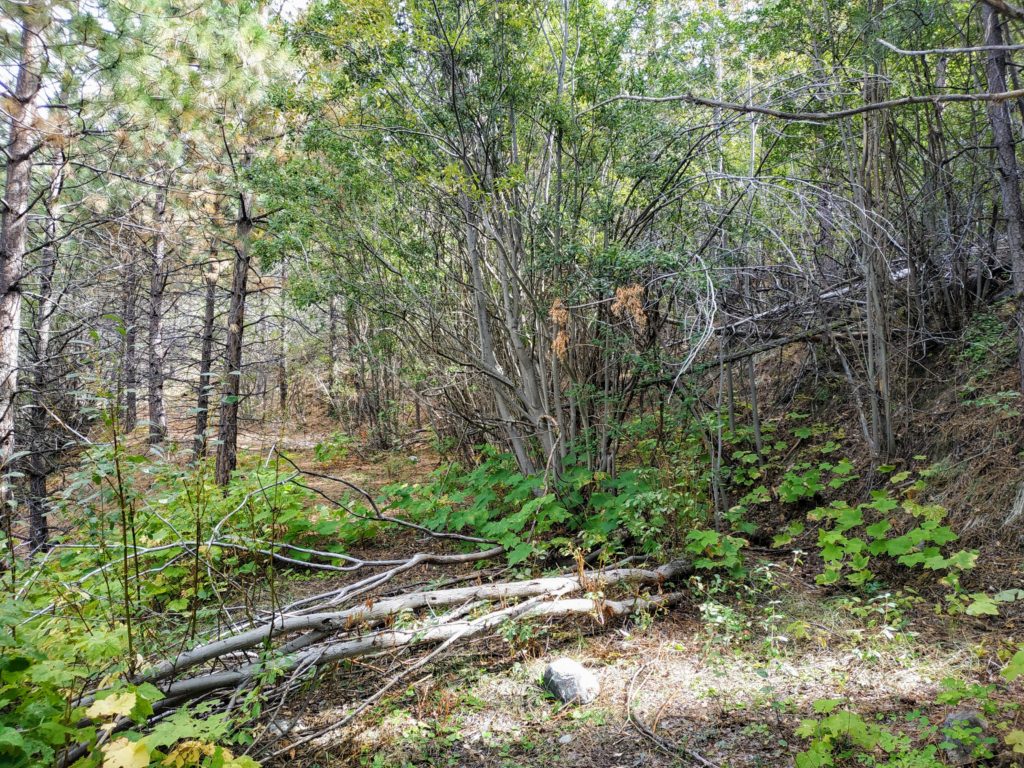
Soon we hit a section of road that looks like no one has ridden on it for a very long time. We climb up a rocky section with ruts on either side only to reach an overgrown jungle of a road where we decide to stop and regroup.
This does not feel like the right path. While I get out the paper map (something I should have done at camp before leaving), my brother decides to walk the trail a bit further. Soon he comes back and says, “uh I don’t think we’re going any further.”
Let me tell you right here, if my brother has doubts, then it is absolutely a no-go for me. He has years of off-road riding experience and is known to do some crazy stuff, so I listen when I hear any tiny whisper of doubt coming out of his mouth.
Something tells me this is not the road we are looking for. You can’t see from the picture, but on the left, there is a drop-off. The Toyota has “just” enough space to get by the tree on the right, but its tires would have to ride the edge that is already sloughing off. Not worth the risk. Not to mention the road doesn’t improve beyond this point.
I look at the map, and I say “we’re here and you see this road, way over across the mountain, yeah that’s the road we’re supposed to be on!” The GPS re-routed us to link up to the original road, unfortunately, the path we’re on, isn’t used by anyone other than cows, so it’s a no-go for us.
We come to the unfortunate conclusion that we must now turn around and go back to the highway to start again. We will discuss what to do once we make it back down.
Tough Decisions
We’ve finally returned to the highway where we missed the correct turn off for Section 5 of the Washington Backcountry Discovery Route. It is around 2:30 p.m., and we are still tired from the previous day’s ride. Due to our time limitations, current physical state, and desire to be safe; we decide to skip Section 5 and instead ride up to Omak via the highway.
We aren’t happy about the decision, but we know it is the right one for us at this time. It is too late in the day to complete section 5, and we did not plan enough days to allow for an extra day of camping and riding.
So we ride to Omak where we’ll spend the night and get our gear ready for the final section of the Washington Backcountry Discovery Route, Section 6.
Day 3: Section 6 of the Washington Backcountry Discovery Route
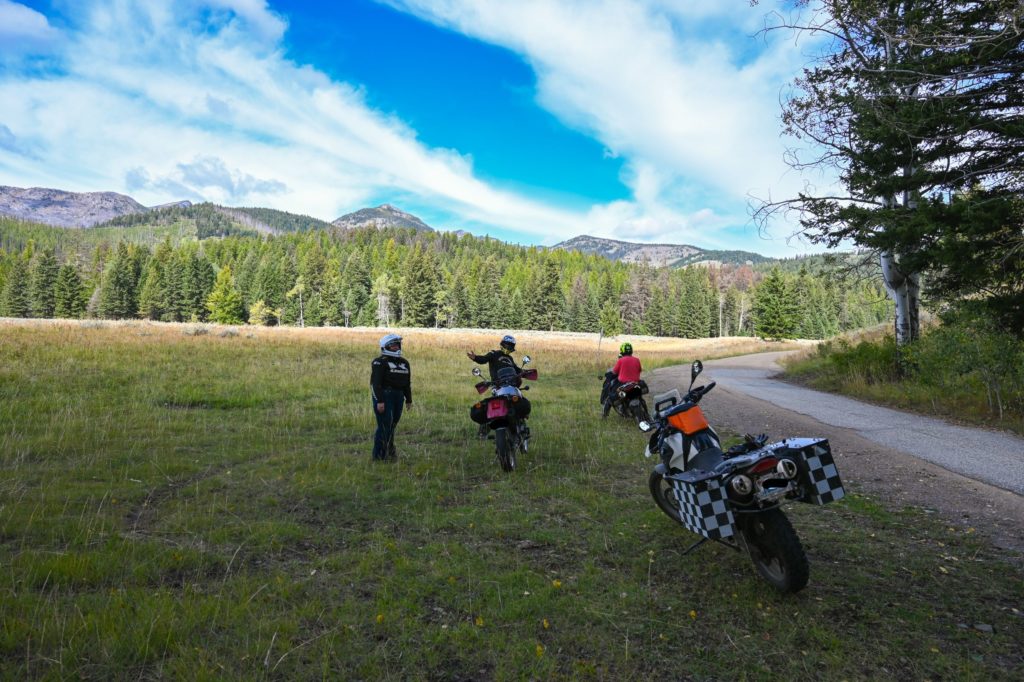
We stop on Section 6 near Conconully, to fix our gear and have a little fun.
My brother and his wife are riding his KLR today. Since we will not be camping, he doesn’t need to bring the Toyota. In the future, he’ll purchase panniers so he can camp off his motorcycle too.
We eat breakfast and fuel up. Then start the ride around 9:30. We don’t need our GPS or maps today as my brother has covered practically every road in the mountains surrounding the Omak area. He knows today’s route forward and backward. I mean he knows where the dips are and where the mud pits are. If anyone needs a guide to ride in the Okanogan Valley, he’s your guy.
We ride up to Conconully to the start of Section 6. It’s getting cold, and we all stop to zip up the vents on our clothing and add any layers for the cooler temps. Then we keep going. Soon we reach the top of Lone Frank Pass, elevation 6,667 feet. It’s a bit windy up here, but there are beautiful views of the mountains and fire-damaged forests below.
Looking down the road at Lone Frank Pass.
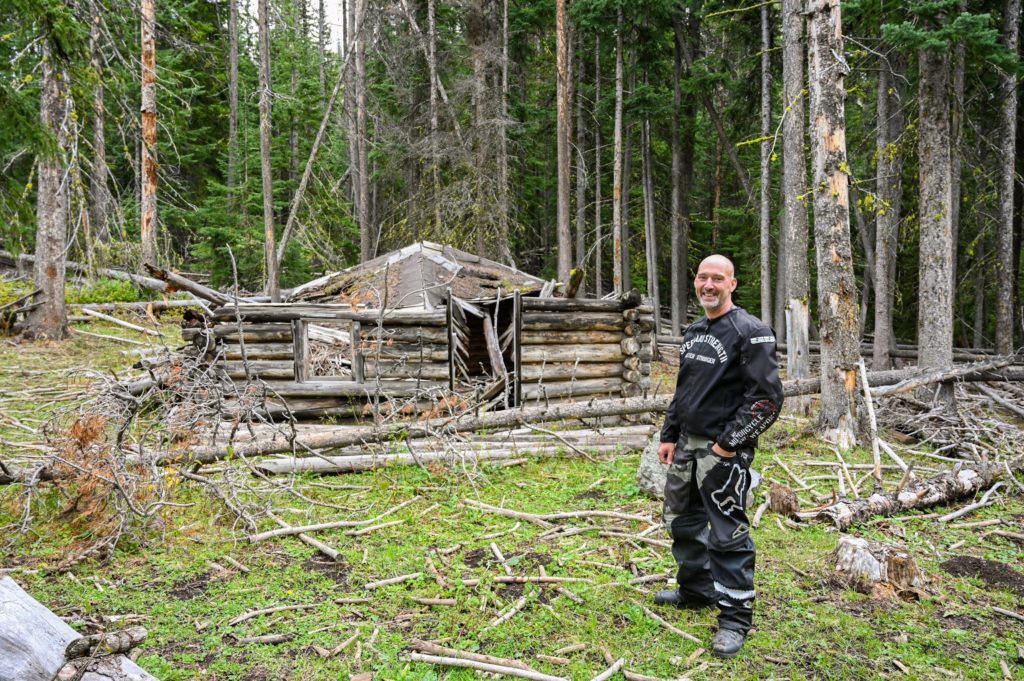
Skull and Crossbones Road
Continuing on we soon reach the turn off for the Skull and Crossbones road. It sounds ominous, but it’s not so bad. We stop at the Skull and Crossbones cabin, which collapsed during the previous winter, it is still a nice stop for a photo opp. Then we continue our journey. Not too far after the Skull and Crossbones cabin, my brother tells us that we will ride through a mud pit.
The bikes got a bit squirrely riding through this slick section of the road, and after I make it through safely, I say “wow, why does it smell like manure?” My brother then lets us know that the “mud” isn’t just mud… We were all grateful none of us took a plunge in the “mud.”
What’s left of the Skull and Crossbones Cabin.
The Final Stretch
The Skull and Crossbones Road eventually connects to a little bit of pavement before returning to a gravel road. My brother takes us on a slight detour to see the local “Christmas tree” near Tiffany Springs. We look at the “ornaments” before returning to our route.
We come up behind a herd of cows running down the road in front of us. Although I am not afraid of a cow, I do know they are still animals, and with that comes some unpredictability. My brother coaches me to pick one side of the road and continue at a steady pace. He said I would be “herding the cows,” and they will move to one side. He was right, as I stayed to the right, they moved to the left and allowed me to pass safely.
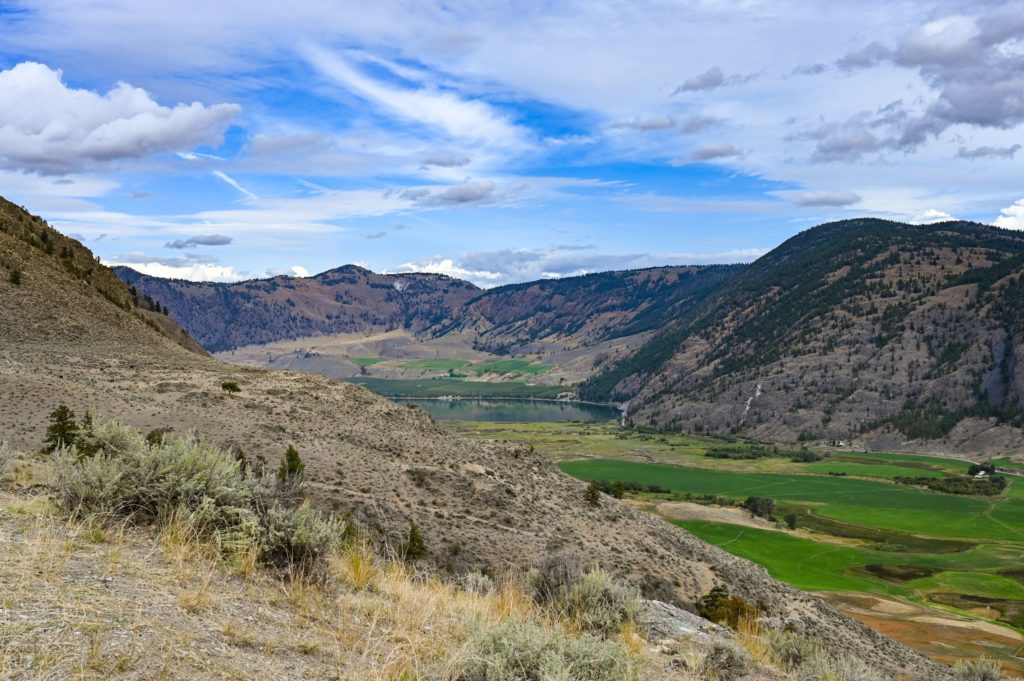
Soon we can see the town of Loomis below us as well as part of Palmer Lake. It is a fun and easy ride back down to the pavement.
A view of Palmer Lake.
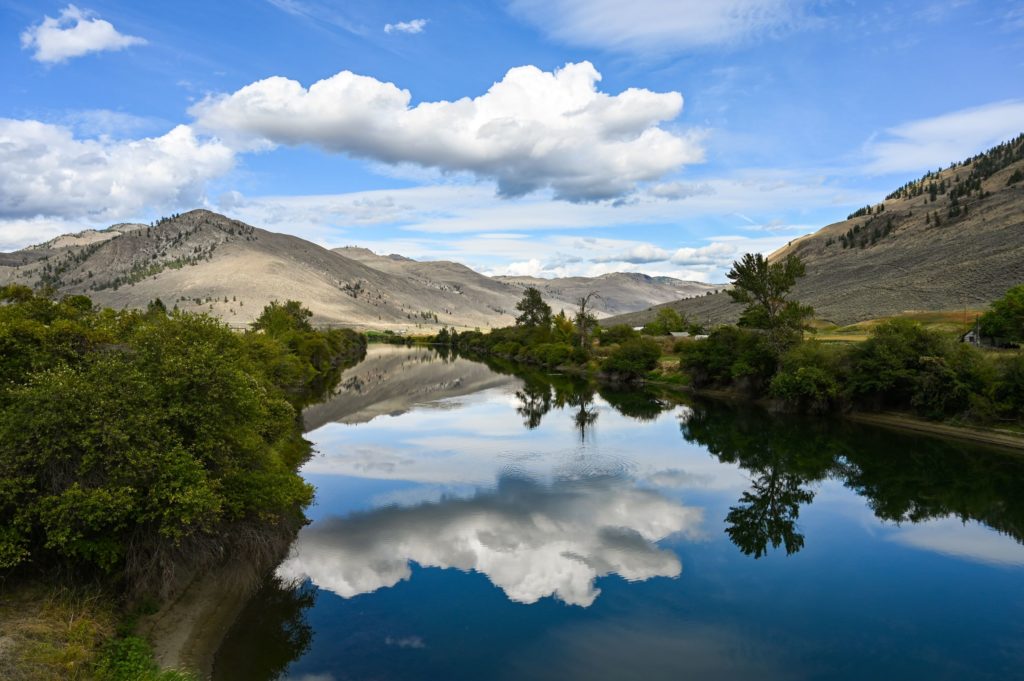
After returning to the paved roads below, we make a left and continue our ride around the beautiful Palmer Lake. There are a lot of neighborhood deer in the Palmer Lake area, so watch out if you ride that section. It’s a short ride around the lake, and soon we are pulling into the old mining town of Nighthawk. We stop to take a few pictures on the town bridge.
Looking over the river in the town of Nighthawk.
We continue down the road before making a left turn for the Canadian border crossing and also the end of Section 6 and the Washington Backcountry Discovery Route. We take a snack break before driving down into the town of Oroville and ultimately making our way back to Omak for the night. It is the end of one journey, but there are many more to come.
The Nighthawk Washington/Canadian border and the end of the WABDR.
Setting Realistic Expectations
I overestimated how simple the ride would be and underestimated the time it would take to complete each section. I imagined we’d roll into camp late afternoon, relax, chat about the day’s ride, eat dinner and get a good night’s rest. And I was so wrong. I should have assumed it would take us longer, that it would be harder and that we would be far more tired each day than I could have imagined.
My assumptions about the ride and us as riders were faulty. I made mistakes. However, I’ve learned from them. I am a more experienced rider now than I was before we started riding the WABDR. I will plan better for trips like this in the future. And I will set better expectations and better communicate to my group the miles for each day and what time I’d like to leave each morning, etc.
That said, we have a great time! We had laughs, we got dirty, and we saw beautiful scenery–we had an adventure! The best way to turn a misadventure into an adventure is your attitude. Always keep a positive attitude, and you’ll always have adventures.
Lessons Learned On the Washington Backcountry Discovery Route
If you are new to off-road motorcycle riding or riding an adventure motorcycle off-road, then give yourself extra time. Extra time to rest, recover and to enjoy the trip and the scenery. Riding is about the journey, not the destination.
Assume the ride will take longer.
Set the time you want to leave by each morning and do your best to stick to it.
Add an extra day or two for detours, emergencies, and other setbacks.
When it stops being fun, take a break, and camp for the night if needed. Then start fresh in the morning.
Take more photos. Get a helmet cam. Document the experience. Most people who don’t ride won’t understand what you mean when you say a “steep rocky descent.” Or when you say “big ruts” or “a huge puddle.”
Drink more water along the way.
This trip has been a fun learning experience. I am a more experienced rider now and I faced my fears and pushed myself further than I thought I could. I don’t regret the rough stuff, and I am proud of myself for what I accomplished and look forward to completing the Washington Backcountry Discovery Route in its entirety one day soon.
My motto: Find your limit and then push past it just a little. Repeat for life.
More Info on the Washington Backcountry Discovery Route
If you want to learn more about the WABDR, you can stream the official Washington Backcountry Discovery Route video on Amazon.com.
Touratech USA has YouTube videos on each section of the WABDR for free. And you can also purchase the map of the WA Backcountry Discovery Route online from Touratech USA.
In addition to Washington’s Backcountry Discovery Route, there are nine other states with completed backcountry routes and more in development. So make sure to check out all the available routes and see if there is one near you.
White River Campground is a first-come-first-served campground near the Sunrise Visitor Center in Mount Rainier National Park. Many visitors overlook the beauty found in this eastern section of the park for the more popular area around Paradise. However, if you don’t take time to explore the area surrounding Sunrise and White River Campground, you will be missing out!
During the summer Cougar Rock Campground and Ohanepecosh Campground fill up due to their online reservation system. Whenever this has been the case, I have always been able to find a site at White River Campground. I think it helps that it has no online reservation system and is strictly a first-come-first-serve system.
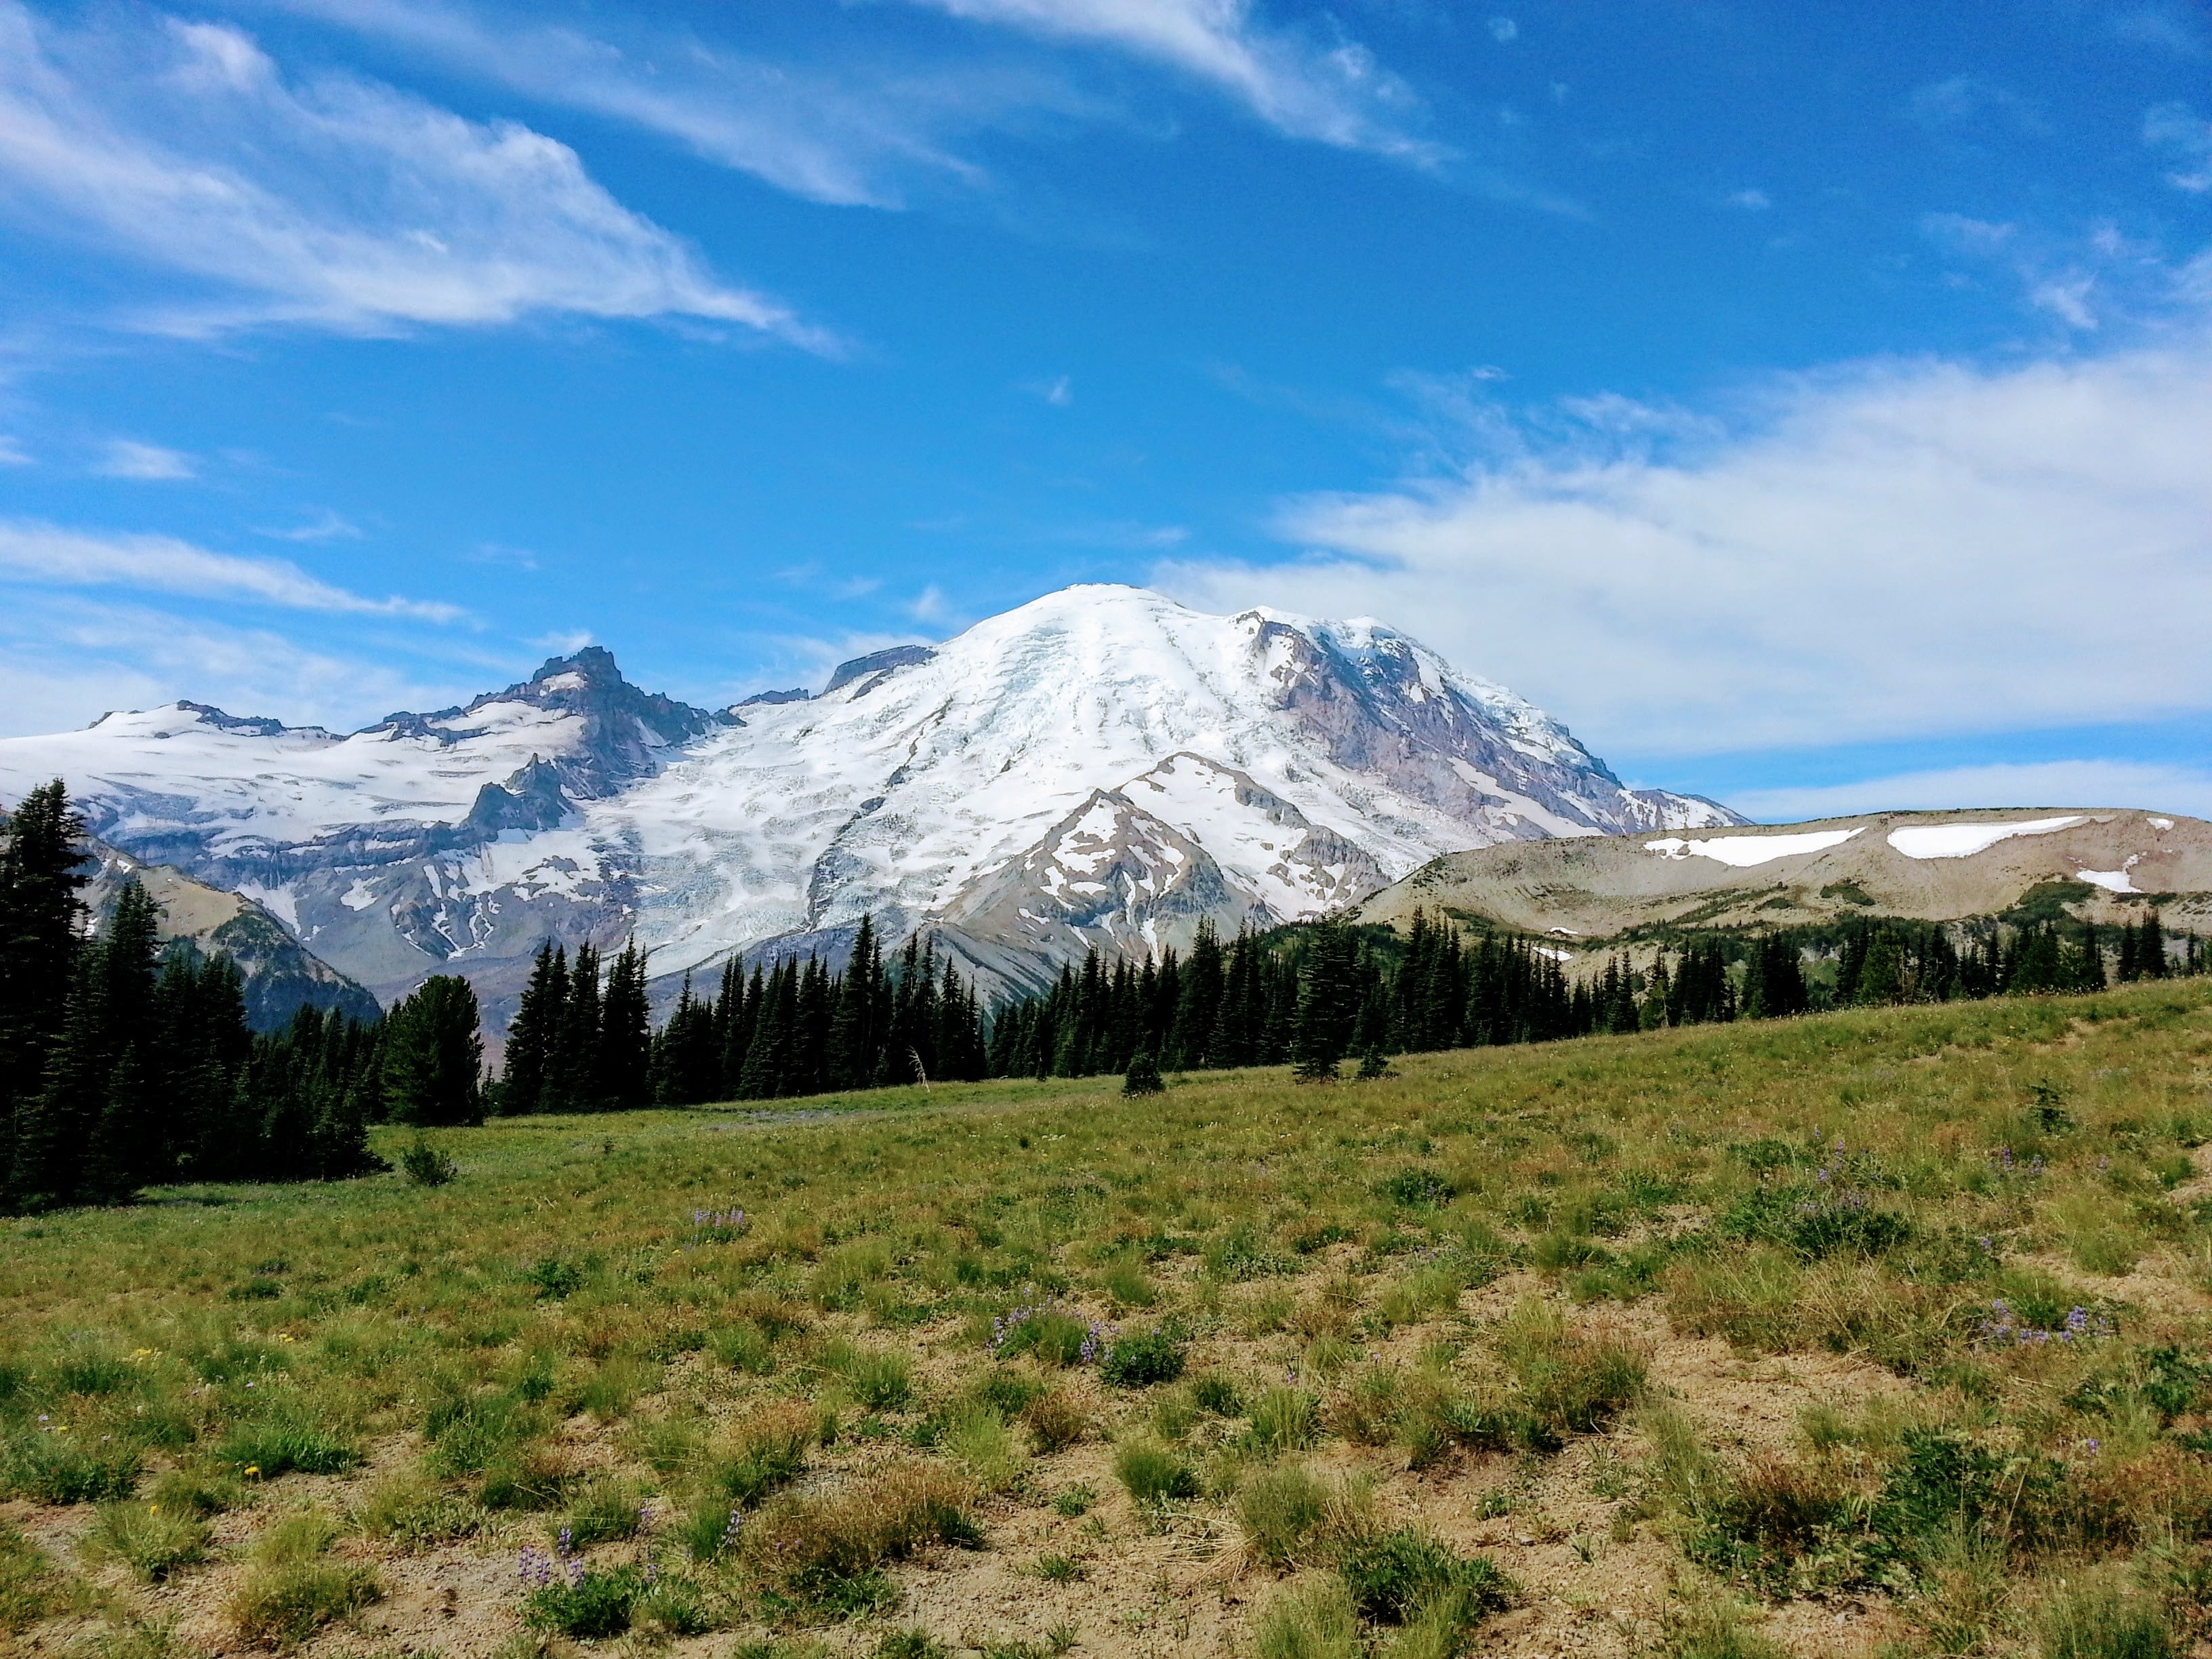
While camping at White River Campground, you can hike from the campground to see the largest glacier in the lower 48 States. Fall asleep to the sound of the roaring river. And wake up to the most beautiful views of Mount Rainier. Visit Sunrise Visitor Center, the highest point in the park you can drive to. You do not want to miss the fantastic views and hiking trails here!
Getting to White River Campground
Drive east on WA Highway 410. It is approximately 1 hour from Enumclaw to White River Campground. Follow Chinook Pass Highway/Highway 410 until you see the road fork to the right for Sunrise Rd/White River Rd. You will turn right here and follow the road to the entrance station for Mount Rainier National Park. Pay the Mt Rainier National Park entrance fee and continue for another 5 miles before making a left at the entrance sign for White River Campground.
Finding a Campsite
Follow the road into the campground, and you will pass the pay station parking on your right. I recommend you stop here and pick up the pay envelope that you need to complete your campsite reservation. Then continue driving thru Loop A, B, C, and D to find an available spot.
Tip: Loop A, C and D all have restrooms with flushing toilets and sinks. Loop B has a pit toilet supplied with hand sanitizer.
Once you have found the campsite you want, fill out the envelope with the necessary information, then tear off the tab and attach to your site number to reserve the spot while you go pay. You will take your envelope with payment (cash or check) and submit it at the pay station, by dropping it in the pay slot. A ranger will come by later in the day to add a tab to your campsite number showing the date you have reserved your spot thru.
Things to Do at White River Campground
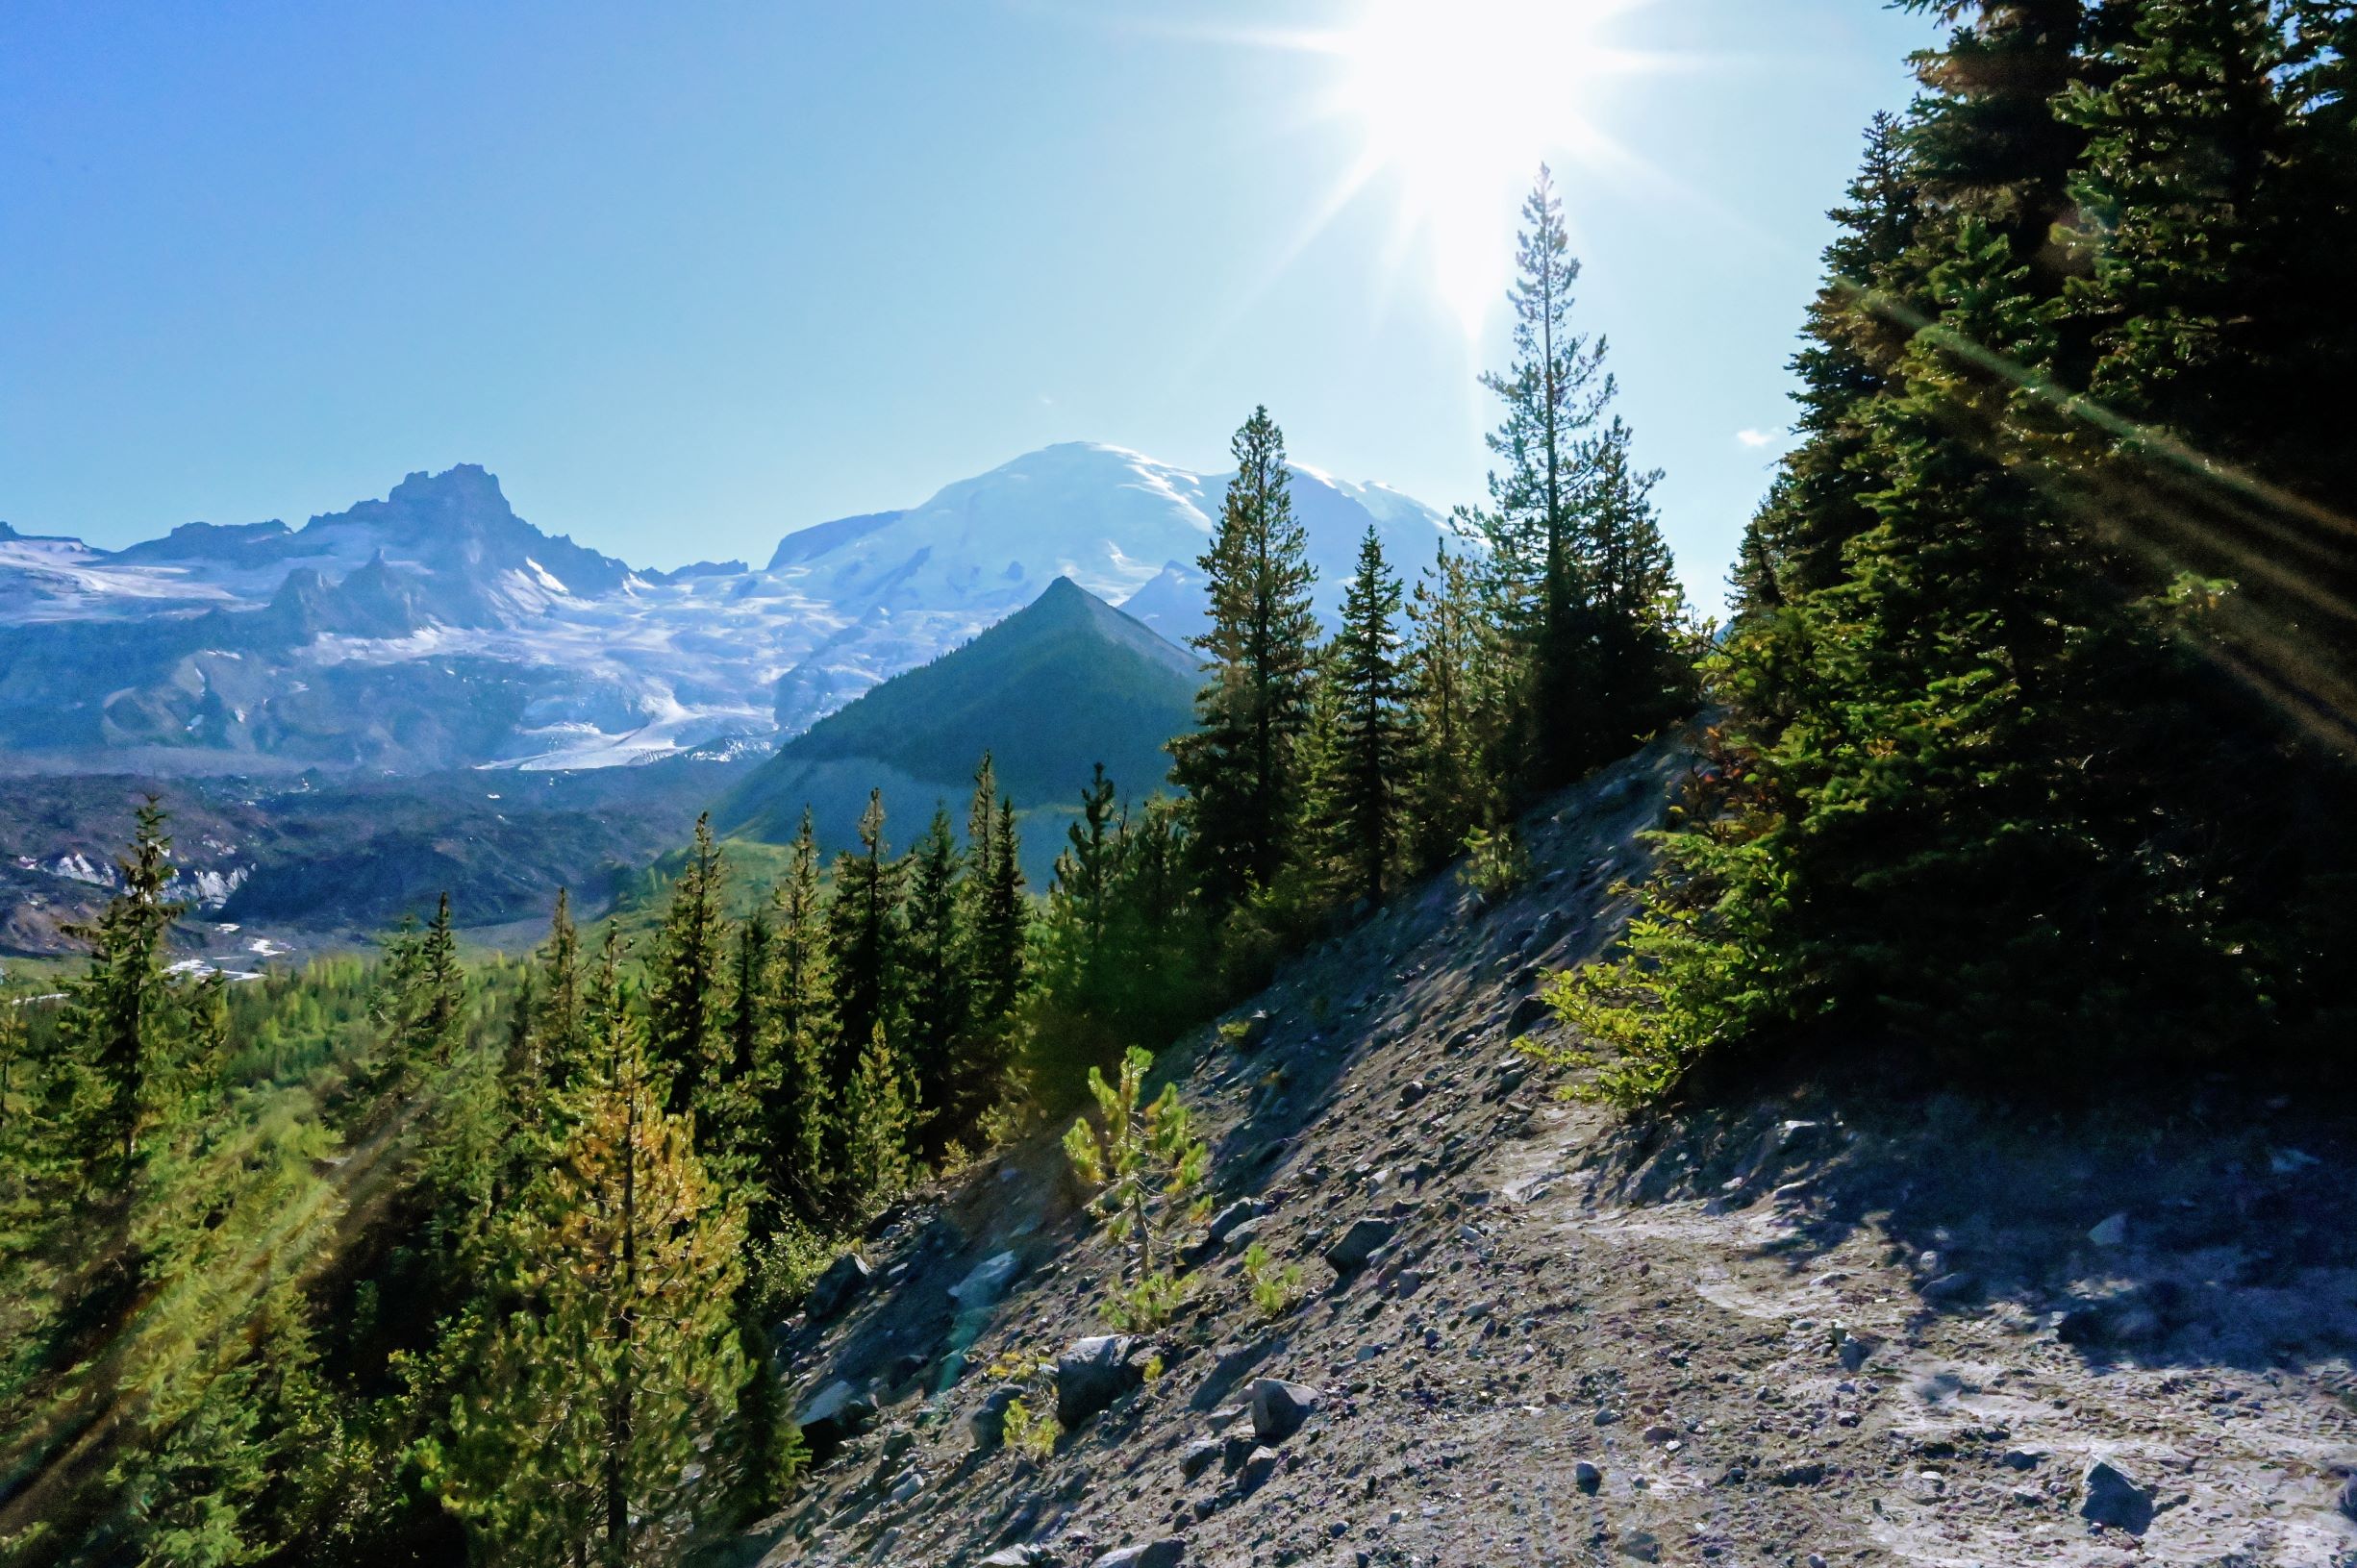
There are lots of things to do at White River Campground and one of them is the hike to see the Emmons Moraine Glacier. Mount Rainier is home to many different glaciers, but this one is the largest. In fact, it is the largest glacier in the lower 48 states! Pretty impressive, huh?
Getting to the Trailhead
You will find the trailhead for the Glacier Basin Trail in Loop D. Your hike to Emmons Moraine starts here. This easy hike is about 3 miles total out and back. It has a steady uphill climb, but it never gets very steep. The 6 year old in our group practically ran the whole way there and back. It takes 1-2 hours total to complete the hike.
Glacier Basin Trail to Emmons Moraine Trail
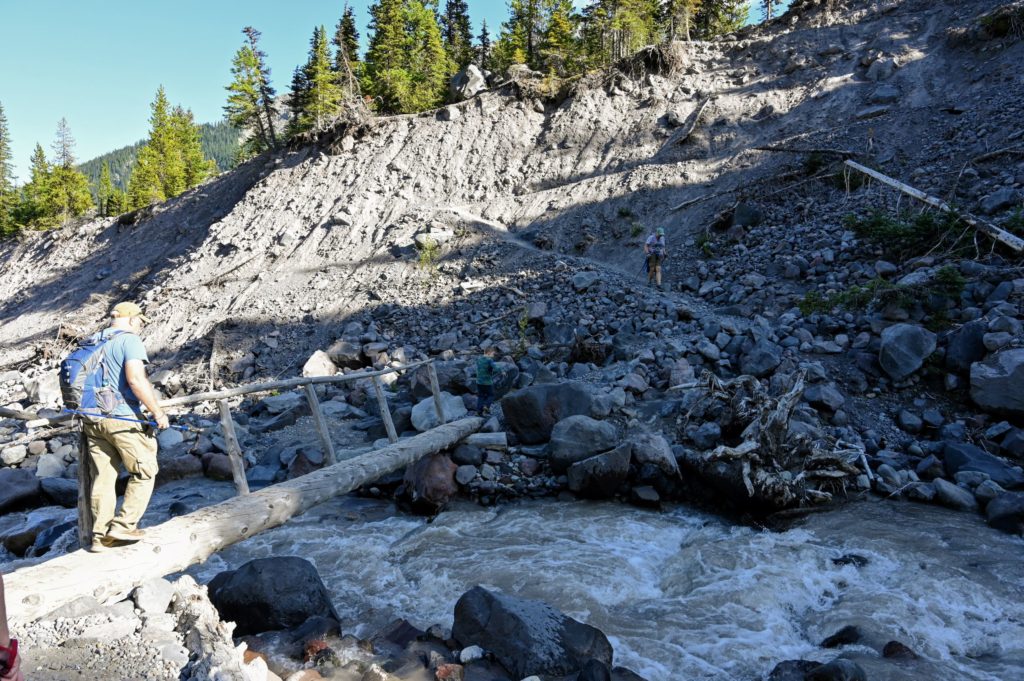
Follow the Glacier Basin Trail as it winds its way thru the beautiful wooded forest with views of White River below. You will pass small streams and waterfalls forging paths down the mountainside. After about 1 mile the Emmons Moraine trail will split from the Glacier Basin Trail and you will make a left to continue to the viewpoint for the glacier.
Hiker crossing the log bridge that takes you to the viewpoint for Emmons Moraine.
Continuing on the Emmons Moraine Trail
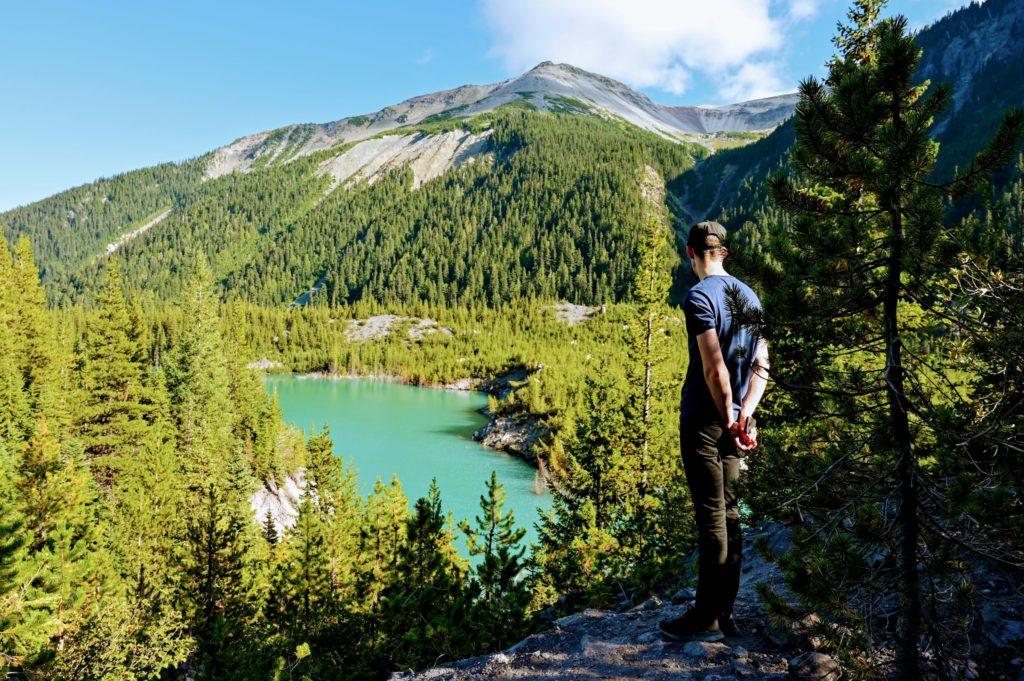
As you turn left you will walk down to the river and cross a log bridge before climbing back up the hillside where you are rewarded with spectacular views of the Emmons Moraine Glacier. You will also have beautiful views of the turquoise lake created by the glacier run off and glacial silt. It is quite the stunning view. Feel free to wander further up the trail for closer views of the glacier before turning around to make the hike back to camp.
The glacial pond formed from Emmons Moraine.
Optional Side Hikes from Emmons Moraine Trail
If you prefer to do a longer hike, you can always take the trail down to the glacial lake (although it’s a bit of a scramble, so proceed with caution) or you can return to the junction for the Glacier Basin Trail and hike to Glacier Basin Camp which is another 2.2 miles from the junction. This adds a total of 4.4 miles to the Emmons Moraine hike, making it about a 7.5 mile hike by the time you return to camp.
Additional Hikes and Things to Do at White River Campground
If you want additional hikes to do from White River Campground, you can hike a portion of the Wonderland Trail starting at Loop C near the old patrol cabin. This trail will take you up to Sunrise. It is about a 3-mile hike from White River Campground to Sunrise Visitor Center.
From the day-use parking lot, you can follow a trail down to the river. Kids and adults alike will enjoy looking for unique rocks and perhaps tossing one or two into the river for fun. It is also a great place to spot views of Rainier and the Emmons Moraine glacier.
In the summer the rangers will often lead evening talks at the community campfire just off the main road in the park (the road that goes by the different loops). You will find the bulletin board here too, which should list any upcoming programs.
“And into the forest I go, to lose my mind and find my soul.” ~John Muir
Visit Sunrise Visitor Center
Don’t miss a visit to Sunrise Visitor Center while staying at White River Campground. The visitor center is another 11 miles up the road from the campground. Follow the road out of the campground and make a left at the junction to get back on Sunrise Rd. Continue to the top where you will find the Sunrise Visitor Center Complex and parking.
There are so many beautiful hikes to do here. There are easy nature hikes that will only take an hour or less to longer multi-hour hikes. Stop by the ranger station and ask them for some recommended trails based on your preferences. Some easier ones I recommend are the: Sourdough Ridge Nature Trail, Shadow Lake, and the Sunrise Rim loop.
Tips for Camping at White River Campground
There is no electricity in the restrooms. So bring a flashlight or LED lantern for those nighttime trips to the bathroom.
There is also no soap in the restrooms, so make sure to pack some from home.
White River Campground is at a much higher elevation, which means it can get a lot colder here at night, so pack layers and extra blankets.
The campground host drives thru the campground loops each night selling firewood. Make sure to have cash. As of 2019, it was $7/bundle.
If you haven’t had a chance to check out this Eastern section of Mount Rainier, don’t miss it! You will be amazed by the beauty you find here. And if you want another stunning hike only a 25-minute drive from the campground, you will find the Naches Peak Loop Trail. I highly recommend it!
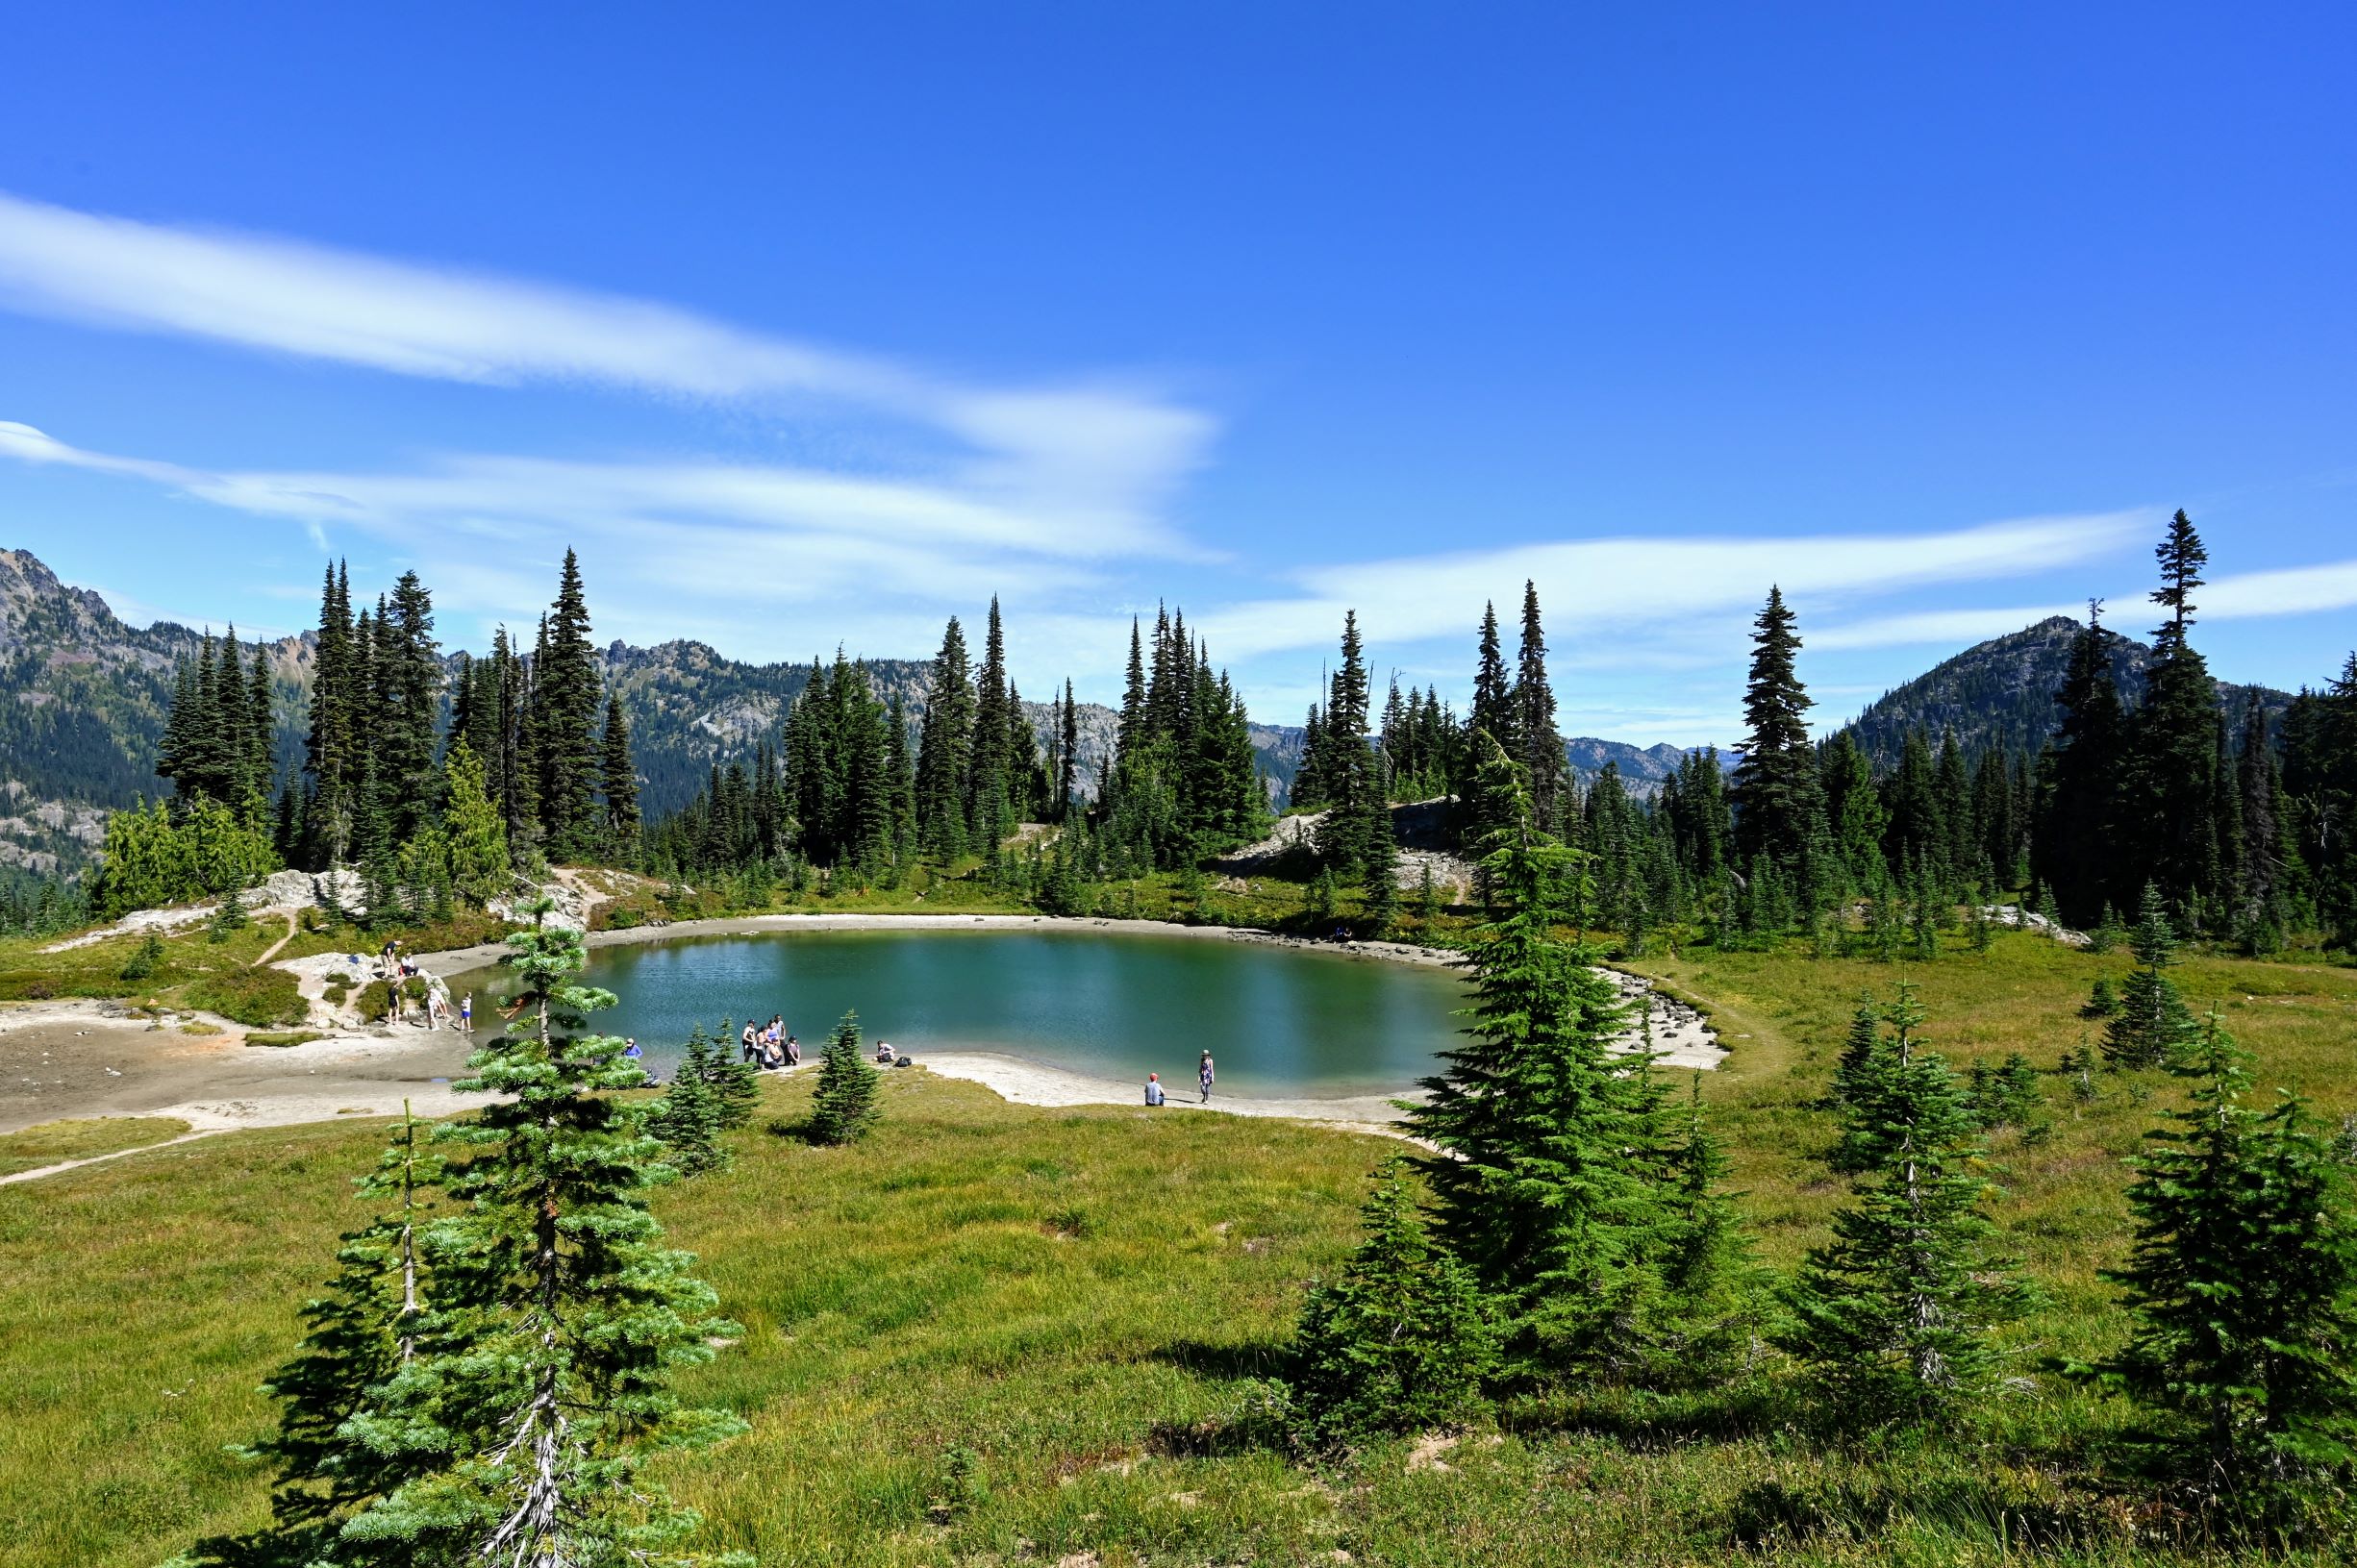
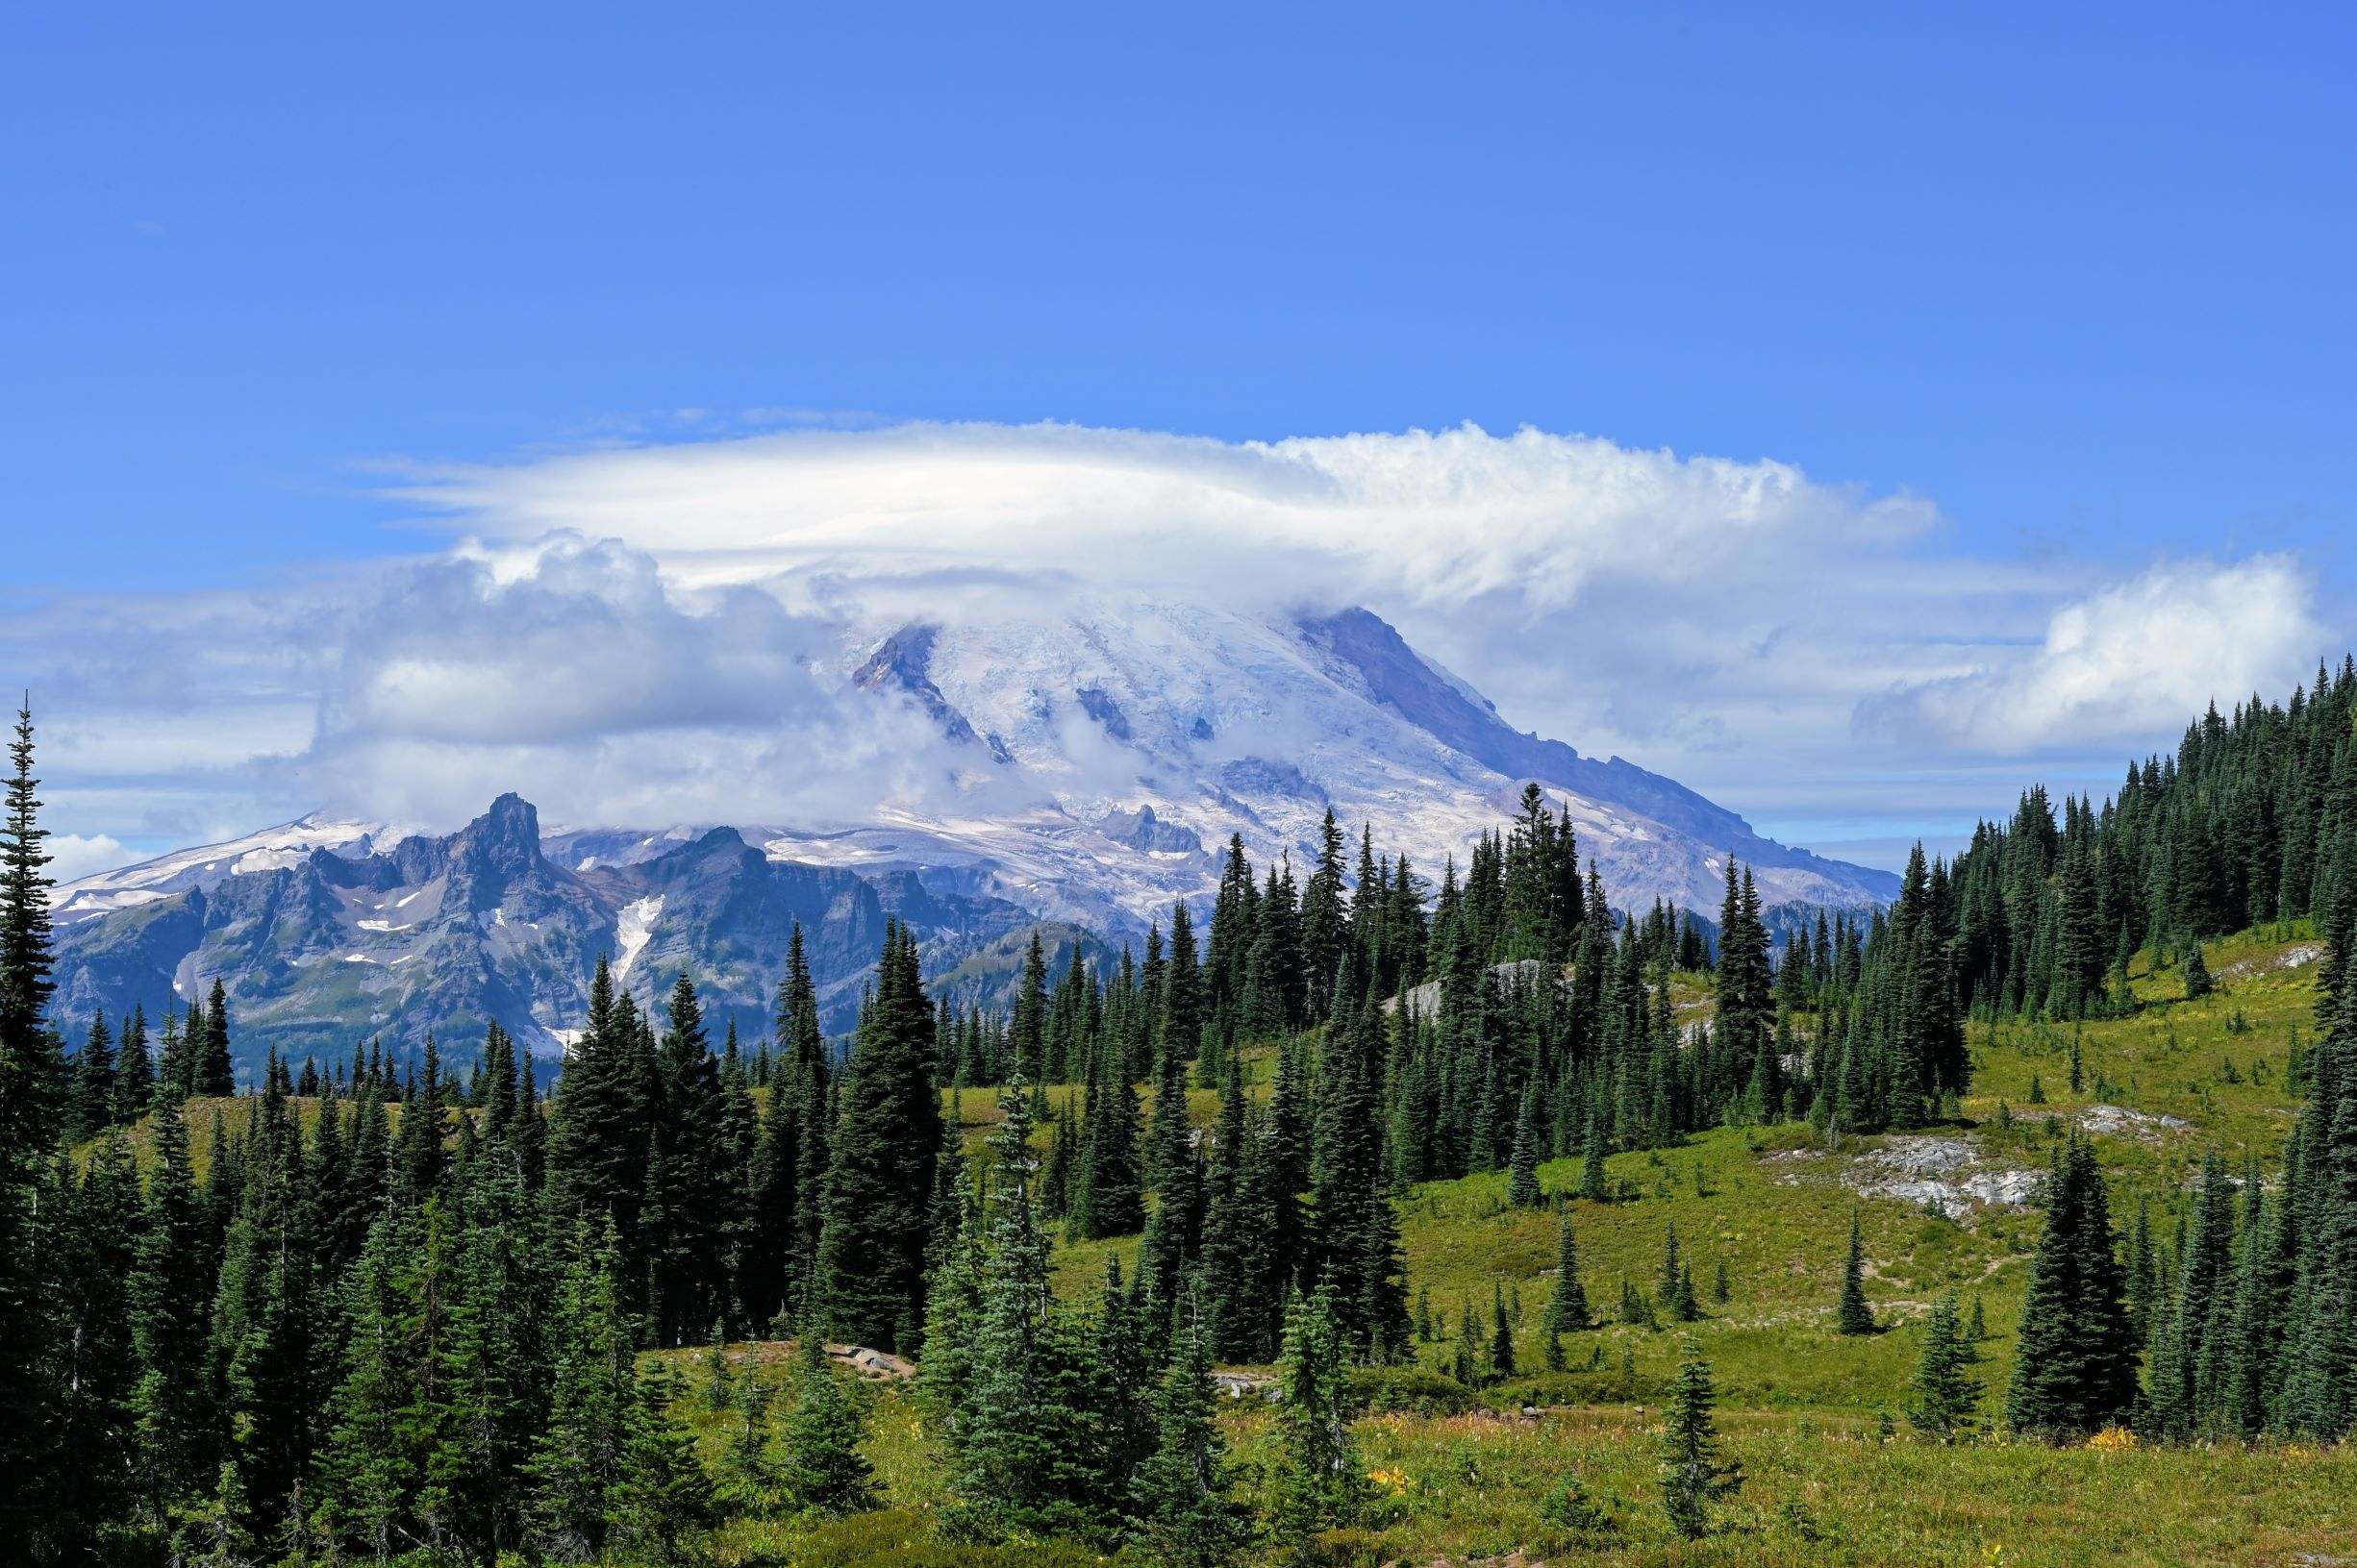
If you’re looking for a hike that is suitable for all ages, has alpine lakes and fantastic views of Mt Rainier, then look no further! This hike has it all, and it’s a loop, so you never have to see the same view twice. Naches Peak Trail is perfect for families. I hiked this with a group of 10 people, ages ranging from 6 to 56 years old. The hike takes around 2-3 hours, depending on your pace and how many breaks you take. The Naches Peak Trail will reward your efforts with beautiful views and fun memories!
Getting to the Trailhead
Enter Mt Rainier National Park along Highway 410. Coming from the west side, it will take about 1 hour from Enumclaw to reach the Naches Peak Trail. At the junction for Highway 410 and 123 make sure to stay left and follow signs to Chinook Pass. It is about a 5-minute drive past the junction to the first parking area at Tipsoo Lake. You will see a sign for Tipsoo Lake and then the parking lot on your left.
There are multiple parking areas you can use to access the Naches Peak Trail. Since it is a loop, you will return to whichever parking area you started from.
The largest parking area is at Tipsoo Lake. There are restroom and picnic facilities at this parking lot. However, if the parking lot is full, don’t worry, continue down the road and you will pass another parking area on the left. And if that is full continue driving just a little further down the way to a parking area on the right and on both sides of the road near the Mt Rainier National Park sign that also doubles as a bridge for the Naches Peak Trail.
Naches Peak Trailhead: Starting Your Hike
We started our hike by Tipsoo Lake. We parked in the Tipsoo Lake parking lot and found the trailhead at the far right corner of the parking lot (when facing away from the road). I recommend hiking this loop in a clockwise direction as this gives you beautiful views of Mt Rainier facing you, rather than at your back.
The trail has a gradual ascent that continues steadily up before once again leveling out. There are shaded areas along the way to stop and take breaks. Soon you will reach a flat area and see the parking area along the road I mentioned in the “Getting to the Trailhead” section.
Walk across the Mt Rainier National Park sign that doubles as a bridge. If you’re ambitious, you could have someone run down to the road and take a picture of you standing above the sign. However, we had a large group, so we just kept on moving!
Shortly after crossing the highway you have views of the mountains and trees that stretch out for miles. It warmed my heart to hear the “oohs and ahhs” that came from the mouths of my 6-year-old nephew and 8-year-old niece. They said, “Oh, wow, this is beautiful!” And they were right.
Watching young children delight in the beauty of nature makes me smile. I feel that nature is therapeutic, and we can all use time away from the fast pace of life (and from our electronics).
The hike continues uphill, at a gradual grade, and soon you are rewarded with a flat area to take a refreshing break alongside this alpine lake.
After resting, continue climbing past rolling hills, rocky mountainsides and if you’re lucky, colorful wildflowers (July thru August is best for this).
The trail reaches another viewing area of the mountains spread out in front of you. Feel free to take another break here if you want before following the path as it curves to the right. Continue the gradual climb up for about another 5-10 minutes before reaching the below viewpoint of Dewey Lake.
Lunch Break Near Dewey Lake
This is about the halfway point in your hike, and it makes an excellent place for a lunch break! There is a small trail that leads to some rocks on the left side (when facing the lake) that make perfect benches to sit on. Our group enjoyed our lunch stop here. And everyone was re-energized for the rest of the hike.
After you finish your break, continue down the trail, and you will come to a fork in the path. This is part of the Pacific Crest Trail that takes you down to Dewey Lake. If you’re not in a hurry and don’t mind adding another 2 miles to your hike, then take a left and hike down to this beautiful lake. Otherwise, continue straight to stay on the Naches Peak Trail.
Soon you will see why I recommended hiking this clockwise. If you’re lucky, you’ll have a clear day with unobstructed views of Mt Rainier. We had some clouds around the top during our hike, but it was still such a beautiful view!
This part of the trail is mostly flat with a slight downhill slope. The Naches Peak Trail will continue its gradual descent as you return to Tipsoo Lake. There are lots of rocks and roots on the trail so watch your step. Poles are not required, but are helpful, especially if you have any problems with mobility or balance.
You eventually make your way down to Highway 410 again, where you will need to cross the road to re-connect with the trail and return to your parking area. You have now come full circle on the Naches Peak Trail! And in case you missed it when you started your hike, make sure to look up, that’s Naches Peak your viewing!
Important Things to Know
You need to purchase a Northwest Forest Pass to park at the trailhead. This pass is different than your National Parks pass or the State Parks Discovery Pass. You can buy a day pass or an annual pass, depending on your needs.
Part of this trail is along the Pacific Crest Trail, and part of this is in the Mount Rainier National Park. That means dogs are allowed on the trail, only in the portion of the PCT, but not within Mount Rainier National Park. So it is best to leave Fido at home for this hike.
Pack plenty of water, snacks and perhaps even a picnic lunch, depending on your group.
Naches Peak Trail is a very popular trail, so practice proper trail etiquette and be prepared to yield the path to faster hikers when it makes sense.
Set the hiking pace to the slowest person in your group. Make sure everyone has fun and can go at a comfortable pace.
Mount Rainier is one of my favorite places to camp and hike here in the Seattle area. It is like a second home to me. If you want to extend this hike and make it a weekend excursion, then consider staying at White River Campground, this area of Mount Rainier is truly remarkable!
If you are looking for a campground close to Seattle, look no further than Kalaloch Campground. This campground is sure to become your family’s favorite getaway destination. Long weekend? Summer vacation? Head to Kalaloch Campground. It is the perfect Northwest getaway.
You’ve got miles of sandy beaches, piles of driftwood for building forts, tide pools for exploring the sea life, whale watching (depending on the time of year) and so much more! And who doesn’t love waking up to the sound of the ocean? Keep reading as I share my favorite things to do when camping at Kalaloch Campground and why I keep returning year after year.
1) Explore the Tide Pools
This is one of my favorite things to do, even now as an adult. I didn’t grow up near the ocean, so when I moved to Seattle at age 18, I had my first experience exploring tide pools. The ocean fascinates me. It is a beautiful “world” that we have barely explored. I know kids and adults alike will get excited seeing the sea anemones, colorful starfish, and barnacles in the many tide pools found at Kalaloch. You’ll see tiny crabs crawling out from under rocks, and you might even see the occasional sea otter foraging for food by the tide pools!
2) Make Sandcastles on the Beach
Okay, what’s a trip to the beach without time spent building sandcastles? I happen to believe that no trip to the beach is a success unless your suitcase comes home with a little sand in it.
3) Visit the Tree of Life at Kalaloch Campground
The Tree of Life is one of the unique treasures found at Kalaloch Campground. It is a beautiful tree suspended above the ground with its roots growing down below. I’m not sure how long it can continue to hang on against the eroding soil around it, but while it is here, you definitely need to check it out!
4) Watch the Sunset on the Beach
Sunsets on the beach are beautiful at Kalaloch Campground. You have a vast sandy beach that reflects the light of the setting sun and casts orange and red light across the crashing waves. I love watching the sunset over the ocean. Whether I am here or in Maui, I’m a sucker for a good sunset!
Oh, and in case you’re wondering, sunrises on the beach at Kalaloch are also spectacular! Cotton candy pinks mixed with baby blues reflected off the sand while the sunlight shimmers on the water. You feel the ocean breeze blowing in your face, and the glow of the sun warms you. Yep, sunrises here are pretty great too!
5) Hiking at Kalaloch Campground
The Kalaloch Creek Nature Trail connects to Kalaloch Campground. It is a short walk thru the beautiful wooded area surrounding the campground. The hike is less than a mile and is accessed from the campground’s Loop A. Follow signs and be very careful when crossing Highway 101.
The rangers also offer guided hikes depending on the time of year you go. So definitely check in with them to see what is happening while you’re there. I think it is fun for adults and kids alike to go on a guided walk with a ranger who knows the area. You learn fun facts and interesting information about the local habitat.
6) Fly Kites on the Beach
Plan ahead and pack your kite! Now sing along with me: “let’s go fly a kite, up to the highest heights…” Okay, if you haven’t seen the original Mary Poppins, stop reading now, watch it and then come back and finish reading this post. Flying kites is such a fun family activity, and the beach in front of Kalaloch Campground is perfect for this at low tide. You will have a huge sandy beach to fly your kites to your heart’s content!
7) Go Stargazing
One benefit of taking a family vacation away from the city is viewing the stars at night. Away from light pollution, you begin to see the vast sea of stars above you. Grab a blanket and some hot cocoa and find an open spot to admire these twinkling lights. We have made trips to Kalaloch just for this purpose.
My husband loves stargazing, so we bring a small telescope, along with our cameras and tripods and practice our astrophotography. You can stargaze at the Kalaloch Campground day-use parking lot, or if it’s low tide, then the beach makes a great place to bring your thermos of cocoa and blankets. Just don’t forget your flashlights!
8) Build a Fort on the Beach from Driftwood
There is so much driftwood on the beaches surrounding Kalaloch campground, and with some teamwork and ingenuity, perhaps you will build yourself a fort that is discussed inside family circles for years to come! Come on, think big!
9) Watch Whales Migrating
Depending on the time of year you can watch grey whales migrating from the beach in front of Kalaloch Campground. It is so much fun to watch them breach and see water shoot up from their blowholes. Bring some binoculars so you can enjoy them close up. Typically the months of May, October, and November are the best months to watch grey whales at Kalaloch. However, believe it or not, we got to see them once during a camping trip at the end of August! So you never know!
10) Build a Bonfire on the Beach
Who doesn’t love a good bonfire on the beach? This is the only time you can use driftwood for your fires. You are not allowed to bring driftwood off the beach to use for your campfire, but you can use it on the beach. So bring your marshmallows and supplies for s’mores and enjoy a bonfire on the beach. Check with the rangers at Kalaloch Campground earlier in the day to make sure there are no fire restrictions during your stay.
And of course, practice safety and make sure to extinguish your fire before leaving. Be careful to cover all the hot coals with sand so that no one accidentally steps on them, during their nightly stroll on the beach.
11) Wake up to Sunlight Streaming thru the Trees
This is one of the joys of camping. Waking up to the sounds of birds, the smell of fresh air and sunlight streaming in thru the trees. It says, “it’s going to be a great day!” Everyone starts stirring around; you grab a cup of coffee as you get the fire going for breakfast; it is a magical time in the stillness of the morning.
12) Biking Around Kalaloch Campground
If you have the room to bring bikes, this is something fun that kids will enjoy. Biking around Kalaloch campground. It is something I see no matter where I go camping. Kids off on their own adventure just cycling around the campgrounds with the carefree hearts that camping brings. They have huge smiles on their faces, and they are usually laughing and talking with each other. I have even witnessed young kids who are just learning to ride their bikes for the first time. It is fun for both them and their parents.
13) Hanging out at the Campsite
One of the things kids love to do is hang out at their campsite and explore the area surrounding it. Climbing trees, playing hide-and-seek and of course playing in the tents. I love watching their happy faces as they enjoy being outdoors. It makes the work involved in planning a camping trip all worth it!
Important Information for Camping at Kalaloch Campground
Make reservations in advance! This is a favorite campground for people who live in the Seattle area, and it fills up quick during the summer months. So plan ahead and reserve your campsite months in advance, if possible. I booked our campsite in May, for an August visit. The reservation period is from May to September, and you can reserve your spot online during this time frame. During the off-season, they don’t accept reservations. During this time, campsites are assigned on a first-come-first-served basis.
You can purchase firewood at Kalaloch Lodge which is about a 1/2 mile from Kalaloch Campground. They also have a small store where you can buy snacks, drinks, and miscellaneous supplies you may have forgotten to pack.
Always check the tide charts posted at the campground when making plans for your daily activities. You never want to get caught on the beach during high tide. Besides the strong currents, there are lots of large trees and driftwood that could easily knock a person out if you were to be hit by one. So know when low tide and high tide are and stay safe!
Getting to Kalaloch Campground
Kalaloch Campground is located off Highway 101 about 34 miles from the town of Forks, Washington. It is around 3-4 hours drive time from Seattle. Depending on where you’re coming from you will either head north thru Bremerton and over to Highway 101 or south thru Olympia, cutting over to Highway 101. I find driving south past Olympia and then cutting over to Highway 101 around Montesano is the quickest way for me.
Kalaloch Lodge Address is: 157151 US-101, Forks, WA 98331 (Kalaloch campground is about a half-mile north from the lodge.)
Conclusion
No matter what you decide to do when visiting Kalaloch Campground, there is a lot to occupy your time and so many fun ways to create wonderful memories with your family. If you need more ideas for things to do near Kalaloch Campground check out these awesome beaches near Kalaloch.
One of the top things to do when vacationing in Maui is to go to the beach! It is the primary reason most people visit Maui and the Hawaiian islands. This article will go over the best Maui beaches for both snorkeling and swimming. There are some incredible beaches in Maui, but just because one is good for snorkeling, doesn’t mean it’s also good for swimming and vice versa. So I am here to share some of my favorite beaches in Maui no matter what you want to do. Most of the beaches in Maui that I list here are located in West Maui. So plan ahead if you are commuting from South Maui.
*How to use this map: Click on the star next to “Best Maui Beaches” and save this to your personal Google maps or click on the icons to pull up more info and driving directions.
Best Maui Beaches for Swimming
D.T. Fleming Park
This park is a great place to spend the day. It has shade trees at the back of the beach, picnic tables, BBQ grills, restrooms and lifeguards on duty. There is also the Burger Shack for food, and if you want, you can walk up to the Ritz-Carlton and eat at The Banyan Tree restaurant. D.T. Fleming Park also connects to the Dragon Tooth Trail which has beautiful views of the ocean and some incredible volcanic rock formations. It is a favorite stop of mine for any Maui itinerary. It has a beautiful stretch of white sand perfect for sunbathing. Make sure to bring your beach gear and enjoy one of the best beaches in Maui!
Address: Lower Honoapiilani Rd, Lahaina, HI 96761
Tip: Check out Maui Babe’s browning lotion and after browning lotion (I use this for sunburns too). It works great! And make sure you always wear sunscreen!
Napili Bay
This is a beautiful stretch of beach! It is on my list of best Maui beaches because of its sandy beach, and mostly rock-free water (in the center, not on the sides). It is located next to my favorite breakfast spot in Maui! The Gazebo restaurant. Just thinking of those piles of hot pineapple macadamia nut pancakes have my mouth watering. Depending on the time of year you visit, the waves can get really big. I mean REALLY big.
It is so much fun to body surf here, but be safe and respect the ocean’s power. When the weather is calm, it is a perfect place to go for a swim. I suggest you grab breakfast at The Gazebo, then drive over to Napili Bay and snag a good spot on the beach. You can relax here while you let your breakfast settle. There is parking for Napili Bay on the street leading down to the beach. The limited parking is probably the one drawback of this beach. However, you can usually find a spot along the road and then it is just a short walk to the end of the road where you’ll find the trail to the beach.
Address: 53 Hui Dr, Lahaina, HI 96761
Napili Bay. Keep your belongings as high up on the beach as possible to avoid getting wet. Even then, it may not be high enough.
Pohaku Park
This small park is sometimes referred to as S-Turns. It is a great place to watch the sunset and sits across from the island of Molokai. It is also a great area to go whale watching in the winter months. And sea turtles are often frequently spotted here. For swimming, I recommend you swim to the right of the park to avoid the rocks. Kahana Beach, which is just to the right of Pohaku, is a great stretch of beach for swimming. You will see the Kahana Beach resort next door to Pohaku Park.
There is a public access trail to Kahana Beach in between the Kahana Beach resort and the Sands of Kahana. This long sandy beach is great for swimming! It gets deep immediately in front of the Kahana Beach resort, but if you have kids or prefer a shallower entry, move a little further down the beach in front of the Sands of Kahana, and you’ll have a shallow entry.
Address: 4085 Lower Honoapiilani Rd, Lahaina, HI 96761 (*Pohaku has a few picnic tables and only a porta-potty for a restroom)
Pohaku Park at sunset.
Best Maui Beaches for Snorkeling
Kapalua Bay
Just a little further north from Napili Bay is Kapalua Bay. I go to this beach every time I visit Maui. It has excellent snorkeling (go in the morning) and such a picturesque setting. There are restrooms as well as an outdoor shower. It has a nice sandy beach with a few shady spots, plus it is alongside the Kapalua Coastal Trail so if you get tired of laying on the beach, you can go for a beautiful “hike” along this trail.
I think this beach is a little too rocky for swimming, but it is a favorite for snorkeling. I’ve seen turtles, eels, and all sorts of colorful fish here. They also rent kayaks and stand up paddleboards.
Address: Kapalua Coastal Trail, Lahaina, HI 96761
Kapalua Beach in the morning before the crowds arrive.
Tip: Snorkel early in the morning between 7 a.m. to 11 a.m. for the calmest and clearest snorkeling conditions.
Honolua Bay
Honolua Bay is an amazing snorkel spot in a marine life conservation area. It’s a bit of a drive to get to this protected bay, but it’s worth the trip! You have a short walk through a “jungle” before reaching the rocky beach. This is not your typical sandy beach either; it is covered in rocks, so be careful as you enter the bay. Its limited facilities and rocky beach make it best suited for snorkeling.
Snorkeling is best on the right side of this protected bay. You have to swim about 600 feet offshore to get to the reefs, so I recommend you wear a life vest if you have any concerns at all about swimming that far. Plus sometimes it is very shallow over the vast reefs, so I like a life vest as it helps me float over the reefs and avoid touching them.
There are portable toilets at the beginning of the trailhead, but no other facilities at the beach. Make sure you’ve got all your essentials packed in a beach bag, including good walking shoes.
Address: Bay Drive, Lahaina, HI 96761
Tip: Purchase a rashguard before coming to Maui. You will be so grateful to have this extra bit of sun protection when you’re out snorkeling for hours at a time.
Olowalu
Olowalu at mile marker 14 is another excellent option for snorkeling. You can book kayak tours here or rent a stand-up paddleboard and paddle out to the reef. The best snorkeling is about 100 feet offshore. So I would recommend bringing a life vest. There is also a blacktip reef shark nursery here; however, I have gone here multiple times and have never seen one. I have, however, seen turtles and plenty of interesting coral and colorful fish. Afterward, get some of the best pie in Maui at Leoda’s Kitchen & Pie Shop.I highly recommend the banana cream pie and coconut cream pie.
Address: Olowalu, look for dirt parking at Mile Marker 14. Leoda’s: 820 Olowalu Village Rd, Lahaina, HI 96761
Lava rocks at Dragon’s Tooth Trail near D.T. Fleming Park. It’s easy to see where the name came from.
Best Maui Beaches for Both Snorkeling and Swimming
Ka’anapali Beach & Black Rock
This is one of the largest and most popular beaches in Maui. This beautiful sandy beach stretches for almost a mile. It is also where the famous Black Rock is located. Get an early start and snag a free parking spot if you can. There are a few public parking areas scattered along Ka’anapali Pkwy. Look for beach access signs near the parking garages to find your way to the beach. Additionally, you can park in the parking garage for Whalers Village, where you can get a 3-hour validation if you purchase something at one of the stores.
There is excellent snorkeling at Black Rock when the conditions are calm. Just be careful as this area can also get some massive waves and currents near the rock. Watch the adventurous people who make the climb up Black Rock to jump off. Be careful if you are snorkeling and keep an eye on those jumping to make sure you don’t get in their way. I have seen eels, shark, turtles, octopus, and lots of fish all around Black Rock. Even if the snorkeling isn’t great during your visit, it is still a spectacular beach for swimming and sunbathing.
Ka’anapali is the perfect beach to spend the day. Sunbathing, swimming, snorkeling, and reading your favorite book are all perfect ways to spend the day here. There are also lots of restaurants and places to eat at Whalers Village, in addition to shopping. So make a day of it!
Address: 2525 Kaanapali Pkwy, Lahaina, HI 96761 (the beach is in front of a row of resorts, look for public parking signs along the Ka’anapali Pkwy)
Black Rock at Ka’anapali Beach. Snorkeling is best near the rock and around the tip. Just be careful of the currents near the rocks.
Kamaole Beach I, II or III
The Kama’ole beaches are a great set of South Maui beaches in Kihei. You will enjoy easy access to good food and shopping in addition to some of the best Maui beaches. Each beach offers its mix of swimming and snorkeling. I think Kama’ole I and Kama’ole II are better for snorkeling than III.
There are lots of unique lava rock formations in the water where you’ll find all sorts of fish, turtles and perhaps even an octopus all curled up. The beaches also have showers, bathrooms, and lifeguards. Depending on the time of year, you may find these beaches better for boogie boarding than snorkeling or swimming. They are worth checking out when in South Maui.
Address: S Kihei Rd, Kihei, HI 96753
Tip: Make sure you purchase reef safe sunscreen. In 2021, Hawaii will implement a ban on the sale of sunscreen containing the coral-harming chemicals oxybenzone and octinoxate.
Maui Sunset looking across at the island of Molokai
Funny Beach Experience You May Wish to Avoid
In case you’re as “lucky” as I was, to be on the beach in Maui on the first working day of the month, you may hear a loud siren. Yep, I was in the water snorkeling to my heart’s content at Kama’ole Beach II when I heard this loud siren go off. My first thought was “SHARK!” You have never seen anyone swim so fast to the shore! My husband says I pushed a young boy out of the way in my hurry, I, of course, deny that. Everyone in the water was scrambling for the beach like mad!
By the time I made it to the beach, I had overheard a local Hawaiian telling a visitor that it was “just” a tsunami drill. I am sure they are entertained each month to watch visitors race for the shore each time they test this essential warning system. I appreciate that they have the system in place, and honestly when my heart stopped trying to pound out of my chest, my friends and I all had a good laugh at each other and our moment of panic. It’s funny, but the thought of a tsunami didn’t scare us as much as the thought of a shark did!
What to Bring to the Beach
snorkel gear (rent or pack from home) sunscreen bug spray water bottles (I like to freeze some the night before) chapstick snacks rashguard (the Hawaiian sun can be brutal) hats beach umbrella (most condos supply these) beach mats & towels underwater cameras good book sandcastle building set beach bag swimsuit cover-up flip-flops sunglasses picnic lunch (optional) beach ball baby shampoo (use this inside your snorkel goggles to keep them from fogging)
Final Thoughts
Maui has many incredible beaches. As always, please make safety your priority. Don’t swim or snorkel alone; it’s always nice to have a buddy. When in doubt, stay out. If the waves look too big, or the situation doesn’t feel right, don’t go in. Ask a local, read weather reports, and take the necessary precautions to give yourself the best possible trip to Maui.
This list of beaches is what I consider to be the best Maui beaches for swimming and snorkeling. However, you should discover for yourself your favorite Maui beach. You’re going to want to return, so why not begin creating your future list of favorite places. If you’re like me, Maui will soon feel like your home away from home.