author.travelffeine.com

Category: Hiking

Enjoy these hiking guides for many different travel destinations. Hikes are a great way to get a new perspective on any area you are visiting, see if there’s one near your next destination, and give it a try!

  • Smith Rock State Park: Misery Ridge Loop Trail

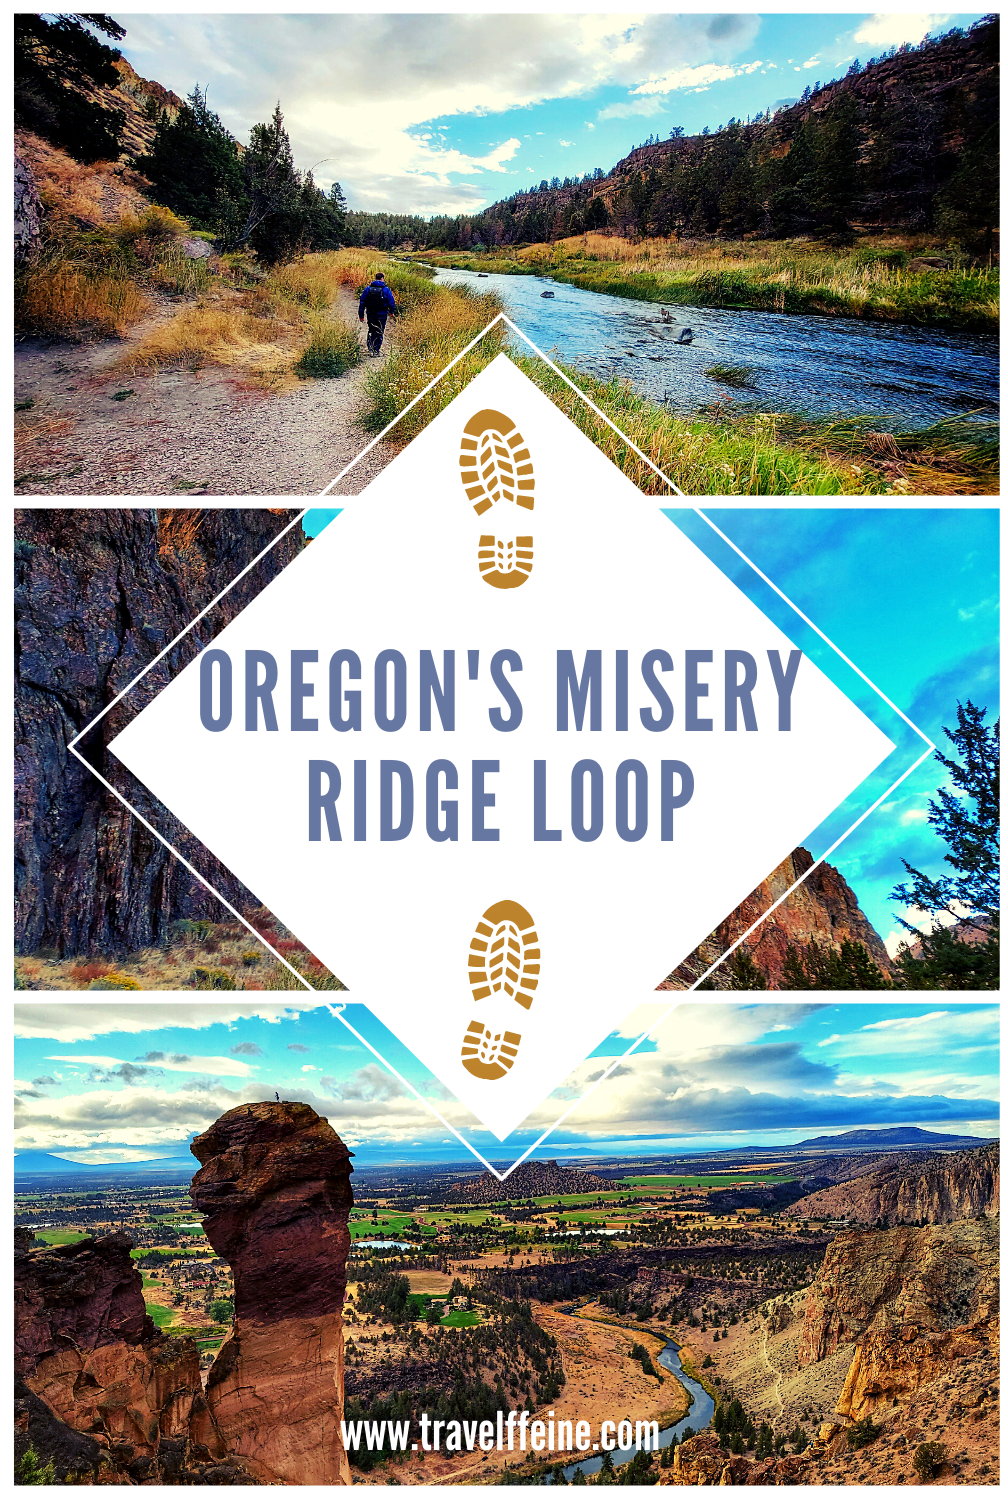
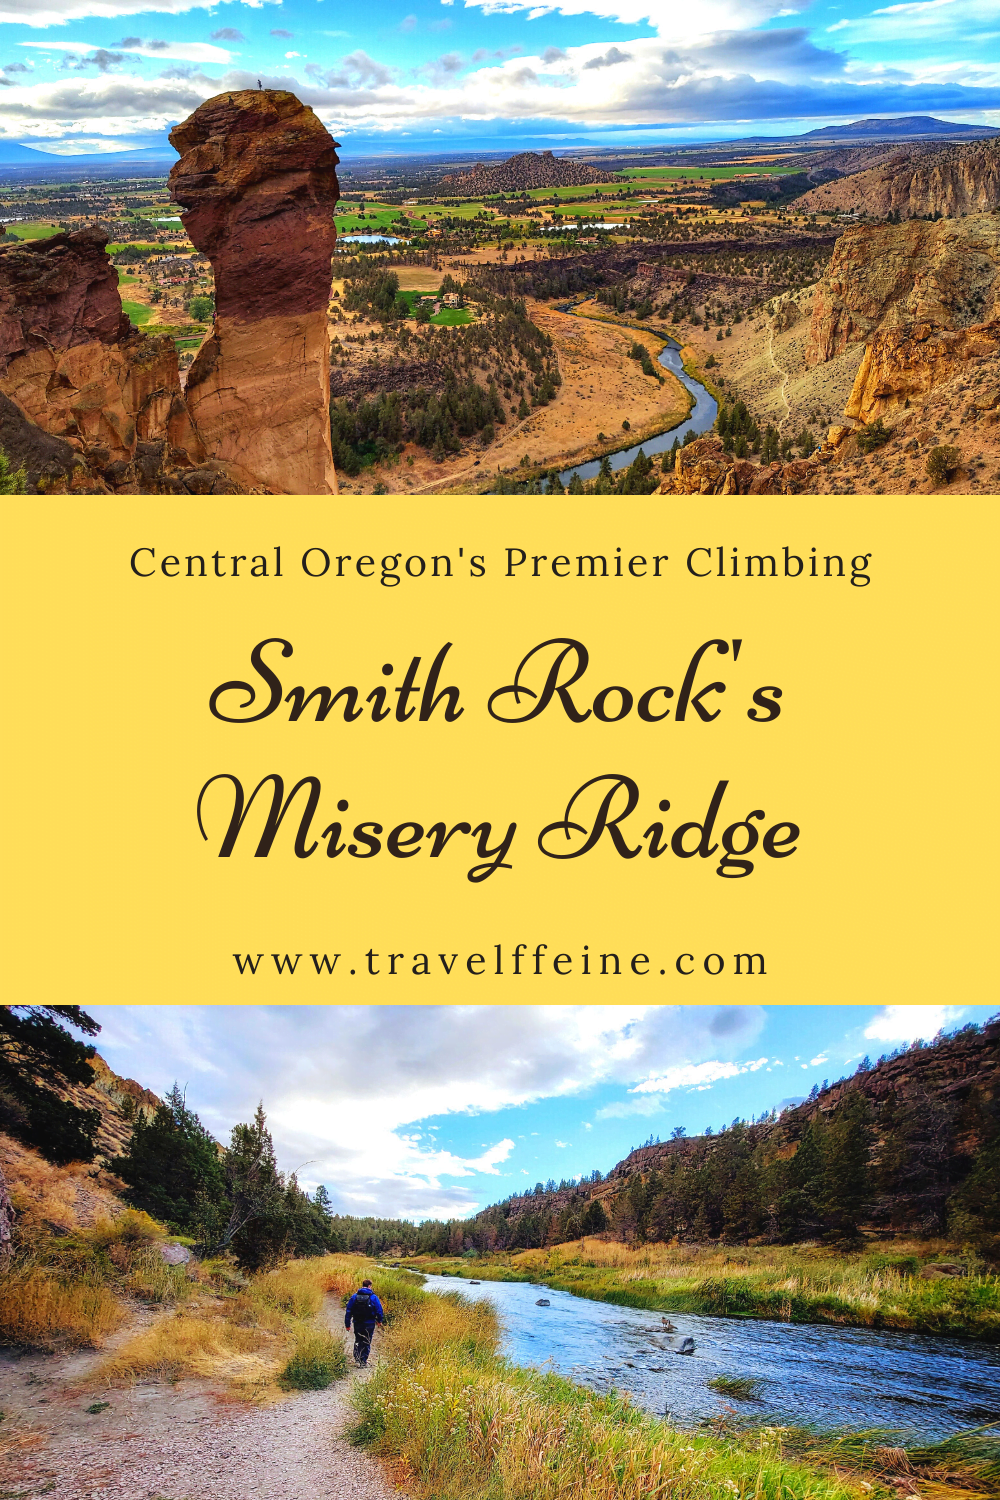
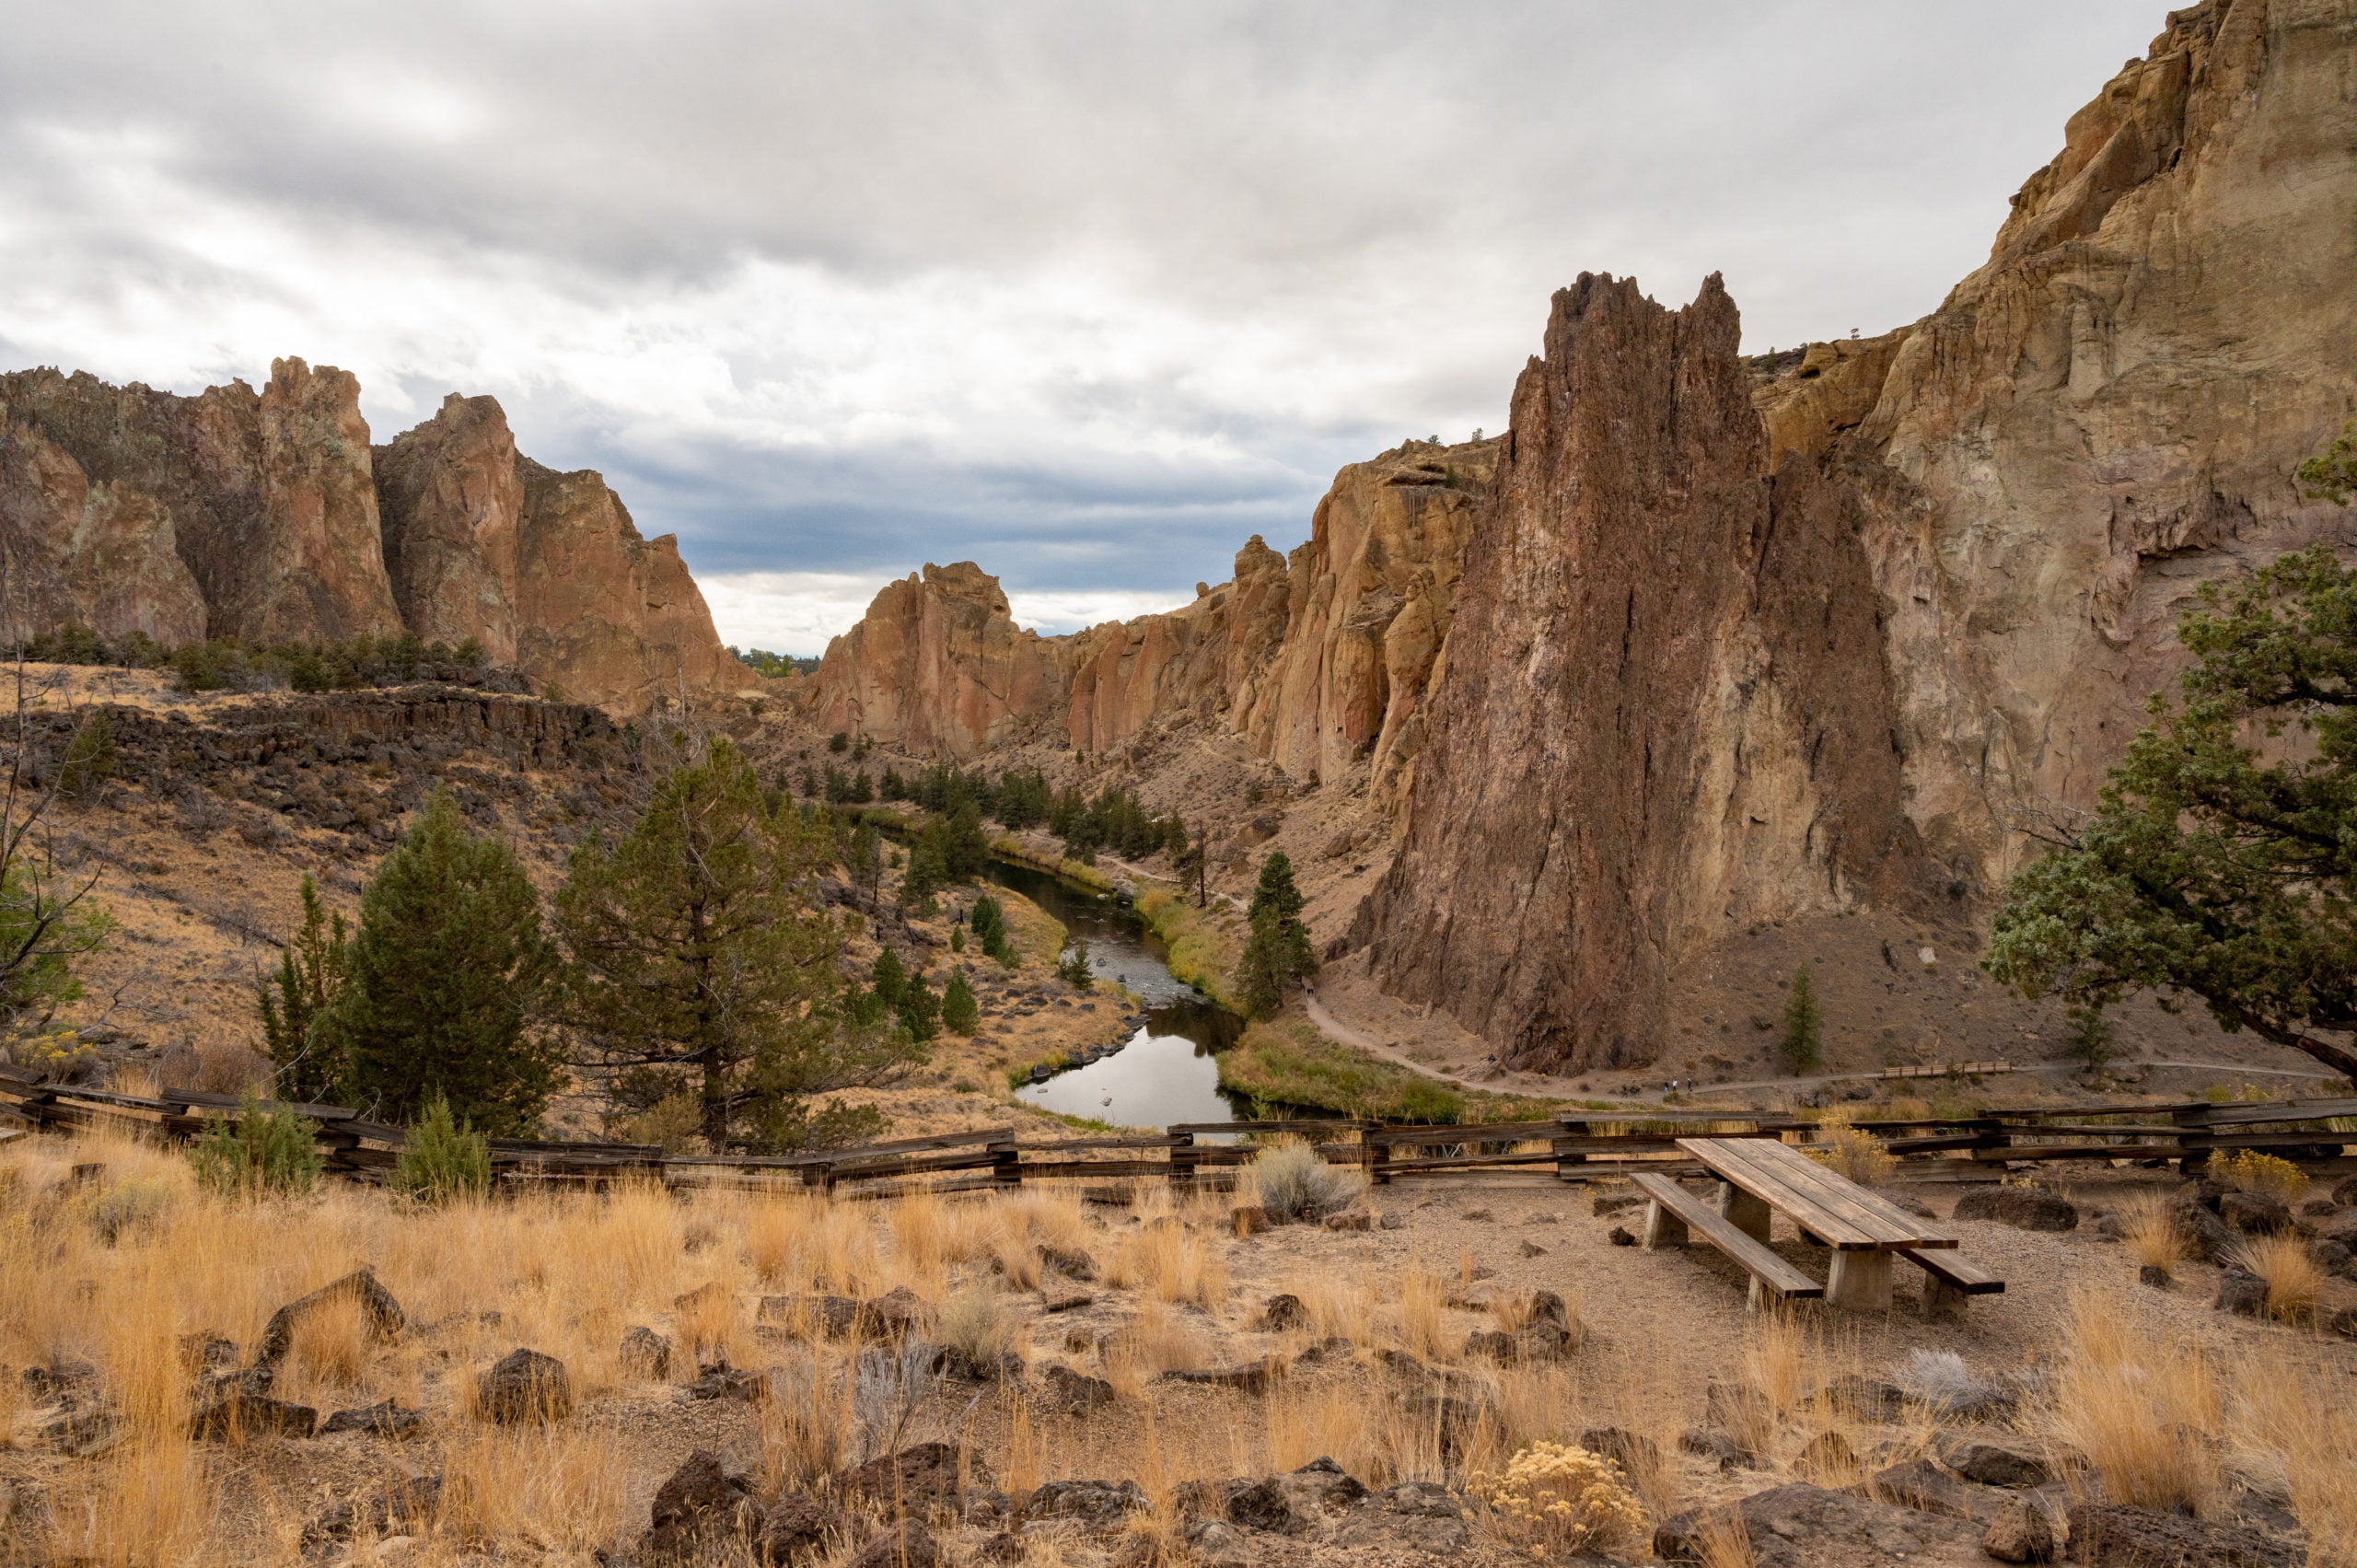
    On a road trip to Central Oregon, hubby and I spontaneously decided to stop at Smith Rock State Park near Bend, Oregon.  I am so glad we did!  This 600+ acre park is beautiful!  The river winds its way through the park, with volcanic rock formations towering alongside it.  It’s no wonder it’s considered Oregon’s top rock climbing destination.  For those looking for exceptional views and a gorgeous natural setting, you’ve come to the right place!

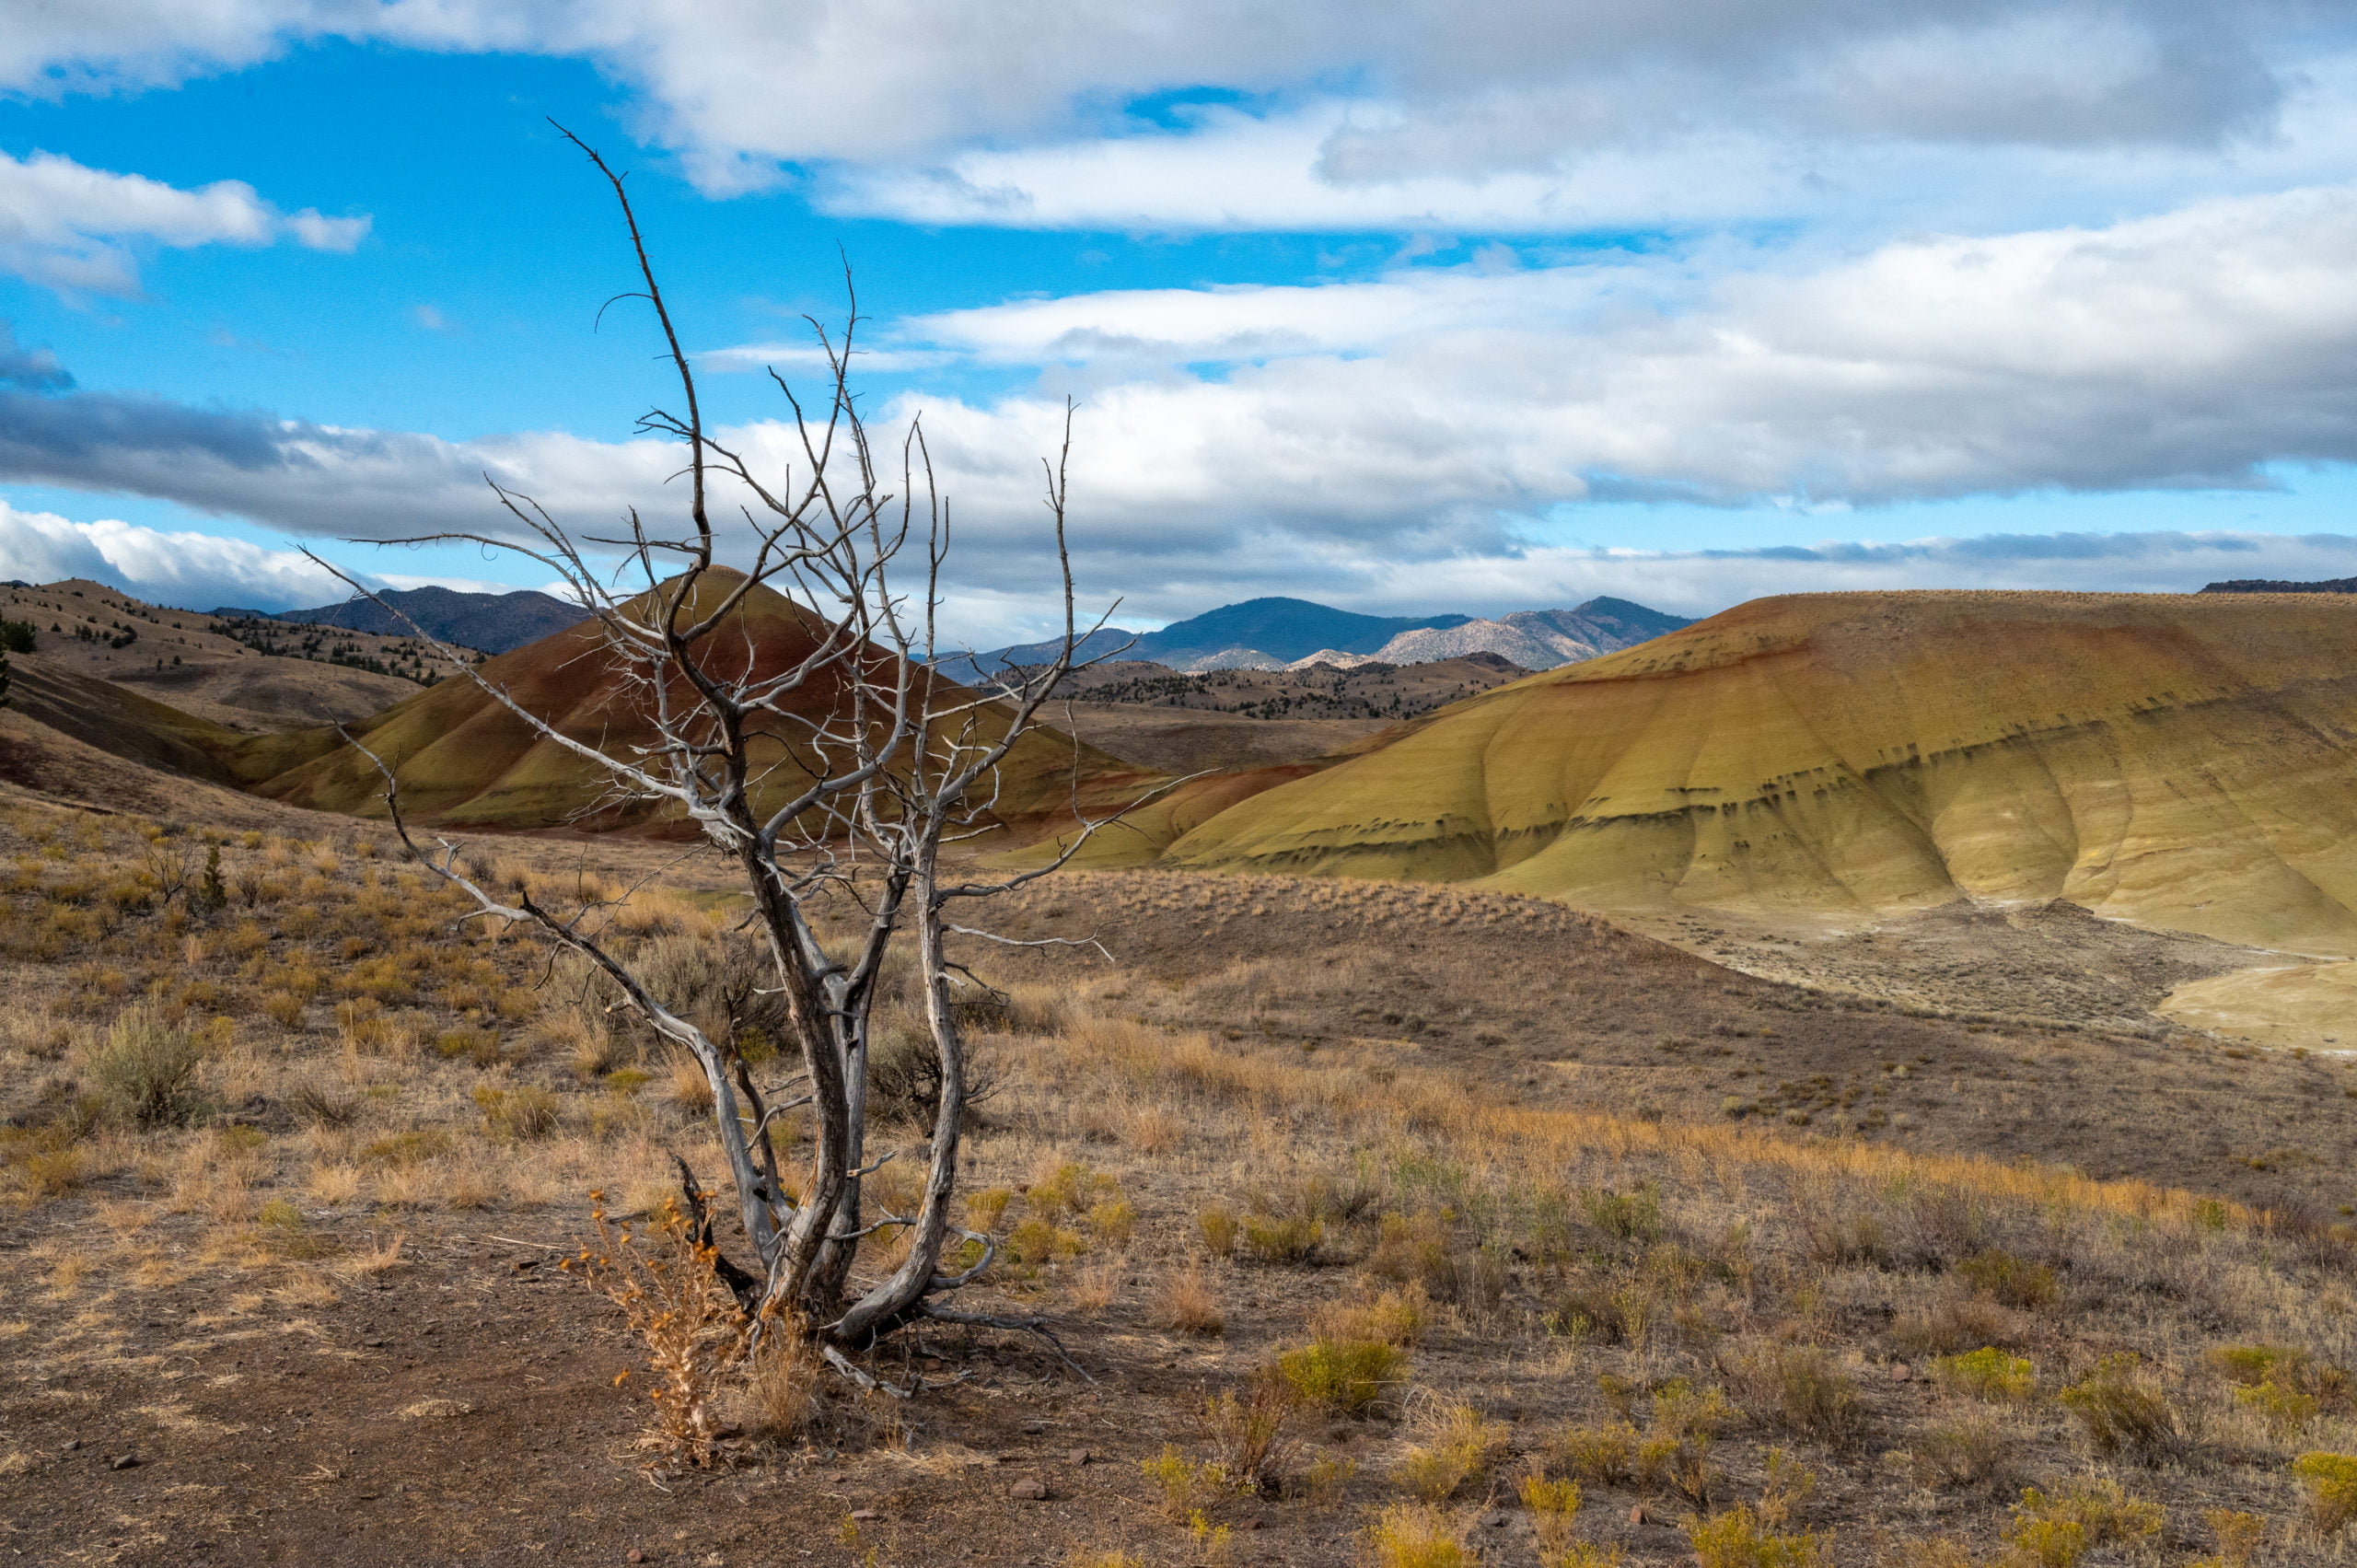
    We arrived mid-afternoon as we’d visited Oregon’s Painted Hills that morning. Since we didn’t have much time to spend at Smith Rock, we wanted a hike that would give us the best feel for this massive park.  So we chose the Misery Ridge Loop Trail.  It was the best decision we made, and I highly recommend you hike it when you visit Smith Rock State Park!

    About Misery Ridge Loop Trail

    Trail Length: ~ 4.0 miles (loop from Welcome Center)

    Elevation Gain: ~ 1000 feet

    Trail Difficulty Rating: Moderate

    Features: Towering volcanic rock formations, sweeping landscapes, river walk, scenic views, wildlife

    Entrance Fee: There is a $5 day-use parking fee. 

    Restrooms: There are restrooms near the Welcome Center as well as portable toilets at the bottom of the Chute Trail near the Crooked River Bridge.

    Open Hours: Dawn to Dusk

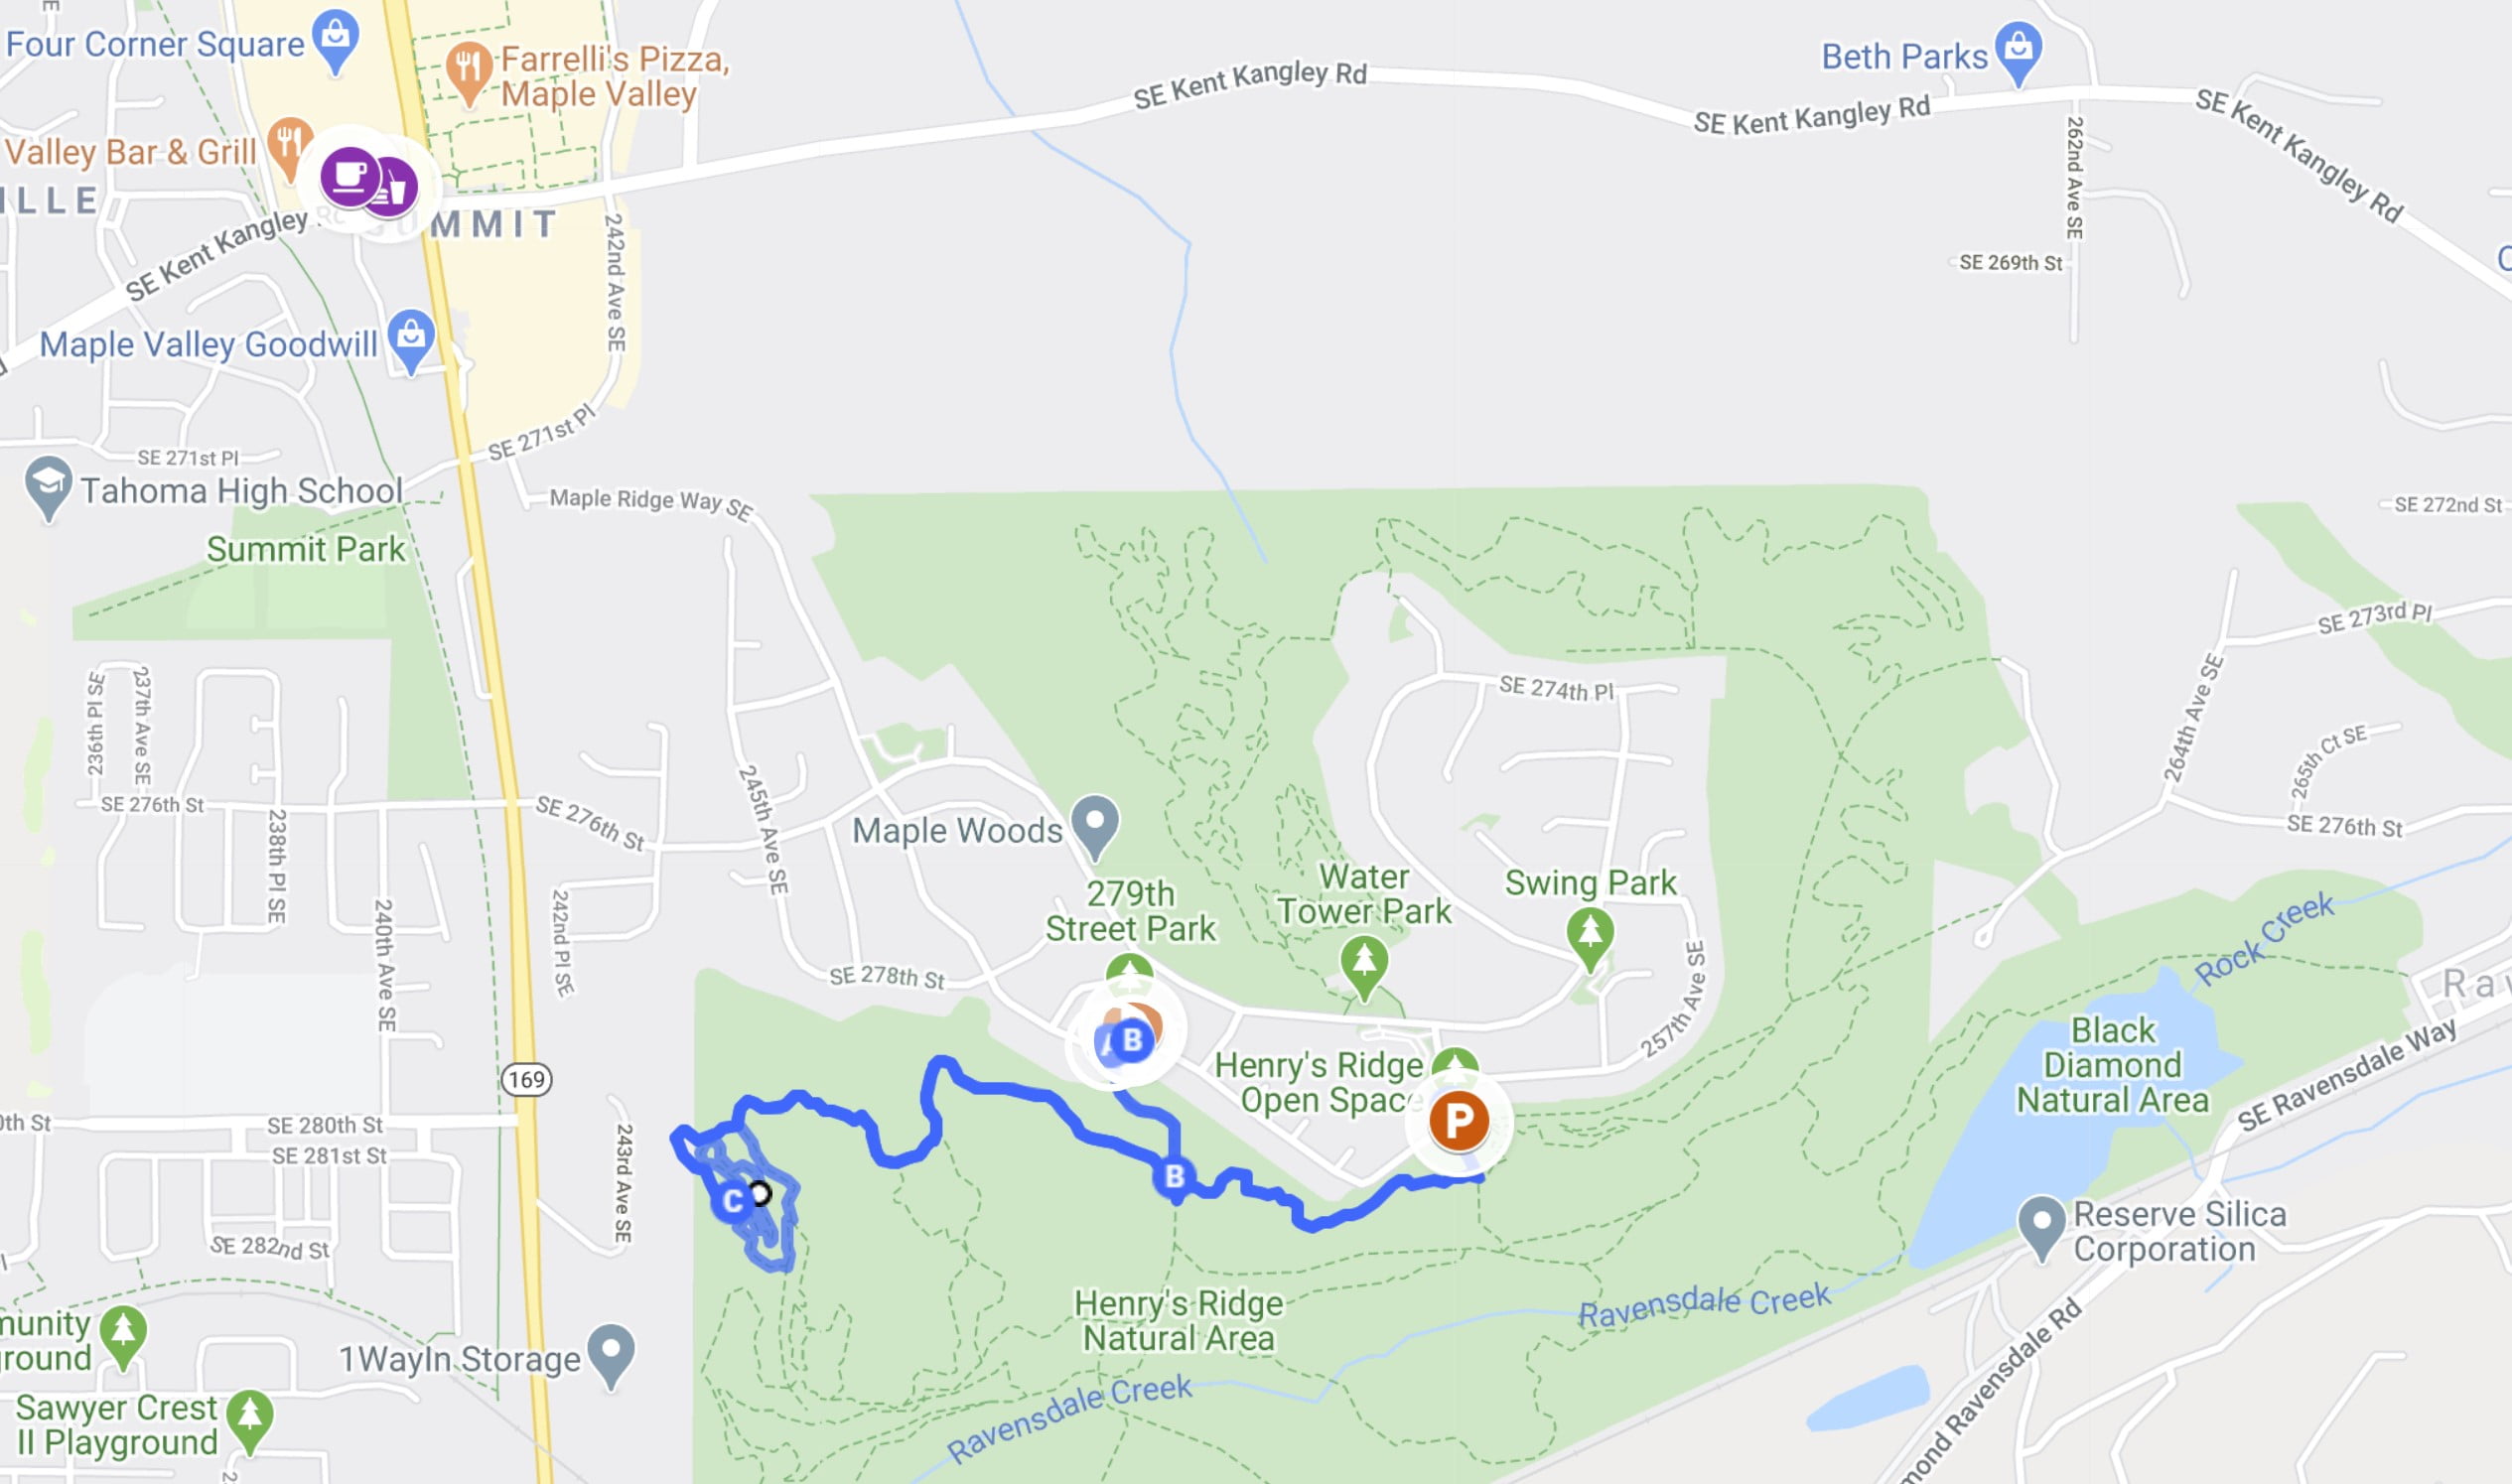
    Getting to Smith Rock State Park

    Smith Rock Welcome Center: 10087 NE Crooked River Drive, Terrebonne, OR 97760

    Smith Rock State Park is located just outside the small town of Terrebonne in Central Oregon.

    Approximate Drive Times:

    • 6 hours from Seattle, Washington
    • 3 hours from Portland, Oregon
    • 40 minutes from Bend, Oregon

    Smith Rock’s Misery Ridge Loop Trail

    Overview of Hiking the Misery Ridge Loop

    I love a hike with variety, and I absolutely love loop trails.  I get to see something new for the whole hike without needing to retrace my steps!  The Misery Ridge Loop Trail knocked it out of the park!   I had multiple viewpoints of Crooked River on my way up the steep switchbacks along Misery Ridge and incredible views of the entire valley at the summit. 

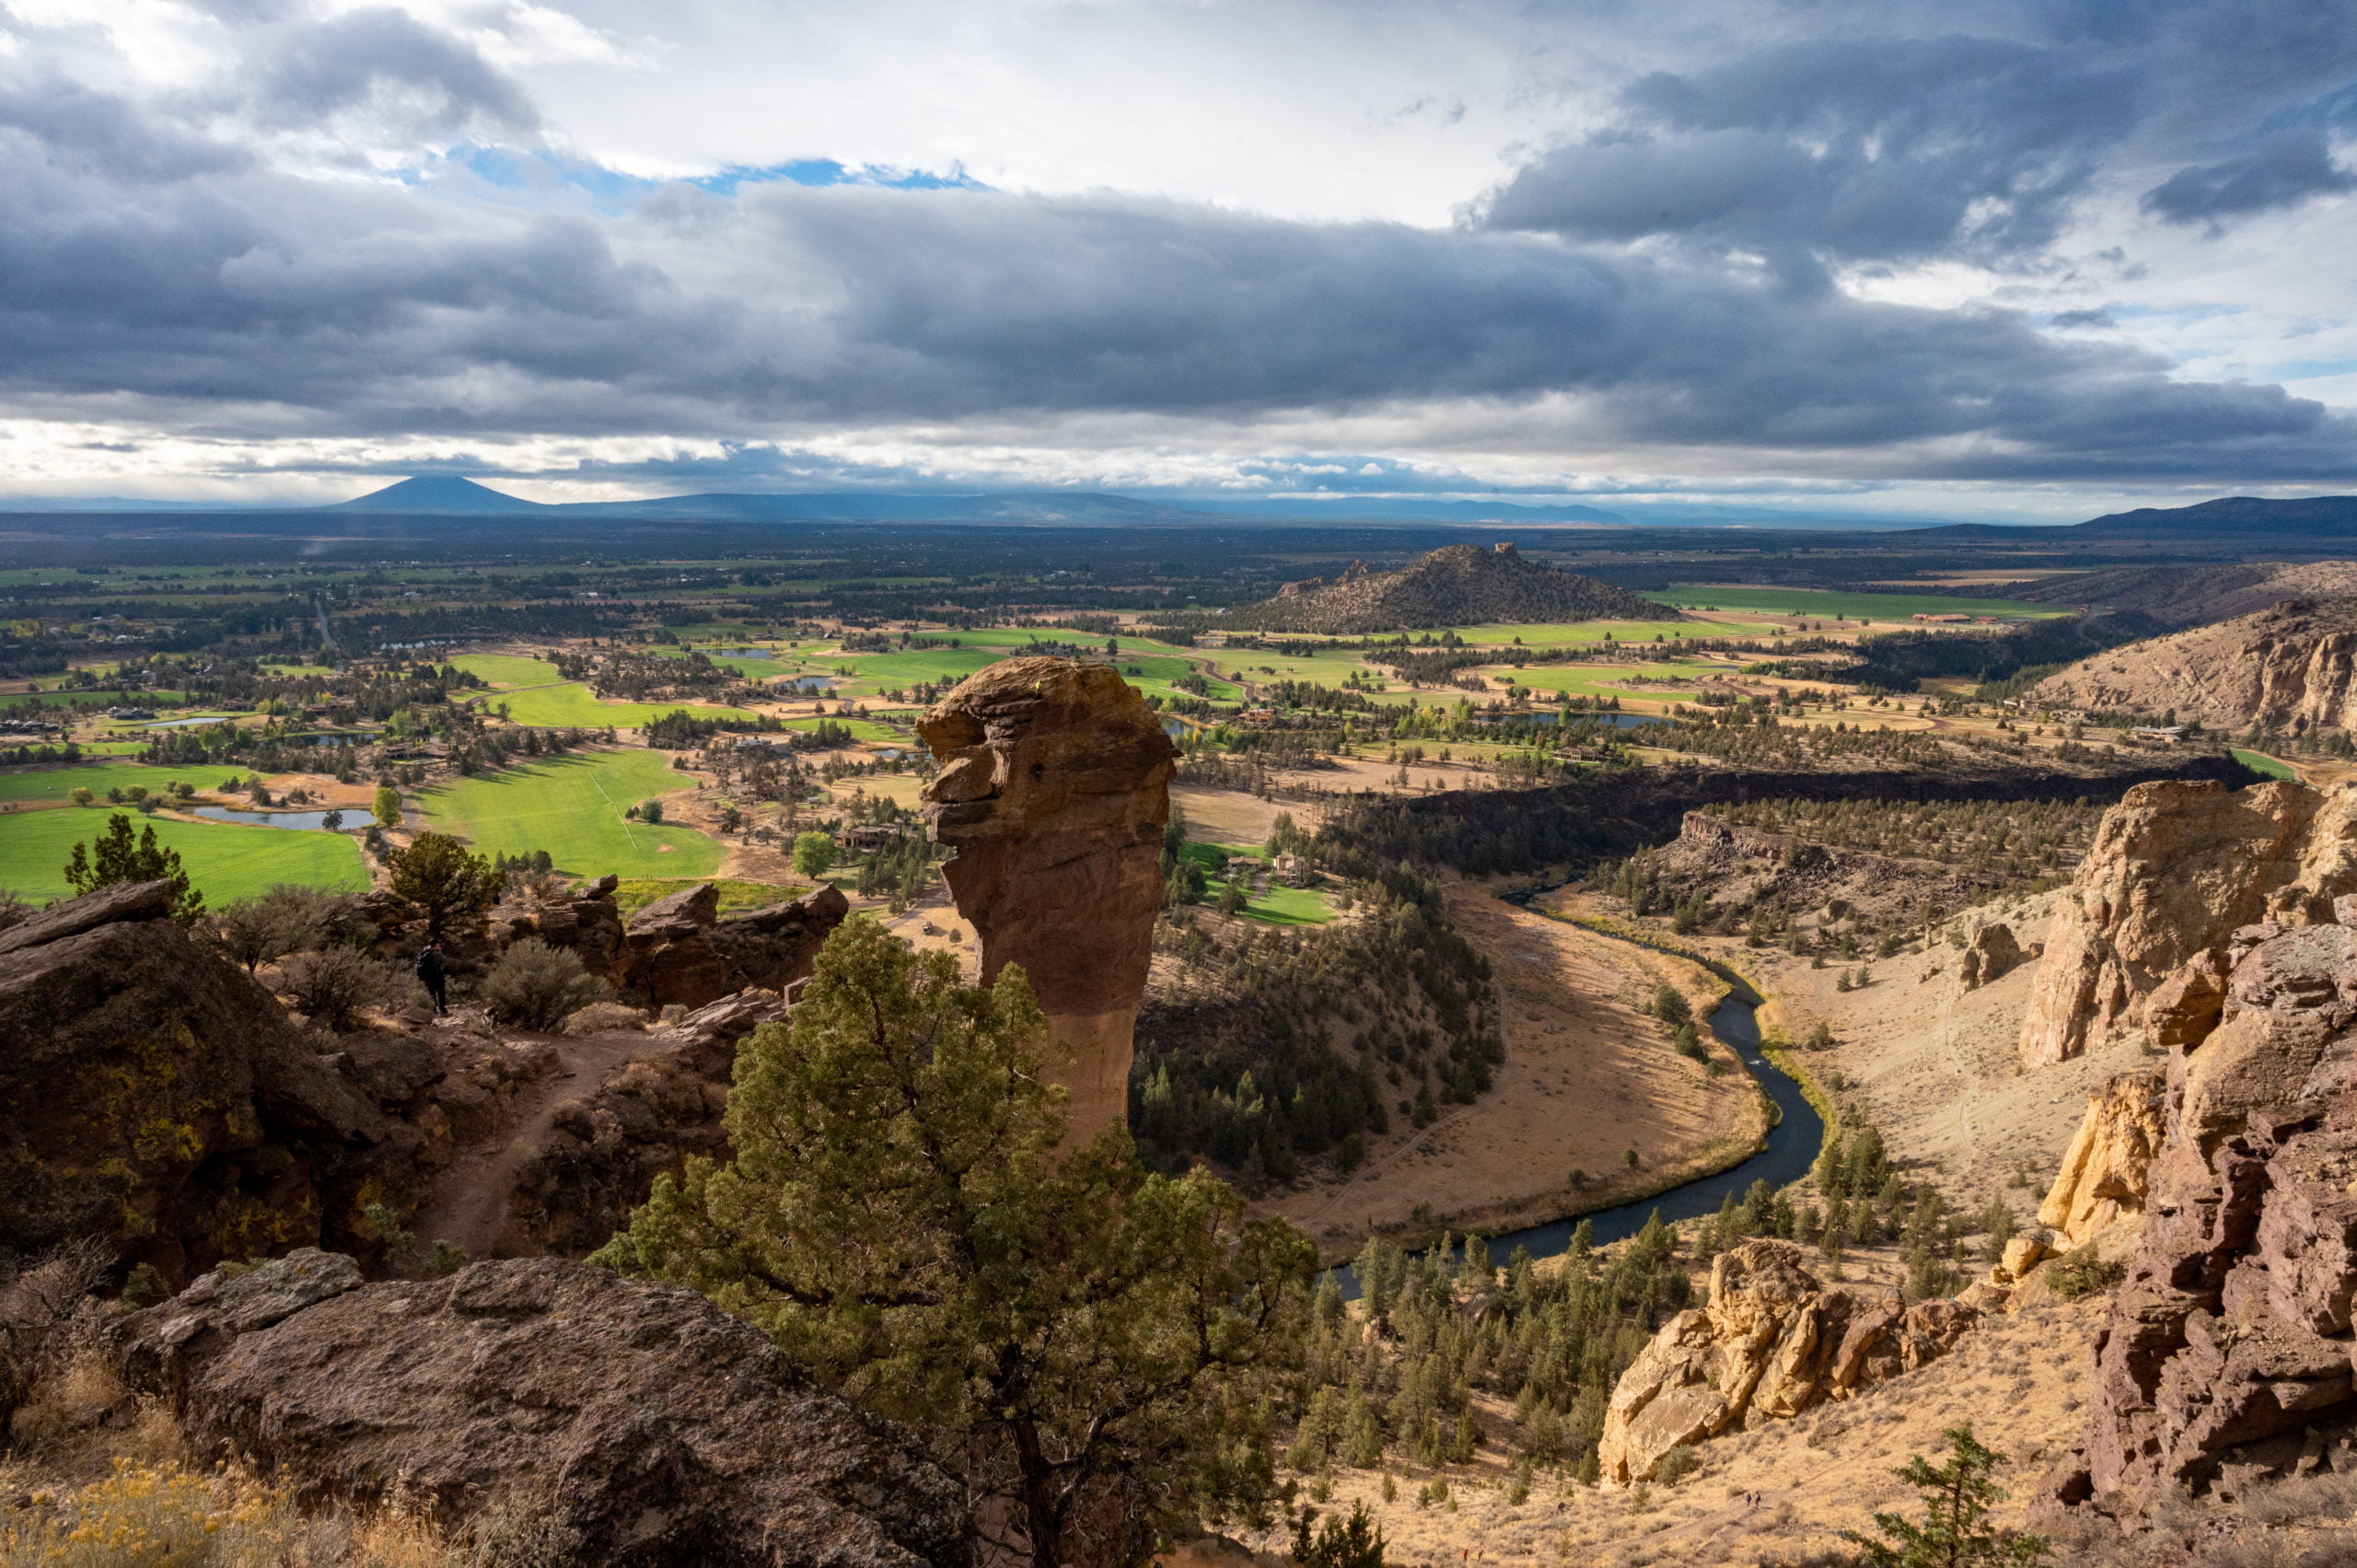
    A little further down the trail, still at the top, I got new views of the valley in addition to the infamous “Monkey Face.”  I enjoyed coming down the backside of Misery Ridge with up-close views of Monkey Face and Crooked River.  I saw rock climbers up close and enjoyed seeing geese, ducks, and cranes along the river.  It was the perfect way to spend an afternoon!

    Parking was full near the Welcome Center, so we parked in the overflow parking lot just inside the park gates. We paid the $5 day-use fee, grabbed our gear, and headed out!  We found a trail that made its way along the ridgeline in the direction of the Welcome Center.  There are excellent viewpoints here as well as picnic areas and a kid’s play area. So, if you find yourself short on time or unable to do a hike, consider stopping here and walking along the ridge for some great photo opportunities and spaces to soak it all in.

    Beginning Our Hike: The Chute Trail

    The path along the upper ridge takes you past the Welcome Center to an Overlook area where you make a left onto a wide path to begin your descent into the canyon. Stay right to take the steeper but shorter Chute Trail. This dirt trail brings you to the bottom, where you’ll cross the Crooked River Bridge. There are porta-potties near the bridge which are your last chance to use a restroom for this hike.

    Misery Ridge Trail

    After crossing the Crooked River Bridge, you’ll head to the right, where you’ll see a trail sign for the Misery Ridge Trail.  I know, with a name like that, you’re beginning to wonder what you’ve got yourself into!

    This is where you begin a series of switchbacks as you make your ascent to the summit. It’s less than a mile to the top, and there’s no rush, so hike at your own pace and take as many breaks as needed.

    You’ll see a few climbers at Red Wall about midway to the summit. Make sure to stop, turn around once in a while, and enjoy the sweeping views of the river as it winds its way through the canyon. These views are going to make you smile, and soon you’ll be done with your steep ascent and can rest and take it all in!

    Misery Ridge Summit

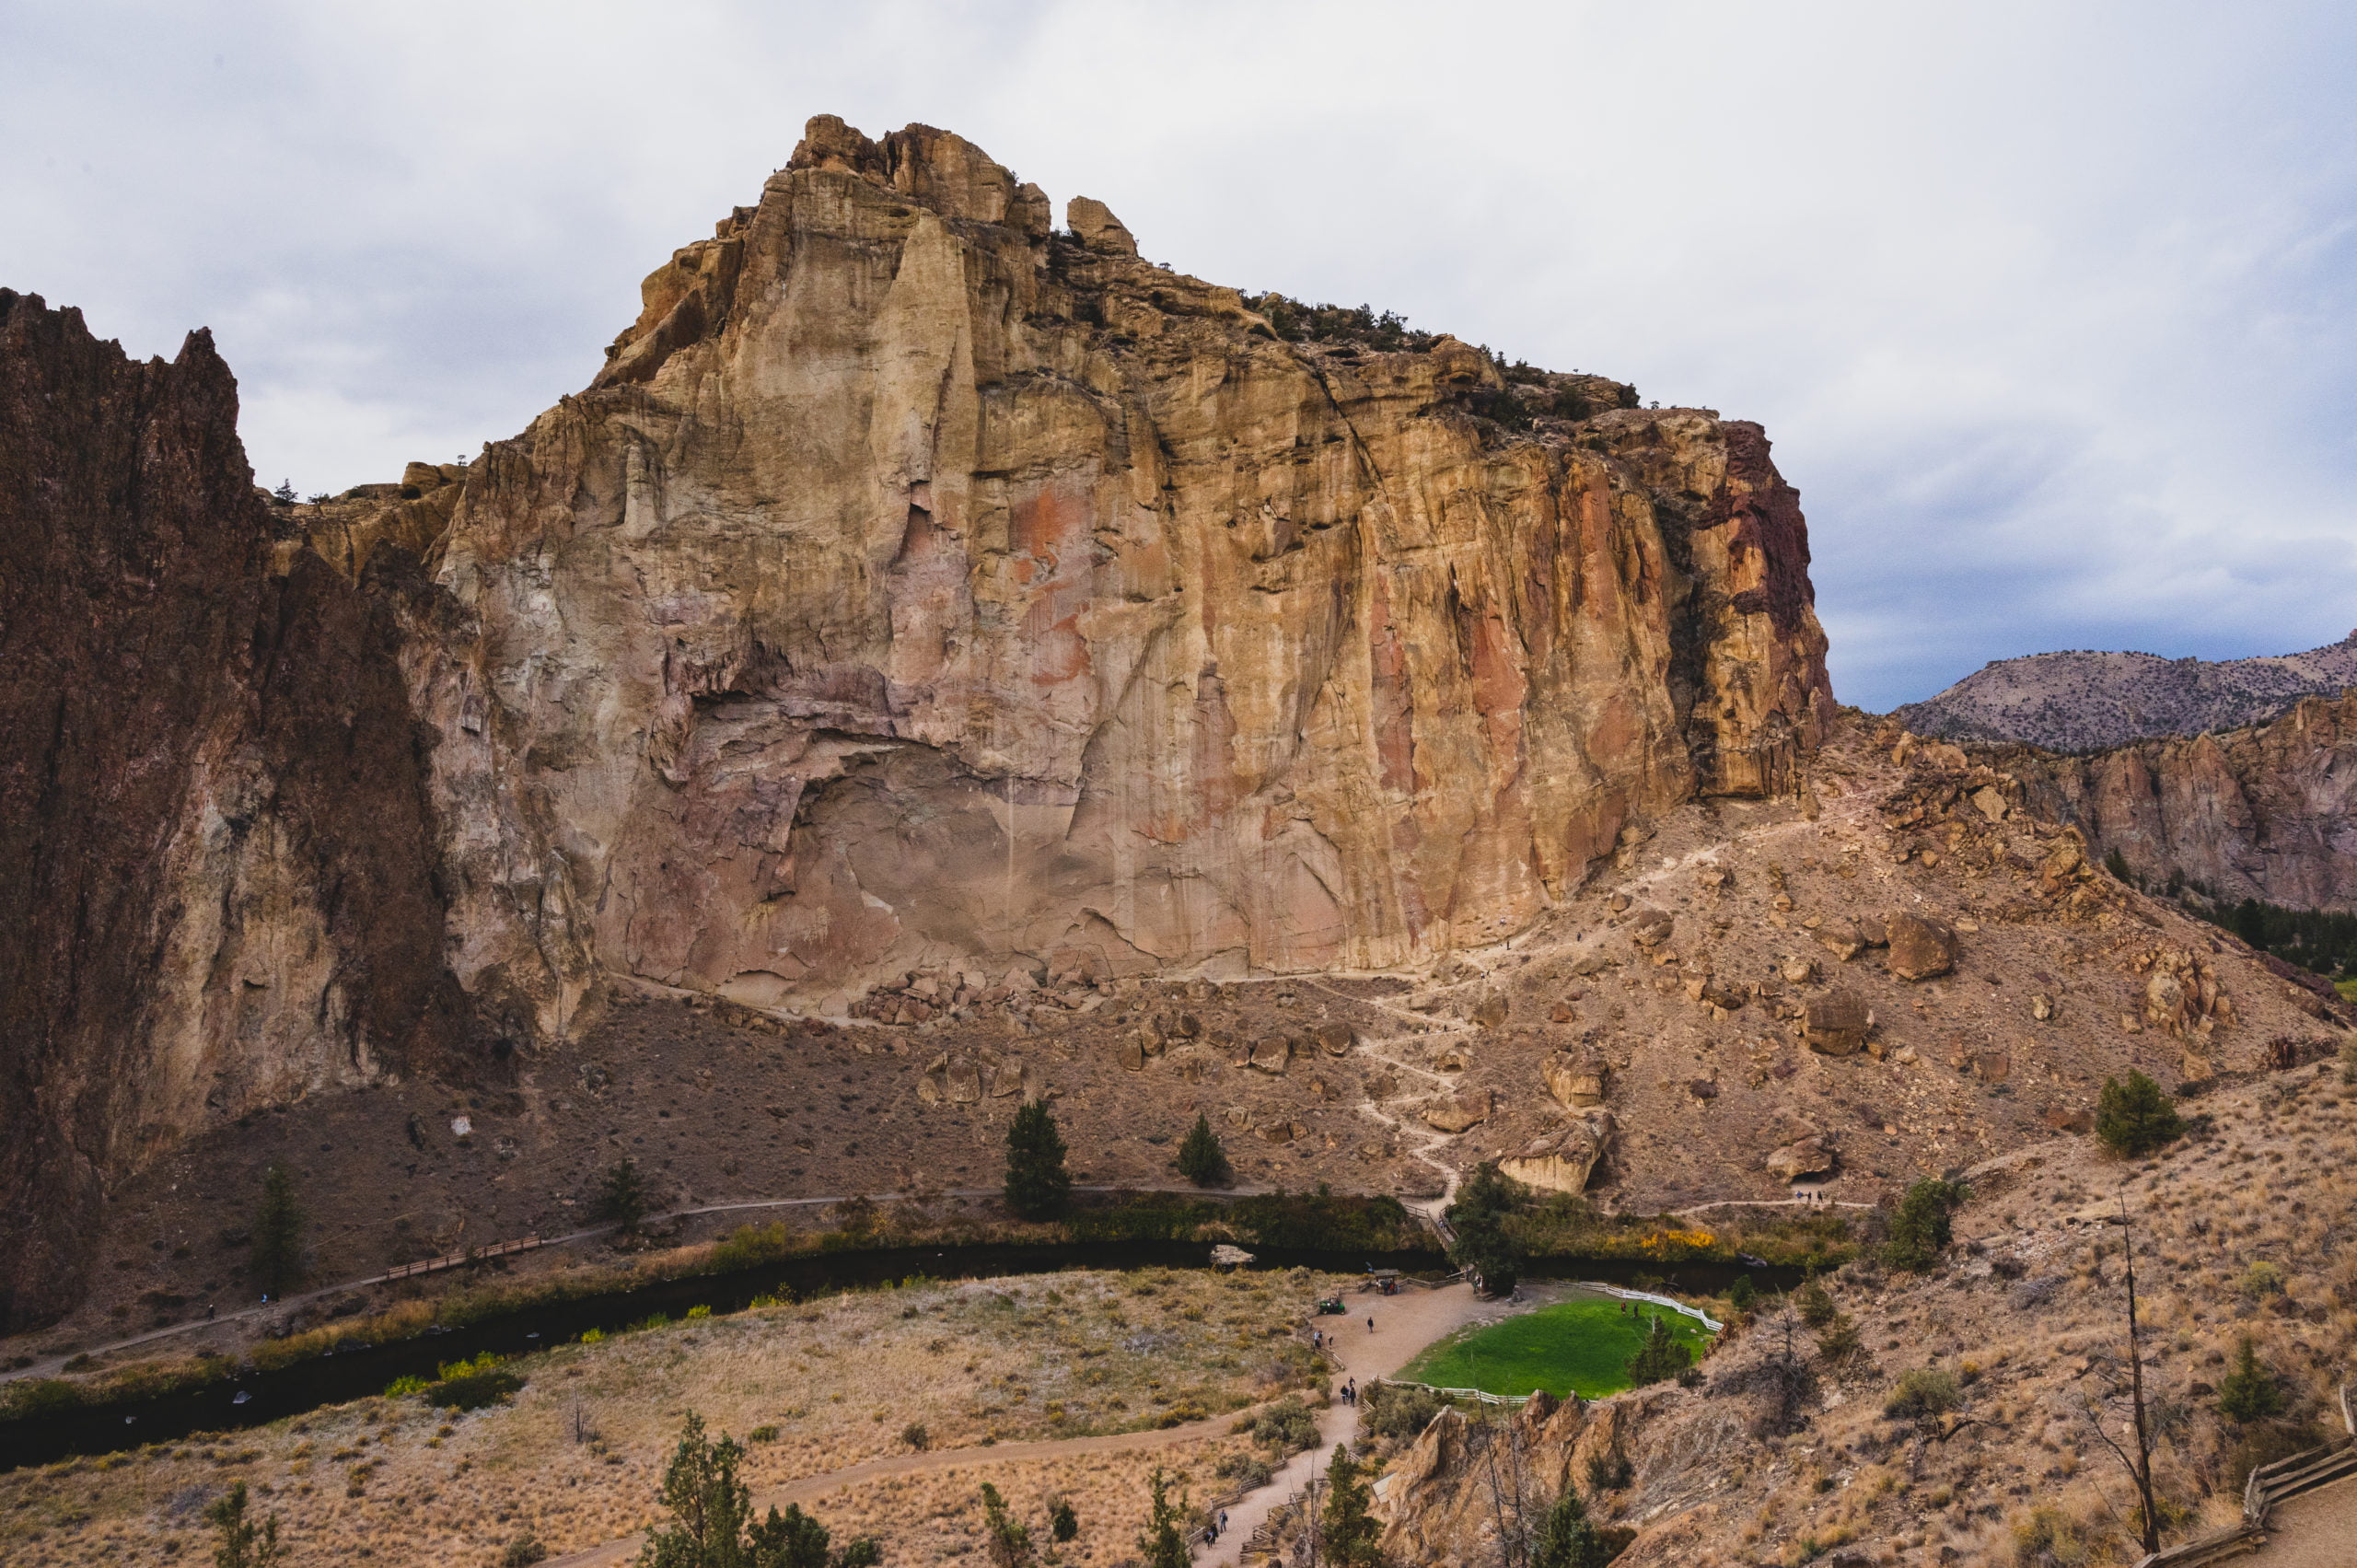
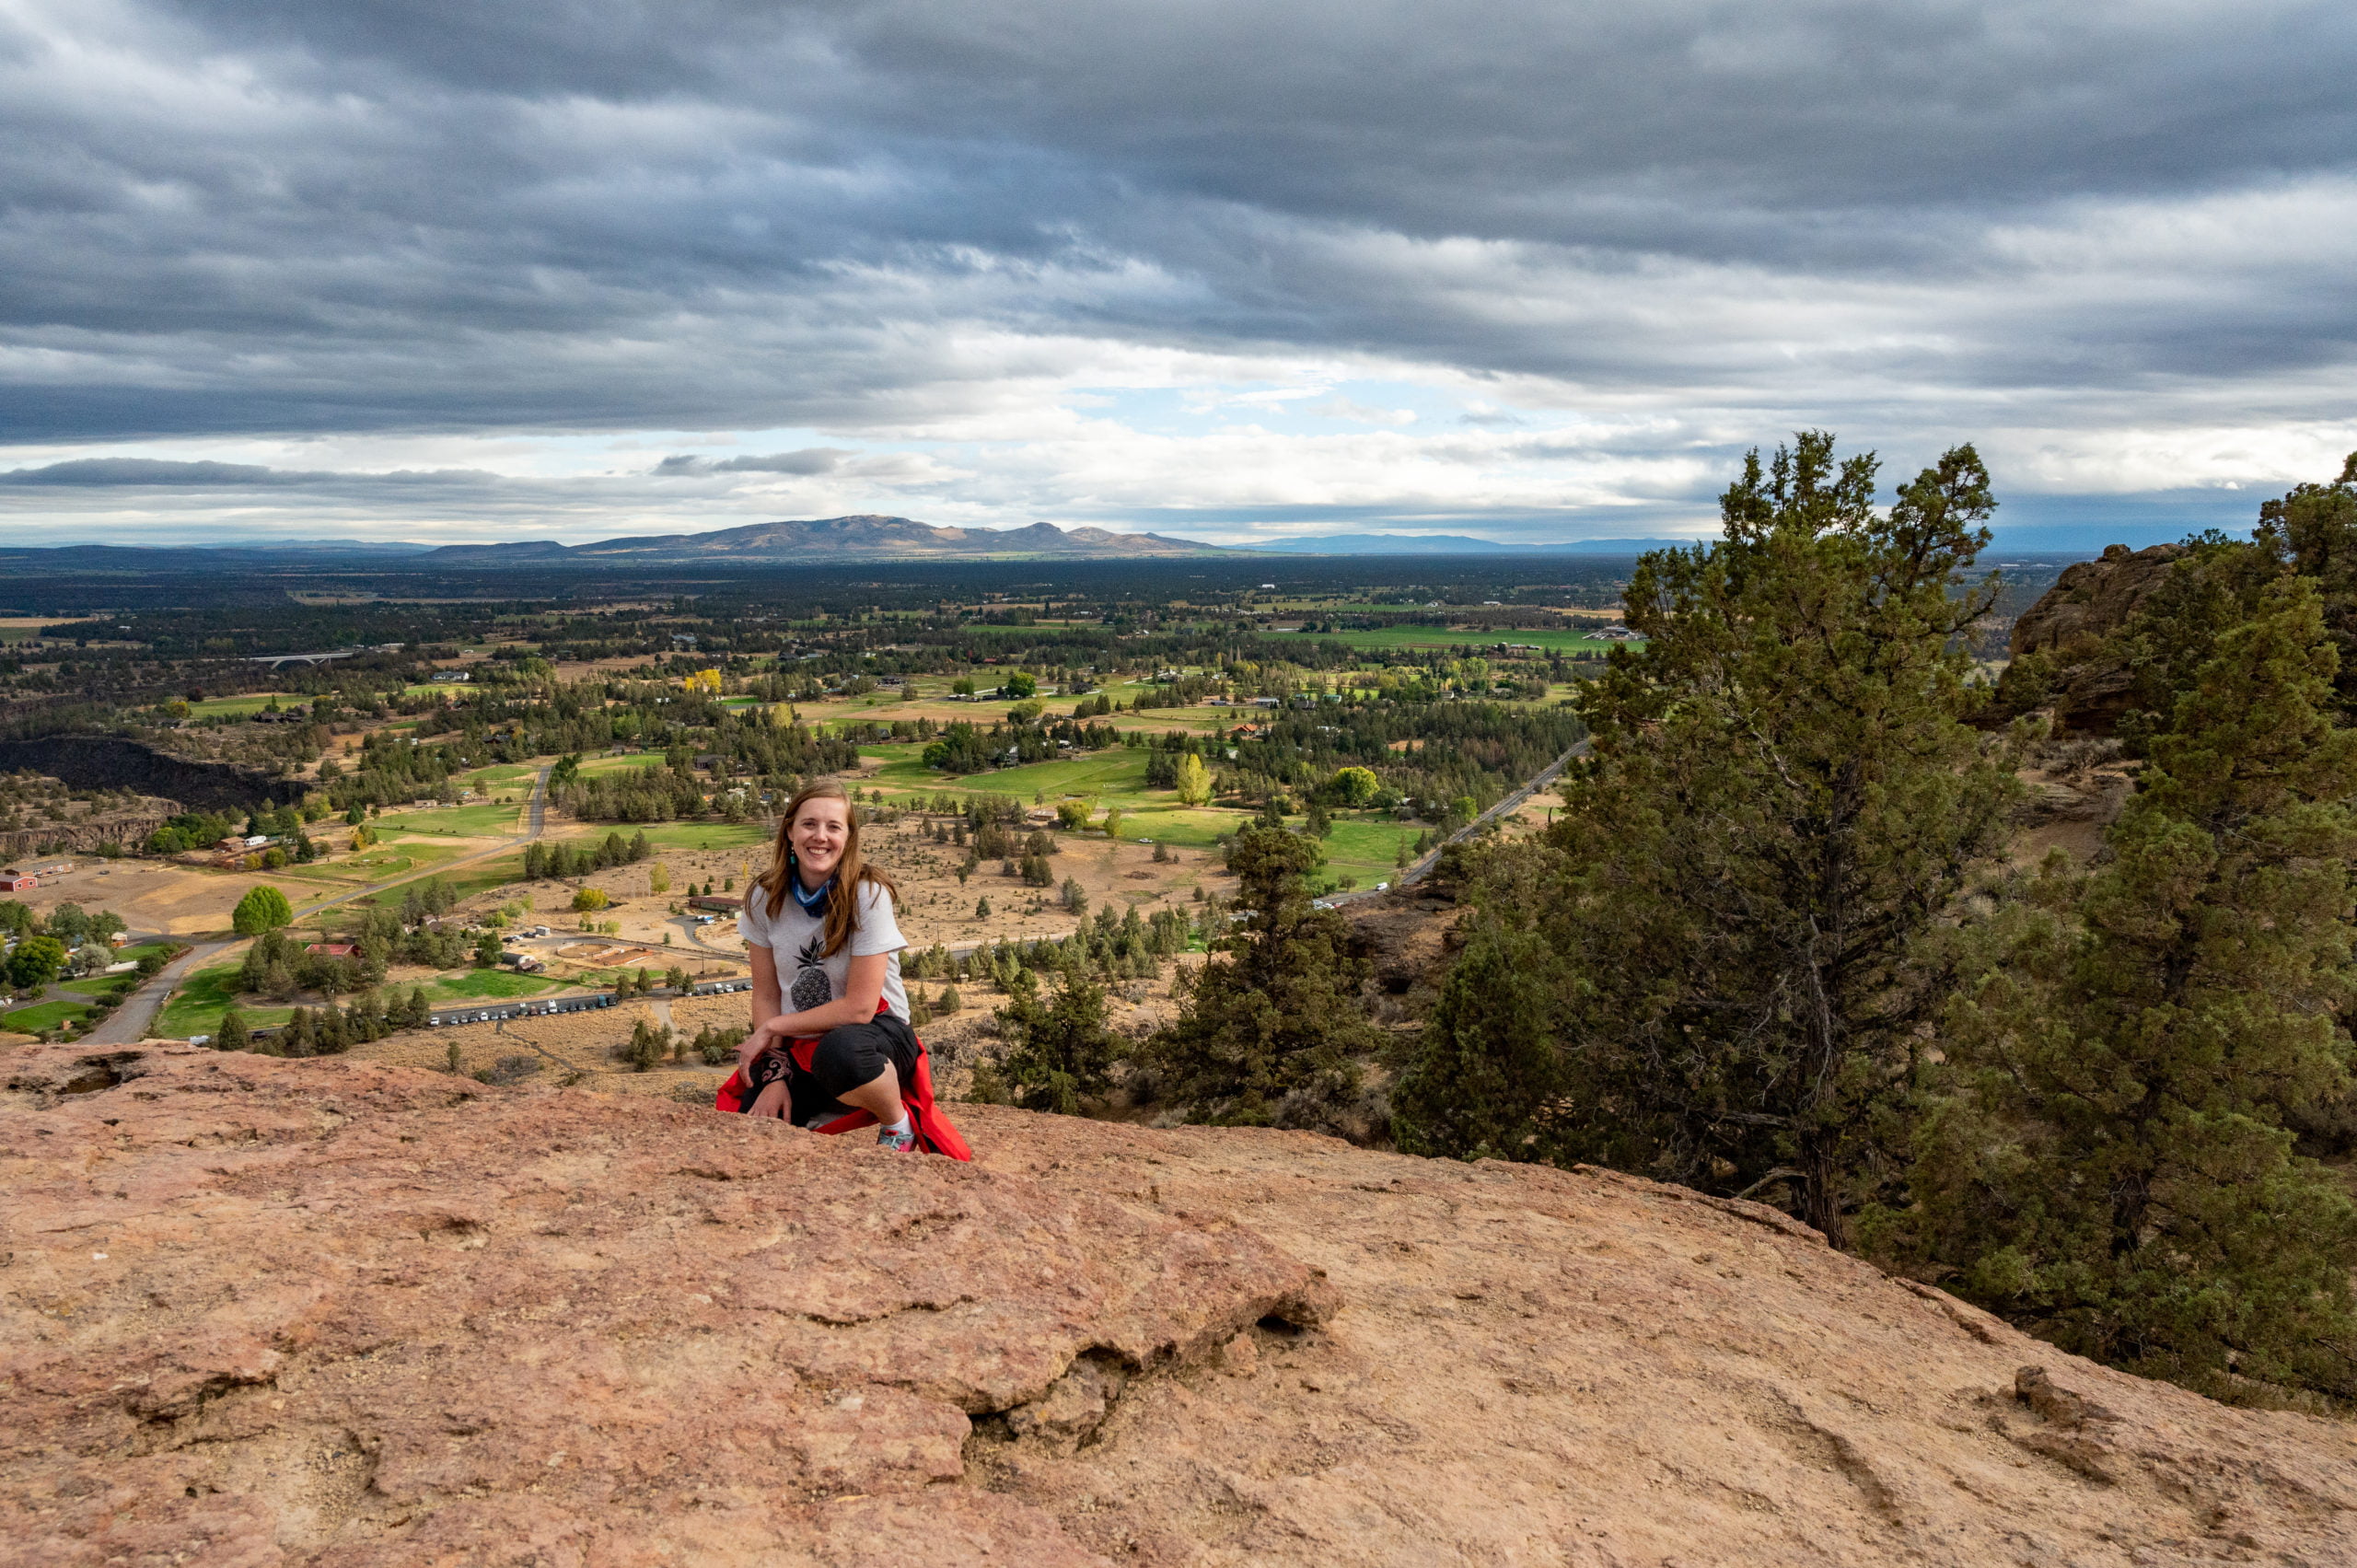
    We made it! That steady climb the entire way up Misery Ridge was worth it!  After getting to the top, head a little to the left for a wide rocky area with outstanding views of the valley below! Look down victoriously at the switchbacks you climbed and enjoy a little break as you soak it all in. When I arrived at the summit, I couldn’t help smile as I saw the reward for my efforts. It felt like I could see all of Smith Rock State Park and all of Central Oregon!

    Monkey Face

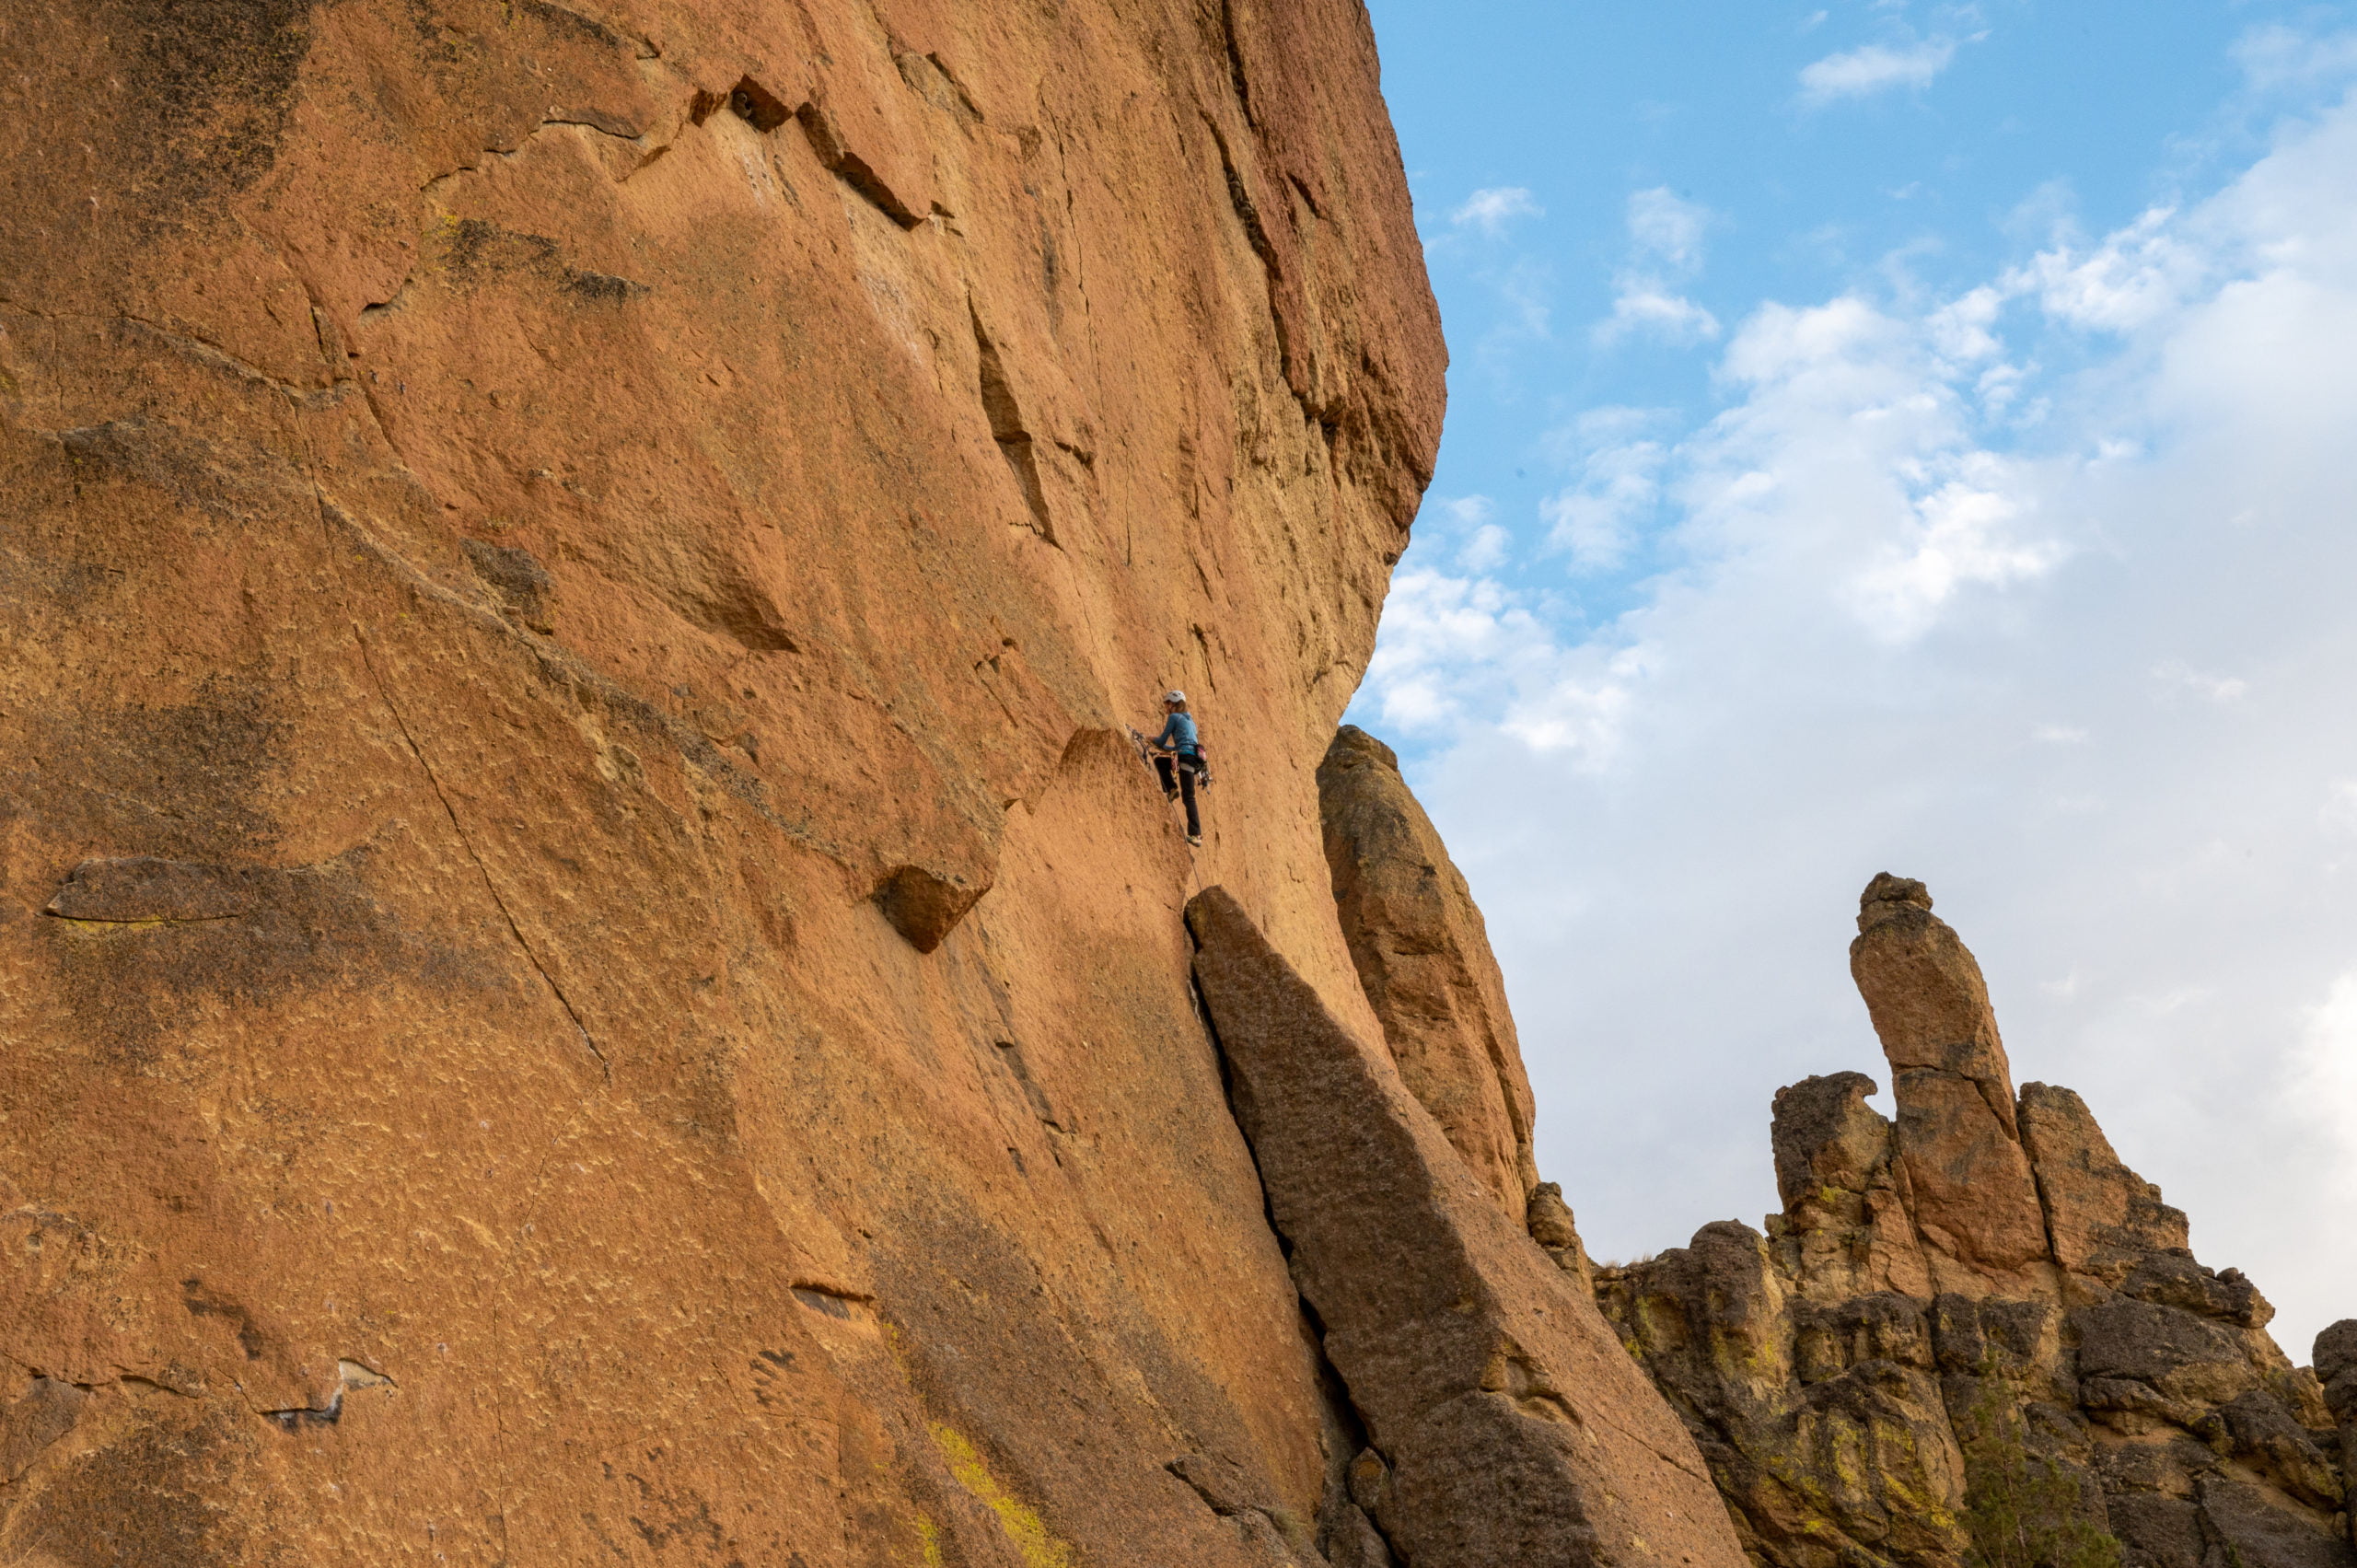
    After enjoying the views, make your way to the trail at the summit, and you’ll soon see a sign for Misery Ridge Trail. Follow this trail west for about 5 minutes and soon you’ll see glimpses of Monkey Face. You’ll also be rewarded with more sweeping views of Crooked River snaking its way through the valley. Feel free to walk closer to Monkey Face for some great photos and also to catch a glimpse of climbers on their way to the top of this iconic rock formation. They’ve sure earned that view!

    *Even if you decide not to make the Misery Ridge Loop and instead go back the way you came, don’t miss the extra little bit of hiking to see Monkey Face before you do.

    Misery Ridge Trail to Mesa Verde Trail

    After your break near Monkey Face, you’ll find your way back to the main Misery Ridge Trail and see where it begins to descend back down toward the river on the west side. Hike down a series of switchbacks and you’ll pass a small rock cave, which I, of course, couldn’t help crawling into. As you get close to the base of Monkey Face, you’ll connect with the Mesa Verde Trail, where you’ll head left. Make sure to glance toward the rocks along the left and look for climbers. You’ll see them scattered everywhere! Also, keep an eye out for trail runners. We were passed twice on the loop by the same runner!

    The River Trail

    After about a half-mile along the Mesa Verde Trail, you’ll come to the River Trail. You’ll continue straight (to the left) to stay on the River Trail.  The trail stays close to the river as you follow its winding path back around the towering rock formations. You’ll continue on this trail admiring the scenery from the ground level that you once gazed on from above. In about a mile, you’ll find yourself back at the Crooked River bridge. From here, you’ll retrace your steps back up the Chute Trail and to the top. 

    Tips & Important to Know

    Weather

    Smith Rock State Park is open year-round.  We visited in October, and the weather was perfect! Light jackets were great to have where it was windy at the top, but overall, I didn’t find I really needed mine. However, if you come in the summer, expect it to be hot, so start early if possible as temperatures can get as high as 100°F. In the winter, temperatures will often reach below freezing, and you’ll might see snow. So wear the appropriate clothing.

    Water

    Make sure to pack plenty of water. You work up quite a thirst hiking that first mile. This is even more important if you hike during the hotter months. I always say you’ll never regret bringing too much water, but you’ll certainly regret not having enough!

    Snacks

    It’s always a good idea to bring snacks to help fuel your body through a hike. Plus, there are some great resting areas within Smith Rock. You might even want to plan a picnic for after your hike.

    Snakes

    Yep, you read that right. There are snakes in Smith Rock State Park. Thankfully, we did not see any during our hike! There are rattlesnakes as well as bull snakes, garter snakes, and other non-venomous varieties.  Obviously, it’s the rattlers you really want to watch out for.  They are often found in tall grass, rocky caves, under rocks, and so on. If you encounter one, do your best to slowly walk away from it, giving it plenty of space. They aren’t typically aggressive and want to get away from you as much as you do them (well, pretty close to as much).

    Miscellaneous

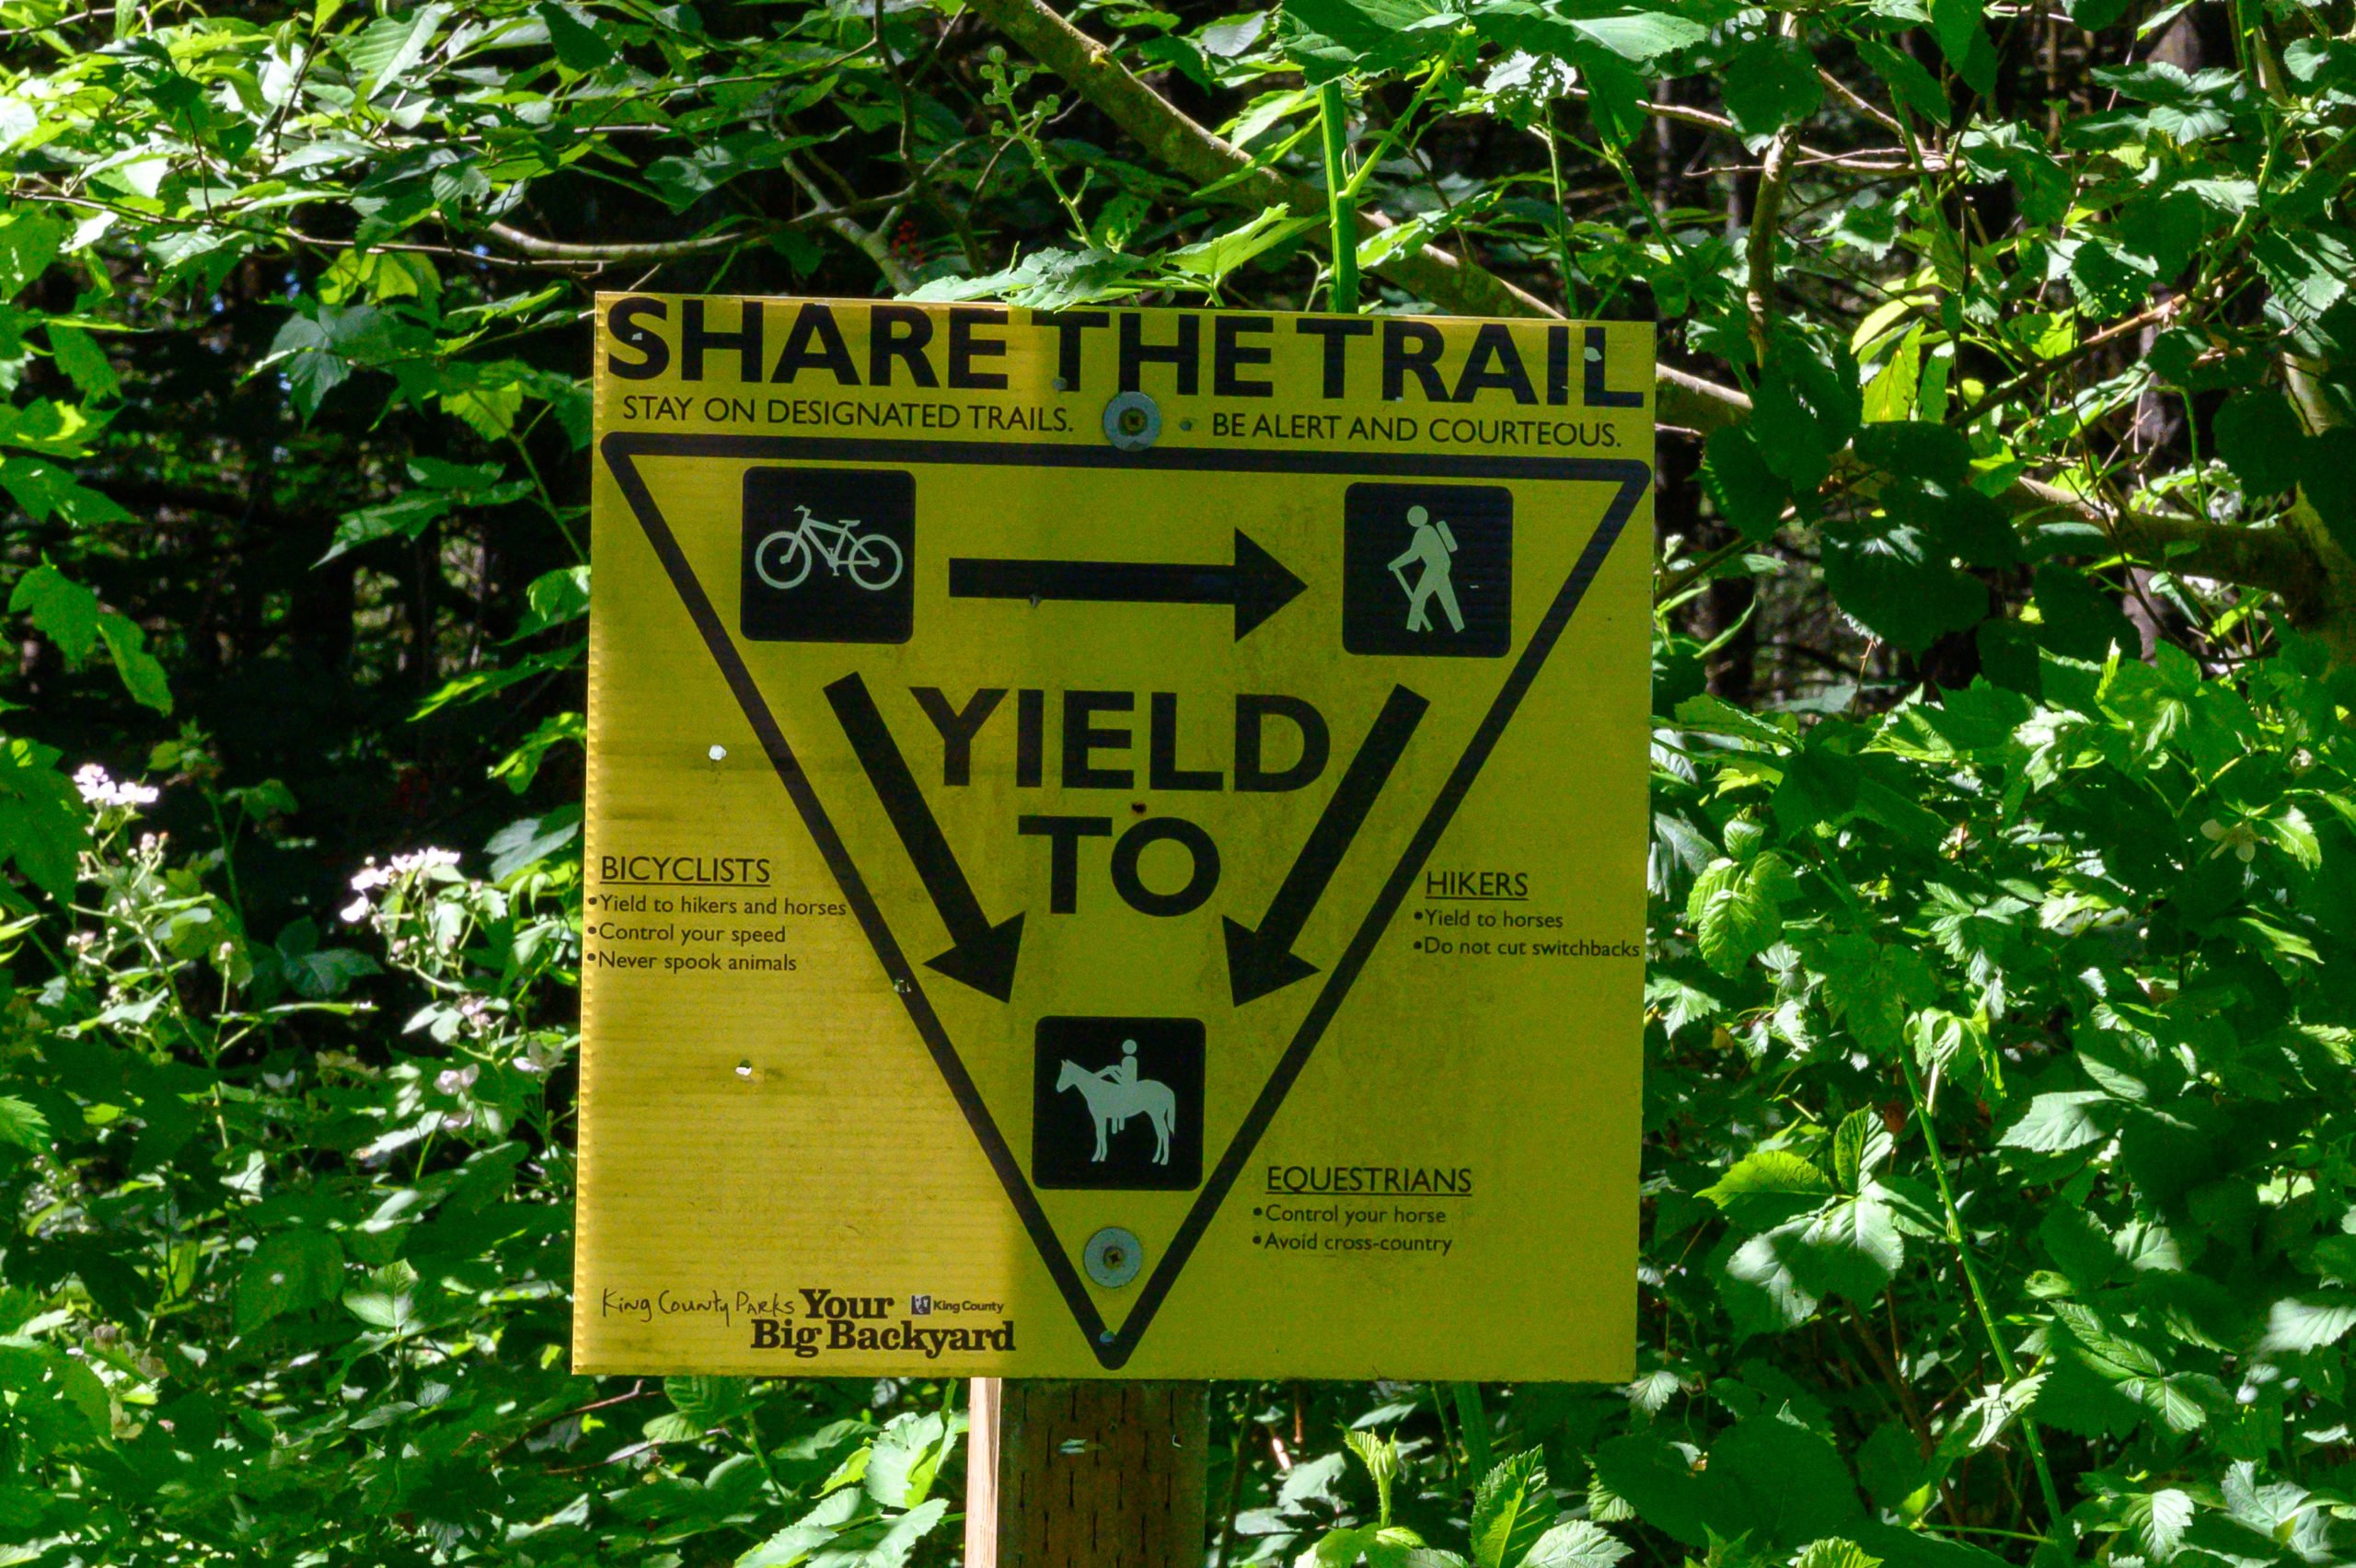
    Bring trekking poles if you have them, as these are useful when you begin your steep descent down the backside of Misery Ridge. The dirt and loose rocks can make this a slippery trail to descend, and poles are nice to have.  The River Trail also allows for mountain bikers, so make sure to watch out and give them the right of way.

    Maps

    If the Welcome Center is open, you can pop in and ask for a trail map for the entire Smith Rock State Park.  However, if they’re not open, or you’d rather use your mobile device, you can use this online brochure and map of Smith Rock State Park.

    Final Thoughts About Smith Rock

    My hubby and I are moderately healthy. Truth be told, we’ve got some extra pounds from all our recent 2020 sedentary living, but we had no issues hiking this trail. We both took breaks as needed and made sure to hydrate often. We did not rush at all, and I stopped and took a TON of photos! 

    That being said, it took us 3 hours to hike from the trail near the Welcome Center and back.  If we had hiked this straight through without any breaks and zillions of photo stops, it most likely would have only taken 2 hours.  The ascent up the Chute Trail is the most strenuous (IMHO), and it’s only about 3/4 of a mile. If you are in reasonable physical shape, you should be able to do this hike, and I think you’ll be glad you did!

    In closing, if you ever find yourself in Central Oregon near Bend, then you need to visit Smith Rock State Park!  With over 600 acres, there is a lot to see and do.  There is rock climbing, mountain biking, horseback riding, and hiking all within this one park!  If I were a local, I can tell you this would be one of my go-to parks.  I loved my visit here!

    Happy Hiking!

  • Waihee Ridge Trail: A Local Favorite on Maui

    Waihee Ridge Trail in Maui is a gorgeous hike with lush jungles, eucalyptus forests, waterfalls, and stunning ocean views. It should definitely be on your list of things to do when visiting Maui, Hawaii. Hiking gives you a unique perspective on the place you’re visiting. You meet locals along the way, and it is a great way to connect and meet people in a non-tourist setting.  I notice this when I am hiking back home as well. I meet visitors to our state and chat with them about their visit and where they are from. Connecting with others through nature and travel, it’s a beautiful thing!  

    During my latest visit to Maui, I hiked Waihee Ridge Trail with my hubby, and we loved it! It was a beautiful hike and offered a pretty decent workout too!  I  absolutely recommend you try it on your next visit to Maui.  Below you’ll find all the info you need to get to the trailhead and prepare for hiking Waihee Ridge Trail.

    About the Waihee Ridge Trail

    Trail Length: 5.0 miles (roundtrip)

    Elevation Gain: ~ 1500 feet

    Trail Difficulty Rating: Moderate

    Features: Lush foliage, waterfalls (from a distance), ocean views, eucalyptus trees, and flowers

    Getting to Waihee Ridge Trail

    The Waihee-Waiehu area is to the northwest of Kahului, and the trailhead is about 10 miles from the Kahului city center. If you’re coming from Lahaina, plan to take about 1 hour to drive to the trailhead. If you come from Kihei, it will most likely take around 35 minutes.

    Take HI-30 E and Kahekili Hwy (Hwy 340) to Maluhia Rd. You’ll drive through the town of Wailuku to connect with the Kahekili Hwy. After about 6 miles on the Kahekili Hwy, you’ll make a left on to Maluhia Rd. Look for the Mendes Ranch on the right side of the road, and this is where you’ll make a sharp left onto Maluhia Rd.  Maluhia Rd is a narrow road, so drive slowly and watch out for oncoming traffic. It’s about a mile on this road to the main trailhead parking lot. 

    Note: there is a parking area when you first turn off onto Maluhia Rd, continue past this to the main trailhead. You may find some people parking here on busy days, but I’d check first at the main trailhead parking. 

    I recommend using Google Maps for turn-by-turn directions from where you’re staying in Maui. You can click on the map below to get driving directions from your starting point.

    My Experience Hiking Waihee Ridge Trail

    My hubby and I left early from our condo in Kahana, grabbing coffee and breakfast at our favorite local coffee shop, Hawaiian Village Coffee.  It is about an hour’s drive from our condo to the Waihee Ridge Trailhead. Although we could drive north and around the top of Maui, due to the narrow roads and nail-biting drop-offs in that section, we chose to drive south to Ma’alaea and then up through Wailuku.   

    Waihe’e (pronounced [why-HEH-eh]) Ridge Trail popped up on my radar when searching for new activities and areas to explore during our latest visit to Maui.  It is highly rated, and I love a hike with a view, so I added it to our list of to-do’s, and I am so glad I did!

    At the Trailhead Parking Lot

    We arrived at the main trailhead parking lot around 8:00 a.m., and the parking lot was a quarter full. There are two porta-potties on one side of the parking lot closest to the trailhead. I used one of them before our hike and found it to be clean (for a pit toilet) with a hand sanitizer dispenser inside as well. 

    There is a small gate you walk through to begin the hike, and after that, begins a very steep hike up a paved trail. It appears it was a road at one time, perhaps to access the water holding tanks we passed.  This initial steep climb was probably the steepest part of the whole hike!  At least it felt that way. It definitely gets the heart going right out of the gate (pun intended). 

    If you find yourself short of breath going up this initial steep ascent, then turn around as I did and enjoy the view behind you as you climb up to the main trail.

    concrete path with ocean views

    Hitting Dirt

    The steep paved portion of the trail ends and forks to the left, and soon you’re under a canopy of pine, guava, and eucalyptus trees. We passed through another hiker’s gate with a warning sign letting hikers know of cross-contamination dangers between islands. We only visited Maui, so we felt assured that our shoes would not carry the Rapid Ohai’a Death fungus.

    Rapid Ohai'a Death fungus sign

    As we weaved through the forests, we came to a bench that made a great resting point and viewpoint as we looked across at the Makamaka’ole Falls. After that initial steep ascent up the paved portion, the trail incline levels out a bit, and there is a nice mix of steady incline and flat trail for catching one’s breathe.

    Makamaka’ole Falls

    I enjoyed all the beautiful plants around me. We saw mushrooms, ferns, multiple species of trees, and flowers. It was so fun getting to see plants that are different than mine back home.

    Viewing Platform 3/4-mile Mark

    About a mile up the trail, we came to another viewpoint with a wooden platform. There was a beautiful Norfolk pine next to it and a gorgeous view of the emerald valley below.  We could see many clouds near the top where we were hiking, but we remained hopeful that things would clear by the time we got to the top.

    Maui canyons

    1.5-mile Marker

    We passed beautiful koa trees and noticed small areas where they are replanting native plants and encouraging the local fauna’s growth.  At around the 1.5-mile marker, we come along a small eucalyptus forest. I think these trees are so pretty with their twisted red and gold bark. 

    It is during the first 1.5 miles of trail that you’ll enjoy nice interludes of shade from the sun.  However, after you pass the eucalyptus trees at the 1.5-mile marker, you’ll cross a field and begin your final ascent. This portion of the trail had very little shade covering, and it is also the portion of the trail we found to be the muddiest and most difficult to maneuver.  There were deep ruts and slick mud where the trail was steep.  

    We saw a few people who chose to hike this trail with their bare feet. I don’t know whether that gave them an advantage over my tennis shoes or not, but I do know you wouldn’t want to try hiking the Waihee Ridge Trail in flip flops!

    Waihee Ridge Trail ridgeline

    2.0-Mile Marker

    At the 2.0-mile mark, I’ll be honest, but I thought to myself, “I’ve probably already seen the best of the views.” As the trail took us further inland, I realized we probably wouldn’t have much better viewpoints, but that didn’t matter. We were almost there! Plus, it allowed us to continue to stop and look below at where we’d come. We chatted with other hikers as we passed and even met a woman celebrating her 40th birthday by running the trail!

    The End of the Waihee Ridge Trail

    The top of Waihee Ridge Trail

    We arrive at the “top” and find a wooden platform with a picnic table. The clouds had not fully lifted. However, we could still enjoy the lush foliage around us and chat with various hikers and listen to the congratulatory greetings for those who succeeded in making it all the way.

    ocean view below

    Really, the hike down was even better as I didn’t have to stop to turn around to enjoy the views below.  Plus, I feel it’s always easier on the way back as you know what to expect and how far you really have to go.  Although we were sweating profusely, we both had such a wonderful time hiking the Waihee Ridge Trail.  It was a great way to start our day!

    a hiker coming up some trail stairs

    We smiled and told people “just a little further” as we passed. I was happy we chose to come earlier in the day as it was already feeling hot as we hiked down, and it wasn’t even noon yet!  

    Make sure to use the provided shoe cleaners outside the hiker’s gate near the trailhead parking lot. I love that they provided these!  I wish we had these at our trails near Seattle, as it is so useful!

    shoe cleaning station

    Tips for Hiking Waihee Ridge Trail

    • Wear comfortable hiking shoes or at least tennis shoes. The trail gets steep and muddy in places, and you’ll want something with a little grip.
    • Bring plenty of water! The Waihee Ridge Trail is a steady climb up for 2.5 miles in humid conditions. You will not regret having too much water, but you will certainly regret not having enough.
    • Bring a snack.  There’s a nice picnic area at the top, as well as a few spots along the way that make for a nice snack break. You’ll be happy to have the extra energy.
    • Check the Weather. This area of Maui gets a lot of rain, so check ahead and plan to come when it’s sunny. I would not recommend hiking this in the rain or after any heavy rain due to the upper trail’s slick and muddy nature.
    • Plan to come earlier in the day. The earlier you come, the more enjoyable your experience. I prefer to hike when it’s cooler. You could come later in the day before sunset, and I would also imagine that it would also be a nice time to hike this trail.hiker on trail with views

    Things to Do Nearby

    If you want more ideas for things to do near Waihee Ridge Trail, read my post on 7 Fun Things to Do in Kahului Before Your FlightYou’ll see the Waiehu golf course on the list. You would have seen this golf course from your view on the Waihee Ridge Trail. It’s a beautiful public golf course located along the ocean. They have reasonable prices, and it’s a fun way to spend a few hours with friends, even if you aren’t “golfers.”

    If you want some delicious Thai food, I recommend Thai Mee Up at the food truck lot across from Costco. If you’re not feeling like Thai food, they have lots of choices from the many food trucks located there.

    Perhaps you need to cool down? Then why not grab some shave ice at the best place on the island! Ululani’s Hawaiian Shave Ice on Dairy Road is my favorite shave ice spot when visiting Maui.

    Happy Hiking!

  • Visiting Oregon’s Unique Painted Hills

    On a recent road trip to Central Oregon, we took a small detour to see Oregon’s Painted Hills.  I’d read about them, and they reminded me a little of the South Dakota Badlands.  I didn’t realize I had anything like that so close to home, so I wanted to check them out. After taking this short road trip to Oregon, I will say that I have a newfound appreciation for Washington’s neighbor state. It has more natural variety than I previously realized, and it left me wanting to explore more of it in the future.

    Prineville, Oregon: Our gateway to Oregon’s Painted Hills

    We left the Alvord Desert and drove about 4.5 hours to the town of Prineville, Oregon.  Our first glimpse of the town of Prineville was from up above the town. It appeared like an oasis in the desert, green and lush.  I wondered what the first settlers along the Oregon Trail must have felt when they first saw this area. 

    Only an hour away, Prineville is a great choice for travelers needing to spend the night before heading on to the Painted Hills.

    After checking into our hotel, we decided to grab some dinner as we had skipped lunch, and were on the verge of getting hangry, so food was a priority!  We read reviews about an authentic Mexican restaurant with great food, so we headed to Tacos Toledo Mi Tiendita. It is a tiny little restaurant mainly used for takeout, but there are two tables for indoor seating.  

    I was ready to order everything on the menu!  Instead, I ordered a tamale (I love tamales!), 5 authentic tacos (no Tex-Mex stuff), a Chile Relleno, and hubby ordered a pambazo with chips and salsa.  I loved everything I ordered!  The pambazo is like a breakfast sandwich. It has potatoes, cheese, and chorizo inside.  

    After dinner, we drove around Prineville and liked what we saw.  They have beautiful historic buildings and the Bowman Museum, which tells the history of the area from the time of the first settlers. The town felt like a nice blend of history and progress.

    Driving From Prineville to Oregon’s Painted Hills

    The next morning we got up early, ate breakfast at the hotel before checking out, and then headed for the Painted Hills.  It is about a 1-hour drive from Prineville to reach the Painted Hills in the John Day Fossil Beds National Monument.

    I enjoyed the drive as it was a mixture of farmland, lakes, and trees.  The drive passed quickly, and soon we were turning off on a small narrow road that passed by more farms while also catching our first glimpses of the Painted Hills. 

     After about a 10-minute drive on this road, we came to the John Day Fossil Beds National Monument entrance.  This is where the road turns to gravel.  It’s nothing too bumpy, though, not at all like our drive to Alvord Desert, where the road was much rougher.  Any car should handle the gravel roads at the Painted Hills. Just take it slow.

    The Painted Hills at John Day Fossil Beds National Monument

    Shortly after entering the National Monument boundary via the gravel road, you’ll come to a fork in the road where you can go left to the Visitor Center or right to continue to the trails and to see the Painted Hills.  If you need to use the restroom, then head to the Visitor Center as that is the only restroom facility at the Painted Hills.

    Trails at the Painted Hills

    Continuing up the dirt road past the turnoff for the Visitor Center, you’ll come to the Painted Overlook. This is the first trail in a series of trails within the Painted Hills park area. You’ll also pass the Carroll Rim Trail parking area on your way to the Painted Overlook parking lot.

    • The Painted Overlook (0.5-mile roundtrip) 
    • Carroll Rim Trail (1.6 miles roundtrip)
    • The Painted Cove Trail (0.25-mile boardwalk trail + overlook)
    • The Red Scar Knoll Trail (0.25-mile trail)
    • The Leaf Hill Trail (0.25-miles roundtrip)
    The Painted Overlook is a 0.5-mile roundtrip gravel path to an viewpoint.  There is a bench on one section of the trail with sweeping views of the painted hills below.  At the beginning of the trail, there are some signs with information regarding the area’s volcanic formation.
    painted hills overlook trail
    The wide gravel path at the Painted Overlook trail.

    The 0.25-mile roundtrip Painted Cove Trail follows a wooden boardwalk before connecting to a dirt path.  Make sure to read the signs along the trail that explain how these unique painted hills came to be. 

    person walking on boardwalk at painted cove in the painted hills
    The wooden boardwalk at the Painted Cove trail.

    At the end of the boardwalk (when starting counterclockwise) leads to a fork in the trail.  You can go left to walk up to an overlook or right to continue the loop.  I recommend walking up to the overlook as it provides great views of the painted hills below and a really neat icy blue lake.

    the painted cove trail overlook
    The view from the Painted Cove trail overlook.

    The Red Scar Knoll Trail (also known as Red Hill trail) is another short trail (.25 mile roundtrip) that leads to a dark red hill on one side and yellow on the other. The trail takes you over a small bridge where it forks straight and to the left where you can view the red side first. 

    Then, retrace your steps back to the main trail and continue as it goes around the hill and brings you to a viewing area of the yellow side of the hill. The red and yellow colors found in the painted hills is due to the blend of iron and magnesium.  The hills are rusting!

    red scar knoll trail viewpoint
    The yellow side of the red scar knoll.

    The Leaf Hill Trail (Leaf Fossil Trail) leads you to a hill where fossilized leaves of genus Metasequoia, the Dawn Redwood, were found. Although it is fascinating that these great trees once lived here, the actual hill and trail were a bit underwhelming.

    Leaf Fossil Hill
    Scattered fossils at the Leaf Fossil Hill trail.

    Time Spent Visiting the Painted Hills

    We spent approximately 2 hours exploring the Painted Hills.  Visiting all of the trails, except the Carroll Rim Trail. We planned to do it last, but the parking lot was full upon our return. Deciding we’d probably seen what there was to see anyway; we left without hiking that trail.

    My recommended trails:

    • The Painted Overlook: This had nice views of the hills we passed while driving up to the Overlook.
    • The Painted Cove Trail: I liked being so close to the Painted Hills as well as the small overlook that let me see the pretty lake and painted hills below.
    Just Okay: The Red Scar Knoll trail was just okay, in my opinion. I did think it was interesting that it is red on one side and yellow on the other, and it is short enough that it won’t take you very long to complete.
    Could have skipped: The Leaf Hills trail was the most boring one of them all.  You could see a bunch of scattered pieces of rock, which may have been fossils, but really, if you are looking for a trail to skip, this is one I felt sort of like “meh” afterward.

    Getting to Oregon’s Painted Hills

    From Prineville, Oregon
    Take US-26 E for about 43 miles before turning left onto Bridge Creek Rd/Burnt Ranch Rd. Follow Bridge Creek Rd for another 5.5 miles before turning left onto Bear Creek Rd. Bear Creek Rd is a gravel road. Follow signs in the park to either the trails or the Visitor Center.

    From Mitchell, Oregon

    Take US-26 W for 3.6 miles, then turn right onto Bridge Creek Rd/Burnt Ranch Rd. Follow Bridge Creek Rd for another 5.5 miles before turning left onto Bear Creek Rd. Bear Creek Rd is a gravel road. Follow signs in the park to either the trails or the Visitor Center.

    Tips for Your Trip

    Fuel up in Prineville or Mitchell, depending on which direction you’re coming from. The only restroom is at the Visitor Center and picnic area near the Painted Hills entrance. Go left at the fork in the gravel road and follow the signs to the Visitor Center. I did not see any other restrooms in the park.

    Bring a jacket, depending on what time of year you visit (we came in the fall), it can get windy and cold.  We were happy we had our rain jackets with us as well as sweatshirts. I also recommend bringing snacks and drinks as there is nothing inside the National Monument area.

    Happy Trails!

  • Suntop Lookout: Easy Access to Incredible Views

    Do you want stunning views of Mount Rainier and the surrounding mountain ranges but without a long hike? Then look no further than Suntop Lookout.  Suntop Lookout was built in 1933 as a fire lookout and also served as a U.S. Army Aircraft lookout site during WWII. It is one of the only fire lookouts in the area that I know of that you can drive all the way up to see.  That is, if the gate is open, I’ll explain more about that below.  However, suffice it to say, even if the gate is closed, it’s a short hike to incredible panoramic views!  

    Getting to Suntop Lookout

    From the town of Enumclaw, head east on SR 410 for about 24 miles. About 6 miles after you pass through the town of Greenwater, you’ll make a right onto Forest Service road 73 (FS 73). It is the first right after passing the winter chain-up area.

    Follow FS 73 for a little over a mile before you make a left on to FS 7315.  Continue up forest road 7315 for about 6 miles before reaching Suntop Lookout. 

    *Please note that the gate to Suntop Lookout may be closed about a mile below the lookout. If this is the case, you’ll need to park below the gate and hike up the road or the trail just below the gate.

    Recreational Pass Required

    A Northwest Forest Pass is required to visit the Suntop Lookout and picnic area.  I did not see a pay station along the road either, so you’ll want to purchase your recreational pass before driving up. You have the option to buy a $5 day pass or a $30 annual pass.

    What Kind of Vehicle Do You Need?

    Road Conditions:

    The road to the Suntop Lookout is a mostly flat gravel road.  However, there are some very deep potholes and in one section of the road, some pretty deep grooves created by water rushing down the mountain.   

    Cars

    I recommend you have an AWD vehicle or one with some ground clearance.  That said, I did see people up there with minivans and small sedans.

    Motorcycles

    This is the option my hubby and I chose.  It is easy to swerve around potholes and makes for a fun ride unless, of course, you’re stuck behind a car choking on dust.  Okay, even then, we have fun! If you have a road-licensed dual-sport or motorcycle set up for off-road riding, this is a great option.  I even saw a couple of Harley riders up here.  However, I wouldn’t recommend a street bike.

    One thing to consider when riding up on your motorcycle is that if the gate is closed, you will need to hike up the rest of the way in your gear.  Plan ahead and make sure you have boots and clothing you’ll feel comfortable hiking in.  We did it with our gear, but it was hot and less than ideal, but do-able.

    Mountain Bikes

    This area is very popular with mountain bikers. We saw some people who had their bikes transported to the gate, and then cycled to the top from there and then back down.  However, others made the entire ride up, which I thought was pretty impressive!  From what I have learned, there are a bunch of excellent mountain biking trails in the area near Suntop Lookout.

    Best Time to Visit Suntop Lookout

    Summer & Fall:

    Summer and early fall are when most people will want to visit Suntop Lookout. The road is typically free from snow during this portion of the year and, therefore, the most accessible. It is also a drier and more pleasant time of the year to visit Suntop. 

    Spring:

    Depending on the snowpack from winter, the road will most likely still have snow.  My hubby and I tried riding our motorcycles up one year over Memorial Day Weekend and hit snow about 2 miles below the summit. It depends on the year, but if you want to be able to drive all the way up, or at least to the gate, then summer would be my recommendation for when to come.

    Winter:

    I have not attempted visiting Suntop Lookout during the winter, but I read that it is a popular snowshoe and cross-country ski destination. Many people snowshoe or ski up the road in the winter.  You will need chains and an AWD vehicle to access the sno-park during winter.

    Hiking to Suntop Lookout When the Gate is Closed

    If you find the gate across the road on your way up to Suntop, don’t worry, it’s only a short hike to the top from here. From the gate, you have two options for hiking to Suntop: walking up the road or taking the trail. Either option will take around 30-40 minutes at a slow, steady pace before reaching the top.

    Walking Up the Road

    If you hike up the road, you’ll have an easy but steady incline to the top. Hiking the road is my recommendation if you have any mobility issues that might make it hard when walking on a narrow trail with lots of loose rocks.  The road has less shade on hot days, so make sure to bring a bottle of water before making the walk up. It is about 0.8 miles to walk from the gate to the Suntop Lookout via the gravel road.

    A hiker walking up a trail.
    Jake is hiking up the trail just past one of the Mt Rainier viewpoints you’ll see along the way.

    Hiking the Trail to Suntop Lookout

    There is a trailhead just below the gate on the left side of the road (when facing the gate).  It is only a 0.5-mile hike to the lookout via the trail. The trail to Suntop is narrow, and there are a lot of loose rocks along the path.  I would still classify the hike up the trail as easy. However, due to the narrow trail, loose rocks, and sometimes steep incline, I think it is best for individuals without mobility issues and are in reasonable shape. I also recommend bringing hiking poles. That said, I passed small children and families along this trail that appeared to be traversing it without issue.  

    When hiking up the trail, you’ll pass a small, rocky trail shortly before reaching the top. This trail is a shortcut to one of the best views of Mount Rainier along this hike. The little trail leads you up to the road where you can get unobstructed views of Mount Rainier before continuing to the lookout.  You can also choose to stay on the main trail, which will curve around and lead you to the lookout first. Then, before heading back to your vehicle, you can walk down the road from the lookout to see gorgeous, unobstructed views of Mt Rainier.

    A hiker walking down a road toward Mt Rainier
    Jake was walking the short walk down the road from the restrooms at Suntop to the unobstructed views of Mt Rainier.

    Advantages of Each Option

    The advantage of the trail is that it is a slightly shorter hike up, and you have a little more shade on sunny days. The advantage of the road is that it is wide, mostly flat, and provides plenty of room for groups to pass and take breaks as needed.

    The road to the Suntop Lookout is also a popular mountain biking route, so you may encounter mountain bikers coming down either the road or the single track trail.  There isn’t much room to get out of the way when they come down the path, but do your best to pull over where it is safe to let them pass.

    What’s At the Top?

    Restrooms:

    You’ll be happy to know that there is a vault toilet just below the lookout and adjacent to the picnic area.

    Picnic Tables:

    There are picnic tables just past the vault toilets.  There is also another picnic table near the lookout. It is a beautiful place to sit and enjoy a picnic lunch with a view. 

    Views at Suntop Lookout

    Hike up to the lookout for 360-degree views of Mount Rainier and the surrounding mountain ranges. Mount Rainier is only 10 miles to the south, and on a clear day, you’ll enjoy views of the central Cascades, Olympic Mountains, and just maybe (and with the aid of binoculars) get to see Mount Baker! If you’re lucky enough to visit when there’s a forest ranger present, you may get a chance to see inside the lookout.  However, even if it is closed up when you visit, the views from the lookout are worth the trip!

    Suntop Lookout Photography

    Suntop lookout is an excellent spot for sunrise and sunset photos.  Look at the forecast the week you want to visit and then see if you can plan for a day with clear skies.  Both sunrise and sunset will provide stunning photo opportunities with the gorgeous colors of the sun reflecting off snow-capped Mount Rainier.  After dark, you can practice your astrophotography and enjoy stargazing at the summit. 

    What to Bring for the Hike

    Picnic Lunch & Snacks: Although it’s a short hike, you might as well make the most of it by enjoying a picnic at the top.

    Water: Water is always a good idea.  It gets hot at the summit during the summer, so having some extra water with you will help!

    Bug Spray: The mosquitoes weren’t bad when we visited. However, they can be depending on the time of year, so I’d bring bug spray just in case.

    Hiking Poles: These are especially useful if you hike up the narrow trail.

    Layers: Depending on what time of year you visit, you may want to bring extra layers. If you chose to come up for the sunset, you’d need layers for when the sun goes down as it can get quite cold.

    Downloaded Offline Map: I always like to have an offline map when I’m going off-road just in case I lose my way.

    Recreational Parking Pass: A Northwest Forest Pass is required at Suntop Lookout.

    Things to Do Nearby

    Places to Eat

    Greenwater Outfitters:  58410 WA-410 east, Enumclaw, WA 98022

    Enjoy lunch at Greenwater Outfitters or pop in for some delicious ice cream.

    Wapiti Outdoors: 58414 WA-410 E, Enumclaw, WA 98022

    Stop in at Wapiti Outdoors for some fantastic coffee and ice cream. If you’re lucky to visit during huckleberry season, make sure to try a huckleberry milkshake. They also have a great selection of t-shirts and outdoor gear.

    Naches Tavern: 58411 WA-410, Enumclaw, WA 98022

    If you’re looking for a bite to eat and something cold to drink after a day of hiking, stop in at the Naches Tavern. 

    Camping

    Dispersed Camping:

    Dispersed (free) camping is allowed in the Mt Baker-Snoqualmie National Forest around the Suntop Lookout area. There are no toilets provided. Follow “leave no trace” principles and clean up your site before leaving. In addition to dispersed camping off of FS-73, if you travel 5 miles past FS-73 on SR-410, you’ll come to NF-7160. Make a right here, and you’ll find more dispersed camping by the Ranger Creek Airstrip.

    Established Campgrounds near Suntop:

    There are also so many other great trails in the area, such as Snoquera Falls, Skookum Flats Trail, and many more.  Plus, you are a short drive to the White River entrance at Mount Rainier National Park.  Why not make it a weekend adventure! I love visiting the Sunset visitor center at Mount Rainier and camping at the White River campground.  

    Here are a couple of articles to get you started planning.

    Happy Trails!
  • Hiking to Spray Park & Falls: My Beautiful Misadventure

    The Spray Park trail and Spray Falls have been on my list of hiking to-dos for years.  The Spray Park trail checks off all my hiking favorites.  It has an alpine lake (Mowich Lake), waterfalls, stunning views, and wildflowers. Plus, I get to see snow in August! It is easy to see why this trail and area of Mount Rainier is so popular. So when I read that the road to the trailhead parking lot was open, I knew I had to go!

    I’ll tell you about my experience hiking to Spray Park and also give some tips and advice on what to bring. Make sure to read over the Know Before You Go, What to Pack, and Additional Tips sections before your trip as they will help you be a little better prepared than I was my first visit here. 

    It may take some extra effort to get to this corner of Mount Rainier, but Mowich Lake and the surrounding area is known for its stunning beauty and outstanding hikes, and it is well worth the effort! 

    Here’s a video montage that gives an overview of my hike to Spray Falls.  You can continue reading about my day below as well as my tips for what to know and how to get there.  You can also click on the links above to jump to each section.

    My Experience Hiking to Spray Park & Spray Falls

    The Drive Up

    I leave my house around 6:45 a.m. I have 2 hours to go before I reach the Mowich Lake parking lot. It is a Tuesday morning, so I hope that it won’t be too busy when I arrive.

    As I drive through the small town of Wilkeson, I think how it looks like a set from an old western. I make a mental note to come back another day to explore the town. 

    After passing through Wilkeson (which has the last gas station along this route), I pass through the town of Carbonado and eventually cross the anxiety-inducing Fairfax bridge.  It is a one-lane bridge suspended high above the canyon, and honestly, it looks a bit rickety, but I go ahead and trust its stability and cross it safely.

    Where the Pavement Ends

    Not long after Fairfax bridge, the pavement ends.  It’s less than 17 miles to the parking lot on this stretch of dirt road, but it will take me almost an hour to get there.  I am in an SUV, but even so, I keep my speed around 20-25 for most of the road. There is a section that is labeled “30 mph,” and it is still very rough. 

    Additionally, I am driving in the direction of the sunlight, so it hits my dirty windshield as I go in and out of the shadows, making it difficult to see.  This part of the drive up is the hardest, but on a clear day, the views of Mt Rainier help to pass the time.

    Mt Rainier from Hwy 165
    This is one of the views on the drive to Mowich Lake.

    I pass by the Paul Peak Trailhead and pay station, I already have an annual national park pass, so I do not need to stop.  I’ve only got another 5 miles to go before arriving at the Mowich Lake Parking area.

    It’s about 8:30 a.m. when I reach the Mowich Lake parking lot. I count at least 20 cars already parked here, but there is still plenty of parking spaces available. I gather my gear and make a quick stop at the pit toilets. They are clean and include hand sanitizer. I grab my camera bag, which doubles as my day pack and head to the trailhead.

    Hiking to Spray Falls and then on to Spray Park

    I walk to the Spray Park trailhead just past the pit toilets, and I notice the trail sign says it’s only 6.0 miles roundtrip to Spray Park. My guidebook and other online sources state that it is 8.0 miles roundtrip. The distance you hike depends on how far into Spray Park you want to go. There is no “you’ve arrived” sign, you hike as far into the meadow as you feel like before returning. The further up you go, the better the views.

    The trail gradually descends into the forest, and soon I cross a small creek.  I love the sound of the water as it makes its way over the rocks. The sights, sounds, and smells of the forest are comforting, and it makes me smile. It feels so good to get away and unplug! 

    Eagle Cliff Viewpoint
    My view while at the Eagle Cliff viewpoint.

    Eagle Cliff Viewpoint

    At about 1.5 miles into the hike, I come to the Eagle Cliff viewpoint. Make sure to stop here, it’s only an extra 100 feet of trail, and on a clear day, it has some beautiful views of Mt Rainier.  I enjoy a mostly clear view of the mountain during my stop.

    After taking some photos, I continue along the main trail, and about .25 mile past Eagle Cliff, I come to the junction for Eagle’s Roost camp.  The campground goes to the right, but the trail for Spray Falls and Spray Park continues on the left. I follow the sign for “water .10 mile,” and soon, I cross another wooden bridge and look up to see a series of small cascading waterfalls flowing over mossy rocks. It’s so beautiful. 

    Shortly after this creek crossing, I arrive at the trail junction for Spray Park and Spray Falls. I head right to take the path toward Spray Falls as I want to stop and see the falls before heading up to Spray Park.

    mossy rocks and cascading waterfalls at spray creek
    A series of small cascading waterfalls shortly before the Spray Falls trail junction.

    Spray Falls

    I’ve seen photos of Spray Falls, and many of them showed people right next to the waterfall.  However, I’m not sure what time of the year they visited as this was not possible during my hike here. There was so much water coming down the mountain that I was unable to cross the rushing water to get unobstructed views of the falls. 

    I was disappointed but unwilling to risk getting my camera gear wet or worse for a better shot.  I will try again at a different time when there isn’t so much water rushing down the mountain.

    Spray Falls at Mt Rainier
    Spray Falls in the distance.

    Spray Park

    I make my way back to the main trail and start my climb up to Spray Park.  The trail sign at the Spray Falls junction says it’s .8 miles to Spray Park. This is where the trail rating turns from “easy” to “moderate.” 

    I read somewhere that there is only a 600-foot elevation gain for the hike to Spray Falls. However, the hike to Spray Park has a 1700 foot elevation gain. It feels like the majority of that is in this .8 mile hike to the entrance of Spray Park. 

    As I climb upward, I’m serenaded by the sounds of Spray Falls in the distance. Soon though, I no longer hear the falls as I continue my climb up to Spray Park.  “Slow and steady wins the race,” I tell myself, and soon I arrive at a log footbridge, which marks the entrance into Spray Park. 

    The entrance to Spray Park at Mt Rainier.
    The entrance to Spray Park at Mt Rainier.

    I chat with a dad and daughter who stop by the log bridge for a break. They offer to take a photo for me with my phone, which is nice as typically, I don’t get pictures of myself on these solo excursions.  We realize, though, as we stop that the mosquitoes are worse here, and no one wants to linger here too long. Soon the dad and daughter leave to continue their hike into Spray Park.  

    I take a few photographs, and eat a snack and then continue following the trail up.  It winds its way through some scattered trees and maintains a steady, but not too steep climb upward.  Soon I get views of Mount Rainier on the right and views of Mt Pleasant and Hessong Rock on the left. 

    A hiker with Mt Rainier in the background.
    A photo a fellow hiker volunteered to take with my phone.

    Alfred Hitchcock’s “The Birds”

    I see a hiker headed my way, and I move to the side to let her pass. As she passes, she tells me there are more beautiful views to come–but, she says, the mosquitoes are “ferocious!”  Yes, that was the exact word she used.

    She said they get “much worse.”  She planned to eat lunch further up in Spray Park, but the mosquitoes were so bad she decided to hike back to Mowich Lake.  Great! I thought glumly, as I tend to be a bug magnet.  If there’s one bug in the room, it’s going to find me!  Now, I wish I’d have brought the can of bug spray with me so I could re-apply. 

    Despite the warning, I continue hiking further into Spray Park, hoping to find “the view.” I love the wildflowers dotting the meadow with beautiful colors!

    Spray Park trail with wildflowers on each side.
    The Spray Park trail continues upward, surrounded by wildflower.

    A little further up, I chat with another dad and daughter on their way back to Mowich Lake.  The dad said he’s hiked this trail before and saw seven bears, but this time not a single one.  They did get to see some goats, though, so that sounded pretty neat!  I love meeting people on the trail and seeing others out enjoying nature and life. I say my goodbyes to the dad and daughter and continue hiking a bit further into Spray Park.

    It’s Lunch Time, and I’m on the Menu

    It’s about a quarter to noon, and I’m hungry, so I decided to stop for a quick lunch break.  I put my bag on the ground to get my water and sandwich, and as I do, a swarm of mosquitoes lands on my backpack.  There’s not even any blood for them to get out of my pack!  

    Of course, they land on me as well, and I do my best to swat them off while trying to take a quick drink and a bite to eat. (Again, if only I’d have brought the bug spray with me!) This lesson will stick with me for about a week as the swelling and itching finally dissipate.

    It’s like Alfred Hitchcock’s movie The Birds, except replace birds with mosquitoes and you’d have a pretty accurate description of my experience.  

    I quickly zip my bag up and decide I too will not be lunching here. I put my pack on, take a few more photos while the mosquitoes make a lunch break out of me, and then decide I’ve got my views for the day. I’m heading back. I couldn’t stop for 5 seconds without being attacked. It just isn’t enjoyable any longer.  I did, however, enjoy the views and beautiful flowers. I even saw a patch of snow, but the bugs…

    The Bee & The Magic Hat

    I descend back into the trees, and soon I pass the junction to Spray Falls and continue toward Mowich Lake.  It’s around the Eagle Cliff viewpoint that a bee decides it wants to chase me.  I try to ignore it, I wave my hand at it, it flies towards my face, and I try to swat it away without making it angry. It does not want to leave me alone!  

    So, I start running. I figure if I run a little way down the trail, it will lose interest.  Nope.  It did not. It kept coming at me.  The last thing I want right now is to get stung by a wasp.  

    I hear voices up ahead, and I jog toward them,  a man and woman come into view, and I say, do you have a hat? I have a bee chasing me.  The woman says, “a hat?”  “Oh, you mean to swat at the bee?”  I say, yes!  So the man graciously takes his hat off, and you know what?  As soon as he takes his hat off, the bee flies away!  I am not kidding!  

    It was quite funny, and we all laughed about his “magic hat.”  Then they tell me a story of when they were hiking years ago, and a bee flew up his wife’s nose!  It sounded like a horror story to me, but she lived, although she did get stung.  I am very thankful the bee left me, but I still heard phantom buzzing noises for a while after I continued down the trail.

    spray park trail hessong rock
    Spray Park trail with views of Hessong Rock.

    The Flat Tire

    It takes about an hour for me to hike back to the Mowich Lake Campground from Spray Park.  I am tired and a little hungry, but happy to be away from the mosquitoes.  As I walk over to my car, I discover that I have a flat tire.  I must have run over something on the way up.

    I make a stop at the restrooms before changing my tire. As I’m walking back to the car, the dad and daughter duo that I spoke with earlier about seeing the goats spot me and say hi and ask me about my hike.  

    We chat for a bit, and then I walk over to change my flat tire.  I’ve never actually changed a tire on my SUV before. It takes me a little bit to figure out how to lower the tire from underneath the vehicle.  I do that, but I am not sure how to now detach it from the cable it is on. 

    I decided to ask the man I chatted with moments before for help. They were driving past my vehicle to leave for home when I stopped them to tell them about my situation. The man quickly parks his truck and very graciously helps me get the spare tire out from underneath the vehicle and then proceeds to change my flat tire.  I am so thankful he stayed to help too as he mentioned the lug nuts were on really tight, and he had a hard time getting them loosened.  I am so grateful for the kindness of strangers!

    Mowich Lake in the morning.
    Mowich Lake is a beautiful, clear alpine lake.

    Conclusion to My Hiking Experience

    I made it home safely but stopped in Wilkeson to air up my spare tire as it also appears to be losing air. All in all, between being eaten alive by mosquitoes, chased by a bee, and getting a flat tire, I’m not sure I’d do it again if I had to pick those exact circumstances, but I don’t regret going either.  

    So would I recommend you make the trip to Mowich Lake?  Absolutely! The hike to both Spray Falls and Spray Park is beautiful, the wildflowers are stunning, and Mowich Lake is a serene alpine lake accessible by car. I would not want to discourage anyone from going, only to suggest you plan ahead and don’t forget to pack bug spray for the hike! 

    In addition to applying bug spray in the parking lot, next time I will also bring it with me on the hike.  Read my tips on what to pack and how to be better prepared than I was before leaving home.

    Getting to the Spray Park Trailhead

    The trailhead for Spray Park is in the northwest corner of Mount Rainier National Park in the Mowich Lake campground. As I previously mentioned, you’ll have an almost 17 mile stretch of gravel road leading up to the parking area. The road ends at the parking lot for the Mowich Lake campground.  Whether you’re coming from Seattle, Tacoma, or Bellevue, the drive will take approximately 2 hours.  

    Driving Directions

    From the town of Wilkeson, you’ll drive south on Highway 165 for about 9 miles before coming to a fork in the road.  Stay to the right of the fork and continue south toward Mowich Lake.  Soon after the road turns into a dirt road, continue along this main road, and in about 9 miles, you’ll come across the Paul Peak Trailhead and pay station.  Stop here if you do not already have a National Parks pass.* You only have about another 5 miles to go from the pay station before you reach Mowich Lake. The road ends in the parking lot.

    *Please note the Washington Discovery Pass and the Northwest Forest Pass are not the same things as the National Park pass, you need to pay an entrance fee to be within the Mount Rainier National Park boundary.  Purchase online ahead of time or stop at the pay station mentioned above.

    Know Before You Go

    Best Time of the Year to Go: July to October

    The road to the Mowich Lake parking lot and Spray Park trailhead is typically only open from mid-July to October. 

    Fees: $30 for a 7-day park pass/$55 for an annual park pass

    You can purchase your national park pass ahead of time online, or you can stop at the pay station on the way up.  The pay station is at the Paul Peak trailhead.  You will see signs telling you to stop and pay.  If you already have a pass, just keep going up the road.

    Road Conditions: The last 17 miles of the drive to the trailhead parking area is on a dirt road.  

    The road is rough and has potholes and washboard conditions along the way—plan for this section of the road to take about one hour to complete. Recommended speeds range from 15-30 mph, depending on the conditions and the vehicle you are driving in. Cars and SUVs alike will have no issue making it. Just take it slow.  On a clear day, you’ll have views of Mt Rainier for the drive up.

    Fuel Up: Make sure to fuel up your vehicle ahead of time. 

    The town of Wilkeson is your last stop for fuel on the drive up.

    No Cell Service: There is no cellphone service in this area of the park. 

    Most people will lose cellphone signal in one of the small towns like Wilkeson before you ever hit the dirt section of the road.  Let someone know of your hiking plans, so in case of an emergency, they will know where to look.  This is always a good idea when hiking in the mountains.

    No Pets: Pets are not permitted on any of the trails within Mount Rainier National Park.

    No Potable Water Provided: There is no potable water for the Mowich Lake trailheads or campground.  

    You need to bring enough drinking water with you or a filtration system to filter lake or creek water.

    Check the Park’s Website for Alerts: Always check with the park to find out if there are any alerts for road closures or weather alerts you need to be aware of before your trip.

    What to Pack for Your Hike

    • Bug spray: Do not leave home without it! Bugs are notoriously bad at Spray Park, read my experience below, and make sure to apply and re-apply as necessary. You may also want to bring a mosquito net for your head.
    • Layers: I hiked this on a warm August day and didn’t need more than my t-shirt, but I still packed a sweatshirt just in case. Depending on what time of year you are here, you may need more layers, and in case you’re ever stranded on a hike, the extra layer may be a lifesaver.
    • Water: There is no potable water, so make sure to pack enough water for your hike, lunch break, and for the ride back down the mountain. 
    • Food: Make sure to pack snacks and food to keep your energy up. I like to bring snacks I can eat on the go and then a sandwich for my lunch break. 
    • First aid kit: It’s always good to have a first aid kit with you, in addition to that I also like to make sure I have moleskin when I’m hiking or backpacking, just in case I or someone in my group gets a blister. 
    • Buff/Bandana: I like the buff I purchased at REI as you can use it as a bandana, hat, face mask, or neck gator. A bandana will also work for most of those situations too.
    • Bear spray: You are hiking in bear country, and your odds of seeing a bear while hiking to Spray Park is pretty good.  So I recommend bringing bear spray, and if you’re by yourself, consider also getting a bear bell or calling out now and again to announce yourself.  
    • Hiking/Trekking Poles: These are optional, but useful for crossing small creeks and for keeping your balance over the rocky terrain and roots on the trail.
    • Sturdy Hiking Shoes: You may want hiking boots, or you may feel comfortable with good trail shoes.  Either way, make sure they’re comfortable and give you enough support.  Then pack a pair of flip flops for, after the hike, I always find my feet like to breathe after a hike.

    Prepare for the drive: Roadside Tools 

    Make sure your car is equipped with the necessary emergency roadside tools and make sure you know how to use them. Bring a tire pressure gauge, jumper cables, and a portable air compressor if you have one.

    Additionally, I recommend you check your tire pressure before leaving town and also make sure your spare tire is properly aired up. 

    Spray Falls Hike Overview

    Distance: 4.0 miles, round trip

    Difficulty Level: Easy

    Approximate Hiking Time: 1.5 hours to 2.5 hours

    The hike to Spray Falls is a mostly level hike with some smaller rolling hills. There is no significant elevation gain for this hike. The trail is narrow for most of the hike, and there are a lot of roots and rocks embedded in the path. If you have significant issues with your balance, the trail might not be a suitable choice.  However, for most people, including families with children, this hike should be a relatively easy hike accomplished in a few hours.

    Hiking to Spray Falls

    Start at the trailhead for Spray Park. You’ll find the Spray Park trailhead on the right, just past the pit toilets at the Mowich Lake Campground. The trail gradually descends into the forest, and soon you’ll cross a small footbridge over Lee Creek.  At about .2 miles into the hike, you’ll come to a trail junction for the Wonderland Trail. Continue to follow the trail signs for Spray Park. 

    About 1 mile past this trail junction, you’ll come to the Eagle Cliff viewpoint. You’ll see a small trail sign pointing to the right.  It is only 100 feet off the main trail.  I recommend stopping here for a quick look.  On a clear day, you’ll have incredible views of Mt Rainier and the Mowich glaciers. 

    After stopping at the Eagle Cliff viewpoint, continue on the main trail for about .25 miles where you’ll arrive at another trail junction. The trail sign will point right for Eagle’s Roost Camp, and to the left, it shows water .10 miles.  Stay to the left of the fork to continue to Spray Falls. 

    Soon you’ll reach the trail junction for Spray Falls. You’ll see a sign that points to the right for Spray Falls viewpoint .10 miles.  Take the trail on the right and follow this until it ends at the viewing area for Spray Falls.  

    Retrace your steps to return to Mowich Lake, or continue to Spray Park if you prefer a longer and more challenging day hike.

    Spray Park Hike Overview

    Distance: 6.0-8.0 miles, round trip

    Difficulty Level: Moderate

    Approximate Hiking Time: 3.5 hours to 5 hours

    The hike to Spray Park is moderately challenging.  However, I feel if you’re in reasonable shape, it should be one you can manage with relative ease.  For some comparison, if you’ve ever hiked to Poo Poo Point, I find the uphill gain to be similar to Spray Park.  The real uphill climb starts at the junction for the Spray Falls viewpoint. This is where the trail switches from easy to moderate difficulty. 

    The trail is narrow for most of the hike, and there are lots of rocks and roots and a variety of creek crossing, so I recommend sturdy hiking shoes and hiking poles will also be helpful, especially if you have troublesome knees.

    The park trail sign shows 6 miles roundtrip; however, my guidebook shows 8 miles roundtrip.  That is because Spray Park is a large area, and how far you choose to hike into Spray Park will determine how long your hike is.

    Hiking to Spray Park

    Follow the directions above for Spray Falls until you reach the junction for Spray Park and Spray Falls. From the junction for the Spray Falls viewpoint, the trail sign shows .8 miles to Spray Park.  This distance brings you to the beginning of Spray Park. You’ll know when you’ve reached it as you come into an open area and begin moving outside of the treeline into an alpine meadow. 

    You’ll soon have views of Hessong Rock and Mount Pleasant to your left and views of Mount Rainier to your right. You can hike an additional mile or so further to see more viewing areas, depending on how you feel or how far you wish to go. 

    Depending on the time of year that you go, if you hike far enough into Spray Park, you will come to the area known as Seattle Park.  Snowfields often surround this area, and I’ve read in the earlier months that hikers often get lost in the snowfields.  I was here in August during a heatwave, so that wasn’t an issue, but be cautious and play it safe if you come when it is snowy, it’s better to turn around than to get lost.

    After enjoying your time in Spray Park, head back the way you came to Mowich Lake campground.

    Camping near Spray Park

    You have a couple of campground options if you want to turn your day hike into an overnight trip.

    Mowich Lake Campground

    Mowich Lake campground is a walk-in, tent sites only, first come first served primitive campground. The walk from the parking lot to the campsites is a short one, though, and they provide a wheelbarrow to help you carry your supplies from the car.   The tent sites are set around a dirt circle, and there is no privacy between campsites. Bear boxes are provided for your food and gear.

    What this campground lacks in amenities and privacy, it makes up for in beauty and location. Mowich Lake is a gorgeous alpine lake!  You can bring your SUP or kayak and enjoy time in this serene mountain setting. It is also a fantastic base camp for hiking trails in the area.

    • Fee: There is no fee to camp here. Campers self-register at the campground, and no wilderness permit is required.
    • No Fires Allowed
    • Pit Toilets
    • No Potable Water (You must pack your water in, or bring a filter to filter lake or creek water.)

    Eagle’s Roost Camp

    This backcountry camp is an excellent place for a beginner backpacking trip or an overnight family backpacking trip.  The camp is located about 2 miles from the Mowich Lake campground, and it takes approximately one hour to hike there. There are seven campsites with bear poles provided for hanging your gear. Remember, you are in bear country, so make sure to take the necessary steps to keep yourself safe.

    • Fee: $20 per trip (good for up to 14 days). You also need a wilderness permit to stay here.
    • No Fires Allowed
    • Pit Toilets
    • No Potable Water (You must pack your water in, or bring a filter to filter lake or creek water.)

    Additional Tips for your Trip & Other Articles You Might Enjoy

    Come during the week to avoid the crowds.  If you do come on a weekend during July and August, plan to arrive early in the morning. This gives you the best chance to get a parking spot and completing the hike before the crowds come.

    Sometimes it is easy to think “I’m not going that far” and, therefore, not perform vehicle checks you might otherwise do for a more extended road trip. However, anytime you’re going to drive up a mountain or be out of cell service range, it’s good to make sure you are adequately prepared! Also, make sure to let someone at home know where you’re going and what your hiking plans are, just in case of an emergency.

    Other articles for things to do in Mount Rainier National Park:

    Have fun and create beautiful memories!

  • Twin Falls Hike: A Short Hike With Gorgeous Views

    Are you feeling a little stir-crazy? Do you need a good day hike to shake off some winter blues?  Well, that’s how I felt after what seemed to be a never-ending winter and a cold and rainy start to our summer in Seattle. I was ready to get outside and soak in the beautiful sunny day we finally had.  So I headed for one of my favorite waterfall hikes close to home, the Twin Falls hike near North Bend, Washington. 

    The Twin Falls trail is a beautiful path that winds its way along the river and through the trees (sorry no Grandma’s house) before leading you to spectacular waterfall views! I’ll tell you all you need to know to get there and as well as some tips, so you don’t extend your hike further than you want to.

    Useful Things To Know Before Getting Started

    • You need a Discover Pass to park at the trailhead for the Twin Falls hike.
    • You can purchase a day-use pass at the trailhead or buy ahead of time.
    • Bring bug spray, depending on what time of year you visit the mosquitoes can be quite bad.
    • Twin Falls is a popular trail, so if you plan to go on a weekend, be prepared for crowds and limited parking. I recommend you come on a weekday if possible, and try to get an early morning start.  Even on a weekday during the summer, the parking lot is often full by noon.
    • There are pit toilets with hand sanitizer provided.
    • I found it easy to follow social distance guidelines along this hike. However, on crowded days, you may want to wear a mask when passing other hikers if you are unable to follow social distancing guidelines.

    Hiking the Twin Falls Trail

    The Twin Falls trail is about 3 miles round trip from the trailhead to the Upper Falls Viewpoint. 

    If you have ever hiked the Franklin Falls trail near Snoqualmie Pass, I will share my thoughts on a comparison of the two. I have hiked the Twin Falls trail and Franklin Falls trail multiple times. I love the ability to get up close to the waterfall at Franklin Falls, but I think Twin Falls is the prettier hike.  You get more access and views of the river along the way, plus the forest opens up a lot more than with the Franklin Falls trail.  

    That said, Franklin Falls is the easiest of the two trails. So depending on your physical shape or the age of those hiking with you, be aware that hiking to Twin Falls is the more challenging hike. 

    It is still a fairly easy to moderate hike, but you will have some steep inclines along the way, and over 100 stairs to descend and ascend to see both waterfall viewing areas.  Take it slow, there are lots of places for breaks along the way and enjoy the journey!

    Starting at the Main Trailhead

    Starting from the main trailhead, you will begin your hike with almost immediate views of the river below.  If you’re itching to dip your toes in the water, don’t worry, you’ll have plenty of opportunities to do that later along the hike. Follow the trail as it winds its way down a hill and into the forest.  You’ll soon cross a little bridge (above photo).  After you cross the bridge, you’ll reach an area with easy access to the river.  

    There are several stops along the way with good river access. Huge boulders are separate the river into small pools. These are good for dipping one’s feet in to cool off on a hot summer day or letting the dogs have a little fun splashing around.

    Benches With a View

    As you continue along the trail, you’ll hike through narrow parts where the foilage crowds the path on either side.  Then you’ll come into large open areas with giant trees looming all around.  Make your way up a series of switchbacks before arriving at a resting point.  You’ll climb a steep switchback to arrive at a set of benches that offer your first glimpse of the upper falls. 

    The benches are a beautiful place to stop and rest.  There is usually a breeze blowing here, so in the summer, it is a refreshing place to sit and cool off.  However, in the colder months, you may wish to bundle up or only stop for a short break if it’s really windy.

    The Big Tree by the River

    When you’ve finished resting at the benches, follow the trail as it descends back down into the forest.  Near the bottom of the hill, you’ll come across a huge tree looming tall, not too far from the river’s edge.  Stop to take photos with the big tree and if you want you can also take another break by the river. I just love all the beautiful trees along this trail!

    Lower Falls Viewpoint

    After you leave the big tree, continue hiking upward to where it levels off, and before long, you’ll see some stairs that fork off to the right.  These stairs will take you down to the Lower Falls viewpoint. 

    This viewpoint, in my opinion, is the best one along the trail.  So make sure to either stop on your way to the Upper Falls Bridge or hike down to it on your way back.  Whichever you choose, you don’t want to miss it! I know hiking down and back up over 100 stairs may not seem worth the effort, but I assure you, it is!

    Upper Falls Viewpoint & Turnaround Area

    As you pass the stairs to the Lower Falls viewpoint, you’ll soon see a large bridge zigzagging through the trees.  There’s a clearing on the bridge providing views of the valley on one side, and the upper falls on the other.  If you want to continue past this point, you can hike a little further up to a small viewing area with a slightly closer view of the upper falls.  

    upper falls bridge
    The wooden bridge viewing area for the upper falls.

    From here, you will turn around and head back in the direction you came.  If you were to continue past this viewpoint and up the trail, it would take you to the John Wayne Trail/Iron Horse Trail that leads to the alternate trailhead I mention in the “Getting Here” section.

    Warning: Don’t make the mistake of passing the upper falls viewing area and thinking the trail will loop you back to the main trailhead.  I had a few families who started to pass me going further up the trail, and I asked them if they had parked at the Homestead Valley Road trail or not.  They had not, but mistakenly thought the trail continued on and somehow lead them back to the main trailhead off Exit 34.  There is no need to hike further (unless you want to) once you’ve seen the Upper Falls.

    Enjoy your hike back to your car, and if you didn’t take time to stop near the river, the walk back is a great time to do it.  I enjoyed having a snack break there, listening to the rushing water, and smiling as I saw a family further up the river enjoying their time together.

    Getting to the Twin Falls Trailhead

    The Main Twin Falls Trailhead:  SE 159th St, North Bend, WA 98045

    1. Take I-90 east to exit 34
    2. Turn right off the exit ramp onto 468th Avenue SE
    3. Drive about half a mile and make a left onto SE 159th Street.
    4. Follow the road until it dead-ends in the Twin Falls parking lot. (You will need a Discover Pass to park here.)

    Alternate Hiking/Parking Option:

    If the main Twin Falls trailhead parking is full, you can also hike to the falls coming from the opposite direction. The hike will be different than what I describe below, but if you drive out there and discover the main trailhead is full, this gives you an alternate option.

    1. Take I-90 east to exit 38
    2. Turn right off the exit onto SE Homestead Valley Road. Drive about 0.10 miles and make your first right, you’ll see a sign for Olallie State Park that lists various trails
    3. Follow this dirt road for a little over a quarter-mile, stay left as you pass two forks in the road along this route.
    4. You will park near the trailhead junction for Iron Horse Trail.
    5. Follow the Iron Horse Trail (may also see signs for John Wayne Pioneer Trail) for about a third of a mile before it connects with the Upper Twin Falls trail. 
    6. Once you reach the Upper Twin Falls and the big bridge, you’ll just need to hike a little further down where you’ll find stairs on your left, leading you to the Lower Falls viewing area.

    Read the following articles for more waterfall fun:

  • Hiking the Whimsical Gnomes Trail

    **Update** The Gnomes Trail has relocated to 25719 Maple Valley Black Diamond Rd SE, Maple Valley, WA 98038. This is also the parking area for the Maple Valley Farmers Market. Read my updated post on the NEW Gnome Trail here.

    Facebook
    Pinterest
    Reddit
    Twitter
    Email

    If you’re looking for a fun, family-friendly hike, then look no further than the Gnomes Trail in Maple Valley, WA. 

    Explore this whimsical trail located within Henry’s Ridge Open Space. Henry’s Ridge Open Space is a network of trails that extend within the Maple Valley and Ravensdale areas.  

    The Gnomes Trail is an easy 2-mile roundtrip hike suitable for all ages. The trail is mostly flat and has a very mild elevation gain of only about 150 feet.  I saw people of all ages and fitness levels hiking this trail. So if you are new to hiking or have younger kids, the Gnomes Trail is a great place to start.

    Getting to the Gnomes Trail

    There are two starting points for the Gnomes Trail in Maple Valley. 

    • 279th Street Park: Maple Ridge Way SE, Maple Valley, WA 98038
    • Henry’s Ridge Open Space: 253rd PI SE, Maple Valley, WA 98038

    I chose to start my hike at the 279th Street Park.  However, you can also start the hike from the Henry’s Ridge Open Space trailhead off of SE 281st Way and 253rd Place SE. 

    Click on the map and see the two trailhead parking areas as well as the mapped trail routes.  I recommend downloading the Google Map for offline use before leaving for your hike.  

    Google Maps will give you walking directions from whichever parking area you choose to start the hike. Google Maps displays the trail and shows you which path to take. You can refer to the map all along the way to make sure you’re on the right track.

    Parking for the Gnomes Trail

    Whether you choose to start from the 279th Street Park or Henry’s Ridge Open Space, just know that there is only street parking at both trailheads.

    I found the 279th Street Park to have less traffic and more parking areas than at the trailhead for Henry’s Ridge Open Space. You can always go to one, and if you can’t find parking, then try the next trailhead.  Refer to the above map for directions.

    Sharing the Trail

    The Henry Ridge Open Space is a multi-use trail system. This means that you are sharing the trails within this natural space with bicyclists, horses, and other hikers.  So yield to horses and move over for the bicyclists.  I know the sign says bicyclists should yield to both hikers and horses, yet, I find as a hiker it is easiest for me to move out of the way.

    Hiking the Gnomes Trail in Maple Valley, WA

    I started my hike from the 279th Street Park, but if you choose to start from the Henry Ridge Open Space trailhead, the directions are the same once you reach the Once Upon a Time trail. 

    It’s important to note that not all of the trails are clearly labeled, so use this guide to help you navigate. Additionally, download an offline map from Google Maps for directions before leaving home.

    fork in the trail
    Route 66 and the Once Upon a Time trail (left). You make a left onto the OUAT trail if coming from Stinger or a sharp right if coming from the 279th Park.

    Starting from the Henry Ridge Open Space Trailhead

    You’ll access the trailhead next to the road and continue straight (pass the Old Mike trail) until you reach the Stinger trail where you’ll make a right. Follow Stinger until you reach a wide gravel trail, this is Route 66, turn right on to the path. In about 20 feet, you’ll cross the road and make a left onto the Once Upon a Time trail (OUAT).  From here the directions are the same as if you were starting from the 279th Street Park.

    Starting from the 279th Street Park

    Park alongside the 279th Street Park and then cross the road to the trailhead. This gravel path is called Route 66 on the map. 

    Follow Route 66 for less than a quarter-mile before making a sharp right onto the Once Upon a Time trail (OUAT).  You’ll spot your first gnome shortly after starting this trail. I think he’s there to let you know you’re heading the right way.

    first gnome you see on OUAT
    This is the first gnome to greet you on your hike.

    This portion of the hike is a dirt trail with rocks and roots here and there, but ample space to stop on the side to let people pass when needed.  Enjoy the forest with its moss-covered trees and stumps left from larger trees that once grew there.   

    a tree growing over a stump
    I liked this tree growing over the old stump.

    The Derailer Trail and Two Choices

    Eventually, you’ll come to a fork in the path, and if you look right, you’ll see a diamond-shaped sign and a sign above it that reads “Derailer.”  You can go right or left here.  

    • If you go right on the Derailer trail, you will follow the path as it loops around and links up with the Lorax trail. Make a right onto the Lorax trail.  (Skip to the asterisk (*) past the directions for making a left to continue.) (The instructions from that point on are the same whether you make a right or left at the Derailer fork.)
    • If you go left at the fork where you see the Derailer trail sign, you will continue a short way down the trail before reaching another fork in the path.  Make a right here to continue on the OUAT trail (Bad Wolf is to the left). In about 250 feet you’ll make another slight right onto the Lorax trail (I don’t recall seeing a sign).  You’ll continue down the Lorax trail and soon pass the fork for the Derailer loop, just stay to the left. 

    *Continue along the trail, and soon you reach a footbridge made out of a fallen tree.  There are two bridges, I stuck with the larger one on the left, but both link you back to the same trail.  

    Cross the bridge and follow the path as it curves left; shortly up ahead, you’ll see the welcome sign for the Gnomes trail.

    footbridge on gnomes trail

    The Gnomes Trail

    Take the Gnomes trail on the right and stay right to follow the trail’s loop.  The Gnomes trail loop is around 0.5 miles. 

    At the entrance to the Gnomes trail, you’ll find a welcome area and a trailhead sign.  Continue up the path enjoying the gnomes scattered everywhere.  Make sure to look up in the trees and under shrubs.  You could make it a game for the kids to see how many gnomes they can find.

    Speaking of games, there is also a geocache hidden not too far from the entrance to the Gnomes trail.  If you’ve never been geocaching, it is a lot of fun for kids and adults alike!  You can download the app and look up geocaches near you to find more.

    Click on the photos below to view a larger image.  These are some of the signs that greet you near the entrance of the trail.

    The Gnomes trail loop is a series of switchbacks curving right and left and then right and left again as it winds its way up, and then down, and then back up before looping you down and around to the main entrance of the Gnomes trail.

    You see a huge variety of gnomes in the first part of the trail, there are even a few fairies, dwarfs, and I also spotted a troll. The gnomes appear to enjoy many of the same activities we do, such as camping, sports, gardening, and so on.  You’ll have fun spotting all the unique gnomes along the way.

    Here are some of the ones I found during my hike.  Make sure to visit and discover your favorites too!

    After the first series of switchbacks, you find yourself back near the main entrance, however, the trail curves right here and begins climbing up again.  The gnomes will appear less and less as you continue along this portion of the trail. 

    You’ll pass another trail junction, make sure to stay left, and soon you’ll come to a “T” in the path where you’ll make a left onto what is called the Ogre trail.  Soon you’ll see a fork on the right for the Ogre trail but continue straight and don’t turn right where you see the sign that reads “Ogre.” 

    You’re looping back, so you’ll want to stay left, and soon you will be back at the main entrance to the Gnomes trail. From this point on, you backtrack the way you came to return to your parking spot.

    Useful Information to Know

    • There are no restrooms at either the parking areas/trailheads or anywhere along the trail. So make sure to take a pitstop before you come.
    • The hike is a little over 2 miles roundtrip, and it took me a little over an hour to hike it. If you have small kids or a large group, plan for it to take 1.5 to 2 hours for the roundtrip hike.
    • The Gnomes trail is an easy hike with minimal elevation gain, but it is narrow in spots with rocks and roots and overgrown bushes along the way. So wear the appropriate shoes, and if you have any mobility issues, you may want to bring a hiking stick.
    • The trail is too narrow in most spots to accommodate a stroller, so plan accordingly.
    • Dogs are allowed, but make sure to pack your poo out as there are no garbages along the trail. This goes for all trash.  This trail system is within a neighborhood, and we must be respectful of the community and the trails.
    • Bring bug spray!  The mosquitos were quite bad on the trails, and I sadly forgot to apply bug spray before leaving.
    • Download an offline map through Google maps of the area, and Google can give you walking directions for the trail.  You can also use any favorite maps apps you might have, such as AllTrails or BackCountry Navigator, if you want to track your hike.
    • The Henry’s Ridge Open Space trails are designed in loops. So don’t panic if you do take a wrong path as it will link up with another one.  There are multiple ways to get to the Gnomes Trail. I am only sharing a couple of options. 

    Recommendations for a Post Hike Treat

    If you’d like something refreshing after your hike, why not head to Dairy Queen for a delicious ice cream treat or perhaps go through Gravity Coffee’s drive-through for a little pick-me-up for the ride home. I’ve marked both of these on the map at the beginning of this post.  There are a ton of other options for food in the Maple Valley/Four Corners area if you want to grab a bite to eat.

    Dairy Queen
    23924 SE Kent Kangley Rd, Maple Valley, WA 98038

    Gravity Coffee
    23912 SE Kent Kangley Rd, Maple Valley, WA 98038

    I’d love to hear from you if you have hiked the Gnomes trail and what you thought about it. If you have any questions, please feel free to send me an email or post them in the comments section below.

  • 6 Stunning Hikes in the Quinault Rainforest

    The beauty of the Quinault rainforest is something you need to see for yourself. It is breathtaking! The good news is, there are a lot of excellent choices for hikes around Lake Quinault, no matter your skill level. Whether you have younger kids or are just a beginner hiker, these Lake Quinault hikes offer you gorgeous displays of the area’s natural beauty with minimal effort. 

    Additionally, the drive around Lake Quinault is a beautiful adventure on its own. So, if you are unable to do any hiking at all, consider making the drive around the lake instead. In this post, I go over some of the easiest and most accessible hikes around Lake Quinault. The scenic drive around the lake combined with a hike in the Quinault rainforest will be a day you’ll never forget! 

    Quick Overview of Rainforests

    We are very fortunate here in Washington state to have a part of the largest temperate rainforest ecosystems in the world, right in our own Olympic National Park. According to National Geographic, rainforests are Earth’s oldest ecosystems and home to over half of the Earth’s plant and animal population! 

    The Olympic National Park covers almost 1 million acres and includes some of the most well-preserved temperate rainforests in North America. For those of us living in Seattle, we have something truly unique in our own backyard–we shouldn’t take that for granted. Instead, we should explore it and protect it.

    6 Easy Beautiful Hikes in the Quinault Rainforest

    1) Maple Glade Rainforest Trail

    This short 0.5  mile loop trail is probably my favorite out of all of the Quinault rainforest hikes I list in this post.  I felt like I entered another world. It was as if I was on the set of Avatar or Endor, the forest moon inhabited by Ewoks. The wonder and beauty of the rainforest all in this short 1/2 mile walk.

    Walking the Trail

    You’ll start by the Maple Glade Rainforest sign and walk across the wooden bridge to begin. Follow the trail as it curves left and winds its way past giant Western hemlocks and redcedar trees.  Soon the path meanders around and then curves left where it opens up alongside a small body of water.  This bog or pond, or whatever it is called, most likely connects to the Kestner Creek.  

    This is the area of the Quinault rainforest, where I feel as though I’ve entered another planet. There are mossy trees everywhere, forming an emerald canopy overhead, and small green plants that live under the water make it appear as a bright green pool of liquid.  I really can’t describe it justly, you’ve got to see it for yourself.  It is one hike I’d do on any day, rain or shine. It is stunning.

    Quinault rainforest green plants

    The trail loops around to the left and circles back to the trailhead. However, you can fork to the left and hike to the Kestner Homestead if you’re up for it.  See my notes on this hike below.  Make sure to stop and sit on the trail bench as you make your way back to the parking lot. The Maple Glade Rainforest trail deserves a slow meandering pace, filled with a lot of gazing upward in awe at the staggering beauty surrounding you.

    Accessibility

    This trail is marked as an accessible trail, although not fully meeting ADA accessibility guidelines. It is a flat trail with no real elevation change.  However, when I hiked it, the path was not wide enough to push a wheelchair through it, plus it gets muddy due to all the rain. So, it’s certainly a flat, easy trail, that one can take very slowly, perhaps with a cane, but probably not with a wheelchair.

    Getting Here

    Turn onto N Shore Rd from US-101. There is a small grocery store on the corner where you turn. Then stay on N Shore Road for about 5.5 miles. You’ll see the turn for the Quinault Rainforest Ranger Station and trailhead parking on the left. The Maple Glade Rainforest Trailhead is also shared by the Kestner Homestead Trail, which I discuss below.

    Facilities

    There are accessible toilets by the Quinault Rainforest Ranger Station as well as picnic tables. The ranger station is only open part-time during the summer when it is; I recommend you go in and speak with the rangers on staff to learn more about the area.

    Maple Glade Rainforest trail

    2) Kestner Homestead Trail

    The Kestner Homestead Trail is a 1.5-mile loop trail that starts from the parking lot at the Quinault Rainforest Ranger Station. The trailhead parallels Kestner Creek to the right, with the Maple Glade Rainforest Trail on the left. Look for salmon in the creek before starting the trail. I saw two huge salmon here when I visited in February. If you combine this hike with the Maple Glade Rainforest trail, it is about 2.0 miles roundtrip.

    The Kestner family moved here in the late 1800s, and the homestead has a variety of structures left behind from these early homesteading days. There is also a large picnic area underneath one of the large barn-like structures—lots of space for kids to run around and explore.

    Tip: If you don’t want to hike the 1.5 miles loop to the Kestner Homestead, you can also make a left out of the Quinault Rainforest Ranger station parking lot and follow the road about 0.5 miles. 

    You’ll see a small parking area on the left-hand side of the road near a gate. You can park here and then walk to the Kestner homestead from here. This option is wheelchair friendly as you have a wide dirt road and open paths that will easily accommodate a wheelchair.

    Getting Here

    Turn onto N Shore Rd from US-101. There is a small grocery store on the corner where you turn. Then stay on N Shore Road for about 5.5 miles. You’ll see the turn for the Quinault Rainforest Ranger Station and trailhead parking on the left.

    Facilities

    There are accessible toilets by the Quinault Rainforest Ranger Station as well as picnic tables. The Kestner Homestead does not have any toilet facilities, but it does have a picnic area.

    Kestner Homestead

    3) July Creek Trail

    This loop trail is at the July Creek Picnic Area about 3.5 miles down the North Shore Road when coming from US-101. You will see the parking area for this day-use picnic area on your right. It’s a very short “hike,” but I feel that the giant trees you find here make it well worth your time!  You also have access to Lake Quinault from the picnic area.

    It is a great place to enjoy a picnic by the lake or to take the short hike past towering Douglas firs and cedar trees. As you continue down the trail, past the main picnic area, you’ll cross July Creek and pass a few more picnic areas with views of the lake before the trail connects with the road.  

    You can walk up the road back to the parking lot from here, or, turn around and loop back up the side trail you passed earlier when crossing the creek bridge, and this will connect you back to the parking lot as well.

    The picture below is of me standing by a fallen tree that is probably about 6’0 in diameter, and someone wrote the number of rings, the last marking I could read was “800” so I guess that means the tree was 800 years old? Either way, these are massive trees and so beautiful to admire.

    Getting Here

    Turn on to North Shore Rd from US-101. There is a small grocery store on the corner. Then drive about 3.5 miles east on North Shore Rd before you see the parking area for the July Creek picnic area.  

    Facilities

    There are vault toilets here and lots of picnic tables scattered along the trail.

    July creek trees Lake Quinault

    4) Quinault Rainforest Nature Loop

    This 0.5 mile interpretive trail is on South Shore Rd about a mile from the Lake Quinault Lodge. The Quinault Rainforest Nature trail gives you a great sample of the rainforest ecosystem. You’ll gaze up at the towering giants around you and listen to the roar of the creek while admiring some waterfalls along the way.  

    This short hike packs a lot in! Stop and read the signs along the trail, explaining more about this unique area. There are some connecting trails you can choose from should you decide to extend your hike, look at the trail map before you begin to plan out the best route that loops you back to your car.

    Getting Here

    Turn on to the South Shore Rd from US-101 and drive about 1.5 miles to the trailhead parking lot, it will be on the right side of the road.

    Facilities

    There are restroom facilities here and a few picnic tables near the parking area.

    mossy trees Quinault rainforest

    5) World’s Largest Sitka Spruce

    Be on the lookout for the trailhead to the Largest Spruce Tree. There is a small sign on the left side of the road when heading east on South Shore Rd. A large dirt parking lot is on the right side of the road. There are no toilet facilities here, so plan ahead. 

    This is a 0.3 mile trail, and it’s a beautiful walk down a path with moss-lined trees on each side before reaching a beautiful crystal clear creek where you’ll gaze across at the towering spruce.  It gets even more impressive close-up!

    Getting Here

    Turn on to the South Shore Rd from US-101 and drive about 1.5 miles to the trailhead parking lot, it will be on the right side of the road.

    Facilities

    There are restroom facilities here and a few picnic tables near the parking area.

    world's largest sitka spruce

    6) Quinault Lodge and Cascade Falls Loop Trail

    This trail goes by a few different names. You might see the trail name as the  Lodge Trail to Cascade Falls Loop or as the Quinault Lodge Trail. The trailhead begins across the street from the Lake Quinault Lodge. If you want more information about the trails in the area, go inside the lodge to the front desk, and they will be happy to answer your questions.  

    The hike is about a 2.0-mile loop that returns you to the lower side of the Lake Quinault Lodge. It is an easy and mostly level trail with only small elevation changes. The path rewards you with views of the Cascade waterfalls as well as some time walking along Lake Quinault. 

    Getting Here

    Turn on to the South Shore Rd from US-101 and drive about 2.0 miles where you’ll see the Lake Quinault Lodge on the left-hand side. There is a dirt parking area on the right side of the road. Look for the trailhead sign to begin your hike. (You can also refer to the Google Map I linked at the top of the post.)

    This trail is one of the trails I mentioned under the Quinault Rainforest Nature Loop that connects with that .5 mile trail. For an optional longer hike, from the Rainforest Nature Trail parking lot, you can take the Quinault Loop Trail #854, which connects the trail systems to create a 4.0-mile loop trail.

    Facilities

    There are restroom facilities at Lake Quinault Lodge and also at Falls Creek Campground. Also, the Lake Quinault Lodge front desk has trail maps and useful information regarding things to do in the area.

    Lake Quinault with logs

    Quinault Rainforest Loop Drive

    If you choose to drive the approximate 31 miles around Lake Quinault, here are a few things you should know. It takes almost 2 hours to complete the entire loop, and only half of the loop is paved.  The pavement ends a little past the Quinault Rainforest Ranger Station on the North Shore Rd. 

    The pavement ends shortly past the Colonel Bob Trailhead turn off on the South Shore Road. The rest of the loop is a graveled dirt road with large potholes scattered here and there. It is doable in a car, but you will need to take it slow.

    Where to Stay at Lake Quinault

    There are several campgrounds scattered around Lake Quinault. However, these are closed during the winter months. You can also choose to stay at the Lake Quinault Lodge on the South Shore or Locharie Resort on the North Shore. There are also some RV park options on the South Shore Rd, one of them, the Rain Forest Resort Village RV Campground is next to the World’s Largest Sitka Spruce. 

    Additionally, you can drive about 30 minutes north on US-101 to Kalaloch and either camp at the Kalaloch campground or stay at Kalaloch Lodge. Both are excellent choices for ocean views.

    rainforest reflections in the water

    Tips for Hiking at Lake Quinault

    What to Pack

    Make sure to pack rain gear (rain jacket, layers for warmth). The Quinault rainforest reportedly gets between 10-15 feet of rain each year! Also make sure to pack sturdy hiking shoes, preferably waterproof or water-resistant, although not required, your feet will appreciate this.  

    It’s always a good idea to pack extra water and snacks. Even though these are shorter hikes, if you combine a few of these or even a drive around the lake, you’ll appreciate having a little extra food for the journey.  I like to pack peanut butter and jam sandwich fixings to make in the car.

    Also, don’t forget to bring your camera gear and tripod if you wish to photograph some of the waterfalls, capture the sunset, or take group shots. A tripod is a handy thing to have!  Plus, none of these trails are that long, so the extra weight shouldn’t be too much of a hassle.

    Wildlife

    Be prepared to see Roosevelt elk during your drive and hikes in the Quinault rainforest. This area is a popular feeding area for the elk, so your chances of seeing one are pretty good. I saw the one below while driving on South Shore Road. 

    You’ll also have excellent opportunities to see eagles, bears, coyote, salmon, and other wildlife that calls the area home.  As always, remember these are wild animals, give them a safe distance and do your best not to disturb them.

    Roosevelt Elk

    Technology Needs

    In addition to packing your camera and any extra batteries and chargers you’ll need, it’s also important to know how to prepare your cell phone. There is no cell service around Lake Quinault, so plan for this by downloading your Google Maps ahead of time, and if you use a hiking app (such as BackCountry Navigator), download the topography maps ahead of time too. 

    Related Articles

    Here are more articles related to this post and the area around Lake Quinault.

    If you’ve never visited the Olympic rainforest before, then take the opportunity to do it this year.  It’s only a 3-hour drive from Seattle, and there are lots of great places to camp as well as lodges and private resorts, and even a few Air BnB options around the lake. 

    This area of US-101 and the Olympic National Park is someplace you need to visit at least once.  Consider making a week of it and stop at a few of the park areas along the way, such as Lake Quinault, Kalaloch, Lake Crescent, and Sol Duc Hotsprings.  You’ll be amazed at the natural beauty of this area.

    Go Explore!

    Quinault Rainforest

  • Gold Creek Pond and Autumn Surprises

    If you’re looking for an easy trail with beautiful views, a picnic area, ADA accessible and close to Seattle–look no further! The Gold Creek Pond Trail is a 1.1 mile loop trail that circles the Gold Creek pond. It is a relatively flat, paved (with a few boardwalk bridges) trail that circles this very large alpine lake of a pond. Keep reading to discover why this trail is worth the trip!

    A Little History About Gold Creek Pond

    As you look at the photographs of Gold Creek Pond, try to imagine that back in the ’70s and ’80s, this pond didn’t even exist.  Instead, this area was a gravel pit supplying the construction of the I-90 freeway. Since that time, a restoration project began and is still underway, to develop the area around Gold Creek. It is such a beautiful location now, as you look out over the water, it is incredible to see the transformation from pit to pond.

    A Snowy Surprise

    The night before I visited Gold Creek Pond, I had plans to take my camera and go hunt down some fall foliage.  When I got up the next morning, my phone’s weather report showed it was 36 degrees out!  Let me tell you for Seattle fall weather–this is cold!

    Honestly, one of the things I love about the Seattle area is our mild weather.  Typically in early October, it is often sunny and in the 60s! I had initially planned on driving to Leavenworth; however, with my late morning start, I knew I’d need to adjust my plans. Gold Creek Pond Trail was on my radar for a while, and it was only an hour’s drive, so I decided to head there.

    Imagine my surprise when I discovered Snoqualmie Pass (Gold Creek Pond is near the summit) had snow! Snow. And it’s barely October! This was odd, but I figured if I didn’t get any photos of fall colors, at least I’d get some snowy fall photos?

    Gold Creek Pond Trail

    After you arrive at the parking lot, you will see a pit toilet on the right and an information board in the center. Follow the path to the left of the information board. Soon you will arrive at the above trail sign. 

    If you go right, this will also lead you to the trailhead for Gold Creek Trail, which takes you to the Alpine Lakes Wilderness Area. However, for this hike, you can go either right or left as you make your loop around the pond. If you come here for a picnic or BBQ, go left as this is the quickest way to the picnic area.

    There are a couple of small wooden bridges that you will cross as you make the 1.1-mile loop around Gold Creek Pond. The wooden planks were icy when I visited, so I took it slow when crossing. If you make the loop counterclockwise, as I did,  you will walk alongside Gold Creek through a wooded area before seeing Gold Creek Pond.

    As I walk, I hear the sounds of the water rushing over the rocks in the creek. The crunch, crunch of snow under my feet, and the faint laughter of someone on the other side of the pond greet my ears. I smile at the beauty this odd snow day had brought.

    One of the wooden bridges you will cross on the loop trail around Gold Creek Pond.

    Making Friends on the Trail

    About halfway around Gold Creek Pond, I came across the two hikers who I had heard earlier. They laughed and had fun as they splashed water and captured it in slow motion with their cell phones. I like meeting people on the trail and seeing their enjoyment of nature.

    informative sign about beavers in Gold Creek Pond
    There are a few informative signs scattered around the trail.

    Later I met a lovely woman who was out hiking with her dog. She said she comes out here during each season and takes a photo.  In wintertime, she uses crampons or snowshoes and said it is beautiful to see then too.

    Then I met a photographer who was seizing the opportunity to find snowy mushrooms, something you wouldn’t usually see.  And later towards the end of the loop trail, a nice man and his wife let me know when I crossed the creek that if I looked down, I could see salmon swimming below.

    So you see, besides enjoying the beauty of nature, you get to meet all sorts of friendly people. It’s a perfect way to relax and remember what a beautiful world we live in.

    fall colors and reflections in the water of gold creek pond
    Make sure to walk out to that tip by taking a short trail that splits off the main one just past the beaver sign.

    Taking Time to Soak in Nature’s Beauty

    Make sure to locate one of the many benches scattered along the trail. There are a few right next to the water that would make the perfect resting spot.

    And if you’re lucky, you might even spot a great blue heron. You are almost certain to see ducks and Canadian geese and of course, the frequent sightings of a mischievous squirrel or two.

    snowy bench by the water at Gold Creek Pond
    Perhaps another time when winter hasn’t beat me to the seat.

    Getting to Gold Creek Pond Trailhead

    It’s only about a 1-hour drive from Seattle to Gold Creek Pond. And what a beautiful drive it is!

    • Take I-90 E to Exit 54 for the Hyak ski area.
    • Turn left at the stop sign.
    • Make a right at the first road passed the I-90 on/off ramps (Forest Service Rd #4832).
    • Drive parallel to I-90 for about 1 mile before making a left at the sign for Gold Creek Rd and Trail.
    • Then continue another quarter mile before making a left onto the pavement and into the parking lot.

    Useful Information

    Road Conditions: The road leading to the trailhead parking lot is a dirt road that is full of potholes. So take it slow, and you should be fine. Once you make the final left, it returns to a paved road as you enter the parking area.

    Parking/Fees: You need a Northwest Forest Pass to park here.  Please note that in the winter, a Sno-Parks permit is required — which is different from the Northwest Forest Pass. If you don’t already have a Northwest Forest Pass, you can purchase a day pass at the parking lot trailhead. For winter use, buy the appropriate sno-parks permit ahead of time.

    Trail access: Gold Creek Pond Trail is ADA accessible, and I saw one woman in her motorized wheelchair here, even with the snow! Some parts of the trail, when I visited, were overgrown a little on each side, so the path got a bit narrow. I love that we have this beautiful trail accessible to those with mobility issues.

    Facilities: There is a pit toilet at the trailhead. Make sure to bring your hand sanitizer, as there was none provided when I visited. On the left side of the pond, you will find a large picnic area with lots of picnic tables and even a few grills scattered here and there.

    Don’t miss this beautiful and family-friendly trail. It is a short drive from Seattle, and if you have extra time and want to explore more of the Snoqualmie area’s beauty, make sure to stop and see the Snoqualmie Falls.

    Happy Trails!

  • Scenic Camping and Hiking at White River Campground

    White River Campground is a first-come-first-served campground near the Sunrise Visitor Center in Mount Rainier National Park. Many visitors overlook the beauty found in this eastern section of the park for the more popular area around Paradise. However, if you don’t take time to explore the area surrounding Sunrise and White River Campground, you will be missing out!

    During the summer Cougar Rock Campground and Ohanepecosh Campground fill up due to their online reservation system. Whenever this has been the case, I have always been able to find a site at White River Campground. I think it helps that it has no online reservation system and is strictly a first-come-first-serve system.

    While camping at White River Campground, you can hike from the campground to see the largest glacier in the lower 48 States. Fall asleep to the sound of the roaring river. And wake up to the most beautiful views of Mount Rainier. Visit Sunrise Visitor Center, the highest point in the park you can drive to.  You do not want to miss the fantastic views and hiking trails here!

    Getting to White River Campground

    Drive east on WA Highway 410. It is approximately 1 hour from Enumclaw to White River Campground. Follow Chinook Pass Highway/Highway 410 until you see the road fork to the right for Sunrise Rd/White River Rd. You will turn right here and follow the road to the entrance station for Mount Rainier National Park. Pay the Mt Rainier National Park entrance fee and continue for another 5 miles before making a left at the entrance sign for White River Campground.

    Finding a Campsite

    Follow the road into the campground, and you will pass the pay station parking on your right. I recommend you stop here and pick up the pay envelope that you need to complete your campsite reservation. Then continue driving thru Loop A, B, C, and D to find an available spot. 

    Tip: Loop A, C and D all have restrooms with flushing toilets and sinks. Loop B has a pit toilet supplied with hand sanitizer.

    Once you have found the campsite you want, fill out the envelope with the necessary information, then tear off the tab and attach to your site number to reserve the spot while you go pay. You will take your envelope with payment (cash or check) and submit it at the pay station, by dropping it in the pay slot. A ranger will come by later in the day to add a tab to your campsite number showing the date you have reserved your spot thru. 

    Things to Do at White River Campground

    There are lots of things to do at White River Campground and one of them is the hike to see the Emmons Moraine Glacier.  Mount Rainier is home to many different glaciers, but this one is the largest. In fact, it is the largest glacier in the lower 48 states! Pretty impressive, huh?

    Getting to the Trailhead

    You will find the trailhead for the Glacier Basin Trail in Loop D. Your hike to Emmons Moraine starts here. This easy hike is about 3 miles total out and back. It has a steady uphill climb, but it never gets very steep. The 6 year old in our group practically ran the whole way there and back. It takes 1-2 hours total to complete the hike. 

    Glacier Basin Trail to Emmons Moraine Trail

    Follow the Glacier Basin Trail as it winds its way thru the beautiful wooded forest with views of White River below. You will pass small streams and waterfalls forging paths down the mountainside. After about 1 mile the Emmons Moraine trail will split from the Glacier Basin Trail and you will make a left to continue to the viewpoint for the glacier. 

    log bridge crossing White River
    Hiker crossing the log bridge that takes you to the viewpoint for Emmons Moraine.

    Continuing on the Emmons Moraine Trail

    As you turn left  you will walk down to the river and cross a log bridge before climbing back up the hillside where you are rewarded with spectacular views of the Emmons Moraine Glacier. You will also have beautiful views of the turquoise lake created by the glacier run off and glacial silt. It is quite the stunning view. Feel free to wander further up the trail for closer views of the glacier before turning around to make the hike back to camp.
    Hiker looking down at the glacial ponds formed from Emmons Moraine Glacier
    The glacial pond formed from Emmons Moraine.

    Optional Side Hikes from Emmons Moraine Trail

    If you prefer to do a longer hike, you can always take the trail down to the glacial lake (although it’s a bit of a scramble, so proceed with caution) or you can return to the junction for the Glacier Basin Trail and hike to Glacier Basin Camp which is another 2.2 miles from the junction. This adds a total of 4.4 miles to the Emmons Moraine hike, making it about a 7.5 mile hike by the time you return to camp.

    Additional Hikes and Things to Do at White River Campground

    If you want additional hikes to do from White River Campground, you can hike a portion of the Wonderland Trail starting at  Loop C near the old patrol cabin. This trail will take you up to Sunrise. It is about a 3-mile hike from White River Campground to Sunrise Visitor Center.

    From the day-use parking lot, you can follow a trail down to the river. Kids and adults alike will enjoy looking for unique rocks and perhaps tossing one or two into the river for fun. It is also a great place to spot views of Rainier and the Emmons Moraine glacier.

    In the summer the rangers will often lead evening talks at the community campfire just off the main road in the park (the road that goes by the different loops). You will find the bulletin board here too, which should list any upcoming programs.

    “And into the forest I go, to lose my mind and find my soul.” ~John Muir

    Visit Sunrise Visitor Center

    Don’t miss a visit to Sunrise Visitor Center while staying at White River Campground. The visitor center is another 11 miles up the road from the campground. Follow the road out of the campground and make a left at the junction to get back on Sunrise Rd. Continue to the top where you will find the Sunrise Visitor Center Complex and parking. 

    There are so many beautiful hikes to do here. There are easy nature hikes that will only take an hour or less to longer multi-hour hikes. Stop by the ranger station and ask them for some recommended trails based on your preferences. Some easier ones I recommend are the: Sourdough Ridge Nature Trail, Shadow Lake, and the Sunrise Rim loop.

    Tips for Camping at White River Campground

    • There is no electricity in the restrooms. So bring a flashlight or LED lantern for those nighttime trips to the bathroom.
    • There is also no soap in the restrooms, so make sure to pack some from home.
    • White River Campground is at a much higher elevation, which means it can get a lot colder here at night, so pack layers and extra blankets.
    • The campground host drives thru the campground loops each night selling firewood. Make sure to have cash. As of 2019, it was $7/bundle.

    If you haven’t had a chance to check out this Eastern section of Mount Rainier, don’t miss it!  You will be amazed by the beauty you find here.  And if you want another stunning hike only a 25-minute drive from the campground, you will find the Naches Peak Loop Trail. I highly recommend it!

    Happy Camping & Happy Trails!