author.travelffeine.com

Category: Photography

Looking for inspiration? Check out our photo diaries and see the places we travel to through the eye of our lens. Want to learn how to take better photos? Check out or photography guides. Looking for photo gear? We list some of our favorites here too. If it has to do with photography you’ll find it here.

  • The Best Viewpoint to Watch the Sunrise at Bryce Canyon

    Plan to get up early at least one morning to watch the sunrise at Bryce Canyon National Park.  Morning light is the best time to see the Bryce Canyon Amphitheater. You will be amply rewarded for your lack of sleep as you see the first rays glimmering over the tops of the hoodoos and bathing them in a gorgeous glow of light.  The yellows and reds seem to sparkle, and the whole canyon comes alive!  

    In this post, I tell you my pick for which viewpoint to see the sunrise at Bryce Canyon, as well as two other options that make my top 3 choices for watching the sunrise when visiting Bryce Canyon National Park.

    My Pick for Watching the Sunrise at Bryce Canyon

    Although there are several options for watching the sunrise at Bryce Canyon, Inspiration Point was my first choice when deciding where to photograph the sunrise during my visit. I love getting up to see the sunrise. There’s something special about greeting the beginning of a new day. Morning light is also one of the best times for photography.  This is especially true at Bryce Canyon!  The canyon glows in the morning light, and the hoodoos are on full display, whereas later, they will be encompassed by the afternoon shadows.

    Why Choose Inspiration Point?

    I like that Inspiration Point has multiple designated viewpoints along the half-mile climb to the top.  You get a closer look at the canyon from the lower viewpoint, then as you make your way to the upper viewpoint, you also pass a midpoint viewing area for an additional perspective.  

    Inspiration Point is also less busy at sunrise.  Most people generally head for Sunrise Point, which is a good option, but a more crowded option.  By choosing Inspiration Point, I was the first person there, and there was only a total of 6 of us up there for the entire sunrise!  This made it a very leisurely and enjoyable way to photograph the sunrise and enjoy the views.

    Inspiration Point allows you to look to the right toward Bryce Point and the left at Sunset Point and Sunrise Point.  The smaller crowds, expansive views, along with the multiple viewpoints are why I chose Inspiration Point for my first option to photograph the sunrise at Bryce Canyon.

    Getting to Inspiration Point

    • Trail Length: 0.6 miles (one-way)
    • Hiking Time: ~10 minutes to upper Inspiration Point
    • Elevation Gain: ~ 140 feet
    • Trail Difficulty Rating: Easy (It’s a little steep at the top, but it’s a wide trail and a short hike.)
    • Features: 3 different viewpoints of the Bryce Canyon Amphitheater, it’s also situated along the Rim Trail for those looking for a longer hike. It is wheelchair accessible to the lower viewpoint. 
    • Restroom Facilities: Yes. There are pit toilets alongside the parking lot.

    Tips for Photographing the Sunrise at Inspiration Point

    What Time to Arrive

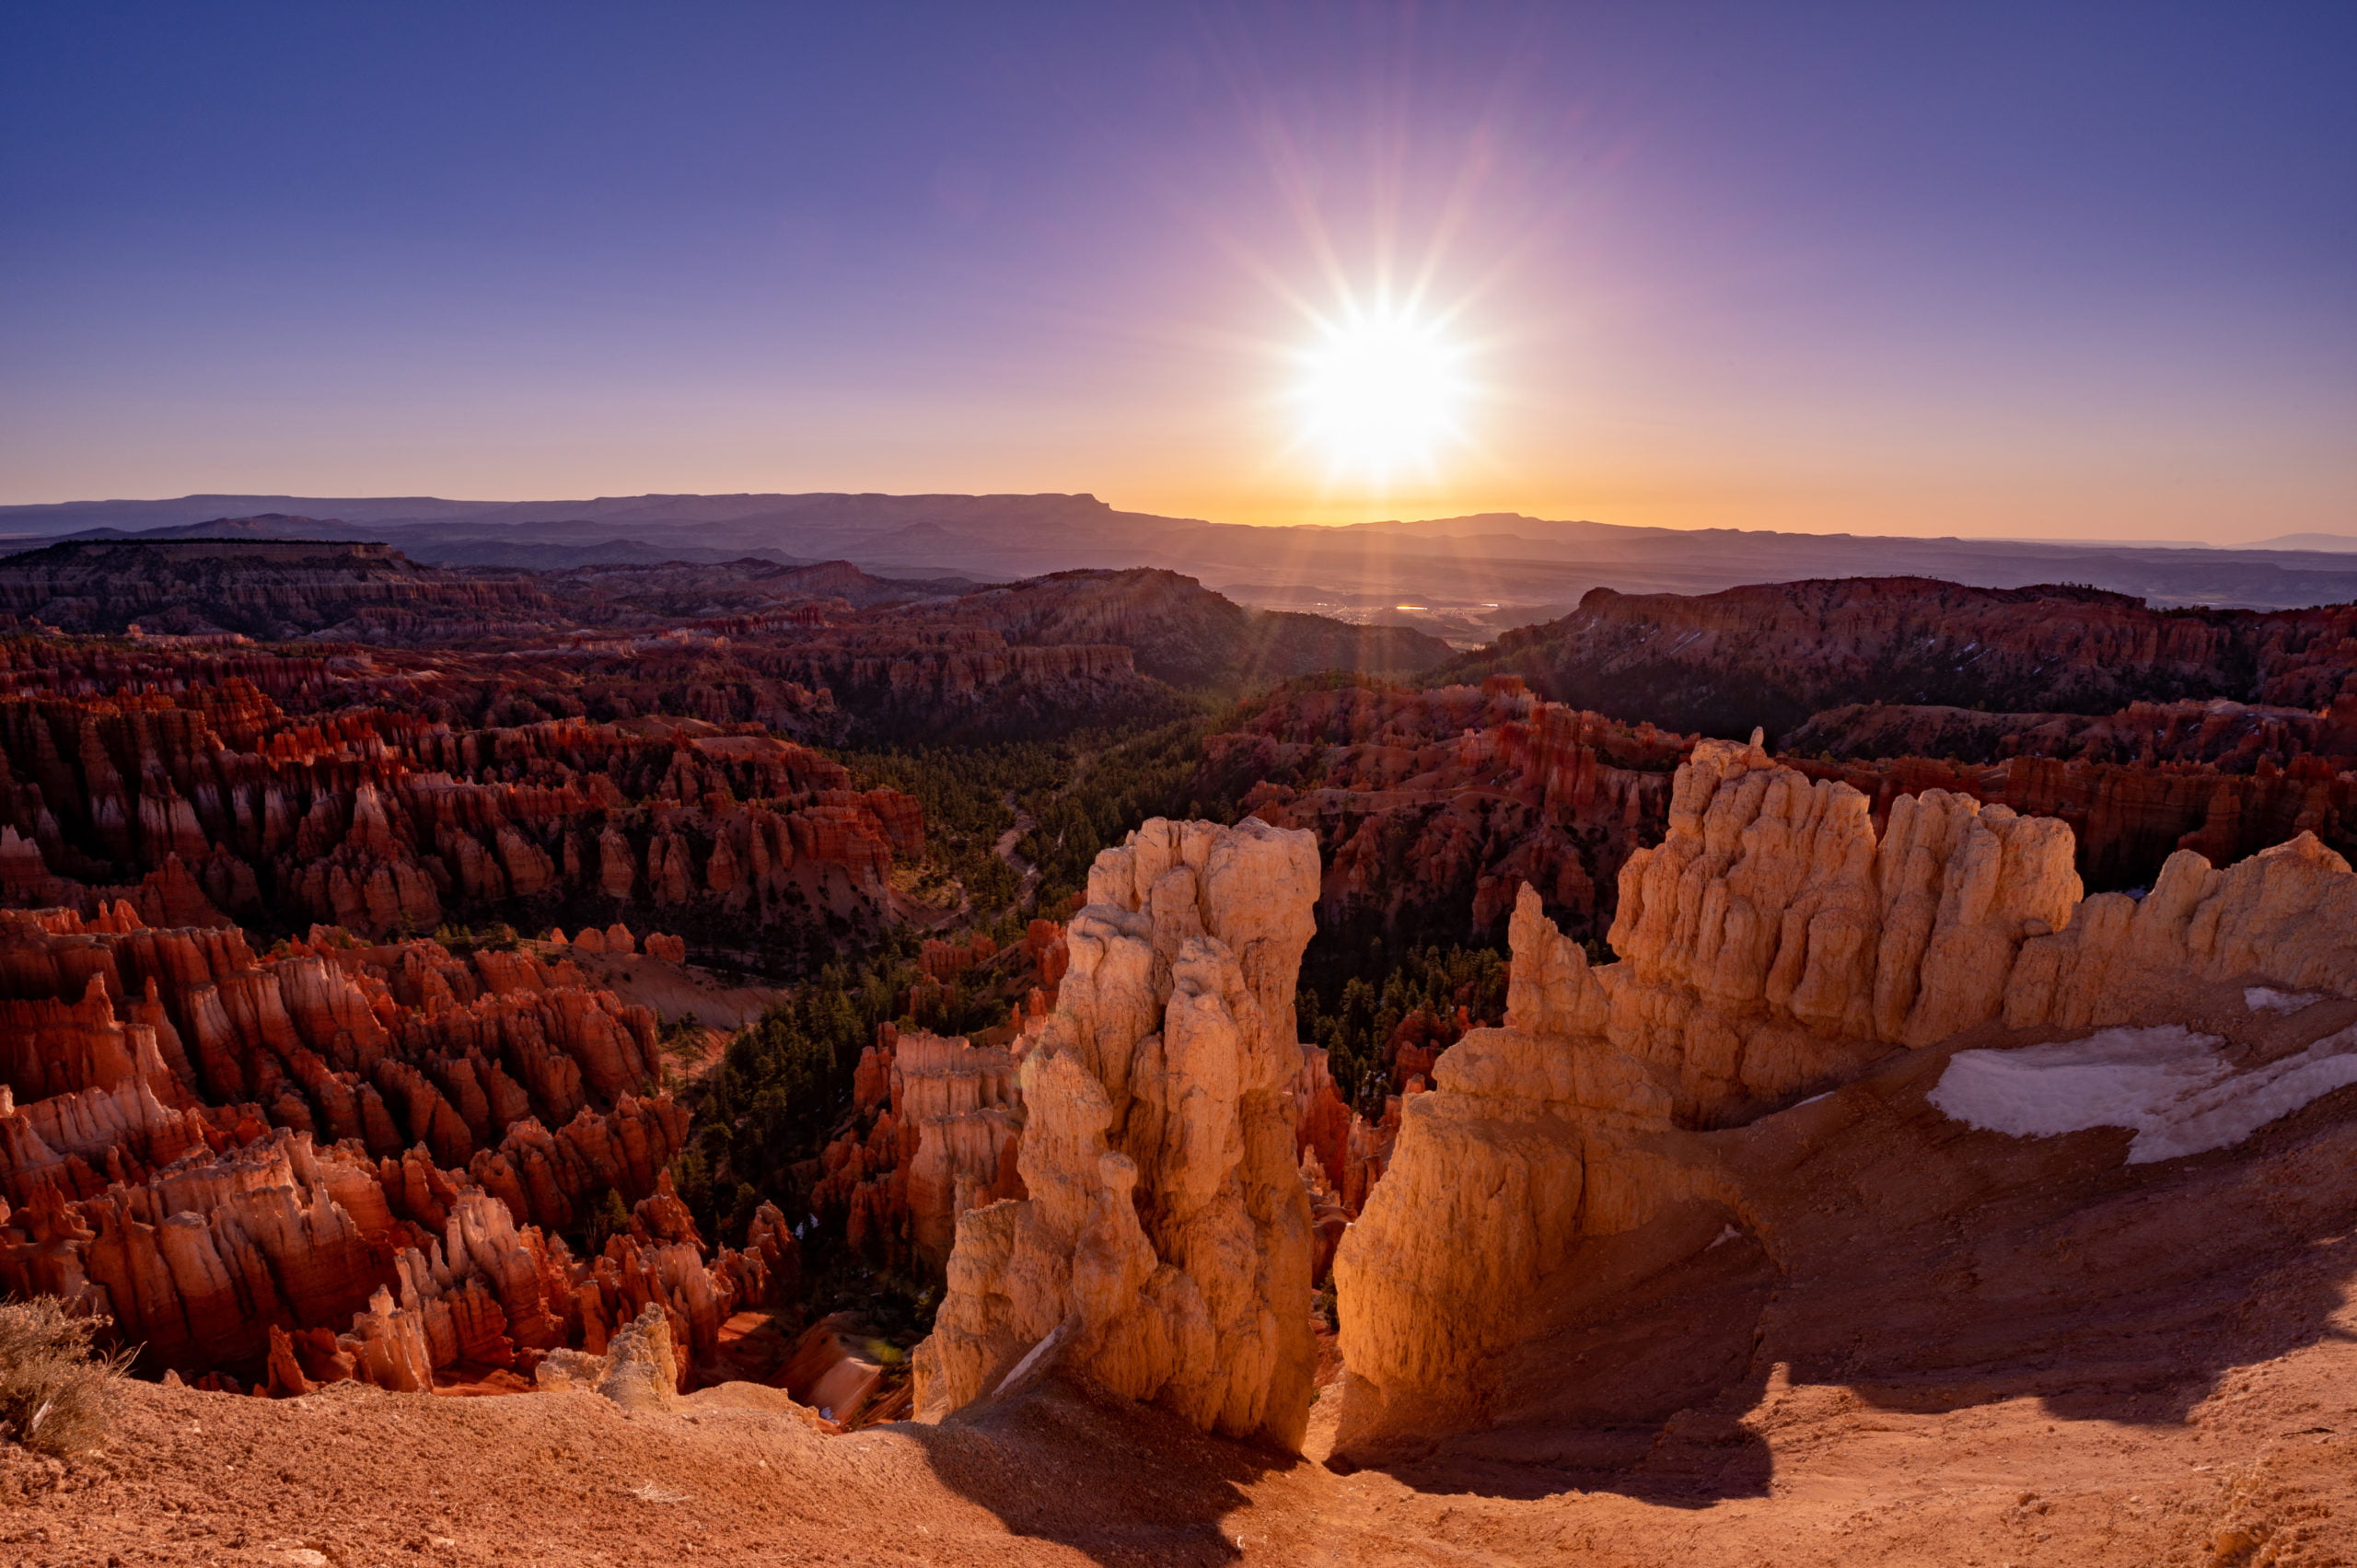
    45-minutes before sunrise

    I typically try to get to a destination at least 1-hour before sunrise. However, 45-minutes was plenty of time at Inspiration Point during my visit in spring.  With 1-hour, you are assured of having the first pick of spots, even in the summer.

    What to bring?

    • Camera
    • Wide-angle lens
    • (A smartphone camera works too!)
    • Tripod
    • Flashlight (For the hike up in the dark.)
    • Warm Layers (Gloves & a hat were really nice to have in the spring.)
    • Hiking Poles (This hike is short but steep at the upper viewpoint, so hiking poles are handy to have.)
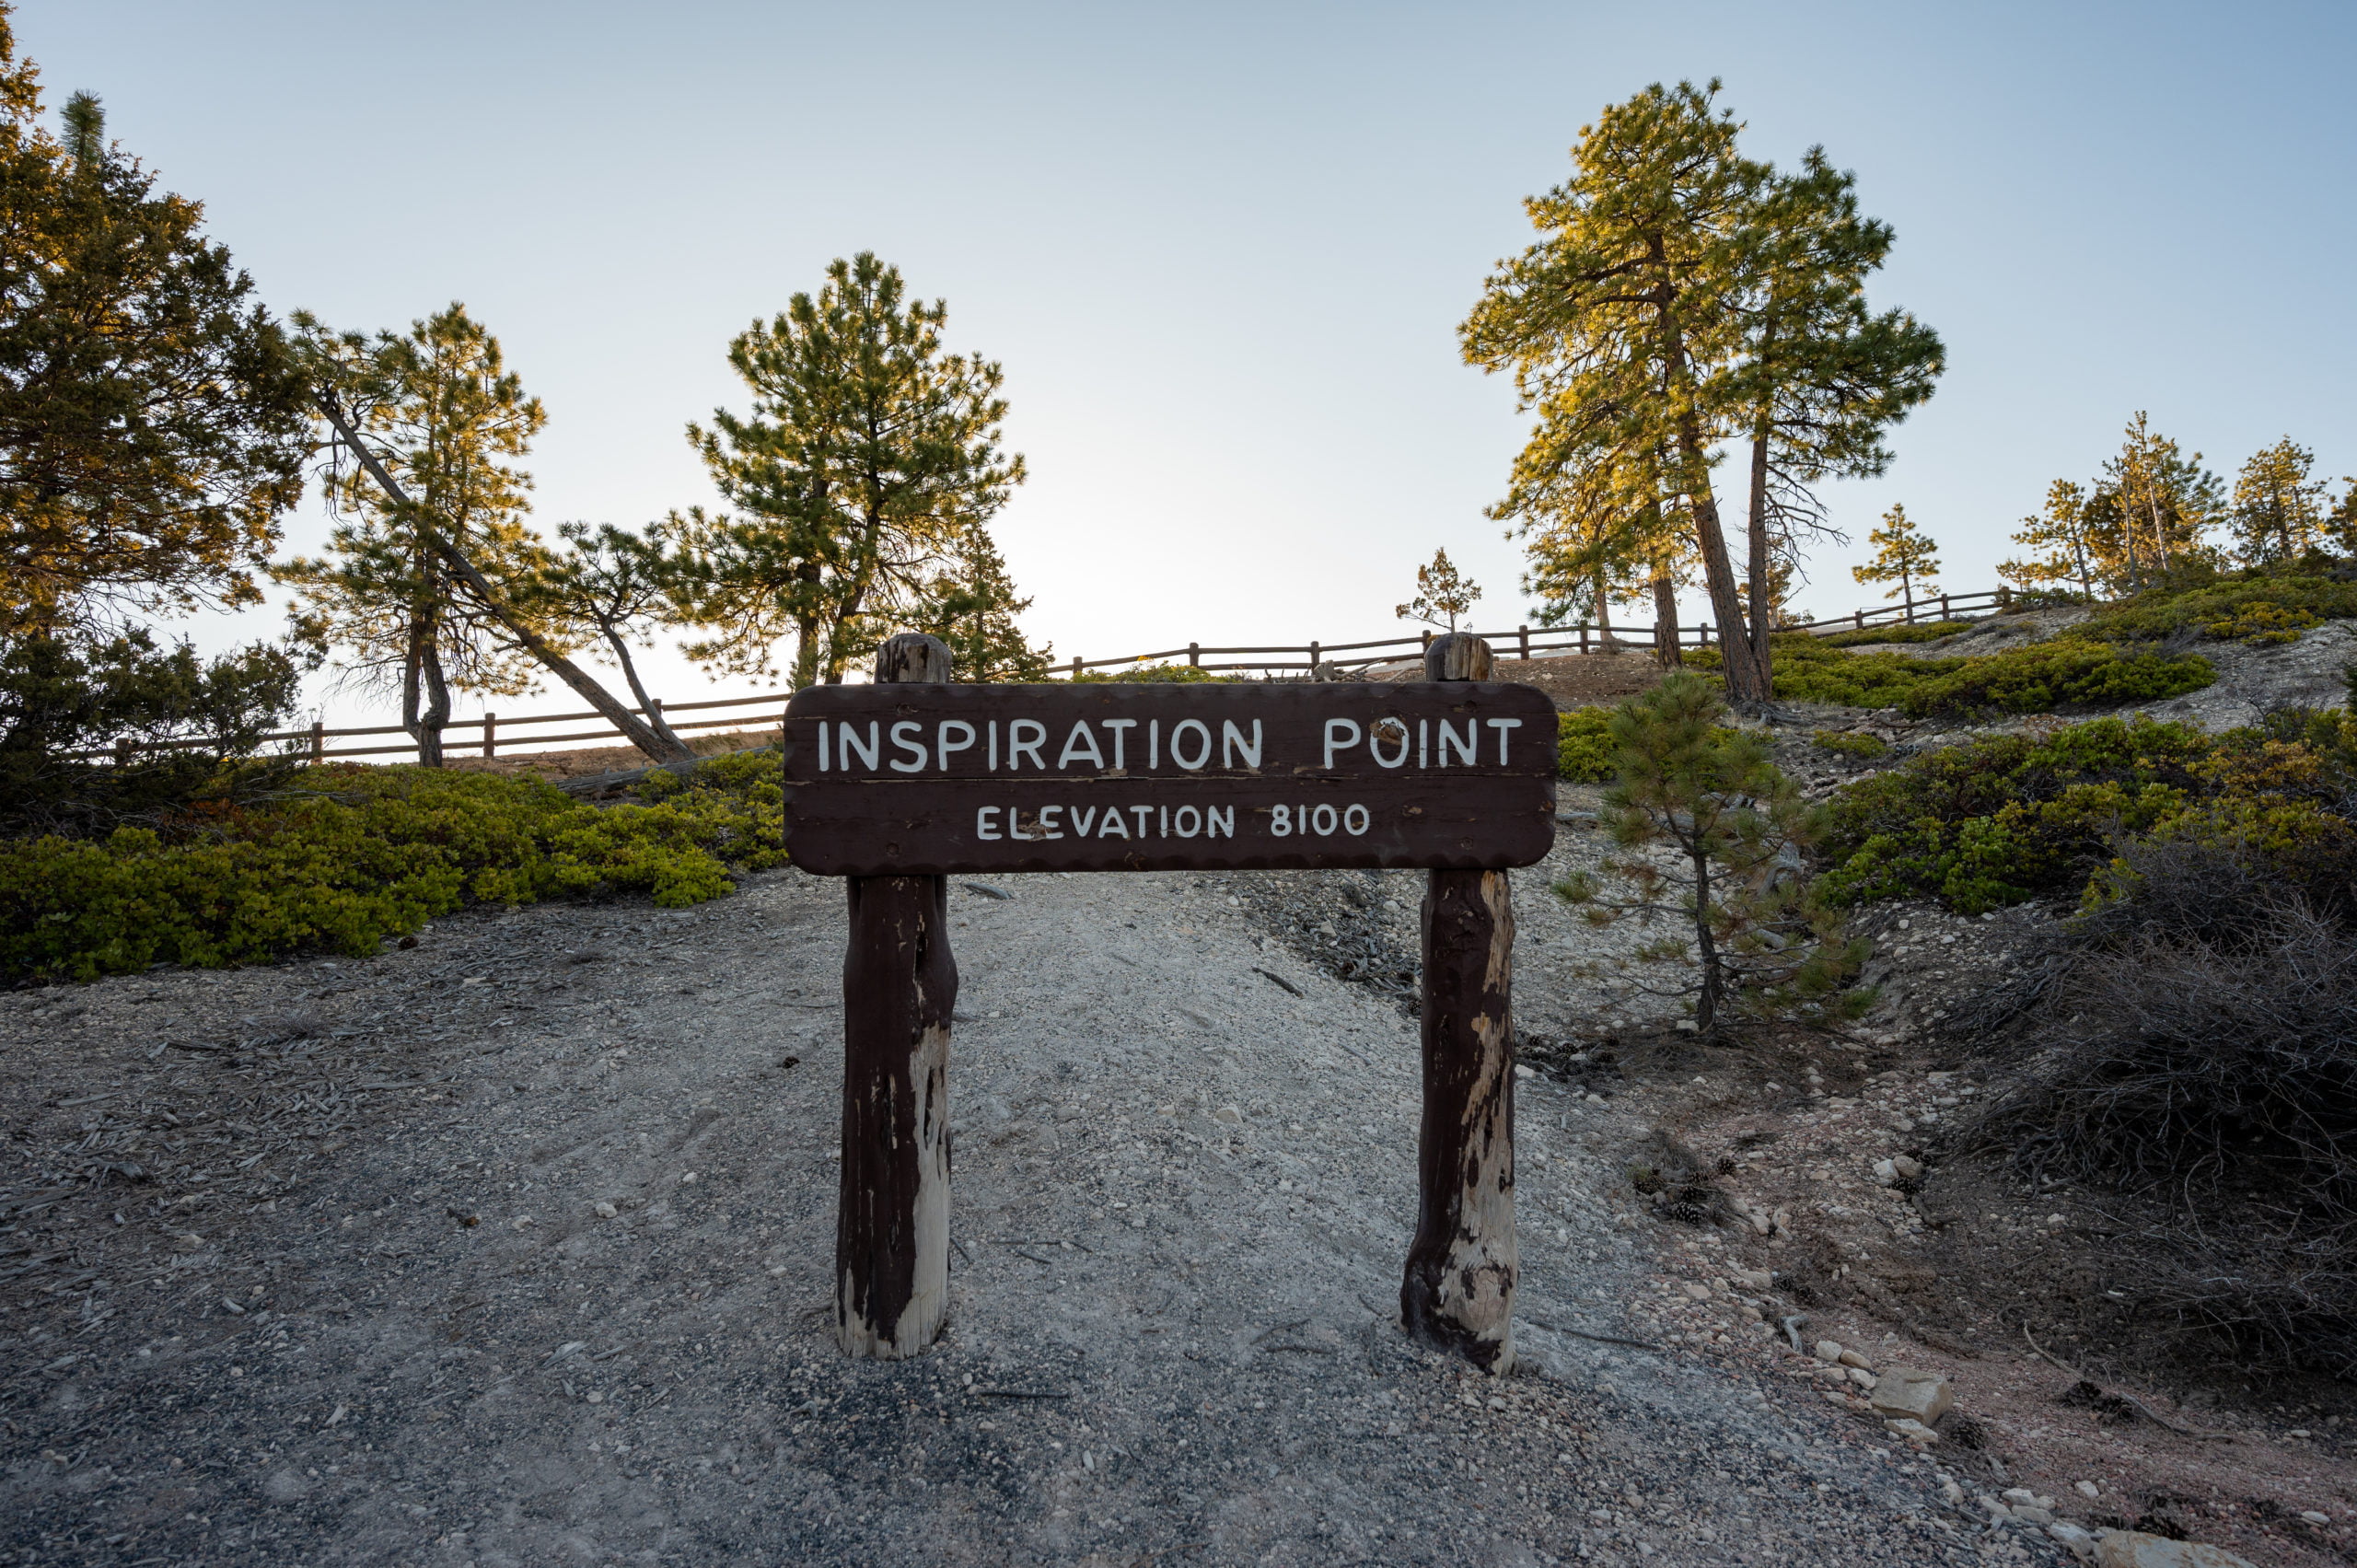
    Upper Viewpoint

    What to expect?

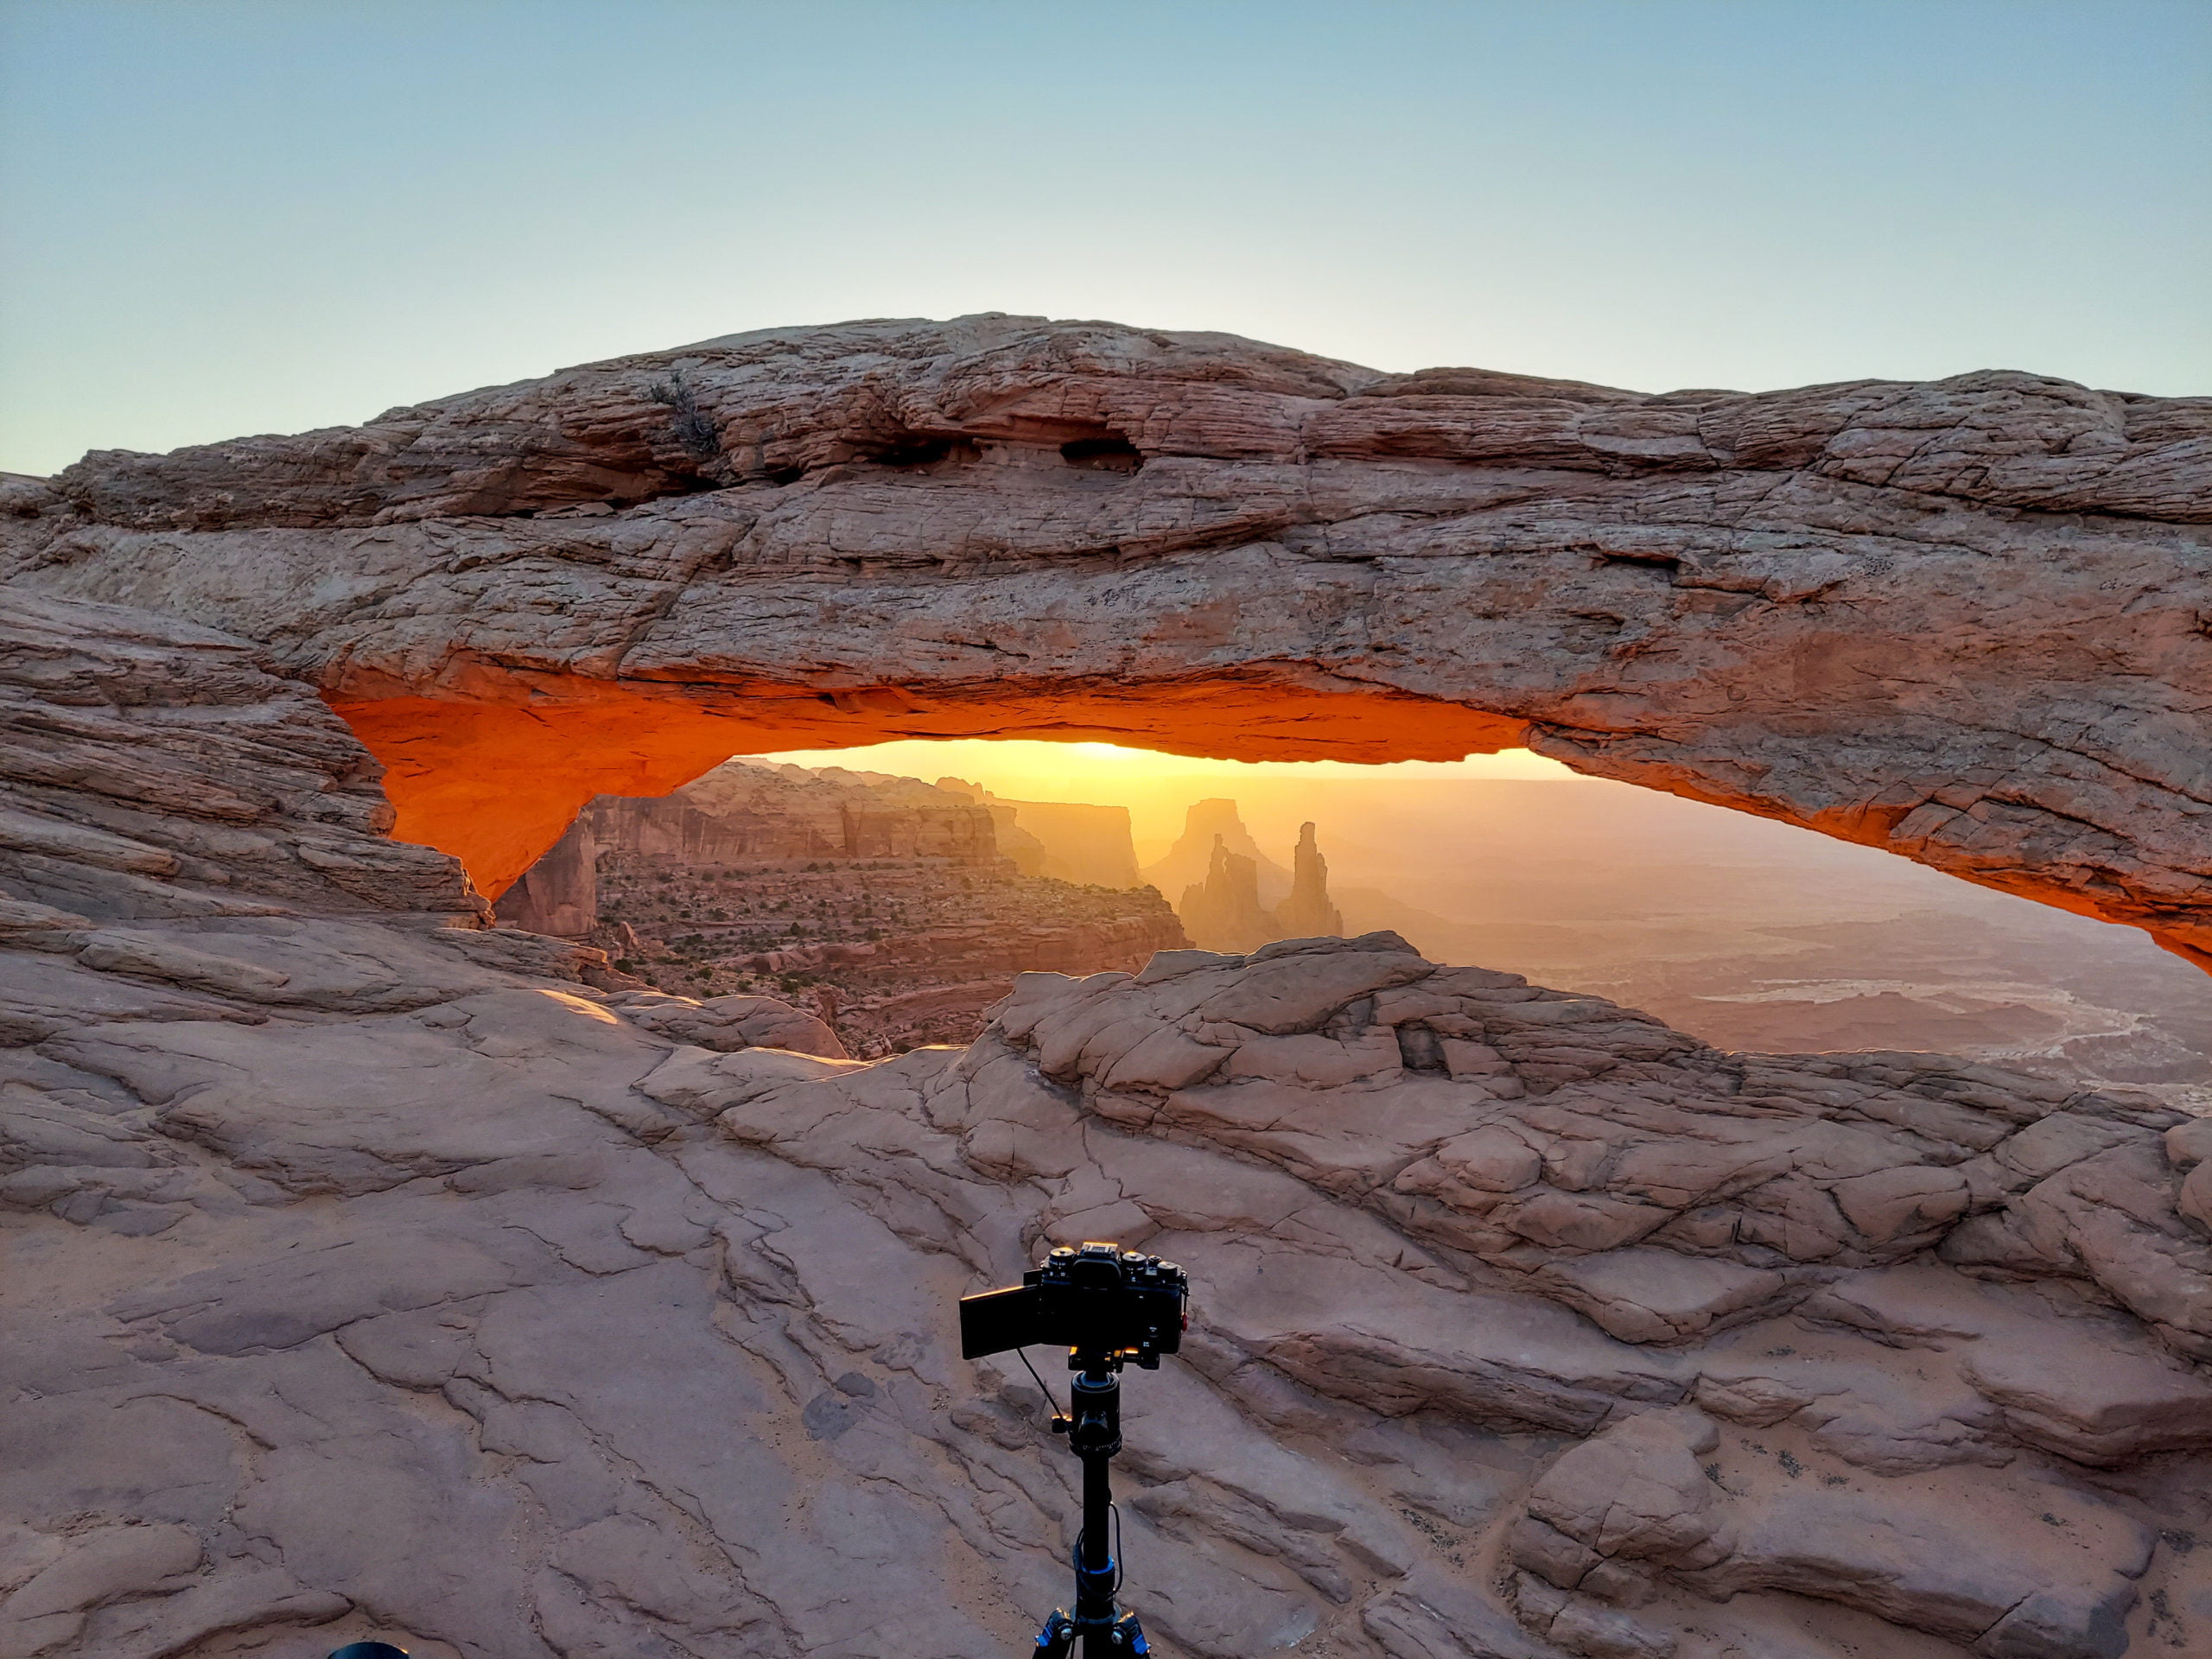
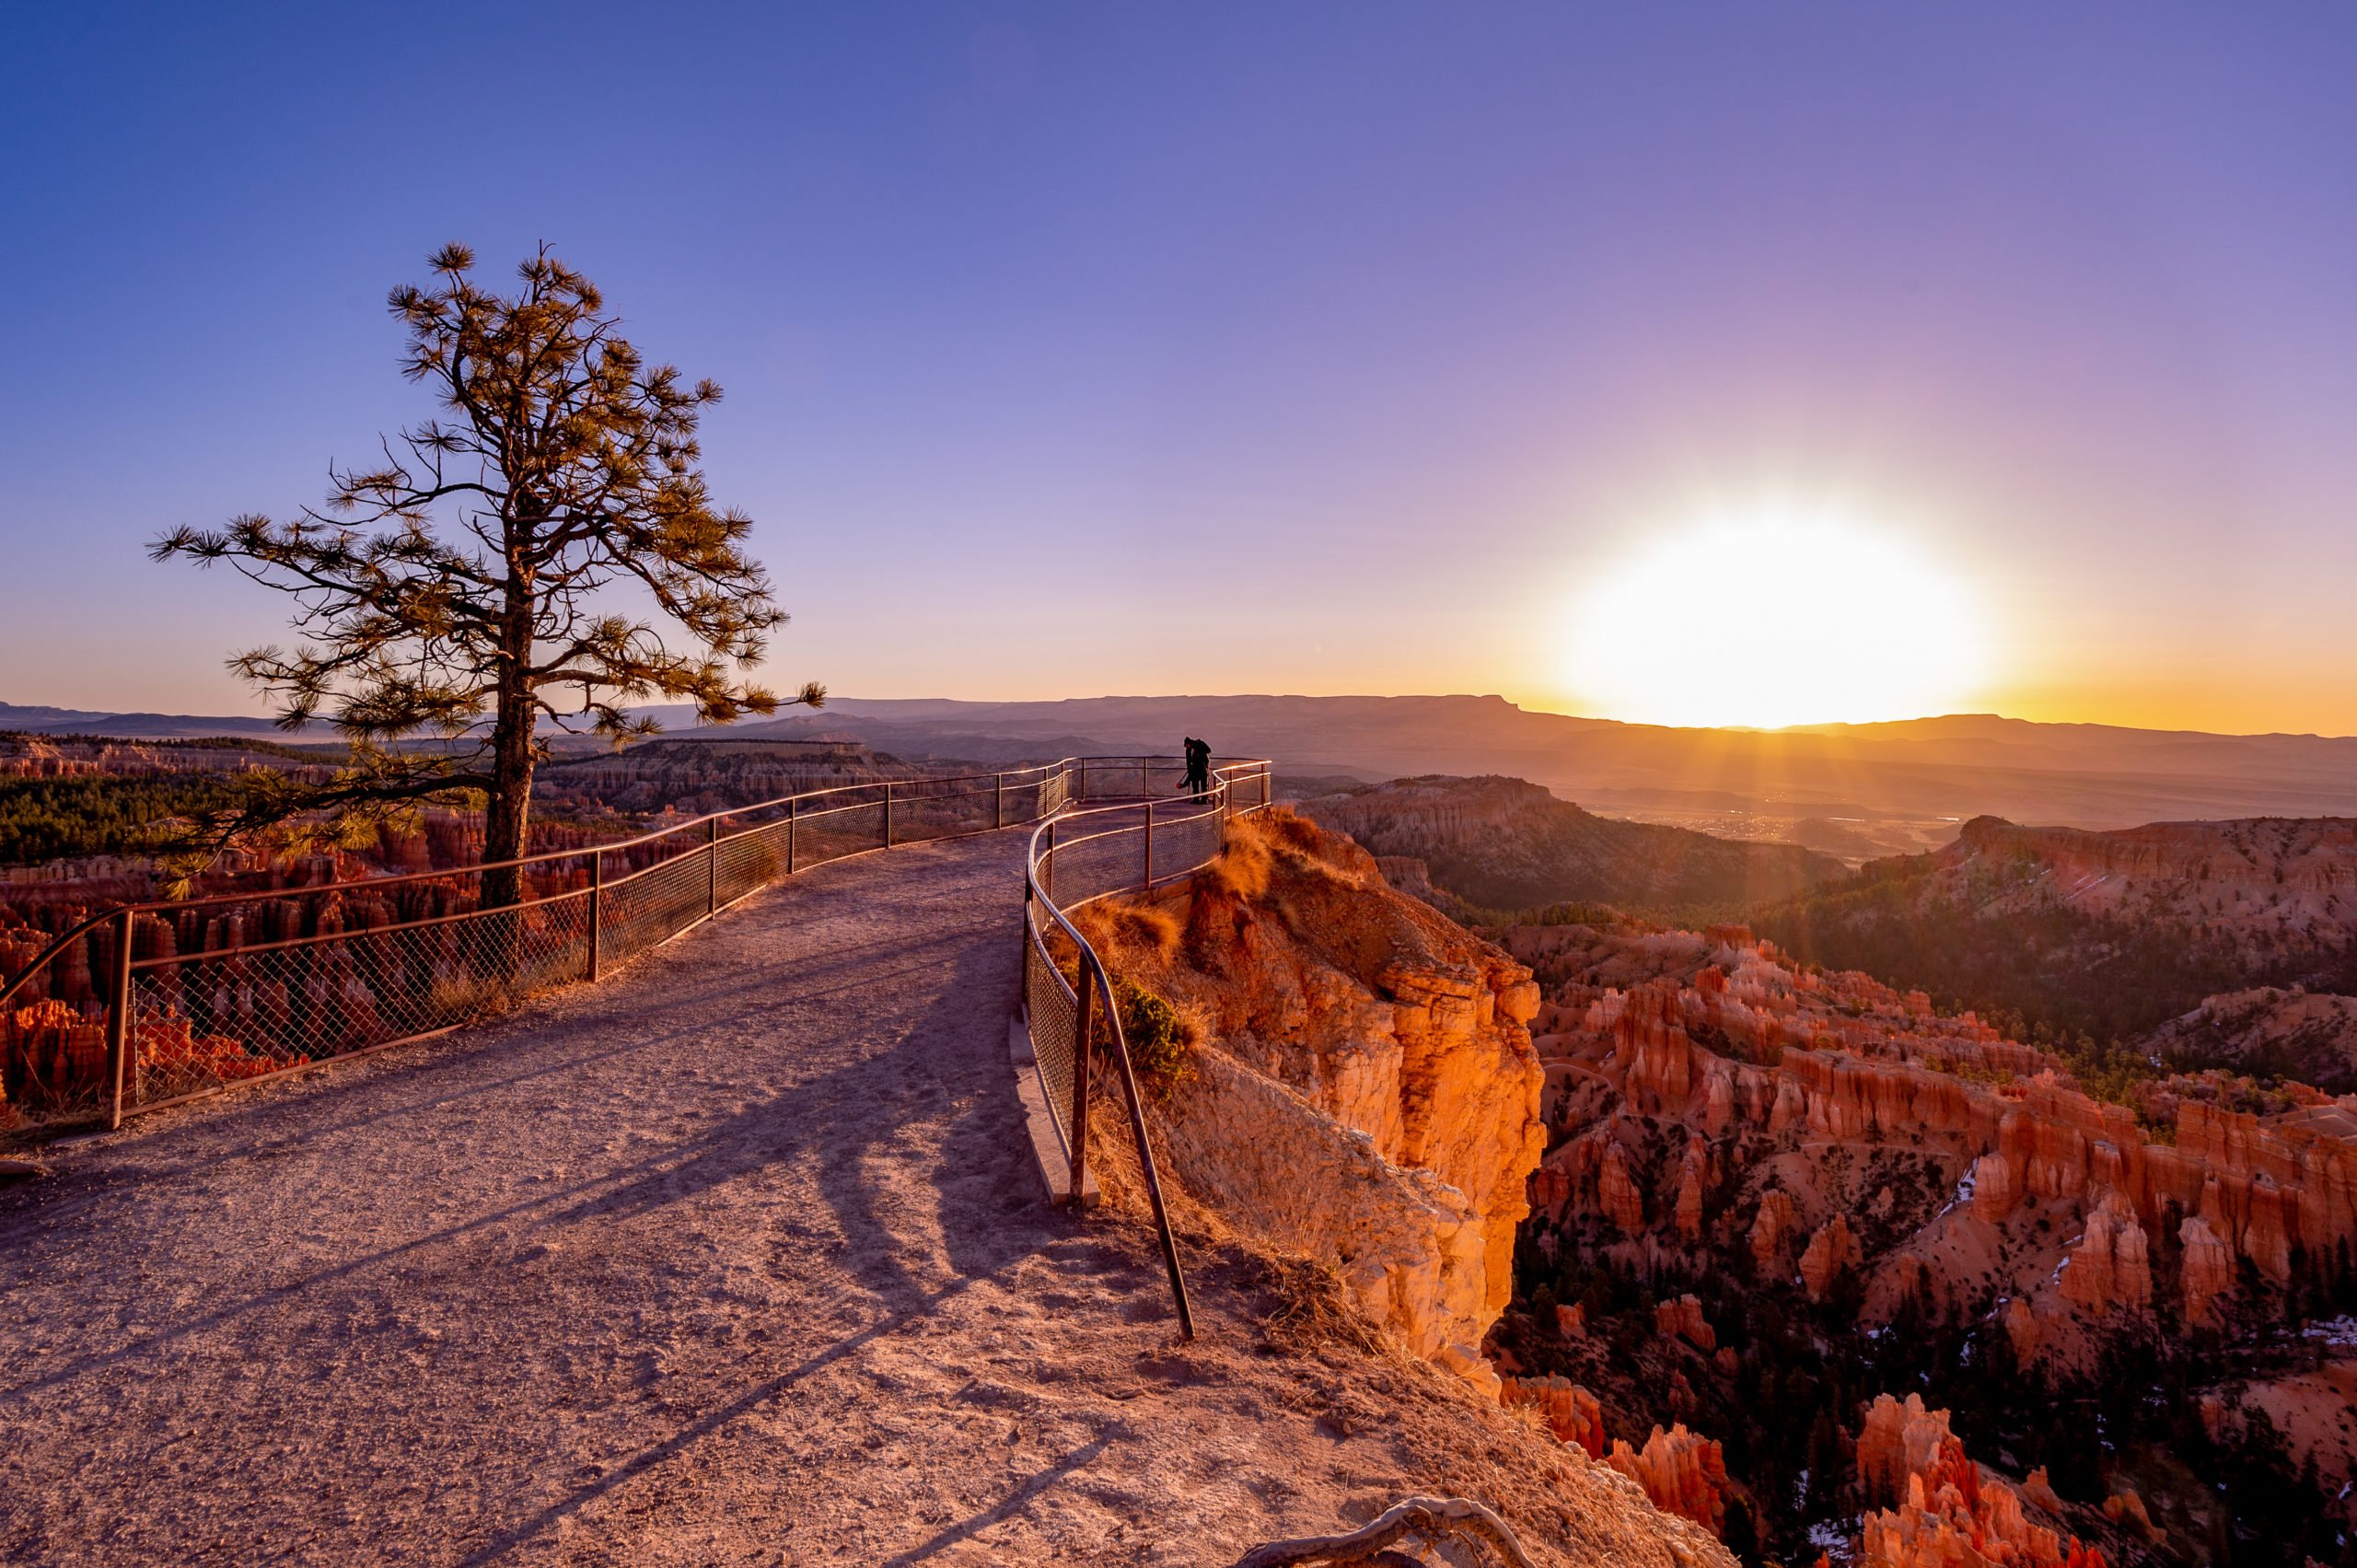
     There is a railing around the upper viewpoint so bring a tall tripod, or you’ll need to hold your camera to avoid the railing in your shots.  

    You are at a higher elevation, so the weather is typically colder than you would expect before the sun comes up. I visited in April, and there was still snow in spots along the trail. The Rim Trail to Bryce Point was also closed due to snow.  

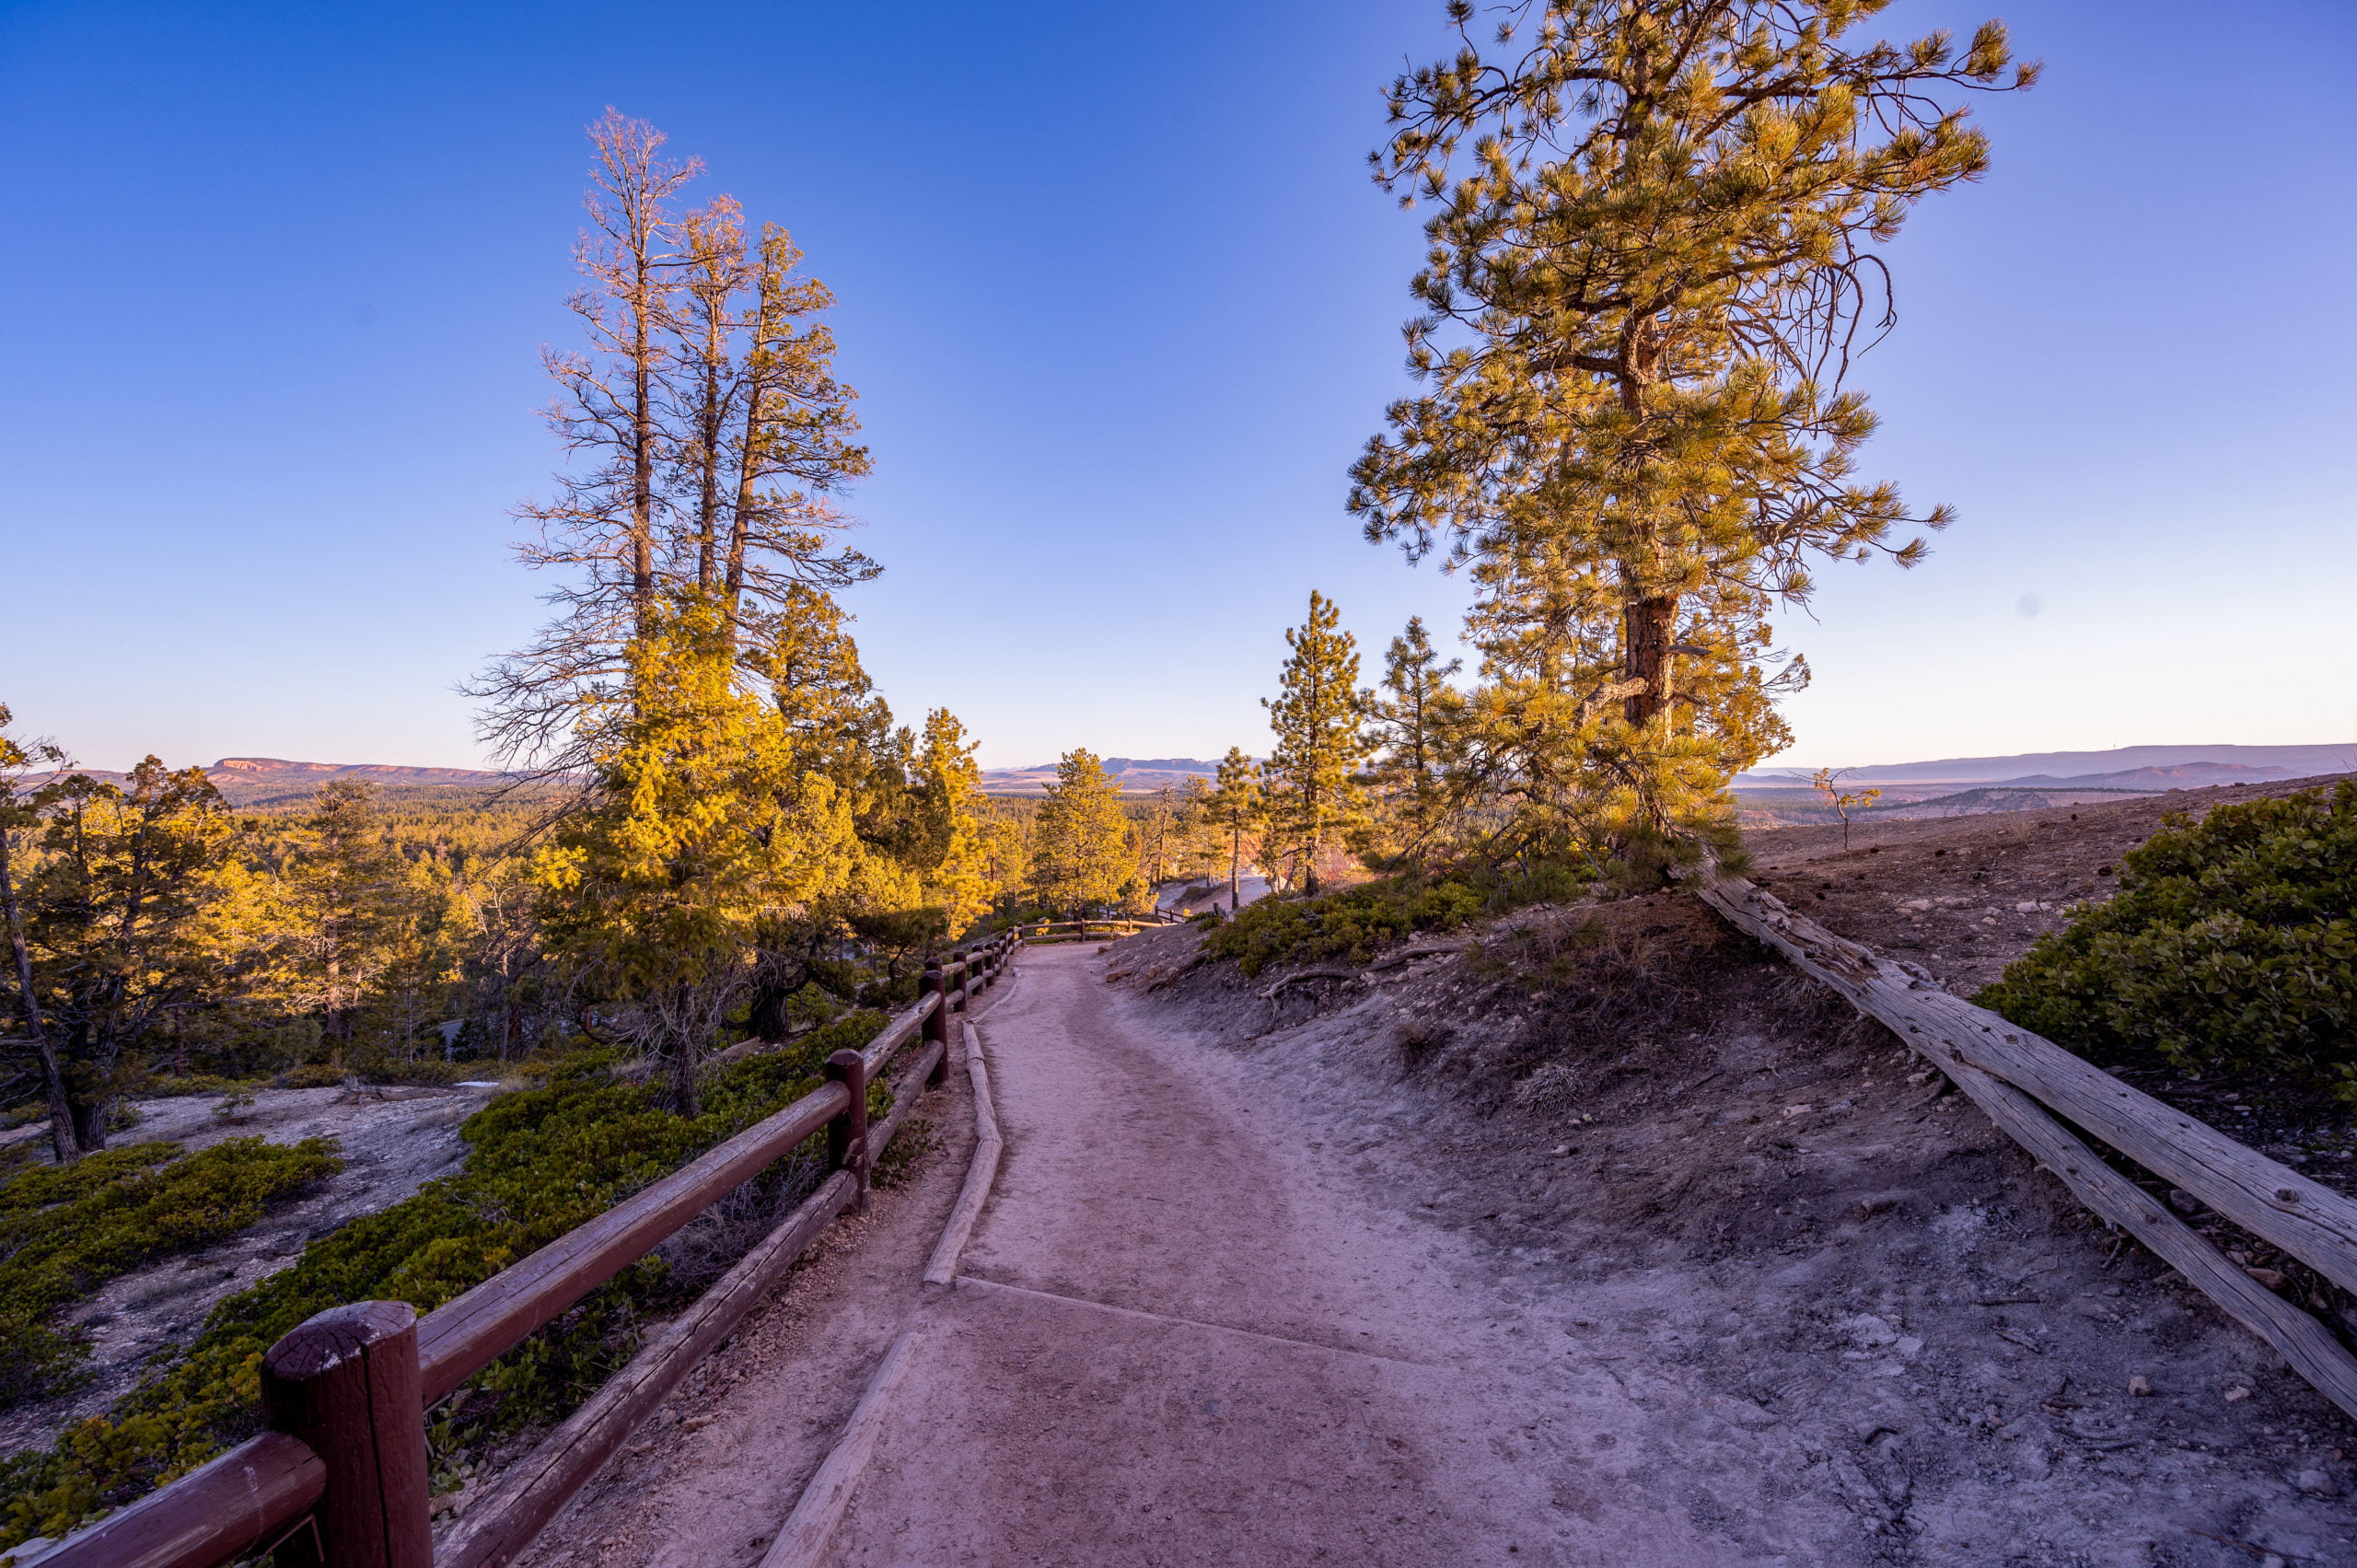
    If, for some reason, you arrive and upper Inspiration Point is crowded, then walk back down the trail for a slightly lower vantage.  There is plenty of room along this trail for you to find a spot to watch the sunrise.  Be careful, though, as only the designated viewpoint areas have a railing. Keep small kids away from the canyon edge and watch your step, especially in the dark.

    I think this is fairly well-known, but no drones are allowed in any of the U.S. National Parks. However, while I visited, someone put a drone in the air at Inspiration Point, and a ranger was there within 5-minutes.  I have no idea how the ranger knew about it so quickly, but they did.  I think they only gave the person a warning, but I assume you could be fined, so I wouldn’t take any chances.

    Sunrise at Bryce Canyon

    Photography Tips

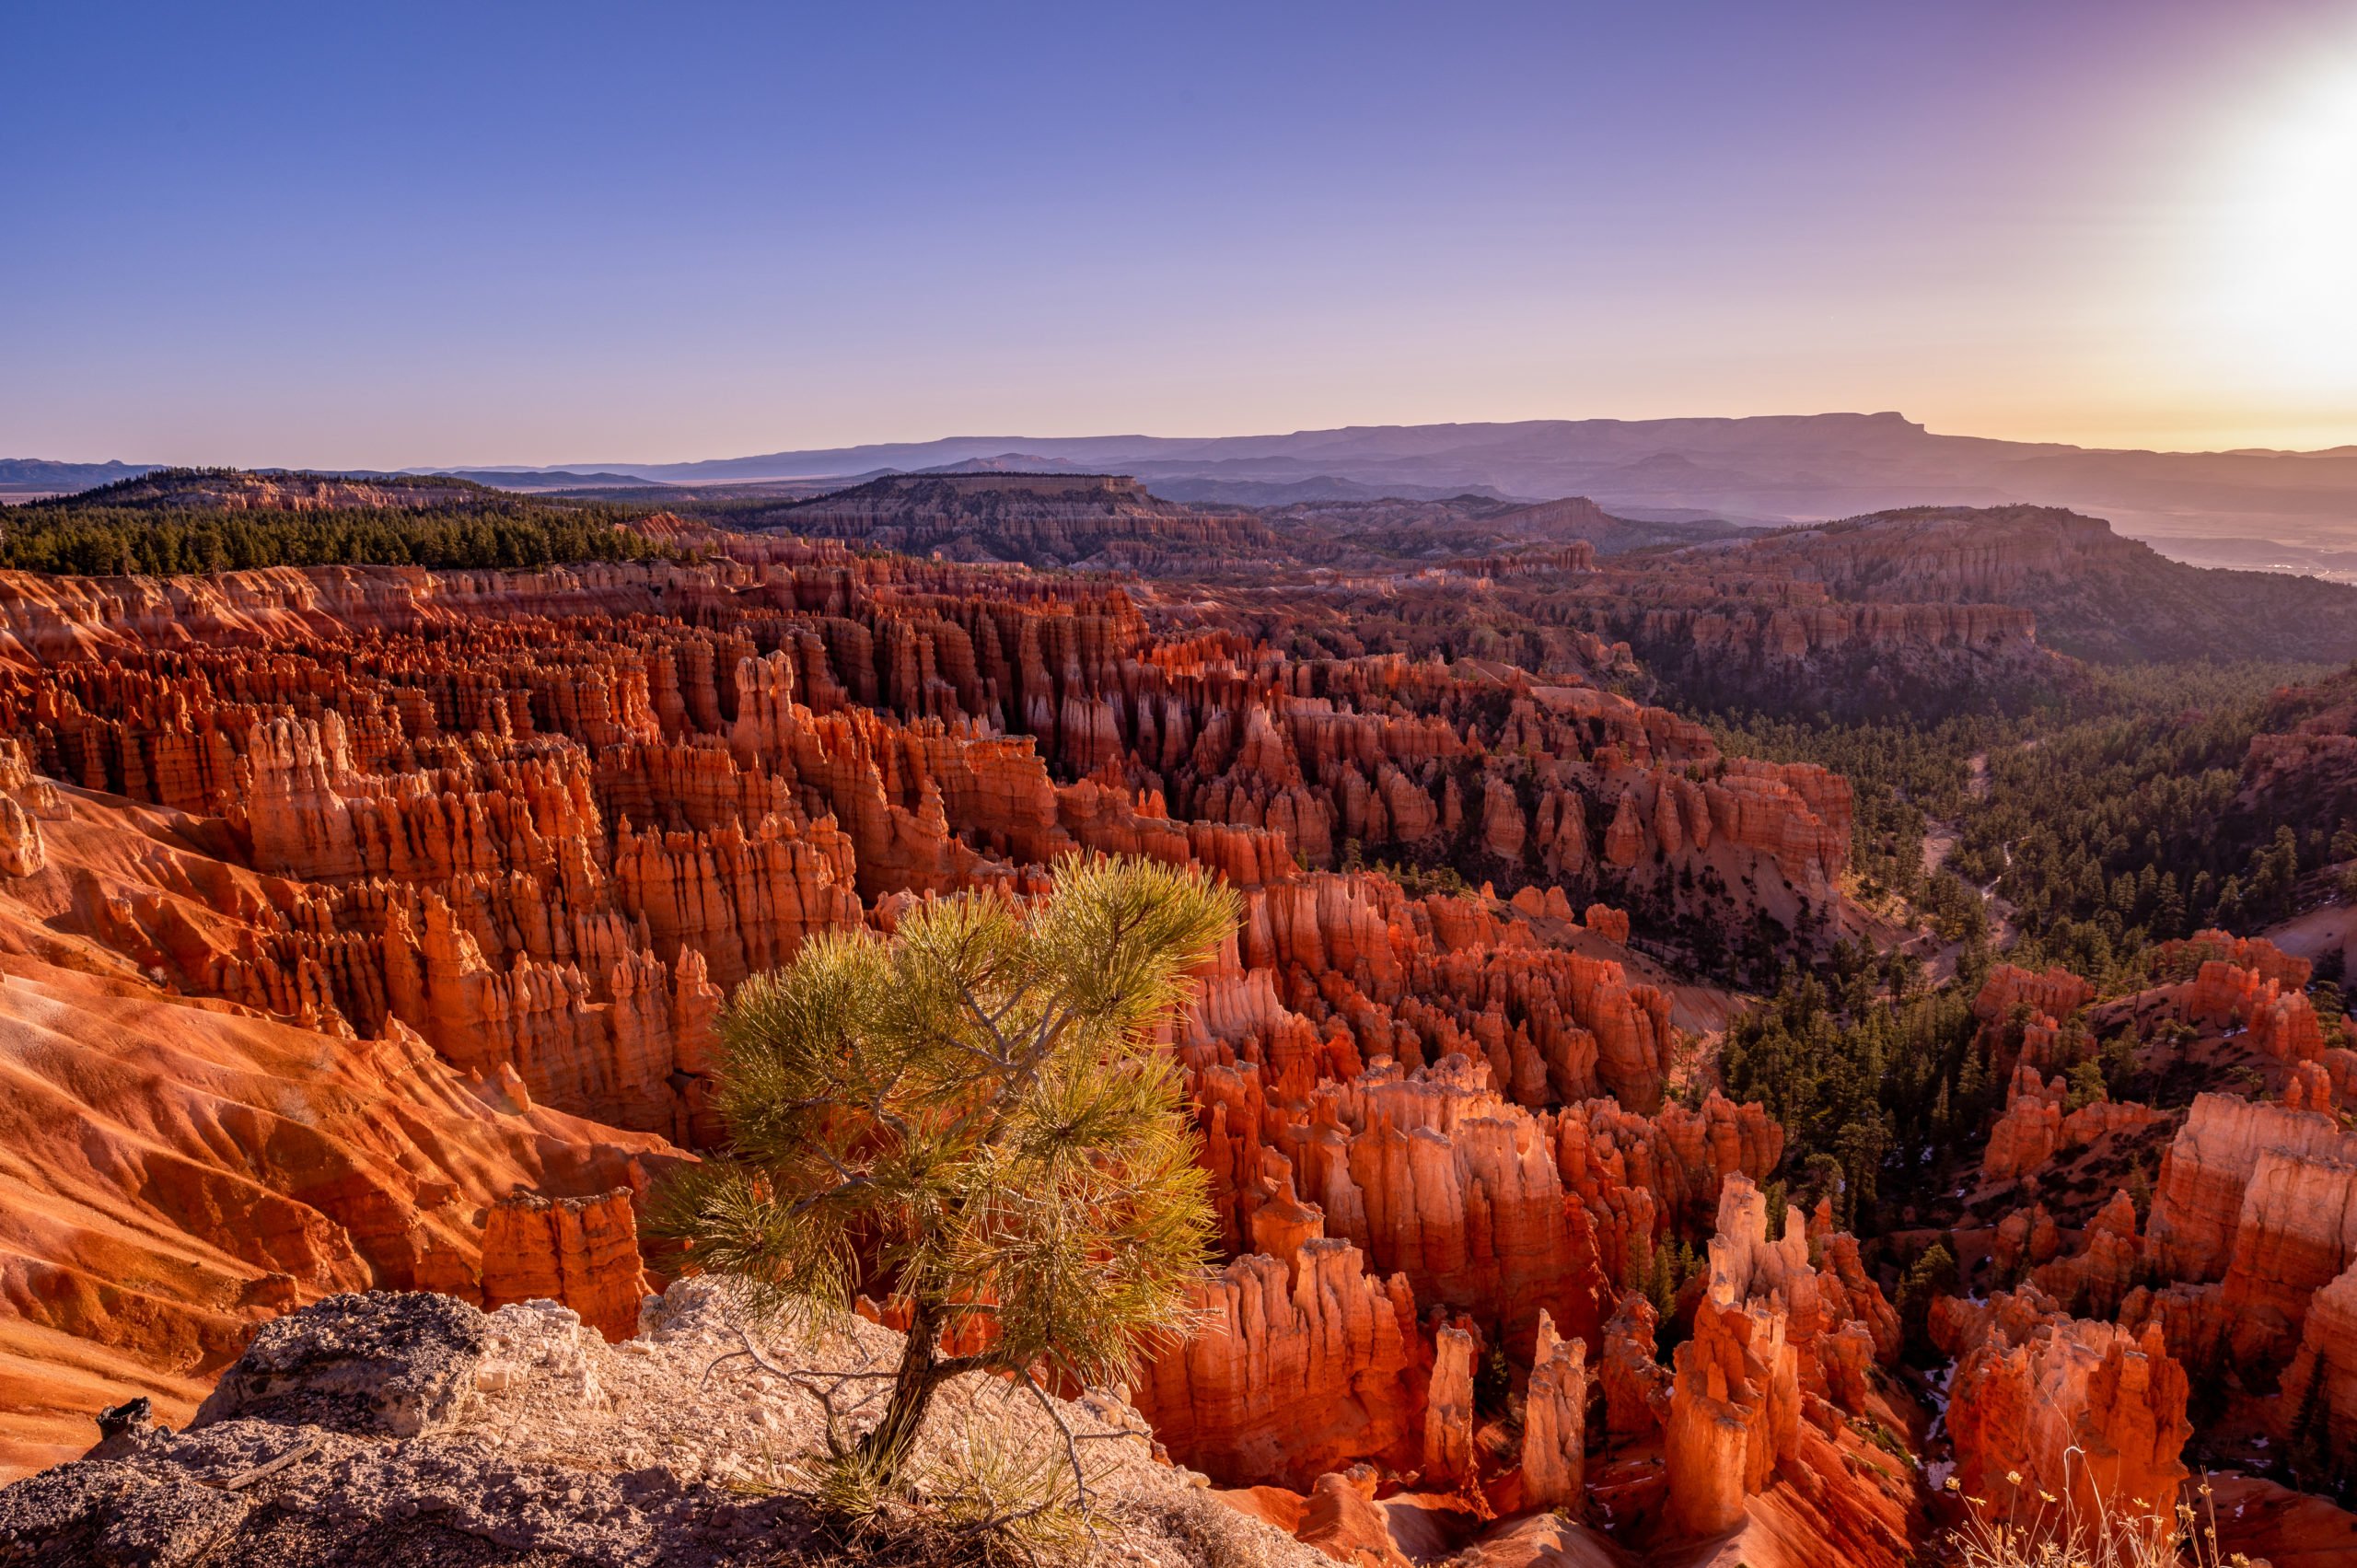
    Photograph it from various vantage points and angles.  I didn’t get a chance to scout out Inspiration Point the day before. Instead, I went directly to the upper viewpoint to set up my tripod for the sunrise.  Then I later photographed it from the midpoint and lower viewpoint.  Walk around the upper viewpoint and try some views on both the left and right sides of Inspiration Point.  Use trees and vegetation to create depth and interest.  

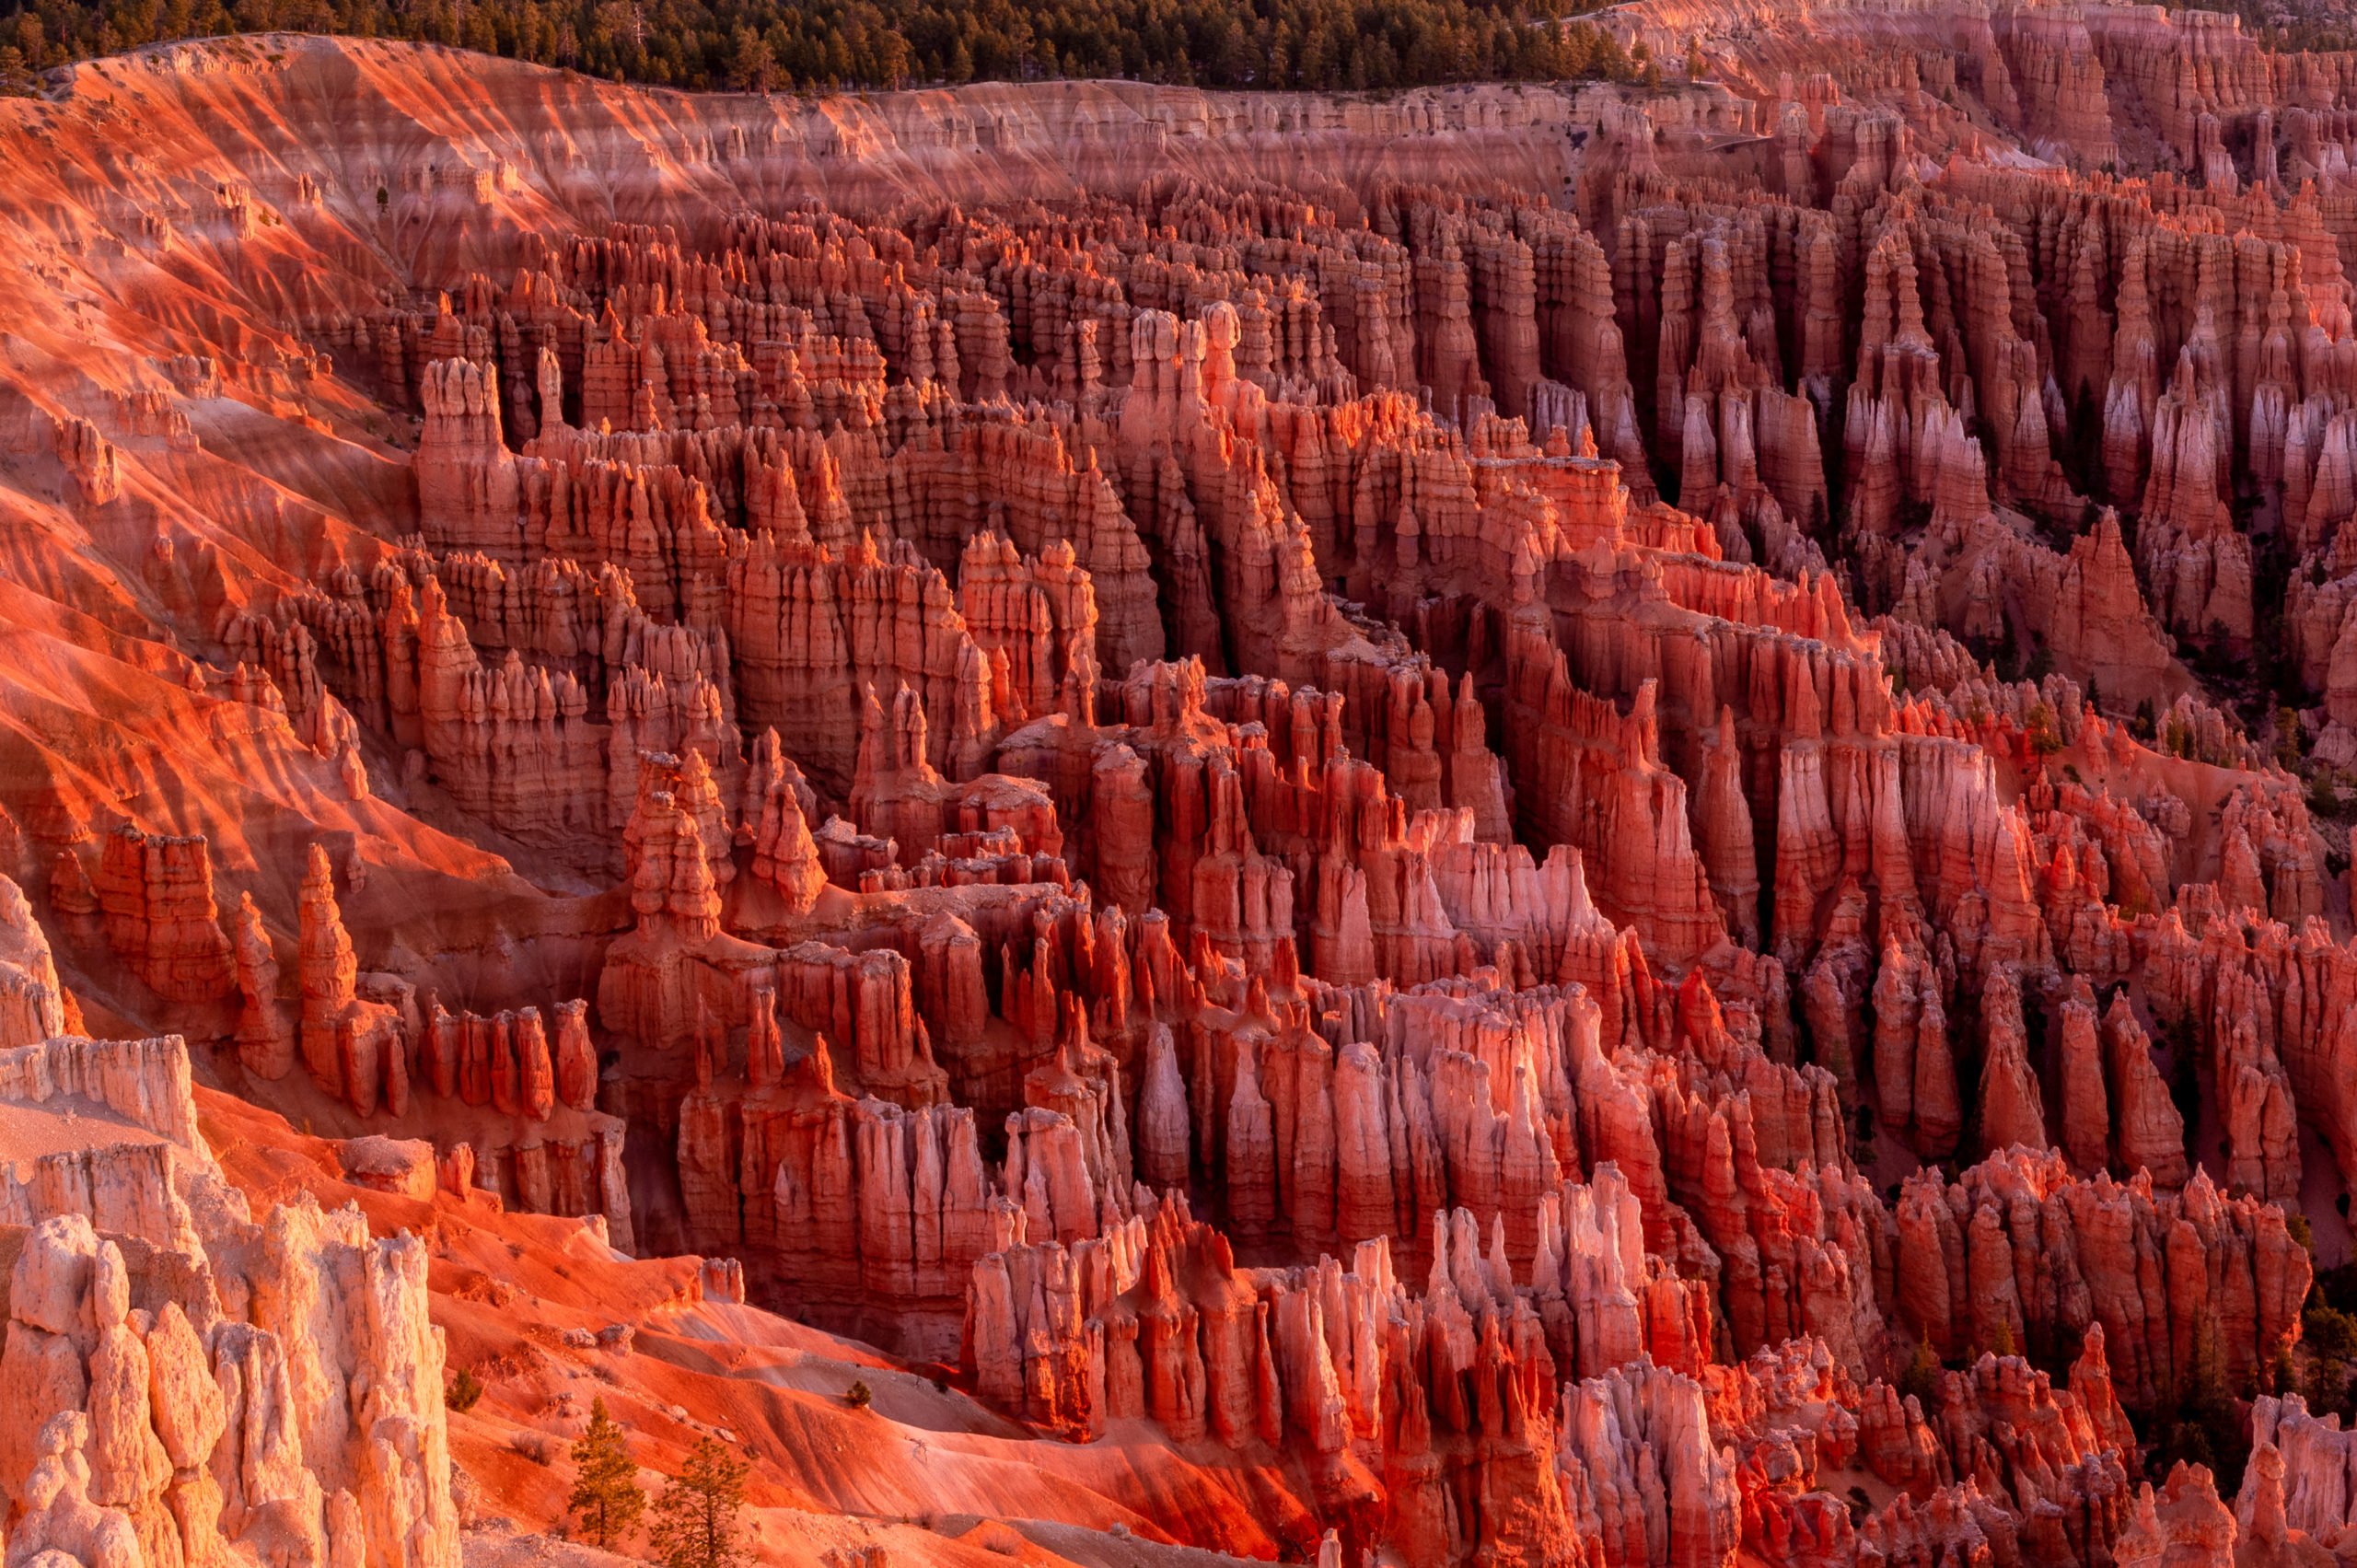
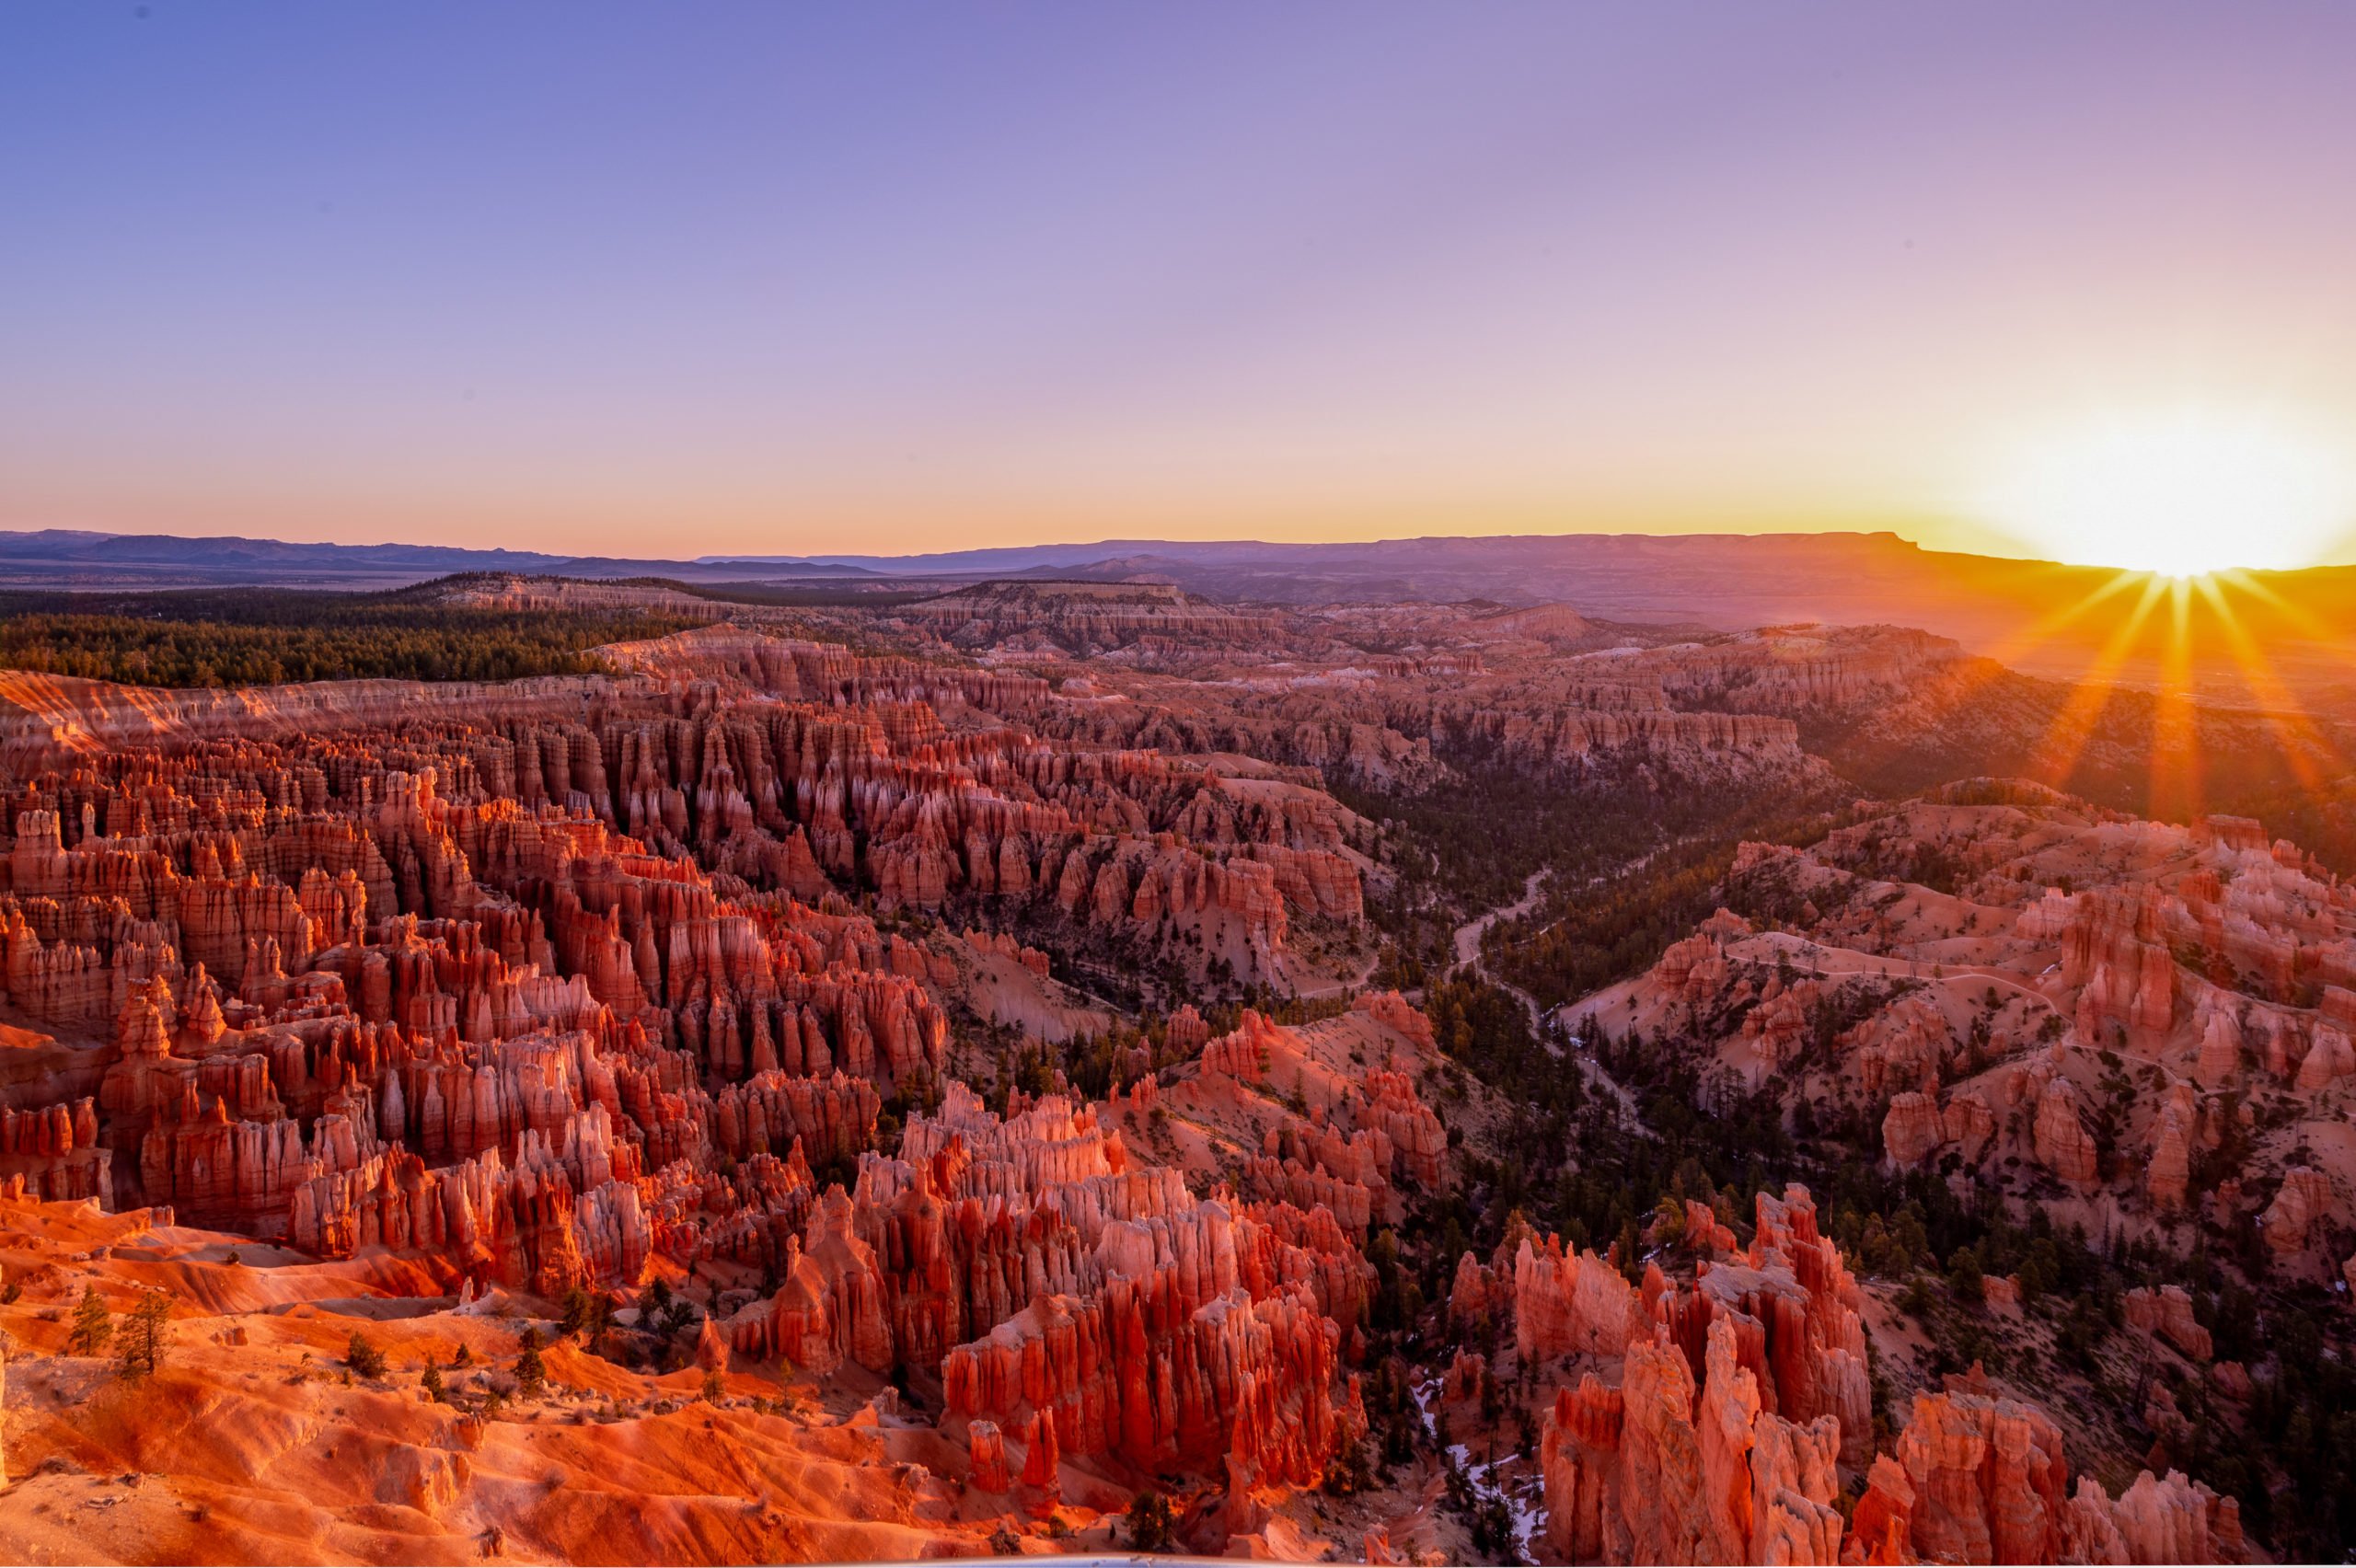
    Try shots from up high and down low.  Also, stick around a little while after the sunrise as the glow in the canyon gets brighter, and the colors really start to come out. 

    More Great Options for Watching the Sunrise at Bryce Canyon

    My other top choices for watching the sunrise at Bryce Canyon are Sunrise Point & Bryce Point. Both of these have gorgeous views! I especially liked the view from Bryce Point. Partly I think, because the viewing platform jutted out, and it felt like I was suspended over the canyon.  The trail to Bryce Point is completely paved, so although a little steep in spots, it is wheelchair accessible.  There are also restrooms at both Sunrise Point and Bryce Point.  Sunrise Point is popular for a good reason. It gives you sweeping views over the Queen’s Garden trail and canyon and makes a great (and popular) choice for photographing the sunrise at Bryce Canyon. 

    What to do After Watching the Sunrise

    After watching the sunrise at Bryce Canyon, you are ready to hike into the canyon and see it up close!  The morning light (and temperatures) make it the perfect time to hit the trails.  If you only have time for one hike in Bryce Canyon, I recommend the Navajo Loop Trail & Peekaboo Loop combination hike.  My hubby and I loved this hike, and it was the perfect way to see the canyon up close after viewing it from above at Inspiration Point.  It really added to the experience to see it from a birds-eye-view first to the ground level.

  • Mesa Arch at Sunrise: A Photographer’s Experience

    Mesa Arch is a pothole arch in Canyonlands National Park.  Although the hike out to the arch is relatively uninteresting, the arch and the view at the overlook make for a big payoff with minimal effort.  And if you decide to hike out to Mesa Arch to see the sunrise, you will be doubly rewarded!  Sunrise at Mesa Arch is an unforgettable experience worthy of the loss of sleep.

    My Sunrise Experience at Mesa Arch

    My hubby and I stayed at a motel in Moab, Utah. Moab is a common starting point for many of the area’s attractions, such as Arches National Park, Canyonlands National Park, Dead Horse Point State Park, and many other hiking and recreational opportunities.  It’s about a 45-minute drive from Moab to the Mesa Arch trailhead, and I wanted to be at Mesa Arch at least an hour before sunrise.

    This meant getting up at 4 a.m.!  I’m fine with getting up at 6 a.m., I do that almost every day, but for some reason, any time before that just seems wrong.  However, I knew that photographing Mesa Arch at sunrise was a popular activity, and I would not be alone.  If I had any hope of getting a spot in front of the arch, I needed to sacrifice a little sleep to make it happen.  My hubby is a good sport and was willing to sacrifice his sleep as well.

    As we made our way up the winding road to Canyonlands National Park, we had one vehicle in front of us, and soon I had another behind.  All I could think about was that I had to get there to get a spot!  I had read other articles that talked about spots filling up even 2 hours before, but I was not ready to get up at 3, so I hoped (and prayed) that 1 hour before would be enough.

    We arrived in the dark at the parking lot for the trailhead, with one other car following close behind.  There were already a few cars in the lot, so I quickly grabbed my gear, put on my headlamp, and headed down the trail, walking as quickly as possible. 

    Hiking to Mesa Arch

    The hike to Mesa Arch is only .50 miles (out and back), and so it takes around 15 minutes to hike to the arch.  We visited the day before, so I could walk the trail in the daylight and get a feel for the area before visiting in the dark.  I recommend you do this if you plan to photograph the sunrise.  Not necessary, but helpful.

    About the Hike:

    • Length: 0.50 miles (loop option or out and back)
    • Time to hike to the arch: ~ 15-20 minutes
    • Trail: First half of the trail is a wide dirt trail, then turns into more uneven terrain with some rock and stairs. Look for the cairns for help staying on the trail.
    • Difficulty: Easy

    This hike is good for all ages, but it is not wheelchair accessible. Most people (including kids) can hike this trail with relative ease. 

    Important to Know: 

    Mesa Arch is set on the edge of an overlook that drops down 1200′ into the canyon below.  Please keep your kids close by and be careful when getting close to the arch, as it is a long way down on the other side!

    1-Hour Before Sunrise

    I reached Mesa Arch a little over an hour before sunrise.  There were only two other photographers there. I was so relieved!  Since they were first, I asked them where they were setting up, and then I chose a spot to the left of them.  However, before I really had time to set up my tripod, a fourth photographer arrived and placed her tripod right next to mine.  

    PHOTOGRAPHY TIP

    Set up your tripod as soon as you get there, get your legs placed as wide as you need them because once other photographers arrive you may not have the room to change this. Also, the ground in front of Mesa Arch is rocky and uneven, so you’ll want to adjust your tripod legs to allow you the freedom to move your tripod height up and down as desired. All this needs to be done before you are crowded out by other photographers. 

    This was the main mistake I made, and I was somewhat restricted with my shots because of it.  If this happens to you, you can always take your camera off the tripod and try some shots that way. If they don’t turn out, you can delete them, but you’ll most likely get some keepers. 

    Also, after you get your shot from the front of Mesa Arch, try moving around and capturing it from various angles. You might be surprised at which photos turn out to be your favorites.

    45-Minutes to Sunrise

    About 15-minutes after I arrived, there were around 10 photographers, with most of the prime spots filling up fast.  One latecomer had the tenacity to ask if he could squeeze in between the two photographers who had been at Mesa Arch when I arrived.  They graciously allowed him to, but I wouldn’t expect this.  For most photographers, if they’ve made the effort (and sacrifice of sleep and coffee) to get there and get a spot, and you slept in, they’re going to be pretty territorial and expect you to find your own place on the edges.

    While we were waiting, the photographer next to me, who was from Indiana, told me about a scene a friend of his observed during his visit to Mesa Arch.  He said two guys actually took to fighting right in front of the arch because one of them wanted a spot in front. Let’s not forget that there’s a 1200 ft cliff on the other side, either! So, yeah, I guess things can get a bit ugly. Personally, I blame it on a lack of sleep and coffee.

    30-minutes to Sunrise

    With only 30-minutes to sunrise, all the main spots in front of Mesa Arch were filled shoulder to shoulder with photographers.   Then a row started forming behind me.  When the sun did finally start coming up, I’d be so busy taking photos I wouldn’t realize I had people behind me leaning over me. I raised up only to bump into the person behind me.

    Honestly, the crowd is part of the experience. Everyone had to get up early to get there before sunrise, which means we’re all a tiny bit crazy, and we all love seeing beautiful displays of nature.

    Go-Time: Sunrise at Mesa Arch

    Things quiet down a little bit as the sun starts to peek over the La Sal Mountains. Everyone is waiting with anticipation as it finally breaks from behind the mountain range and casts its warm glow over the canyons below.  The sun reflects off Mesa Arch, first starting as a subtle glow and then intensifying into a beautiful bright orange arc of glowing rock.  The layers of shadows in the White Rim canyon below are a stunning backdrop to the glowing Mesa Arch.

    The sound of shutters fills the air as if the paparazzi had just spotted some celebrity. Every photographer furiously tries to capture this beautiful sight.  People with cell phones peer over the photographers’ shoulders to capture this moment, too; others walk along the fringes trying not to get in the view of the cameras. Some just came to see it. They stand back in awe, with no “device” in hand. They stand there capturing it with their eyes and mind.  It was such a beautiful experience!

    10-Minutes After Sunrise

    I look around, and almost every photographer I had just stood shoulder to shoulder with has vanished.  They packed up and headed off, most likely for coffee. However, I stay. I love golden hour, and the light and shadows in the canyon are too good to pass up. 

    I came to photograph Mesa Arch at sunrise, but here’s a little tip: the glow remains even after sunrise, and the lighting that bathes the canyon is incredible!  So, if you really, really can’t make it for the actual sunrise, then get here as soon after as possible, and you’ll enjoy a relatively un-crowded view and still get to see some gorgeous light.

    What to Bring When Visiting Mesa Arch for Sunrise:

    • Pack layers. Depending on what time of year it is, it might be fairly cold in the morning.  We were there in April, and I wore gloves, a warm hat, and a sweatshirt and jacket.  By the time we left, around 8:00 a.m. I no longer needed the gloves, hat, or jacket.
    • Water. Even though this is a short hike, it’s still a good idea to bring a bottle of water and a snack.
    • Trekking Poles. If you have any issues with uneven ground, these are a good idea. Also, in a pinch, a trekking pole can be used as a monopod for your camera.
    • Headlamp. Very useful when arriving in the dark. A headlamp with a red light is also a nice plus if you plan to arrive to photograph at twilight or plan to do any night photography.

    Photographers:

    • Camera
    • Lenses (A wide lens is needed as everyone stands relatively close to the arch. I shot with a 14-30mm lens.)
    • Extra Batteries
    • Tripod
    • Dust cleaner for your lens. It gets windy here and dusty. Learn from my mistake and dust off the front of your lens mid-shooting to keep it clear of dust particles on your images.
    • Shutter Release Cable (optional)

    The Night Before Your Hike to Mesa Arch

    Make sure to charge all your batteries the night before and put a fully charged battery in your camera before going to sleep.  Pack your bag with all your essentials and layout your warm clothes and things you’ll want to bring.  If you’re like me, your brain doesn’t function at optimal levels that early in the morning.  So having it all ready to go the night before really helps!

    Getting Your Coffee Fix On the Go

    We brewed a quick cup of hot coffee in the hotel for the drive to Mesa Arch, which was the bare minimum to get me by.  I also pack a large bottle of cold brew in our cooler, which I drank after photographing the sunrise.  Having cold brew with me when I’m on a road trip is a must! 

    Coffee Tip: Always keep a bottle of cold brew in your cooler.

    Because I’m often getting up early, I don’t always want to take the time to heat water (if I’m camping) and brew a cup of coffee. With cold brew, I can get my caffeine fix quickly before anyone else gets hurt. Really it’s a safety measure for anyone traveling with me.  

    I love using oat milk or almond milk when I travel as it doesn’t need refrigerated until after opening.  I make quick cold brew lattes like this vanilla oat milk cold brew using bottled cold brews, it takes one minute to make, and I’m ready to go!

    Getting to Mesa Arch in Canyonlands National Park

    Mesa Arch is located in Canyonlands’ Islands in the Sky section of the park, a 30-minute drive from Moab, Utah.

    From Moab  

    Take US-191 N for about 11 miles.  Then turn left onto UT-313 W. Continue on this road all the way into Canyonlands National Park and until you see signs for the Mesa Arch parking lot and trailhead (about 20 miles). 

    Parking

    The parking lot is not very big, so during the day, it fills up quickly.  However, I noticed that even during busy times, there seems to be a regular coming and going of vehicles because it is such a short hike.  If it is full and there don’t seem to be any spots opening up, then continue driving toward the Grand View Point Overlook and stop at Mesa Arch on your way back.

    Tip: There is a great overlook across the street from the visitor center and there are water filling stations at the visitor center as well. Make sure to stop here!

    With Extra Time

    The Islands in the Sky portion of Canyonlands National Park is really a beautiful place with gorgeous views from above.  It also has the Shafer Canyon Road, a 4×4 road you can drive into the canyon, but it’s recommended you have a high clearance full off-road vehicle or motorcycle for this.  

    With extra time in the area, make sure to also visit Arches National Park and Dead Horse State Park.  This is a beautiful area of Utah that you can easily spend a week (or more) exploring. However, even with only 2-4 days, you can see a good portion of these three parks.

    Final Thoughts Regarding Mesa Arch

    I know getting up early is not fun for most of us, but Mesa Arch at sunrise really is an incredible experience.  For me, it wasn’t just the gorgeous sunrise and observing the glow of the sun on the arch. It was the crowd of people experiencing it with me, the anticipation, and the hike in the dark.  I chatted with people from all over the country, Indiana, New York, Florida, and even a fellow Seattlite was two shoulders down from me.  It was a way to connect with fellow humans and with nature.  

    It’s also such an easy hike, and it provides gorgeous views that often are only found on hikes that take miles of uphill climbing to reach.  Again, if you can’t make it there by sunrise, then I highly recommend you try coming as soon after sunrise as possible.  The lighting for the hour and even two hours after is beautiful!  

    Even if you arrive at Canyonlands National Park later in the day and are unable to visit for sunrise, you’ll still want to visit Mesa Arch. It is an interesting natural feature, and the overlook there offers spectacular views.

    Have you visited Canyonlands National Park?  If so, I’d love to hear about your experience.  If not, I hope you’ll add it to your travel bucket list.

    Happy Exploring!

  • A Beginner’s Guide to Photographing Waterfalls

    I love waterfalls! I’m not sure what it is about water cascading down rocks and over cliffs, but I can’t seem to get enough of it! Thankfully, here in the Pacific Northwest, we have no shortage of waterfalls.  Snoqualmie Falls and Franklin Falls are a couple of my favorites, just a short drive from Seattle.  

    I especially love hiking to see waterfalls. The waterfalls are my reward at the end of the trail.  You know, sort of like the pot of gold at the end of the rainbow, but without the actual gold.  And speaking of rainbows, waterfalls are great places to see those too!

    As a photographer, I enjoy capturing a waterfall’s beauty to share with others who might not get a chance to see it in person, or better yet, to inspire others to see it themselves! Waterfall photography is a skill I am still learning, but I wanted to pass along some tips I found especially useful when just beginning. Use the tips in this post as a foundation for developing your skills, and most of all, have fun!

    What Kind of Camera Do You Need

    You can use any camera to photograph waterfalls. However, if your camera doesn’t allow you to adjust your settings manually, you will be limited in the type of photograph you can get. 

    So in this post, I’m going to assume you have a DSLR camera, mirrorless camera, or some type of digital camera that allows you to manually change your ISO setting, aperture, and shutter speed.  

    I know some smartphones allow you to adjust some of these settings, so even if all you have is a smartphone or point-and-shoot camera, you can still apply many of these tips using the camera you currently own. I think getting out and using what you have now is better than not getting out at all.

    What Kind of Lens Should You Use

    I recommend you start with a wide-angle lens.  I like to use my 24mm to 70mm zoom lens as it allows me a little flexibility on zooming in and cropping areas of my scene to achieve a different look.  

    If you have fixed lenses, then bring a wide-angle lens and also a telephoto lens and use both to see what you can capture with each.  While it may seem like you should always try to photograph the entire waterfall, often you will find by zooming in or using a telephoto lens you can highlight one unique area of the waterfall that might be overlooked with a wide-angle shot.

    Remember, you should have fun when you’re out photographing the world. Develop your eye, learn new techniques, but always have fun while doing it.

    Additional Gear to Bring

    Other gear you might want to bring would be a backpack for your camera and additional lenses, plus any snacks or water you might want.  Another item that can be useful depending on the temperature you’re shooting in is a pair of gloves. Preferably ones that allow you to touch your smart phone or camera screen without removing them. I’ll also go over other gear you’ll want, such as filters, lens cloth, and waterproof clothing in the tips below.

    12 Tips for Photographing Waterfalls

    #1 Bring a Sturdy Tripod

    A good tripod is necessary for photographing waterfalls, especially if you want to try to blur the water’s movement, rather than stop it. When using a tripod, you can slow your shutter speed down and capture the silky motion of the cascading water.

    One other tip regarding the use of a tripod is to be mindful of where you place it.  If you put it in a stream or at the edge of the waterfall’s flow, the vibrations from the water flowing around your tripod’s legs can cause blurry images.  So keep that in mind when choosing where to set up your shot.

    #2 Wear Water-Resistant Clothing

    You will get wet while photographing waterfalls, so make sure to wear clothing that is water-resistant or waterproof. A good rain jacket and waterproof shoes will go along way in keeping you comfortable while photographing waterfalls.

    #3 Pack a Lens Cloth

    This one is also essential to remember to bring. Often, you will be close to the waterfalls you are photographing, and a lens cloth will be a lifesaver! Trust me, when your lens is covered in spray from the waterfall, it makes it hard to take that photo!

    You don’t want to scratch your lens either by using your shirt, so it’s nice to have a lens cloth tucked in your pocket so you can easily pull it out whenever you need to wipe your lens off.

    #4 Set Your ISO to the Lowest Setting

    To capture the flow of water and not have the highlights in the water completely blown out, you need to set your ISO at the lowest setting on your camera.  This will probably be around ISO 100, depending on your camera’s settings. You may even want to underdevelop your photos a little and then correct the exposure in post-processing to get the best results.

    Where you might want a higher ISO is if you’re working in low lighting conditions, and you’re trying to freeze the water’s motion.  Then you might want to use ISO 200 or ISO 400.

    #5 Set Your Aperture to Capture the Details

    In addition to setting your ISO to the lowest setting, you’ll also want a smaller aperture (also known as an f-stop). The aperture controls the amount of light reaching your camera’s sensor.  A small aperture allows less light in but will enable you to capture more of the detail of your waterfall and surrounding scenery.  Whereas, the opposite is true when using a wide aperture. A wide aperture allows more light in but has less of the scene in focus.

    The higher the f-stop number (f/22), the smaller the opening and the least amount of light reaching the sensor.  The lower the aperture or f-stop (f/2.8), the larger the opening and the more light entering your camera’s sensor.  I suggest playing around with f-stops starting at f/11 through f/22 (or up to the highest f-stop your camera allows). 

    Sometimes you may want to have a wider aperture like an f/5.6 depending on what part of the scene you want in focus(or out of focus) or if you need to allow more light in to freeze the water’s motion. Other times, to achieve a longer exposure time (slow shutter speed), you’ll need a smaller aperture to let in less light. The more you experiment with your camera’s settings, the more you’ll learn and improve your photography skills.

    #6 Setting Your Shutter Speed

    You can adjust the shutter speed to create different effects when photographing waterfalls. You can freeze the motion of the water with higher shutter speeds, or you can slow it down and create a blurred, silky movement with longer exposure times.  I recommend trying different shutter speeds to see which effect you prefer. There is no perfect shutter speed or aperture; it all depends on the look you want.

    Experiment with your settings to see which effect you like the best.  If, for example, you want to try freezing the motion of the water than start at a shutter speed of 1/200, this will partially freeze the movement, then try 1/500 to freeze the water’s action completely.  You may need to use a larger aperture and increase your ISO to achieve this depending on the light in which you’re shooting.

    #7 Bring the Right Filters

    Two types of filters are handy to have when photographing waterfalls, polarizing filters, and a neutral density (ND) filter. The polarizing filter is useful when you’ve got a pool of water below your waterfall, and you want to capture what’s beneath the surface.  The polarizing filter will reduce the glare and reflections on the water’s surface.

    ND filters reduce the amount of light coming into the camera’s sensor.  They make your camera think it’s darker than it is. You can purchase them in varying strengths depending on how much light you want to block. Although not a requirement for photographing waterfalls, they help you achieve the lower shutter speeds you need to capture the motion of the waterfall without blowing out the highlights. 

    If you think you’ll photograph waterfalls regularly, then consider purchasing one. All of the images I’ve shown in this article were shot without an ND filter.  However, I also shot early in the morning, in a wooded landscape shaded from the sun. This is a good set to get started with, however if you’re looking for something a little less expensive you can always buy one to start with and then add on from there.  Make sure you purchase the correct filter size to match your lens size.

    You would not be able to achieve the low shutter speeds and retain the details in the waterfall if this were a bright sunny scene.  The highlights will be completely blown out.  ND filters are necessary when shooting waterfalls on a bright sunny day if you wish to slow the water’s motion.

    #8 Get a Shutter Release Cord

    Another helpful tool is a remote shutter release cord. They are useful when working with very low shutter speeds, as any amount of movement can blur your image. So by using a shutter release cord, you reduce the risk of camera shake when pressing down the shutter release button.  This is the one I use with my Nikon and ask you can see they’re relatively inexpensive.

    All of the images in this post were taken without a shutter release cord. So, you can certainly photograph waterfalls without them, but they are convenient to have and not all that expensive either.  Plus, if you have any interest in astrophotography or night photography, you’ll definitely want one!

    #9 Try Different Angles & Viewpoints

    Play around with the various angles at which you can photograph your waterfall. All of the photographs in this article were taken at the same waterfall setting. At the beginning of the post, I included a photo of the overall scene I was working with. I did this so you could see examples of shooting a single scene from many different angles and viewpoints.

    Try shooting down low, or finding a higher vantage point.  Perhaps, swap out your wide-angle lens for a telephoto lens and try focusing on just one area rather than trying to capture the entire waterfall. No matter what you’re photographing, it is always good to try to see it from different angles and viewpoints. 

    Many times people will just walk up, center their subject, snap, walk away.  However, if they took the time to compose their photo, choosing to highlight unique features in their scene, they would most likely create a more visually appealing photograph. 

    Take time to get low to the ground, or to climb that small hill close by, and discover a new way of viewing your subject. If you have a zoom lens, make sure to move it in and out to see what look you prefer. You might be surprised at what a difference cropping the scene in can make.

    #10 Be Careful of the Slippery Conditions

    This one should go without saying, but be careful when walking around a waterfall.  Slippery when wet, is a condition that always applies to waterfalls. So while I recommend that you try to photograph all the available angles, only do so when it is safe. You don’t want to injure yourself or break your camera–now that would be bad!

    #11 Shoot in RAW Mode

    If possible, shoot in RAW mode as this enables you to capture the most detail in the highlights and shadows.  This is important for post-processing as you can bring out those details later when you begin to “develop” your photo and correct any low-lighting and underdevelopment.

    If your camera does not allow you to shoot in RAW, then just choose the highest JPEG setting it allows. Often cameras will have JPEG-Fine or JPEG-Normal, if that is the case with yours, choose JPEG-Fine or the highest quality available when RAW isn’t an option.

    #12 Experiment & Take Notes

    Use bracketing on your camera to take multiple photos at different exposures. Try different combinations of aperture and shutter speed to achieve the effect you desire. 

    Consider bringing a small pocket notebook with you and a pen to take notes about what settings you’re trying, what you’re learning, and maybe any ideas that come to you for future photoshoots. 

    Yes, modern cameras now record all your settings for you, but sometimes it’s nice to write it down for easy viewing in the field.

    Final Notes on Photographing Waterfalls

    Best Weather for Photographing Waterfalls

    Often when photographing outdoors, we prefer sunny conditions, but when it comes to waterfalls, a cloudy day can often be a bonus!  You see, if it is a little darker out, it helps achieve the lower lighting conditions needed to fully capture the details of the waterfall. 

    A calm day is also essential when photographing waterfalls. This helps keep your camera from shaking and limits the risk of blurred, out of focus images. If you have a long exposure and it’s windy, then the trees and shrubs and water in the scene will be blowing and end up blurred due to the slow shutter speeds.

    No Perfect Setting

    Remember, there’s no “right” shutter speed or aperture.  However, some settings you can start with to freeze the water are a shutter speed of 1/200 and higher and then a wider aperture to let in more light.  If you want to capture the silky motion of the waterfall, in addition to choosing the lowest ISO, try a smaller aperture, maybe f/16 and a 1-second shutter speed for a starting point.  Then play around with the settings from there until you get the look you want.

    Have Fun

    Enjoy developing your photography skills (yes, I meant that as a pun). It is so much fun to try new things. When you look at your photographs later, it’s exciting to see what you’ve captured and to come up with ideas to try next time. 

    Remember, all the gear in the world won’t replace a good eye and regular practice. So learn to use what you have, and most of all, have fun doing it!  

    Go Chase Some Waterfalls!

    Note: Travelffeine is reader-supported. This post contains affiliate links. When you make a purchase using one of these affiliate links, we get paid a small commission at no extra cost to you. And as always, all opinions are our own. Thank you!