On a recent road trip to Central Oregon, we took a small detour to see Oregon’s Painted Hills. I’d read about them, and they reminded me a little of the South Dakota Badlands. I didn’t realize I had anything like that so close to home, so I wanted to check them out. After taking this short road trip to Oregon, I will say that I have a newfound appreciation for Washington’s neighbor state. It has more natural variety than I previously realized, and it left me wanting to explore more of it in the future.
Prineville, Oregon: Our gateway to Oregon’s Painted Hills
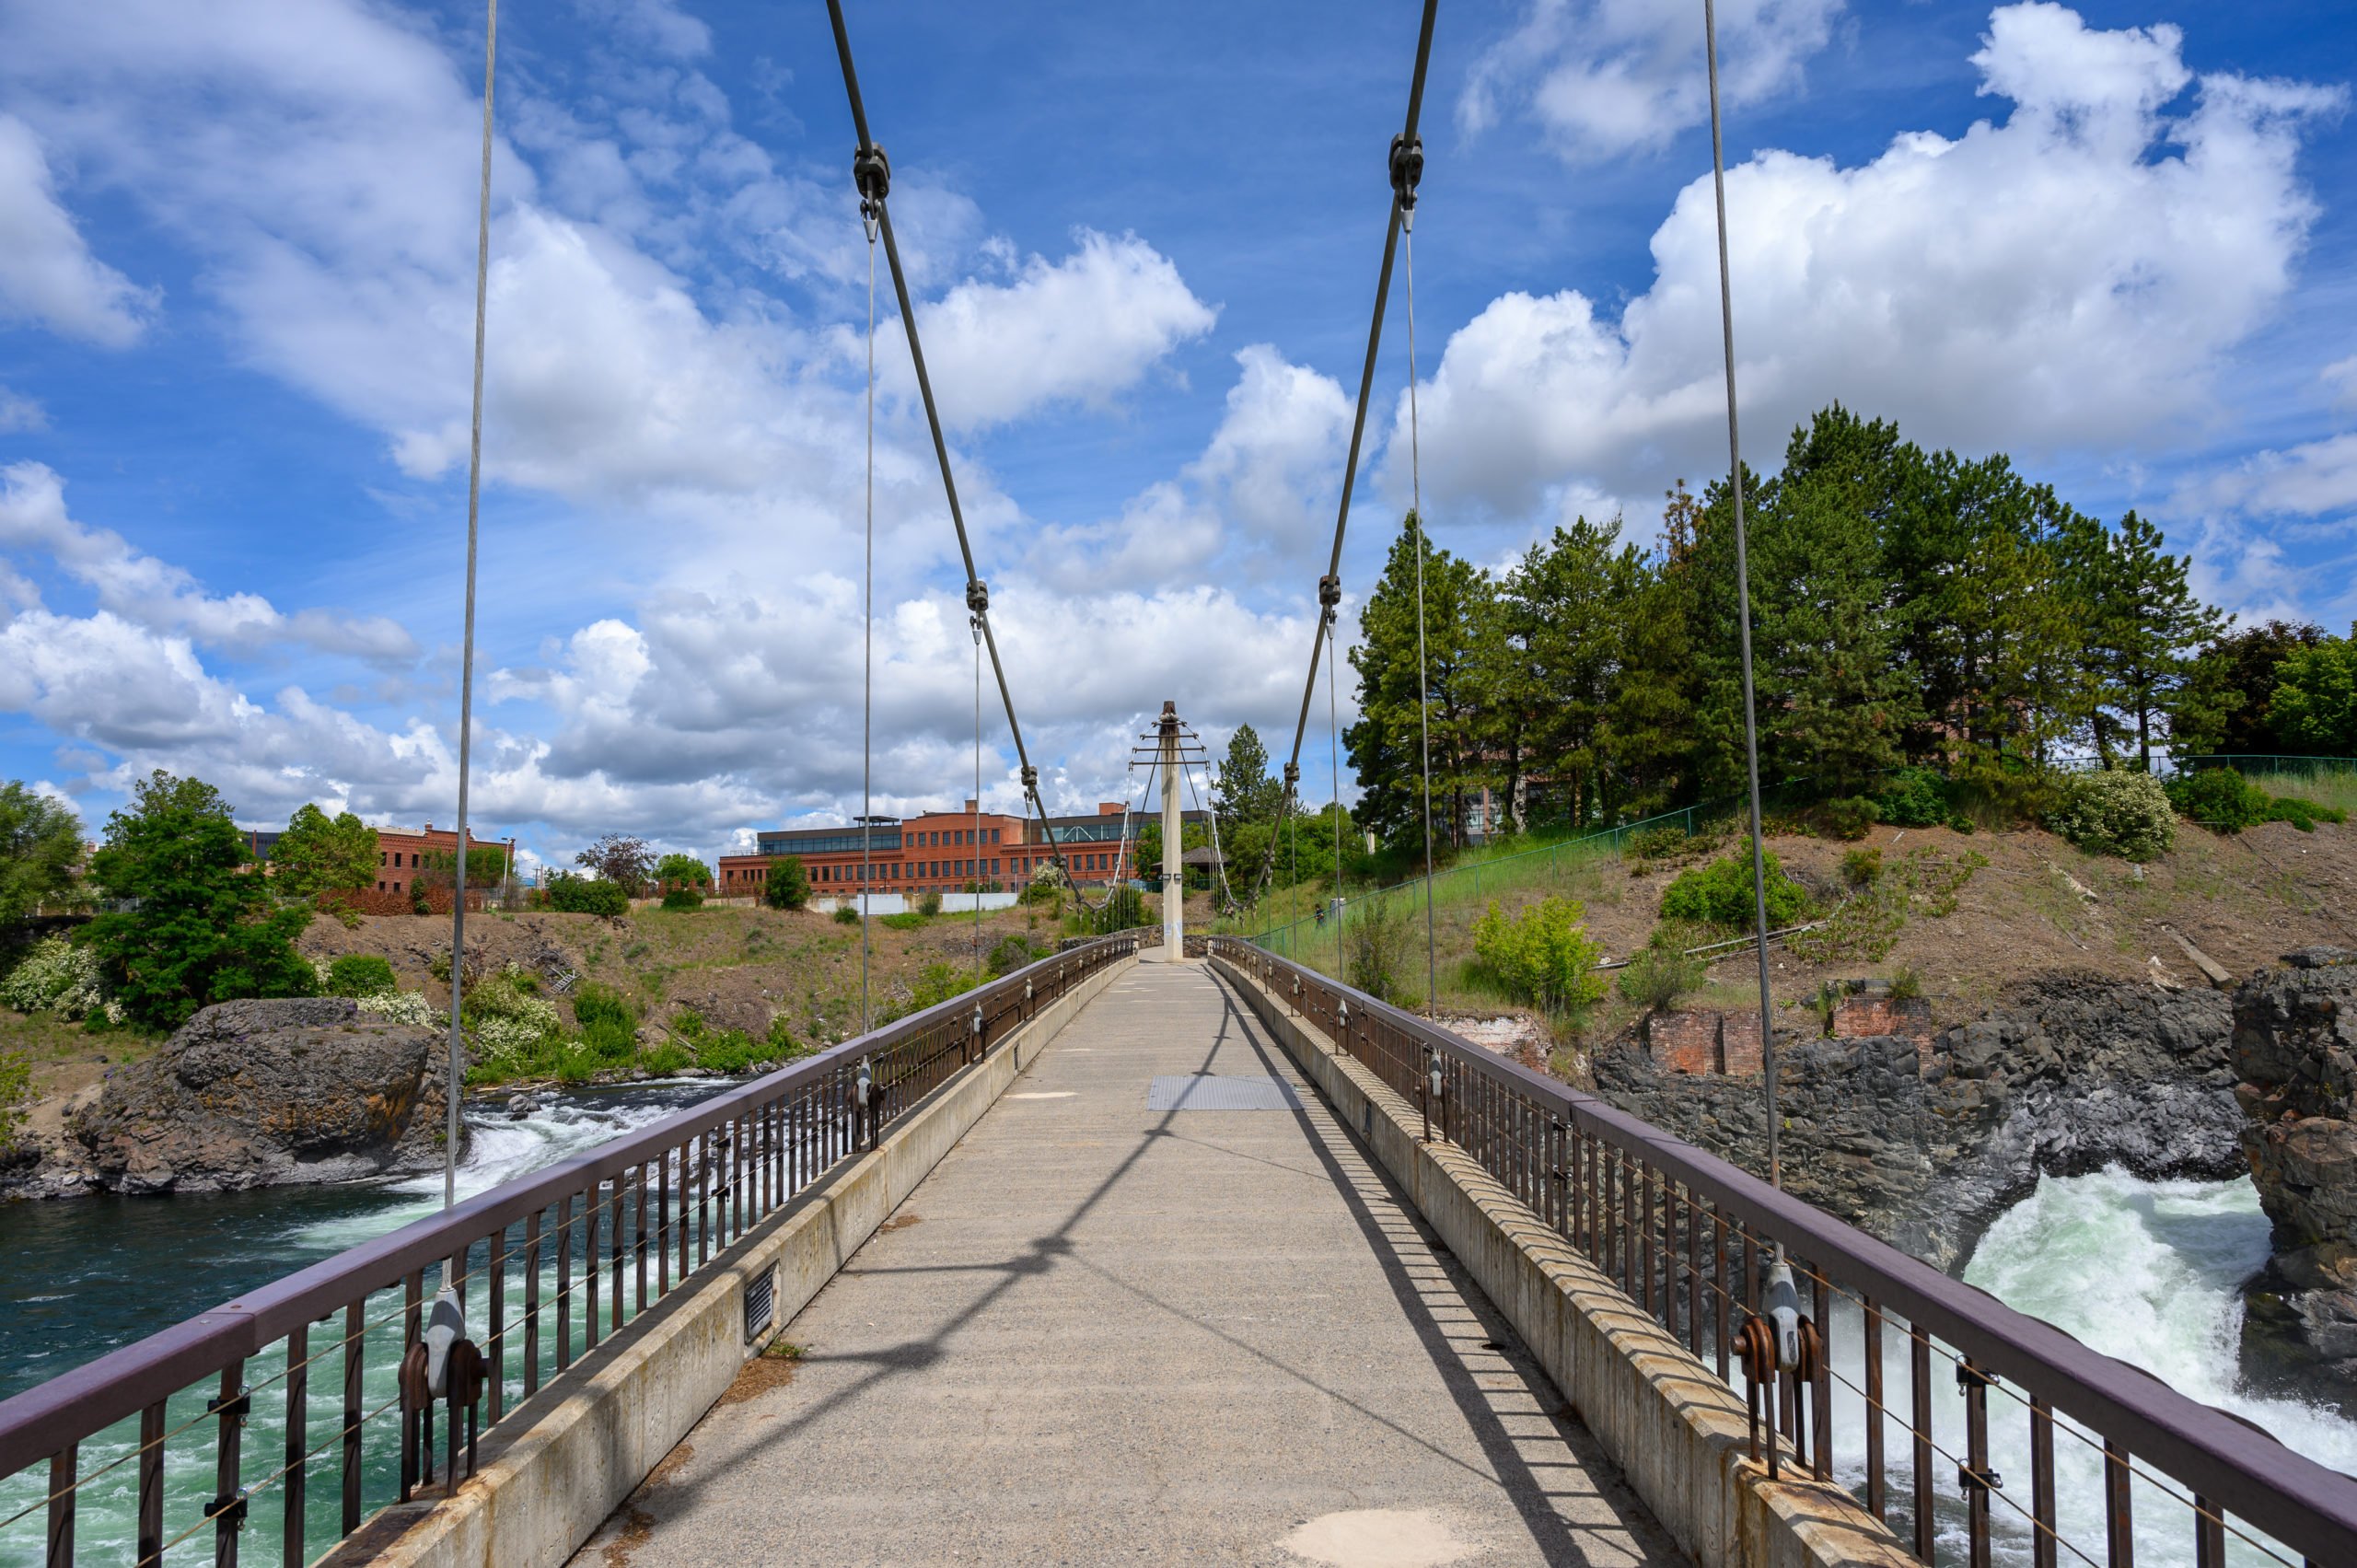
We left the Alvord Desert and drove about 4.5 hours to the town of Prineville, Oregon. Our first glimpse of the town of Prineville was from up above the town. It appeared like an oasis in the desert, green and lush. I wondered what the first settlers along the Oregon Trail must have felt when they first saw this area.
Only an hour away, Prineville is a great choice for travelers needing to spend the night before heading on to the Painted Hills.
After checking into our hotel, we decided to grab some dinner as we had skipped lunch, and were on the verge of getting hangry, so food was a priority! We read reviews about an authentic Mexican restaurant with great food, so we headed to Tacos Toledo Mi Tiendita. It is a tiny little restaurant mainly used for takeout, but there are two tables for indoor seating.
I was ready to order everything on the menu! Instead, I ordered a tamale (I love tamales!), 5 authentic tacos (no Tex-Mex stuff), a Chile Relleno, and hubby ordered a pambazo with chips and salsa. I loved everything I ordered! The pambazo is like a breakfast sandwich. It has potatoes, cheese, and chorizo inside.
After dinner, we drove around Prineville and liked what we saw. They have beautiful historic buildings and the Bowman Museum, which tells the history of the area from the time of the first settlers. The town felt like a nice blend of history and progress.
Driving From Prineville to Oregon’s Painted Hills
The next morning we got up early, ate breakfast at the hotel before checking out, and then headed for the Painted Hills. It is about a 1-hour drive from Prineville to reach the Painted Hills in the John Day Fossil Beds National Monument.
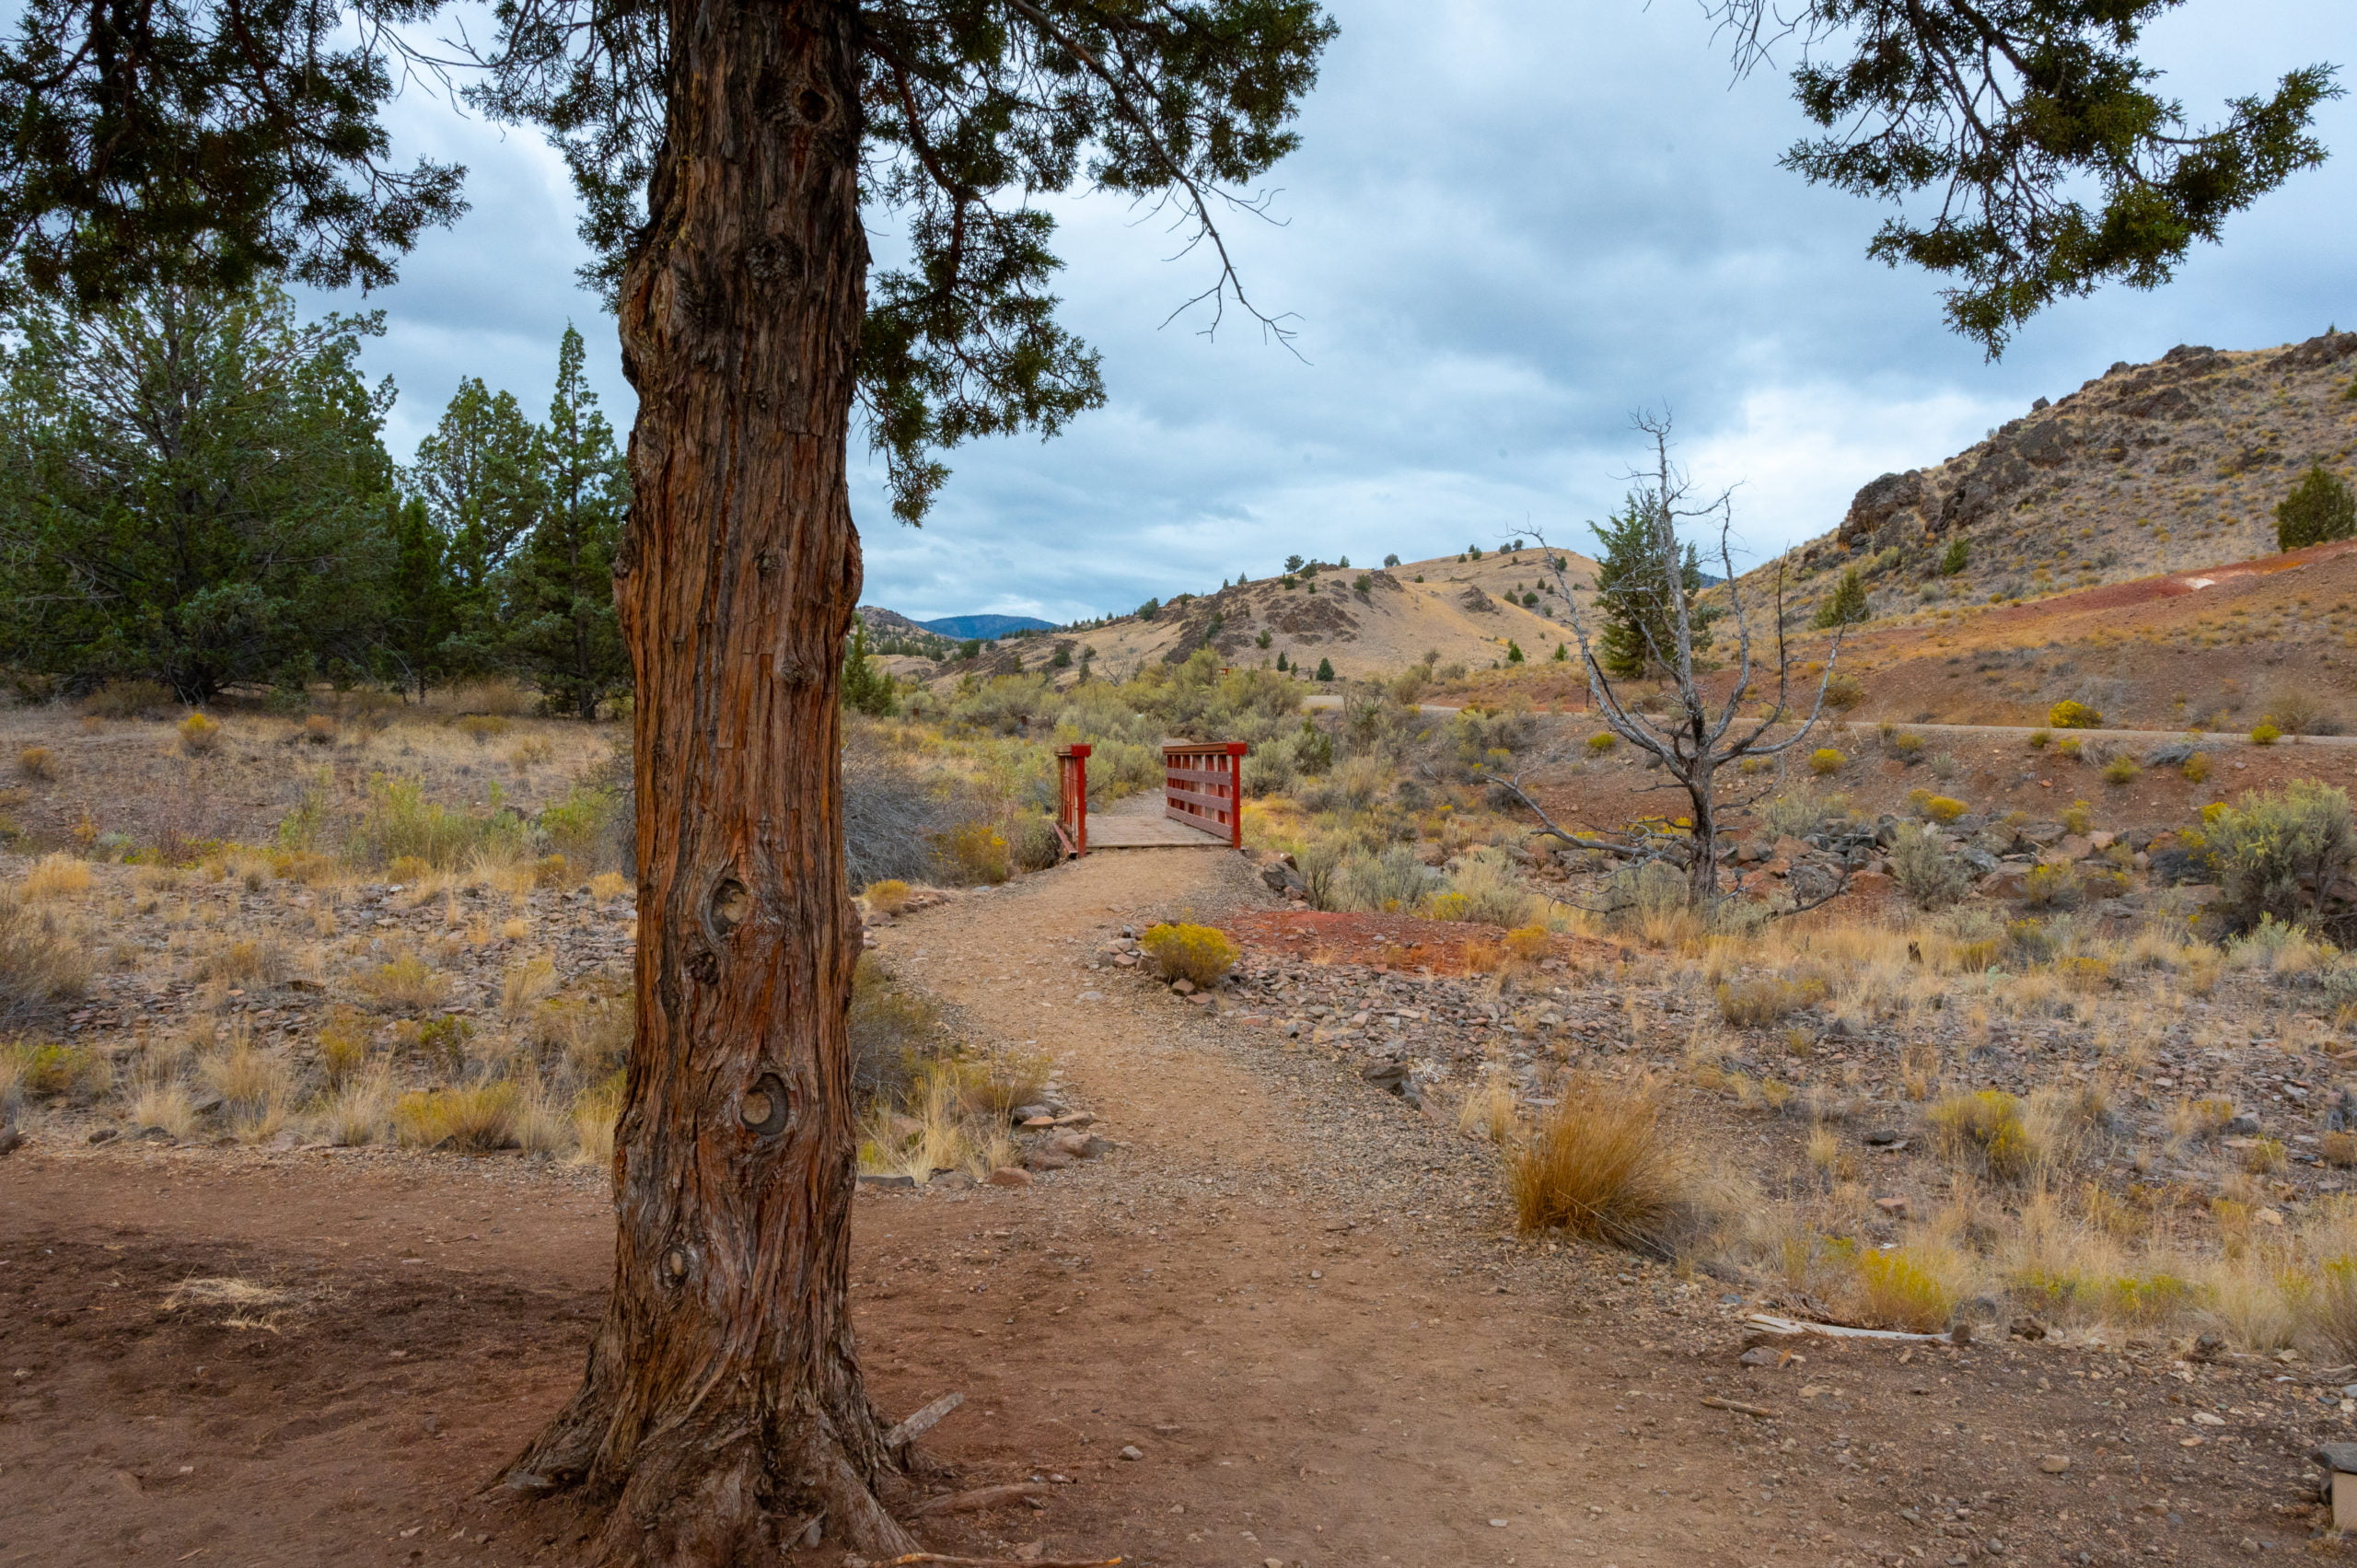
I enjoyed the drive as it was a mixture of farmland, lakes, and trees. The drive passed quickly, and soon we were turning off on a small narrow road that passed by more farms while also catching our first glimpses of the Painted Hills.
After about a 10-minute drive on this road, we came to the John Day Fossil Beds National Monument entrance. This is where the road turns to gravel. It’s nothing too bumpy, though, not at all like our drive to Alvord Desert, where the road was much rougher. Any car should handle the gravel roads at the Painted Hills. Just take it slow.
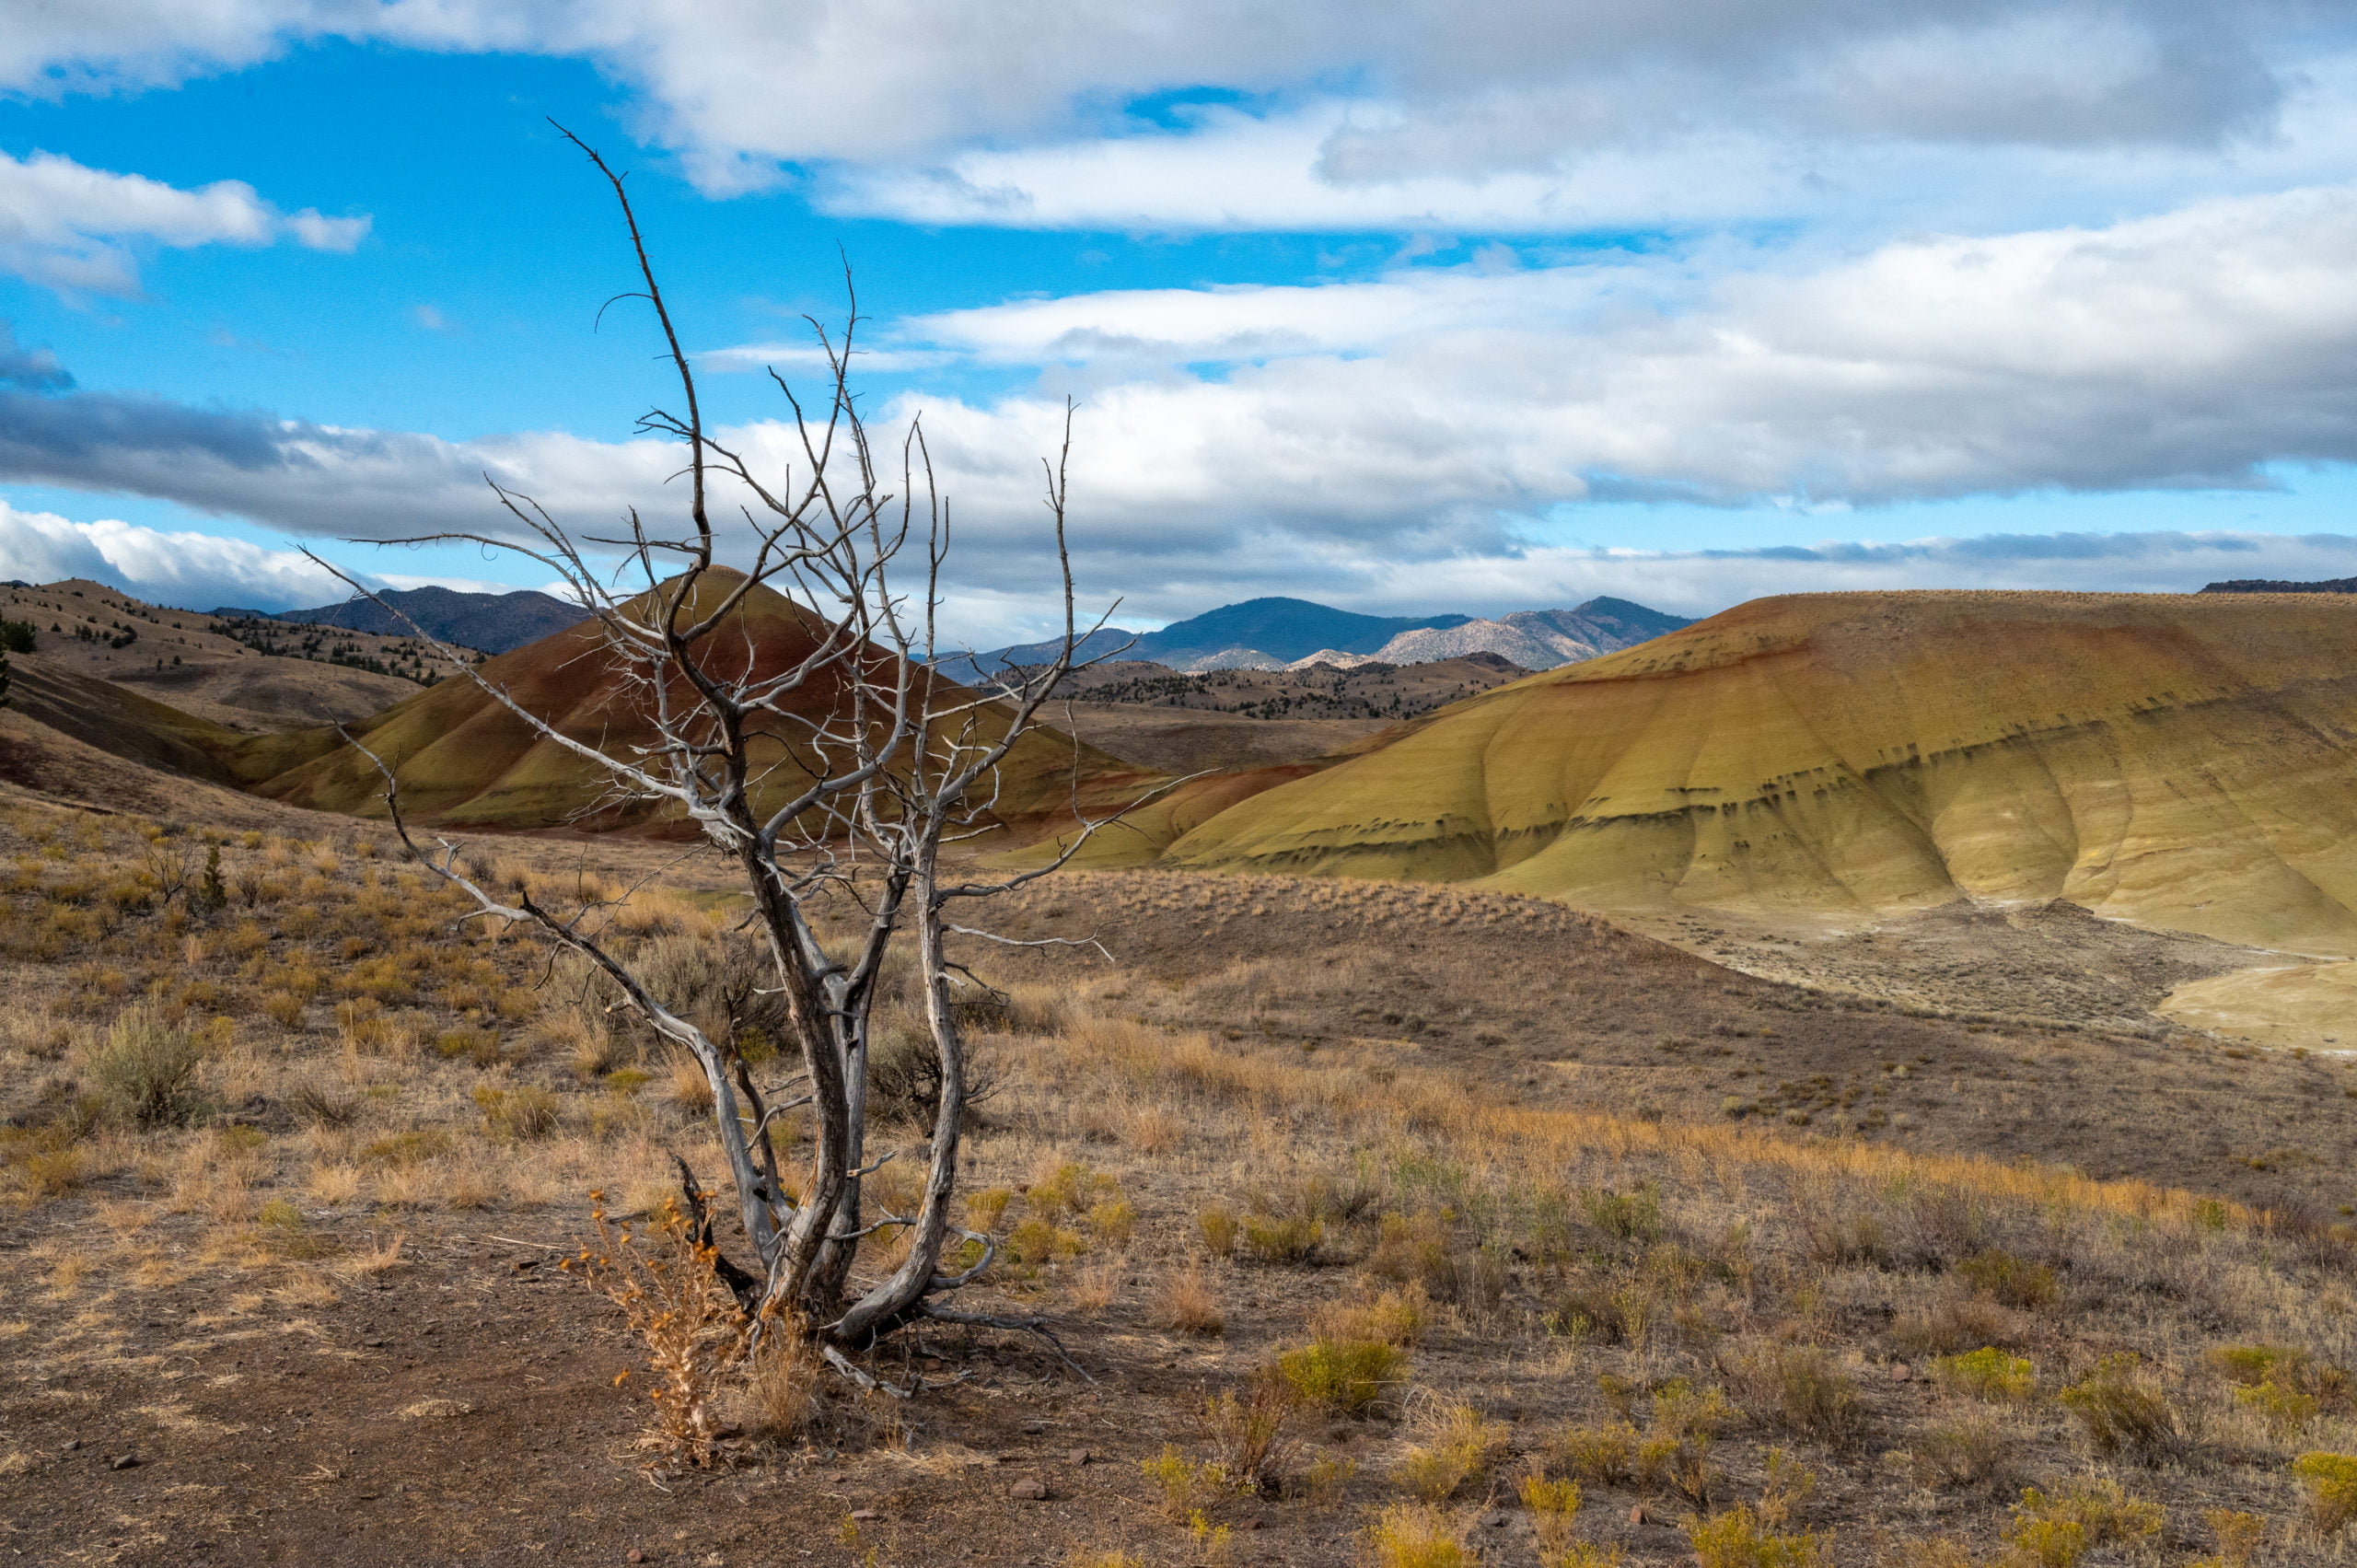
The Painted Hills at John Day Fossil Beds National Monument
Shortly after entering the National Monument boundary via the gravel road, you’ll come to a fork in the road where you can go left to the Visitor Center or right to continue to the trails and to see the Painted Hills. If you need to use the restroom, then head to the Visitor Center as that is the only restroom facility at the Painted Hills.
Trails at the Painted Hills
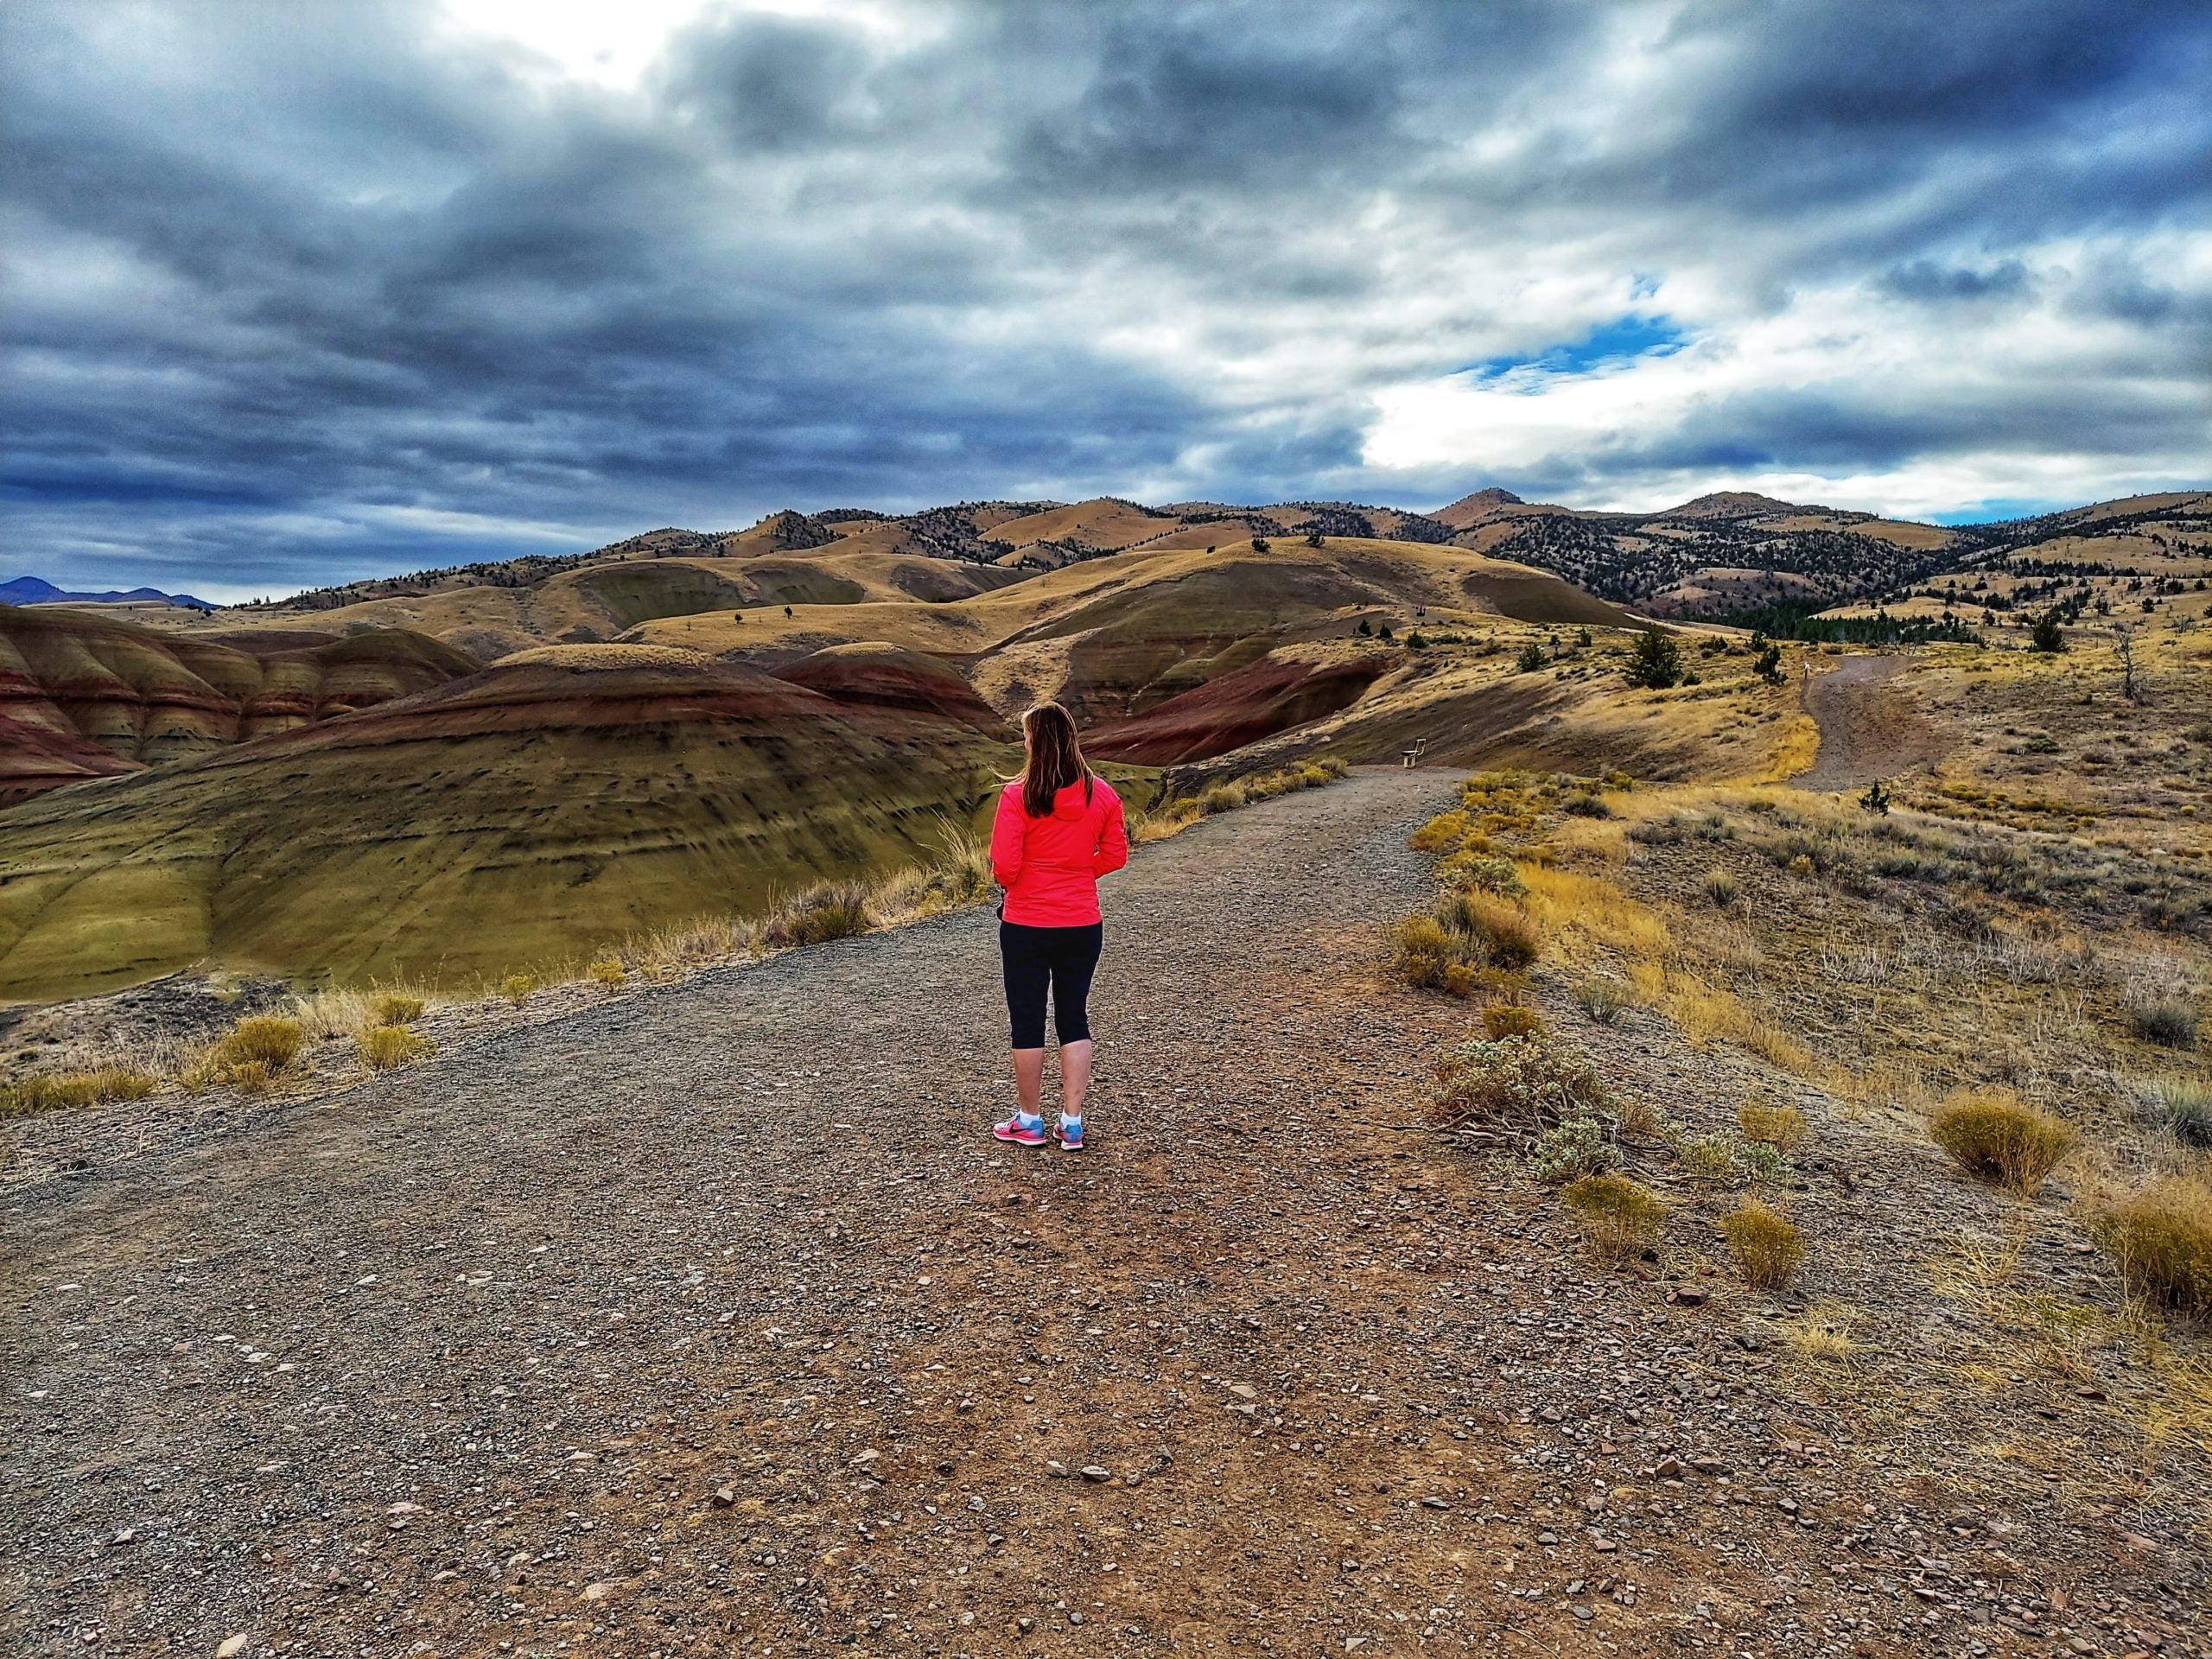
Continuing up the dirt road past the turnoff for the Visitor Center, you’ll come to the Painted Overlook. This is the first trail in a series of trails within the Painted Hills park area. You’ll also pass the Carroll Rim Trail parking area on your way to the Painted Overlook parking lot.
The Painted Overlook (0.5-mile roundtrip)
Carroll Rim Trail (1.6 miles roundtrip)
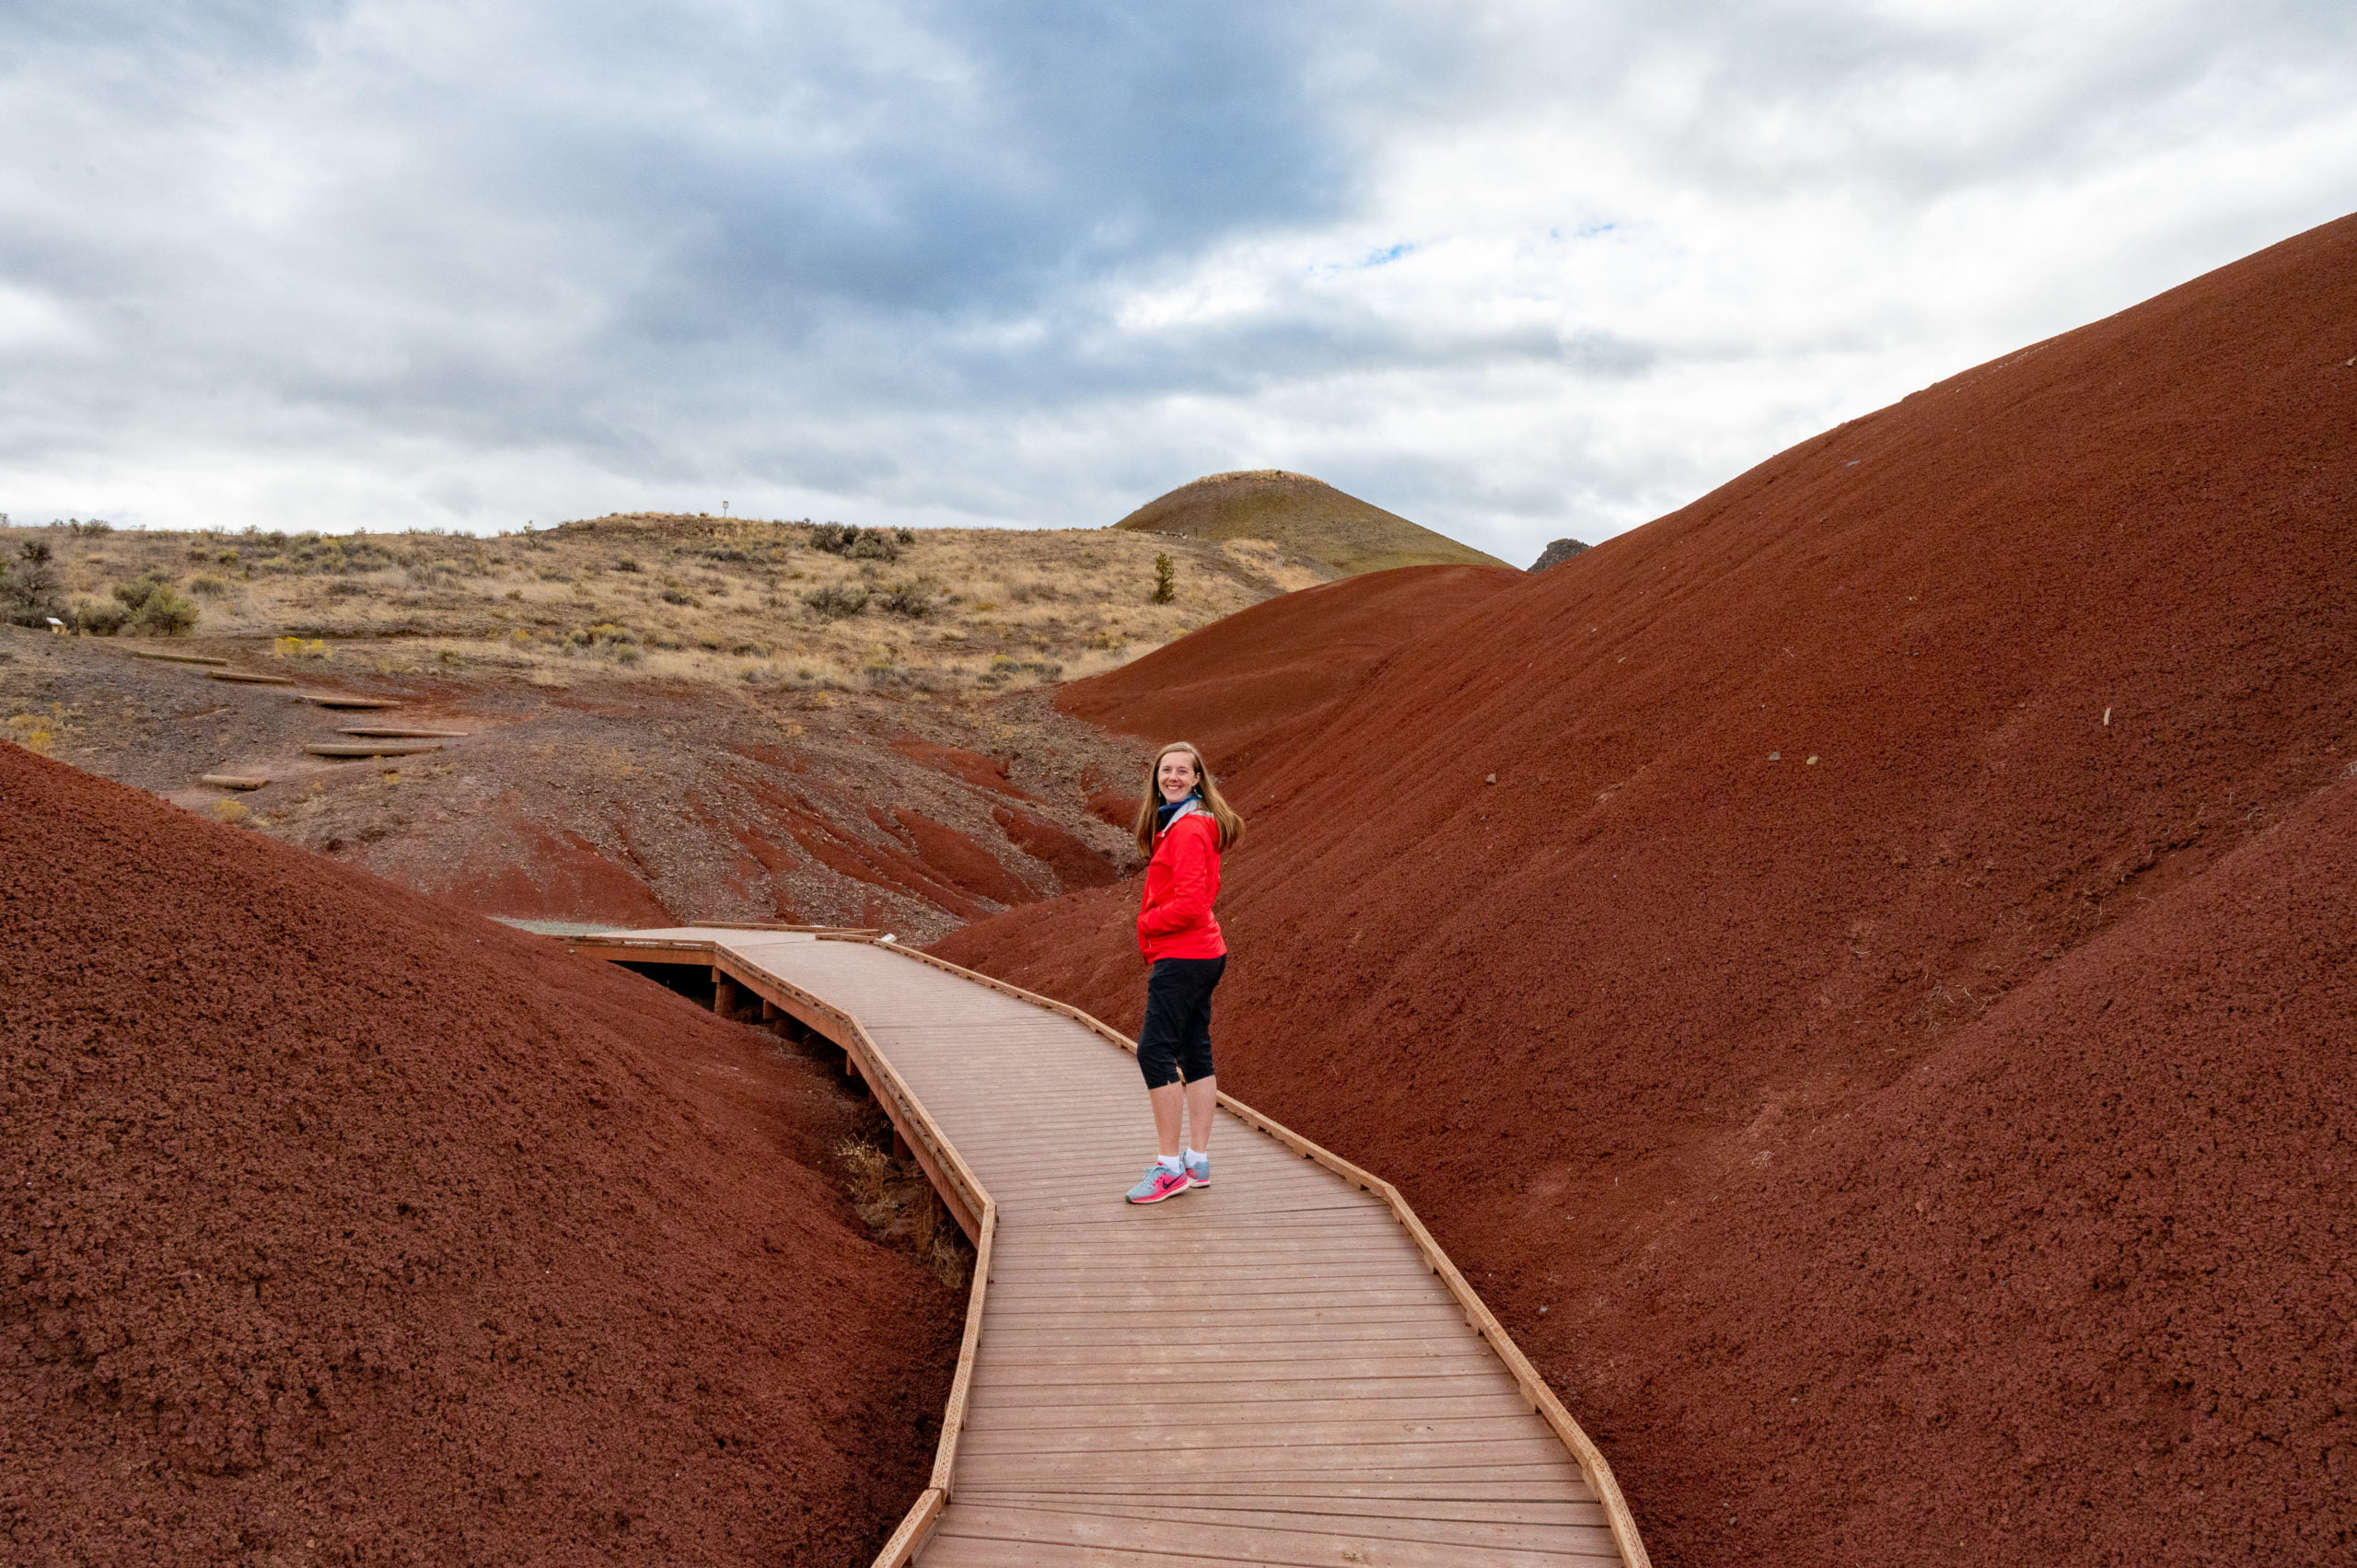
The Painted Cove Trail (0.25-mile boardwalk trail + overlook)
The Red Scar Knoll Trail (0.25-mile trail)
The Leaf Hill Trail (0.25-miles roundtrip)
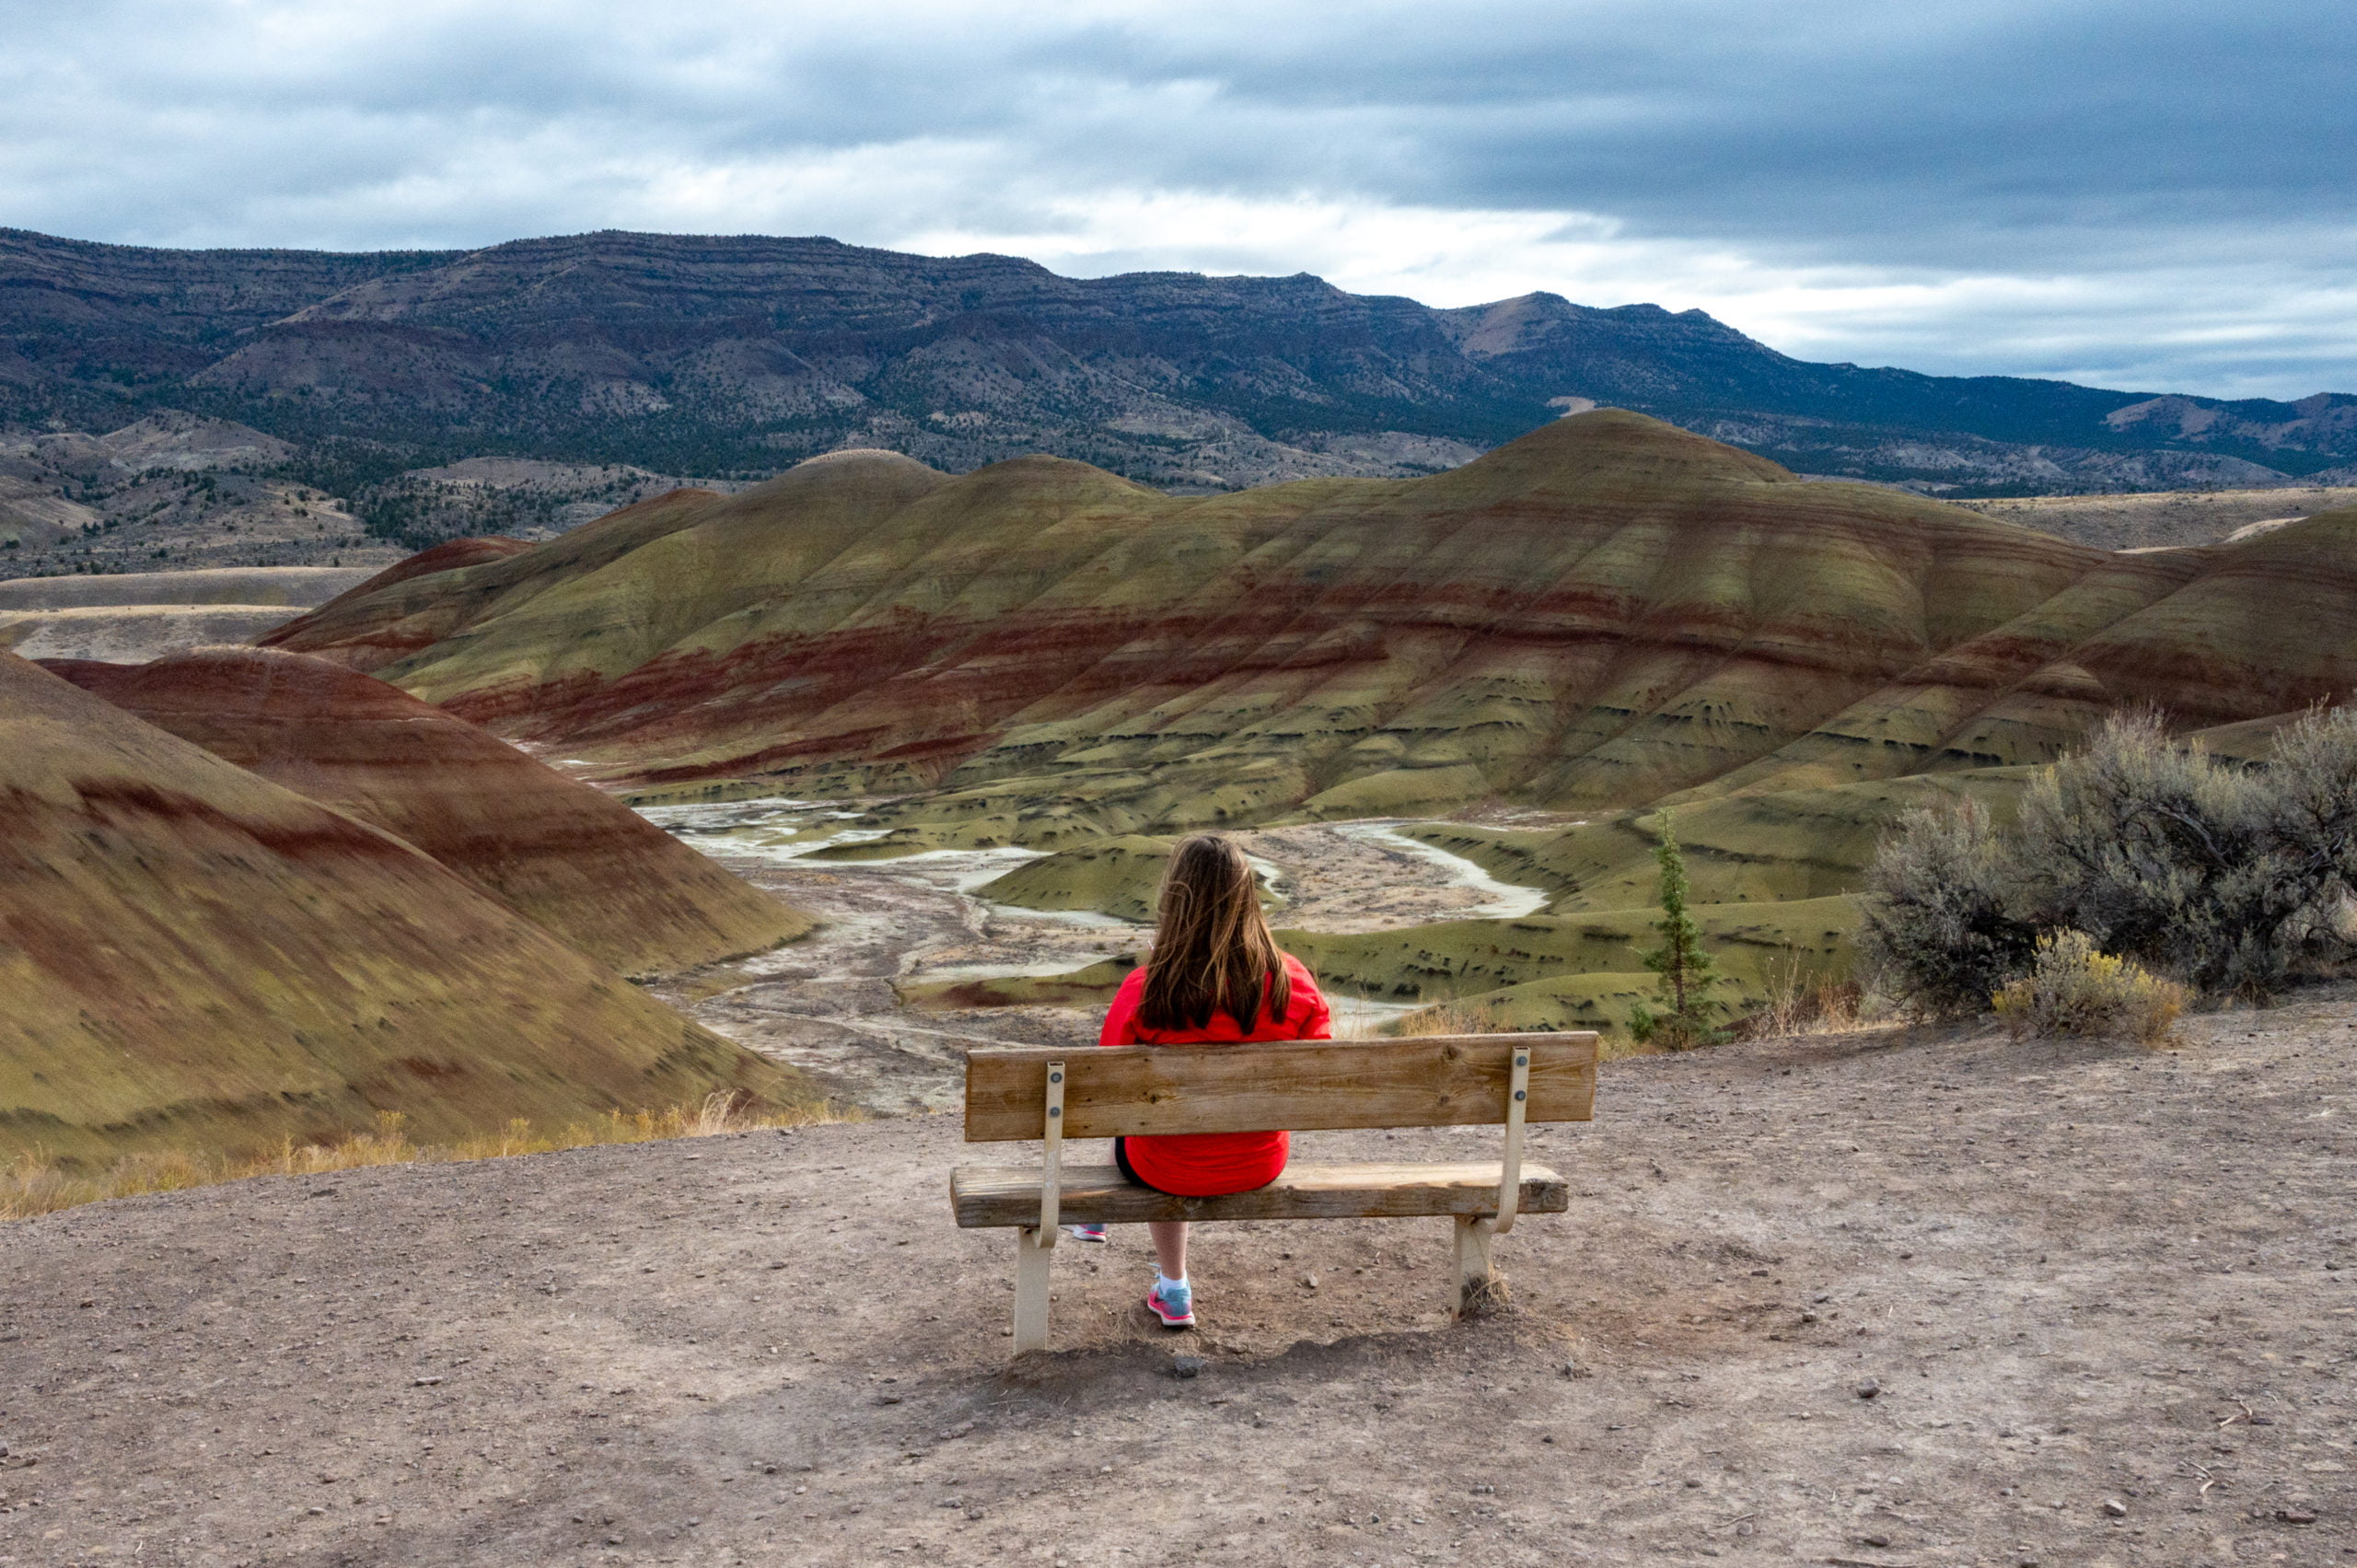
The Painted Overlook is a 0.5-mile roundtrip gravel path to an viewpoint. There is a bench on one section of the trail with sweeping views of the painted hills below. At the beginning of the trail, there are some signs with information regarding the area’s volcanic formation.
The wide gravel path at the Painted Overlook trail.
The 0.25-mile roundtrip Painted Cove Trail follows a wooden boardwalk before connecting to a dirt path. Make sure to read the signs along the trail that explain how these unique painted hills came to be.
The wooden boardwalk at the Painted Cove trail.
At the end of the boardwalk (when starting counterclockwise) leads to a fork in the trail. You can go left to walk up to an overlook or right to continue the loop. I recommend walking up to the overlook as it provides great views of the painted hills below and a really neat icy blue lake.
The view from the Painted Cove trail overlook.
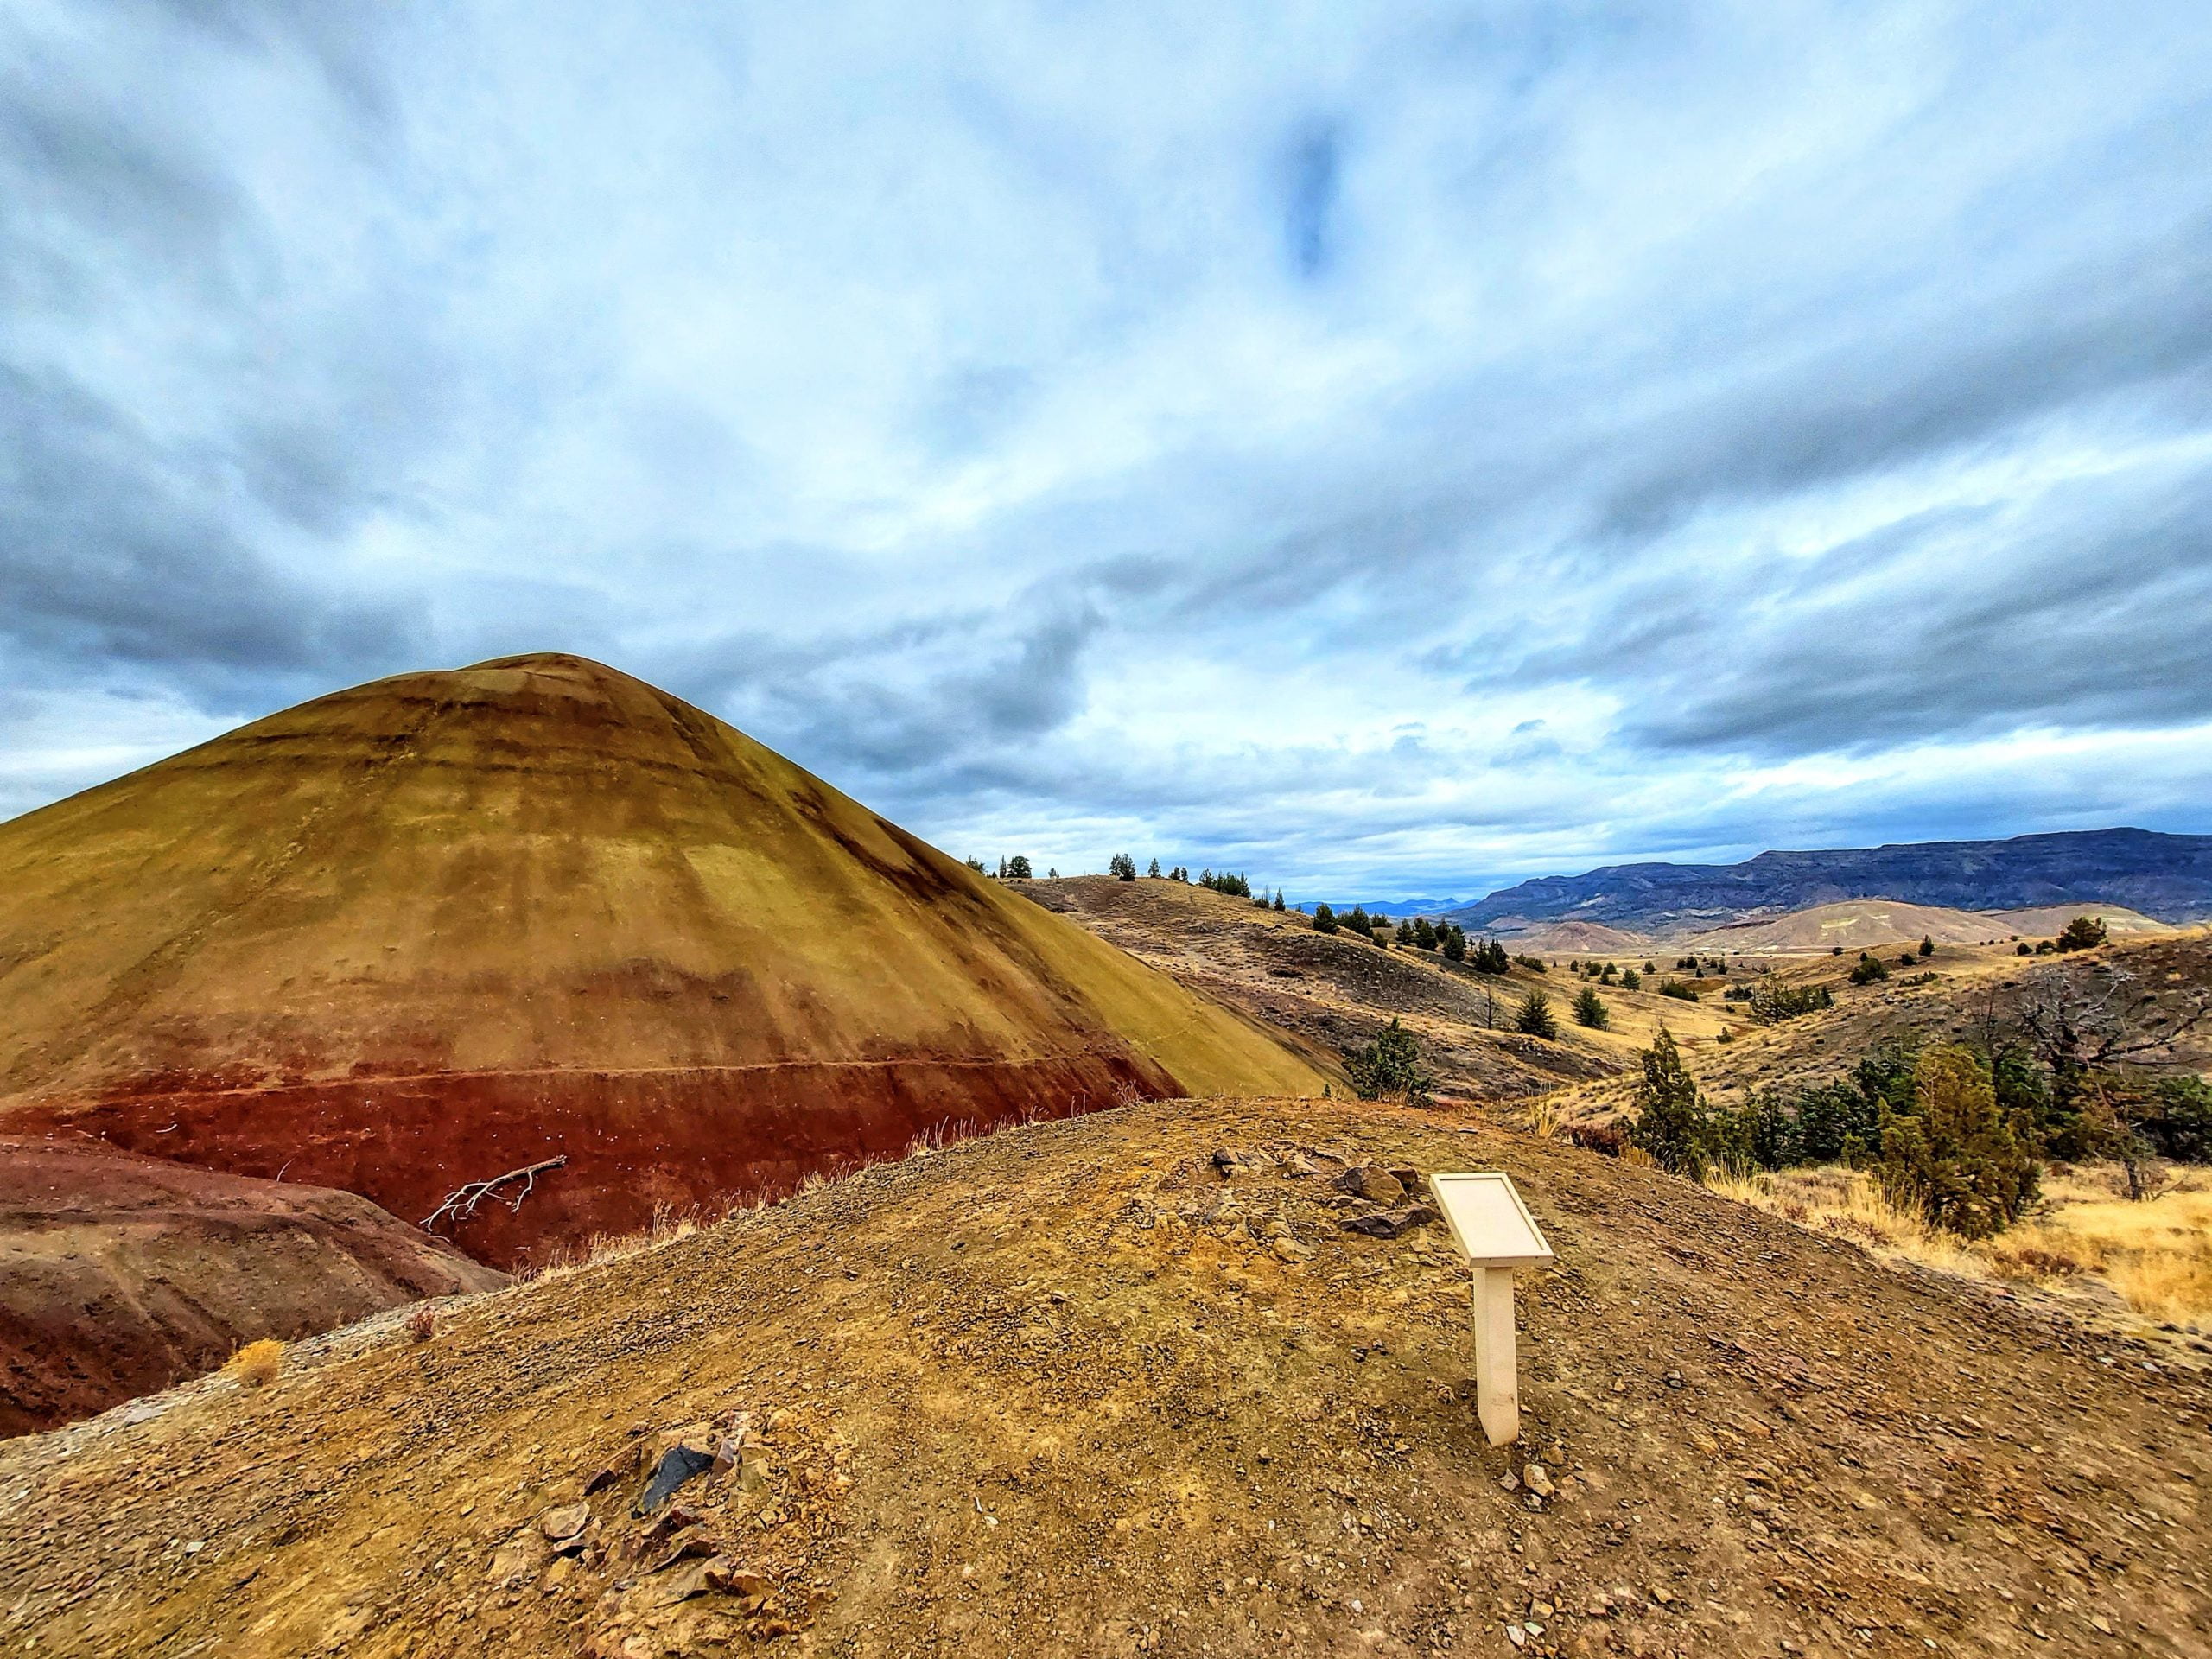
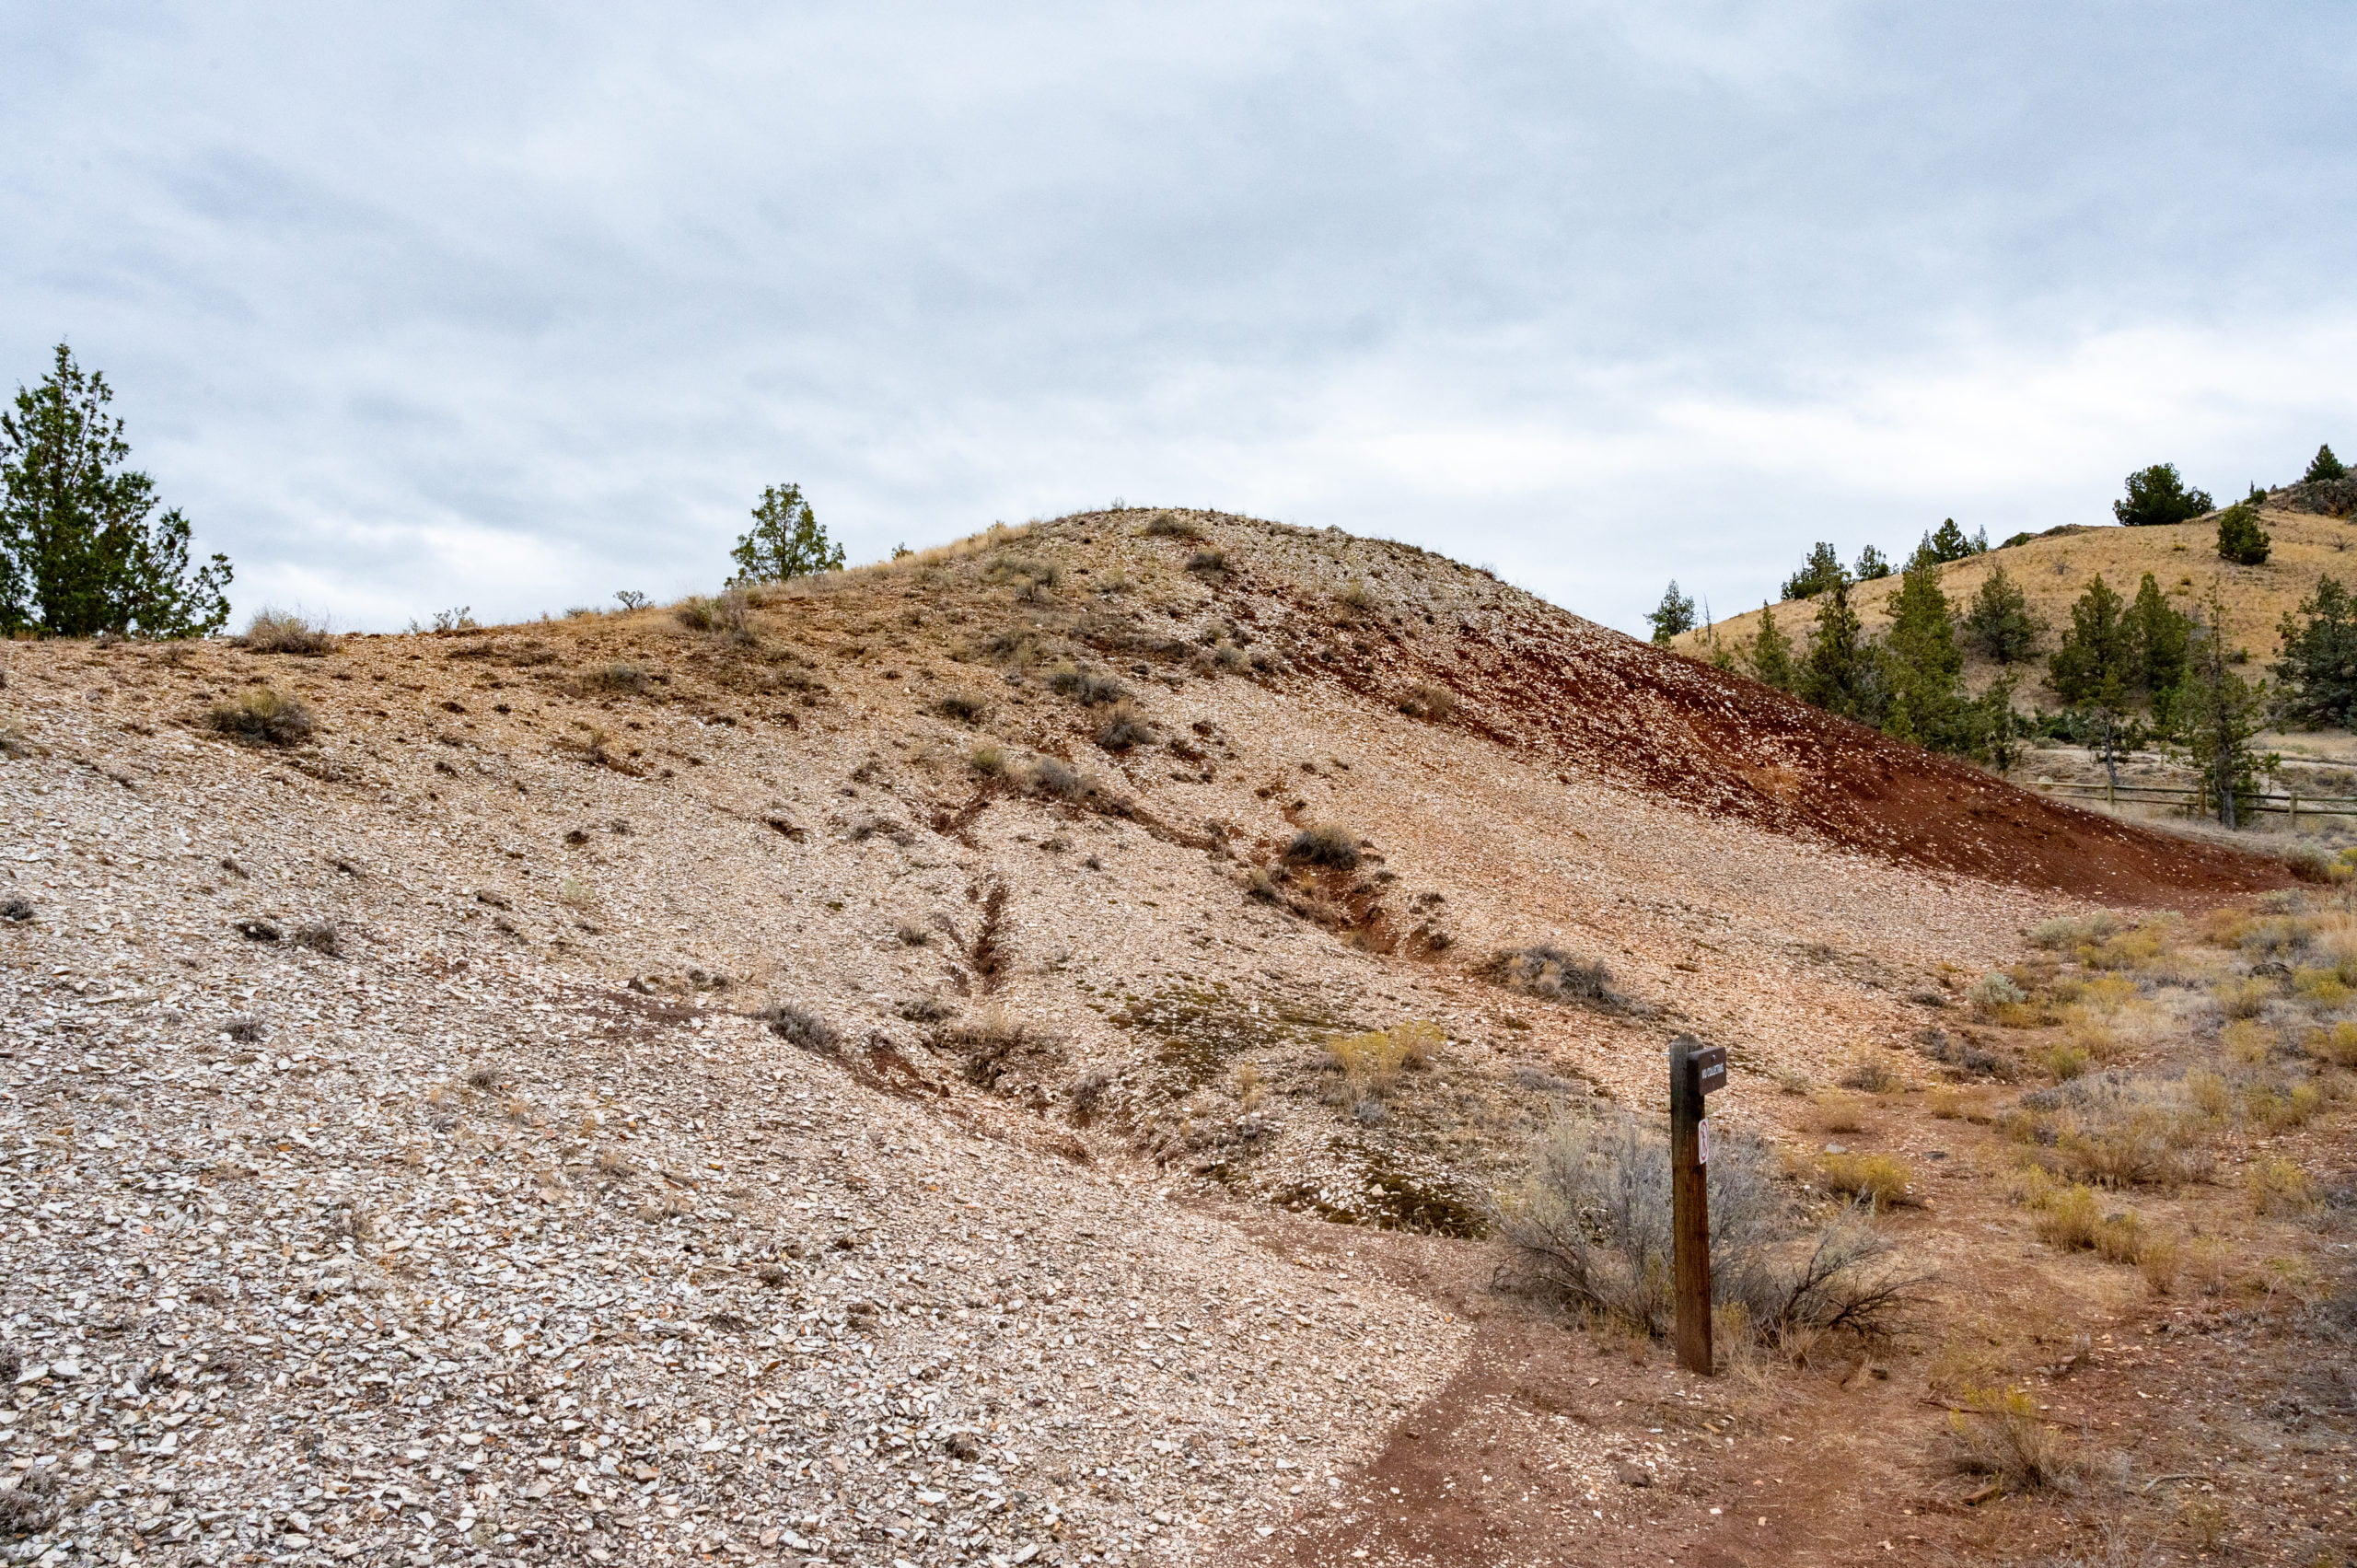
The Red Scar Knoll Trail (also known as Red Hill trail) is another short trail (.25 mile roundtrip) that leads to a dark red hill on one side and yellow on the other. The trail takes you over a small bridge where it forks straight and to the left where you can view the red side first.
Then, retrace your steps back to the main trail and continue as it goes around the hill and brings you to a viewing area of the yellow side of the hill. The red and yellow colors found in the painted hills is due to the blend of iron and magnesium. The hills are rusting!
The yellow side of the red scar knoll.
The Leaf Hill Trail (Leaf Fossil Trail) leads you to a hill where fossilized leaves of genus Metasequoia, the Dawn Redwood, were found. Although it is fascinating that these great trees once lived here, the actual hill and trail were a bit underwhelming.
Scattered fossils at the Leaf Fossil Hill trail.
Time Spent Visiting the Painted Hills
We spent approximately 2 hours exploring the Painted Hills. Visiting all of the trails, except the Carroll Rim Trail. We planned to do it last, but the parking lot was full upon our return. Deciding we’d probably seen what there was to see anyway; we left without hiking that trail.
My recommended trails:
The Painted Overlook: This had nice views of the hills we passed while driving up to the Overlook.
The Painted Cove Trail: I liked being so close to the Painted Hills as well as the small overlook that let me see the pretty lake and painted hills below.
Just Okay: The Red Scar Knoll trail was just okay, in my opinion. I did think it was interesting that it is red on one side and yellow on the other, and it is short enough that it won’t take you very long to complete.
Could have skipped: The Leaf Hills trail was the most boring one of them all. You could see a bunch of scattered pieces of rock, which may have been fossils, but really, if you are looking for a trail to skip, this is one I felt sort of like “meh” afterward.
Getting to Oregon’s Painted Hills
From Prineville, Oregon Take US-26 E for about 43 miles before turning left onto Bridge Creek Rd/Burnt Ranch Rd. Follow Bridge Creek Rd for another 5.5 miles before turning left onto Bear Creek Rd. Bear Creek Rd is a gravel road. Follow signs in the park to either the trails or the Visitor Center.
From Mitchell, Oregon
Take US-26 W for 3.6 miles, then turn right onto Bridge Creek Rd/Burnt Ranch Rd. Follow Bridge Creek Rd for another 5.5 miles before turning left onto Bear Creek Rd. Bear Creek Rd is a gravel road. Follow signs in the park to either the trails or the Visitor Center.
Tips for Your Trip
Fuel up in Prineville or Mitchell, depending on which direction you’re coming from. The only restroom is at the Visitor Center and picnic area near the Painted Hills entrance. Go left at the fork in the gravel road and follow the signs to the Visitor Center. I did not see any other restrooms in the park.
Bring a jacket, depending on what time of year you visit (we came in the fall), it can get windy and cold. We were happy we had our rain jackets with us as well as sweatshirts. I also recommend bringing snacks and drinks as there is nothing inside the National Monument area.
The islands are officially back open to visitors from the mainland! If you want to book a trip to Hawaii but don’t want to spend 14 days quarantining in a hotel room, I am here to help! My hubby and I rescheduled our 2020 trip to Maui three times due to delays in their re-opening and pre-testing option. We did not want to spend all that money to fly to Hawaii, only to sit in a room for 14 days. Finally, we had success when we rescheduled our trip for the third time to travel to Maui in November.
For those of you planning your trip or thinking about it, I’ve included all of the links and information I found useful when planning my own post-COVID trip to Maui. Most of the information will apply to the rest of the Hawaiian islands as well.
The information I include here was up-to-date as of November 2020. I am sharing my experience to help others plan their trip to Hawaii. However, please check Hawaii’s COVID-19 Portal for the most up to date and current information for travel to Hawaii.
Also, this information only applies to travelers coming from the mainland U.S. I traveled to Maui from the West Coast, so my experience might differ slightly from someone coming from other parts of the U.S. However, the links I provide will give you the necessary information to plan your trip from anywhere in the lower 48 states.
Overview of Steps to Avoid the 14-day Quarantine
Take your COVID-19 test 72 hours or less before the last leg of your departure. This means if you fly from Dallas to L.A. to Hawaii, you’ll take the test based on the departure time of your L.A. flight.
After receiving your negative test results, upload a PDF version to your Safe Travels account. Also, notify your condo or hotel as needed. *Please note the State of Hawaii now requires your negative results to be uploaded before landing in Hawaii. Failure to do so will result in a 14-day quarantine, even if you receive your negative results after landing.
Print a copy of your negative test results, flight reservations, and condo/hotel reservations and bring these with you.
24 hours prior to your departure, complete the Safe Travels Health Questionnaire and get your QR code. Save the QR code as a screenshot and also print and bring with you. You are required to show this QR code at the airport upon arriving in Hawaii.
*If you have a connecting flight to a second island, you will need a QR code for that flight as well. We needed one for our flight to Honolulu and then our connecting flight to Kahului. The QR codes have no identifying features to tell you which QR code is for which airport, so keep that straight to show the correct code for scanning at the corresponding airport.
72 Hour Pre-test Requirements
The COVID-19 State of Hawai’i Portal is where you’ll want to go for all the update to date information on their COVID-19 testing requirements. At the time of my trip, the 72-hour pre-test requirements were as follows:
Take your COVID-19 test 72 hours or less before your flight departure time. If you have a multi-city flight itinerary, the departure time is from the last city you leave before arriving at a Hawaii airport. So if you travel from Dallas to L.A. to Honolulu, you use your L.A. flight’s departure time to determine your 72-hour window.
You must take a Nucleic Acid Amplification Test (NAAT) from a certified Clinical Laboratory Improvement Amendment (CLIA) lab to bypass the State of Hawai‘i’s 14-day mandatory quarantine. These are also referred to as RT-PCR tests. Visit the State of Hawai’i’s travel partner page to see a list of approved testing facilities. The test must be administered by one of these approved testing facilities.
Once you receive your negative test results, you will upload them as a PDF to Hawai’i’s Safe Travels website. You will need to create a Safe Travels account first. To do this, you’ll need your trip itinerary (flight information, duration of the trip, and where you’ll be staying). You’ll also need your State I.D. as they will ask you to fill this in.
*Each island may create their own additional test requirements, so check for any additional island-specific requirements. You can check withthe appropriate county office: County of Kaua‘i, County of Maui, County of Hawai‘i.
Questions to Ask When Choosing Your 72-Hour Pre-Test:
How quickly will you get your results back?
Are they having any issues running out of tests?
Do they process results on the weekends? (Some locations told me it was business days online, others said they process 7 days a week.)
How much does it cost?
Can you use your health insurance to pay for it?
Is the test a diagnostic test (no antigen tests allowed), specifically a NAAT test? (They may use the words RT-PCR, this is a type of NAAT test.)
What Happens if Your Test Does Not Come Back in Time
If your test results do not come back in before your flight departs, you will have two choices.
One: Cancel your trip plans and try to get your tickets and travel plans rescheduled for later.
Two:Fly to Hawaii and hope your test comes in by the time you arrive. If it does, then you’ll upload your results to the Safe Travels site on your phone when you arrive in Hawaii, and you should be good to go. If it does not, you are then required to quarantine at an approved location until your test results come in. *UPDATE: You are now required to have your test results uploaded to Safe Travels before arriving in Hawaii. They will automatically quarantine you for 14 days if you do not, even if your negative test results come in when you land.
You cannot get a rental car, and you cannot go to your condo (you’ll need to check the list to see if your hotel is on the approved quarantine list) if you have not uploaded your negative test results before arrival. If your test results are positive, then you’ll be forced to quarantine for 14 days at an approved quarantine location, and you will not be able to rent a car, get groceries, or go anywhere until the quarantine is completed. They do follow up, and multiple tourists were arrested for breaking quarantine.
*This situation is always changing. Please monitor the changes via Hawaii’s website and following news updates from Hawaii and your specific island destination.
Setting Up Your Safe Travels Account
As I mentioned in the steps above, you will need to create a Safe Travels account. The Hawaiian State Government requires you to enter your travel itinerary details here. This is also where you will upload the PDF results of your COVID-19 test.
To set up your account, you’ll need to provide your trip itinerary (flight information, duration of the trip, and where you’ll be staying) and your State I.D. as they will ask you to fill this in. Make sure you use whatever I.D. you are bringing with you. For example, if you’re only bringing your Driver’s License and not your Passport, don’t enter your Passport info on the Safe Travels site as they will want to see the same I.D. when you arrive in person.
24-Hour Health Questionnaire
Then 24 hours before your departure, you will log-in to your Safe Travels account and complete the 24-hour Health Questionnaire. Upon completing this questionnaire, you are given a QR code.
QR Code
You must show this QR code when arriving in Hawaii. Take a screenshot of this QR code and save it on your phone. (Note: If you have a connecting flight that is also in Hawaii, you will need two QR codes. They don’t have any description to tell you which QR code is for which flight, so make sure to keep that clear when saving on your phone and when printing.) For example, we flew from Seattle to Honolulu, then Honolulu to Kahului. We needed two QR codes. To get this, you must enter each flight into your Safe Travels account separately.
My Experience Getting Our Covid-19 Test:
This was probably the most stressful part of planning our trip to Hawaii. Our was condo booked, our flights booked, and rental car, but it all hinges on whether we get our test results back within the 72-hour pretest window. If we do not get our test results back before landing in Maui, we will be directed to a quarantine facility until our test results come in. That means we won’t be able to pick up our rental car or check in to our condo until the negative test results are processed. If our test results came back positive, then we’d be forced to quarantine for 14 days.*
*UPDATE: The State of Hawaii now requires the negative test results before arrival. Otherwise, you are forced to quarantine for 14 days–no exceptions. Visit the State of Hawaii website for the most up to date information.
I researched all the options listed and determined which options were available to me in Washington State. Due to the high number of visitors that travel from Seattle to Hawaii, I honestly thought there’d be more airport options available, but those seem to be popping up in California first. We’re the ones with the rain here, people! We need the sun more than those Californians! Okay, all kidding aside, I am sure more choices will become available in the future as airlines do their best to provide travelers with additional options.
Check with your airline to see if they partner with any testing sites for travel to Hawaii, as these give your test results priority and give you the best chance of receiving your results back in time for your flight.
Some of the options I found for travelers flying out of SeaTac Airport:
Quest Diagnostics (you need to find out where they have locations)
Vault Health (Hawaiian Airlines customers receive priority processing for this at-home testing option.)
We flew with Hawaiian Airlines who plans to expand drive-up testing options, but only San Francisco had a drive-up option available at the time of this article. Hawaiian Airlines also partnered with Vault Health, an at-home approved test, for Hawaii’s 72-hour pretest requirements.
I initially researched using Quest Diagnostics and Walgreens. I contacted Quest but never heard back from them, and their site did not show where their drive-up locations were located in Washington State. So without knowing how close that option would be, and since they never replied to me, I moved on to the other two options available to me.
Walgreens was next on the list, and I discovered I had two options: a 72-hour RT-PCR test or a rapid test option that allowed you to receive results the next day (only some locations offer this). Walgreens was also the only facility that allowed you to submit to insurance and didn’t require you to pay out of pocket (this may vary based on your location).
I loved the idea of not needing to pay anything for my test, as, let’s face it, it all adds up. However, my main concern was that they only allowed appointments to be scheduled out 3 days in advance. So I would need to wait to schedule until Monday before our flight. This also meant that if there were no appointments available (I read reports from other travelers who couldn’t get appointments due to demand) that we would be out of luck and left scrambling to find a backup plan. I was also told by a Walgreens employee that they were running out of the tests at some locations.
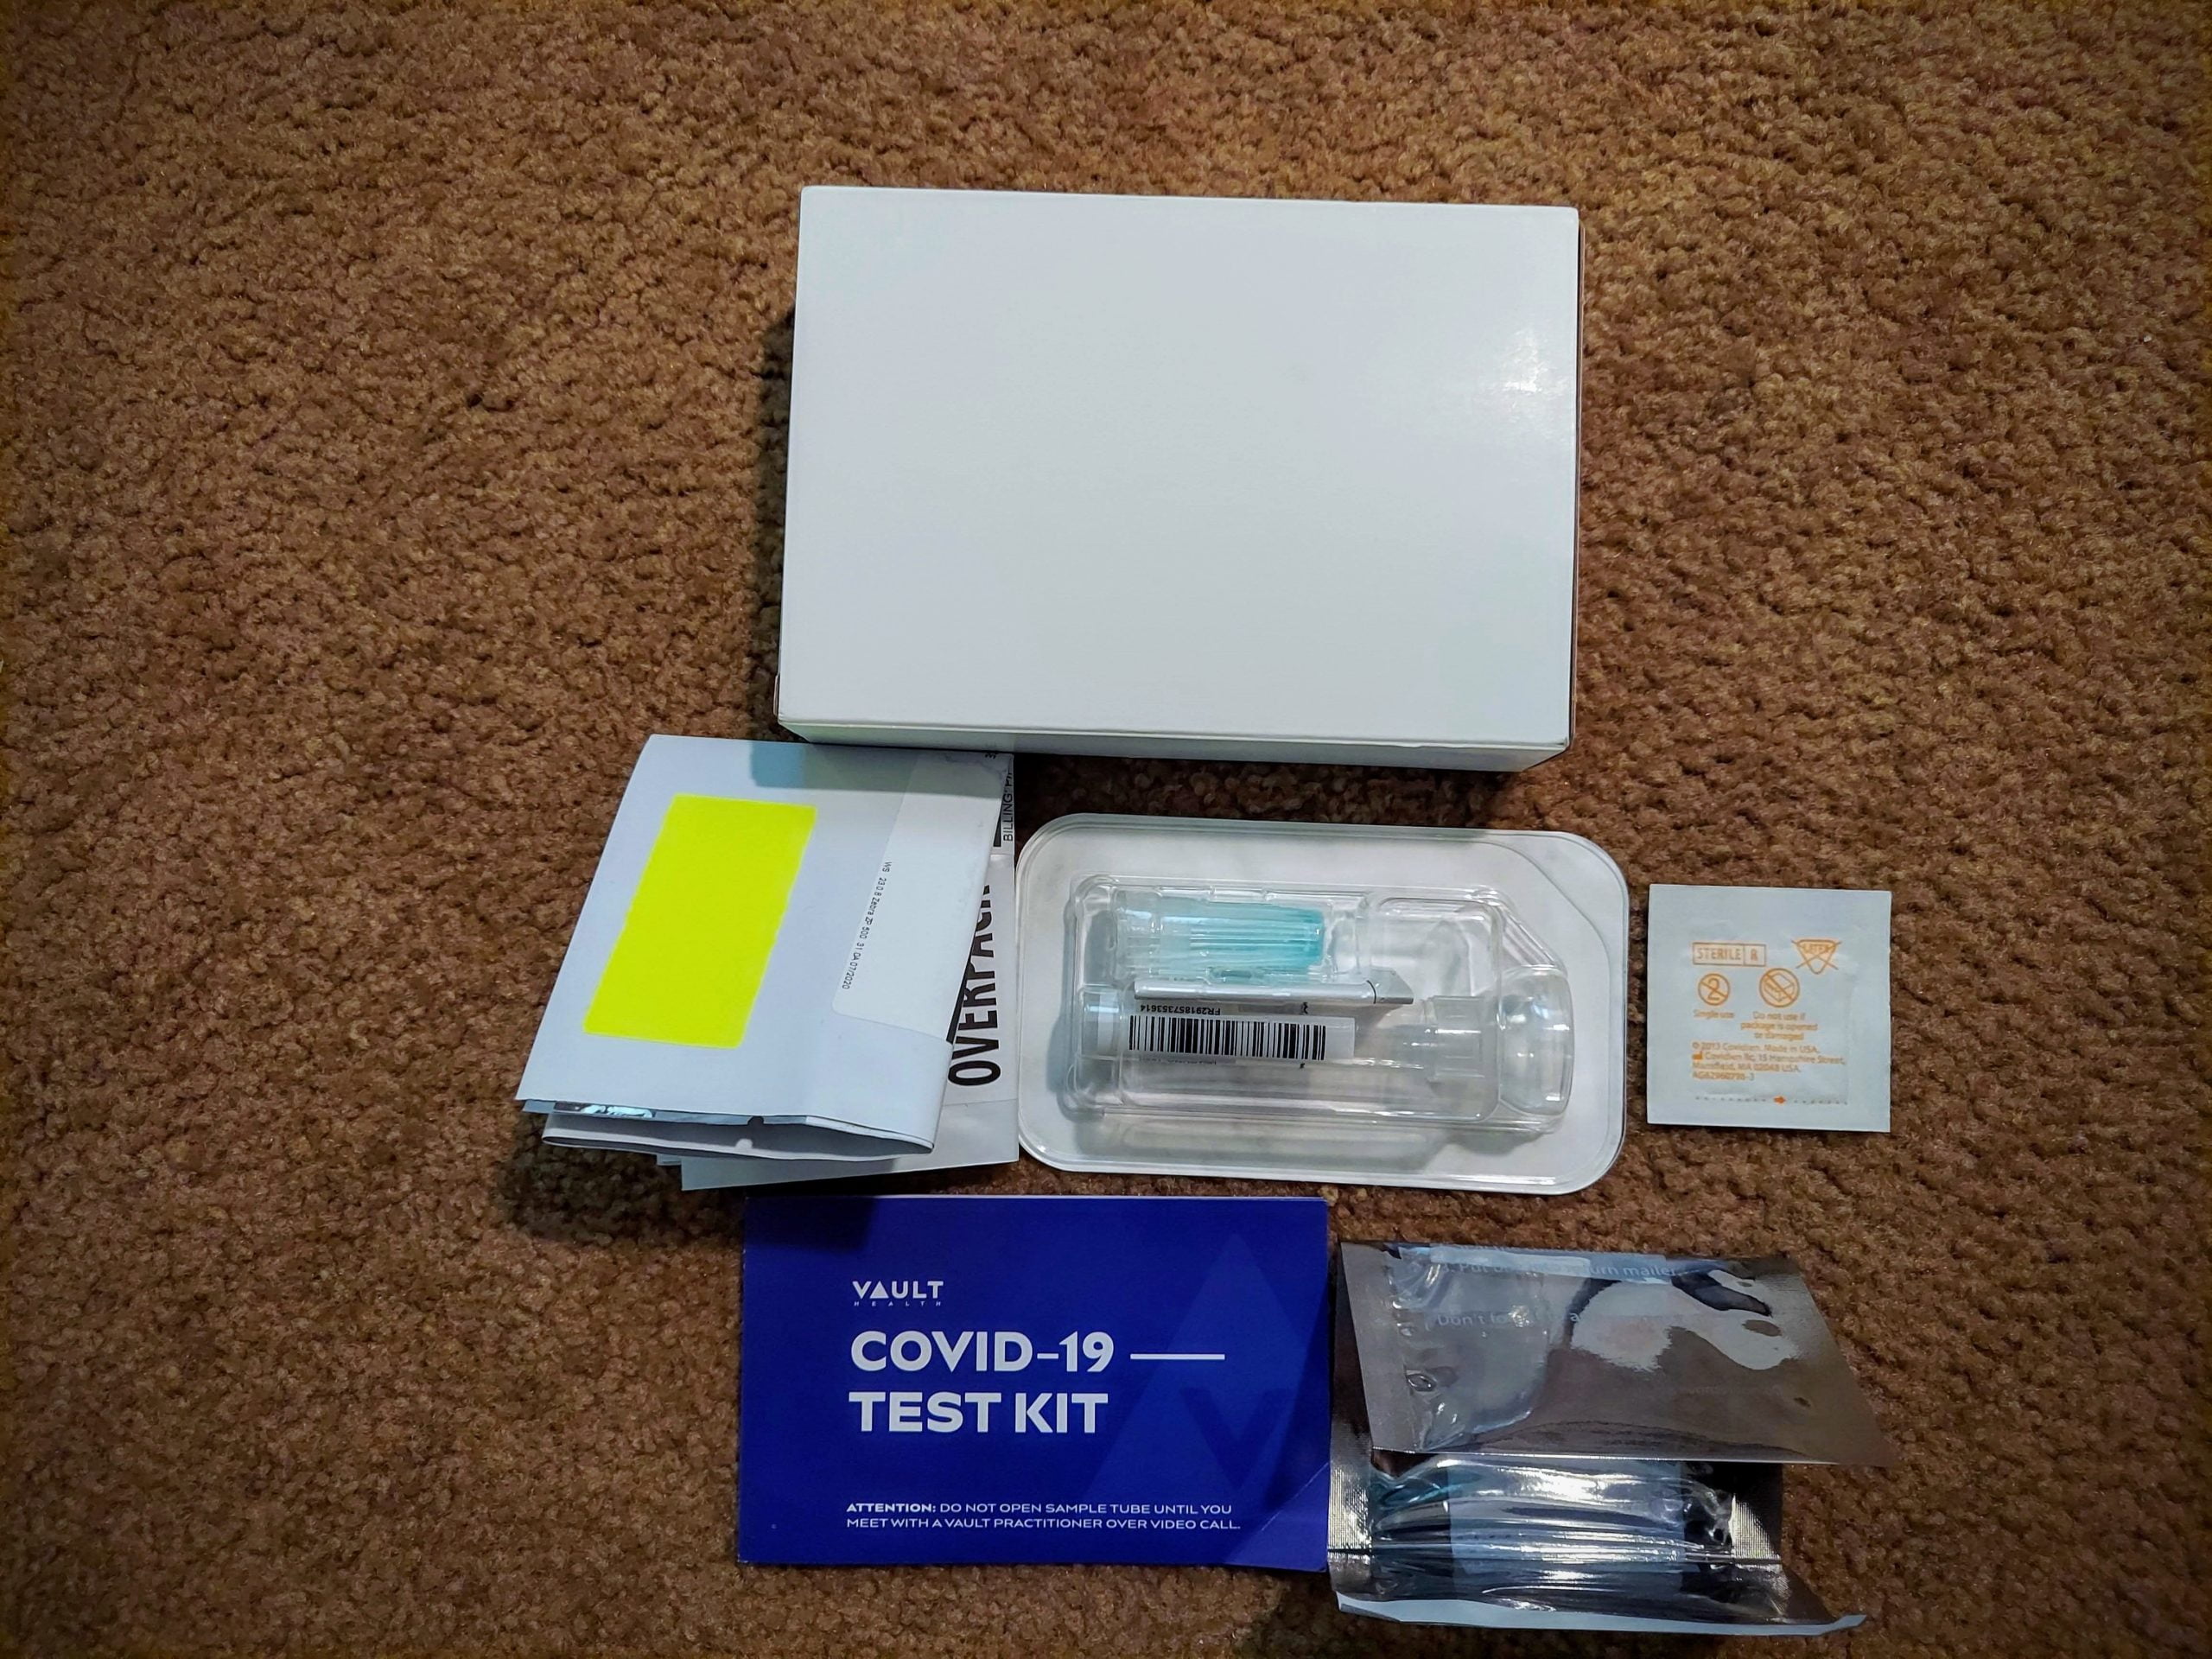
Testing Thru Vault Health
After lengthy discussions with my hubby, I decided to turn to Hawaiian Airlines’ partner Vault Health. Hawaiian Airlines partnered with Vault Health to provide at-home testing kits. This was the most expensive option at $150 per test. However, Hawaiian Airlines passengers are given priority processing to ensure the 72-hour window is met.
How it Works:
You take your test online via a zoom video call where a technician will step by step tell you what to do and observe you administering the test. Don’t eat, drink, smoke, or chew gum for 30 minutes before your video call. When you’re ready, you’ll log in to your Vault Health account and download the Zoom app for your video call. This can be done on your computer, tablet, or phone.
The technician in the zoom video call will instruct you how to open the test’s packaging (don’t do this before your call, it’s crucial you do not open the specimen tube packaging before your zoom call). It should take less than 10 minutes to do the test with the practitioner over the zoom video call.
Afterward, you’ll place your sample tube in the plastic bio bag, and then you’ll place that inside the white box that your kit came in, seal that up and then place that inside the shipping pouch with the pre-paid Next Day Air shipping label.
Drop it off at the nearest UPS store. The lab receives your sample the following day, and you should get your results a day after this. They have a chart to show you examples for when to order your kit, when to take the test, and when you should get results back based on when your flight leaves.
Our Experience Using the Vault Health At Home Testing Kit:
We filled out the online order form for our tests. Each adult must create their own individual order (make sure to use the link on Hawaiian Air’s website for each order). Vault Health also requires an uploaded copy of our photo ID, so the technician who proctors our test can verify we are who we say we are. Within an hour of completing our orders, we received an email notification that provided us with a UPS tracking number for our test kits. Our testing kits were shipped via UPS Next Day Air.
By using Vault Health for our tests, I was able to order our tests almost two weeks before our flight. I ordered ours on a Sunday night, and we received them Tuesday at 10:30 a.m. Look at Vault Health’s recommended schedule for when to order your tests and when to take them.
The testing kit arrived in a nondescript white box that is also the box you ship your test sample back in. It is an ingenious design with low waste. I was impressed with that. Inside the box are instructions, the DNA specimen collection tube, alcohol wipe, a bio envelope to put that in, and a shipping bag pre-labeled with a UPS Next Day Air label for their New Jersey based lab.
My husband and I took turns with our Zoom calls. I showed the technician my I.D., and he had me unpack my kit and then walked me through how to provide a testing sample. Honestly, the hardest part was spitting in the collection tube, once you get that done, it’s just an easy stop at a UPS shipping store, and you’re set!
Make sure you get your sample dropped off before the last UPS Air pickup at your local UPS store. Call and ask when that is or look on their website.
The Waiting Period
The test was the easy part; now, the hard part began. Waiting for our test results. I was so anxious, I felt like the fate of my travel plans were in someone else’s hands. I prayed and I talked to my hubby about it. He got stressed by me being stressed. So I prayed some more and talked to a friend about it.
I dropped our tests off on a Thursday; our flight was scheduled to leave Sunday morning. A hurricane was hitting the East Coast, where our samples were headed. Friday morning, I got up and entered the tracking numbers; I was so happy to see our test samples had already made it to New Jersey. Around 10:00 a.m. PST, we received a notification from Vault Health that the lab received our test samples. More waiting.
Then it happened, on Friday night, at 5:44 p.m., we got the email with our test results. We were COVID-19 negative, and we were going to Maui!
Summary Timeline of our Vault Health Testing Experience:
I ordered the test kit on a Sunday, received it via UPS Overnight Air on Tuesday morning.
We took our test with a lab tech via Zoom Thursday morning before our scheduled Sunday departure, and I dropped our test results off at UPS that morning.
The tests were sent via Overnight Air to New Jersey (I’m on the West Coast) and arrived their Friday morning. We received our negative test results Friday night. I had all day Saturday to pack in peace.
Next Steps After Getting Negative Test Results
After receiving our negative results, I logged into our Vault Health accounts to download the PDF version of our test results. This is required to submit to the Hawaii Safe Travels website. I uploaded the PDF results, and then I also text the team at Chase’N Rainbows to let them know our results were negative. They asked me to send them a copy of the negative results, and the following day I received instructions for checking into our condo.
I also printed copies of the PDF results along with copies of our flights and condo reservations. The state of Hawaii recommends you do this for faster processing and just in case your mobile device doesn’t work.
Lastly, 24 hours before our scheduled flight departure, I logged into my Safe Travels account and completed the Health Questionnaire. Upon completion, you’re sent a QR code, which you’ll want to save as a screenshot on your phone and print out and bring with you. This is required for each airport in Hawaii. We had a connecting flight in Honolulu, so that meant I needed to generate a QR code for our flight from Seattle to Honolulu and then also a QR code for our flight from Honolulu to Kahului. I created two separate trips on their Safe Travels site to do this.
Our Experience at the Airport in Hawaii
Before boarding the plane, our forehead temperature is scanned. Other than this, and of course, everyone wearing face masks, the flight experience was pretty much the same. They gave us one meal, and everyone takes their masks off to eat and then put them back on. There were no additional snack or meal services during the flight. Also, expect that you may be seated next to a stranger, as flights are filling back up again, and they are no longer leaving the middle seats empty.
QR Code Checkpoint at Airport:
We had a connecting flight in Honolulu before continuing to Kahului, Maui. Upon arriving at the Honolulu airport, we were placed in two lines, one for those staying in Honolulu and another for those connecting to other flights.
We stood in line for probably 30 minutes before we stopped at the checkpoint, where they asked for our QR code and proof of negative test results. They also checked our I.D. After that, we were free to head to our gate and get something to eat.
The options available for eating and shopping is one of the things that has changed. Many of the options are closed, and the open ones don’t always offer seating areas or have limited hours. We got food at Burger King in the Honolulu airport as it was one of two options, not counting Starbucks. We then took our food to our seats, where we removed our masks to eat before replacing them again.
Upon arriving in Maui, we once again waited in line to show our QR code, I.D., and negative COVID-19 test results. Thankfully, the Maui line was much shorter than the line at the airport in O’ahu.
We asked if we needed a paper to show we had been screened with negative test results; the airport agent we spoke with said no, we could show our test results if asked. However, the car rental counter agent said the airport checkpoint had been providing a piece of paper and that we should take a screenshot of our Safe Travels page that showed the negative results received. She said we could show this if needed.
Mask Requirements in Maui
No one in Maui asked us to show proof that we are exempt from the 14-day quarantine. However, I overheard someone saying if you take a boat tour, you must show this. Our Maui experience is the same as previous trips, except for the mask mandate and that many businesses are still closed. You don’t need to wear one at the beach when socially distancing or in the water. However, when in public areas or places of business, a mask is required. We are still enjoying the water, still enjoying the sunshine, and still loving our time in the beautiful Hawaiian islands!
Tips for Researching and Planning Your Trip
Regularly review Hawaii’s COVID-19 Portal* as this is the official State of Hawaii page for traveling under the COVID-19 restrictions. I made sure to check it multiple times during the weeks leading up to my departure. I didn’t want to miss any important announcements.
Another method I used for staying up on any current changes was by searching “Hawaii travel” on Google, and then I click the “News” tab and sort by the past week. This way, I read about any recent press releases that might be pertinent to my trip.
I verified the cancellation policy with my condo rental. When my hubby and I visit Maui, we stay in a condo. We have had wonderful experiences booking our condos through Chase’N Rainbows: West Maui Condos. We appreciate the fantastic customer service and communication that we get with the Chase’N Rainbows team. They were quick to respond to our questions and keep us updated on any COVID-19 updates that would affect our stay with them. I also emailed them any questions and concerns I had and was so appreciative of their fast replies and willingness to work with us and the ever-changing travel situation. If you’re headed to Maui and want a condo on the west side, consider booking with Chase’N Rainbows.
No matter who you book through, make sure to ask them any questions you have, such as, “if our COVID-19 tests come back negative, can I still cancel and receive a full refund?” You will also want to keep them updated about any trip delays and as soon as you receive your negative test results, let them know as they need confirmation to finalize your trip plans.
*Always verify you have the most up to date information when planning.The COVID-19 situation, restrictions, and regulations are constantly changing. Always check for the most current information.
Call before visiting a restaurant unless you know for sure that it is open. Google is not entirely up to date with what businesses are currently opened, closed permanently, or temporarily closed. It is pretty good, but not 100%. To avoid any disappointment, it is best to verify first before heading out. This is the same when booking tours. Call and find out if they’re operating and what restrictions are in effect at that time.
Sadly, many businesses closed permanently due to the loss of business in 2020, and even more, are still temporarily closed. When possible, spend your money where it will help the local economy. They really need it right now. Many more places were opening in December in anticipation of increased tourism, so it may have changed greatly by the time you arrived.
Final Planning Thoughts On Post-COVID Travel to Maui
Try not to stress too much. We contacted our condos ahead of time to find out their cancellation policy if our test results didn’t come back in time or were positive and we had to cancel our trip. Most places have a very lenient cancellation policy due to the demands and restrictions of living in a post-COVID world. Once we knew we had options for canceling that didn’t cause us to lose our money, we felt a lot better about moving forward with our trip plans.
Some people are not ready to start traveling yet, and that is okay. However, many places, like Hawaii, rely almost solely on tourism for their economy. If you’re healthy and want to travel someplace, you couldn’t do much better for a travel destination than Hawaii.
Hawaii is a diverse state with a diverse set of islands. Be respectful of the local customs, try to support local businesses when you visit, and soak in the sun and relaxing atmosphere of this incredible destination. I know so many people need time to relax and time to recover from this year. Perhaps more so than any other year. So if you need a place to get away, Hawaii can offer you a respite from your cares and perhaps some mental healing too.
I hope this article helps you plan your trip to Hawaii. I know I’ve repeatedly said this, but I cannot stress enough how fluid the COVID-19 situation is and how important it is to make sure you get the official travel information from Hawaii’s state COVID-19 webpage.
Additional Articles You Might Enjoy
*Please note these articles were written before 2020. Please keep in mind some of the places listed may not currently be open for business. I am writing this from Maui and have already encountered favorite restaurants that are now permanently closed for business due to the COVID-19 shutdown. I will update my posts shortly to reflect this.
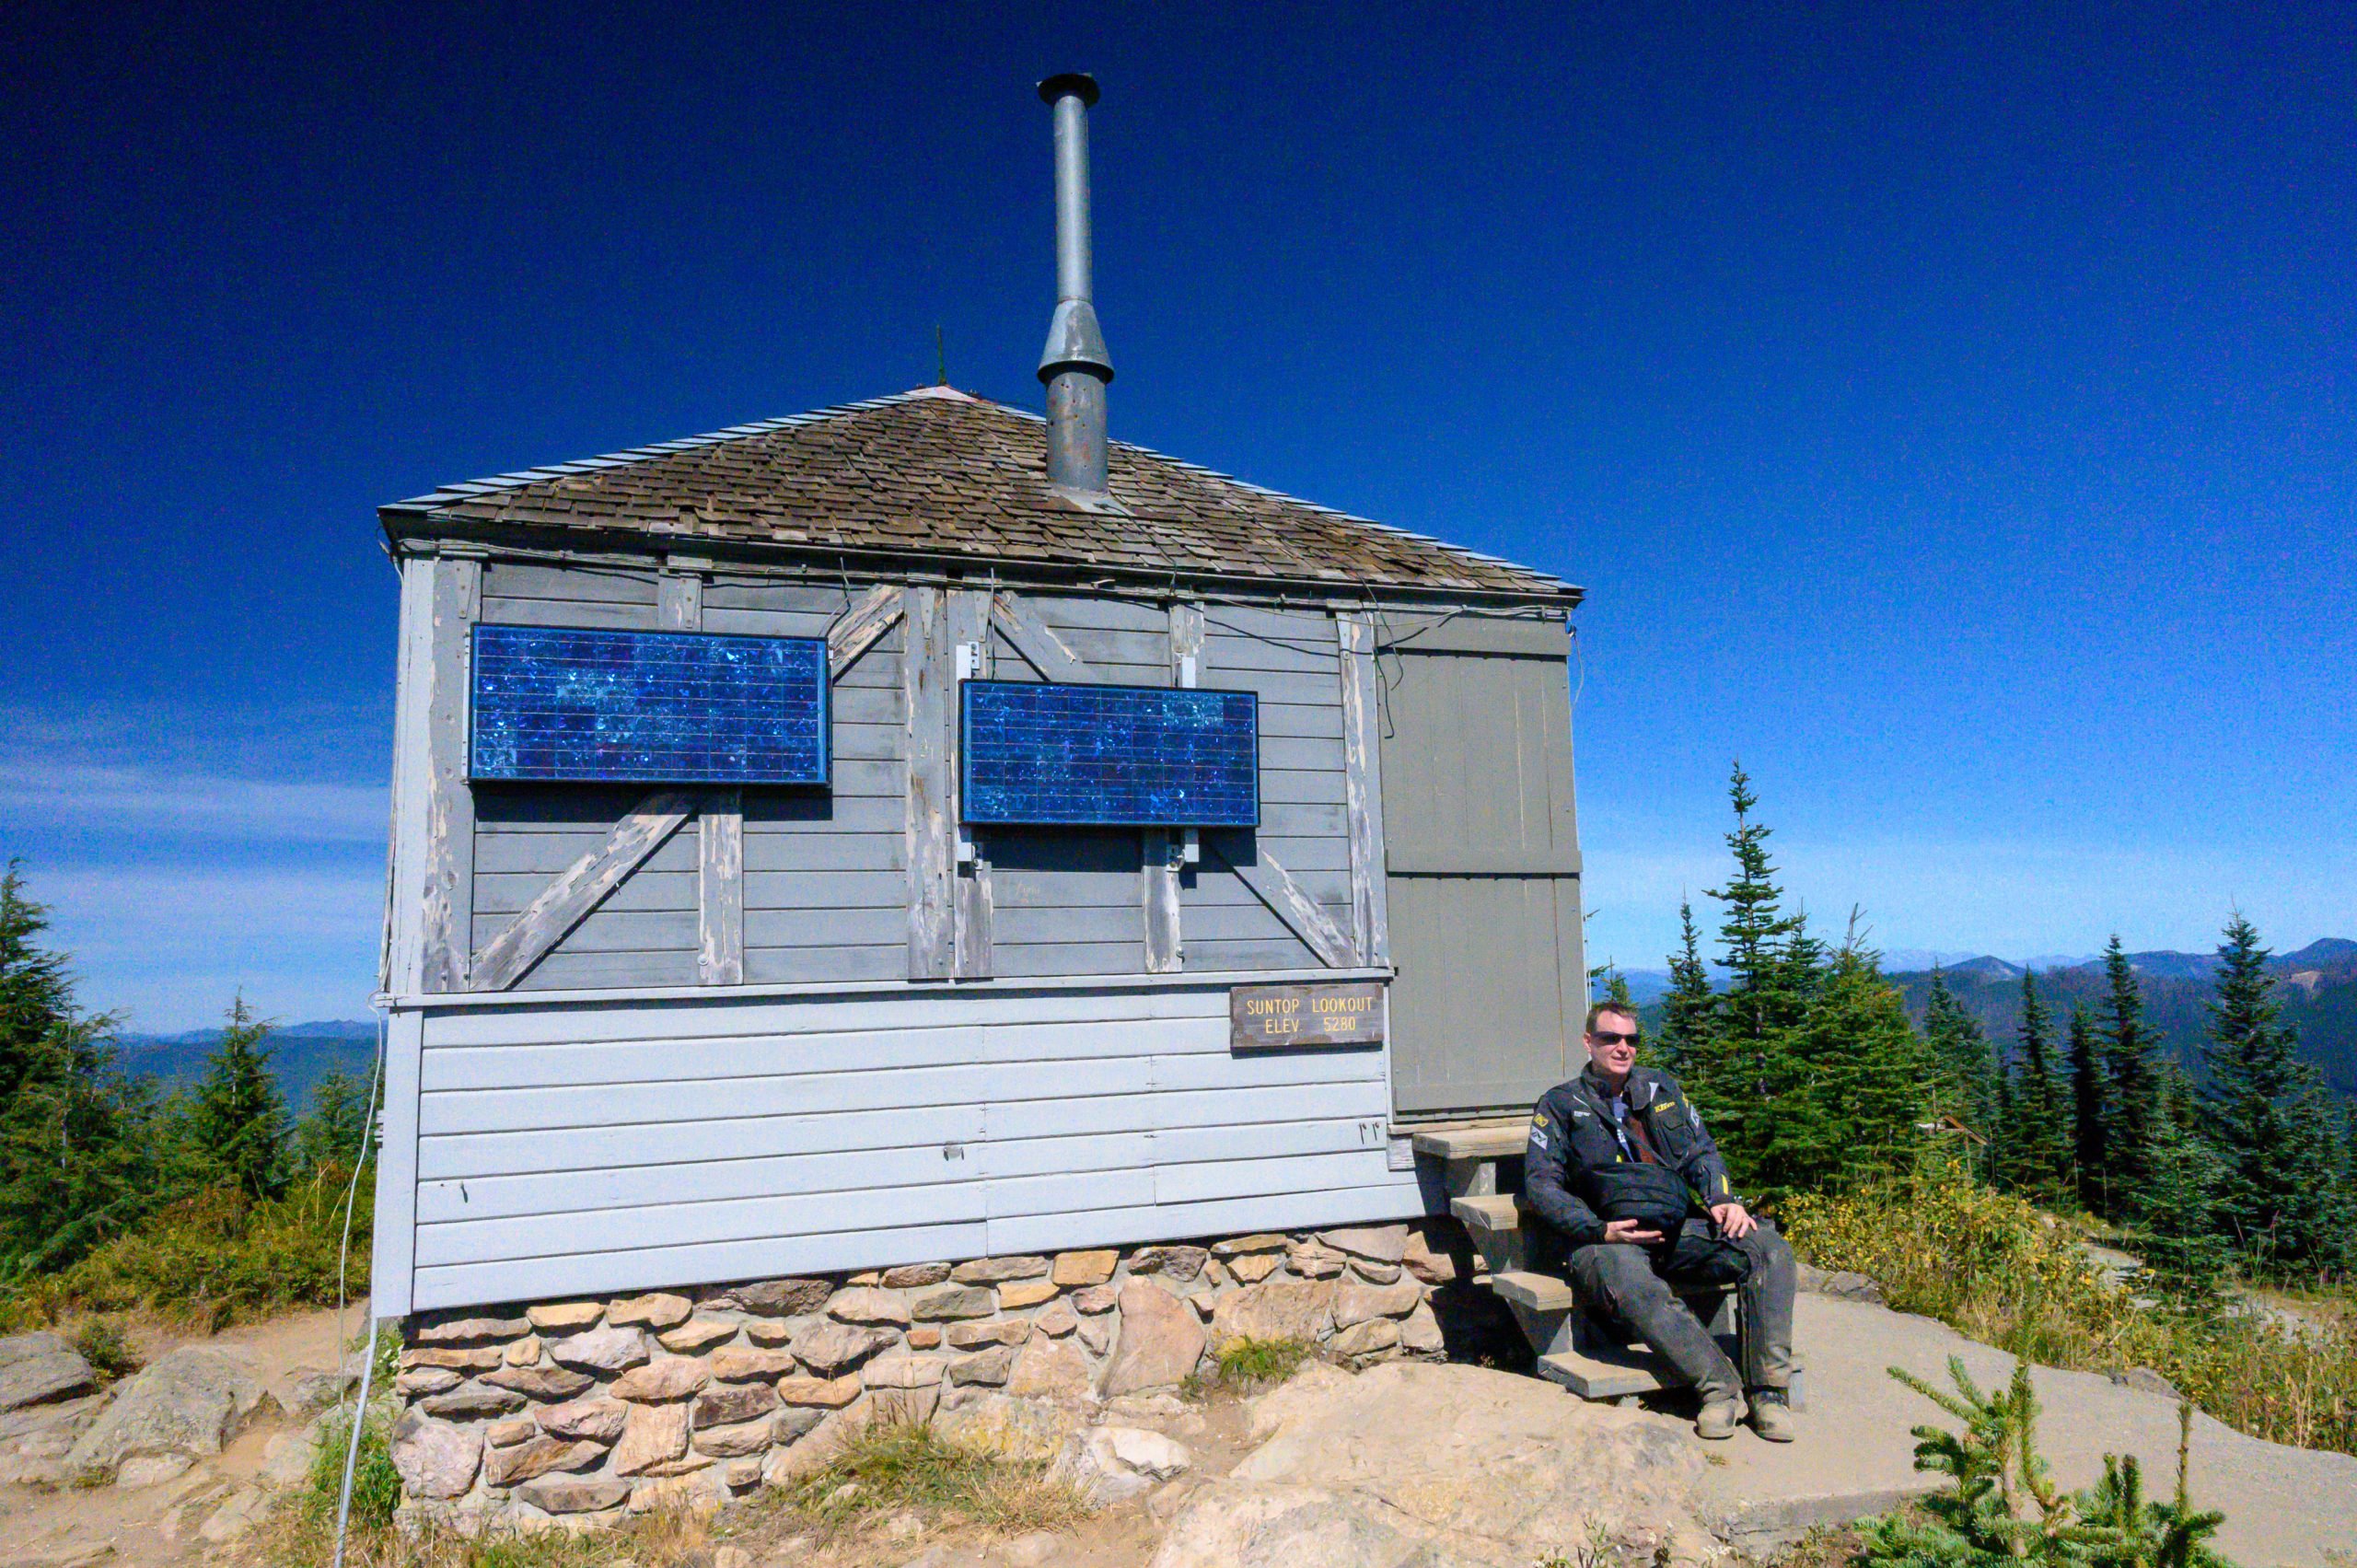
Do you want stunning views of Mount Rainier and the surrounding mountain ranges but without a long hike? Then look no further than Suntop Lookout. Suntop Lookout was built in 1933 as a fire lookout and also served as a U.S. Army Aircraft lookout site during WWII. It is one of the only fire lookouts in the area that I know of that you can drive all the way up to see. That is, if the gate is open, I’ll explain more about that below. However, suffice it to say, even if the gate is closed, it’s a short hike to incredible panoramic views!
Getting to Suntop Lookout
From the town of Enumclaw, head east on SR 410 for about 24 miles. About 6 miles after you pass through the town of Greenwater, you’ll make a right onto Forest Service road 73 (FS 73). It is the first right after passing the winter chain-up area.
Follow FS 73 for a little over a mile before you make a left on to FS 7315. Continue up forest road 7315 for about 6 miles before reaching Suntop Lookout.
*Please note that the gate to Suntop Lookout may be closed about a mile below the lookout. If this is the case, you’ll need to park below the gate and hike up the road or the trail just below the gate.
Recreational Pass Required
A Northwest Forest Pass is required to visit the Suntop Lookout and picnic area. I did not see a pay station along the road either, so you’ll want to purchase your recreational pass before driving up. You have the option to buy a $5 day pass or a $30 annual pass.
What Kind of Vehicle Do You Need?
Road Conditions:
The road to the Suntop Lookout is a mostly flat gravel road. However, there are some very deep potholes and in one section of the road, some pretty deep grooves created by water rushing down the mountain.
Cars
I recommend you have an AWD vehicle or one with some ground clearance. That said, I did see people up there with minivans and small sedans.
Motorcycles
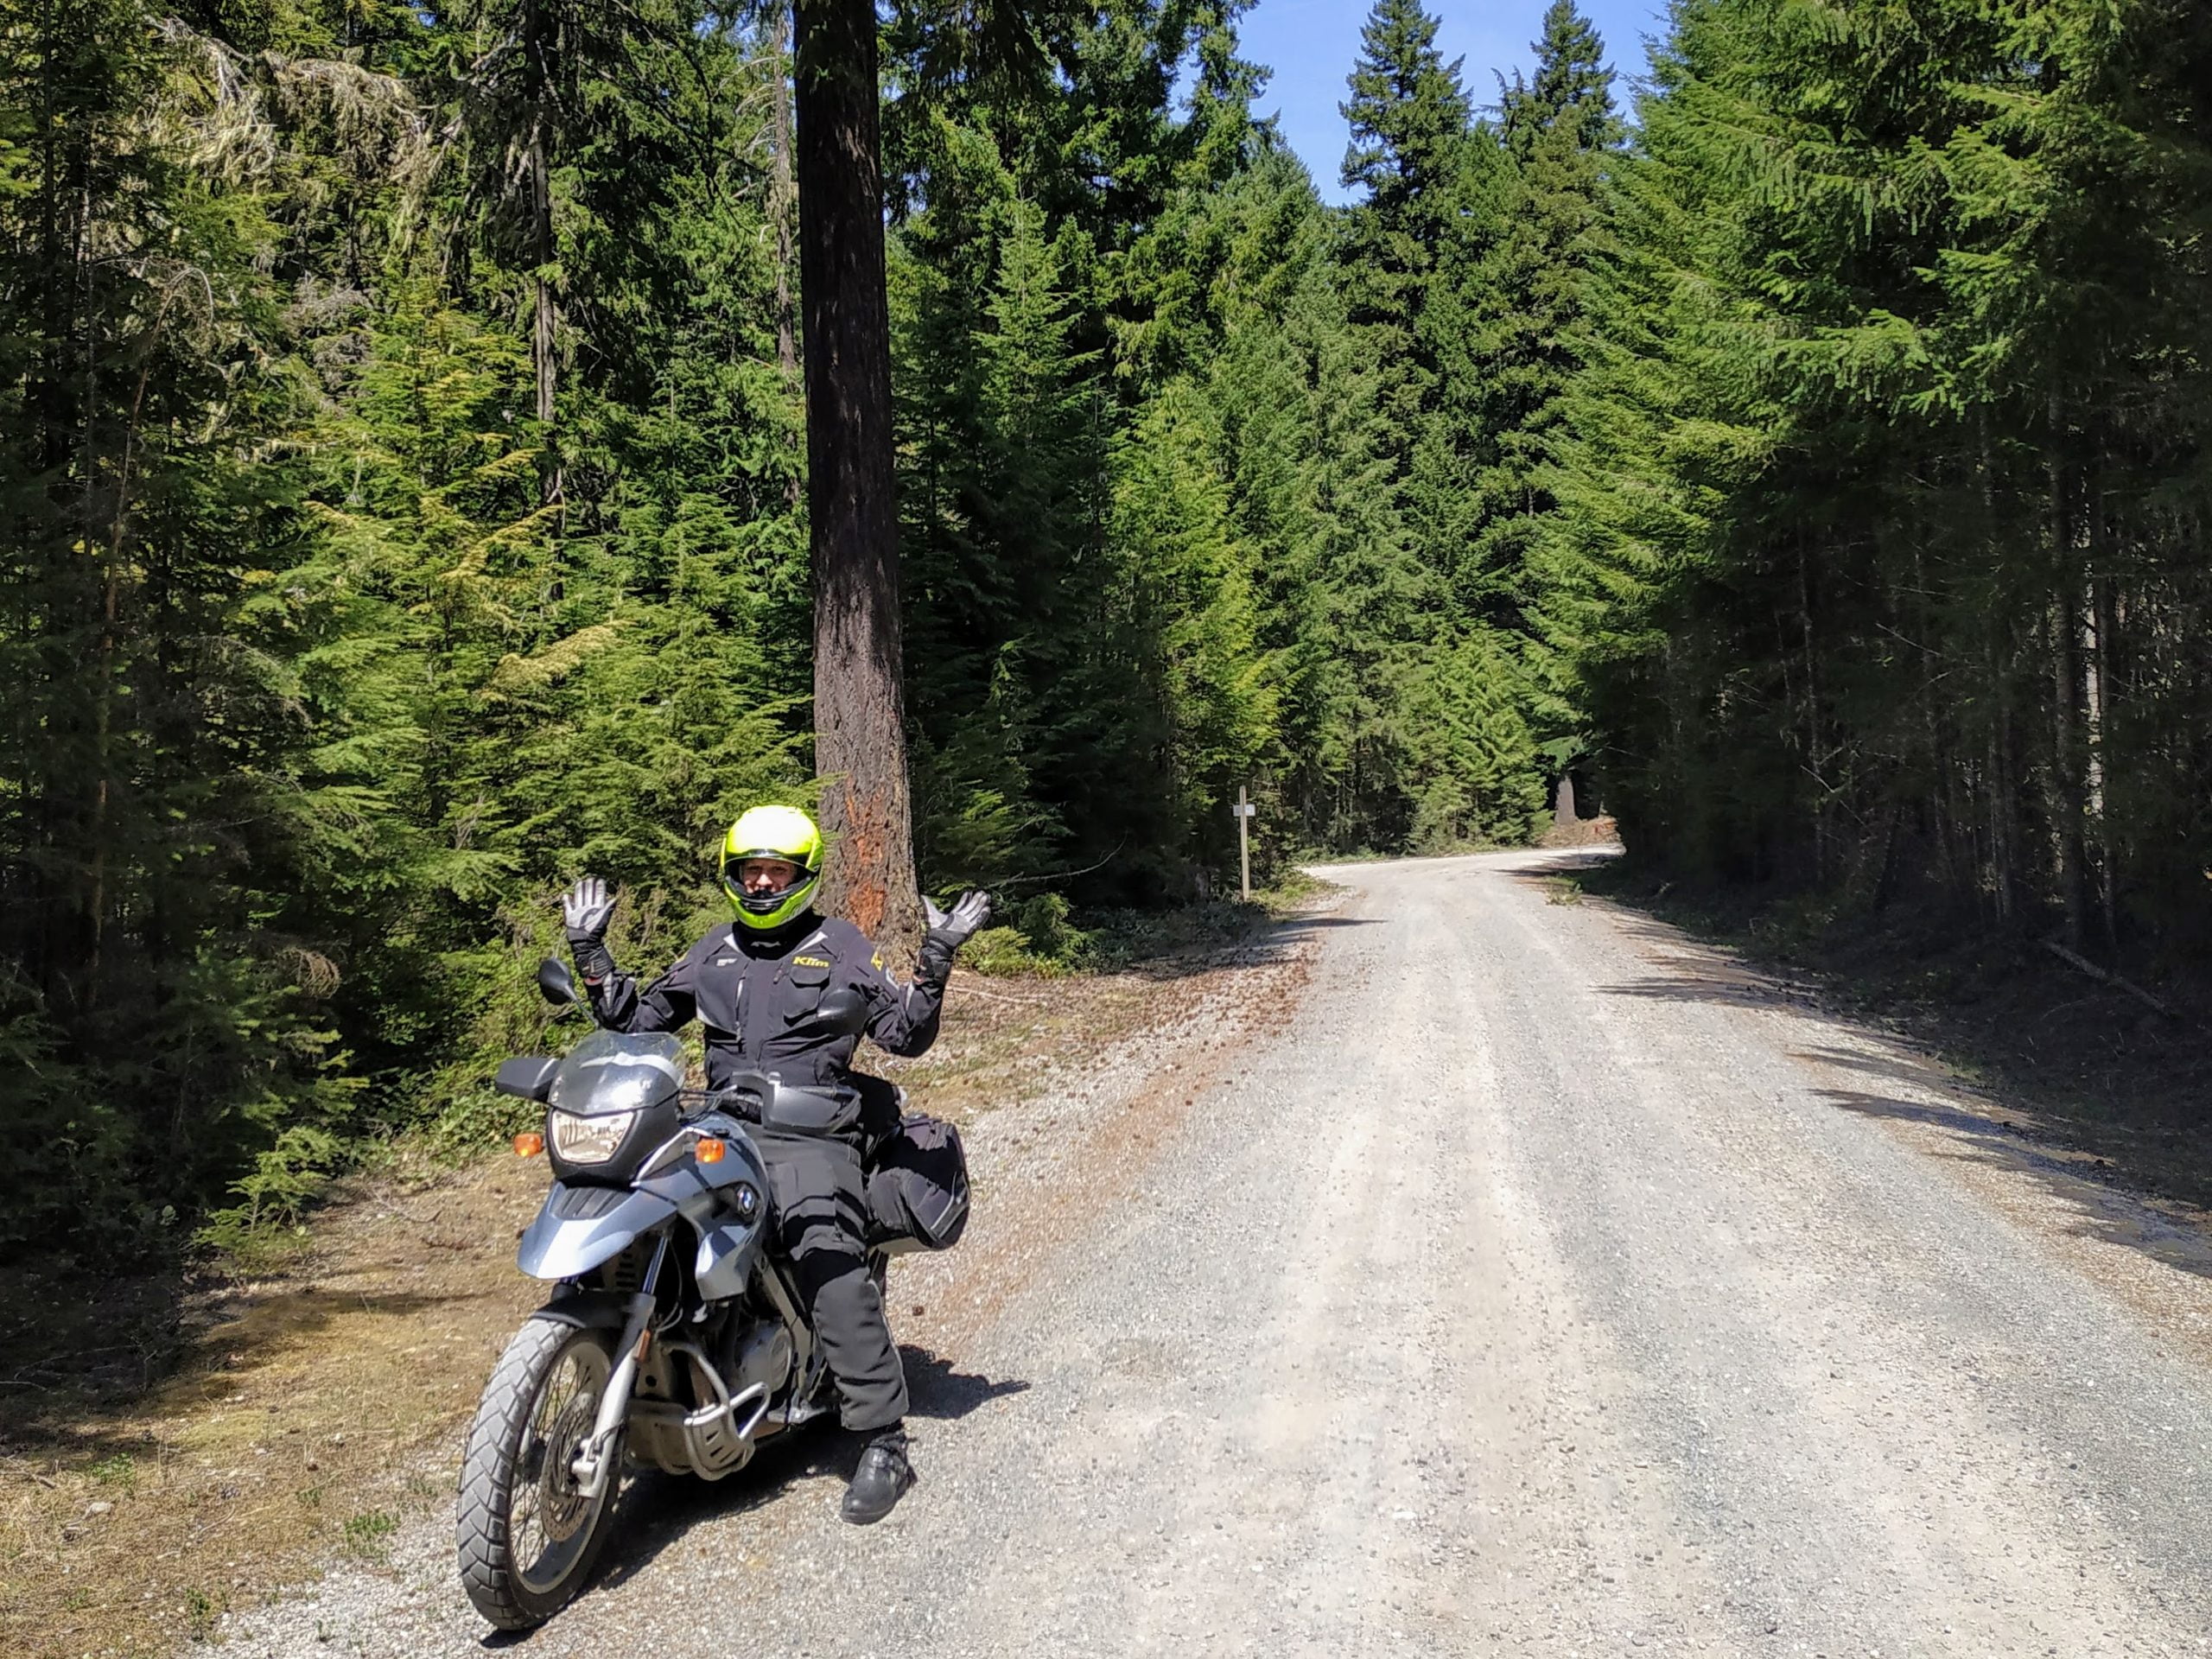
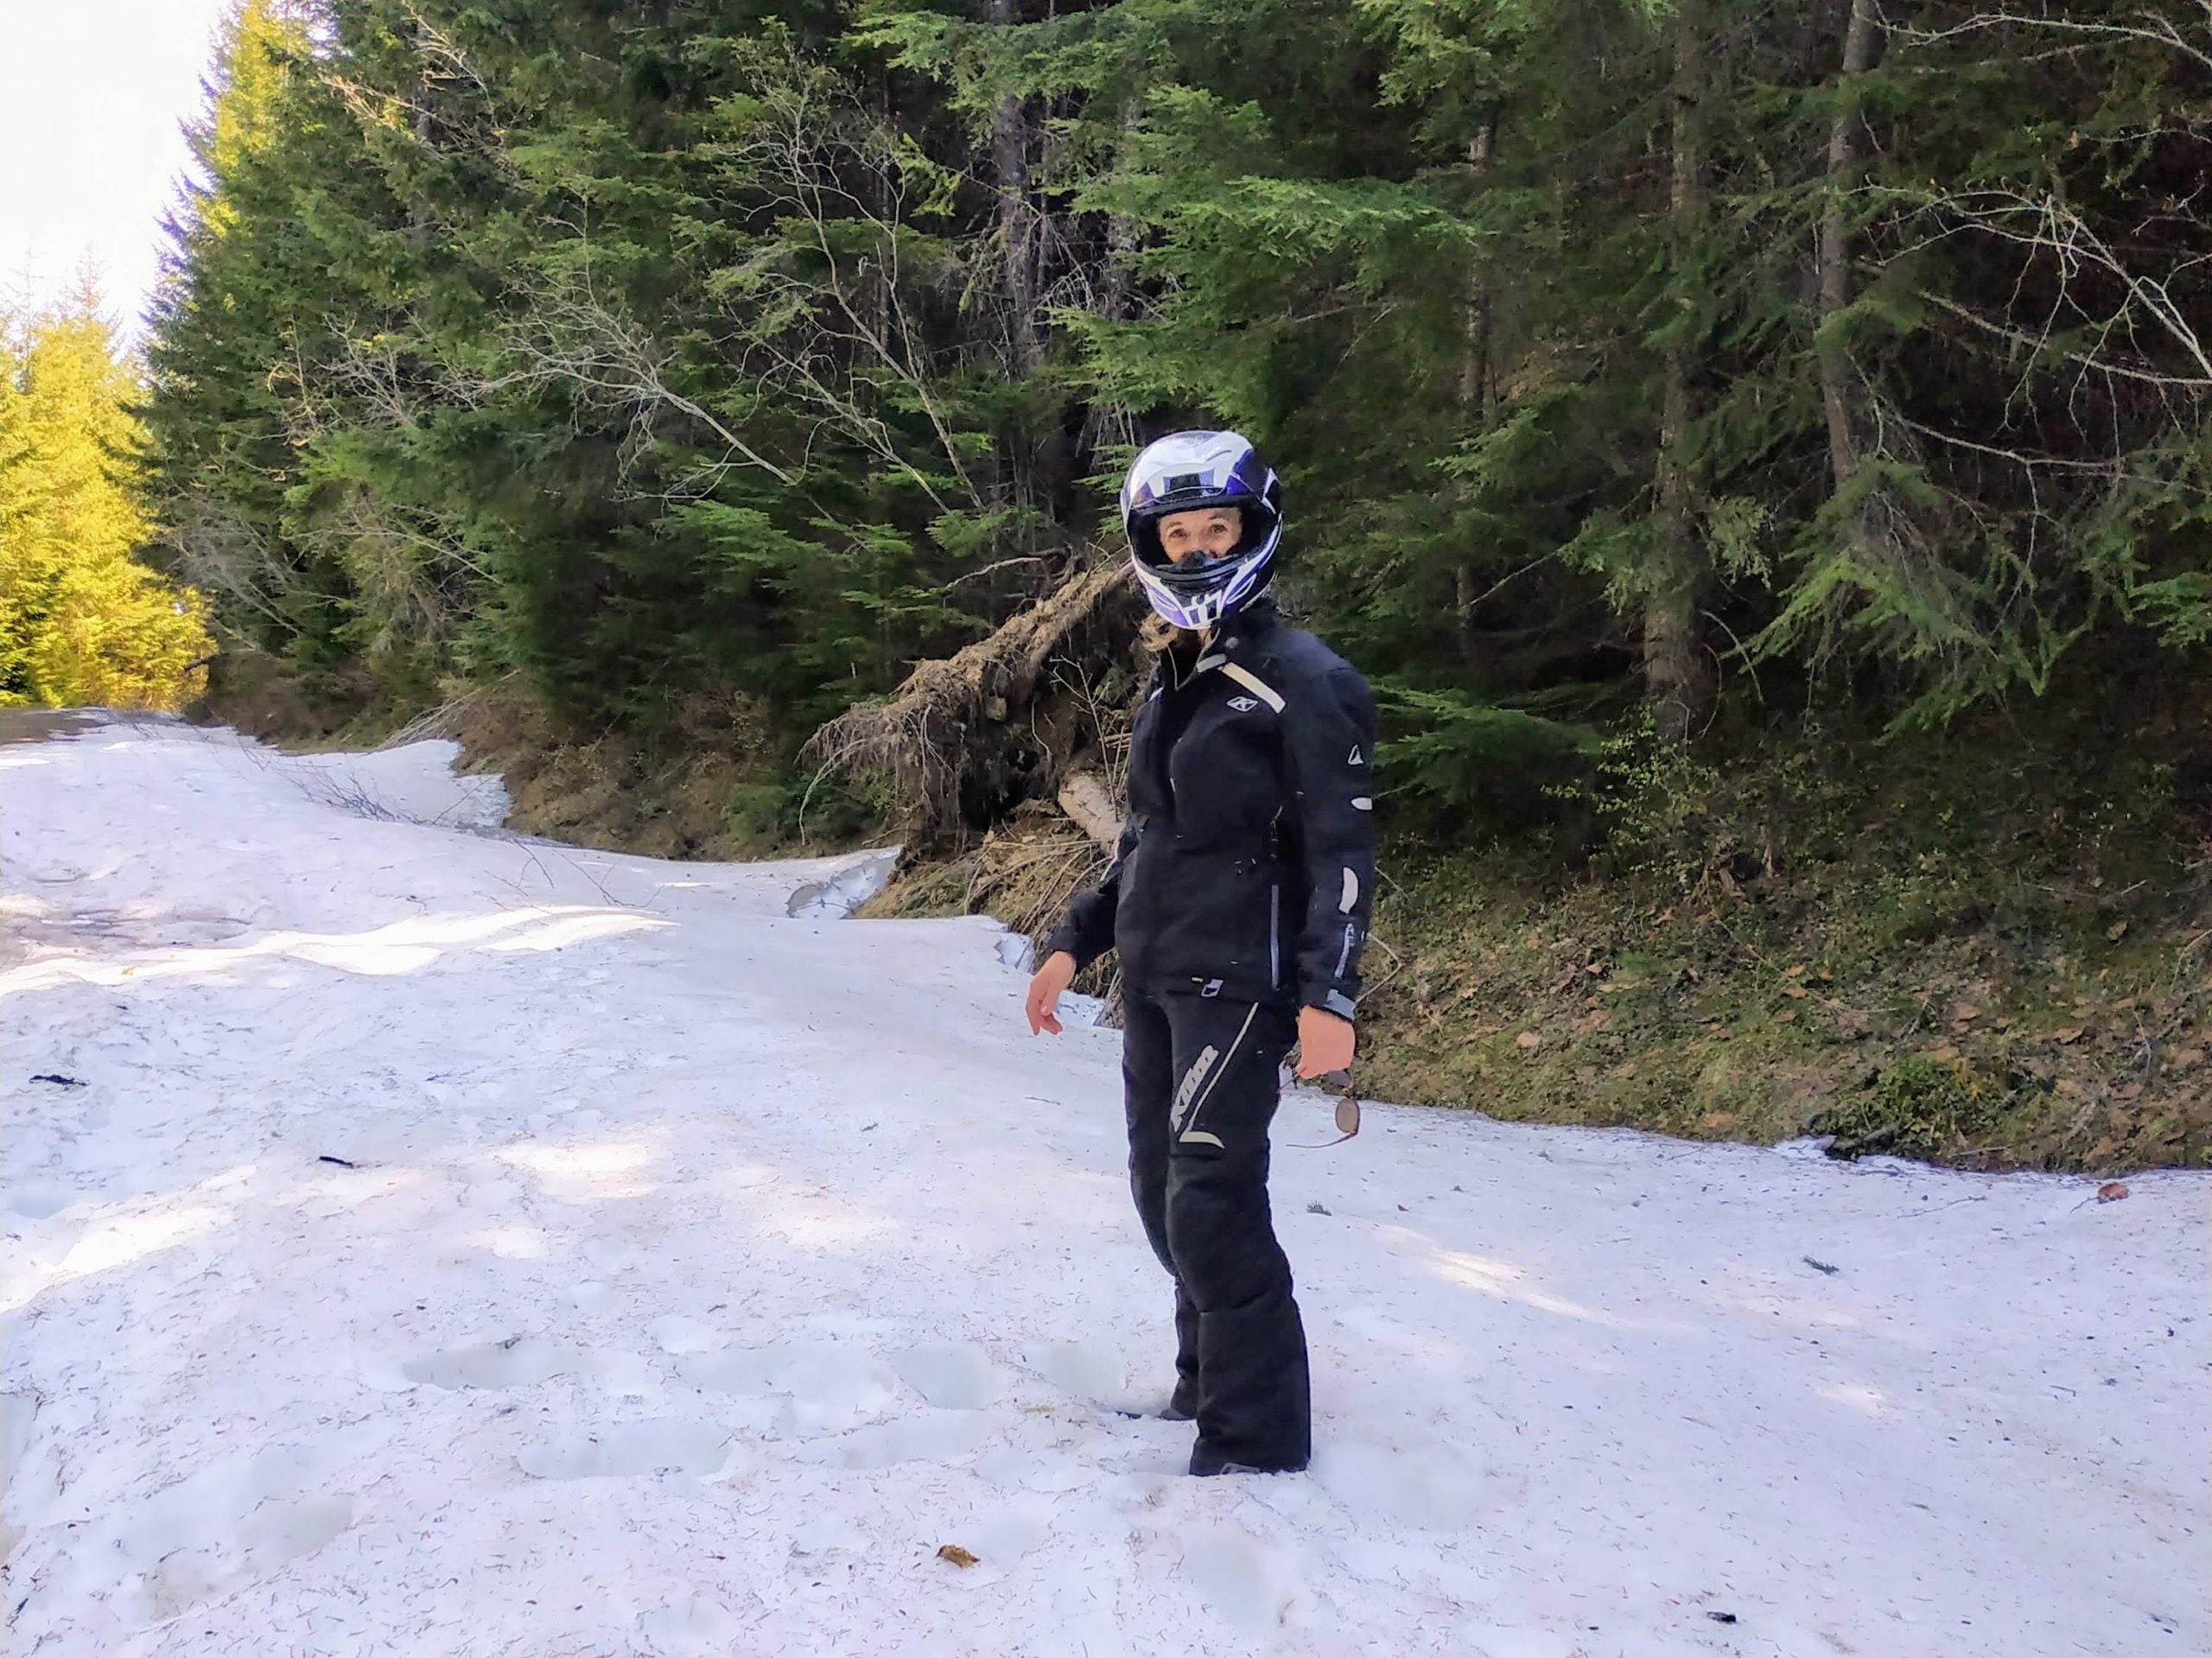
This is the option my hubby and I chose. It is easy to swerve around potholes and makes for a fun ride unless, of course, you’re stuck behind a car choking on dust. Okay, even then, we have fun! If you have a road-licensed dual-sport or motorcycle set up for off-road riding, this is a great option. I even saw a couple of Harley riders up here. However, I wouldn’t recommend a street bike.
One thing to consider when riding up on your motorcycle is that if the gate is closed, you will need to hike up the rest of the way in your gear. Plan ahead and make sure you have boots and clothing you’ll feel comfortable hiking in. We did it with our gear, but it was hot and less than ideal, but do-able.
Mountain Bikes
This area is very popular with mountain bikers. We saw some people who had their bikes transported to the gate, and then cycled to the top from there and then back down. However, others made the entire ride up, which I thought was pretty impressive! From what I have learned, there are a bunch of excellent mountain biking trails in the area near Suntop Lookout.
Best Time to Visit Suntop Lookout
Summer & Fall:
Summer and early fall are when most people will want to visit Suntop Lookout. The road is typically free from snow during this portion of the year and, therefore, the most accessible. It is also a drier and more pleasant time of the year to visit Suntop.
Spring:
Depending on the snowpack from winter, the road will most likely still have snow. My hubby and I tried riding our motorcycles up one year over Memorial Day Weekend and hit snow about 2 miles below the summit. It depends on the year, but if you want to be able to drive all the way up, or at least to the gate, then summer would be my recommendation for when to come.
Winter:
I have not attempted visiting Suntop Lookout during the winter, but I read that it is a popular snowshoe and cross-country ski destination. Many people snowshoe or ski up the road in the winter. You will need chains and an AWD vehicle to access the sno-park during winter.
Hiking to Suntop Lookout When the Gate is Closed
If you find the gate across the road on your way up to Suntop, don’t worry, it’s only a short hike to the top from here. From the gate, you have two options for hiking to Suntop: walking up the road or taking the trail. Either option will take around 30-40 minutes at a slow, steady pace before reaching the top.
Walking Up the Road
If you hike up the road, you’ll have an easy but steady incline to the top. Hiking the road is my recommendation if you have any mobility issues that might make it hard when walking on a narrow trail with lots of loose rocks. The road has less shade on hot days, so make sure to bring a bottle of water before making the walk up. It is about 0.8 miles to walk from the gate to the Suntop Lookout via the gravel road.
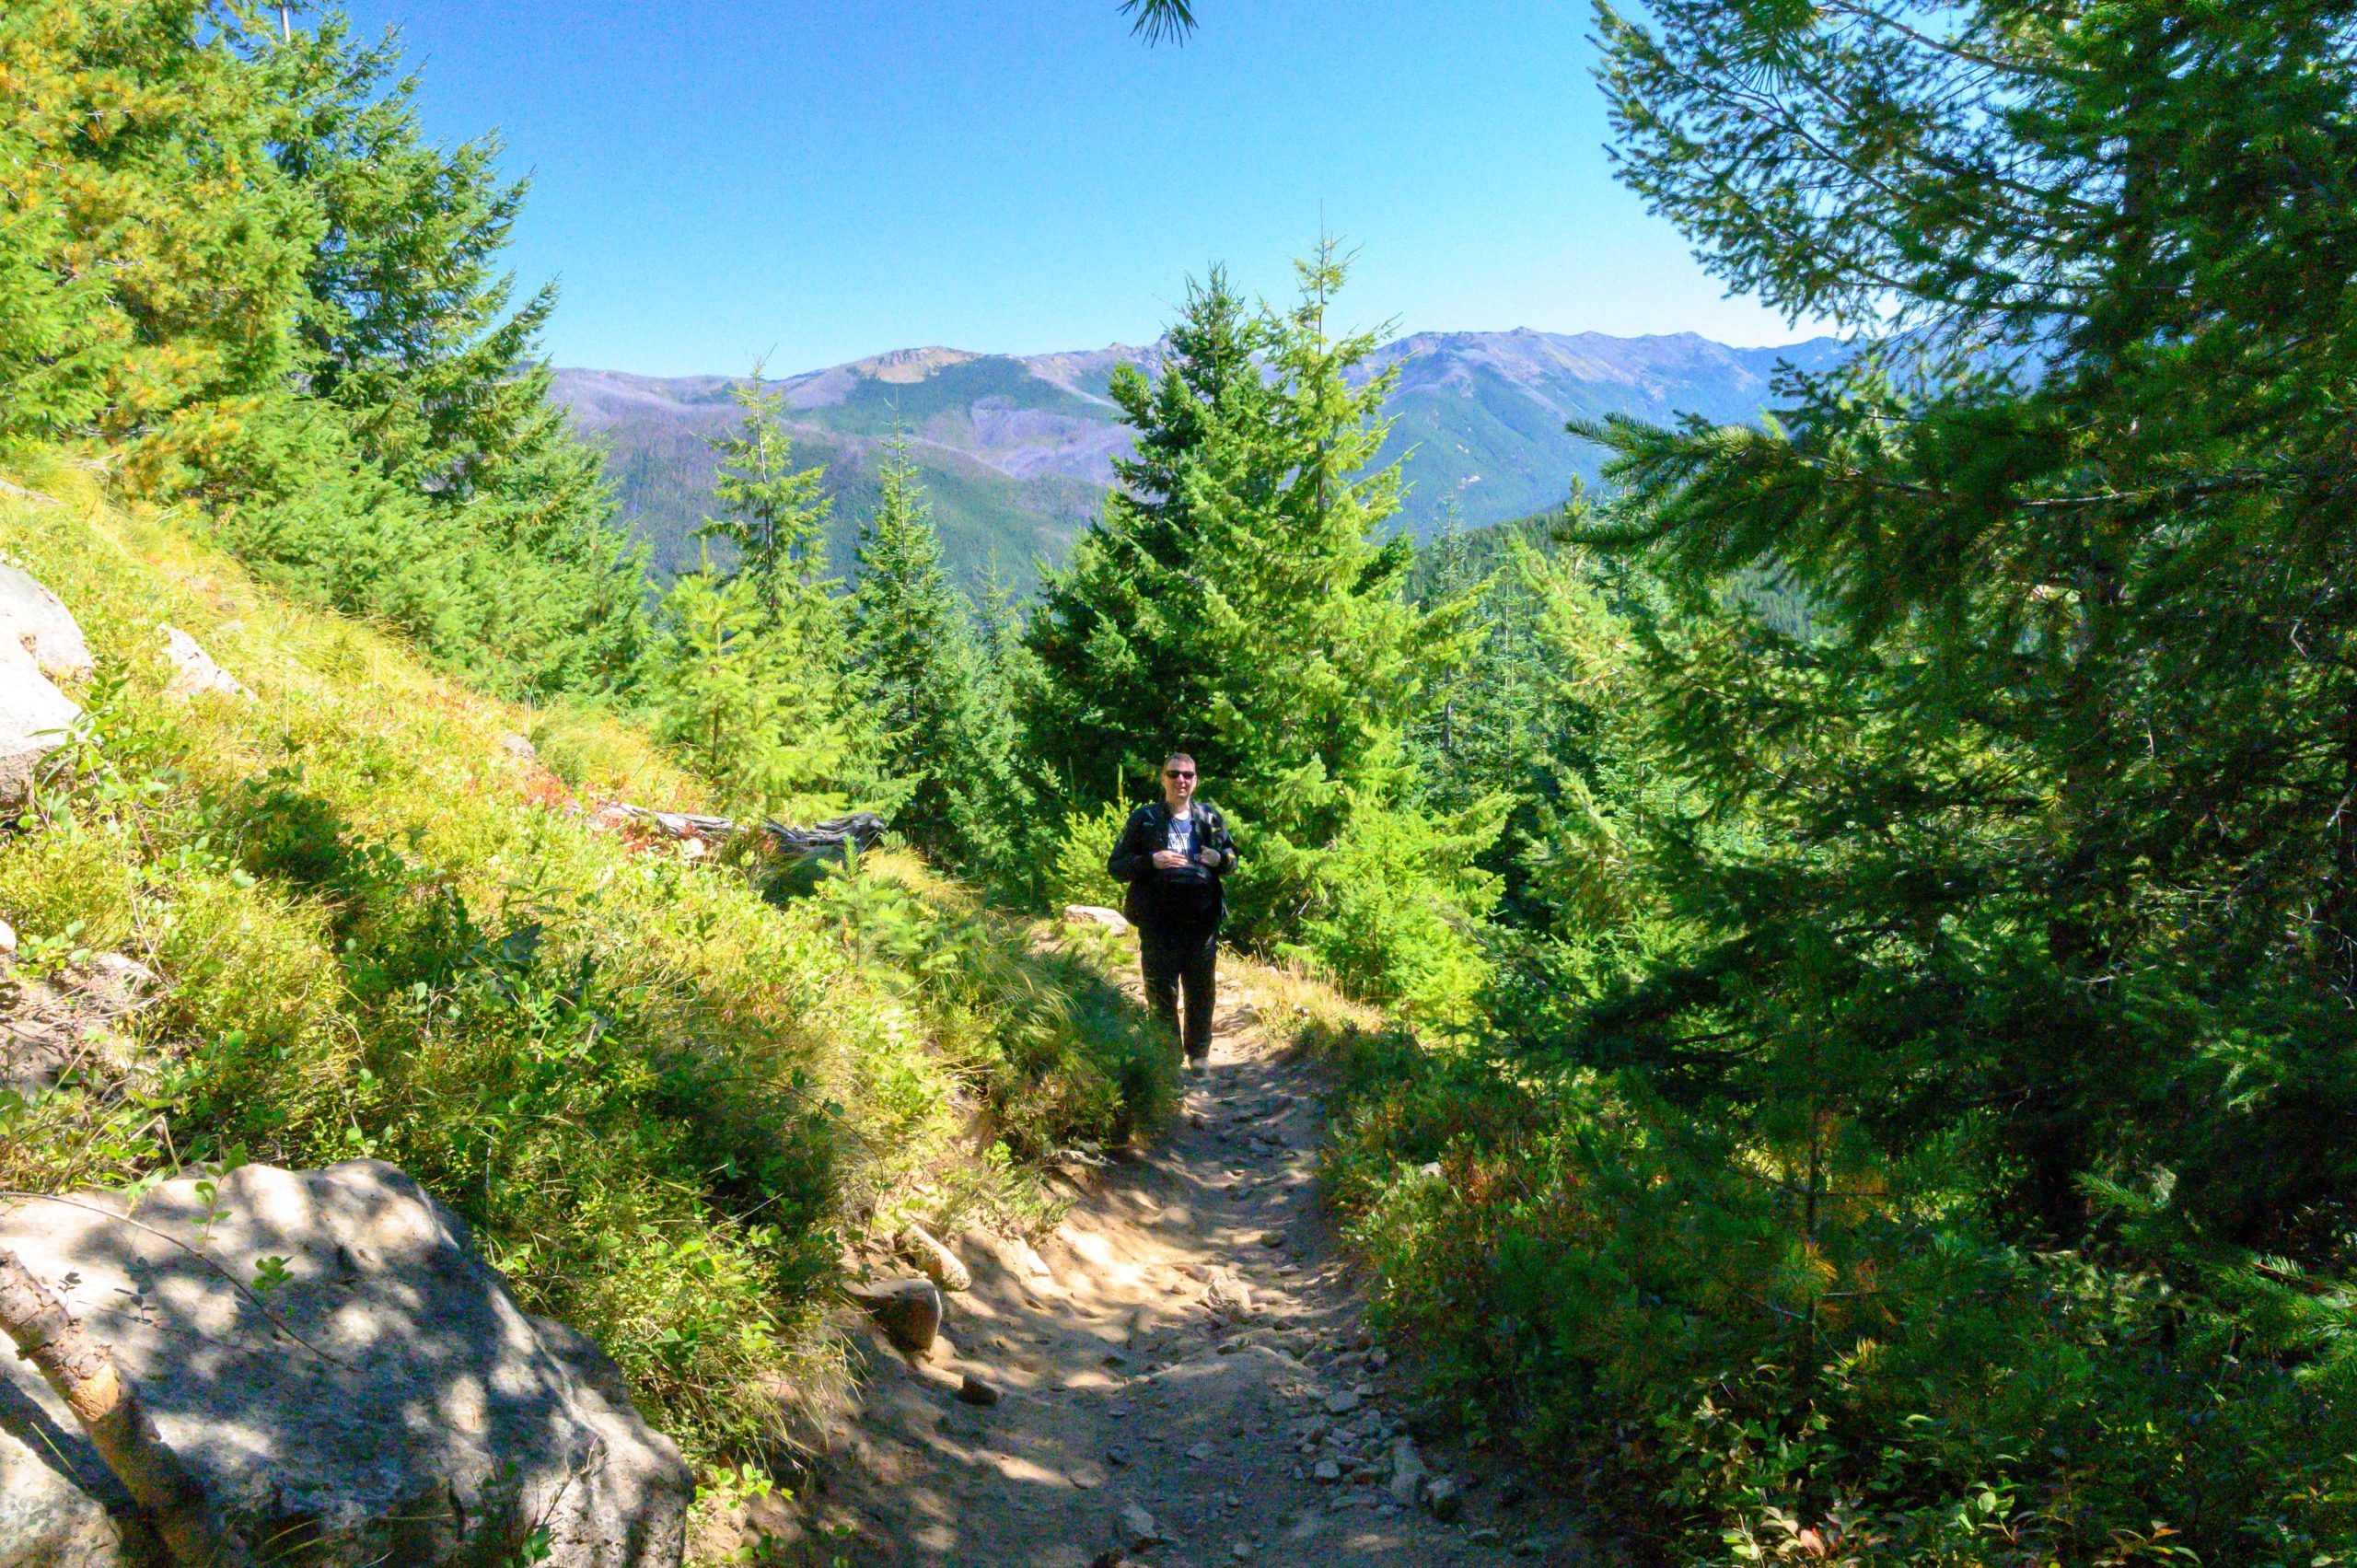
Jake is hiking up the trail just past one of the Mt Rainier viewpoints you’ll see along the way.
Hiking the Trail to Suntop Lookout
There is a trailhead just below the gate on the left side of the road (when facing the gate). It is only a 0.5-mile hike to the lookout via the trail. The trail to Suntop is narrow, and there are a lot of loose rocks along the path. I would still classify the hike up the trail as easy. However, due to the narrow trail, loose rocks, and sometimes steep incline, I think it is best for individuals without mobility issues and are in reasonable shape. I also recommend bringing hiking poles. That said, I passed small children and families along this trail that appeared to be traversing it without issue.
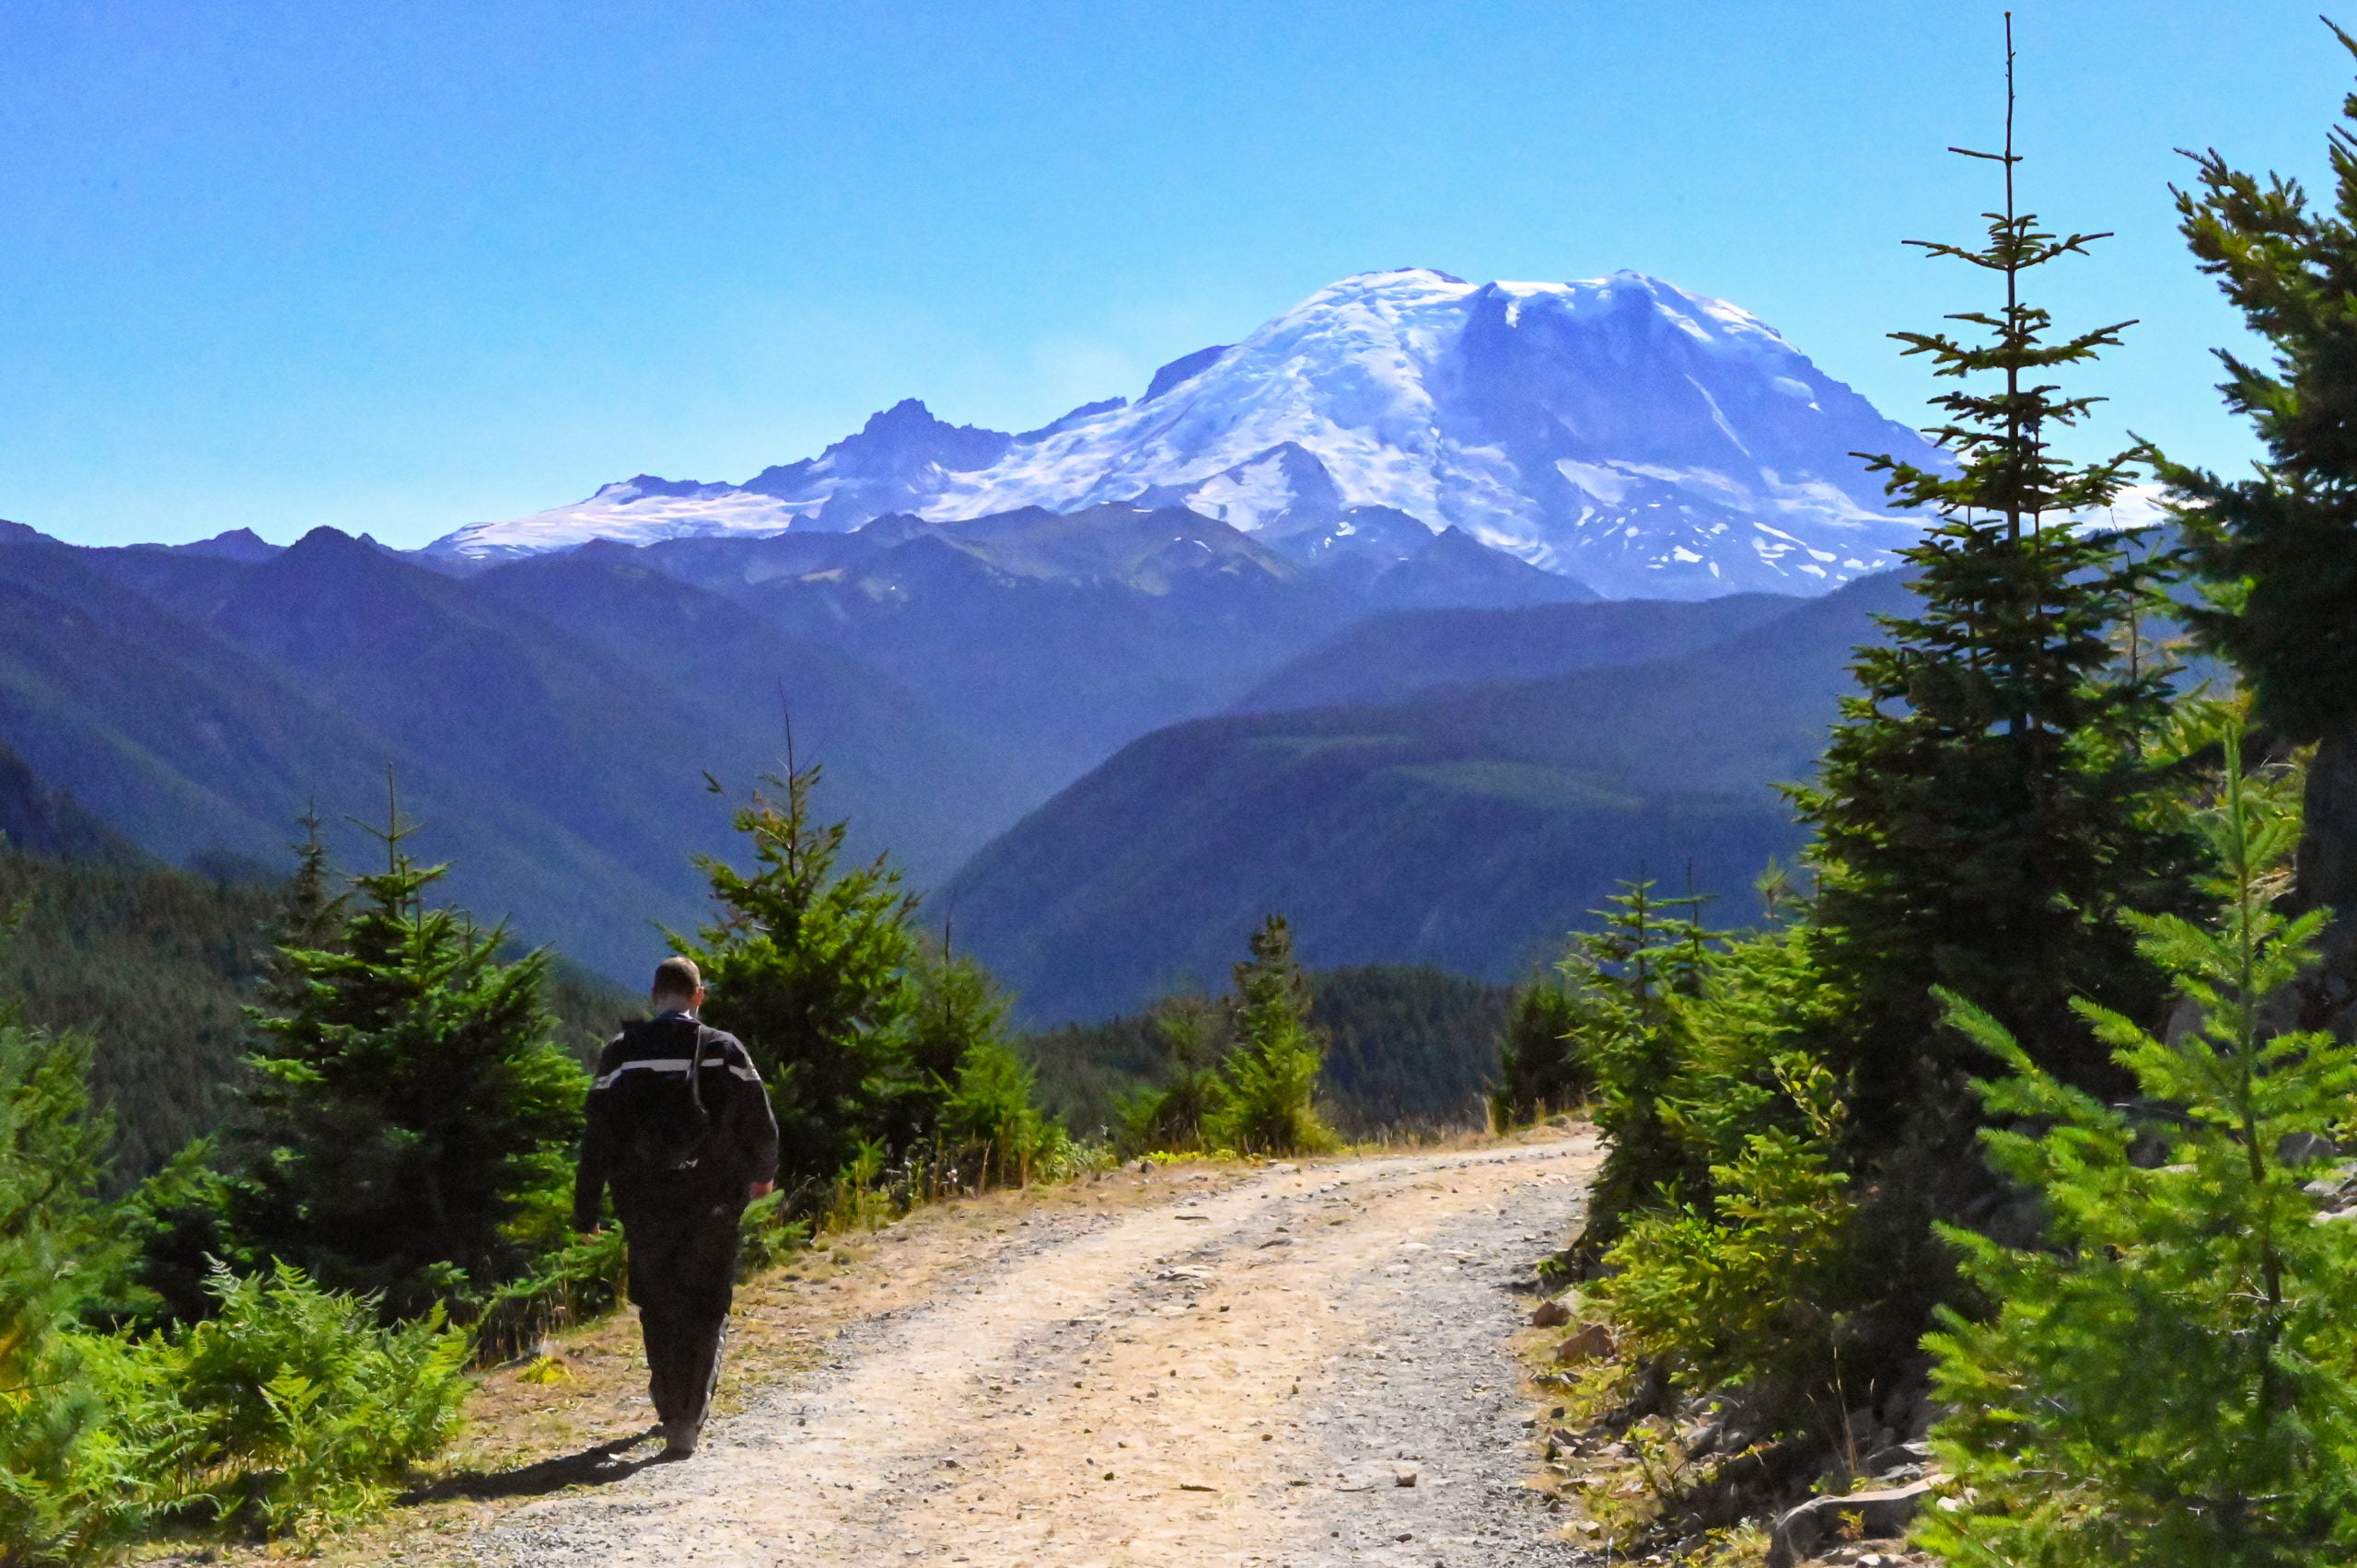
When hiking up the trail, you’ll pass a small, rocky trail shortly before reaching the top. This trail is a shortcut to one of the best views of Mount Rainier along this hike. The little trail leads you up to the road where you can get unobstructed views of Mount Rainier before continuing to the lookout. You can also choose to stay on the main trail, which will curve around and lead you to the lookout first. Then, before heading back to your vehicle, you can walk down the road from the lookout to see gorgeous, unobstructed views of Mt Rainier.
Jake was walking the short walk down the road from the restrooms at Suntop to the unobstructed views of Mt Rainier.
Advantages of Each Option
The advantage of the trail is that it is a slightly shorter hike up, and you have a little more shade on sunny days. The advantage of the road is that it is wide, mostly flat, and provides plenty of room for groups to pass and take breaks as needed.
The road to the Suntop Lookout is also a popular mountain biking route, so you may encounter mountain bikers coming down either the road or the single track trail. There isn’t much room to get out of the way when they come down the path, but do your best to pull over where it is safe to let them pass.
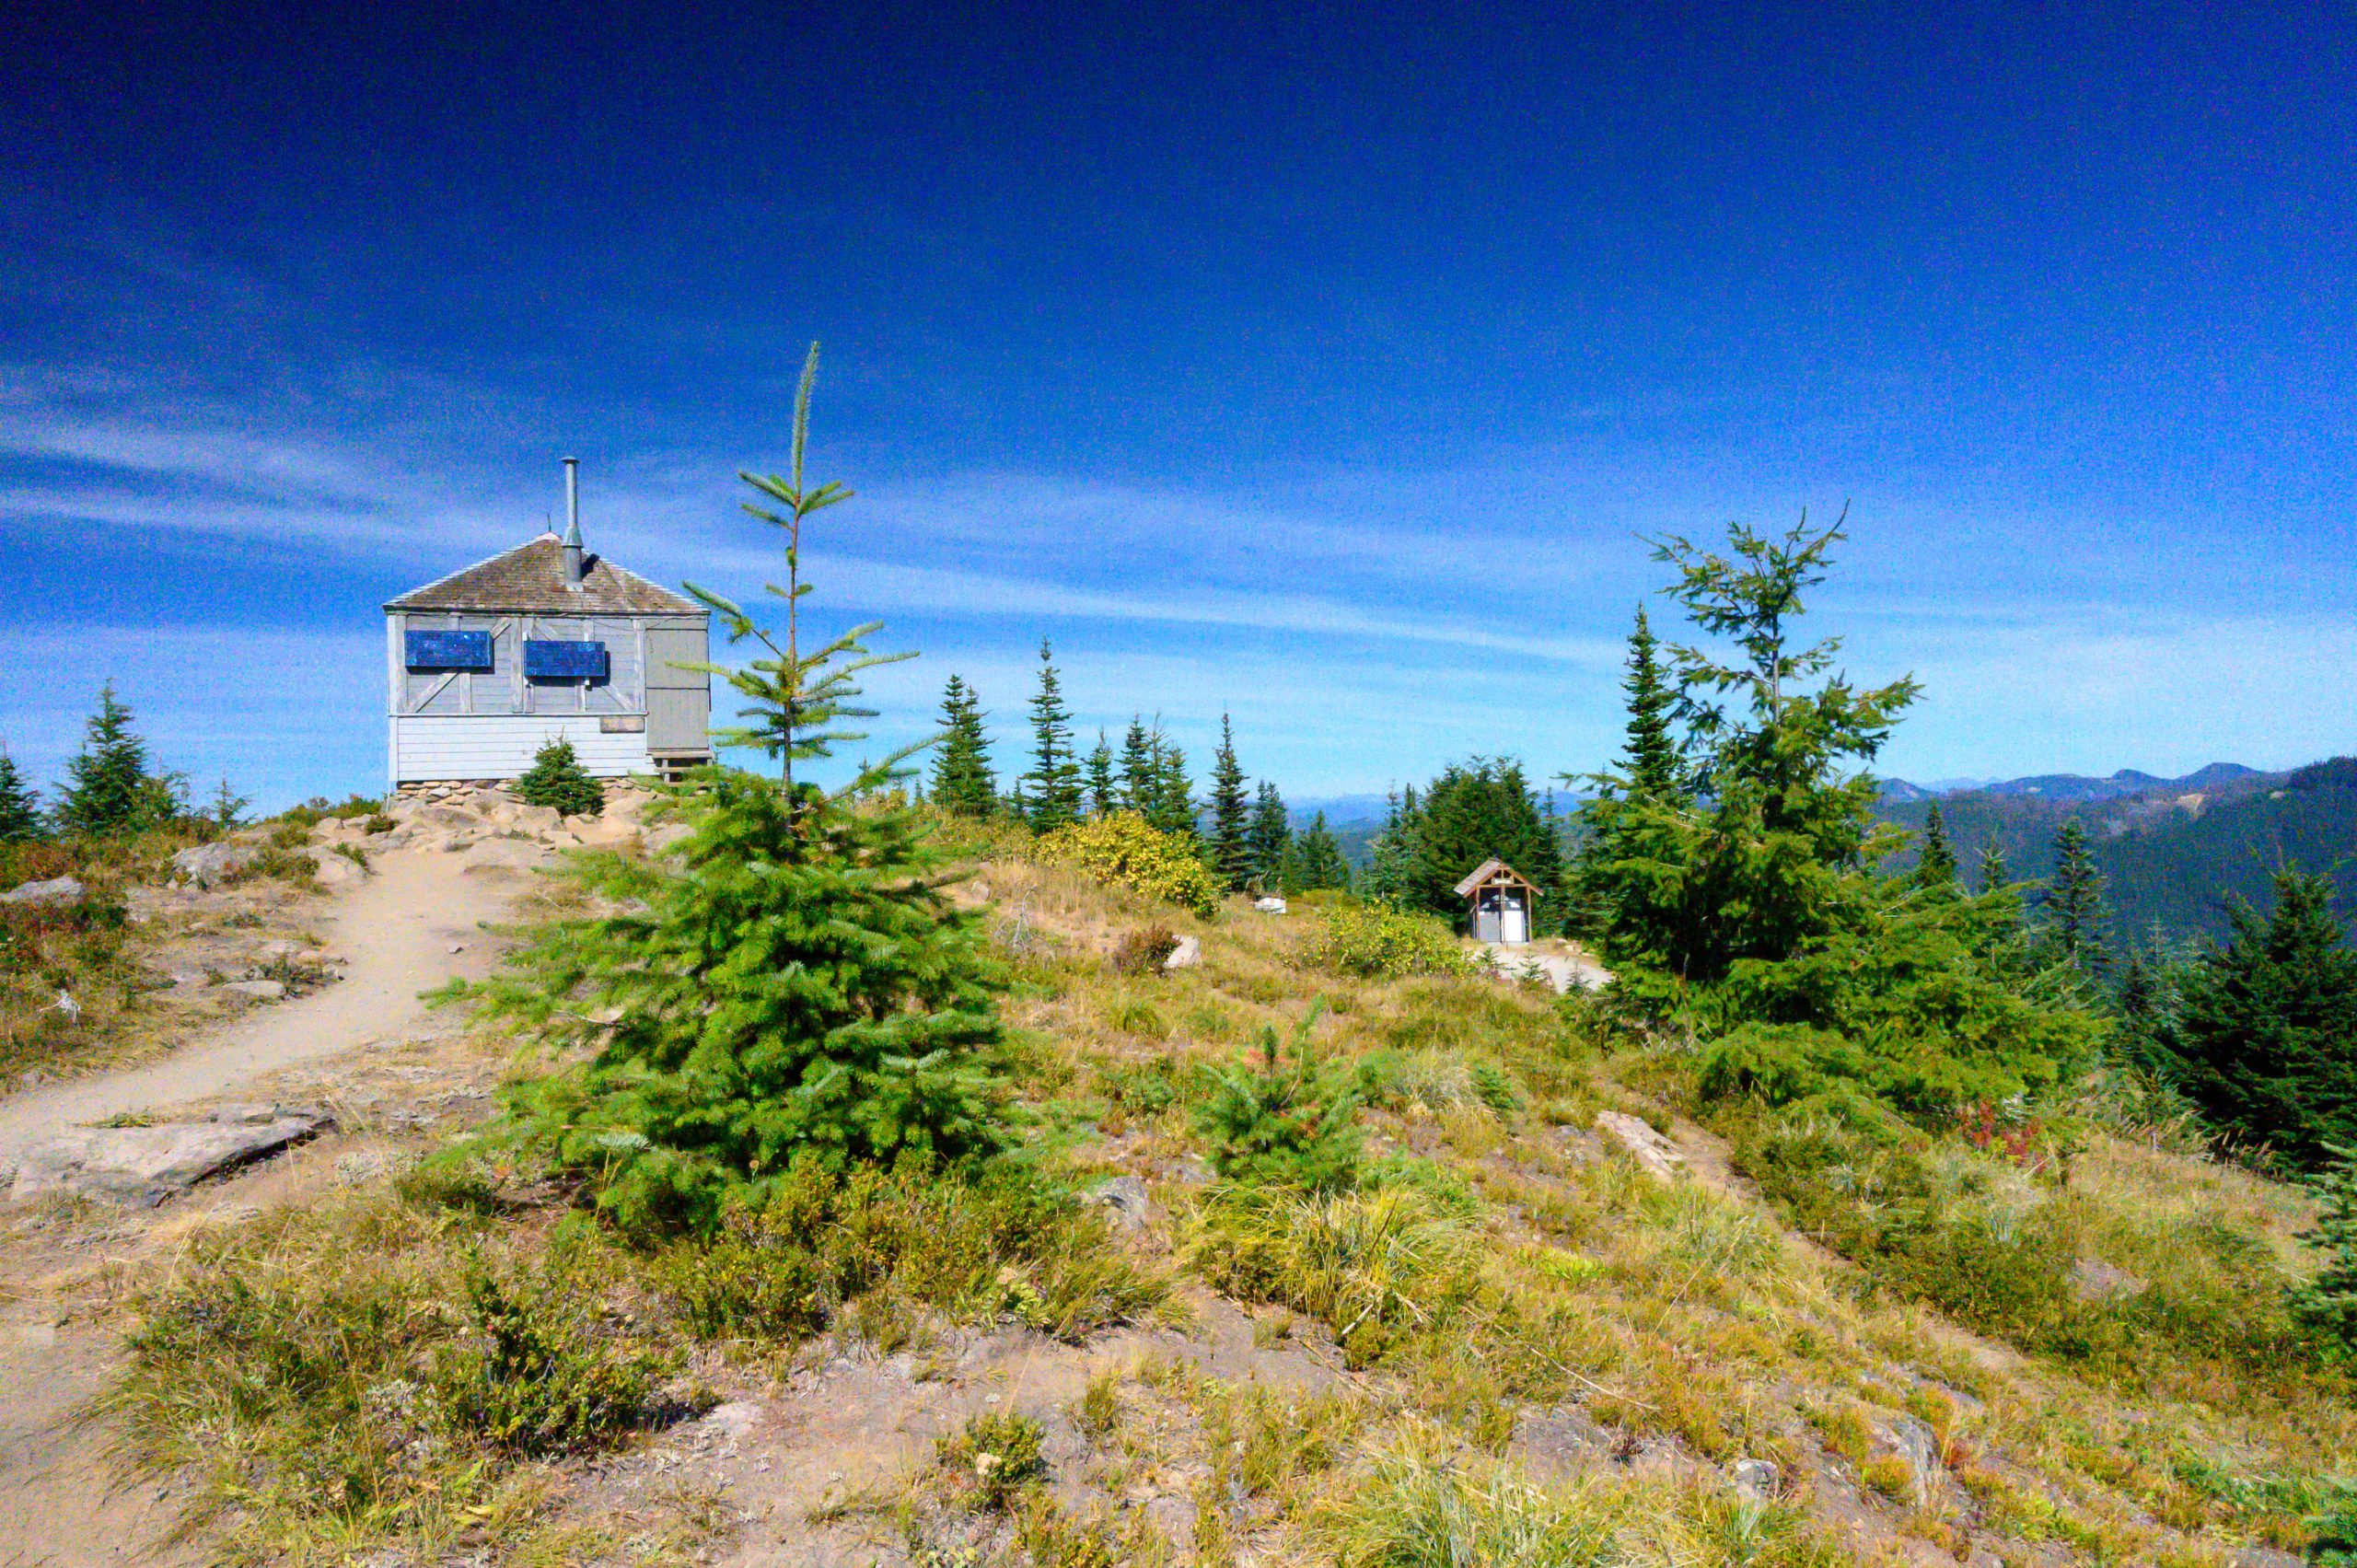
What’s At the Top?
Restrooms:
You’ll be happy to know that there is a vault toilet just below the lookout and adjacent to the picnic area.
Picnic Tables:
There are picnic tables just past the vault toilets. There is also another picnic table near the lookout. It is a beautiful place to sit and enjoy a picnic lunch with a view.
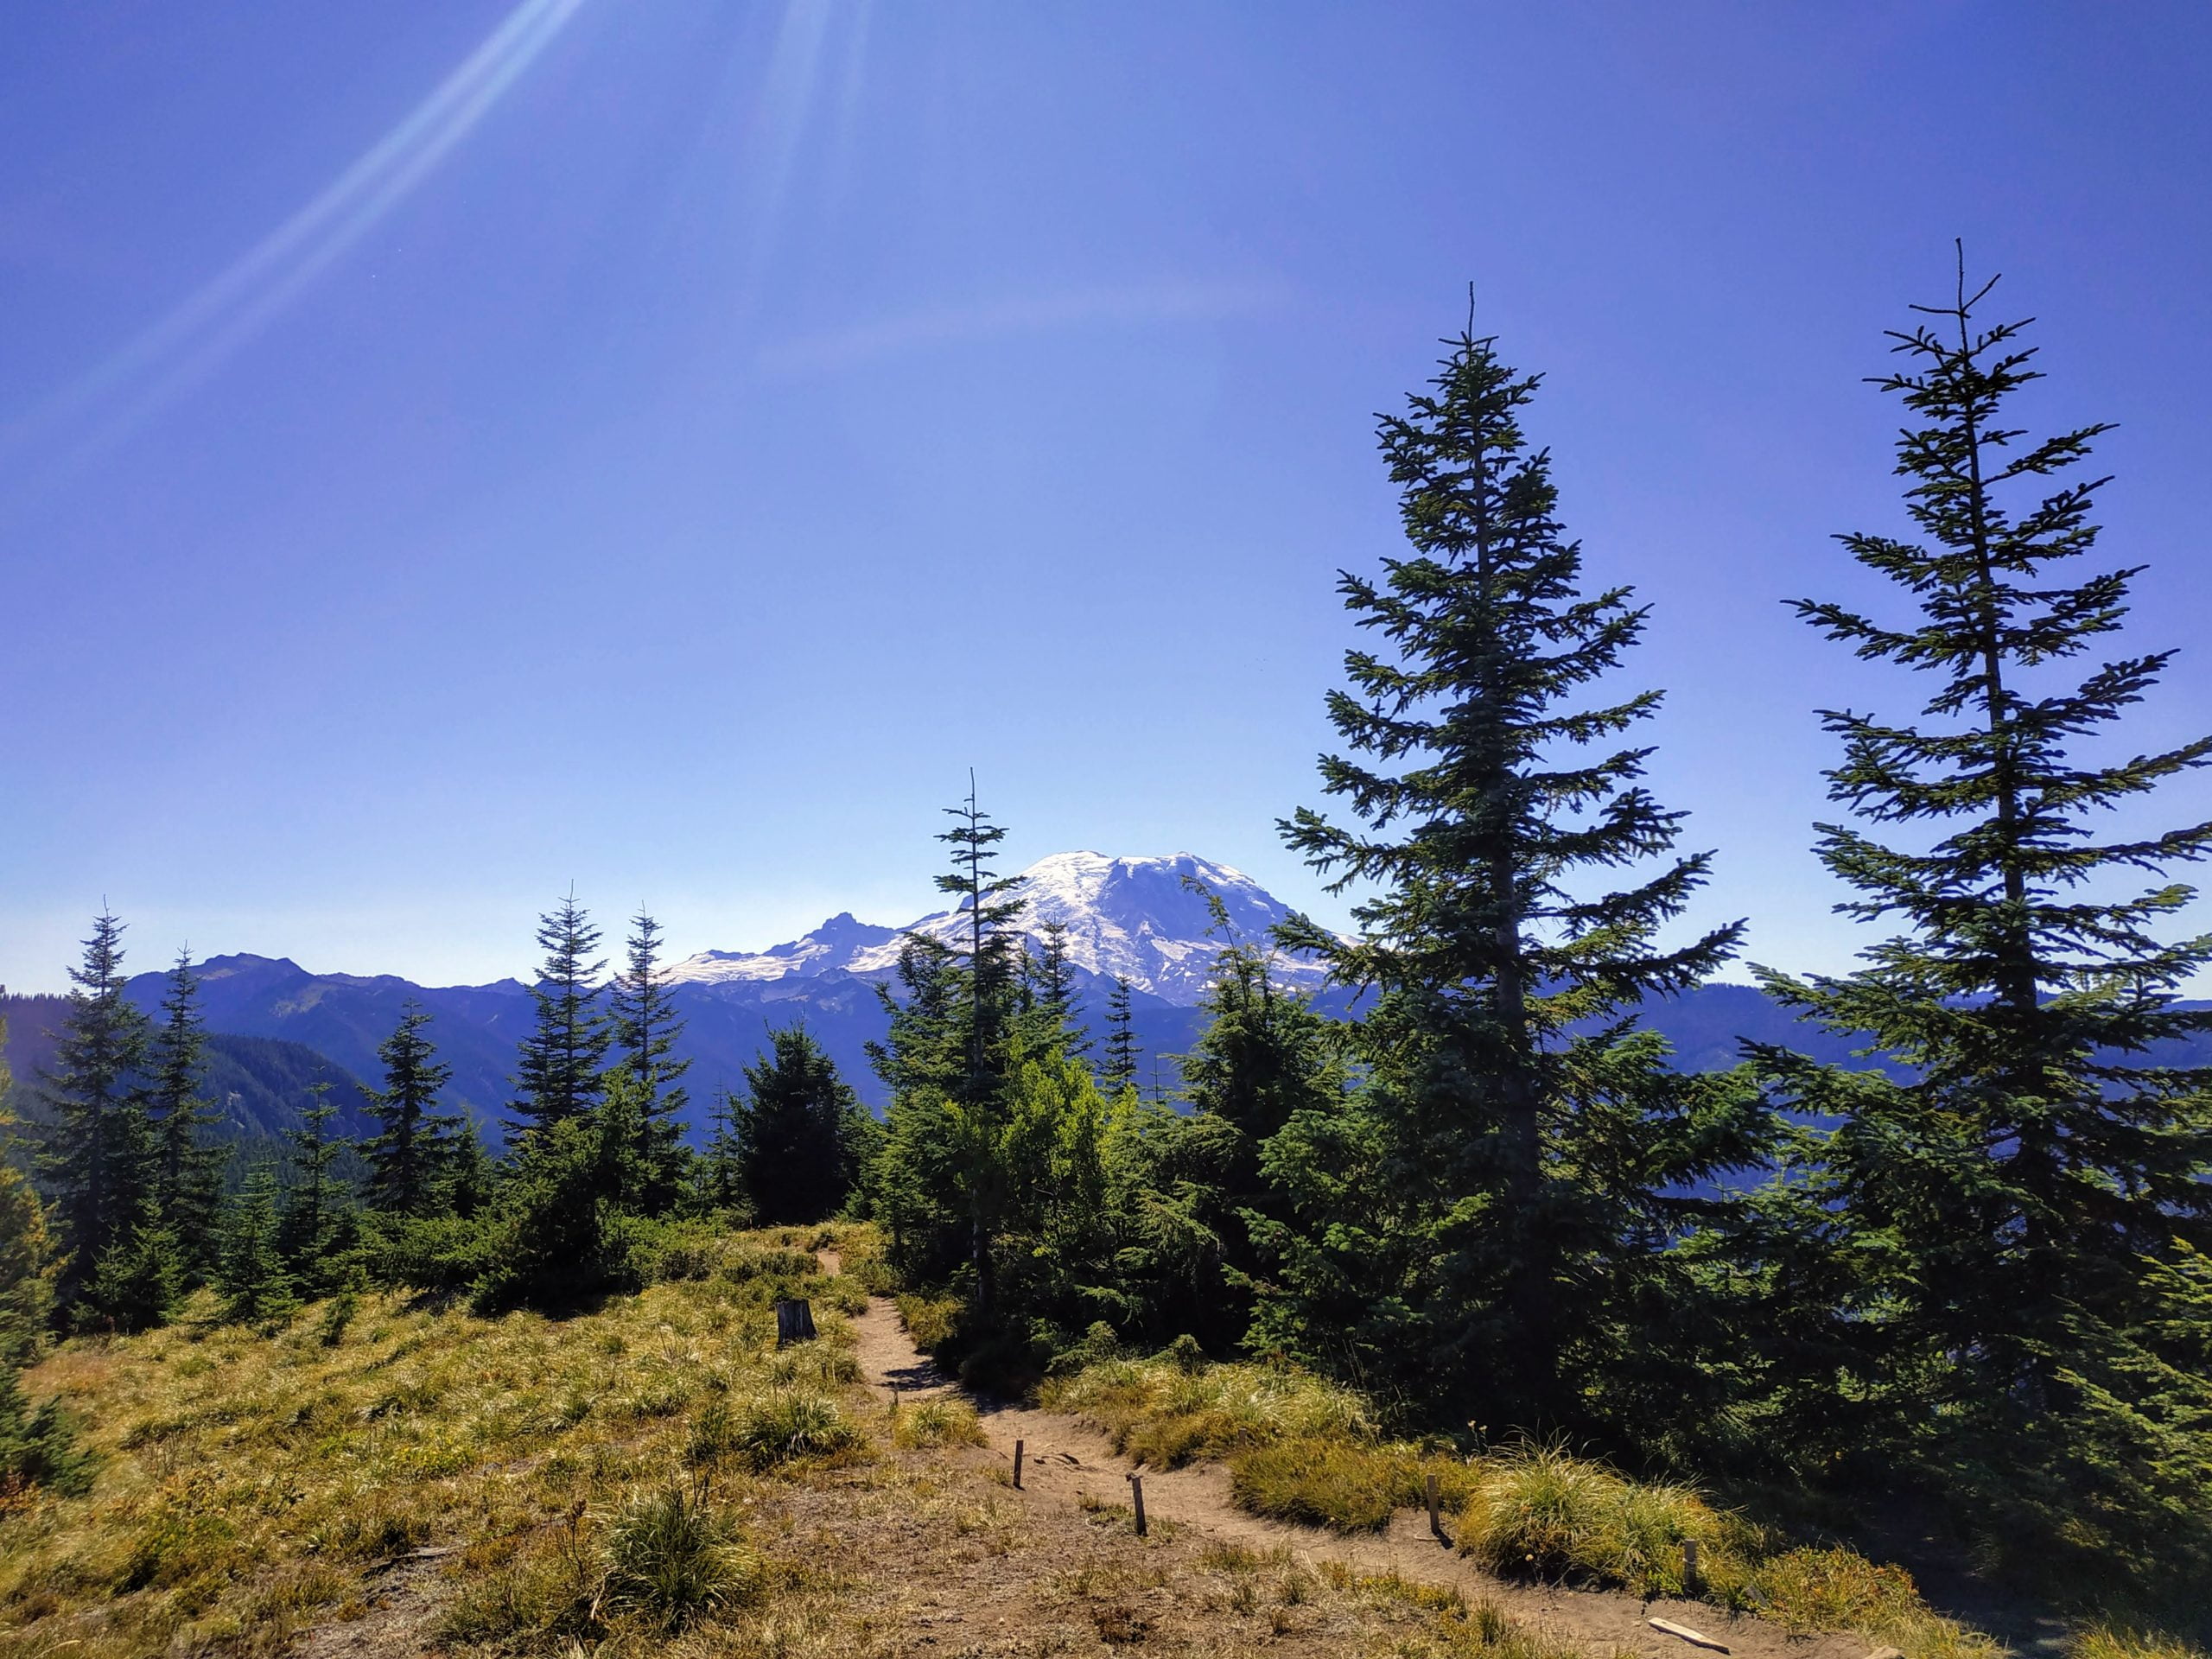
Views at Suntop Lookout
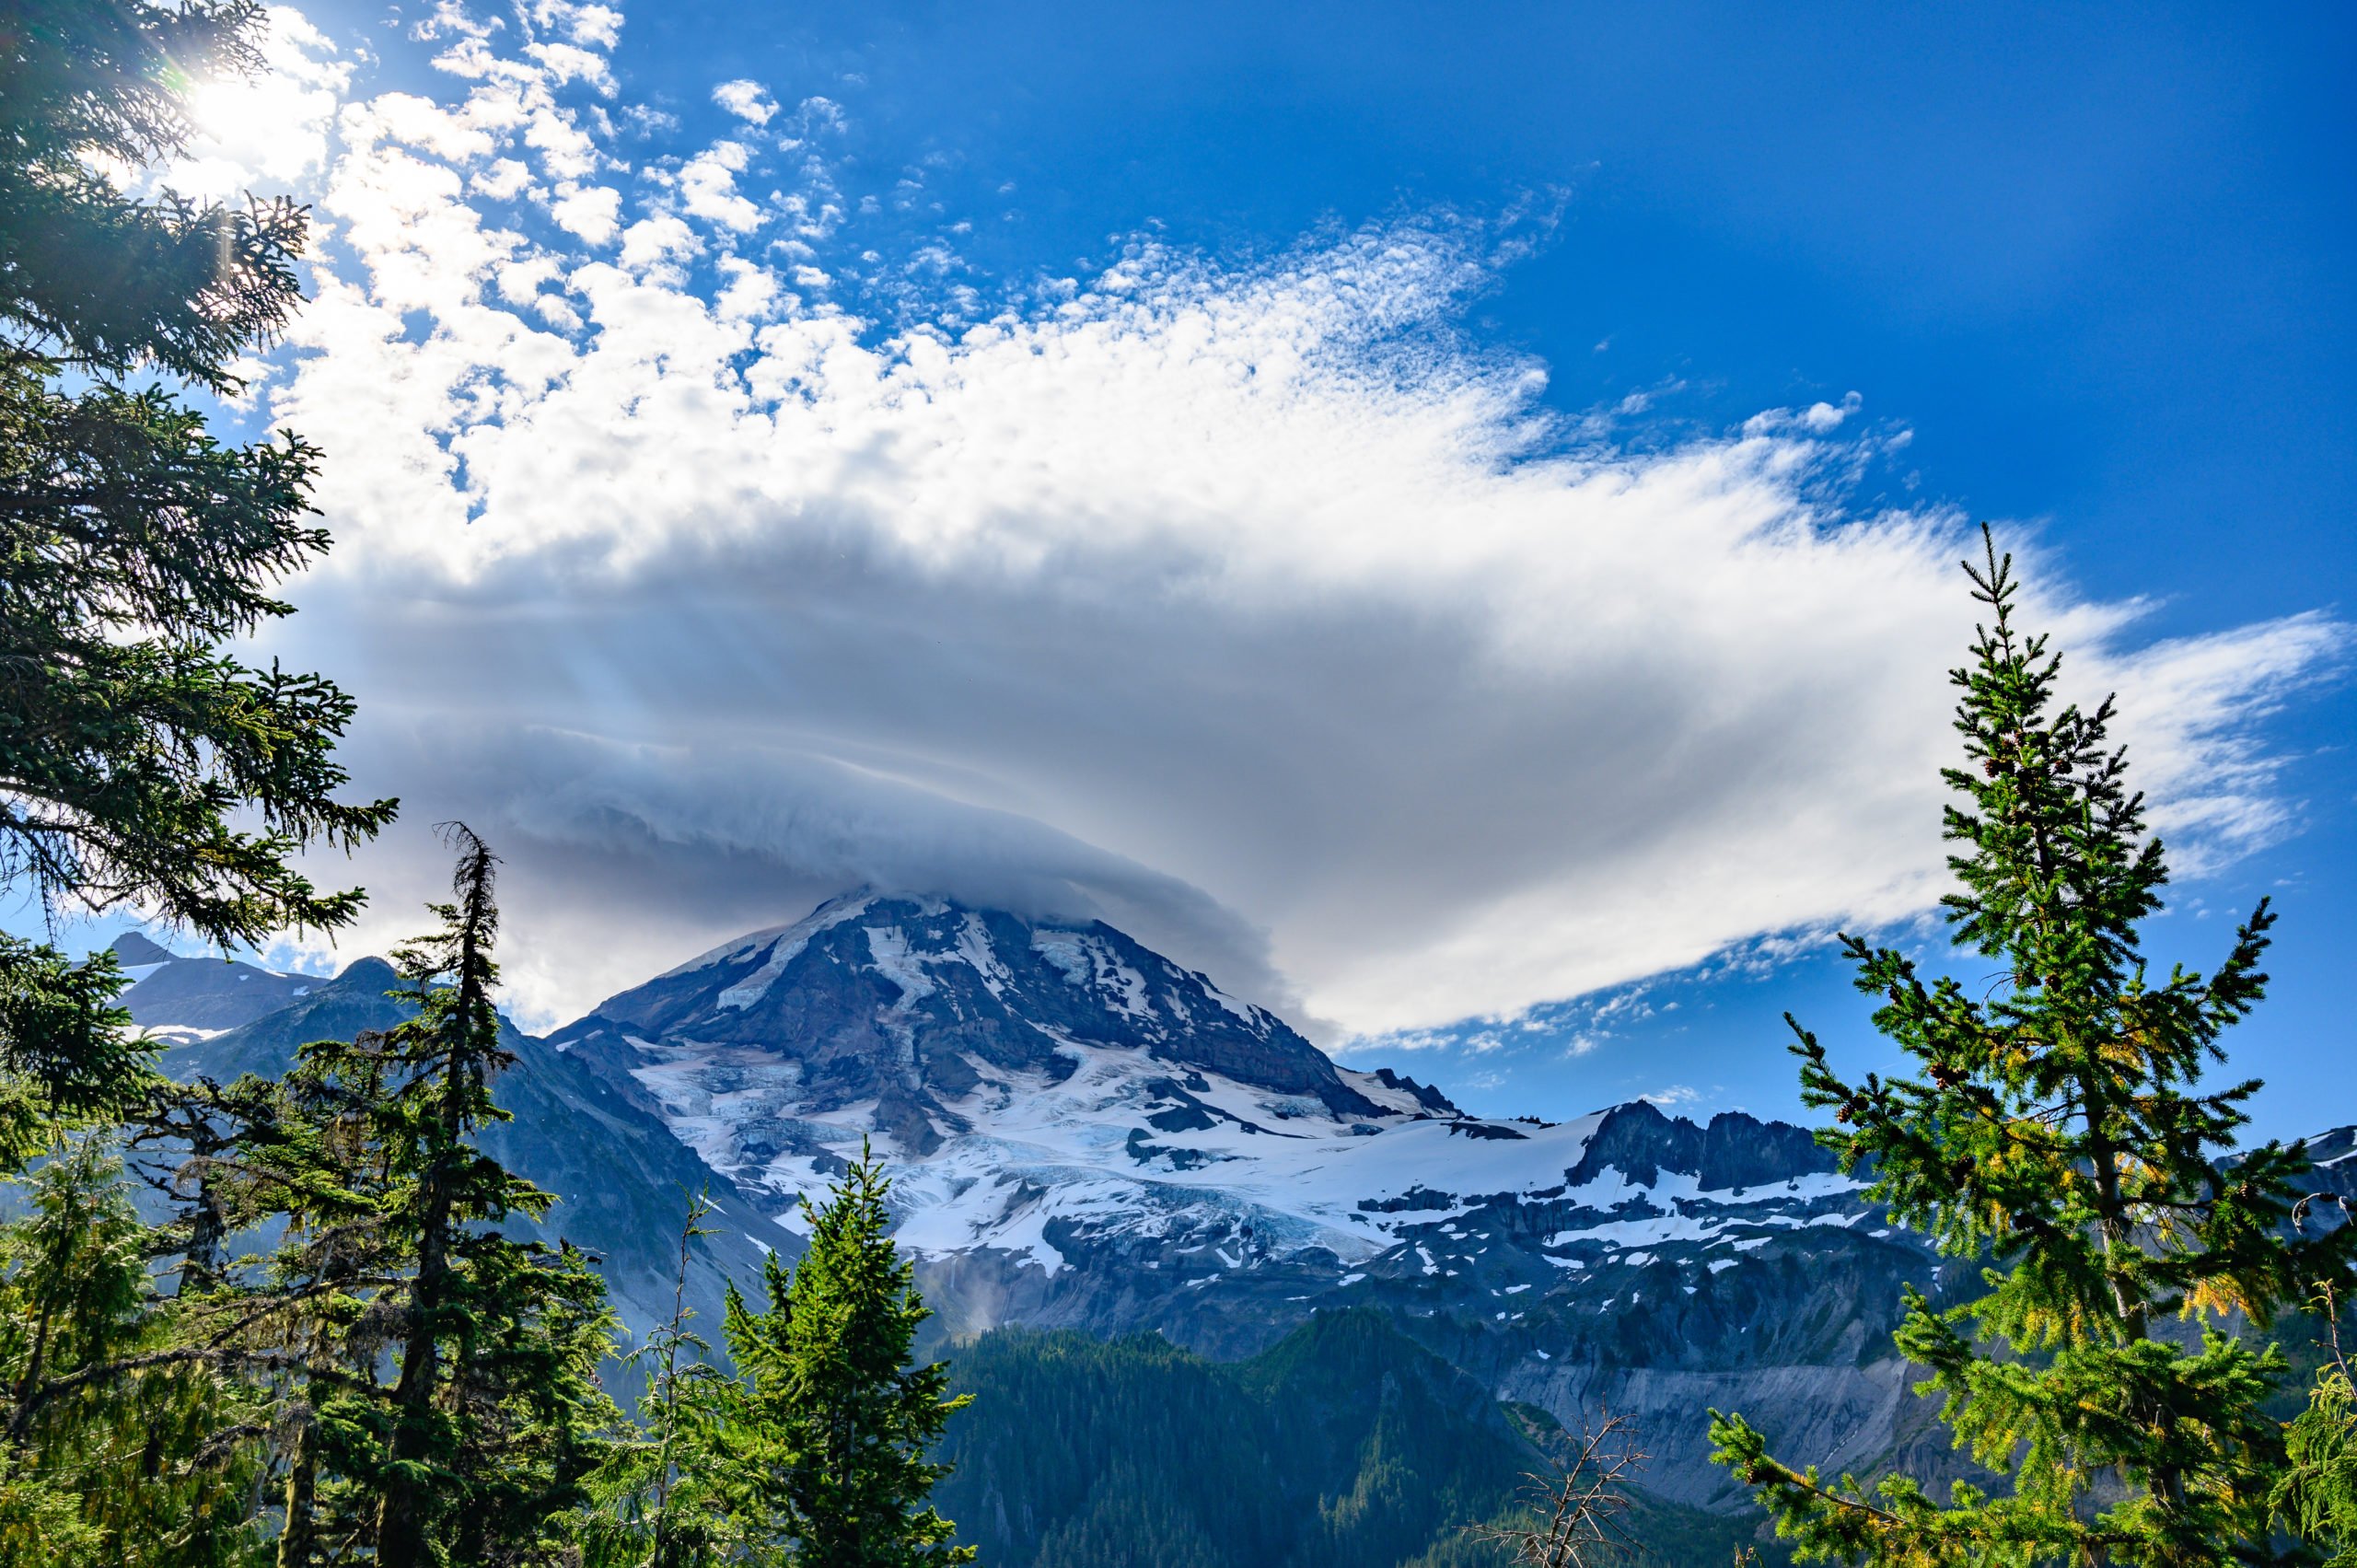
Hike up to the lookout for 360-degree views of Mount Rainier and the surrounding mountain ranges. Mount Rainier is only 10 miles to the south, and on a clear day, you’ll enjoy views of the central Cascades, Olympic Mountains, and just maybe (and with the aid of binoculars) get to see Mount Baker! If you’re lucky enough to visit when there’s a forest ranger present, you may get a chance to see inside the lookout. However, even if it is closed up when you visit, the views from the lookout are worth the trip!
Suntop Lookout Photography
Suntop lookout is an excellent spot for sunrise and sunset photos. Look at the forecast the week you want to visit and then see if you can plan for a day with clear skies. Both sunrise and sunset will provide stunning photo opportunities with the gorgeous colors of the sun reflecting off snow-capped Mount Rainier. After dark, you can practice your astrophotography and enjoy stargazing at the summit.
What to Bring for the Hike
Picnic Lunch & Snacks: Although it’s a short hike, you might as well make the most of it by enjoying a picnic at the top.
Water: Water is always a good idea. It gets hot at the summit during the summer, so having some extra water with you will help!
Bug Spray: The mosquitoes weren’t bad when we visited. However, they can be depending on the time of year, so I’d bring bug spray just in case.
Hiking Poles: These are especially useful if you hike up the narrow trail.
Layers: Depending on what time of year you visit, you may want to bring extra layers. If you chose to come up for the sunset, you’d need layers for when the sun goes down as it can get quite cold.
Downloaded Offline Map: I always like to have an offline map when I’m going off-road just in case I lose my way.
Recreational Parking Pass: A Northwest Forest Pass is required at Suntop Lookout.
Things to Do Nearby
Places to Eat
Greenwater Outfitters: 58410 WA-410 east, Enumclaw, WA 98022
Enjoy lunch at Greenwater Outfitters or pop in for some delicious ice cream.
Wapiti Outdoors: 58414 WA-410 E, Enumclaw, WA 98022
Stop in at Wapiti Outdoors for some fantastic coffee and ice cream. If you’re lucky to visit during huckleberry season, make sure to try a huckleberry milkshake. They also have a great selection of t-shirts and outdoor gear.
Naches Tavern: 58411 WA-410, Enumclaw, WA 98022
If you’re looking for a bite to eat and something cold to drink after a day of hiking, stop in at the Naches Tavern.
Camping
Dispersed Camping:
Dispersed (free) camping is allowed in the Mt Baker-Snoqualmie National Forest around the Suntop Lookout area. There are no toilets provided. Follow “leave no trace” principles and clean up your site before leaving. In addition to dispersed camping off of FS-73, if you travel 5 miles past FS-73 on SR-410, you’ll come to NF-7160. Make a right here, and you’ll find more dispersed camping by the Ranger Creek Airstrip.
There are also so many other great trails in the area, such as Snoquera Falls, Skookum Flats Trail, and many more. Plus, you are a short drive to the White River entrance at Mount Rainier National Park. Why not make it a weekend adventure! I love visiting the Sunset visitor center at Mount Rainier and camping at the White River campground.
Here are a couple of articles to get you started planning.
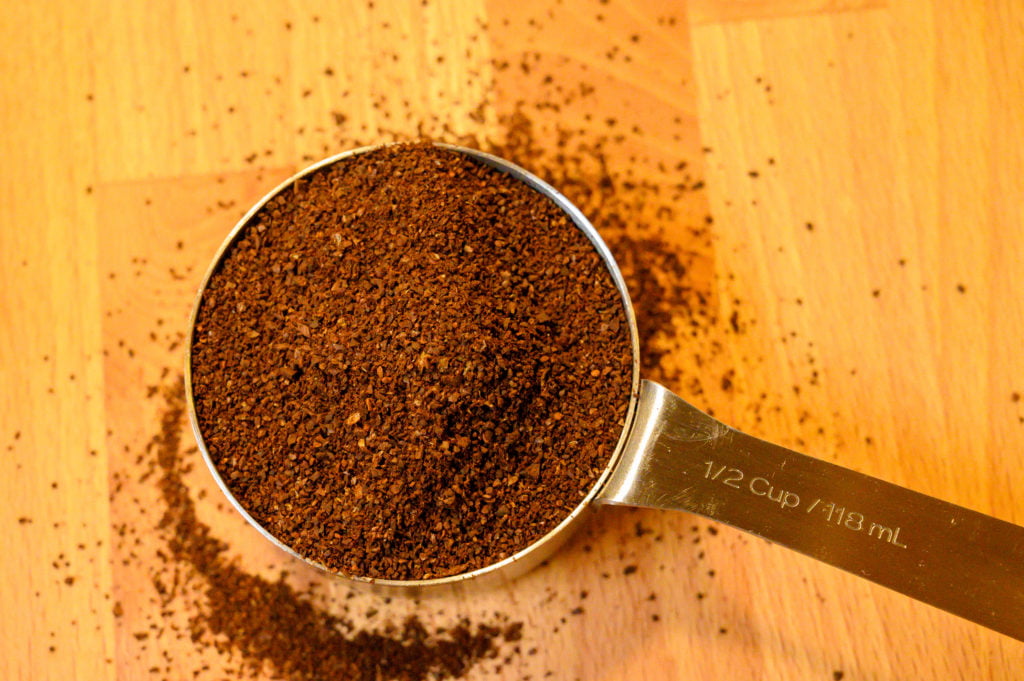
If you’re looking for an alternative to Keurig’s single-serve coffee maker, then consider the AeroPress. What it lacks in convenience to Keurig’s single-serve K-cups, it more than makes up for in flavor and portability. The Aeropress gives you a portable way to enjoy delicious, smooth, full-flavored coffee.
In this post, I discuss some of the reasons you might choose the Aeropress vs. the Keurig for your single-serve coffee maker. I share how easy it is to use the AeroPress coffee maker, including a beginner’s guide for how to make coffee three ways using the AeroPress.
Use these links to skip ahead to any of the tutorials in this article:
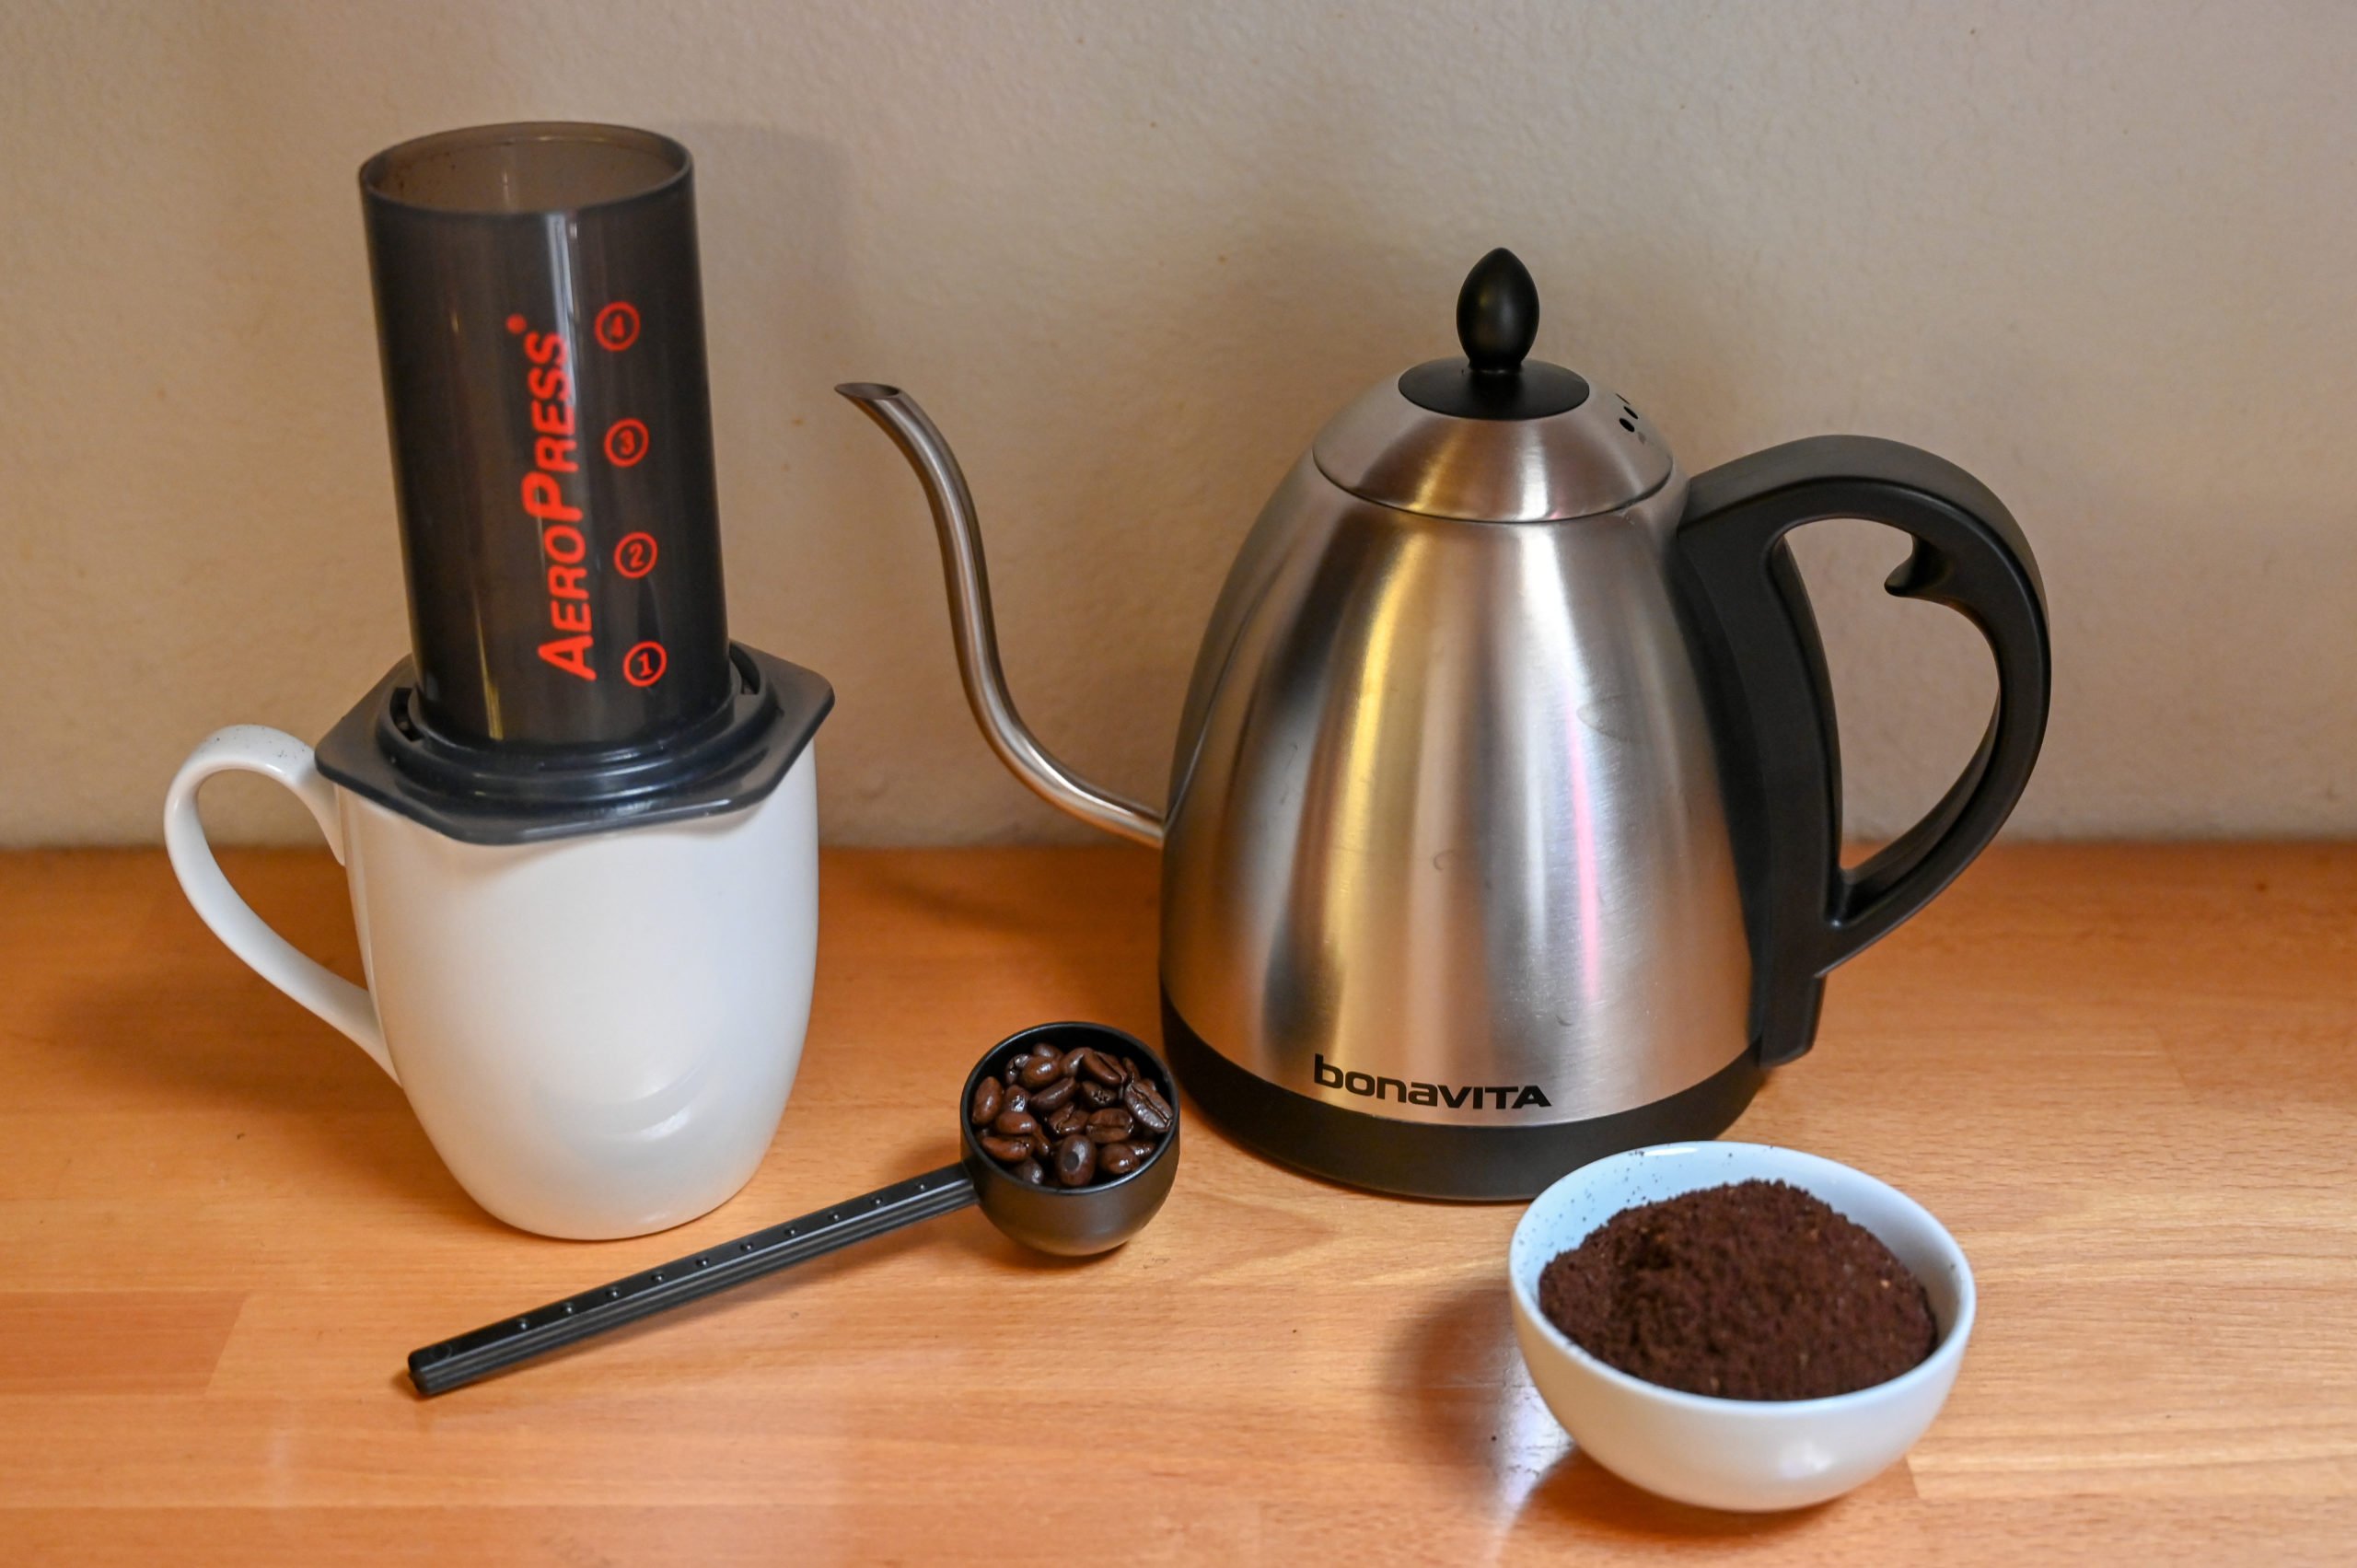
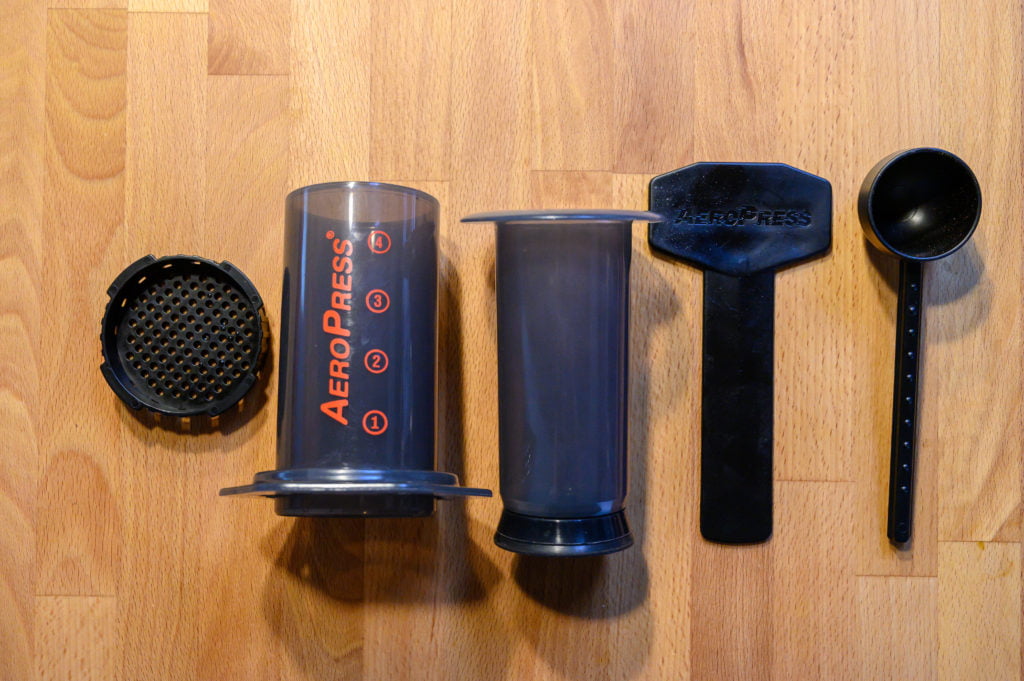
The AeroPress is a single-serve coffee maker invented by Alan Adler in 2005. Its unique design uses air pressure and human strength to brew your coffee. Espresso machines also use pressure to create espresso shots. Although the AeroPress cannot achieve the same pressure as an espresso machine, it works on a similar principle of quick extraction for maximum flavor.
AeroPress components left to right: filter cap, chamber, plunger, stirring stick, and coffee scoop.
Drip Coffee
A drip coffee maker uses gravity to let the water slowly drip through the coffee and filter into your coffee pot. This means the coffee sits in the water for a longer period of time, and thus you tend to get a more acidic cup of coffee and lose some of the flavors along the way. Keurig’s single-serve coffee maker uses this gravity method too.
French Press
The method for making AeroPress coffee is similar to the French Press. You heat water, grind your coffee, add in the coffee grounds and water, then let it sit before “pressing” the water out and extracting your coffee. With the French Press, the coffee sits in the water and gathers more of the oils and acidity from the coffee grounds.
Whereas the AeroPress extracts the coffee directly into a mug, which keeps the coffee from sitting in the water, thereby eliminating the oily residue found in French Press coffee. They are very similar but create different styles of coffee–robust vs. smooth.
Coffee is coffee, but flavor is key.
I enjoy all methods of coffee brewing. Let’s face it– it’s still coffee. I’ll drink cowboy coffee and enjoy it. However, when I’m at home, I prefer a method that creates a more flavorful and enjoyable cup of coffee than, say, campfire coffee. No method is “wrong” in my opinion. However, some methods do taste better. It’s a matter of personal preference.
Speed vs. Flavor: The Great Coffee Dilemma
Keurig’s single-serve coffee machines are convenient, and they provide “instant” coffee gratification. On those mornings when I wake up so tired I don’t want to think before my coffee (okay, that’s most morning), I head to my Keurig machine. I drag myself to the kitchen and robotically place a K-cup (usually Don Francisco’s Hawaiian Hazelnut) into my coffee maker. About 60 seconds later, I’ve got a cup of coffee that I can make in my sleep. The Keurig is the ultimate in single-serve coffee efficiency.
However, some mornings, especially on the weekends, I want to start with a really good cup of coffee. It’s less about instant and more about savoring the deliciousness that is coffee. There are always those days where you can’t seem to get your coffee fast enough, but then there are those days where you want to slow down a little and really appreciate your morning cup of coffee.
This is where the AeroPress comes in, it takes a little more time, but afterward, when you’re sipping your coffee, you’ll think “it was worth it.” With the Keurig, you’re stuck with the grind and amount of coffee in each k-cup. However, with the AeroPress, you can customize each cup of coffee by changing your grind size, amount of coffee, and by using fresh ground, quality coffee beans. And isn’t that the main benefit of single-serve coffee? To create an individual cup made to order?
Quality Coffee Beans
When I began using my AeroPress, I was surprised at the amount of flavor that I could taste from the coffee that I missed when using my Keurig machine. Since then, I started sampling freshly roasted coffee from our local coffee roasters using Bean Box. You can read more about small-batch coffee and Bean Box in this article, but in short, it’s changed my coffee time at home.
My husband and I look forward to trying the new roasts we get each month from Bean Box and look forward to tasting the different flavors. This morning we both tried a special roast created for Father’s Day made using whiskey barrels; it’s incredible how much of the flavor you get coming through into the coffee!
If you have only tried store-bought coffee, I highly recommend you give Bean Box a try. You can get freshly roasted coffee delivered to your door for as low as $5! Some of my favorites are the Portofino Blend, the Honolulu Blend, and the Johnson House Blend. I get the quality and taste from a local coffee roaster delivered to my home. Each month they have a new blend, so there’s always something new to try.
In Summary:
There’s a spectrum of coffee quality, and we all recognize it when we have a really good cup of coffee. We say, “Wow! Now, this is good coffee.” It doesn’t mean we don’t enjoy the convenient coffee choices, just that when given an option (or when someone else makes it), we’ll always choose the better-tasting coffee–no matter the method.
The Keurig K-cup single-serve coffee maker offers a quick and convenient cup of coffee.
The Aeropress coffee maker takes a little more time and is a little more hands-on, but brews a more flavorful cup of coffee.
What I Like About the AeroPress vs Keurig
In addition to brewing a better-tasting cup of coffee, there are other reasons to consider using the AeroPress vs. Keurig for your single-serve coffee.
The AeroPress costs less. The AeroPress is $30 vs. the Keurig machines, which start around $80 and up.
It’s cheaper to buy coffee by the pound than by the pod. K-cups tend to be expensive, and although you can purchase a reusable K-cup, most people don’t regularly use that. The AeroPress doesn’t use pods, just ground coffee, making it more affordable.
The AeroPress is also more environmentally friendly. Most K-cups are made from plastic, whereas the AeroPress uses compostable paper filters. You can even purchase a reusable metal filter if you prefer. The AeroPress comes with 300 microfilters, and to buy more, it’s around $4 for a pack of 350.
The AeroPress is portable. I love that I can take the AeroPress camping or traveling. Its small footprint makes it easy to pack and go.
The AeroPress brews a less acidic, smooth, full-flavored coffee. You lose a lot of the flavor with the Keurig k-cups and have less control over the acidity and strength.
What You’ll Need to Make AeroPressCoffee
Equipment You’ll Need:
The AeroPress Coffee Maker
Microfilters ((Each AeroPress coffee maker comes with 350 microfilters.)
Hot water kettle (I’ve seen some people heat their water in the microwave, but I prefer using a kettle.)
Thermometer (Often overlooked, a thermometer is the best way to get the right temperature for full-flavor extraction. Some kettles have this built-in, if you don’t have a thermometer, bring your water to a boil, then set off the heat for 1-2 minutes.)
Coffee Grinder (optional) You can purchase it ground at the store. However, I prefer to grind fresh right before using it.
Ground Coffee (fresh ground is best) (I used the Portofino Blend for this post.)
Kitchen Scale (optional) If you want to get more technical with your coffee brewing, a kitchen scale is great for weighing out the exact amounts of coffee and water to create your personalized recipe.
How to Make Single-Serve Coffee 3 Ways with an AeroPress
The Regular Method: A Tutorial for Beginners
Regular Brewing Method Instructions
Heat Water to 200 degrees Fahrenheit. (You can use any temp between 180 degrees and 205 degrees Fahrenheit. I’m sharing my method. Feel free to customize to your liking.)
Rinse the paper filter with heated water, then discard the water and place the AeroPress chamber with filter and filter cap in place on top of a mug.
Add two heaping scoops of ground coffee to the chamber. (Medium to medium-coarse grind. 2 heaping scoops is around 25 grams of coffee.) Then gently shake the chamber to level the grounds.
Add water to cover the coffee grounds (just below the 2 line)
Stir about 15 times. Then wait about 30 seconds for the coffee to bloom.
Add in water to just above the 3 line (~ 200g water). Wait 1 minute.
Insert the plunger at an angle (this helps create the air pressure) then apply firm pressure straight down slowly but steadily until the plunger reaches the bottom.
Remove the filter cap, rinse, and set aside. Then expel the coffee and filter into the trash and rinse the AeroPress chamber and plunger before placing it aside.
Enjoy your cup of coffee! You can add 1/2 cup to 3/4 cup hot water to make an Americano-style coffee. If you drink it straight without adding water, it will be a very strong cup of coffee!
The Inverted Method
The Inverted Method Instructions
Heat Water to 200 degrees Fahrenheit.
Insert the plunger into the top of the chamber, so it’s touching the number 4 line. Set the AeroPress on the counter with the filter side on the top (upside down from the regular method). The plunger should now be resting on the counter with the filter-side up.
Add two heaping scoops of ground coffee to the chamber. (Medium to medium-coarse grind)
Add water to cover the coffee grounds.
Wait about 30 seconds, then add water to about the top of the chamber (~ 200g water)
Gently stir the water and coffee.
Wait 2 minutes.
Rinse a paper filter with warm water, then place the filter in the filter camp and gently attach to the AeroPress chamber. Be careful not to dislodge the plunger from the chamber.
Carefully place a mug upside down over the filter cap and flip the AeroPress right side up on to the coffee mug. It should now be sitting on top of the mug just as in the regular method.
Push straight down on the plunger for about 20 seconds until you reach the bottom.
Remove the filter cap, rinse, and set aside. Then expel the coffee grounds and filter and rinse the AeroPress chamber and plunger before setting it aside.
Enjoy your cup of coffee! (Add in hot water to make an Americano-style coffee.)
Faux Espresso & Latte
How to Make an Espresso or Latte with the AeroPress (or as close as you can get)
Heat Water to 200 degrees Fahrenheit.
Rinse the paper filter with heated water, then discard the water and place the filter in the filter cap and attach it to the AeroPress chamber.
Add two scoops of finely ground coffee to the chamber. (It’s important to have fine ground coffee to create more pressure and a stronger brew.) Then gently shake the chamber to level the grounds.
Tamp down the grounds inside the brewing chamber using a spice grinder, bottle, or hand-held coffee grinder. Any object that fits inside the chamber and is long enough to hold on to. Firmly press down the grounds to compact them.
Wet a second microfilter and place it on the bottom of your tamping object. Then carefully insert this along with the tamper inside the chamber. Now tamp down this filter on top of your coffee.
Add 150 ml (2/3 cup) of water heated to 200 degrees to the chamber.
Without waiting, insert the plunge and apply firm pressure straight down until the plunger hisses and reaches the bottom. (There will be a lot more pressure using this method, and it will be a lot harder to push down. If needed, pull up a little on the plunger and push down again if the pressure is too much.)
Remove the filter cap, rinse, and set aside. Then expel the coffee and filter into the trash and rinse the AeroPress chamber and plunger before putting it aside.
Enjoy your faux shot of espresso.
Latte Tips:
If you want to make this into a latte, heat 1/2 cup of milk with one tablespoon of half-and-half and froth using a milk frother like this one, or using a French Press.
If using a French Press: Add heated milk to the French press, push the French press plunger into the milk, and with short quick and up and down movement, froth your milk until it has doubled in size. Add to the coffee and voila! A latte!
Additional Tips for Making AeroPress Coffee
Make sure to use a sturdy coffee mug as you’ll apply a lot of downward force on top of the coffee mug during the brewing process.
You can rinse and reuse the paper filters, and they are also compostable.
Adjust the water temperature to your personal preferences. Lower temperatures usually result in a milder, smoother finish, while higher temperatures provide a little more robust flavor.
Have fun with it! Play around with the water temperature and amount of coffee to create your personalized cup of coffee. Most people use anywhere between 17g of ground coffee to 30g of ground coffee for the best flavor. The great thing about single-serve coffee is each cup is made to order!
When storing your AeroPress, you don’t want to leave the plunger seal stuck inside the chamber, as this can cause it to wear down more quickly over time. Store the plunger and chamber separately or with the plunger pushed all the way through so the seal is sticking out the other side.
More Coffee-Related Articles
Check out these posts to stir your coffee passions further (Do you like what I did there?):
The Spray Park trail and Spray Falls have been on my list of hiking to-dos for years. The Spray Park trail checks off all my hiking favorites. It has an alpine lake (Mowich Lake), waterfalls, stunning views, and wildflowers. Plus, I get to see snow in August! It is easy to see why this trail and area of Mount Rainier is so popular. So when I read that the road to the trailhead parking lot was open, I knew I had to go!
I’ll tell you about my experience hiking to Spray Park and also give some tips and advice on what to bring. Make sure to read over the Know Before You Go, What to Pack, and Additional Tips sections before your trip as they will help you be a little better prepared than I was my first visit here.
It may take some extra effort to get to this corner of Mount Rainier, but Mowich Lake and the surrounding area is known for its stunning beauty and outstanding hikes, and it is well worth the effort!
Here’s a video montage that gives an overview of my hike to Spray Falls. You can continue reading about my day below as well as my tips for what to know and how to get there. You can also click on the links above to jump to each section.
My Experience Hiking to Spray Park & Spray Falls
The Drive Up
I leave my house around 6:45 a.m. I have 2 hours to go before I reach the Mowich Lake parking lot. It is a Tuesday morning, so I hope that it won’t be too busy when I arrive.
As I drive through the small town of Wilkeson, I think how it looks like a set from an old western. I make a mental note to come back another day to explore the town.
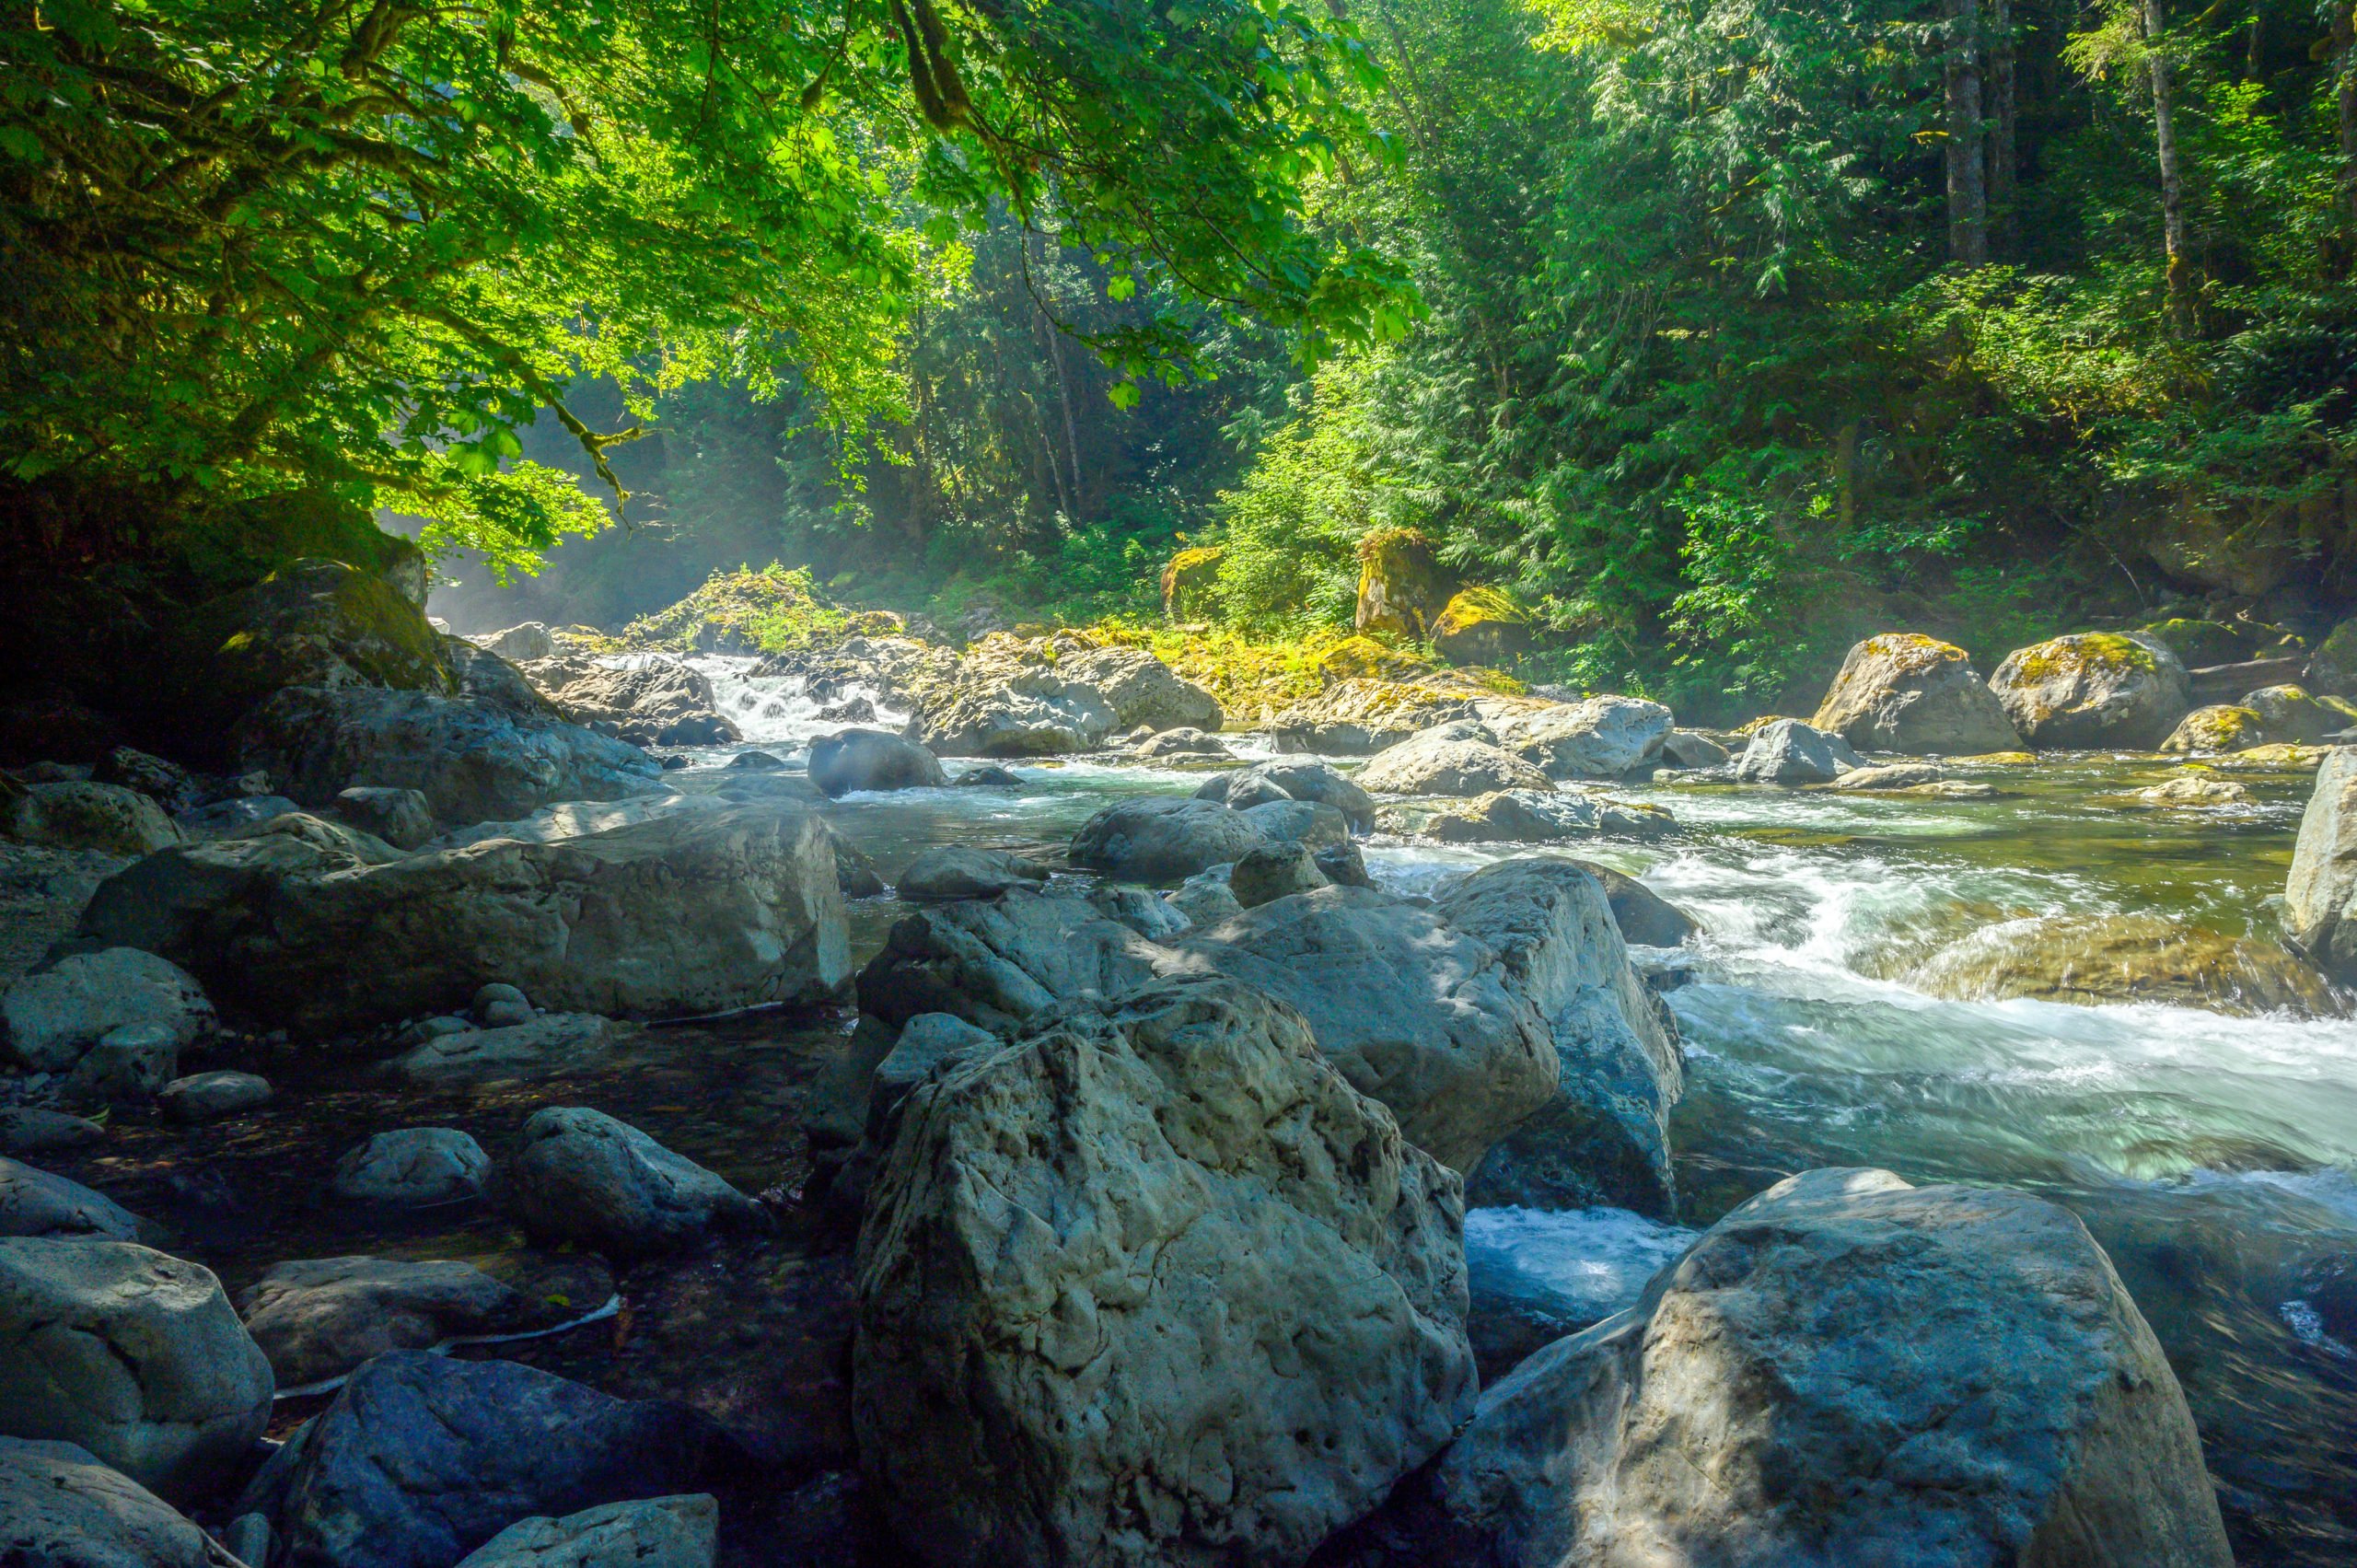
After passing through Wilkeson (which has the last gas station along this route), I pass through the town of Carbonado and eventually cross the anxiety-inducing Fairfax bridge. It is a one-lane bridge suspended high above the canyon, and honestly, it looks a bit rickety, but I go ahead and trust its stability and cross it safely.
Where the Pavement Ends
Not long after Fairfax bridge, the pavement ends. It’s less than 17 miles to the parking lot on this stretch of dirt road, but it will take me almost an hour to get there. I am in an SUV, but even so, I keep my speed around 20-25 for most of the road. There is a section that is labeled “30 mph,” and it is still very rough.
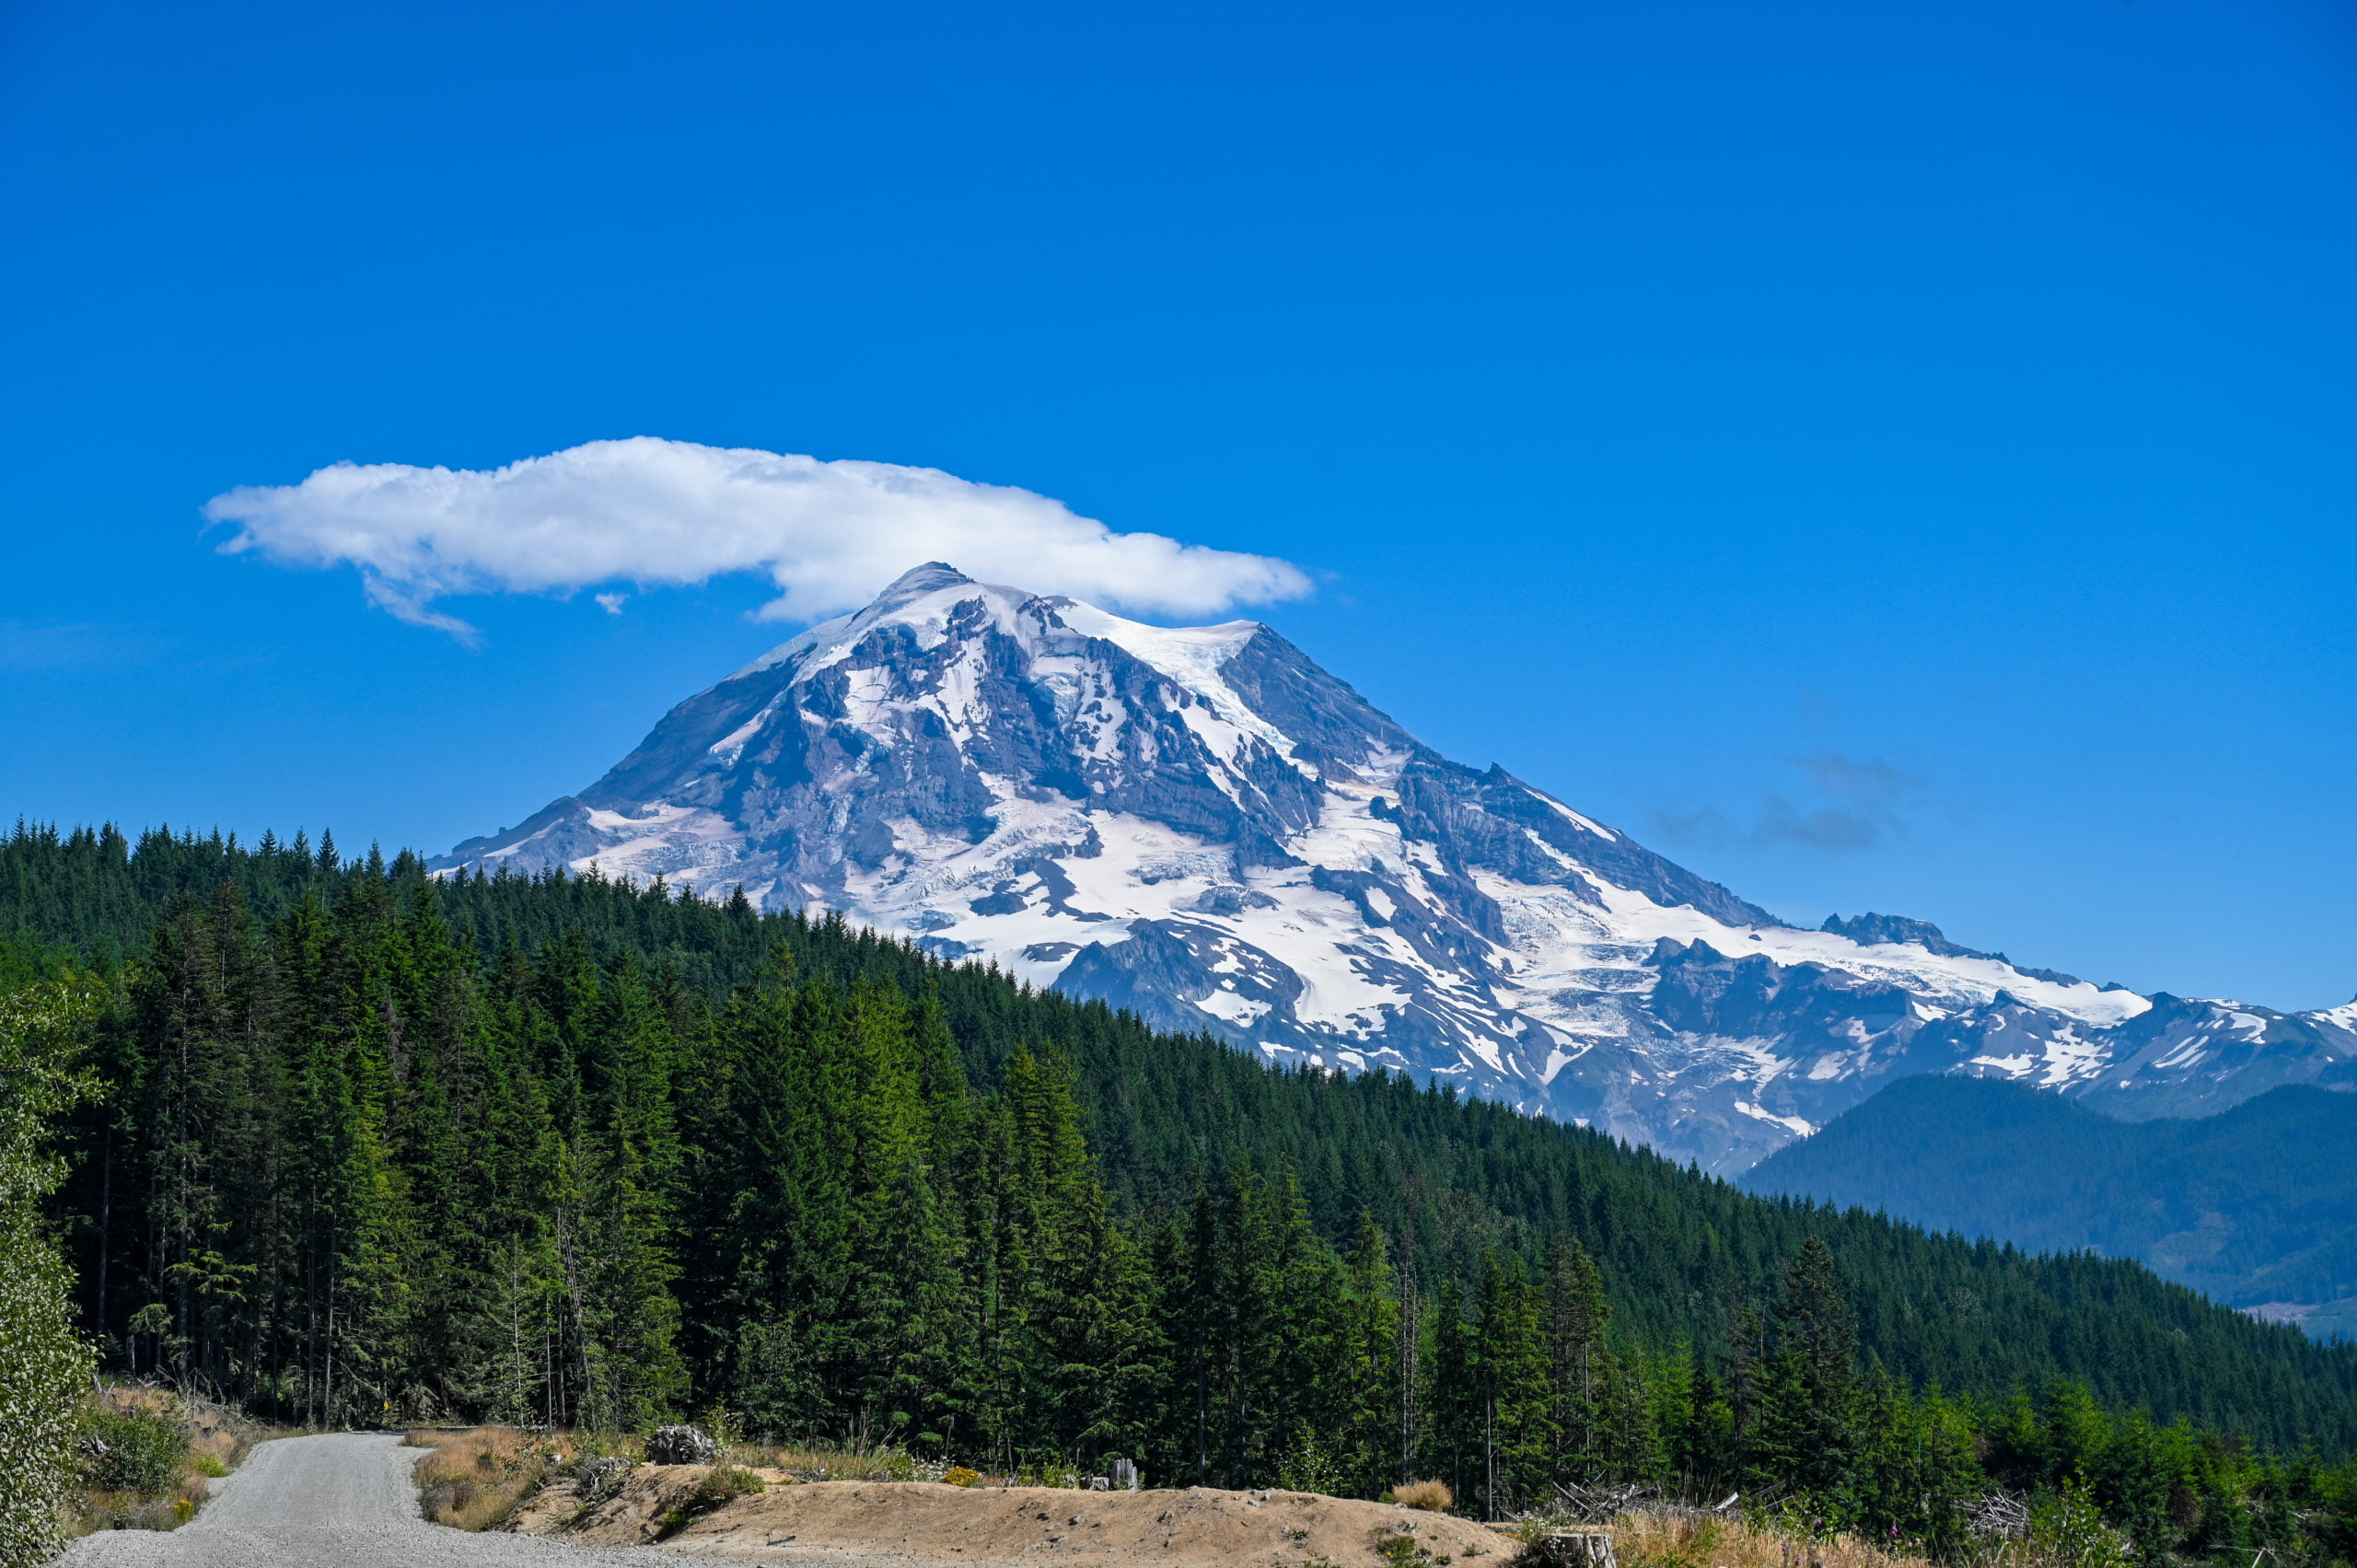
Additionally, I am driving in the direction of the sunlight, so it hits my dirty windshield as I go in and out of the shadows, making it difficult to see. This part of the drive up is the hardest, but on a clear day, the views of Mt Rainier help to pass the time.
This is one of the views on the drive to Mowich Lake.
I pass by the Paul Peak Trailhead and pay station, I already have an annual national park pass, so I do not need to stop. I’ve only got another 5 miles to go before arriving at the Mowich Lake Parking area.
It’s about 8:30 a.m. when I reach the Mowich Lake parking lot. I count at least 20 cars already parked here, but there is still plenty of parking spaces available. I gather my gear and make a quick stop at the pit toilets. They are clean and include hand sanitizer. I grab my camera bag, which doubles as my day pack and head to the trailhead.
Hiking to Spray Falls and then on to Spray Park
I walk to the Spray Park trailhead just past the pit toilets, and I notice the trail sign says it’s only 6.0 miles roundtrip to Spray Park. My guidebook and other online sources state that it is 8.0 miles roundtrip. The distance you hike depends on how far into Spray Park you want to go. There is no “you’ve arrived” sign, you hike as far into the meadow as you feel like before returning. The further up you go, the better the views.
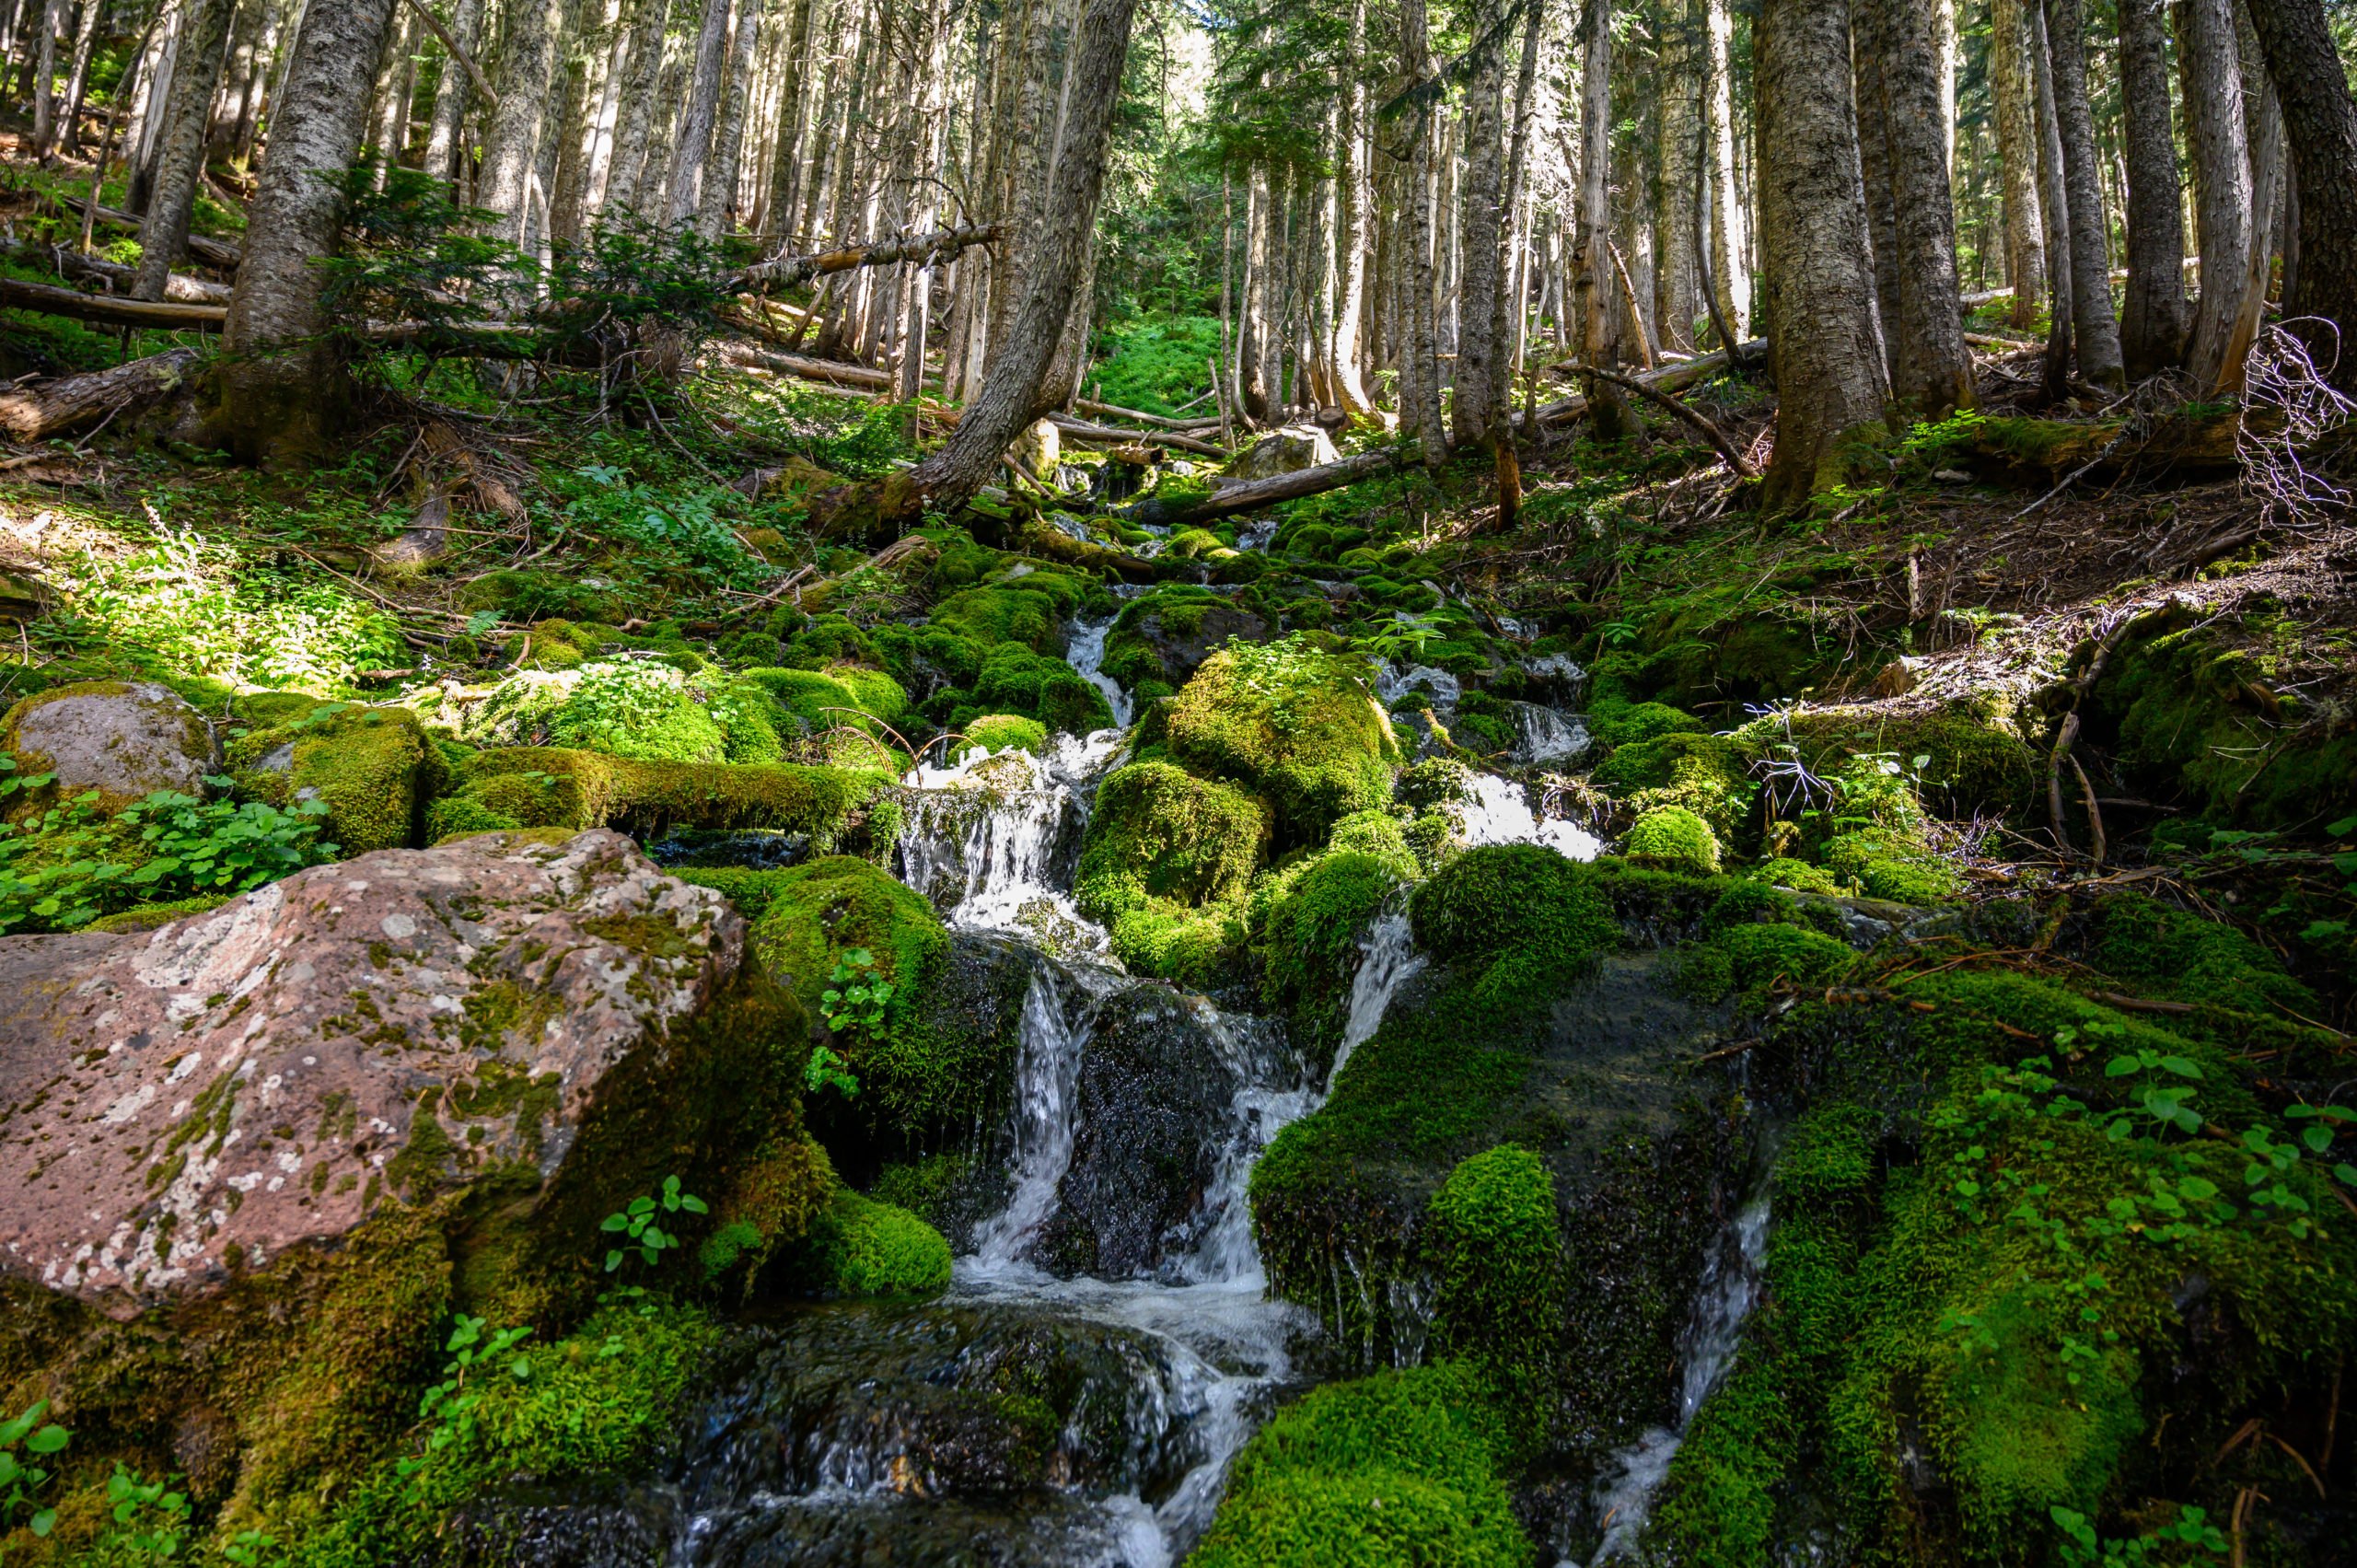
The trail gradually descends into the forest, and soon I cross a small creek. I love the sound of the water as it makes its way over the rocks. The sights, sounds, and smells of the forest are comforting, and it makes me smile. It feels so good to get away and unplug!
My view while at the Eagle Cliff viewpoint.
Eagle Cliff Viewpoint
At about 1.5 miles into the hike, I come to the Eagle Cliff viewpoint. Make sure to stop here, it’s only an extra 100 feet of trail, and on a clear day, it has some beautiful views of Mt Rainier. I enjoy a mostly clear view of the mountain during my stop.
After taking some photos, I continue along the main trail, and about .25 mile past Eagle Cliff, I come to the junction for Eagle’s Roost camp. The campground goes to the right, but the trail for Spray Falls and Spray Park continues on the left. I follow the sign for “water .10 mile,” and soon, I cross another wooden bridge and look up to see a series of small cascading waterfalls flowing over mossy rocks. It’s so beautiful.
Shortly after this creek crossing, I arrive at the trail junction for Spray Park and Spray Falls. I head right to take the path toward Spray Falls as I want to stop and see the falls before heading up to Spray Park.
A series of small cascading waterfalls shortly before the Spray Falls trail junction.
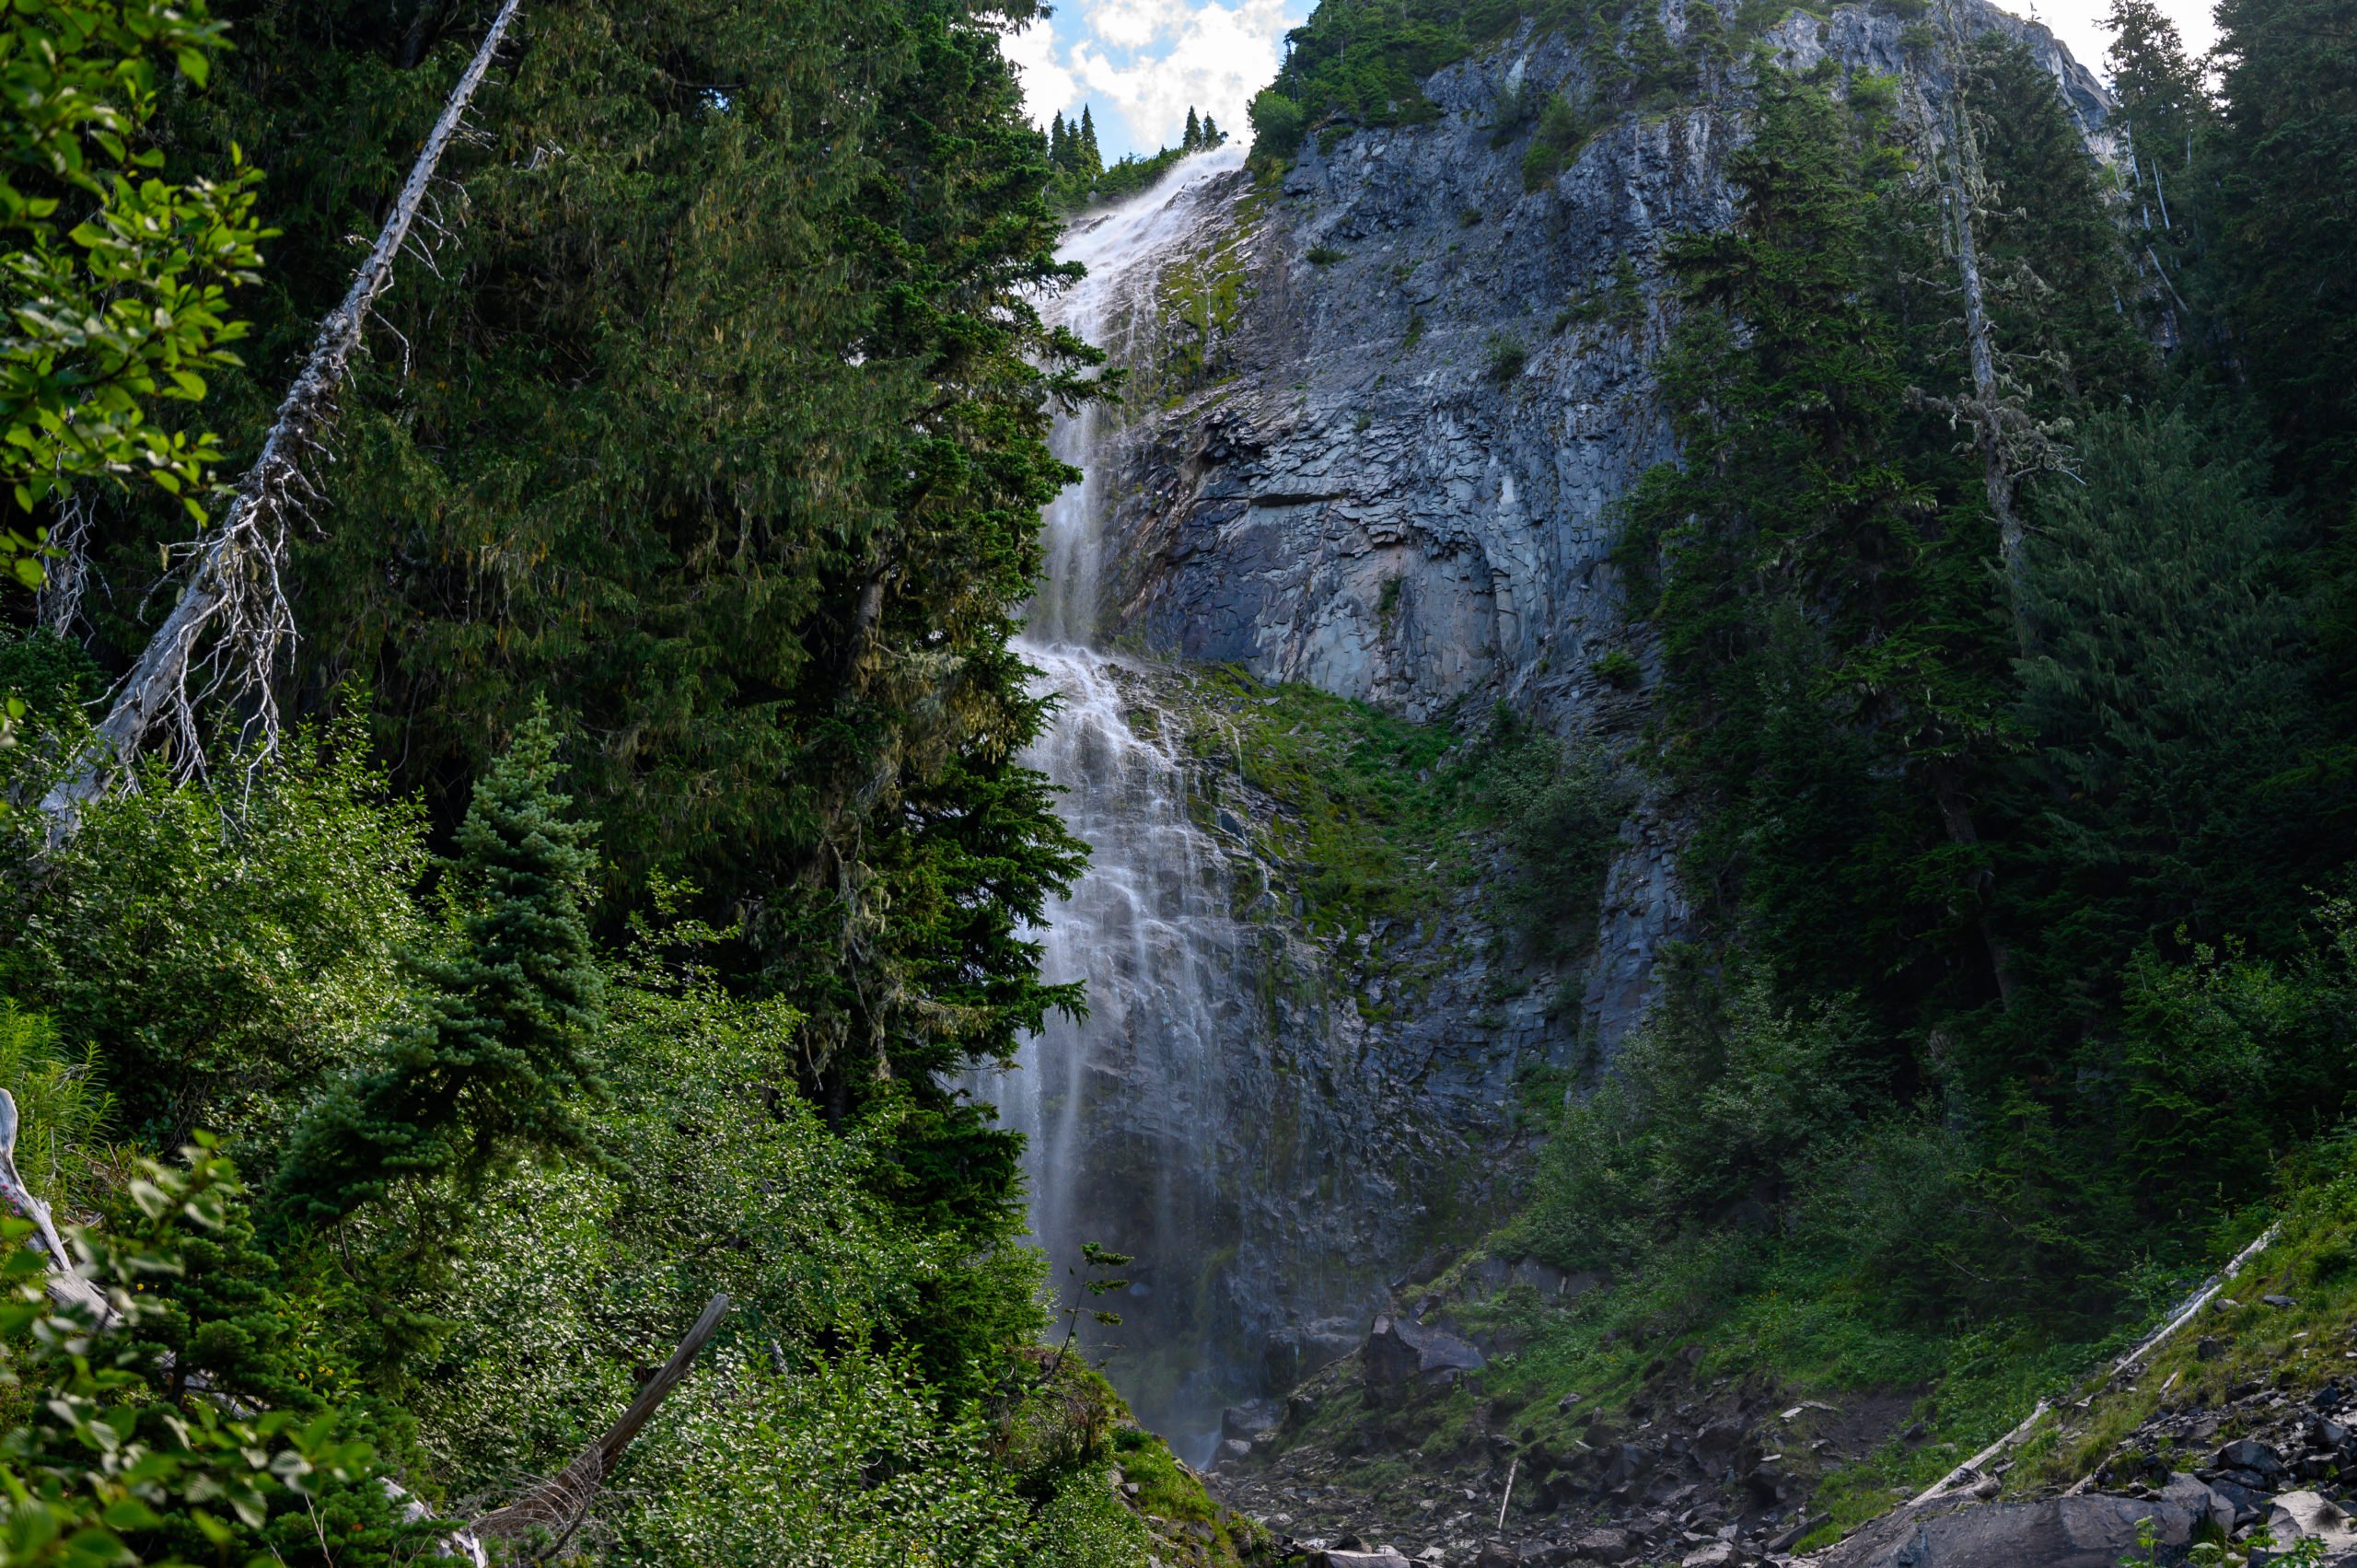
Spray Falls
I’ve seen photos of Spray Falls, and many of them showed people right next to the waterfall. However, I’m not sure what time of the year they visited as this was not possible during my hike here. There was so much water coming down the mountain that I was unable to cross the rushing water to get unobstructed views of the falls.
I was disappointed but unwilling to risk getting my camera gear wet or worse for a better shot. I will try again at a different time when there isn’t so much water rushing down the mountain.
Spray Falls in the distance.
Spray Park
I make my way back to the main trail and start my climb up to Spray Park. The trail sign at the Spray Falls junction says it’s .8 miles to Spray Park. This is where the trail rating turns from “easy” to “moderate.”
I read somewhere that there is only a 600-foot elevation gain for the hike to Spray Falls. However, the hike to Spray Park has a 1700 foot elevation gain. It feels like the majority of that is in this .8 mile hike to the entrance of Spray Park.
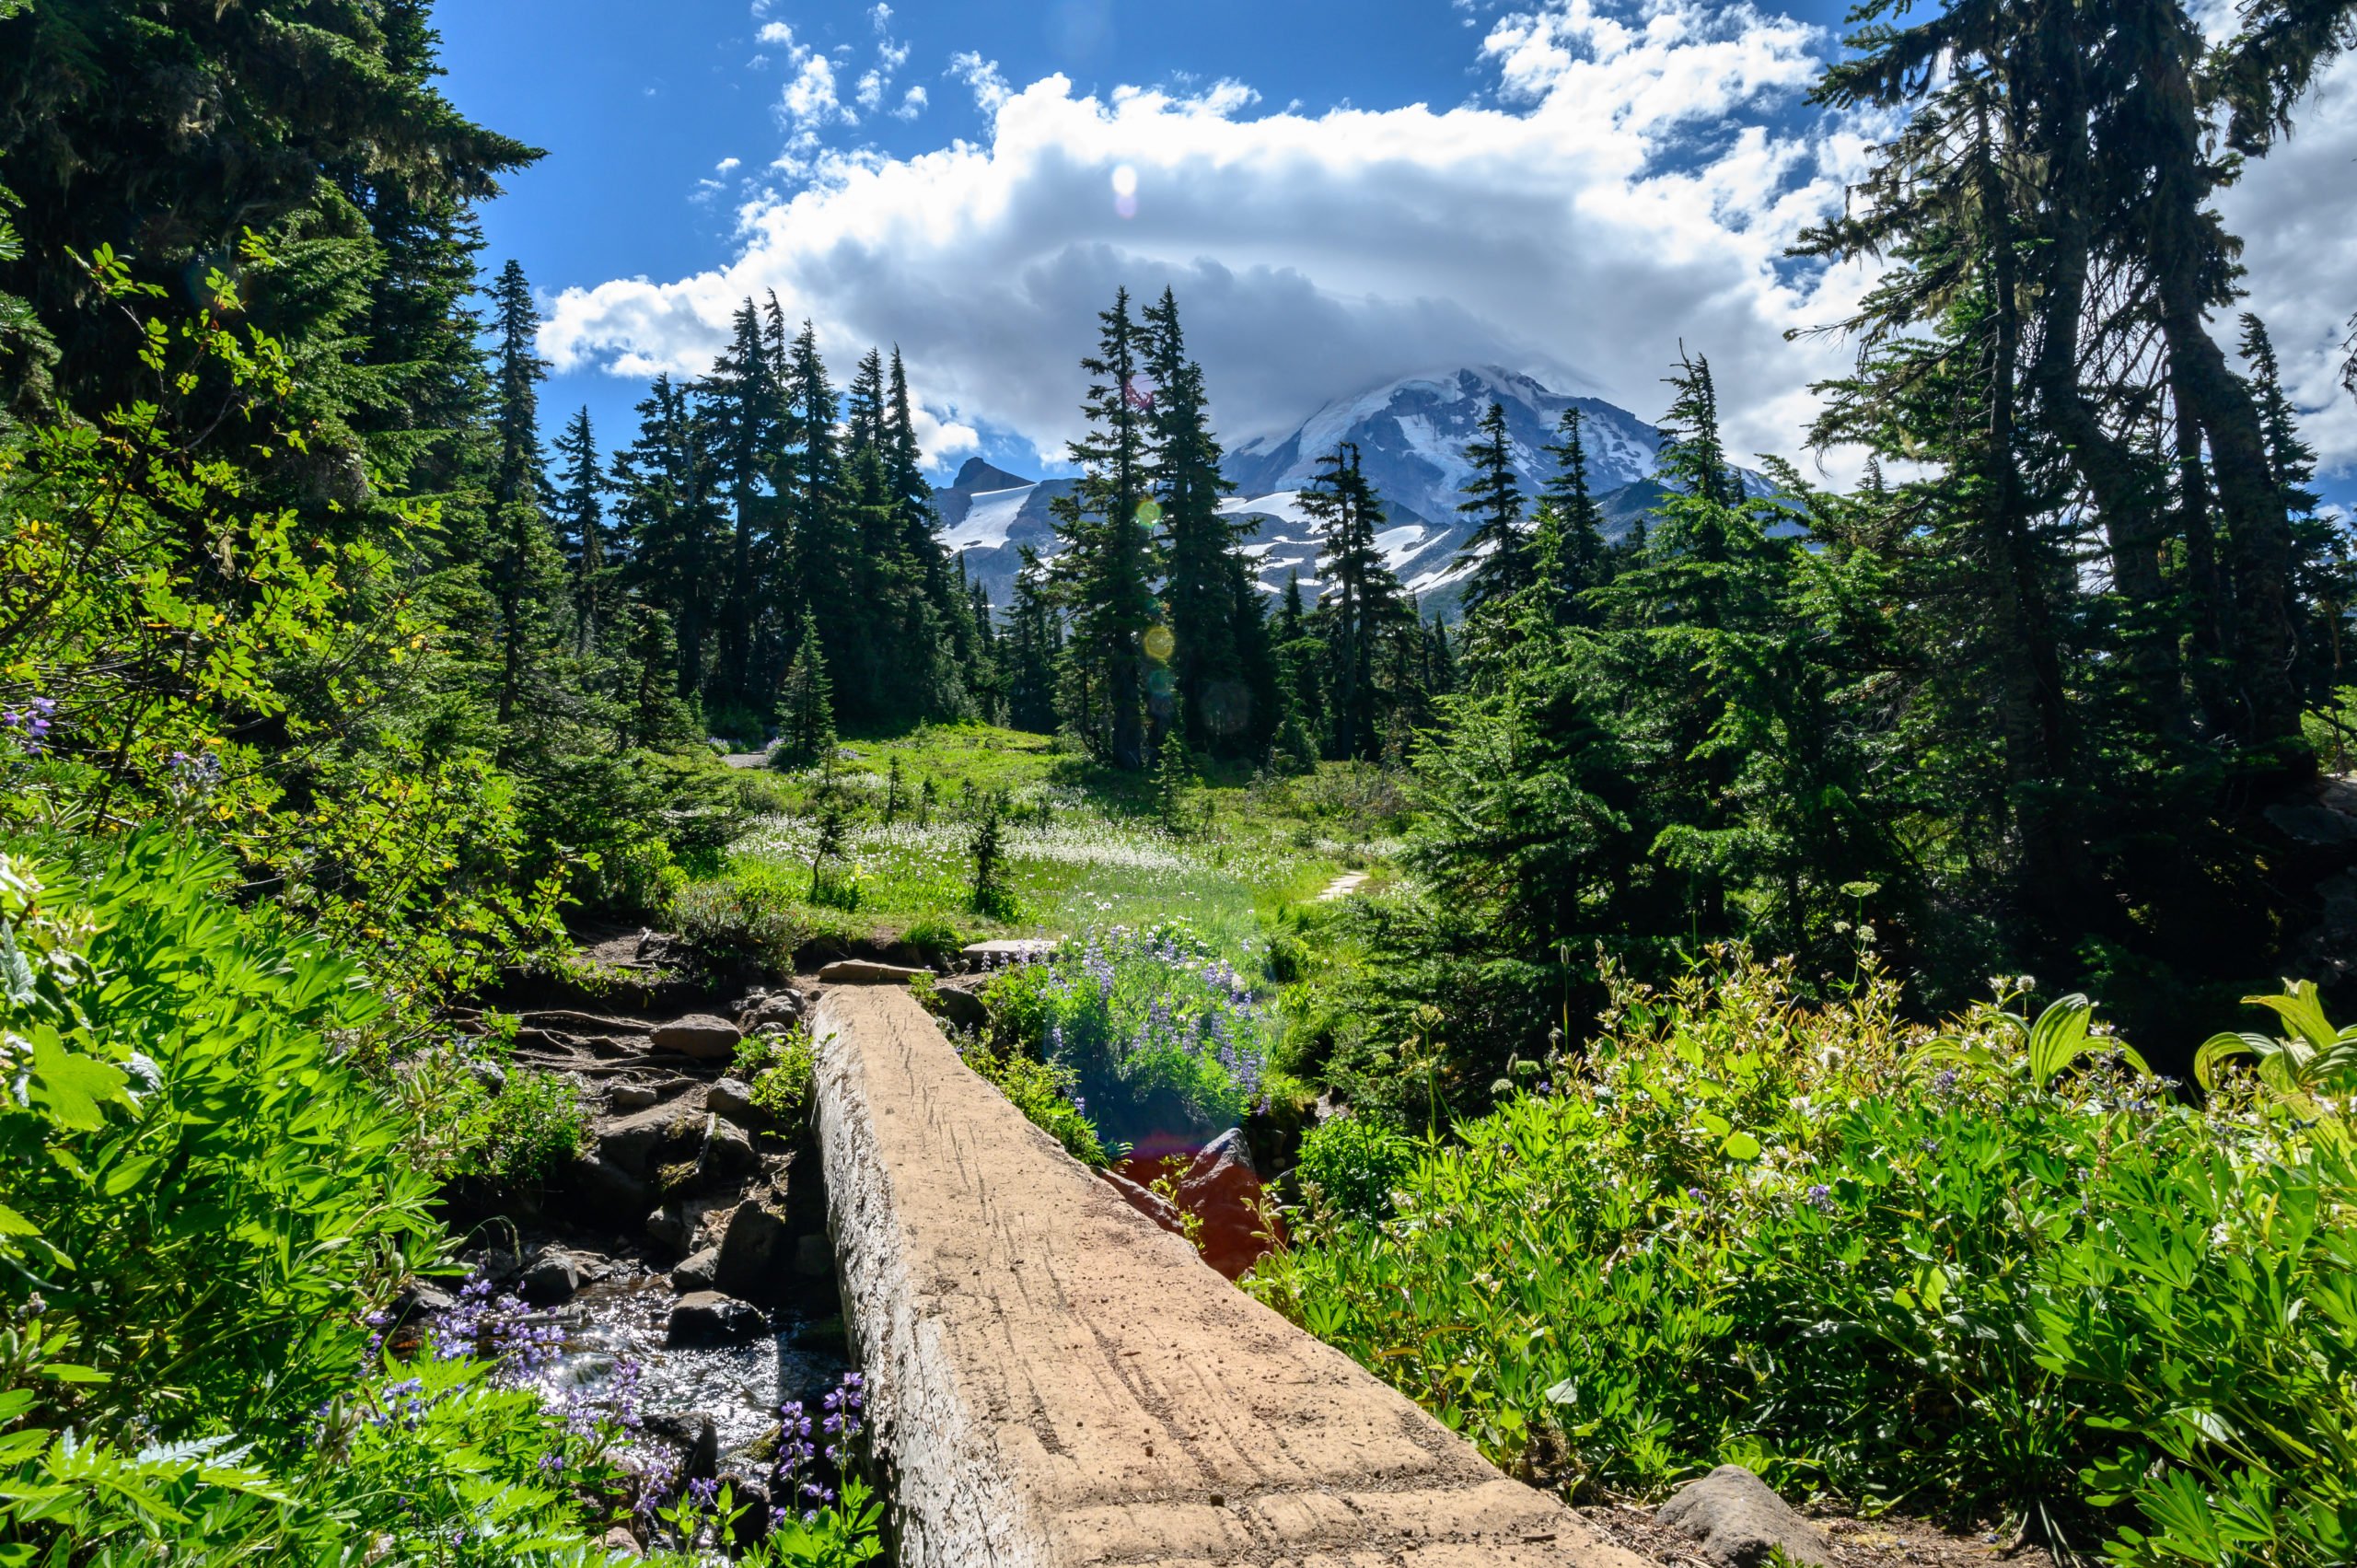
As I climb upward, I’m serenaded by the sounds of Spray Falls in the distance. Soon though, I no longer hear the falls as I continue my climb up to Spray Park. “Slow and steady wins the race,” I tell myself, and soon I arrive at a log footbridge, which marks the entrance into Spray Park.
The entrance to Spray Park at Mt Rainier.
I chat with a dad and daughter who stop by the log bridge for a break. They offer to take a photo for me with my phone, which is nice as typically, I don’t get pictures of myself on these solo excursions. We realize, though, as we stop that the mosquitoes are worse here, and no one wants to linger here too long. Soon the dad and daughter leave to continue their hike into Spray Park.
I take a few photographs, and eat a snack and then continue following the trail up. It winds its way through some scattered trees and maintains a steady, but not too steep climb upward. Soon I get views of Mount Rainier on the right and views of Mt Pleasant and Hessong Rock on the left.
A photo a fellow hiker volunteered to take with my phone.
Alfred Hitchcock’s “The Birds”
I see a hiker headed my way, and I move to the side to let her pass. As she passes, she tells me there are more beautiful views to come–but, she says, the mosquitoes are “ferocious!” Yes, that was the exact word she used.
She said they get “much worse.” She planned to eat lunch further up in Spray Park, but the mosquitoes were so bad she decided to hike back to Mowich Lake. Great! I thought glumly, as I tend to be a bug magnet. If there’s one bug in the room, it’s going to find me! Now, I wish I’d have brought the can of bug spray with me so I could re-apply.
Despite the warning, I continue hiking further into Spray Park, hoping to find “the view.” I love the wildflowers dotting the meadow with beautiful colors!
The Spray Park trail continues upward, surrounded by wildflower.
A little further up, I chat with another dad and daughter on their way back to Mowich Lake. The dad said he’s hiked this trail before and saw seven bears, but this time not a single one. They did get to see some goats, though, so that sounded pretty neat! I love meeting people on the trail and seeing others out enjoying nature and life. I say my goodbyes to the dad and daughter and continue hiking a bit further into Spray Park.
It’s Lunch Time, and I’m on the Menu
It’s about a quarter to noon, and I’m hungry, so I decided to stop for a quick lunch break. I put my bag on the ground to get my water and sandwich, and as I do, a swarm of mosquitoes lands on my backpack. There’s not even any blood for them to get out of my pack!
Of course, they land on me as well, and I do my best to swat them off while trying to take a quick drink and a bite to eat. (Again, if only I’d have brought the bug spray with me!) This lesson will stick with me for about a week as the swelling and itching finally dissipate.
It’s like Alfred Hitchcock’s movie The Birds, except replace birds with mosquitoes and you’d have a pretty accurate description of my experience.
I quickly zip my bag up and decide I too will not be lunching here. I put my pack on, take a few more photos while the mosquitoes make a lunch break out of me, and then decide I’ve got my views for the day. I’m heading back. I couldn’t stop for 5 seconds without being attacked. It just isn’t enjoyable any longer. I did, however, enjoy the views and beautiful flowers. I even saw a patch of snow, but the bugs…
The Bee & The Magic Hat
I descend back into the trees, and soon I pass the junction to Spray Falls and continue toward Mowich Lake. It’s around the Eagle Cliff viewpoint that a bee decides it wants to chase me. I try to ignore it, I wave my hand at it, it flies towards my face, and I try to swat it away without making it angry. It does not want to leave me alone!
So, I start running. I figure if I run a little way down the trail, it will lose interest. Nope. It did not. It kept coming at me. The last thing I want right now is to get stung by a wasp.
I hear voices up ahead, and I jog toward them, a man and woman come into view, and I say, do you have a hat? I have a bee chasing me. The woman says, “a hat?” “Oh, you mean to swat at the bee?” I say, yes! So the man graciously takes his hat off, and you know what? As soon as he takes his hat off, the bee flies away! I am not kidding!
It was quite funny, and we all laughed about his “magic hat.” Then they tell me a story of when they were hiking years ago, and a bee flew up his wife’s nose! It sounded like a horror story to me, but she lived, although she did get stung. I am very thankful the bee left me, but I still heard phantom buzzing noises for a while after I continued down the trail.
Spray Park trail with views of Hessong Rock.
The Flat Tire
It takes about an hour for me to hike back to the Mowich Lake Campground from Spray Park. I am tired and a little hungry, but happy to be away from the mosquitoes. As I walk over to my car, I discover that I have a flat tire. I must have run over something on the way up.
I make a stop at the restrooms before changing my tire. As I’m walking back to the car, the dad and daughter duo that I spoke with earlier about seeing the goats spot me and say hi and ask me about my hike.
We chat for a bit, and then I walk over to change my flat tire. I’ve never actually changed a tire on my SUV before. It takes me a little bit to figure out how to lower the tire from underneath the vehicle. I do that, but I am not sure how to now detach it from the cable it is on.
I decided to ask the man I chatted with moments before for help. They were driving past my vehicle to leave for home when I stopped them to tell them about my situation. The man quickly parks his truck and very graciously helps me get the spare tire out from underneath the vehicle and then proceeds to change my flat tire. I am so thankful he stayed to help too as he mentioned the lug nuts were on really tight, and he had a hard time getting them loosened. I am so grateful for the kindness of strangers!
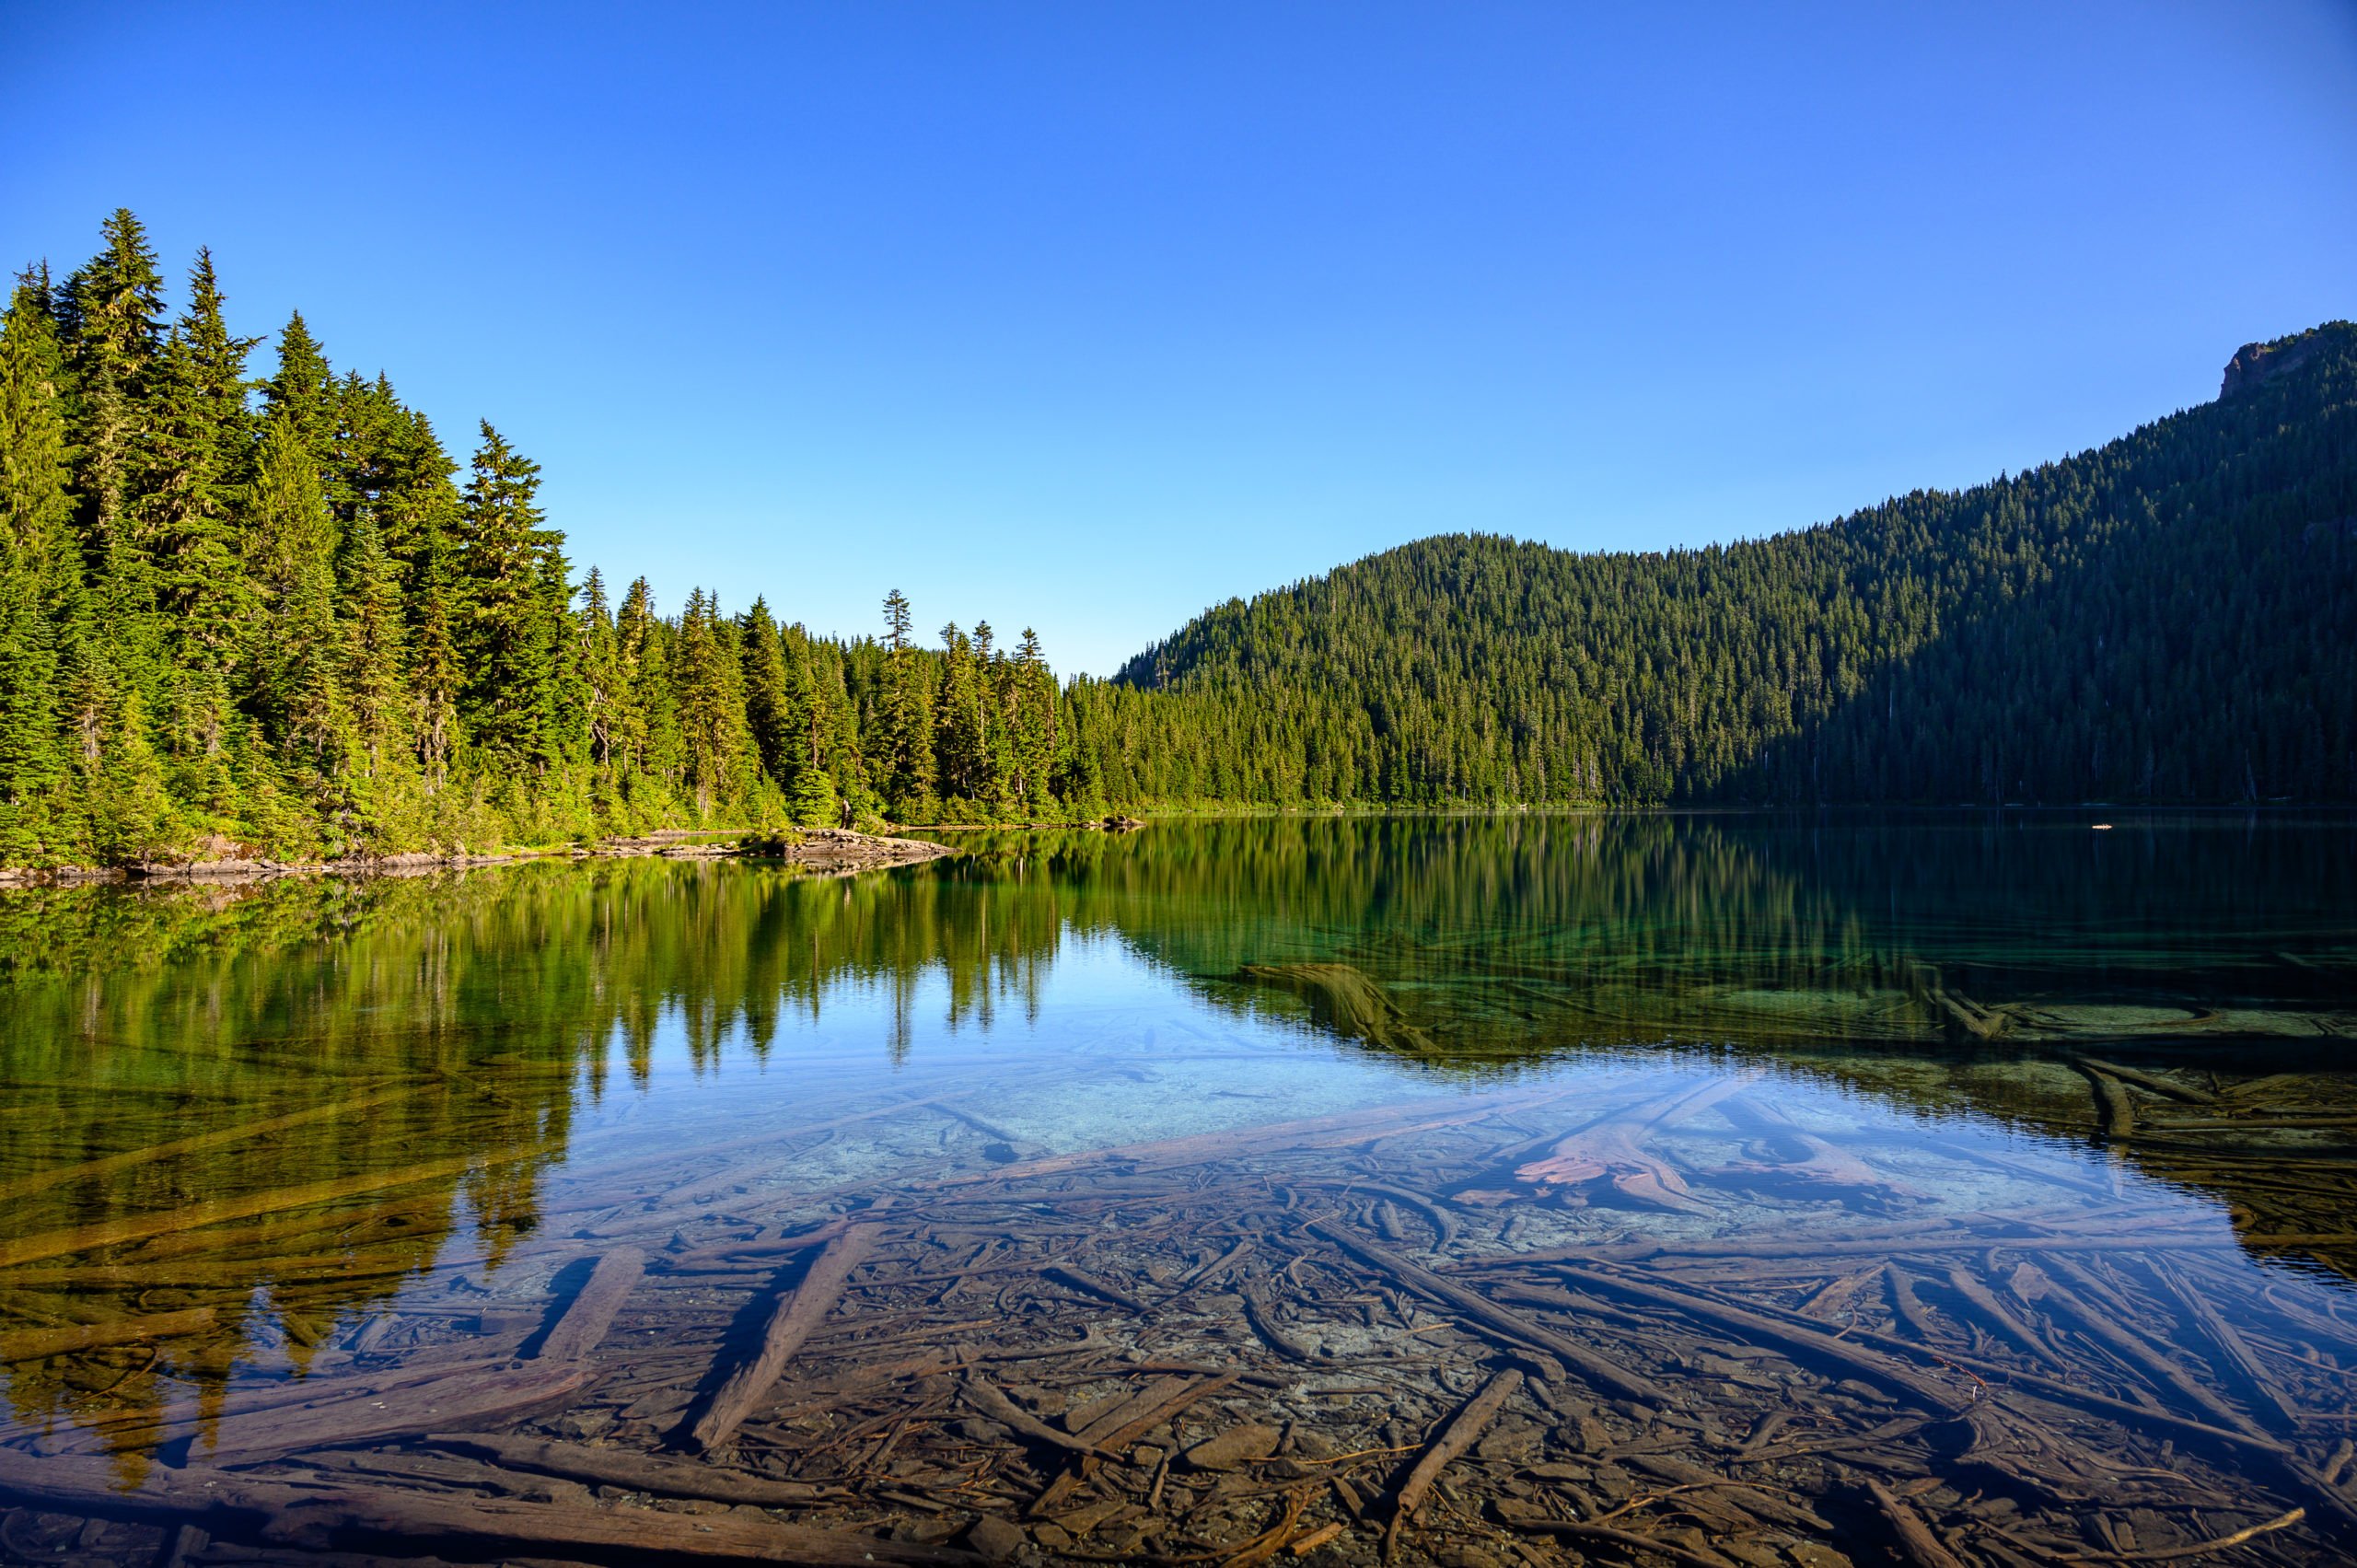
Mowich Lake is a beautiful, clear alpine lake.
Conclusion to My Hiking Experience
I made it home safely but stopped in Wilkeson to air up my spare tire as it also appears to be losing air. All in all, between being eaten alive by mosquitoes, chased by a bee, and getting a flat tire, I’m not sure I’d do it again if I had to pick those exact circumstances, but I don’t regret going either.
So would I recommend you make the trip to Mowich Lake? Absolutely! The hike to both Spray Falls and Spray Park is beautiful, the wildflowers are stunning, and Mowich Lake is a serene alpine lake accessible by car. I would not want to discourage anyone from going, only to suggest you plan ahead and don’t forget to pack bug spray for the hike!
In addition to applying bug spray in the parking lot, next time I will also bring it with me on the hike. Read my tips on what to pack and how to be better prepared than I was before leaving home.
Getting to the Spray Park Trailhead
The trailhead for Spray Park is in the northwest corner of Mount Rainier National Park in the Mowich Lake campground. As I previously mentioned, you’ll have an almost 17 mile stretch of gravel road leading up to the parking area. The road ends at the parking lot for the Mowich Lake campground. Whether you’re coming from Seattle, Tacoma, or Bellevue, the drive will take approximately 2 hours.
From the town of Wilkeson, you’ll drive south on Highway 165 for about 9 miles before coming to a fork in the road. Stay to the right of the fork and continue south toward Mowich Lake. Soon after the road turns into a dirt road, continue along this main road, and in about 9 miles, you’ll come across the Paul Peak Trailhead and pay station. Stop here if you do not already have a National Parks pass.* You only have about another 5 miles to go from the pay station before you reach Mowich Lake. The road ends in the parking lot.
*Please note the Washington Discovery Pass and the Northwest Forest Pass are not the same things as the National Park pass, you need to pay an entrance fee to be within the Mount Rainier National Park boundary. Purchase online ahead of time or stop at the pay station mentioned above.
Know Before You Go
Best Time of the Year to Go: July to October
The road to the Mowich Lake parking lot and Spray Park trailhead is typically only open from mid-July to October.
Fees: $30 for a 7-day park pass/$55 for an annual park pass
You can purchase your national park pass ahead of time online, or you can stop at the pay station on the way up. The pay station is at the Paul Peak trailhead. You will see signs telling you to stop and pay. If you already have a pass, just keep going up the road.
Road Conditions: The last 17 miles of the drive to the trailhead parking area is on a dirt road.
The road is rough and has potholes and washboard conditions along the way—plan for this section of the road to take about one hour to complete. Recommended speeds range from 15-30 mph, depending on the conditions and the vehicle you are driving in. Cars and SUVs alike will have no issue making it. Just take it slow. On a clear day, you’ll have views of Mt Rainier for the drive up.
Fuel Up: Make sure to fuel up your vehicle ahead of time.
The town of Wilkeson is your last stop for fuel on the drive up.
No Cell Service: There is no cellphone service in this area of the park.
Most people will lose cellphone signal in one of the small towns like Wilkeson before you ever hit the dirt section of the road. Let someone know of your hiking plans, so in case of an emergency, they will know where to look. This is always a good idea when hiking in the mountains.
No Pets: Pets are not permitted on any of the trails within Mount Rainier National Park.
No Potable Water Provided: There is no potable water for the Mowich Lake trailheads or campground.
You need to bring enough drinking water with you or a filtration system to filter lake or creek water.
Check the Park’s Website for Alerts:Always check with the park to find out if there are any alerts for road closures or weather alerts you need to be aware of before your trip.
What to Pack for Your Hike
Bug spray: Do not leave home without it! Bugs are notoriously bad at Spray Park, read my experience below, and make sure to apply and re-apply as necessary. You may also want to bring a mosquito net for your head.
Layers: I hiked this on a warm August day and didn’t need more than my t-shirt, but I still packed a sweatshirt just in case. Depending on what time of year you are here, you may need more layers, and in case you’re ever stranded on a hike, the extra layer may be a lifesaver.
Water: There is no potable water, so make sure to pack enough water for your hike, lunch break, and for the ride back down the mountain.
Food: Make sure to pack snacks and food to keep your energy up. I like to bring snacks I can eat on the go and then a sandwich for my lunch break.
First aid kit: It’s always good to have a first aid kit with you, in addition to that I also like to make sure I have moleskin when I’m hiking or backpacking, just in case I or someone in my group gets a blister.
Buff/Bandana: I like the buff I purchased at REI as you can use it as a bandana, hat, face mask, or neck gator. A bandana will also work for most of those situations too.
Bear spray: You are hiking in bear country, and your odds of seeing a bear while hiking to Spray Park is pretty good. So I recommend bringing bear spray, and if you’re by yourself, consider also getting a bear bell or calling out now and again to announce yourself.
Hiking/Trekking Poles: These are optional, but useful for crossing small creeks and for keeping your balance over the rocky terrain and roots on the trail.
Sturdy Hiking Shoes: You may want hiking boots, or you may feel comfortable with good trail shoes. Either way, make sure they’re comfortable and give you enough support. Then pack a pair of flip flops for, after the hike, I always find my feet like to breathe after a hike.
Prepare for the drive: Roadside Tools
Make sure your car is equipped with the necessary emergency roadside tools and make sure you know how to use them. Bring a tire pressure gauge, jumper cables, and a portable air compressor if you have one.
Additionally, I recommend you check your tire pressure before leaving town and also make sure your spare tire is properly aired up.
Spray Falls Hike Overview
Distance: 4.0 miles, round trip
Difficulty Level: Easy
Approximate Hiking Time: 1.5 hours to 2.5 hours
The hike to Spray Falls is a mostly level hike with some smaller rolling hills. There is no significant elevation gain for this hike. The trail is narrow for most of the hike, and there are a lot of roots and rocks embedded in the path. If you have significant issues with your balance, the trail might not be a suitable choice. However, for most people, including families with children, this hike should be a relatively easy hike accomplished in a few hours.
Hiking to Spray Falls
Start at the trailhead for Spray Park. You’ll find the Spray Park trailhead on the right, just past the pit toilets at the Mowich Lake Campground. The trail gradually descends into the forest, and soon you’ll cross a small footbridge over Lee Creek. At about .2 miles into the hike, you’ll come to a trail junction for the Wonderland Trail. Continue to follow the trail signs for Spray Park.
About 1 mile past this trail junction, you’ll come to the Eagle Cliff viewpoint. You’ll see a small trail sign pointing to the right. It is only 100 feet off the main trail. I recommend stopping here for a quick look. On a clear day, you’ll have incredible views of Mt Rainier and the Mowich glaciers.
After stopping at the Eagle Cliff viewpoint, continue on the main trail for about .25 miles where you’ll arrive at another trail junction. The trail sign will point right for Eagle’s Roost Camp, and to the left, it shows water .10 miles. Stay to the left of the fork to continue to Spray Falls.
Soon you’ll reach the trail junction for Spray Falls. You’ll see a sign that points to the right for Spray Falls viewpoint .10 miles. Take the trail on the right and follow this until it ends at the viewing area for Spray Falls.
Retrace your steps to return to Mowich Lake, or continue to Spray Park if you prefer a longer and more challenging day hike.
Spray Park Hike Overview
Distance: 6.0-8.0 miles, round trip
Difficulty Level: Moderate
Approximate Hiking Time: 3.5 hours to 5 hours
The hike to Spray Park is moderately challenging. However, I feel if you’re in reasonable shape, it should be one you can manage with relative ease. For some comparison, if you’ve ever hiked to Poo Poo Point, I find the uphill gain to be similar to Spray Park. The real uphill climb starts at the junction for the Spray Falls viewpoint. This is where the trail switches from easy to moderate difficulty.
The trail is narrow for most of the hike, and there are lots of rocks and roots and a variety of creek crossing, so I recommend sturdy hiking shoes and hiking poles will also be helpful, especially if you have troublesome knees.
The park trail sign shows 6 miles roundtrip; however, my guidebook shows 8 miles roundtrip. That is because Spray Park is a large area, and how far you choose to hike into Spray Park will determine how long your hike is.
Hiking to Spray Park
Follow the directions above for Spray Falls until you reach the junction for Spray Park and Spray Falls. From the junction for the Spray Falls viewpoint, the trail sign shows .8 miles to Spray Park. This distance brings you to the beginning of Spray Park. You’ll know when you’ve reached it as you come into an open area and begin moving outside of the treeline into an alpine meadow.
You’ll soon have views of Hessong Rock and Mount Pleasant to your left and views of Mount Rainier to your right. You can hike an additional mile or so further to see more viewing areas, depending on how you feel or how far you wish to go.
Depending on the time of year that you go, if you hike far enough into Spray Park, you will come to the area known as Seattle Park. Snowfields often surround this area, and I’ve read in the earlier months that hikers often get lost in the snowfields. I was here in August during a heatwave, so that wasn’t an issue, but be cautious and play it safe if you come when it is snowy, it’s better to turn around than to get lost.
After enjoying your time in Spray Park, head back the way you came to Mowich Lake campground.
Camping near Spray Park
You have a couple of campground options if you want to turn your day hike into an overnight trip.
Mowich Lake Campground
Mowich Lake campground is a walk-in, tent sites only, first come first served primitive campground. The walk from the parking lot to the campsites is a short one, though, and they provide a wheelbarrow to help you carry your supplies from the car. The tent sites are set around a dirt circle, and there is no privacy between campsites. Bear boxes are provided for your food and gear.
What this campground lacks in amenities and privacy, it makes up for in beauty and location. Mowich Lake is a gorgeous alpine lake! You can bring your SUP or kayak and enjoy time in this serene mountain setting. It is also a fantastic base camp for hiking trails in the area.
Fee: There is no fee to camp here. Campers self-register at the campground, and no wilderness permit is required.
No Fires Allowed
Pit Toilets
No Potable Water (You must pack your water in, or bring a filter to filter lake or creek water.)
Eagle’s Roost Camp
This backcountry camp is an excellent place for a beginner backpacking trip or an overnight family backpacking trip. The camp is located about 2 miles from the Mowich Lake campground, and it takes approximately one hour to hike there. There are seven campsites with bear poles provided for hanging your gear. Remember, you are in bear country, so make sure to take the necessary steps to keep yourself safe.
No Potable Water (You must pack your water in, or bring a filter to filter lake or creek water.)
Additional Tips for your Trip & Other Articles You Might Enjoy
Come during the week to avoid the crowds. If you do come on a weekend during July and August, plan to arrive early in the morning. This gives you the best chance to get a parking spot and completing the hike before the crowds come.
Sometimes it is easy to think “I’m not going that far” and, therefore, not perform vehicle checks you might otherwise do for a more extended road trip. However, anytime you’re going to drive up a mountain or be out of cell service range, it’s good to make sure you are adequately prepared! Also, make sure to let someone at home know where you’re going and what your hiking plans are, just in case of an emergency.
Other articles for things to do in Mount Rainier National Park:
The first time I tried tamarind agua fresca was at a Mexican restaurant in Barcelona. It was love at first sip! This wasn’t my first experience with the flavors of tamarind though. My first experience with tamarind was in Maui, Hawaii. I was ordering shave ice, and I saw “tamarind” listed as one of the syrup choices. I asked about it, and they said it was a little sour. Well, they had me at “sour,” so I tried it, and it is now one of my favorite syrup flavors for shave ice!
Tamarind agua fresca, is also known as agua de tamarindo or tamarind water. It is a popular drink in Mexico, and I understand why. Tamarind agua is so light and refreshing. It makes the perfect drink on a hot day. If you’ve never tried it, I hope you’ll give this simple recipe a try. I’m pretty sure you’re going to love it too!
Tamarind is a fruit from the legume family. It looks like those little seed pods that fall off certain kinds of trees or like giant odd-shaped peanuts. Inside the shell is where the fruit is. It’s a soft, chewy sort of fruit surrounding multiple seeds.
Eating Tamarind Fruit
The tamarind fruit is a nice blend of tart and tangy with a hint of sweetness. You can eat fresh tamarind by removing the shell and chewing the fruit off the seeds and spitting them out. I know it sounds a little gross, but think of it like a cherry, where you eat the fruit from around the pit and then spit out the pit.
Many cultures use tamarind in cooking too. I’ve yet to try using it that way, but I would like to. I love eating the fruit as is, or dried and seeded like these that I ate while in Thailand. However, using it to make tamarind agua fresca is probably my favorite. It’s a unique flavor, and its refreshing taste hits the spot on a warm summer day.
Health Benefits of Tamarind
Tamarind has many reported health benefits such as: lowering blood sugar, helping with stomach problems, treating colds and fevers, used as an anti-inflammatory, and helping to regulate cholesterol levels.
It is also a good source of vitamins and nutrients such as iron, fiber, potassium, phosphorus, vitamin C, and more. I don’t recommend you try to self-medicate with tamarind, only to show that in addition to being delicious, it also provides a variety of health benefits.
How to Make Tamarind Agua Fresca
Tamarind agua is incredibly easy to make. You only need three ingredients: tamarind, water, and sugar (to taste).
Remove the tamarind shells and peel away the veins. Discard the stringy veins and shells.
This is easy to do, but the fruit (also called the pulp) of the tamarind is sticky, so your hands will get a little sticky in the process. I like to squeeze the sides of the shell, and sometimes, if I’m lucky, I can slide the fruit with seeds right out of the shell. It’s kind of like when I’m eating crab, and I get the perfect crack of the shell, so the whole piece of crab comes right out!
Place the shelled tamarind in a medium saucepan and cover with four cups of water. Bring to a boil, then reduce the heat to medium-low and cook for 15 minutes.
You can also soak the tamarind for 2-3 hours instead of boiling. I’ve made tamarind agua fresca both ways, and I didn’t notice a big difference in taste. So choose whichever method you prefer.
Remove from the heat and let cool completely.
If you’re removing the seeds by hand, it is essential to let the mixture cool to the touch. I still let it cool even if I’m using a blender to remove the seeds, but it’s less important that it’s completely cool when using this method.
Remove the tamarind seeds.
Remove the seeds from the tamarind and discard. You can remove them with your hands or pour the tamarind with liquid into a blender and pulse on low for about 3 seconds. The seeds should mostly settle at the bottom of the blender. Gently pour the liquid and pulp from the blender and remove any seeds that come through.
Pour the tamarind pulp and liquid through a fine-mesh strainer into a pitcher or 8-cup container.
Try to strain as much of the pulp as possible, as this is where the flavor and nutrients are. If a few seeds get in there, just toss them out along with any veins or pulp leftover after you’ve strained it.
Add 4 cups of water to your tamarind concentrate and sugar to taste. Stir well to mix in the sugar and tamarind pulp.
You can serve the tamarind agua fresca over ice, and if you want, you can add in a splash of lime juice. I like it with or without the lime juice. It’s optional.
Tips for Making Tamarind Agua Fresca
Choose brown or white sugar based on your preference. If using brown sugar, start with smaller amounts, as it tends to be richer and sweeter than white sugar. Stir the tamarind agua fresca after it’s been sitting as the tamarind pulp settles at the bottom, and it’s where the flavor is.
I buy tamarind in the produce section where you buy what you want and pay by weight. However, sometimes you’ll find it in boxes like the below photo. If you see it labeled “sweet,” this is a more mature version of the fruit, and thus it is sweeter, so I add less sugar when using this variety.
You can also buy the paste in some stores. It’s the pulp without the shell, shrink-wrapped in a block (sometimes you’ll find it in a jar too). You would measure out the amount you want to use and then add water, strain, and blend, just as you did above. I’ve only ever used the fresh tamarind fruit, so I can’t tell you the exact amounts, you’ll need to experiment to get the desired flavor.
So that’s it. Remove shells, boil (or soak) tamarind pulp, then remove seeds, strain the fruit and combine with water and sugar. Voila! Delicious agua de tamarindo!
Tamarind Agua Fresca (Agua de Tamarindo/Tamarind Water)
A delicious and refreshing drink that is easy to make!
Remove the tamarind shells and peel away the veins. Discard the veins and shells.
Place the peeled tamarind fruit in a medium saucepan with 4 cups of water.
Bring to a boil, then reduce heat to medium-low and simmer for 15 minutes. (You can also soak the peeled tamarind for 2-3 hours instead of boiling.)
Remove from the heat and let cool completely.
Once the tamarind water is cool you can remove the seeds with your hands or pour the contents into a blender and pulse on low for about 3 seconds. The seeds should settle at the bottom of the blender.
Pour the tamarind pulp and tamarind water through a fine-mesh strainer into a pitcher or 8-cup container. Try to strain in as much pulp as possible as this holds the flavor.
Add the remaining 4 cups of water and sugar to taste, stir well and enjoy!
Notes
Optional: Add a splash of lime juice for a little extra freshness to your drink. You can use white or brown sugar, add a little, taste, and then add more until you reach your desired sweetness.
Are you feeling a little stir-crazy? Do you need a good day hike to shake off some winter blues? Well, that’s how I felt after what seemed to be a never-ending winter and a cold and rainy start to our summer in Seattle. I was ready to get outside and soak in the beautiful sunny day we finally had. So I headed for one of my favorite waterfall hikes close to home, the Twin Falls hike near North Bend, Washington.
The Twin Falls trail is a beautiful path that winds its way along the river and through the trees (sorry no Grandma’s house) before leading you to spectacular waterfall views! I’ll tell you all you need to know to get there and as well as some tips, so you don’t extend your hike further than you want to.
Useful Things To Know Before Getting Started
You need a Discover Pass to park at the trailhead for the Twin Falls hike.
Bring bug spray, depending on what time of year you visit the mosquitoes can be quite bad.
Twin Falls is a popular trail, so if you plan to go on a weekend, be prepared for crowds and limited parking. I recommend you come on a weekday if possible, and try to get an early morning start. Even on a weekday during the summer, the parking lot is often full by noon.
There are pit toilets with hand sanitizer provided.
I found it easy to follow social distance guidelines along this hike. However, on crowded days, you may want to wear a mask when passing other hikers if you are unable to follow social distancing guidelines.
Hiking the Twin Falls Trail
The Twin Falls trail is about 3 miles round trip from the trailhead to the Upper Falls Viewpoint.
If you have ever hiked the Franklin Falls trail near Snoqualmie Pass, I will share my thoughts on a comparison of the two. I have hiked the Twin Falls trail and Franklin Falls trail multiple times. I love the ability to get up close to the waterfall at Franklin Falls, but I think Twin Falls is the prettier hike. You get more access and views of the river along the way, plus the forest opens up a lot more than with the Franklin Falls trail.
That said, Franklin Falls is the easiest of the two trails. So depending on your physical shape or the age of those hiking with you, be aware that hiking to Twin Falls is the more challenging hike.
It is still a fairly easy to moderate hike, but you will have some steep inclines along the way, and over 100 stairs to descend and ascend to see both waterfall viewing areas. Take it slow, there are lots of places for breaks along the way and enjoy the journey!
Starting at the Main Trailhead
Starting from the main trailhead, you will begin your hike with almost immediate views of the river below. If you’re itching to dip your toes in the water, don’t worry, you’ll have plenty of opportunities to do that later along the hike. Follow the trail as it winds its way down a hill and into the forest. You’ll soon cross a little bridge (above photo). After you cross the bridge, you’ll reach an area with easy access to the river.
There are several stops along the way with good river access. Huge boulders are separate the river into small pools. These are good for dipping one’s feet in to cool off on a hot summer day or letting the dogs have a little fun splashing around.
Benches With a View
As you continue along the trail, you’ll hike through narrow parts where the foilage crowds the path on either side. Then you’ll come into large open areas with giant trees looming all around. Make your way up a series of switchbacks before arriving at a resting point. You’ll climb a steep switchback to arrive at a set of benches that offer your first glimpse of the upper falls.
The benches are a beautiful place to stop and rest. There is usually a breeze blowing here, so in the summer, it is a refreshing place to sit and cool off. However, in the colder months, you may wish to bundle up or only stop for a short break if it’s really windy.
The Big Tree by the River
When you’ve finished resting at the benches, follow the trail as it descends back down into the forest. Near the bottom of the hill, you’ll come across a huge tree looming tall, not too far from the river’s edge. Stop to take photos with the big tree and if you want you can also take another break by the river. I just love all the beautiful trees along this trail!
Lower Falls Viewpoint
After you leave the big tree, continue hiking upward to where it levels off, and before long, you’ll see some stairs that fork off to the right. These stairs will take you down to the Lower Falls viewpoint.
This viewpoint, in my opinion, is the best one along the trail. So make sure to either stop on your way to the Upper Falls Bridge or hike down to it on your way back. Whichever you choose, you don’t want to miss it! I know hiking down and back up over 100 stairs may not seem worth the effort, but I assure you, it is!
Upper Falls Viewpoint & Turnaround Area
As you pass the stairs to the Lower Falls viewpoint, you’ll soon see a large bridge zigzagging through the trees. There’s a clearing on the bridge providing views of the valley on one side, and the upper falls on the other. If you want to continue past this point, you can hike a little further up to a small viewing area with a slightly closer view of the upper falls.
The wooden bridge viewing area for the upper falls.
From here, you will turn around and head back in the direction you came. If you were to continue past this viewpoint and up the trail, it would take you to the John Wayne Trail/Iron Horse Trail that leads to the alternate trailhead I mention in the “Getting Here” section.
Warning: Don’t make the mistake of passing the upper falls viewing area and thinking the trail will loop you back to the main trailhead. I had a few families who started to pass me going further up the trail, and I asked them if they had parked at the Homestead Valley Road trail or not. They had not, but mistakenly thought the trail continued on and somehow lead them back to the main trailhead off Exit 34. There is no need to hike further (unless you want to) once you’ve seen the Upper Falls.
Enjoy your hike back to your car, and if you didn’t take time to stop near the river, the walk back is a great time to do it. I enjoyed having a snack break there, listening to the rushing water, and smiling as I saw a family further up the river enjoying their time together.
Getting to the Twin Falls Trailhead
The Main Twin Falls Trailhead: SE 159th St, North Bend, WA 98045
Take I-90 east to exit 34
Turn right off the exit ramp onto 468th Avenue SE
Drive about half a mile and make a left onto SE 159th Street.
Follow the road until it dead-ends in the Twin Falls parking lot. (You will need a Discover Pass to park here.)
Alternate Hiking/Parking Option:
If the main Twin Falls trailhead parking is full, you can also hike to the falls coming from the opposite direction. The hike will be different than what I describe below, but if you drive out there and discover the main trailhead is full, this gives you an alternate option.
Take I-90 east to exit 38
Turn right off the exit onto SE Homestead Valley Road. Drive about 0.10 miles and make your first right, you’ll see a sign for Olallie State Park that lists various trails
Follow this dirt road for a little over a quarter-mile, stay left as you pass two forks in the road along this route.
You will park near the trailhead junction for Iron Horse Trail.
Follow the Iron Horse Trail (may also see signs for John Wayne Pioneer Trail) for about a third of a mile before it connects with the Upper Twin Falls trail.
Once you reach the Upper Twin Falls and the big bridge, you’ll just need to hike a little further down where you’ll find stairs on your left, leading you to the Lower Falls viewing area.
Read the following articles for more waterfall fun:
If you’re like me, you’re probably getting a little stir crazy at home while we wait out these unprecedented times and hope for a tomorrow that once again involves world travel. To quench my thirst for travel, I’m exploring areas close to home, and I’m also streaming travel shows to keep my travel dreams alive until they can once again become a reality.
This list of travel shows is some of the travel television I’ve been streaming lately. Some of the shows on this list remind me of past trips I’ve taken, and others inspire ideas for future travels. Watching travel shows is not as good as actually being able to travel, but it definitely helps!
Food & Travel Shows
Warning: Do not watch these shows on an empty stomach. I love watching food and travel shows, but they tend to make me really hungry! Lately, due to closures and other restrictions, these shows also remind me of how quickly things have changed. I hope for a day when I can once again immerse myself in the food culture both locally and abroad. All right, let the salivating begin!
Diners, Drive-Ins, and Dives
This food and travel show with host Guy Fieri is probably not new to most of you, but maybe it’s been a while since you’ve watched it. In case you didn’t know, Guy started filming for season 32 at the end of last year. Season 32! That’s a lot of episodes to inspire your future travels and food stops along the way.
I’ve met people during my travels that plan their trips around the nearest Diners, Drive-Ins, and Dives restaurants for their intended destination. Once you watch the show, you’ll understand why. So if you’re planning a road trip this summer, watch the show and see if any of the restaurants featured are along your route and get ready to feast on some incredible food!
I recommend you see if there are any Diners, Drive-Ins, and Dives restaurants located near you and plan a trip to visit one soon! You might call ahead first to make sure they’re open, then make a day of it and create some great memories, while eating some fantastic food.
Streaming on: Hulu, Amazon Prime Video, Pluto, iTunes, YouTube, and most major streaming services
Taste the Nation with Padma Lakshmi
This Hulu Original travel show starring Padma Lakshmi (Top Chef) explores the connection of the food we eat in America to its origins and influences within our communities.
This is perhaps one of the things I love most about trying new foods when I’m traveling. It is such an excellent way to connect to the local culture and experience the region you are in. There is a story behind each dish, and food transforms life in ways we often overlook.
Food is a common tie that brings us all together. I love learning about the history behind the foods we eat in America, and it reminds me of what a beautiful melting pot our country is.
Streaming on: Hulu
Eat the World with Emeril Lagasse
This Amazon Original travel show takes us on a food adventure with host Emeril Lagasse. Top chefs join Emeril as he goes on a culinary trip around the world to discover what goes into making some of our favorite global dishes.
Eat the World will have you making plans for where to eat on your next trip and possibly inspire you to try making some of these dishes at home. Bam! Okay, sorry, just felt like I needed to throw Emeril’s famous catchphrase in there, perhaps you’ll do it too when cooking up one of these incredible dishes.
Streaming on: Amazon Prime Video
Street Food
Street Food is a Netflix Original travel show that explores the street food commonly seen on different continents. There are two different Street Food series to choose from on Netflix. One is Street Food Asia, and the other is Street Food Latin America. I recommend watching both. It teaches you more about the various street food options and also about the sub-culture behind street food vendors.
I love sampling food at a street food market. It’s an easy (and cheap) way to sample a variety of local foods. These markets often open up at night, and I love the energy and atmosphere that surrounds them. It’s a travel and food experience all in one place.
Streaming on: Netflix
Bizarre Foods
Okay, speaking of street foods makes me think of this food and travel show hosted by Andrew Zimmern. There are 22 seasons of the show and a whole lot of different foods to consider trying and a few definite no’s.
I’m pretty adventurous, I’ve eaten scorpion, silkworms, grasshoppers, and other types of non-traditional foods, however, Anthony Zimmern takes this curiosity for food to a whole new level. Cringe, binge, and be thankful you don’t have to eat everything he does!
Other shows with Andrew Zimmern you might enjoy are Driven by Food and The Zimmern List.
Streaming on: Hulu, Amazon Prime Video, Pluto TV, iTunes, YouTube, and most major streaming services
Non-Traditional Comedic Travel Shows
Here are a couple of less traditional travel shows. I’m not sure they’ll always inspire you to travel to the specific places their hosts do, but they’ll make you laugh and help you see tourist destinations from a different perspective.
This travel show hosted by Richard Ayoade (The IT Crowd) is almost an anti-travel show. That’s not the right word, really, but Richard certainly seems to be a bit of a reluctant traveler at times and often finds the most peculiar places to visit or odd means of visiting popular areas.
Richard’s quest is to see each popular tourist destination in only 48 hours. His dry British humor will have you laughing along in his adventures, and perhaps his unique travel choices will inspire a few of your own.
Streaming on: Amazon Prime Video, Hulu and iTunes
James May: Our Man in Japan
Another off-beat travel show this time with James May, who you might recognize from shows like Top Gear and The Grand Tour. He, too, tries unique and off-the-wall adventures during his tour through Japan. He learns more about the Japanese culture and meets locals who introduce him to experiences unique to their country.
I’ve only been to Japan once, but May’s adventures remind me of my trip and inspire me to try some unique experiences of my own on my next visit there.
Streaming on: Amazon Prime Video
Travel Shows to Inspire a U.S. Road Trip
These travel shows will inspire your next road trip or even a camping trip to stay at one of America’s gorgeous National Parks. I love our National Parks system. We may not have ancient buildings or old castles, but what we lack in historical buildings we more than makeup for with the beauty of our parks. If it’s been a while since you’ve explored the U.S., start planning a trip with these travel shows.
Secrets of the National Parks
Explore the secrets of our National Parks with this beautiful television series. Learn about the unique natural wonders in these parks, as well as some of the wildlife that lives there. You will get ideas of things to do and what to see when you visit some of America’s National Parks. The videos are beautiful to watch, and it inspires me to go and explore more of the parks that I haven’t yet visited.
Streaming on: Amazon Prime Video and Tubi
America’s National Parks
This series by National Geographic about America’s National Parks focuses more on the wildlife that lives in each of the parks. This is a nature and travel show in one. I watch it and am grateful that we have these National Parks as a refuge for our wildlife and unique plants to preserve them for future generations to see. It is such an amazing world we live in!
Streaming on: Amazon Prime Video and Disney+
Seeing the USA
Seeing the USA is a reality-style travel show. Follow Brandy Yanchek as she explores the U.S., meeting locals, and learning about the culture of each state she visits. You will get ideas for places in each country that perhaps you might not have considered before and also learn about some of the local businesses that are unique to each city she visits. If you’re considering a trip somewhere in the U.S., check out this series found on Amazon Prime Video.
Streaming on: Amazon Prime Video
Adventure Travel Shows
Expedition Overland
Expedition Overland is a reality-style travel show that follows a team of people in their vehicles as they travel across remote areas in an overlanding expedition. Overlanding is sort of like backpacking, but with an off-road vehicle. You carry what you’ll need to sleep and eat and any emergency supplies you might need should you get stuck somewhere. You are typically driving off-road through remote areas and over rugged terrain. The adventure is in the journey.
Expedition Overland shows the planning, equipment needed, and the fun that goes into one of these adventures. You may just find yourself heading to the nearest car dealer to begin an overlanding adventure of your own.
Streaming on: Amazon Prime Video and YouTube
Around the Next Bend
This reality travel show is about an epic adventure two young (and extremely underprepared) guys take on their journey rafting down the Ganges River in India. Their trip appears to have been a spontaneous idea.
Although some have commented on their lack of things like a waterproof bag for electronics, I love hearing stories of people pursuing their dreams and seeking out new experiences. Perhaps it will inspire your spontaneous adventure. At a minimum, it should make you smile.
Streaming on: Amazon Prime Video and iTunes
By Any Means with Charley Boorman
If any of you have watched the Long Way Round or Long Way Down shows, then Charley Boorman will be a name you recognize. Follow Charley in this travel show as he avoids commercial travel and instead tries to travel by any (transportation) means necessary.
He’ll use animals, small aircraft, rides with strangers, motorcycles, and more as he journeys from Ireland to Sidney (season one) and Sidney to Tokyo (season 2). Charley has a playful and expressive side, and you can’t help but smile along with him as he relishes in the joy of the journey and the discovery of new places and people.
On a side note, season 2 is called Right to the Edge: Sydney to Tokyo By Any Means. It’s helpful to know that when searching for streaming options.
Streaming on: YouTube and Dailymotion (originally aired on BBC)
Rogue Trip
Rogue Trip is the latest travel show released by Disney Plus. In this father-son travel show, you’ll travel to countries most people will never get a chance to visit.
Former war journalist Bob Woodruff takes his son Mack on a journey to explore some of the countries he visited during his work with ABC. They visit places like Columbia, Papua New Guinea, Ethiopia, Pakistan, and more. See beautiful places, unique wildlife, and learn about the people and culture that make up these countries.
Streaming on: Disney+
Lost Cities
Lost Cities is another Disney Plus travel show that reminds me of a real-world Indian Jones adventure. You’ll follow Albert Lin as he seeks out Lost Cities scattered around the world. Albert uses the latest technology combined with the knowledge of locals to seek out lost civilizations.
You’ll learn more about the history and the mysteries behind places like Petra, Stonehenge, El Dorado City of Gold, and more. So grab your bullwhip (I don’t know, Indiana Jones seemed to think they were useful) and join the adventure!
Streaming on: Disney+
More Travel Shows To Inspire You
There are so many great travel shows to inspire you when you can’t travel and help you plan for when you can. Read more of my favorite travel shows and travel movies in the post 32 Travel Shows & Movies to Inspire You at Home. I understand that it can be a challenge right now to stay positive and to plan for future trips. I recommend you explore areas where you live and stay inspired by the many fantastic travel shows, movies, and books that are available to you.
I love waking up to crisp fresh air, falling asleep to the sounds of nature, and roasting marshmallows around a campfire. So I give up some comforts of home for a few days to enjoy living in the great outdoors. I won’t, however, give up my coffee. I have to make coffee when camping. It’s a part of the camp experience I look forward to each morning.
Alright, it’s a part of the life experience I look forward to daily, but when camping, it’s a little extra special to sit there with a hot mug of delicious campfire coffee. The coffee tells me that it doesn’t matter that I only slept four hours the night before and that I haven’t showered in two days, all that matters is that I have coffee and I’m in a beautiful place. It also matters to the people I camp with, as I would be a much grumpier companion without it.
I have tried a variety of ways to make coffee while camping, and these are a few of my favorite methods. I think they’re also some of the easiest and most flavorful ways to make coffee while camping. Whether you’re camping with a group, or by yourself, car camping or backpacking, there is an option for everyone. So let’s get to it!
Cowboy Coffee
Cowboy Coffee is the tried and true method to make coffee when camping. If it is good enough for rough and tough cowboys, it’s good enough for me! I love this method for brewing campfire coffee as it is so simple, you don’t need a bunch of equipment, and it’s also great for crowds.
I own an 8-cup enamel coffee maker like this one. However, you can get them in all different sizes and from a variety of companies. So choose the size that makes sense for your coffee needs. The idea behind cowboy coffee is pretty simple, you boil water, add coffee, let it steep, and then you drink it! Simple as that. To avoid bitter coffee or a bunch of grounds in your cup, follow the steps below.
Here’s the recipe I use for my 8-cup coffee pot. Adjust according to the size of your coffee maker and personal preferences. I find that the amount of coffee I use also depends on the coffee beans I’m using, so you may have to play around with the ratios to get your preferred strength.
~ 1 cup medium to coarse ground coffee per pot (measure according to the size of your coffee pot, approximately 2 tbsp of ground coffee per 8 oz of water)
1/4-1/2 cup cold water (depends on the size of the coffee pot)
Optional Ingredients: sugar, half-n-half, coffee creamer, cinnamon to sprinkle on top
Let it sit for about 45 seconds. This brings the water temp down below the boiling point. The ideal coffee temperature is around 195°F to 205°F. By allowing your boiling water to cool a little, it helps you avoid brewing a bitter cup of coffee and instead extract the best flavor from the coffee grinds.
Add your coffee and slowly stir into the water with a long wooden spoon. Close the lid.
Wait about 2 minutes.
Stir again and wait another 2 minutes. (I keep the lid closed to retain heat.)
Then add about 1/4 cup cold water to the spout and on top of the coffee. I dribble a little down the spout first. Then, I open the lid to my coffee maker and sprinkle a little on top. The cold water helps settle the grinds to the bottom of the coffee pot, so you don’t get a cup full of coffee grounds–yuck!
Let this sit for about another minute.
Slowly pour a cup of hot, steaming deliciousness and enjoy! (You’ll want to pour the coffee carefully, so you don’t disturb the grounds that have settled onto the bottom of the pot)
Notes:
If you don’t plan on drinking your coffee right away, you may want to pour it into a separate carafe or thermos to keep it hot for later. The longer the coffee sits in the pot with the coffee grounds, the stronger (and more bitter) it will get.
AeroPress Coffee
If you want to make coffee when camping but don’t want to sacrifice any of the flavors, the AeroPress coffee maker is your best bet. You can use it to make espresso, lattes, or an Americano all from the picnic table at your campsite. Although I’ve also made French Press coffee when camping, now I prefer using the AeroPress as it brews a smoother and less acidic cup of coffee.
Three main parts of the AeroPress coffee maker:
Chamber (it’s the long plastic piece with numbers written on the side)
Plunger (the long piece of plastic with a rubber end)
Filter cap (attaches to the bottom of the chamber)
AeroPress components left to right: filter cap, chamber, plunger, stirring stick, and coffee scoop.
There are a variety of ways to make coffee using the AeroPress. However, since this is for campfire coffee, I kept the equipment and the method as simple as possible. Below are instructions for brewing an Americano or drip-style coffee. I will also give tips for brewing an espresso-style or latte.
An important thing to note is that you need a sturdy coffee mug to use with the AeroPress. You cannot use a paper cup for this method as you apply firm pressure when pushing down on the plunger to extract the coffee. A paper cup would not hold up.
Equipment:
AeroPress Coffee Maker (Use a 20% off coupon at Bed Bath & Beyond for the best deal)
Coffee Scoop (the AeroPress comes with one that is equal to 2.5 tbsp or 3 tbsp heaping)
Stirring Utensil (the AeroPress comes with a special stirring stick, you can also use a spoon)
Coffee Pot made for use over a fire or stove (for boiling water)
Campfire or camp stove
Towel or Grill Gloves (to avoid burning yourself when you take the coffee pot off the heat)
Sturdy coffee mug (Needs to be sturdy enough to handle the pressure of the AeroPress being pushed down on top)
Ingredients:
Water for boiling
Medium-fine ground coffee (~ 6 tbsp per brew)
Additional hot water to make an Americano or drip-style coffee (optional)
Optional Ingredients: sugar, half-n-half, milk (for a latte) coffee creamer, cinnamon to sprinkle on top
My Favorite Roast Type: Light or Medium Roast(AeroPress works well for Light Roasts and allows to the subtler flavors to shine through)
Instructions:
Boil water (at least 16 ounces).
Remove from heat and let sit for about 1-2 minutes. A water temp anywhere between 180°F to 205°F works well with the AeroPress.
Prep your AeroPress by placing a microfilter in the filter cap, and attach it to the AeroPress chamber, then place it over your coffee mug.
Pour a little hot water over the empty coffee filter to rinse it out, then dump the water out of your mug and place the AeroPress back on top of your cup.
Add two rounded scoops of coffee (~6 tbsp) to your AeroPress chamber and give it a little shake to even out the coffee grinds.
Pour hot water into the AeroPress to just below the number two. Stir for 10 seconds.
Then add enough hot water to come to the top of the number three. Wait 1 minute.
Insert the plunger into the top of the AeroPress chamber and gently press down. Don’t force the plunger down. You’ll feel a slight resistance as you push down. If it feels too hard to push, then gently pull up slightly and then push down again. It should take about 30 seconds to push the plunger to the bottom.
Remove the AeroPress maker from your coffee mug and add about 3/4 cup of hot water to the coffee to create a 12-ounce Americano style coffee. Adjust the amount of water to get the coffee strength you prefer.
Take the Aeropress and unscrew the filter cap (be careful as it may be hot). Then hold the AeroPress over a plate or trash bag and push down on the plunger to expel the filter and coffee grounds. Rinse the bottom of the Aeropress chamber and plunger with cold water, and it’s ready to use again.
Tips for Making an Espresso Style Coffee:
For an espresso-style coffee, use the same amount of coffee, but add less water. Add water to just below the number two, stir for about 10 seconds, then slowly plunge to extract the coffee. Drink this shot of coffee without adding any water.
Tips for Making a Latte:
Make a brew according to the Espresso instructions above, then add warm milk to the coffee (I use about a 1/2 cup of milk). If you want to get fancy, you can bring one of these battery-powered milk frothers to froth your milk. Now, won’t you feel special drinking your latte while sitting around the campfire!
Brew Buddy Coffee
Last year I purchased the Primula brew buddy for my off-road motorcycle trip. I needed something small and lightweight since we were packing our camping gear on our motorcycles. It is also great for backpacking as it is incredibly lightweight and compact. It is the simplest of the campfire coffee methods and the cheapest of them too! You place the brew buddy over a mug, add coffee to the filter in the center, then slowly pour in hot water and voila! You have a freshly brewed cup of coffee. Easy peasy!
Remove the coffee pot from the heat and let sit 30 seconds to 1 minute.
Place brew buddy on top of your coffee mug.
Add 3 Tablespoons of coffee to the filter in the center of the brew buddy. (Adjust to personal preferences.)
Slowly pour in your hot water over the coffee in the brew buddy until you’ve filled your mug to your desired level. (You may have to lift it to check the water level from time to time.)
Remove the brew buddy from the top of your cup. Be careful as the sides of the plastic may be hot to the touch. (The longer you leave it on the mug, the stronger the coffee gets, and it will eventually turn bitter).
Rinse coffee grounds from brew buddy to clean it for future use and set aside to dry (or to make the next cup).
Drink up!
*Psst, you can also put loose leaf tea in your brew buddy and brew a cup of tea. I won’t tell, I promise. However, you may want to save that for the afternoon when everyone has already had their coffee—no need to start a riot.
Additional Tips to Make Coffee When Camping
Coffee Grinds:
You can either purchase your favorite coffee ground or as whole beans. If you choose to grind your coffee beans (my preference), then make sure to grind them at home before leaving for camp. If you have a hand grinder and want to grind your beans at camp, you can certainly do that. I tend to prep at home to make camping as simple as possible.
If you’re making cowboy coffee, then you’ll want a medium to coarse grind something that sort of looks a little smaller than kosher salt. The coarser grind will help prevent getting coffee grounds in your cup when you pour.
Whereas if you’re making AeroPress coffee or using the brew buddy, then something more along medium to medium-fine is a good grind size. Medium is about the size of sea salt, and medium-fine would be like coarse sand.
You can experiment with grind size at home to find your personal preference and then pack that for your camping trip.
A medium-coarse coffee grind.
Cowboy Coffee Tips
Measure the amount of water your coffee pot takes before leaving home, then choose the appropriate measuring cup or bring bags of pre-measured coffee to use each day. A general starting point for coffee to water ratio is two tablespoons of coffee per 8 oz of water.
So if you have a 12-cup coffee pot, then you’ll know you want somewhere around 1 1/2 cups of ground coffee per pot (adjusted to personal preferences). The important thing is to know how much water your coffee pot holds and then go from there to determine how much coffee you’ll need per pot.
Final Thoughts for Campfire Coffee
In all honesty, no matter which method you use to make coffee when camping, you’re going to be so happy just to have coffee that it won’t matter quite as much how you get it. That said, I hope this post shows just how easy it is to brew a quality cup of coffee when camping.
Oh, and make sure to pack extra coffee cups as you are going to have people stopping by to ask for some when they see you sitting there drinking your liquid hug-in-a-mug. I’m smiling just thinking about that first cup of campfire coffee. The air is crisp, my coffee is hot, the camp is quiet, and I inhale the smell of freshly brewed coffee and clean air. Life is good.
It’s incredible to me how many times I visited Spokane or drove past the city without ever stopping at Riverfront Park. It is one of the main attractions in this Eastern Washington city, and yet I hadn’t visited it! Well, recently, during a visit to see some family, I discovered what I’d been missing.
The Spokane Riverfront Park is a 100-acre urban park with trails for walking and biking, plus plenty of green spaces for just relaxing too. There are sculptures, bridges, a historic clock tower, and the Numerica Skyride and Skate Ribbon.
The Numerica Skyride at Riverfront Park is a short 15-minute ride over part of Riverfront Park and then across the river where you get to see the lower falls from a bird’s eye view. You feel the spray coming off the falls as your gondola glides past. It is a fun and unique way to view the river, and I highly recommend you try it!
COVID-19 Update and Changes
Currently, in Washington state, we are in “Phase 2” of the COVID re-start timeline. Phase 2 means more businesses are allowed to re-open. One of the businesses to recently re-open is the Numerica Skyride at Spokane’s Riverfront Park.
An attendant sanitizes each gondola before permitting you to board. It takes a little more time as you have to wait for them to wipe each gondola down before boarding, but they do their best to keep things moving. They also have multiple hand sanitizer stations in the waiting area for you to use before boarding and when you disembark.
They only board by individual family groups. This is sort of a perk from the new restrictions as my hubby, and I had the entire gondola to ourselves, which allowed me to easily enjoy views from both sides without fighting for a good view. Okay, no fighting would have occurred, but it was nice to have it all to ourselves.
The Numerica Skyride also has the Skate Ribbon, which was still closed at the time of our visit. Typically though, you can rent skates or bring your own and then skate around their track. The skate ribbon looks like a miniature race track for cars, but instead, it’s for skating. In the winter, they turn it into an ice skating rink. Hopefully, soon it will also re-open, and people can enjoy this fun activity in Riverfront Park.
The Numerica Skyride Experience
Tickets and Hours:
You’ll purchase your tickets inside the Numerica Skate Ribbon building. Visit their website for current ticket prices and hours of operation. You can also book your ticket online if you prefer. The Numerica Skyride is wheelchair accessible. They offer a variety of discounts for those in the Military, Seniors (55+), AAA, and college students.
The Ride:
After they sanitize your gondola, you’ll enter with your group and take a seat. There are two benches on each side of the gondola. There are also open window slats behind each bench as well as in the door. So you not only have good air circulation, but you can also take photos through the slats and avoid the glare/reflections off the glass.
If You’re Unable to Ride the Skyride
I realize there may be many reasons why you might be unable to ride the Skyride at Riverfront Park. Perhaps you’re afraid of heights, or you don’t like enclosed spaces, or maybe you don’t have the funds for it right now. Whatever the reason, you still have the option to view the lower falls up close without taking the gondola ride.
Walk west past the Skyride and follow the overhead line of the gondola. This path will lead you down a series of staircases that will take you to a viewing platform at the base of the lower falls. You can look up and see the gondolas above you. You’ll enjoy beautiful views of the falls from the ground level.
More Fun Things to do at Spokane’s Riverfront Park
In addition to the Skyride, I highly recommend you take time to explore other areas of this 100-acre urban park. Strolling around scenic Riverfront Park is a great way to spend an hour or two. There are signs throughout the park, pointing you in the direction of the main attractions, so it is easy to find your way.
Spokane Visitor Center, Rotary Fountain, & Looff Carrousel
You can also stop at the Spokane Visitor Center and pick up some maps and get ideas for other sites to see during your visit to Spokane. Next to the Visitor Center, you’ll find the Rotary Fountain. Follow the path a little further east, and you’ll see the historic Looff Carrousel. The Looff Carrousel is currently closed due to the COVID-19 restrictions. However, you can check here periodically to learn about its future re-opening date.
Sculptures in the Park
Admire the sculptures scattered around the park like the ones shown above commemorating the runners in Spokane’s Bloomsday Run. You can get a map at the Visitor Center that shows the locations to the various sculptures.
Garbage-Eating Goat
Don’t miss seeing the Garbage-Eating Goat. It is an interactive sculpture designed by Sister Paula Mary Turnbull, also known as the “welding nun” Make sure to bring a piece of garbage to feed it. Press the white button on the right side and then place your garbage in the goat’s mouth and watch it disappear! Try only to feed it paper trash as it’s an old goat, and larger trash items will choke (I mean clog) it. The garbage eating goat is on the east side of the Looff Carrousel.
The famous garbage eating goat.
Pavilion at Riverfront
The Pavilion is another unique attraction at Riverfront Park. Built for the 1974 World Expo, it used to be covered by a large canvas material. Later, it was redesigned and now looks like a work of modern architectural art. The cables are illuminated with colorful lights to create the free light shows displayed every Friday, Saturday, and Sunday.
Looking at the Pavilion near the Howard Street Bridge.
The Great Northern Clock Tower
Make sure to visit Havermale Island and see the historic clock tower. Completed in 1902, the Clock Tower was a part of the Great Railroad Depot. You can easily spot it as it towers above the park. This giant clock is still wound by hand every week. A person must climb five stories and then crank the clock 98 times to keep the giant clock operating. That’s a lot of work!
It’s strange as I didn’t even realize I was on an island when I crossed the bridge to admire the clock tower more closely. The clock tower is on Havermale Island. The island was a refuge to the people in Spokane while fleeing from the Great Fire of 1889. Make sure to read the plaques scattered around Riverfront Park to learn more about its interesting history.
The Childhood Express (also known as “the Big Red Wagon”)
Kids and adults alike will enjoy this giant red wagon. It’s not only fun to look at, but it’s also a slide that kids (and kids-at-heart) can enjoy climbing up and sliding down via the front handle. Underneath the wagon are monkey bars for swinging on as the kids make their way back to the ladder. The Childhood Express, created by artist Ken Spiering, is 12 feet tall by 12 feet wide and 27 feet long. I love its playful design.
Upper & Lower Falls
Another area I enjoyed walking to was the Howard Street Bridge and trail to see the upper waterfalls. Make sure to look for the mountain goat sculpture just below the bridge. You can cross the bridge to access Snxw Meneɂ Island (sin-HOO-men-huh), formerly known as Canada Island (the plaques in the park were not yet updated to reflect this).
Another option that I chose to do is to follow the trail that goes below the Howard Street Bridge to get more views of the lower falls. If you continue down the stairs and along the path, you’ll come to a pedestrian suspension bridge, which you can also cross to access Snxw Meneɂ Island (formerly Canada Island).
The Howard Street bridge, as seen from the stairs that lead to the path below it and the pedestrian suspension bridge.
Central Promenade
Stroll along the newly completed central promenade, which you can access from the Rotary Fountain. Watch the ducks swim by, bring a blanket or picnic fixings, and enjoy making memories in the park. There is so much to see and do at Spokane’s Riverfront Park. You can spend an hour or half a day here–it’s really up to you!
Where to Park
Riverfront Park is in the process of being renovated. They are continually working to improve the park, and the newly completed central promenade is just one of these beautiful improvements. Because of this, there are many areas closed due to construction, including many of the park’s parking lots.
You can park in Parking Lot 7, located at 527N N Lincoln St, which is on the north side of the Spokane River close to the Post Street Bridge. You can also look for street parking in the areas surrounding Riverfront Park. Visit the city’s website to learn more about parking lot closures due to construction.
Another option, which I used, was to park in the River Park Square parking garage located at 777 W Spokane Falls Blvd. It is across from the Numerica Skyride and main entrance to Riverfront Park. It costs more than Parking Lot 7, but it felt a little safer to me, and I also liked the added convenience of being across from the main entrance as well as places to eat in the mall and surrounding area.
Places to Eat Near Riverfront Park
There are so many food choices located close to the main entrance of the park and around the River Park Square shopping center. You will find food to curb any craving from sushi, ramen, Mexican, or burgers. There are options for everyone! More restaurants are opening for dine-in service as we continue to progress in the state’s phased plan for the post-COVID response.
Cafes
There are also some great cafes around the area of Riverfront Park across from the Skyride and main entrance. I recommend you try Atticus Coffee and Gifts, named after the character in To Kill a Mockingbird.
Atticus Coffee: 222 N Howard St.
Another excellent cafe option around the corner from Atticus Coffee is Indaba Coffee. You will be welcomed into the cafe like an old friend to enjoy some delicious coffee and food too if you’d like.
Indaba Coffee: 210 N Howard St.
Last but certainly not least, if you’ve never tried Dutch Bros. Coffee, then you should experience it at least once while you’re on the east side of the state. They are scattered all around the city, so Google one to see which is closest to you.
Getting to Spokane’s Riverfront Park
Riverfront Park: 507 N Howard St, Spokane, WA 99201
From Seattle:
If you’re coming from Seattle it takes about 4 hours to get to Spokane, you could do it as a day trip if you got up early, but it will be a more relaxing visit if you stay overnight. The drive from Seattle is a straight shot on I-90 East. Enjoy the varied terrain as you make the road trip there.
You’ll cross Snoqualmie Pass and see the beautiful mountains and lush green forests and not too long after that you’ll be in a desert area with volcanic rock-lined canyons on either side. Soon you’ll pass by farms with signs along the way telling you what crop is grown there. Bring your tunes, bring a friend, and have fun!
Final Thoughts
Whether you’ve never visited Spokane’s Riverfront Park before or whether it’s been a long time, I recommend you take the time to explore all the unique features of this beautiful park. I also recommend you ride the Numerica Skyride and take in the beauty of the Spokane River falls.
The setting of this urban park is an incredible one with the Spokane River, the falls, small islands, multiple bridges and trails, and all smack in the middle of the city!
As more local businesses open up, I encourage those who are healthy to get outside and start making memories! We may not be able to travel far, but everyone can explore their hometowns and their local states.
Here are some ideas for those of you who live in Washington state to get out and start exploring.